1995 JEEP CHEROKEE seat
[x] Cancel search: seatPage 1367 of 2198
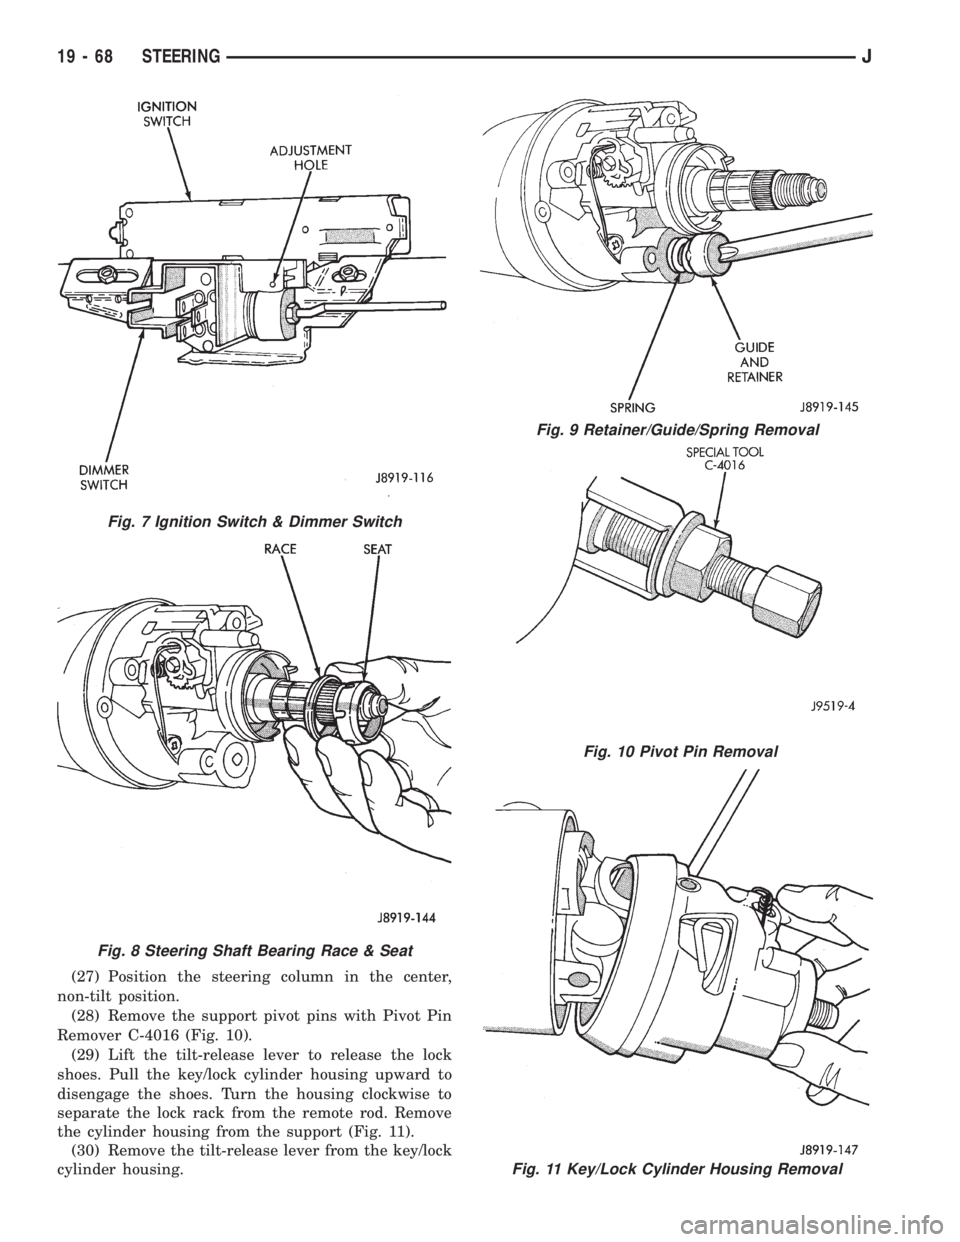
(27) Position the steering column in the center,
non-tilt position.
(28) Remove the support pivot pins with Pivot Pin
Remover C-4016 (Fig. 10).
(29) Lift the tilt-release lever to release the lock
shoes. Pull the key/lock cylinder housing upward to
disengage the shoes. Turn the housing clockwise to
separate the lock rack from the remote rod. Remove
the cylinder housing from the support (Fig. 11).
(30) Remove the tilt-release lever from the key/lock
cylinder housing.
Fig. 10 Pivot Pin Removal
Fig. 11 Key/Lock Cylinder Housing Removal
Fig. 7 Ignition Switch & Dimmer Switch
Fig. 8 Steering Shaft Bearing Race & Seat
Fig. 9 Retainer/Guide/Spring Removal
19 - 68 STEERINGJ
Page 1370 of 2198
(45) If equipped with a column shift:
²Remove the wave washer and the shift tube spring
²Remove the shift bowl from the steering column
jacket
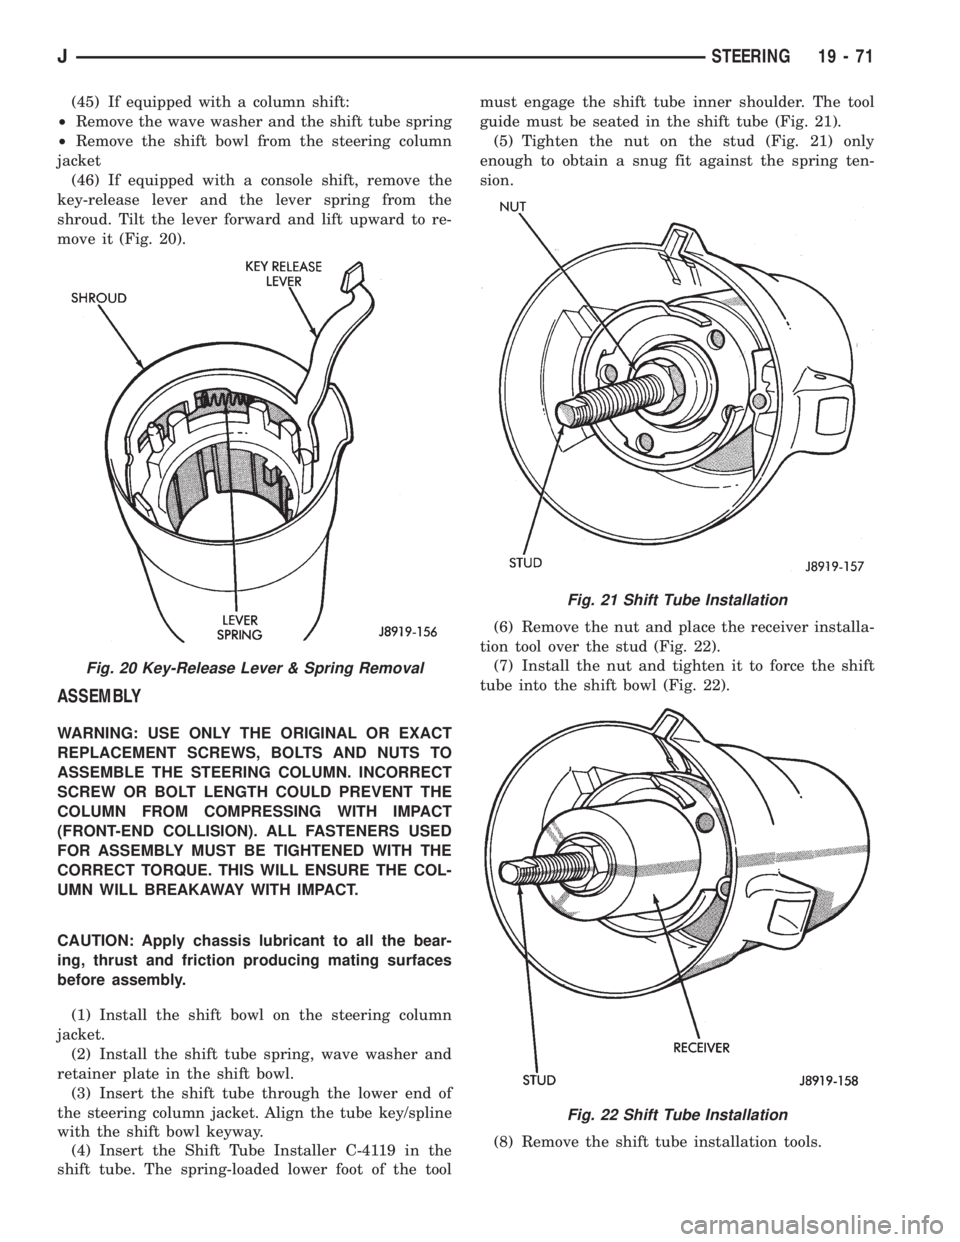
(46) If equipped with a console shift, remove the
key-release lever and the lever spring from the
shroud. Tilt the lever forward and lift upward to re-
move it (Fig. 20).
ASSEMBLY
WARNING: USE ONLY THE ORIGINAL OR EXACT
REPLACEMENT SCREWS, BOLTS AND NUTS TO
ASSEMBLE THE STEERING COLUMN. INCORRECT
SCREW OR BOLT LENGTH COULD PREVENT THE
COLUMN FROM COMPRESSING WITH IMPACT
(FRONT-END COLLISION). ALL FASTENERS USED
FOR ASSEMBLY MUST BE TIGHTENED WITH THE
CORRECT TORQUE. THIS WILL ENSURE THE COL-
UMN WILL BREAKAWAY WITH IMPACT.
CAUTION: Apply chassis lubricant to all the bear-
ing, thrust and friction producing mating surfaces
before assembly.
(1) Install the shift bowl on the steering column
jacket.
(2) Install the shift tube spring, wave washer and
retainer plate in the shift bowl.
(3) Insert the shift tube through the lower end of
the steering column jacket. Align the tube key/spline
with the shift bowl keyway.
(4) Insert the Shift Tube Installer C-4119 in the
shift tube. The spring-loaded lower foot of the toolmust engage the shift tube inner shoulder. The tool
guide must be seated in the shift tube (Fig. 21).
(5) Tighten the nut on the stud (Fig. 21) only
enough to obtain a snug fit against the spring ten-
sion.
(6) Remove the nut and place the receiver installa-
tion tool over the stud (Fig. 22).
(7) Install the nut and tighten it to force the shift
tube into the shift bowl (Fig. 22).
(8) Remove the shift tube installation tools.
Fig. 20 Key-Release Lever & Spring Removal
Fig. 21 Shift Tube Installation
Fig. 22 Shift Tube Installation
JSTEERING 19 - 71
Page 1371 of 2198
(9) Install the shift tube thrust washer and the re-
tainer plate snap ring.
(10) Install the lower bearing in the steering col-
umn.
(11) Position the shift gate in the steering column
support. Install the attaching screws.
(12) Position the support in the steering column.
(13) Install all support attaching screws finger-
tight. Next, tighten the screws alternately and evenly
to7Nzm (60 in. lbs.) torque.
(14) Install the remote rod in the support. Route
the rod through the upper end of the shroud and in-
sert it into the rod slot located in the support.
(15) Install the dimmer switch and ignition switch.
(16) Install the steering shaft in the steering col-
umn.
(17) Install replacement races and bearings in the
key/lock cylinder, if removed.Ensure that the bear-
ings are lubricated with chassis lubricant be-
fore installation.
(18) Install the lock shoes, the lock shoe springs
and the lock shoe pin the key/lock cylinder housing.
Use a 4.5-mm (0.18-in) diameter rod to align the
shoes and the pin during installation.
(19) Install the tilt-release lever, the lever spring
and the lever pin in the key/lock cylinder housing.
Insert a wedge between the housing and the lever to
relieve the spring tension. This will allow easier re-
lease lever pin installation.
(20) Install the lock bolt in the key/lock cylinder
housing and engage it in the lock sector cam surface.
(21) Install the lock rack, the rack preload spring
and a replacement shim in the key/lock cylinder
housing. Align and mate the square block tooth on
the lock rack and the lock sector.
(22) Install the lock spring and the spring retain-
ing screw. Tighten the screw to 4 Nzm (35 in. lbs.)
torque.
(23) Align and install the assembled key/lock cylin-
der housing on the support. Retain the lock shoes in
the disengaged position for easier housing installa-
tion.
(24) Align the pivot pin holes in the housing with
those in the support. Insert the pivot pins.Press the
housing firmly downward when inserting the
pivot pins. This prevents damaging the holes in
the support.When the pivot pins are within both
the housing and the support holes, seat them fully
with a punch and a hammer.
(25) Insert tilt-release lever in key/lock cylinder
housing and place housing in the full-upward tilt po-
sition.
(26) Lubricate the tilt spring guide and the tilt
spring liberally with chassis lubricant and position
the spring on the guide.
(27) Insert the tilt spring guide and the spring into
the key/lock cylinder housing. Install the guide re-tainer over the spring. Engage the retainer lock tabs
with the housing lugs by pressing the retainer down-
ward and turning clockwise with a screwdriver.
(28) Place the cover on the key/lock cylinder hous-
ing. Align and install the cover retaining screws.
Tighten the screws to 7 Nzm (60 in. lbs.) torque.
(29) Install the gear selector indicator lamp mount-
ing bracket screw.
(30) Install the gear selector indicator cover and
retaining screws.
(31) Route the dimmer switch wire harness and
gear selector indicator down through the steering col-
umn.
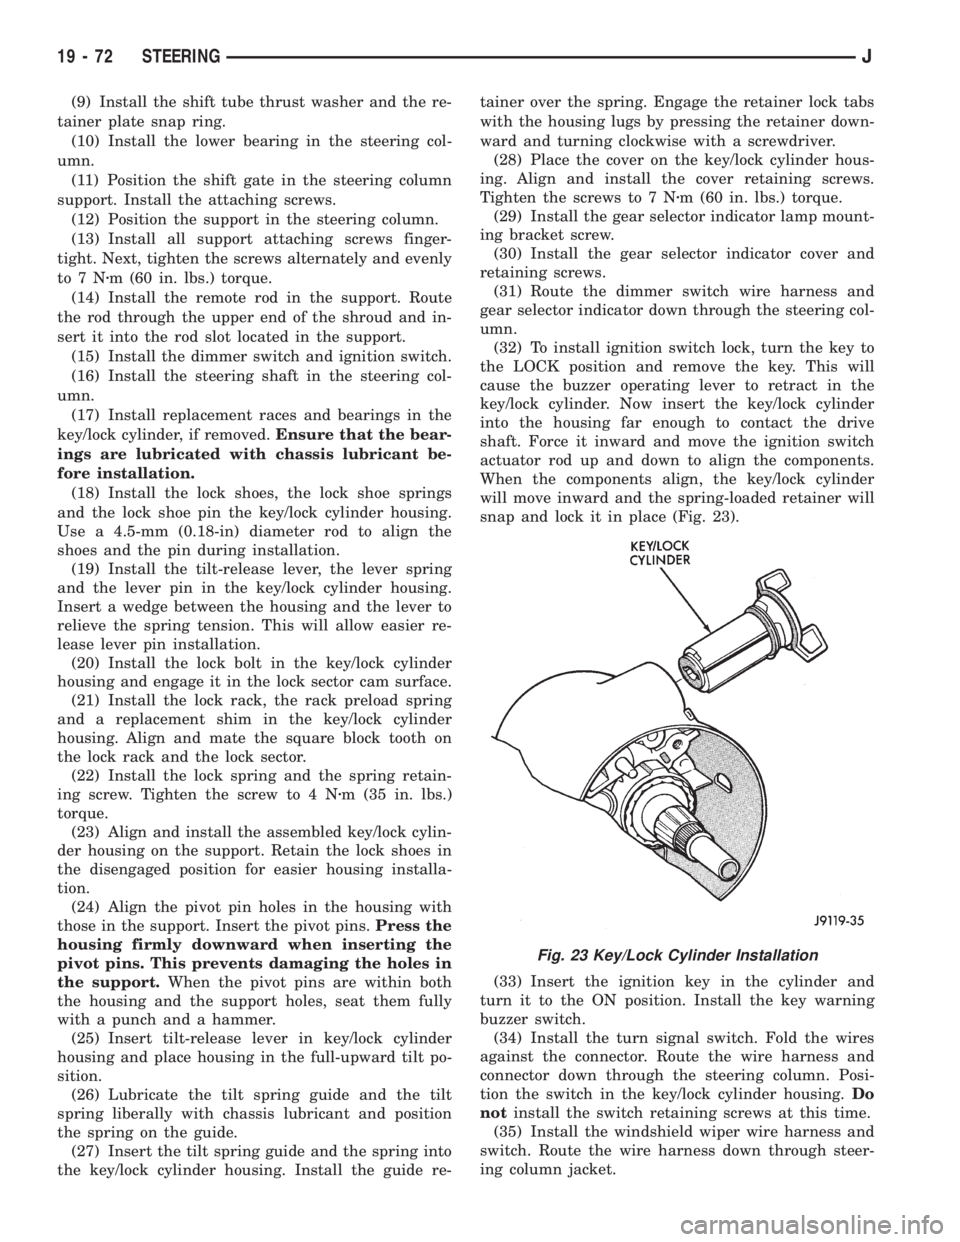
(32) To install ignition switch lock, turn the key to
the LOCK position and remove the key. This will
cause the buzzer operating lever to retract in the
key/lock cylinder. Now insert the key/lock cylinder
into the housing far enough to contact the drive
shaft. Force it inward and move the ignition switch
actuator rod up and down to align the components.
When the components align, the key/lock cylinder
will move inward and the spring-loaded retainer will
snap and lock it in place (Fig. 23).
(33) Insert the ignition key in the cylinder and
turn it to the ON position. Install the key warning
buzzer switch.
(34) Install the turn signal switch. Fold the wires
against the connector. Route the wire harness and
connector down through the steering column. Posi-
tion the switch in the key/lock cylinder housing.Do
notinstall the switch retaining screws at this time.
(35) Install the windshield wiper wire harness and
switch. Route the wire harness down through steer-
ing column jacket.
Fig. 23 Key/Lock Cylinder Installation
19 - 72 STEERINGJ
Page 1372 of 2198
(36) If equipped, install the cruise control wire har-
ness. Install the turn signal stalk by pushing it
straight into the column.
(37) Insert the hazard warning knob in the hazard
warning switch and press it inward. Align and install
the turn signal switch retaining screws. Ensure that
the turn signal switch is properly seated before tight-
ening the screws. Tighten the screws to 4 Nzm (33 in.
lbs.) torque. Thread the hazard warning switch knob
into the switch and pull the knob outward.
(38) Install and seat the upper bearing race in the
key/lock cylinder housing.
(39) Install the upper bearing preload spring, the
canceling cam and the lockplate.
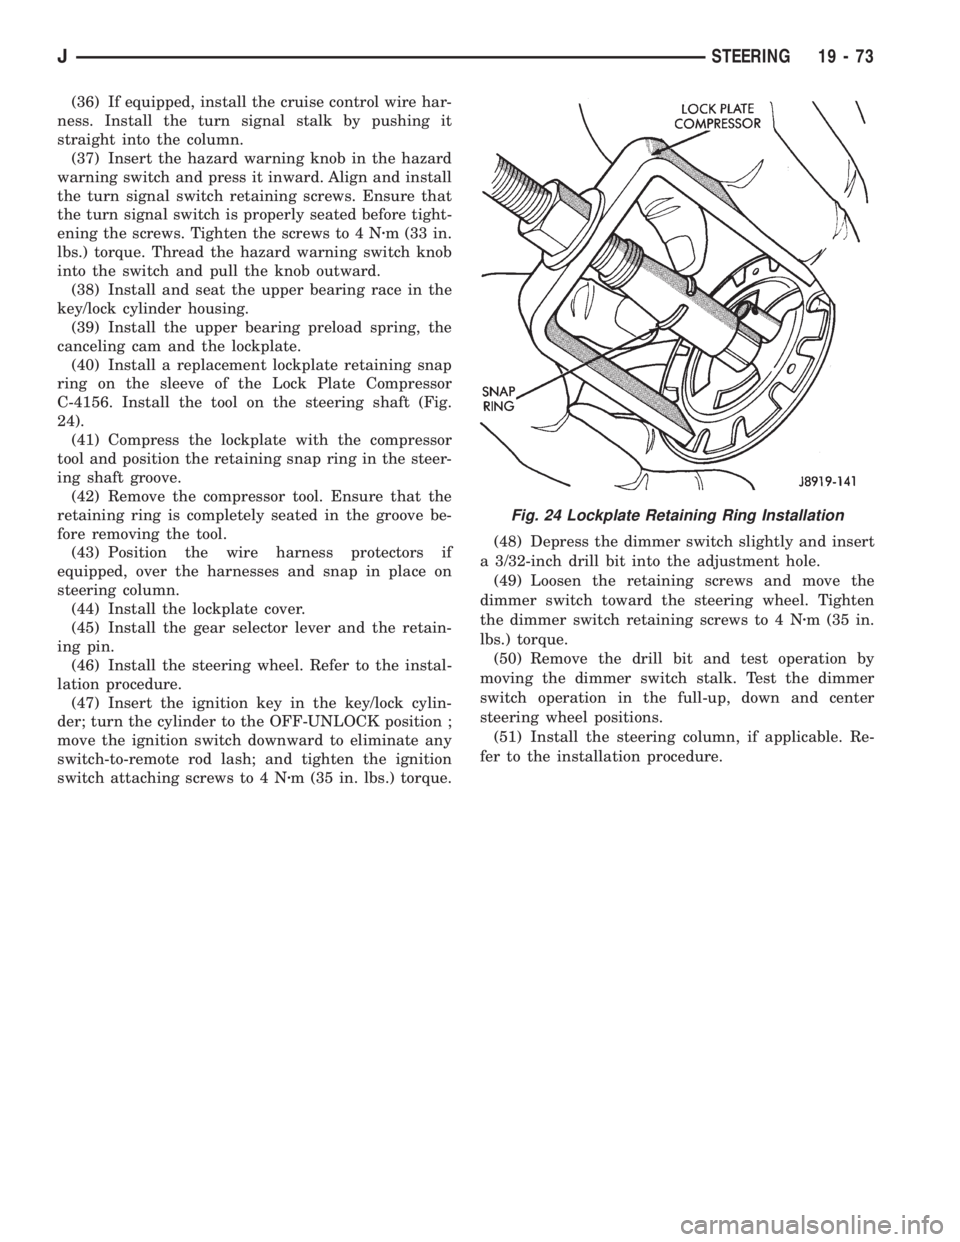
(40) Install a replacement lockplate retaining snap
ring on the sleeve of the Lock Plate Compressor
C-4156. Install the tool on the steering shaft (Fig.
24).
(41) Compress the lockplate with the compressor
tool and position the retaining snap ring in the steer-
ing shaft groove.
(42) Remove the compressor tool. Ensure that the
retaining ring is completely seated in the groove be-
fore removing the tool.
(43) Position the wire harness protectors if
equipped, over the harnesses and snap in place on
steering column.
(44) Install the lockplate cover.
(45) Install the gear selector lever and the retain-
ing pin.
(46) Install the steering wheel. Refer to the instal-
lation procedure.
(47) Insert the ignition key in the key/lock cylin-
der; turn the cylinder to the OFF-UNLOCK position ;
move the ignition switch downward to eliminate any
switch-to-remote rod lash; and tighten the ignition
switch attaching screws to 4 Nzm (35 in. lbs.) torque.(48) Depress the dimmer switch slightly and insert
a 3/32-inch drill bit into the adjustment hole.
(49) Loosen the retaining screws and move the
dimmer switch toward the steering wheel. Tighten
the dimmer switch retaining screws to 4 Nzm (35 in.
lbs.) torque.
(50) Remove the drill bit and test operation by
moving the dimmer switch stalk. Test the dimmer
switch operation in the full-up, down and center
steering wheel positions.
(51) Install the steering column, if applicable. Re-
fer to the installation procedure.
Fig. 24 Lockplate Retaining Ring Installation
JSTEERING 19 - 73
Page 1381 of 2198
(7) Disconnect transfer case shift linkage at trans-
fer case.
(8) Disconnect vehicle speed sensor wires and
transfer case vent hose.
(9) Remove slave cylinder from clutch housing.
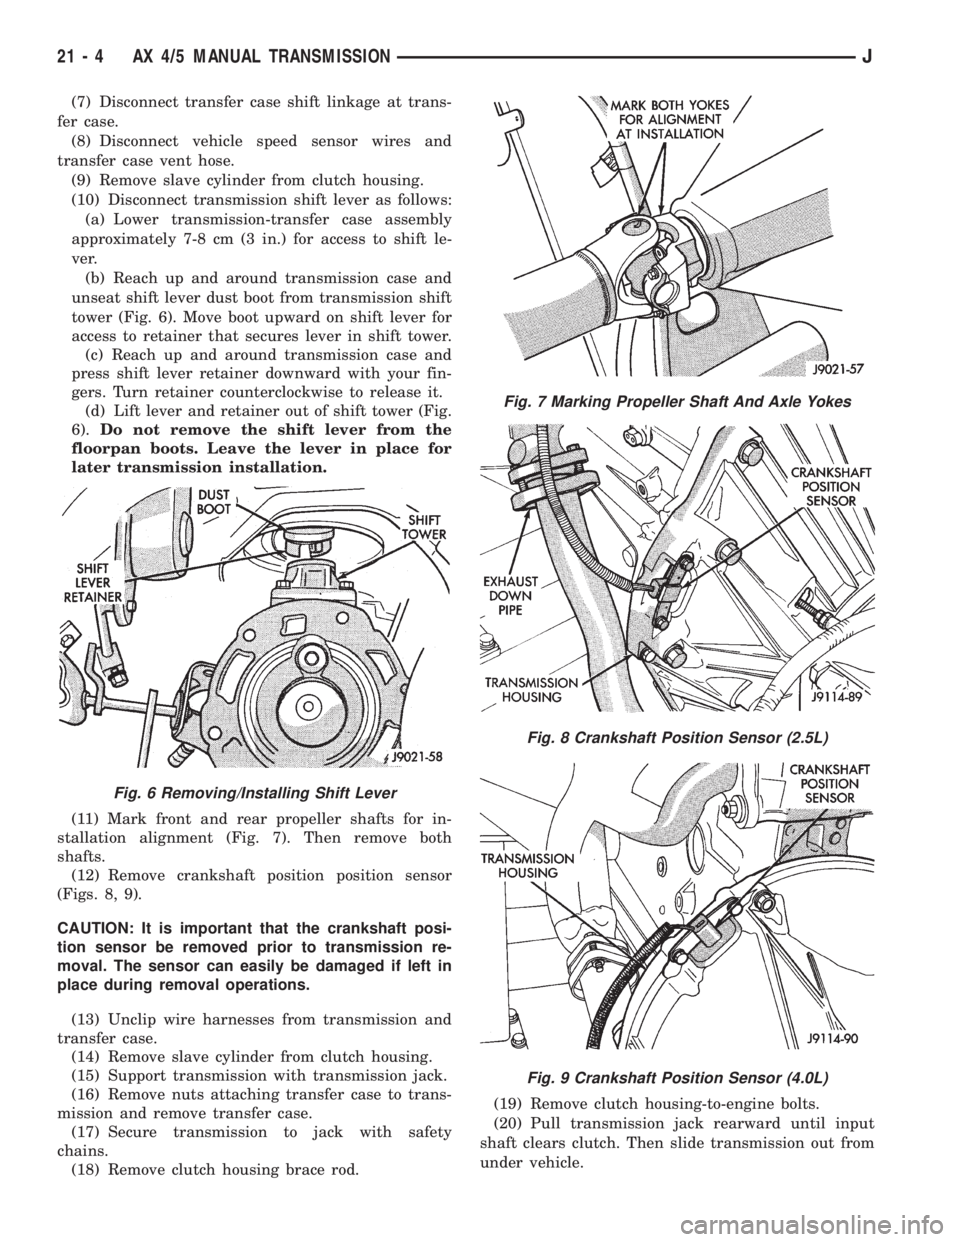
(10) Disconnect transmission shift lever as follows:
(a) Lower transmission-transfer case assembly
approximately 7-8 cm (3 in.) for access to shift le-
ver.
(b) Reach up and around transmission case and
unseat shift lever dust boot from transmission shift
tower (Fig. 6). Move boot upward on shift lever for
access to retainer that secures lever in shift tower.
(c) Reach up and around transmission case and
press shift lever retainer downward with your fin-
gers. Turn retainer counterclockwise to release it.
(d) Lift lever and retainer out of shift tower (Fig.
6).Do not remove the shift lever from the
floorpan boots. Leave the lever in place for
later transmission installation.
(11) Mark front and rear propeller shafts for in-
stallation alignment (Fig. 7). Then remove both
shafts.
(12) Remove crankshaft position position sensor
(Figs. 8, 9).
CAUTION: It is important that the crankshaft posi-
tion sensor be removed prior to transmission re-
moval. The sensor can easily be damaged if left in
place during removal operations.
(13) Unclip wire harnesses from transmission and
transfer case.
(14) Remove slave cylinder from clutch housing.
(15) Support transmission with transmission jack.
(16) Remove nuts attaching transfer case to trans-
mission and remove transfer case.
(17) Secure transmission to jack with safety
chains.
(18) Remove clutch housing brace rod.(19) Remove clutch housing-to-engine bolts.
(20) Pull transmission jack rearward until input
shaft clears clutch. Then slide transmission out from
under vehicle.
Fig. 6 Removing/Installing Shift Lever
Fig. 7 Marking Propeller Shaft And Axle Yokes
Fig. 8 Crankshaft Position Sensor (2.5L)
Fig. 9 Crankshaft Position Sensor (4.0L)
21 - 4 AX 4/5 MANUAL TRANSMISSIONJ
Page 1382 of 2198
(21) Remove clutch release bearing, release fork
and retainer clip.
(22) Remove clutch housing from transmission.
TRANSMISSION INSTALLATION
(1) Install clutch housing on transmission. Tighten
housing bolts to 37 Nzm (27 ft. lbs.) torque.
(2) Lubricate contact surfaces of release fork pivot
ball stud and release fork with high temp grease.
Then install release bearing, fork and retainer clip.
(3) Mount transmission on transmission jack.
(4) Lightly lubricate pilot bearing and transmis-
sion input shaft splines with Mopar high temp
grease.
(5) Align transmission input shaft, release bearing,
and clutch disc splines. Then slide transmission into
place.
(6) Install and tighten clutch housing-to-engine
bolts to 38 Nzm (28 ft. lbs.) torque.Be sure the
housing is properly seated on engine block be-
fore tightening bolts.
(7) Lower transmission approximately 7-8 cm (3
in.) for access to shift tower. Be sure transmission is
in first or third gear.
(8) Reach up and around transmission and insert
shift lever in shift tower. Press lever retainer down-
ward and turn it clockwise to lock it in place. Then
install lever dust boot on shift tower.
(9) Install slave cylinder in clutch housing.
(10) Align and install transfer case on and trans-
mission. Tighten transfer case-to-transmission nuts
to 35 Nzm (26 ft. lbs.) torque.
(11) Connect transfer case vent hose and shift link-
age. Check and adjust linkage if necessary.
(12) Connect transfer case vent hose.
(13) Secure wire harnesses in clips/tie straps on
transmission and transfer case.
(14) Connect backup light switch wires.
(15) Connect vehicle speed sensor wires.
(16) Install and connect crankshaft position sensor.
(17) Install rear crossmember (Fig. 5). On XJ,
tighten crossmember-to-frame bolts to 41 Nzm (31 ft.
lbs.) torque. Then tighten transmission-to-rear sup-
port bolts/nuts to 45 Nzm (33 ft. lbs.) torque. On YJ,
tighten bolts/nuts to indicated torque (Fig. 5).
(18) Remove jack stand.
(19) Align and install front/rear propeller shafts.
Tighten shaft U-joint clamp bolts to 19 Nzm (170 in.
lbs.) torque.
(20) Install skid plate, if equipped. Tighten bolts to
42 Nzm (31 ft. lbs.) torque. Tighten stud nuts to 17
Nzm (150 in. lbs.) torque.
(21) Top off transmission and transfer case lubri-
cant levels.
(22) Lower vehicle.
TRANSMISSION DISASSEMBLY AND OVERHAUL
ADAPTER HOUSING AND FRONT BEARING
RETAINER REMOVAL
(1) Drain transmission lubricant.
(2) Remove release bearing and lever.
(3) Remove clutch housing bolts and remove hous-
ing.
(4) On 2-wheel drive models, remove vehicle speed
sensor, speedometer adapter and speedometer driven
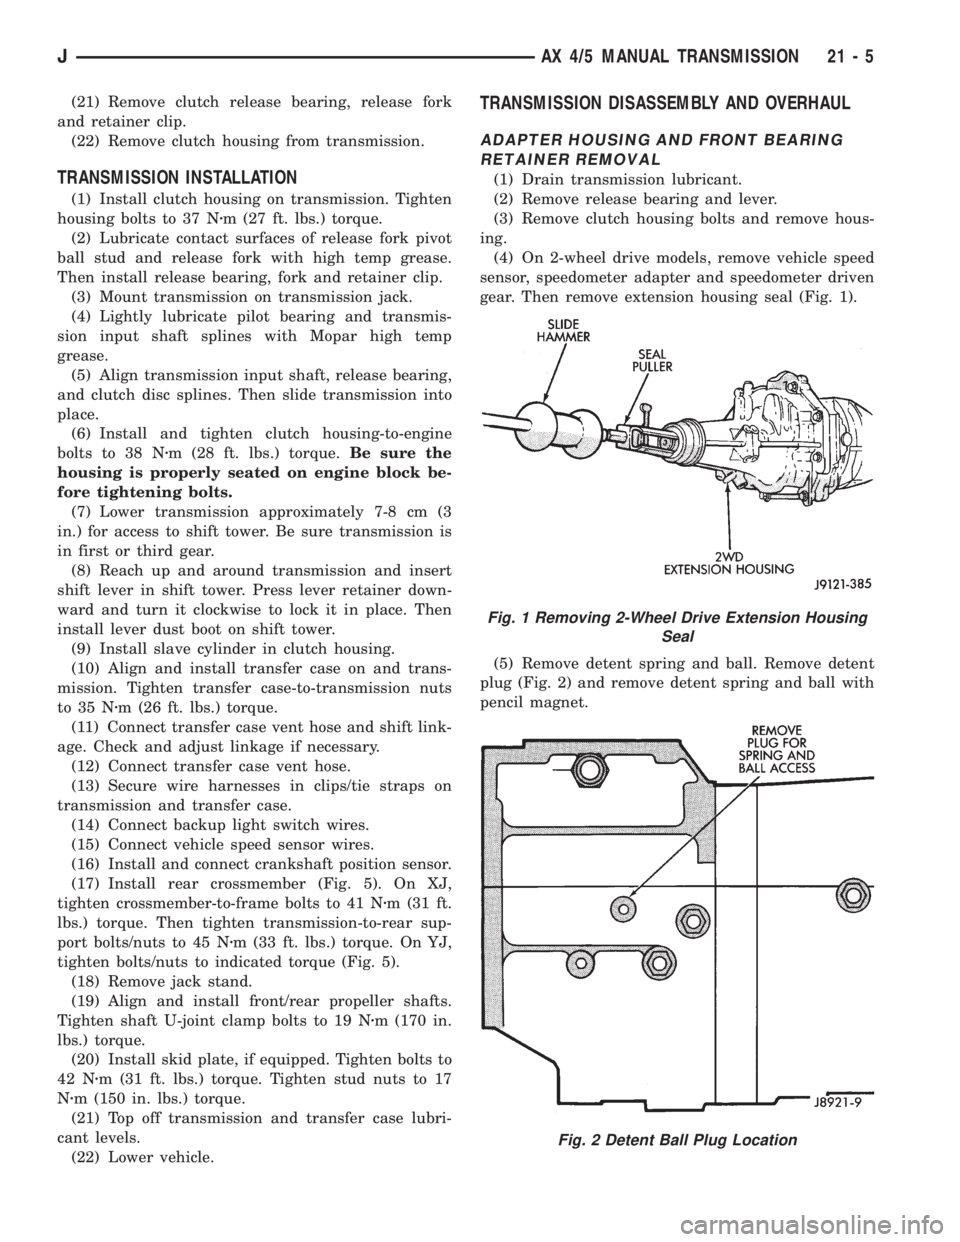
gear. Then remove extension housing seal (Fig. 1).
(5) Remove detent spring and ball. Remove detent
plug (Fig. 2) and remove detent spring and ball with
pencil magnet.
Fig. 1 Removing 2-Wheel Drive Extension Housing
Seal
Fig. 2 Detent Ball Plug Location
JAX 4/5 MANUAL TRANSMISSION 21 - 5
Page 1397 of 2198
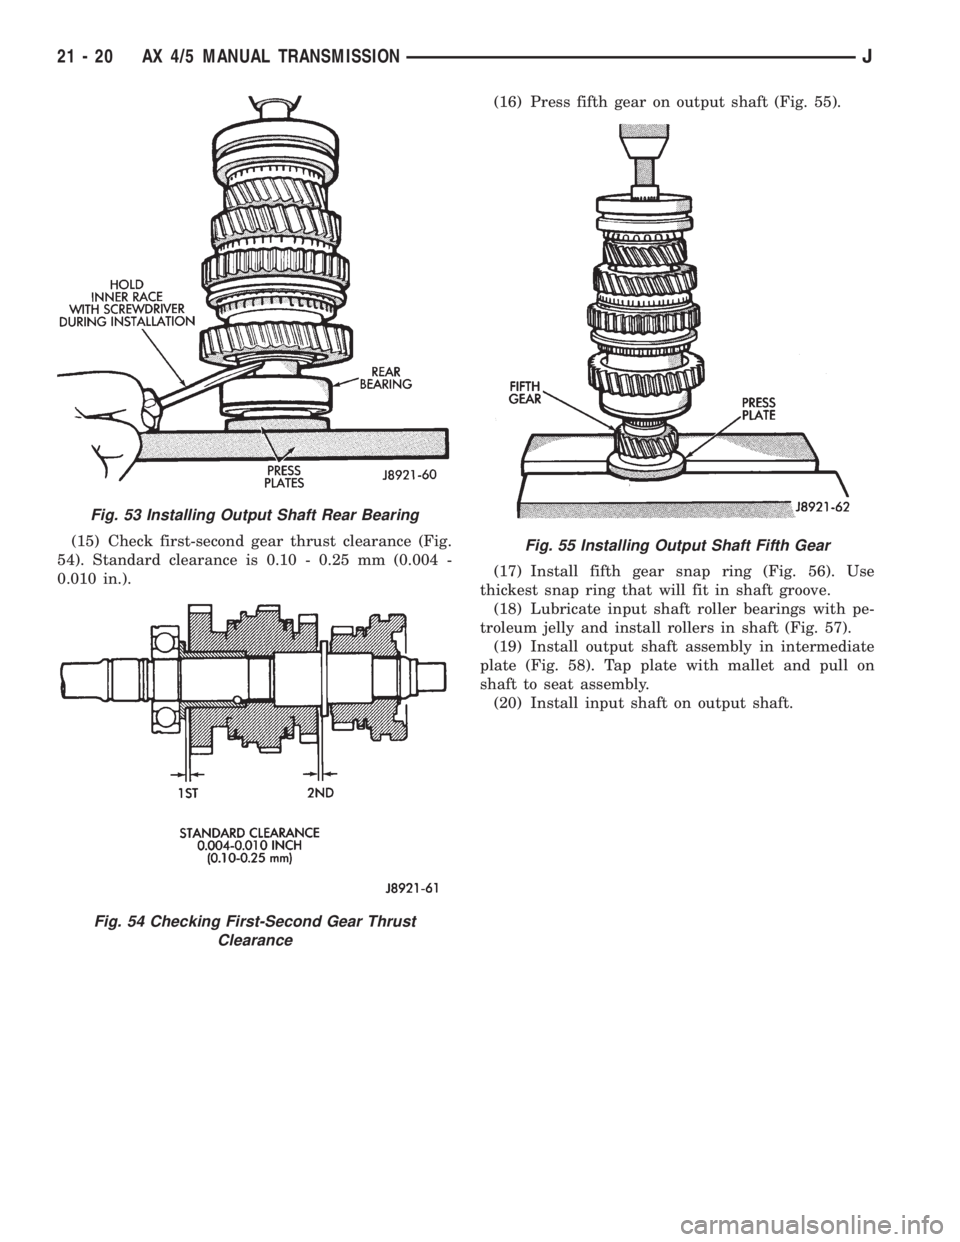
(15) Check first-second gear thrust clearance (Fig.
54). Standard clearance is 0.10 - 0.25 mm (0.004 -
0.010 in.).(16) Press fifth gear on output shaft (Fig. 55).
(17) Install fifth gear snap ring (Fig. 56). Use
thickest snap ring that will fit in shaft groove.
(18) Lubricate input shaft roller bearings with pe-
troleum jelly and install rollers in shaft (Fig. 57).
(19) Install output shaft assembly in intermediate
plate (Fig. 58). Tap plate with mallet and pull on
shaft to seat assembly.
(20) Install input shaft on output shaft.
Fig. 53 Installing Output Shaft Rear Bearing
Fig. 54 Checking First-Second Gear Thrust
Clearance
Fig. 55 Installing Output Shaft Fifth Gear
21 - 20 AX 4/5 MANUAL TRANSMISSIONJ
Page 1402 of 2198
SHIFT MECHANISM ASSEMBLY AND
INSTALLATION
When assembling the shift mechanism, refer
to Figure 66 for component details and loca-
tion.
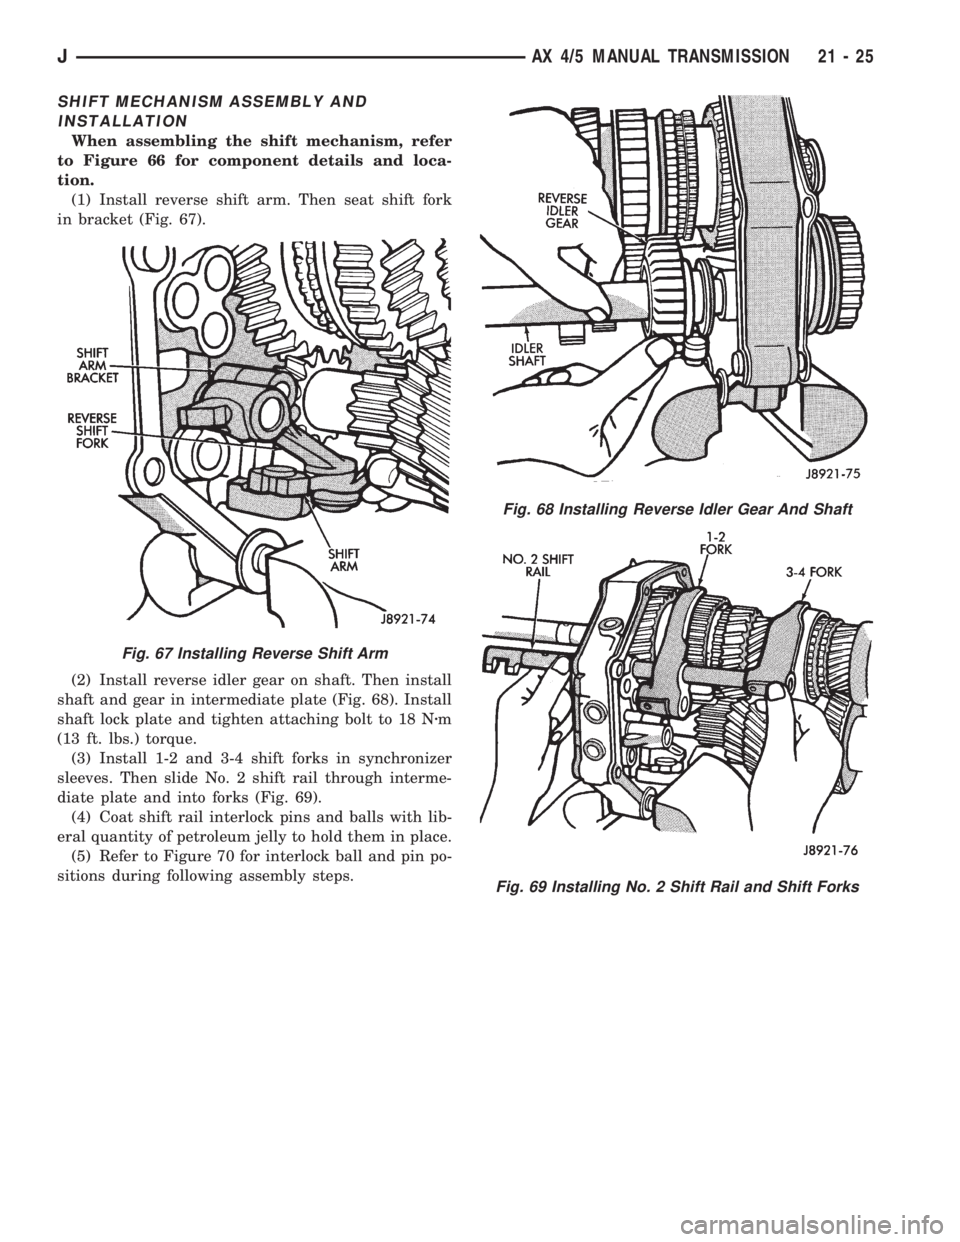
(1) Install reverse shift arm. Then seat shift fork
in bracket (Fig. 67).
(2) Install reverse idler gear on shaft. Then install
shaft and gear in intermediate plate (Fig. 68). Install
shaft lock plate and tighten attaching bolt to 18 Nzm
(13 ft. lbs.) torque.
(3) Install 1-2 and 3-4 shift forks in synchronizer
sleeves. Then slide No. 2 shift rail through interme-
diate plate and into forks (Fig. 69).
(4) Coat shift rail interlock pins and balls with lib-
eral quantity of petroleum jelly to hold them in place.
(5) Refer to Figure 70 for interlock ball and pin po-
sitions during following assembly steps.
Fig. 68 Installing Reverse Idler Gear And Shaft
Fig. 69 Installing No. 2 Shift Rail and Shift Forks
Fig. 67 Installing Reverse Shift Arm
JAX 4/5 MANUAL TRANSMISSION 21 - 25