1995 GMC SIERRA brake
[x] Cancel search: brakePage 308 of 488
~ NOTICE:
When using concentrated washer fluid,
follow the
manufacturer’s instructions for adding water.
Don’t mix water with ready-to-use washer fluid. Water can
cause the solution to freeze and damage your washer fluid
tank and other parts of the washer system.
Also, water
doesn’t clean as well as washer fluid.
0 Fill your washer fluid tank only 3/4 full when it’s very cold.
This allows for expansion, which could damage the tank if it
is
completely full.
0 Don’t use radiator antifreeze in your windshield washer. It
can damage your washer system and paint.
Brake Master Cylinder
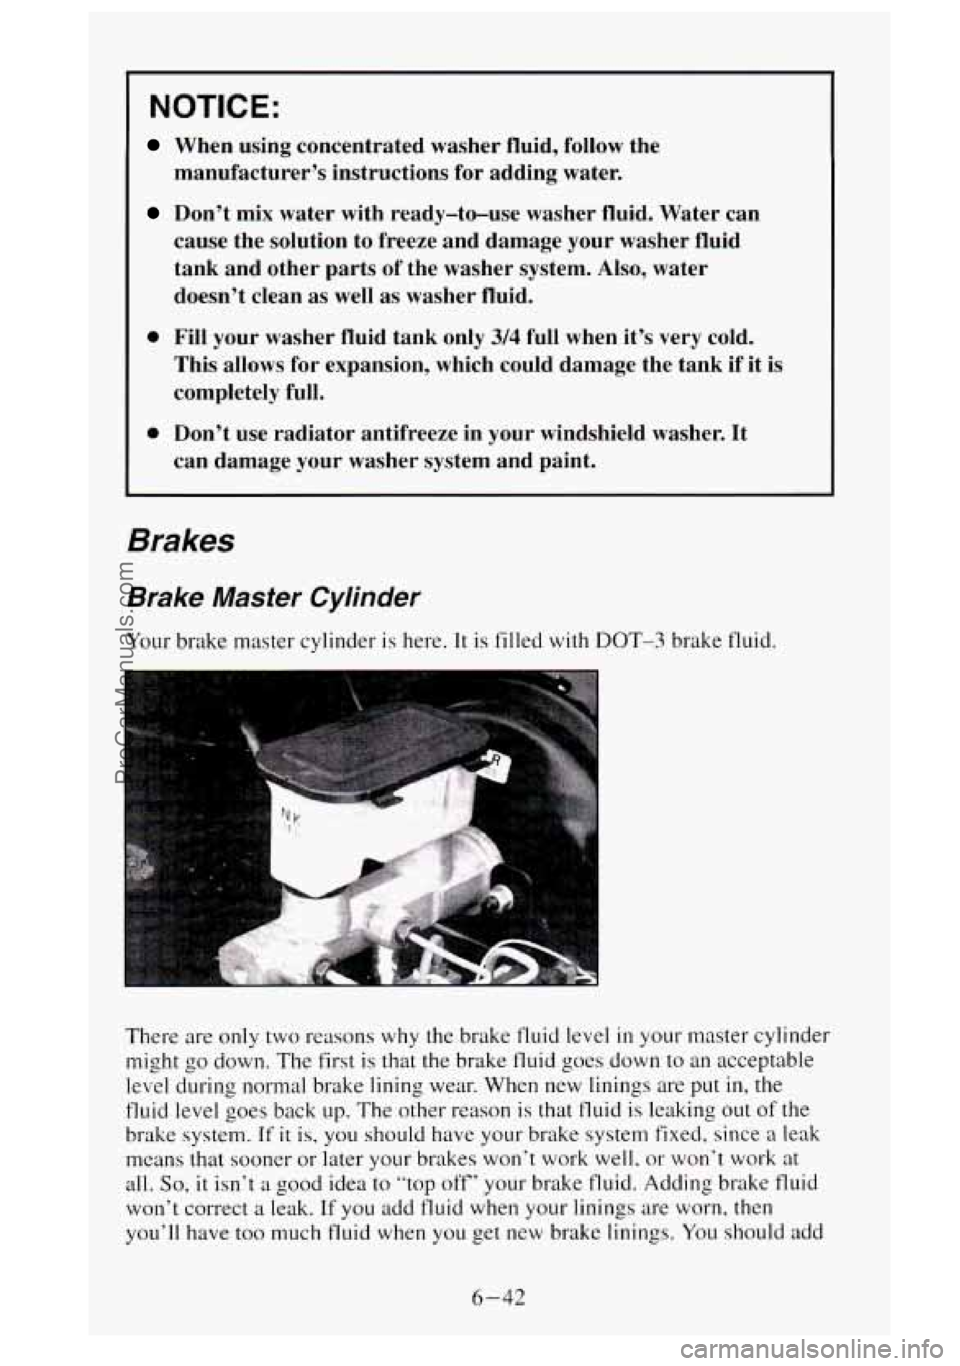
Your brake master cylinder is here. It is filled with DOT-3 brake fluid.
There are only two reasons why the brake fluid level
in your master cylinder
might go down. The first is that the brake fluid goes down to an acceptable
level during normal brake lining wear. When new linings are put in, the
fluid level goes back up. The other reason
is that fluid is leaking out of the
brake system. If it is, you should have your brake system fixed, since a leak
means that sooner or later your brakes won’t work well, or won’t work at
all.
So, it isn‘t a good idea to “top off’ your brake fluid. Adding brake fluid
won’t correct a leak. If you add fluid when your linings are worn, then
you’ll have
too much fluid when you get new brake linings. You should add
6-42
ProCarManuals.com
Page 309 of 488
(or remove) brake fluid, as necessary, only when work is done on the brake
hydraulic system.
A CAUTION:
If you have too much brake fluid, it can spill on the engine. The
fluid will burn
if the engine is hot enough. You or others could
be burned, and your vehicle could be damaged. Add brake fluid
only when work is done on the brake hydraulic system.
Refer to the Maintenance Schedule to determine when to check your brake
fluid. See “Periodic Maintenance Inspections”
in the Index.
To Check Brake Fluid
You can check the brake fluid without taking off the cap. Just look at the
windows on the brake fluid reservoir. The fluid levels should be above MIN.
If they aren’t, have your brake system checked to see if there is a leak.
After work
is done on the brake hydraulic system, make sure the levels are
above MIN and below the top
of each window.
What to Add
When you do need brake fluid, use only DOT-3 brake fluid - such as
Delco Supreme 11
@ (GM Part No. 1052535). Use new brake fluid from a
sealed container only, and always clean the brake fluid reservoir cap before
removing it.
NOTICE:
Don’t let someone put in the wrong kind of fluid. For
example, just
a few drops of mineral-based oil, such as engine
oil, in your brake system can damage brake system parts
so
badly that they’ll have to be replaced.
Brake fluid can damage paint, so be careful not to spill brake
fluid on your vehicle.
If you do, wash it off immediately. See
“Appearance Care” in the Index.
6-43
ProCarManuals.com
Page 310 of 488

Brake Wear
Your vehicle has front disc brakes and rear drum brakes. If you have a C
3500 HD model, it has four-wheel disc brakes.
Disc brake pads have built-in wear indicators that make
a high-pitched
warning sound when the brake pads are worn and new pads are needed. The
sound may come and
go or be heard all the time your vehicle is moving
(except when you are pushing on the brake pedal firmly).
I A CAUTION:
The brake wear warning sound means that sooner or later your
brakes won’t work well. That could lead to an accident. Whe\
n
you hear the brake wear warning sound, have your vehicle
serviced.
NOTICE:
Continuing to drive with worn-out brake pads could result in
costly brake repair.
Some driving conditions or climates may cause a brake squeal when the
brakes are first applied or lightly applied. This does not mean something is
wrong with your brakes.
If you have rear drum brakes, they don’t have wear indicators, but if you
ever hear
a rear brake rubbing noise, have the rear brake linings inspected.
Also, the rear brake drum should be removed and inspected each time the
tires are removed for rotation
or changing. When you have the front brakes
replaced, have the rear brakes inspected, too.
Brake linings should always be replaced as complete axle sets.
Brake Pedal Travel
See your dealer if the brake pedal does not return to normal height, or if
there is a rapid increase in pedal travel. This could be a sign of brake
trouble.
6-44
ProCarManuals.com
Page 311 of 488
Brake Adjustment
Every time you make a brake stop, your disc brakes adjust for wear.
If your brake pedal goes down farther than normal, your rear drum brakes
may need adjustment. Adjust them by backing
up and firmly applying the
brakes
a few times.
Replacing Brake System Parts
The braking system on a modeffl VEShicle is complex. Its many parts have to
be of top quality and work well together if the vehicle
is to have really good
braking. Vehicles we design and test have top-quality
GM brake parts in
them, as your vehicle does when it is new. When you replace parts of your
braking system
- for example, when your brake linings wear down and
you have to have new ones put
in - be sure you get new genuine GM
replacement parts. If you don't, your brakes may no longer work properly.
For example, if someone puts in brake linings that are wrong for your
vehicle, the balance between your front and rear brakes can change
- for
the worse. The braking performance you've come to expect can change
in
many other ways if someone puts in the wrong replacement brake parts.
Front Shock Absorbers
The front shock absorbers of your vehicle do many things. They help the
vehicle ride smoothly and
also control the travel of the suspension system.
When the shock absorbers are serviced, any replacement shock absorbers
must be the same as the original equipment shock absorbers
in both
extended length and strength.
I NOTICE:
If you use shock absorbers that are not the same as the original
shock absorbers, the shock absorbers
or suspension system
could be damaged.
6-45
ProCarManuals.com
Page 331 of 488
Wheel Alignment and Tire Balance
The wheels on your vehicle were aligned and balanced carefully at the
factory
to give you the longest tire life and best overall performance.
In most cases, you will not need to have your wheels aligned again.
However, if
you notice unusual tire wear or your vehicle pulling one way or
the other,
the alignment may need to be reset. If you notice your vehicle
vibrating when driving
on a smooth road, your wheels may need to be
rebalanced.
Wheel Replacement
Replace any wheel that is bent, cracked, or badly rusted or corroded. If
wheel nuts keep coming loose, the wheel, wheel bolts, and wheel nuts
should be replaced.
If the wheel leaks air, replace it (except some aluminum
wheels, which can sometimes be repaired). See your
GM dealer if any of
these conditions exist.
Your dealer will know the kind of wheel you need.
Each new wheel should have the same load carrying capacity, diameter,
width, offset, and be mounted the same way as the one
it replaces.
If you need to replace any of your wheels, wheel bolts, or wheel nuts,
replace them only with new
GM original equipment parts. This way, you
will be sure to have the right wheel, wheel bolts, and wheel nuts for your
vehicle.
A CAUTION:
Using the wrong replacement wheels, wheel bolts, or wheel nuts
on your vehicle can be dangerous. It could affect the braking
and handling
of your vehicle, make your tires lose air and make
you lose control, You could have a collision in which
you or
others could be injured. Always use the correct wheel, wheel
bolts, and wheel
nuts for replacement.
NOTICE:
The wrong wheel can also cause problems with bearing life,
brake cooling, speedometer/odometer calibration, headlamp
aim, bumper height, vehicle ground clearance, and tire or tire
chain clearance to the body and chassis.
6-65
ProCarManuals.com
Page 353 of 488
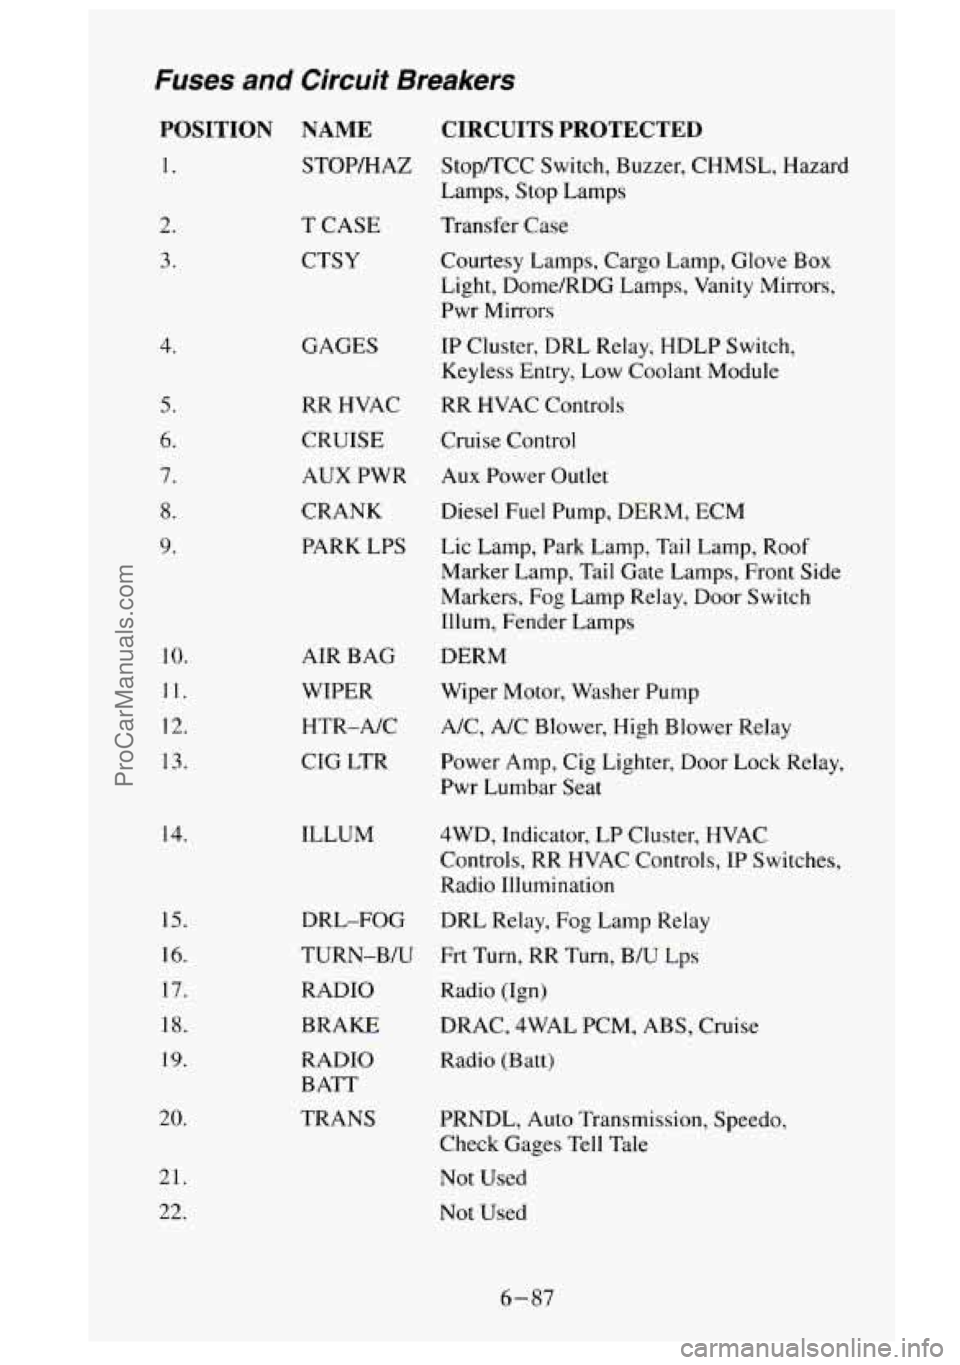
Fuses and Circuit Breakers
POSITION NAME
1. STOP/HAZ
2.
3.
4.
5.
6.
7.
8.
9.
10.
11.
12.
13.
14.
IS.
16.
17.
18.
19.
20.
21. 22.
T CASE
CTSY
GAGES
RR HVAC
CRUISE
AUX PWR
CRANK
PARK LPS
AIR BAG
WIPER HTR-A/C
CIG LTR
ILLUM
DRL-FOG
TURN-B/U RADIO
BRAKE RADIO
BATT
TRANS
CIRCUITS PROTECTED
Stop/TCC Switch, Buzzer, CHMSL, Hazard
Lamps, Stop Lamps
Transfer Case
Courtesy Lamps, Cargo Lamp, Glove Box
Light, Dome/RDG Lamps, Vanity Mirrors,
Pwr Mirrors
IP Cluster, DRL Relay, HDLP Switch,
Keyless Entry, Low Coolant Module
RR HVAC Controls
Cruise Control
Aux Power Outlet
Diesel Fuel Pump, DERM, ECM
Lic Lamp, Park Lamp, Tail Lamp, Roof
Marker Lamp, Tail Gate Lamps, Front Side
Markers, Fog Lamp Relay, Door Switch
Illum, Fender Lamps
DERM
Wiper Motor, Washer Pump
A/C, A/C Blower, High Blower Relay
Power Amp, Cig Lighter, Door Lock Relay,
Pwr Lumbar Seat
4WD, Indicator, LP Cluster, HVAC
Controls,
RR HVAC Controls, IP Switches,
Radio Illumination
DRL Relay, Fog Lamp Relay
Frt Turn, RR Turn, B/U Lps
Radio (Ign)
DRAC, 4WAL PCM, ABS, Cruise
Radio (Batt)
PRNDL, Auto Transmission, Speedo,
Check Gages
Tell Tale
Not Used
Not Used
6-87
ProCarManuals.com
Page 356 of 488

LAMP OR BULB
INSTRUMENT
PANEL
Daytime Running
Lamps Indicator?
Charging System
Indicator Lamp
Instrument Cluster
Illumination
Headlamp Beam
Indicator
Directional Signal
Indicator
Brake Warning
Indicator
SIR (Air Bag)
Safety Belt Warning
Check Gages Indicator
Malfunction Indicator
(“Service Engine
Soon”) Lamp
Upshift Indicator Glow Plugs Lamp**
Low Coolant Lamp**
Water in Fuel Lamp**
Service Throttle Soon
Lamp**
**Diesel only
“fanadian Vehicles only
TRADE NO.
74
74
194
74
74
74
74
74
74
74
74
74
74
74
74
1
I
6
1
2
1
6-90
ProCarManuals.com
Page 360 of 488
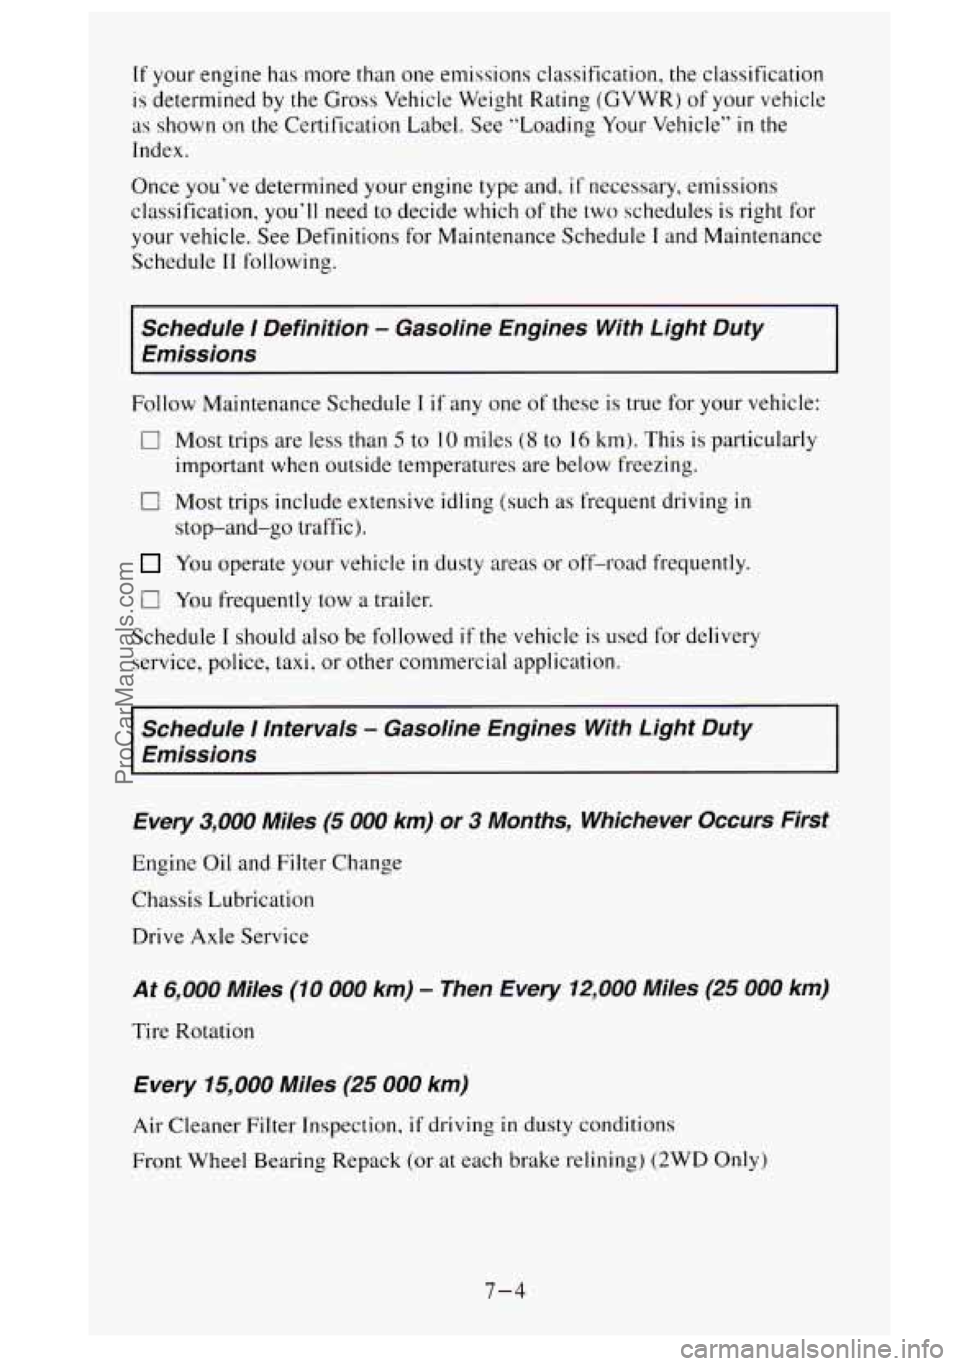
If your engine has more than one emissions classification, the classification
is determined by the Gross Vehicle Weight Rating (GVWR) of your vehicle
as shown on the Certification Label. See “Loading Your Vehicle”
in the
Index.
Once you’ve determined your engine type and,
if necessary, emissions
classification, you’ll need to decide which of the two schedules is right for
your vehicle. See Definitions for Maintenance Schedule
I and Maintenance
Schedule
I1 following.
Schedule I Definition - Gasoline Engines With Light Duty
Emissions
Follow Maintenance Schedule I if any one of these is true for your vehicle:
iII Most trips are less than 5 to 10 miles (8 to 16 km). This is particularly
important when outside temperatures are below freezing.
0 Most trips include extensive idling (such as frequent driving in
stop-and-go traffic).
You operate your vehicle in dusty areas or off-road frequently.
0 You frequently tow a trailer.
Schedule
I should also be followed if the vehicle is used for delivery
service, police, taxi, or other commercial application.
Schedule I Intervals - Gasoline Engines With Light Duty
Emissions
Every
3,000 Miles (5 000 km) or 3 Months, Whichever Occurs First
Engine Oil and Filter Change
Chassis Lubrication
Drive Axle Service
At 6,000 Miles (10 000 km) - Then Every 12,000 Miles (25 000 km)
Tire Rotation
Every 75,000 Miles (25 000 km)
Air Cleaner Filter Inspection, if driving in dusty conditions
Front Wheel Bearing Repack
(or at each brake relining) (2WD Only)
7-4
ProCarManuals.com