Page 84 of 386

Downloaded from www.Manualslib.com manuals search engine Windshield Wipers
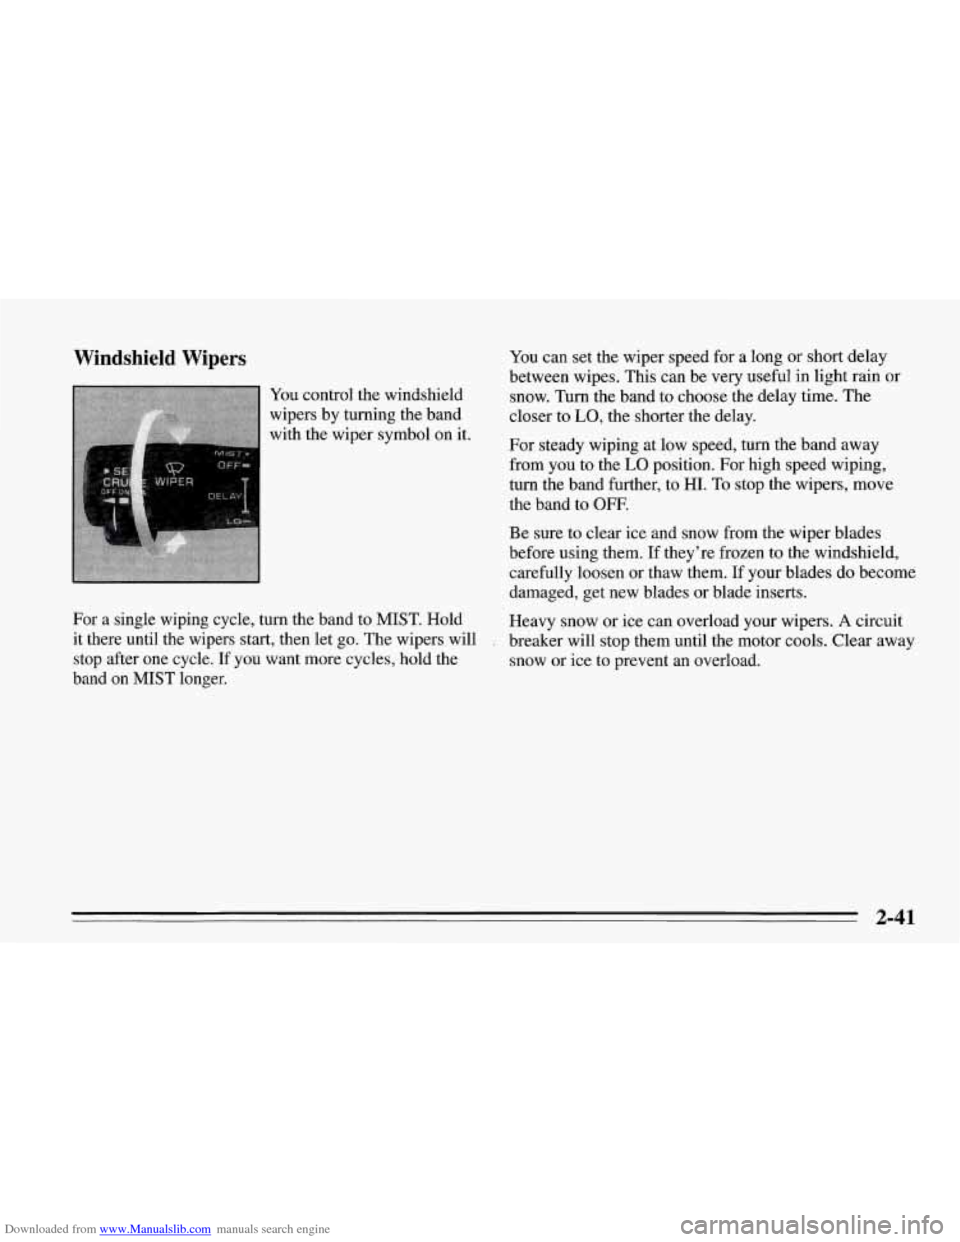
You control the windshield
wipers by turning the band
with the wiper symbol on it.
For
a single wiping cycle, turn the band to MIST. Hold
it there until the wipers start, then let go. The wipers will
stop after one cycle.
If you want more cycles, hold the
band
on MIST longer. You
can set the wiper speed for a long or short delay
between wipes. This can be very useful in light rain or
snow. Turn the band to choose the delay time. The
closer to
LO, the shorter the delay.
For steady wiping at low speed, turn the band away
from you to the
LO position. For high speed wiping,
turn the band further, to HI. To stop the wipers, move
the band to OFF.
Be sure to clear ice and snow from the wiper blades
before using them.
If they’re frozen to the windshield,
carefully loosen or thaw them. If your blades
do become
damaged, get new blades or blade inserts.
Heavy snow or ice can overload your wipers.
A circuit
breaker will stop them until the motor cools. Clear away
snow or ice to prevent an overload.
2-41
Page 88 of 386

Downloaded from www.Manualslib.com manuals search engine To Increase Speed While Using Cruise Control
There are two ways to go to a higher speed. Here’s the
first:
Use the accelerator pedal to get to the higher speed.
Push the button at the end of the lever, then release
the button and the accelerator pedal. You’ll now
cruise at the higher speed.
Here’s the second way to go to a higher speed:
Move the cruise switch to R/A. Hold it there until
you get up to the speed you want,
and then release
the switch.
To increase your speed in very small amounts, move
the switch to
R/A for less than half a second and then
release it. Each time you do this, your vehicle will
go
about 1 mph (1.6 km/h) faster.
To Reduce Speed While Using Cruise Control
There are two ways to reduce your speed while using
cruise control:
Push in the button at the end of the lever until you
reach the lower speed you want, then release it.
0 To slow down in very small amounts, push the
button for less than half a second. Each time you
do this, you’ll go 1 mph (1.6 km/h) slower.
Passing Another Vehicle While Using Cruise Control
Use the accelerator pedal to increase your speed. When
you take your foot off the pedal, your vehicle will slow
down to the cruise control speed you set earlier.
Using Cruise Control on Hills
How well your cruise control will work on hills depends
upon your speed, load, and the steepness
of the hills.
When going up steep hills, you may have to step on the
accelerator pedal to maintain your speed. When going
downhill, you may have to brake or shift to a lower gear
to keep your speed down. Of course, applying the brake
takes you out of cruise control. Many drivers find ths to
be too much trouble and don’t use cruise control on
steep hills.
To Get Out of Cruise Control
There are several ways to turn off the cruise control:
Step lightly on the brake pedal or push the clutch
pedal, if you have a manual transmission;
OR
0 Move the cruise switch to OFF,
To Erase Speed Memory
When you turn off the cruise control or the ignition,
your cruise control set speed memory is erased.
2-45
Page 90 of 386

Downloaded from www.Manualslib.com manuals search engine Headlamp Doors
The headlamp doors are designed to open when you
turn the headlamps on and close when you turn the
headlamps and parking lamps off. If you turn the
headlamps on, then turn the headlamp switch back to
the parking lamps setting, the headlamp doors will stay
open. You
can open the doors manually using the knob next to
the headlamp assembly. Turn the knob counterclockwise
until the doors are open.
The headlamp doors should be open when driving in icy
or snowy conditions to prevent the doors from freezing
closed and when washing the vehicle to help clean the
headlamps.
Daytime Running Lamps (Canada Only)
Daytime Running Lamps (DRL) can make it easier for
others to see the front of your vehicle during the day.
DRL can be helpful in many different driving
conditions, but they can be especially helpful in the
short periods after dawn and before sunset.
A light sensor on top of the instrument panel makes the
DRL work,
so be sure it isn’t covered.
The DRL system will make your front turn signal lamps
come on when:
The ignition is on,
The headlamp switch is off, and
0 The parking brake is released.
2-47
Page 91 of 386
Downloaded from www.Manualslib.com manuals search engine When the DRL are on, only your front turn signal lamps
will be
on. The taillamps, sidemarker and other lamps
won’t
be on. Your instrument panel won’t be lit up either.
When it’s dark enough outside, your front turn signal
lamps will go out and your headlamps will come on.
The other lamps that come on with your headlamps will
also come on.
When it’s bright enough outside, the regular lamps will
go off, and your front turn signal lamps come on.
As with any vehicle, you should turn on the regular
headlamp system any time you need
it.
Fog Lamps
Use your fog lamps for
better vision in foggy or
misty conditions. Your
parking lamps
or
low-beam headlamps must
be on or your fog lamps
won’t work.
To turn the fog lamps on, push the button. Push the
button again
to turn the fog lamps off. A light above the
button will come on when the fog lamps are on.
2-48
Page 103 of 386
Downloaded from www.Manualslib.com manuals search engine Ashtray and Lighter
Ashtray
2. Put the ends of the shade into the slots behind the
seats.
To use the ashtray, push on the right side of the door
next to the shift lever.
To remove it, lift up on the
snuffer.
2-60
Page 104 of 386
Downloaded from www.Manualslib.com manuals search engine NOTICE:
Don’t put papers and other things that burn into
your ashtray.
If you do, cigarettes or other
smoking materials could set them on fire, causing
damage.
You can remove the ashtray and use the space as a
second cupholder. When
you put the ashtray back, be
sure to use the rear opening.
NOTICE:
Loose objects (such as paper clips) can lodge
behind and beneath the ashtray lid and prevent
movement of the lid. Avoid putting small loose
objects near the ashtray.
Cigarette Lighter
I I‘ 17
To use the lighter, push it in all the way and let go.
When it’s ready, it will pop back by itself.
I NOTICE:
Don’t hold a cigarette lighter in with your hand
while it is heating.
If you do, it won’t be able to
back
away from the heating element when it’s
ready. That can make it overheat, damaging the
lighter and the heating element.
2-61
Page 108 of 386
Downloaded from www.Manualslib.com manuals search engine 1. Acceleration Slip Regulation (ASR) Switch
2. Side Window Defogger Vent
3. Side Air Vent
4. Turn SignaVHeadlamp Beam Lever
5. Tilt Lever
6. Instrument Cluster
7. Ignition Switch
8. Trip Monitor Controls
9. Solar Sensor
10. Center Air Vent
11. Driver Information Center
12. Comfort Controls
13. Fuse Panel
14.. Audio System
15. AshtrayLighterKupholder
16. Selective Ride Control (if equipped)
17. Power Seat Control (if equipped)
18. Shift Lever (automatic shown)
19. Horn
20. Main Lamp Control
21. Fog Lamp Switch
2-65
Page 111 of 386

Downloaded from www.Manualslib.com manuals search engine Your Corvette’s odometer is tamper-resistant. It will
read
OD0 ERR if someone has tampered with it.
If a new odometer is installed, it will automatically reset
to the correct reading. If an electrical or other problem
makes setting the odometer correctly impossible, then
it’s set
at zero, but a label on the driver’s door must
show the old reading and when the new one was
installed.
Trip Odometer
The trip odometer can tell you how far your Corvette has
been driven since you last set the trip odometer to zero.
To display the trip odometer, press TRIP OD0 on the
Trip Monitor.
To reset it, press and hold RESET TRIP
for two seconds.
Tachometer
The tachometer displays the engine speed in thousands
of revolutions per minute (rpm).
Fuel will shut off at
7200 rpm for the LT5 (Code J)
engine and at 5850 rpm for the LT1, (Code P) engine.
If you continue to drive your Corvette at the fuel shut
off rpm, you could damage your engine. Be sure to
operate your Corvette below the fuel shut
off rpm or
reduce your rpm quickly when the fuel shuts off.
Warning Lights, Gauges and
Indicators
Warning lights and gauges can signal that something is
wrong before it becomes serious enough to cause an
expensive repair or replacement. Paying attention to
your warning lights and gauges could also save you or
others from injury.
Warning lights come
on when there may be or is a
problem with one of your vehicle’s functions. As you
will see in the details on the next few pages, some
warning lights come
on briefly when you start the
engine just to let you know they’re working. If you are
familiar with this section, you should not be alarmed
when this happens.
Gauges can indicate when there may be or is a problem
with one
of your vehicle’s functions. Often gauges and
warning lights work together to let you know when
there’s a problem with your vehicle.
When one of the warning lights comes on and stays on
when you are driving, or when one
of the gauges shows
there may be a problem, check the section that tells you
what to do about it. Please follow this manual’s advice.
Waiting to
do repairs can be costly -- and even
dangerous.
So please get to know your warning lights
and gauges. They’re a big help.
2-68