Page 1627 of 1771
Entry Light Timer System
Trml Wire Test condition
Test: Desired result
Possible cause if result is not obtained
Lights-on Reminder System:
Trml Wire Test condition
Test: Desired result
Possible cause if result is not obtainedProCarManuals.com
Page 1637 of 1771

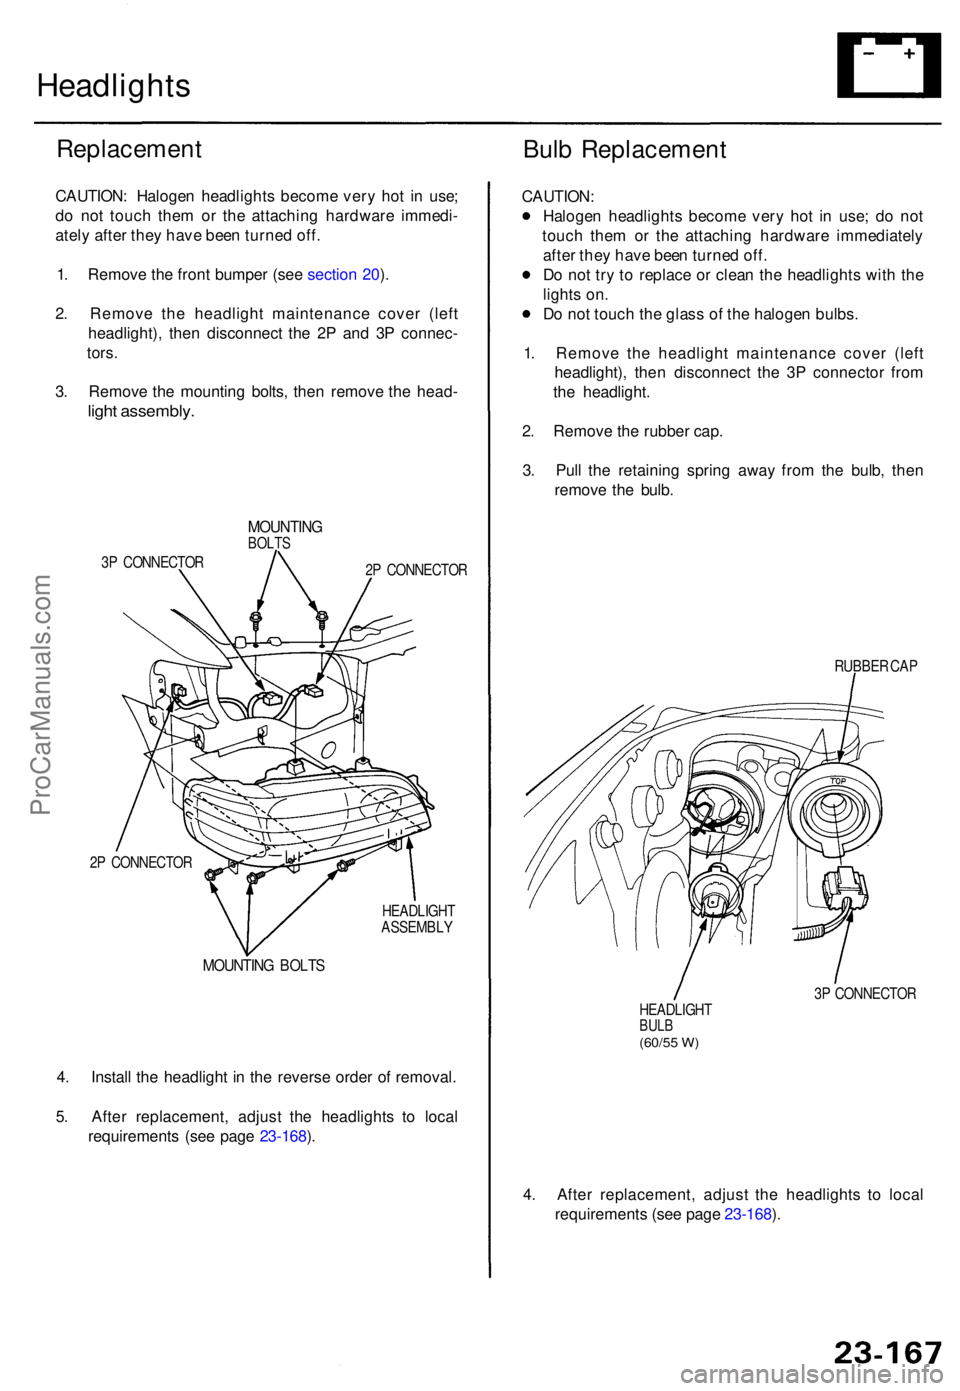
Headlights
Replacemen t
CAUTION: Haloge n headlight s becom e ver y ho t i n use ;
d o no t touc h the m o r th e attachin g hardwar e immedi -
atel y afte r the y hav e bee n turne d off .
1 . Remov e th e fron t bumpe r (se e sectio n 20 ).
2 . Remov e th e headligh t maintenanc e cove r (lef t
headlight) , the n disconnec t th e 2 P an d 3 P connec -
tors .
3 . Remov e th e mountin g bolts , the n remov e th e head -
light assembly .
MOUNTIN GBOLTS
3P CONNECTO R
2P CONNECTO R
2 P CONNECTO R
HEADLIGHT
ASSEMBL Y
MOUNTING BOLT S
4. Instal l th e headligh t i n th e revers e orde r o f removal .
5 . Afte r replacement , adjus t th e headlight s t o loca l
requirement s (se e pag e 23-168 ).
Bul b Replacemen t
CAUTION:
Haloge n headlight s becom e ver y ho t i n use ; d o no t
touc h the m o r th e attachin g hardwar e immediatel y
afte r the y hav e bee n turne d off .
D o no t tr y t o replac e o r clea n th e headlight s wit h th e
light s on .
D o no t touc h th e glas s o f th e haloge n bulbs .
1 . Remov e th e headligh t maintenanc e cove r (lef t
headlight) , the n disconnec t th e 3 P connecto r fro m
th e headlight .
2 . Remov e th e rubbe r cap .
3 . Pul l th e retainin g sprin g awa y fro m th e bulb , the n
remov e th e bulb .
RUBBE R CA P
3 P CONNECTO R
HEADLIGH T
BULB(60/5 5 W )
4. Afte r replacement , adjus t th e headlight s t o loca l
requirement s (se e pag e 23-168 ).
ProCarManuals.com
Page 1638 of 1771
Headlights
Before adjustin g th e headlights :
Par k th e ca r o n leve l ground .
Mak e sur e th e fue l tan k i s full .
Th e drive r o r someon e wh o weigh s th e sam e shoul d si t th e driver' s seat .
Loa d th e trun k wit h th e item s yo u usuall y carry . (I f yo u usuall y pul l a trailer , attac h i t t o th e car. )
Pus h dow n o n th e fron t an d rea r bumper s severa l time s t o mak e sur e th e ca r i s sittin g normally .
VERTICAL ANGL E GAUG E
RIGH T HEADLIGH T
ASSEMBL Y
FO G LIGH T
ADJUSTE R
ARROW
INDICATO R
(Bubble )
VERTICA LADJUSTE R
HORIZONTA L
ADJUSTE R
MARK
HORIZONTA L INDICATO R GEA R
Adjustmen t
ProCarManuals.com
Page 1641 of 1771
Front Tur n Signa l Light s Fron
t Sid e Marke rLights
Replacemen t
1. Remov e th e screw , an d pul l th e fron t tur n signa l
ligh t assembl y ou t o f th e fron t bumper .
FRONT TUR N
SIGNA L LIGH T
2P CONNECTO R
2. Disconnec t th e 2 P connecto r fro m th e light .
3. Tur n th e bul b socke t 45 ° counterclockwise , remov e
it fro m th e ligh t housing , the n replac e th e bulb .
BULB(21 W )
HOUSIN G
BULB SOCKE T
Replacemen t
1. Remov e th e screw , an d pul l th e fron t sid e marke r
light assembl y ou t o f th e fron t bumper .
FRONT SID E MARKE R LIGH T
2P CONNECTO R
2. Disconnec t th e 2 P connecto r fro m th e light .
3. Tur n th e bul b socke t 45 ° counterclockwise , remov e
i t fro m th e ligh t housing , the n replac e th e bulb .
HOUSIN GBULB(3CP)
BULB SOCKE T
ProCarManuals.com
Page 1642 of 1771
Taillights
Replacemen t
1. Ope n th e trun k lid , an d pul l bac k th e trun k sid e trim .
2. Disconnec t th e 8 P connecto r fro m th e tailligh t
assembly .
3. Remov e th e fou r mountin g nut s an d th e tailligh t
assembly .
GASKET
8P CONNECTO RTAILLIGHTASSEMBL Y
NOTE:
Inspect the gasket; replace it if it is distorted or stays
compressed .
After installin g them , ru n wate r ove r th e light s t o
mak e sur e the y d o no t leak .
Bulb Replacemen t
1. Ope n th e trun k lid , an d pul l bac k th e trun k sid e trim .
2 . Tur n th e bul b socke t 45 ° counterclockwise , remov e
it fro m th e tailligh t housing , the n replac e th e bulb .
BRAK E LIGHT/TAILLIGH T BUL B (21/ 5 W )
REA R SID E MARKE R LIGH T BUL B (3CP )
TURN SIGNA L LIGH T BUL B (2 1 W )
BACK-U P LIGH T BUL B (2 1 W )
ProCarManuals.com
Page 1643 of 1771
License Plate Lights
A/T Gear Position
Indicator Trim Light
Replacement
1. Remove the two screws from the license plate light
assembly.
2. Pull the light out, and disconnect the 2P connector
from it.
2P CONNECTOR
LENS
BULB (8 W)
3. Take the lens off, then replace the bulb.
Replacement
1. Carefully pry the A/T gear position indicator trim out
of the center console.
A/T GEAR POSITION INDICATOR TRIM
CENTER CONSOLE
2. Turn the 2P connector counterclockwise to remove
it from the A/T gear position indicator trim.
3. Remove the bulb from the 2P connector.
A/T GEAR
POSITION
INDICATOR
TRIM
BULB (1.4 W)
2P CONNECTORProCarManuals.com
Page 1653 of 1771
Dash Lights Brightness Controller
Controller Input Test
NOTE: The control unit is built into the dash lights brightness controller.
1. Carefully pry the controller out of the dashboard, then disconnect the 3P connector from the controller.
2. Inspect the connector terminals to be sure they are all making good contact.
If the terminals are bent, loose or corroded, repair them as necessary, and recheck the system.
If the terminals look OK, make the following input tests at the connector.
— If any test indicates a problem, find and correct the cause, then recheck the system.
— If all the input tests prove OK, the controller must be faulty; replace it.
WIRE SIDE OF FEMALE TERMINALS
3P CONNECTOR
DRIVER'S
SWITCH
PANEL
DASH LIGHTS
BRIGHTNESS
CONTROLLER
Trml Wire
Test condition
Test: Desired result
Possible cause if result is not obtainedProCarManuals.com
Page 1728 of 1771

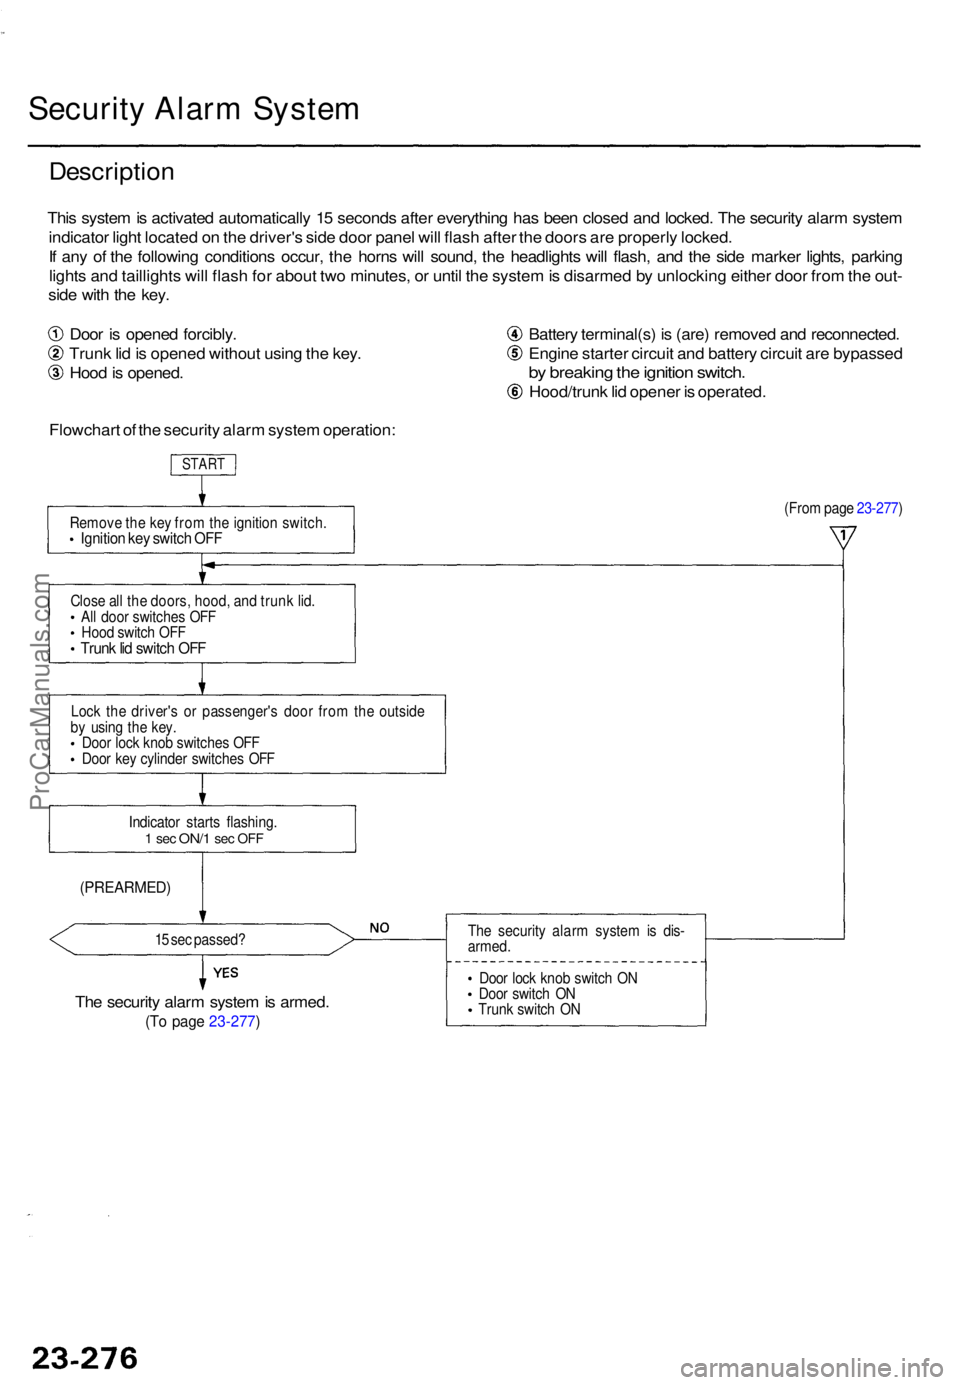
Security Alar m Syste m
Descriptio n
This syste m is activate d automaticall y 1 5 second s afte r everythin g ha s bee n close d an d locked . Th e securit y alar m syste m
indicato r ligh t locate d o n th e driver' s sid e doo r pane l wil l flas h afte r th e door s ar e properl y locked .
I f an y o f th e followin g condition s occur , th e horn s wil l sound , th e headlight s wil l flash , an d th e sid e marke r lights , parkin g
light s an d taillight s wil l flas h fo r abou t tw o minutes , o r unti l th e syste m is disarme d b y unlockin g eithe r doo r fro m th e out -
sid e wit h th e key .
Doo r i s opene d forcibly .
Trun k li d is opene d withou t usin g th e key .
Hoo d is opened . Batter
y terminal(s ) i s (are ) remove d an d reconnected .
Engin e starte r circui t an d batter y circui t ar e bypasse d
by breakin g th e ignitio n switch .
Hood/trun k li d opene r i s operated .
Flowchar t o f th e securit y alar m syste m operation :
START
Remov e th e ke y fro m th e ignitio n switch .Ignition ke y switc h OF F
(Fro m pag e 23-277 )
Clos e al l th e doors , hood , an d trun k lid .
Al l doo r switche s OF F
Hoo d switc h OF F
Trun k li d switc h OF F
Loc k th e driver' s o r passenger' s doo r fro m th e outsid e
b y usin g th e key .
Doo r loc k kno b switche s OF F
Doo r ke y cylinde r switche s OF F
Indicato r start s flashing .
1 se c ON/ 1 sec OF F
(PREARMED )
15 se c passed ?
The securit y alar m syste m is armed .
(To pag e 23-277 )
The securit y alar m syste m is dis -
armed .
Doo r loc k kno b switc h O N
Doo r switc h O N
Trun k switc h O N
ProCarManuals.com