1995 ACURA TL battery replacement
[x] Cancel search: battery replacementPage 569 of 1771
A/C Service Tips and Precautions
The air
conditioner system uses
HFC-134a
(R-134a)
refrigerant
and
polyalkyleneglycol (PAG) refrigerant
oil*,
which
are not
compatible with CFC-12 (R-12) refrigerant and mineral oil. Do not use R-12 refrigerant or mineral oil in this system, and do
not attempt to use R-12 servicing equipment; damage to the air conditioner system or your servicing equipment will result.
*DENSO ND-OIL 8:
P/N 38897 - PR7 - A01AH: 120 (4 fl-oz, 4.2 Imp-oz)
P/N 38899 - PR7 - A01: 40 (1 1/3 fl-oz, 1.4 Imp-oz)
Use only service equipment that is U.L.-listed and is certified to meet the requirements of SAE J2210 to remove R-134a
from the air conditioner system.
CAUTION: Exposure to air conditioner refrigerant and lubricant vapor or mist can irritate eyes, nose and throat. Avoid
breathing the air conditioner refrigerant and lubricant vapor or mist.
If accidental system discharge occurs, ventilate work area before resuming service.
R-134a service equipment or vehicle air conditioner systems should not be pressure tested or leak tested with compressed
air.
Some mixtures of air and R-134a have been shown to be combustible at elevated pressures and can result
in tire or explosion causing injury or property damage. Never use compressed air to pressure test R-134a service equip-
ment or vehicle air conditioner systems.
Additional health and safety information may be obtained from the refrigerant and lubricant manufacturers.
1. Always disconnect the negative cable from the battery whenever replacing air conditioning parts.
2. Keep moisture and dust out of the system. When disconnecting any lines, plug or cap the fittings immediately; don't
remove the caps or plugs until just before you reconnect each line.
3. Before connecting any hose or line, apply a few drops of refrigerant oil to the O-ring.
4. When tightening or loosening a fitting, use a second wrench to support the matching fitting.
5. When discharging the system, use a R-134a refrigerant Recovery/Recycling/Charging System; don't release refriger-
ant into the atmosphere.
6. Add refrigerant oil after replacing the following parts:
NOTE:
To avoid contamination, do not return the oil to the container once dispensed, and never mix it with other refriger-
ant oils.
Immediately after using the oil, replace the cap on the container, and seal it to avoid moisture absorption.
Do not spill the refrigerant oil on the vehicle; it may damage the paint; if the refrigerant oil contacts the paint, wash
it off immediately.
Condenser ........................................ 25 (5/6 fl-oz, 0.9 Imp-oz)
Evaporator........................................ 50 (1 2/3 fl-oz, 1.8 Imp-oz)
Line or hose ...................................... 20 (2/3 fl-oz, 0.7 Imp-oz)
Receiver/Dryer
.................................
15
(1/2
fl-oz,
0.5
Imp-oz)
Leakage repair ................................. 25 (5/6 fl-oz, 0.9 Imp-oz)
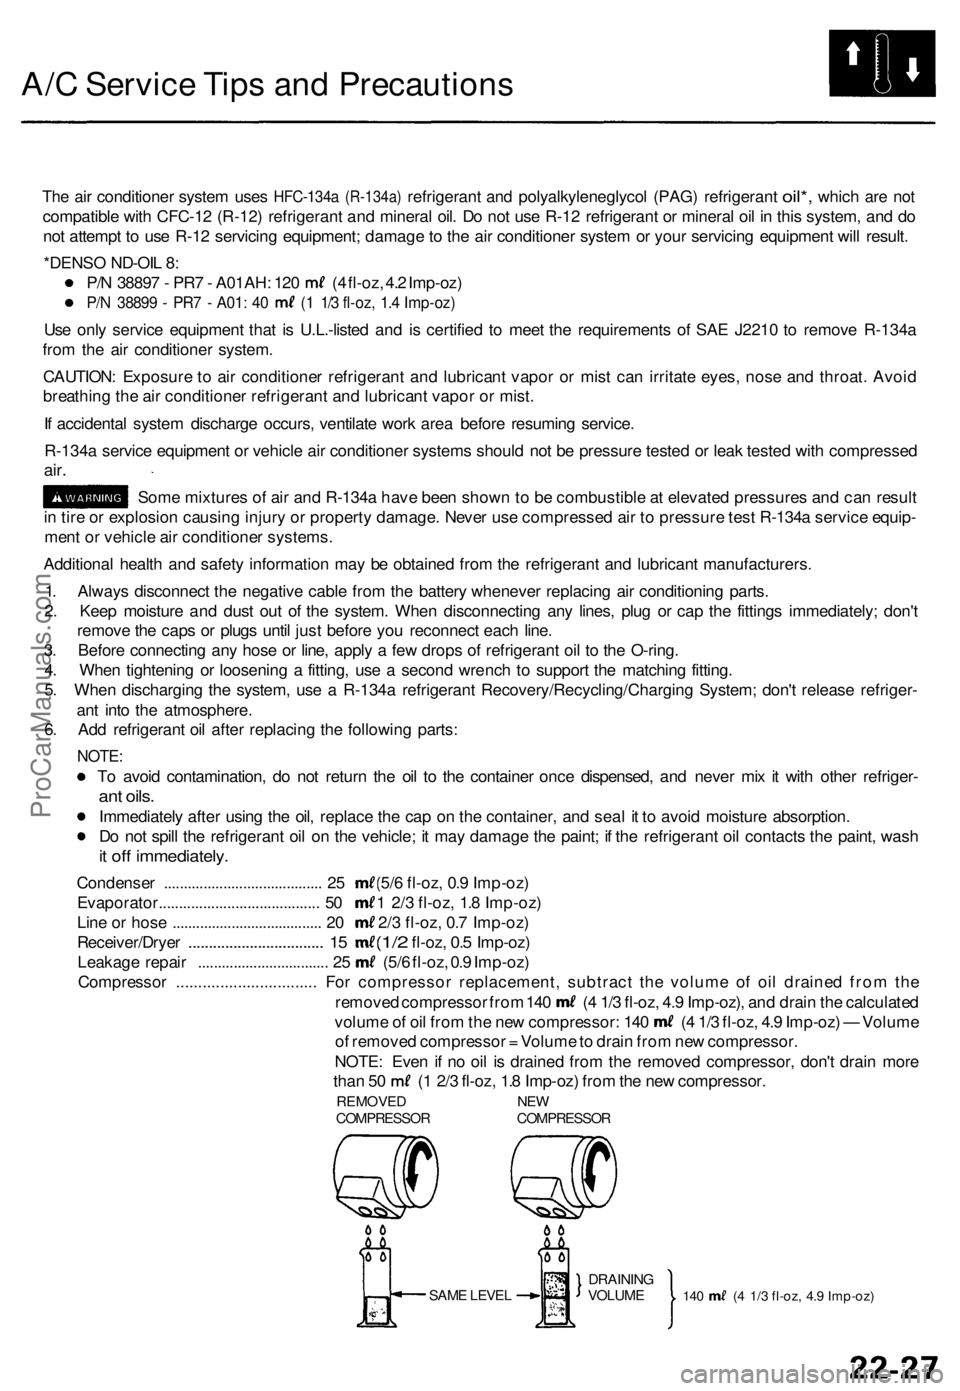
Compressor ................................ For compressor replacement, subtract the volume of oil drained from the
removed compressor from 140 (4 1/3 fl-oz, 4.9 Imp-oz), and drain the calculated
volume of oil from the new compressor: 140 (4 1/3 fl-oz, 4.9 Imp-oz) — Volume
of removed compressor = Volume to drain from new compressor.
NOTE: Even if no oil is drained from the removed compressor, don't drain more
than 50 (1 2/3 fl-oz, 1.8 Imp-oz) from the new compressor.
REMOVED NEW
COMPRESSOR COMPRESSOR
SAME LEVEL
140 (4 1/3 fl-oz, 4.9 Imp-oz)
DRAINING
VOLUMEProCarManuals.com
Page 645 of 1771
Precautions/Procedures
General Precaution s
Carefully inspec t an y SR S par t befor e yo u instal l it . D o
no t instal l an y par t tha t show s sign s o f bein g droppe d
o r improperl y handled , suc h a s dents , crack s o r defor -
mation :
— Airba g assemblie s
— Cabl e ree l
— SR S uni t
Use onl y a digita l multimete r t o chec k th e system . I f
it' s no t a Hond a multimeter , mak e sur e it s outpu t i s
1 0 m A (0.0 1 A ) o r les s whe n switche d t o th e smalles t
valu e i n th e ohmmete r range . A teste r wit h a highe r
outpu t coul d damag e th e airba g circui t o r caus e acci -
denta l deploymen t an d possibl e injury .
Do no t instal l use d SR S part s fro m anothe r vehicle .
When makin g SR S repairs , us e onl y ne w parts .
Excep t whe n performin g electrica l inspections ,
alway s disconnec t bot h th e negativ e cabl e an d posi -
tiv e cabl e fro m th e battery , an d wai t a t leas t thre e
minute s befor e beginnin g work .
Replacemen t o f th e combinatio n ligh t an d wiper /
washe r switche s an d cruis e contro l switc h ca n b e
don e withou t removin g th e steerin g wheel :
— Fo r combinatio n ligh t an d wiper/washe r switc h
replacement , se e sectio n 23 .
— Fo r cruis e contro l set/resum e switc h replacement ,
se e sectio n 23 .
Wheneve r th e ignitio n switc h i s O N (II) , o r ha s bee n
turne d OF F fo r les s tha n thre e minutes , b e carefu l no t
to bum p th e SR S unit ; th e airbag s coul d accidentall y
deploy an d caus e damag e o r injury .
Wheneve r th e airba g ha s bee n activated , replac e th e
SR S unit .
The origina l radi o ha s a code d thef t protectio n circuit .
B e sur e t o ge t th e customer' s cod e numbe r befor e dis -
connectin g th e batter y cables .
Airbag Handlin g an d Storag e
Do no t tr y t o disassembl e th e airba g assembly . I t ha s n o
serviceabl e parts . Onc e a n airba g ha s bee n operate d
(deployed) , i t canno t b e repaire d o r reused .
Fo r temporar y storag e o f th e airba g assembl y durin g ser -
vice , pleas e observ e th e followin g precautions :
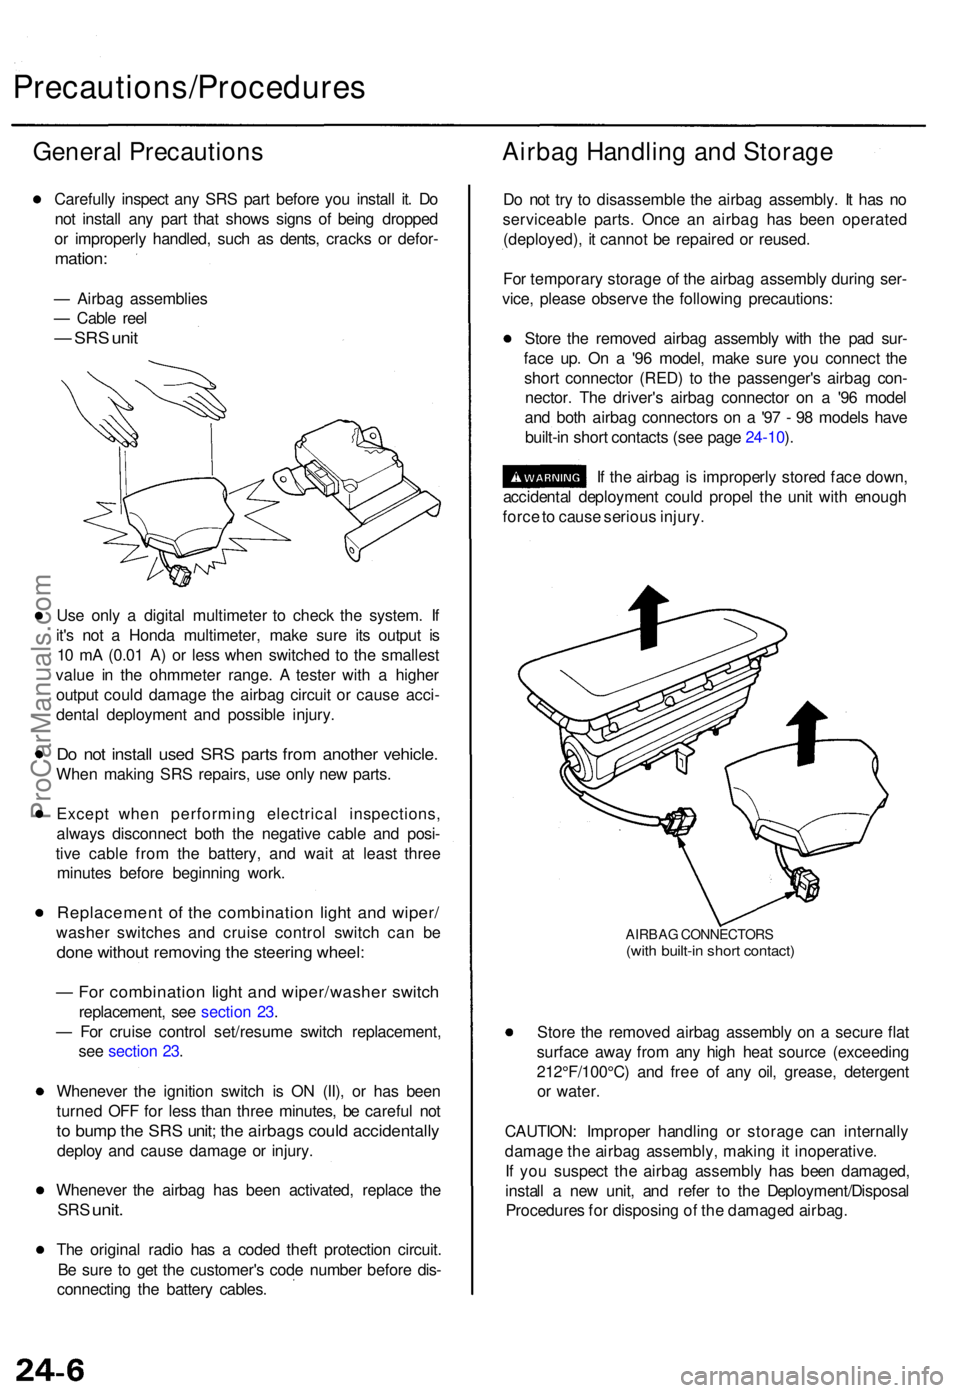
Stor e th e remove d airba g assembl y wit h th e pa d sur -
fac e up . O n a '9 6 model , mak e sur e yo u connec t th e
shor t connecto r (RED ) t o th e passenger' s airba g con -
nector . Th e driver' s airba g connecto r o n a '9 6 mode l
an d bot h airba g connector s o n a '9 7 - 9 8 model s hav e
built-i n shor t contact s (se e pag e 24-10 ).
I f th e airba g is improperl y store d fac e down ,
accidenta l deploymen t coul d prope l th e uni t wit h enoug h
forc e to caus e seriou s injury .
AIRBA G CONNECTOR S(with built-i n shor t contact )
Store th e remove d airba g assembl y o n a secur e fla t
surfac e awa y fro m an y hig h hea t sourc e (exceedin g
212°F/100°C ) an d fre e o f an y oil , grease , detergen t
o r water .
CAUTION : Imprope r handlin g o r storag e ca n internall y
damag e th e airba g assembly , makin g it inoperative .
I f yo u suspec t th e airba g assembl y ha s bee n damaged ,
instal l a ne w unit , an d refe r t o th e Deployment/Disposa l
Procedure s fo r disposin g o f th e damage d airbag .
ProCarManuals.com
Page 658 of 1771
Airbag
Replacement
After a collision in which the airbags were deployed, the
airbag assemblies and the SRS unit must be replaced.
Store a removed airbag assembly with
the pad surface up. If the airbag is improperly stored
face down, accidental deployment could propel the unit
with enough force to cause serious injury.
CAUTION:
Always disconnect the airbag connectors when the
SRS main harness is disconnected.
'96 Model: Always keep the short connector (RED) on
the passenger's airbag when the harness is discon-
nected.
Do not disassemble or tamper with the airbag.
NOTE:
Do not install used SRS parts from another vehicle.
When repairing, use only new SRS parts.
Carefully inspect the airbag before you install it. Do
not install an airbag that shows signs of being
dropped or improperly handled, such as dents, cracks
or deformation.
1. Make sure you have the anti-theft code for the radio,
then write down the frequencies for the radio's pre-
set buttons.
2. Disconnect the battery negative cable, then discon-
nect the positive cable from the battery, and wait at
least three minutes.
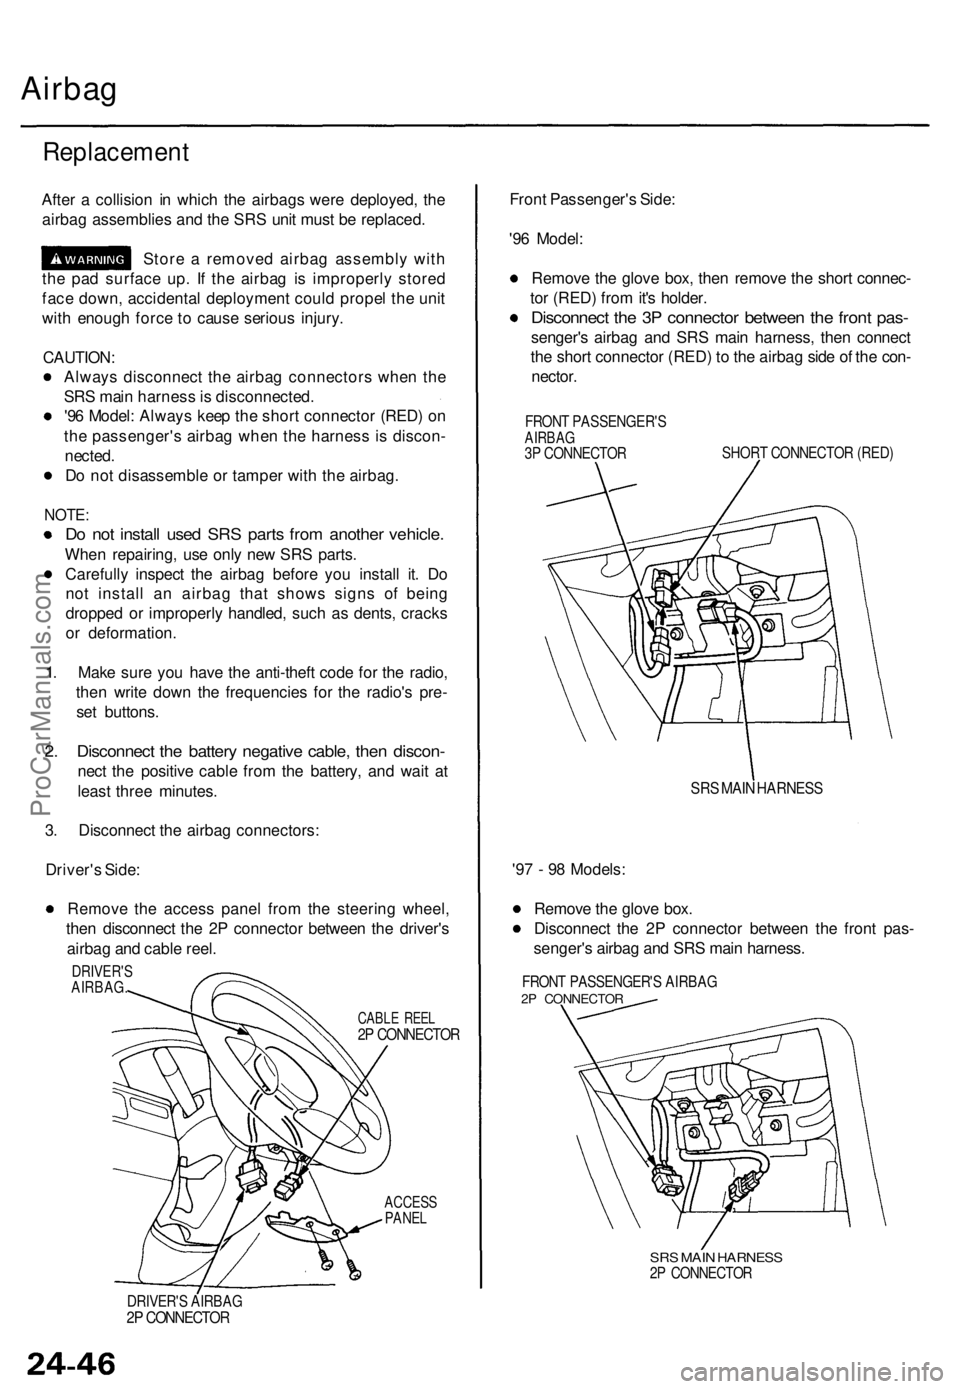
3. Disconnect the airbag connectors:
Driver's Side:
Remove the access panel from the steering wheel,
then disconnect the 2P connector between the driver's
airbag and cable reel.
ACCESS
PANEL
Front Passenger's Side:
'96 Model:
Remove the glove box, then remove the short connec-
tor (RED) from it's holder.
Disconnect the 3P connector between the front pas-
senger's airbag and SRS main harness, then connect
the short connector (RED) to the airbag side of the con-
nector.
FRONT PASSENGER'S
AIRBAG
3P CONNECTOR
SHORT CONNECTOR (RED)
SRS MAIN HARNESS
'97 - 98 Models:
Remove the glove box.
Disconnect the 2P connector between the front pas-
senger's airbag and SRS main harness.
FRONT PASSENGER'S AIRBAG
2P CONNECTOR
SRS MAIN HARNESS
2P CONNECTOR
DRIVER'S AIRBAG
2P CONNECTOR
CABLE REEL
2P CONNECTOR
DRIVER'S
AIRBAG.ProCarManuals.com
Page 668 of 1771
SRS Uni t
Replacemen t
CAUTION:
Durin g installatio n o r replacement , d o no t bum p
(impac t wrench , hamme r etc. ) th e are a nea r th e SR S
unit .
D o no t damag e th e SR S uni t terminal s o r connec -
tors.
Do no t disassembl e th e SR S unit ; i t ha s n o service -
abl e parts .
Stor e th e SR S uni t i n a clean , dr y area .
D o no t us e an y SR S uni t whic h ha s bee n subjecte d
t o wate r damag e o r show s sign s o f bein g droppe d o r
improperl y handled , suc h a s dents , crack s o r defor -
mation .
1 . Mak e sur e yo u hav e th e anti-thef t cod e fo r th e
radio , the n writ e dow n th e frequencie s fo r th e
radio' s prese t buttons .
2 . Disconnec t th e batter y negativ e cable , the n discon -
nec t th e positiv e cabl e fro m th e battery , an d wai t a t
leas t thre e minutes .
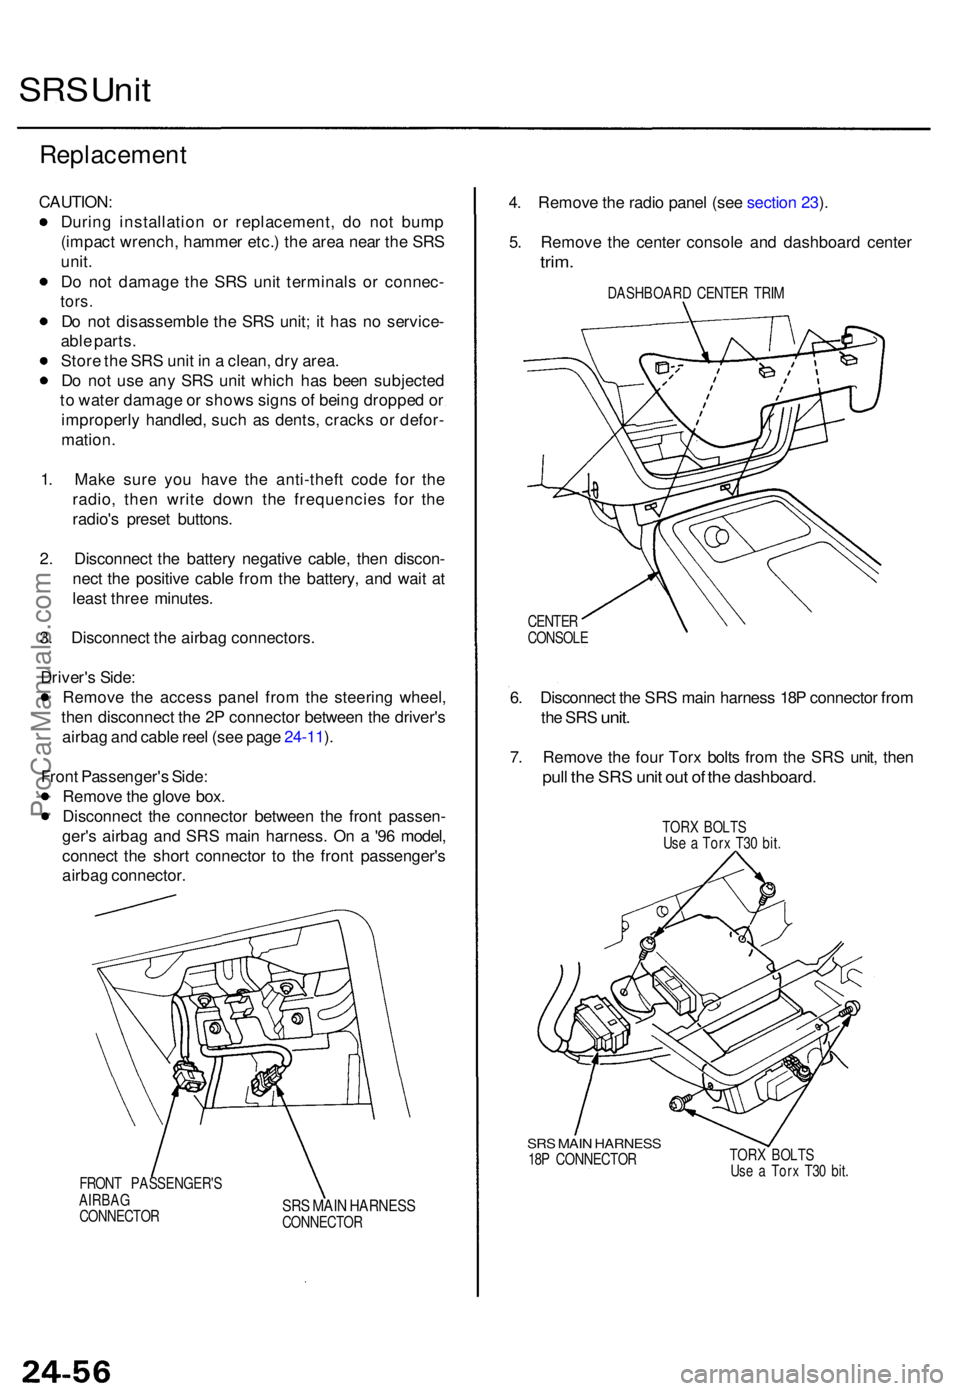
3 . Disconnec t th e airba g connectors .
Driver' s Side :
Remov e th e acces s pane l fro m th e steerin g wheel ,
the n disconnec t th e 2 P connecto r betwee n th e driver' s
airba g an d cabl e ree l (se e pag e 24-11 ).
Fron t Passenger' s Side :
Remov e th e glov e box .
Disconnec t th e connecto r betwee n th e fron t passen -
ger' s airba g an d SR S mai n harness . O n a '9 6 model ,
connec t th e shor t connecto r t o th e fron t passenger' s
airba g connector .
FRONT PASSENGER' S
AIRBA G
CONNECTO R
SRS MAI N HARNES SCONNECTO R
4. Remov e th e radi o pane l (se e sectio n 23 ).
5 . Remov e th e cente r consol e an d dashboar d cente r
trim.
DASHBOAR D CENTE R TRI M
CENTE R
CONSOL E
6. Disconnec t th e SR S mai n harnes s 18 P connecto r fro m
th e SR S
unit .
7. Remov e th e fou r Tor x bolt s fro m th e SR S unit , the n
pull th e SR S uni t ou t o f th e dashboard .
TORX BOLT S
Us e a Tor x T3 0 bit .
SRS MAI N HARNES S18P CONNECTO R TOR
X BOLT SUse a Tor x T3 0 bit .
ProCarManuals.com
Page 1740 of 1771
Precautions/Procedures
General Precaution s
• Carefull y inspec t an y SR S par t befor e yo u instal l it . D o
not instal l an y par t tha t show s sign s o f bein g droppe d
or improperl y handled , suc h a s dents , crack s o r defor -
mation :
Airbag assemblie s
Cabl e ree l
SRS uni t
• Us e onl y a digita l multimete r t o chec k th e system . I f
it' s no t a Hond a multimeter , mak e sur e it s outpu t i s
1 0 m A (0.0 1 A ) o r les s whe n switche d t o th e smalles t
valu e i n th e ohmmete r range . A teste r wit h a highe r
outpu t coul d damag e th e airba g circui t o r caus e acci -
denta l deploymen t an d possibl e injury .
• D o no t instal l use d SR S part s fro m anothe r vehicle .
Whe n makin g SR S repairs , us e onl y ne w parts .
• Excep t whe n performin g electrica l inspections ,
alway s disconnec t bot h th e negativ e cabl e an d posi -
tiv e cabl e fro m th e battery , an d wai t a t leas t thre e
minute s befor e beginnin g work .
• Replacemen t of the combinatio n ligh t an d wiper /
washer switche s an d cruis e contro l switc h ca n b e
don e withou t removin g th e steerin g wheel :
Fo r combinatio n ligh t an d wiper/washe r switc h
replacement , se e sectio n 23 .
Fo r cruis e contro l set/resume/cance l switc h
replacement , se e sectio n 23 .
• Wheneve r th e ignitio n switc h i s O N (II) , o r ha s bee n
turne d OF F fo r les s tha n thre e minutes , b e carefu l no t
t o bum p th e SR S unit ; th e airbag s coul d accidentall y
deplo y an d caus e damag e o r injury .
• Wheneve r th e airba g ha s bee n activated , replac e th e
SR S unit .
• Th e origina l radi o ha s a code d thef t protectio n circuit .
B e sur e to ge t th e customer' s cod e numbe r befor e dis -
connectin g th e batter y cables .
Airbag Handlin g an d Storag e
Do no t tr y t o disassembl e th e airba g assembly . I t ha s n o
serviceabl e parts . Onc e a n airba g ha s bee n operate d
(deployed) , i t canno t b e repaire d o r reused .
Fo r temporar y storag e o f th e airba g assembl y durin g ser -
vice , pleas e observ e th e followin g precautions :
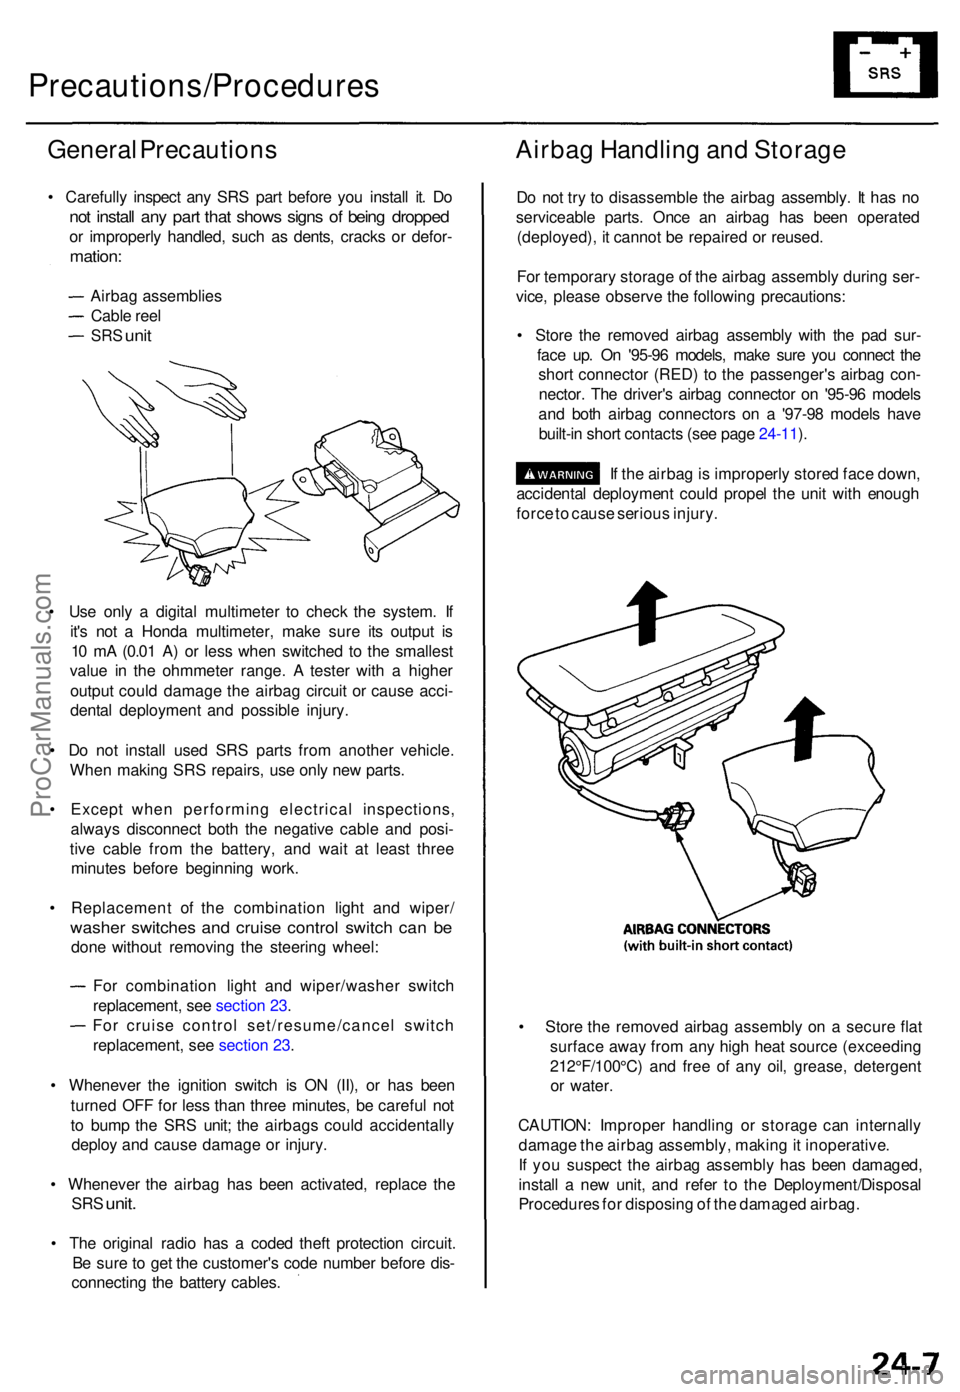
• Stor e th e remove d airba g assembl y wit h th e pa d sur -
fac e up . O n '95-9 6 models , mak e sur e yo u connec t th e
shor t connecto r (RED ) t o th e passenger' s airba g con -
nector . Th e driver' s airba g connecto r o n '95-9 6 model s
an d bot h airba g connector s o n a '97-9 8 model s hav e
built-i n shor t contact s (se e pag e 24-11 ).
I f th e airba g is improperl y store d fac e down ,
accidenta l deploymen t coul d prope l th e uni t wit h enoug h
forc e to caus e seriou s injury .
• Stor e th e remove d airba g assembl y o n a secur e fla t
surfac e awa y fro m an y hig h hea t sourc e (exceedin g
212°F/100°C ) an d fre e o f an y oil , grease , detergen t
o r water .
CAUTION : Imprope r handlin g o r storag e ca n internall y
damag e th e airba g assembly , makin g it inoperative .
I f yo u suspec t th e airba g assembl y ha s bee n damaged ,
instal l a ne w unit , an d refe r t o th e Deployment/Disposa l
Procedure s fo r disposin g o f th e damage d airbag .
ProCarManuals.com
Page 1765 of 1771
Cable Reel
Replacement
Store a remove d airba g wit h th e pa d sur -
fac e up . I f th e airba g i s improperl y store d fac e down ,
accidenta l deploymen t coul d prope l th e uni t wit h
enoug h forc e to caus e seriou s injury .
CAUTION :
• Alway s disconnec t th e airba g connecto r whe n th e
SR S mai n harnes s is disconnected .
• D o no t disassembl e o r tampe r wit h th e airbag .
NOTE : Carefull y inspec t th e airba g befor e installin g it .
D o no t instal l a n airba g tha t show s sign s o f bein g
droppe d o r improperl y handled , suc h a s dents , crack s o r
deformation .
1. Mak e sur e yo u hav e th e anti-thef t cod e fo r th e
radio , the n writ e dow n th e frequencie s fo r th e
radio' s prese t buttons .
2 . Disconnec t th e batter y negativ e cable , the n discon -
nec t th e positiv e cabl e fro m th e battery , an d wai t a t
leas t thre e minutes .
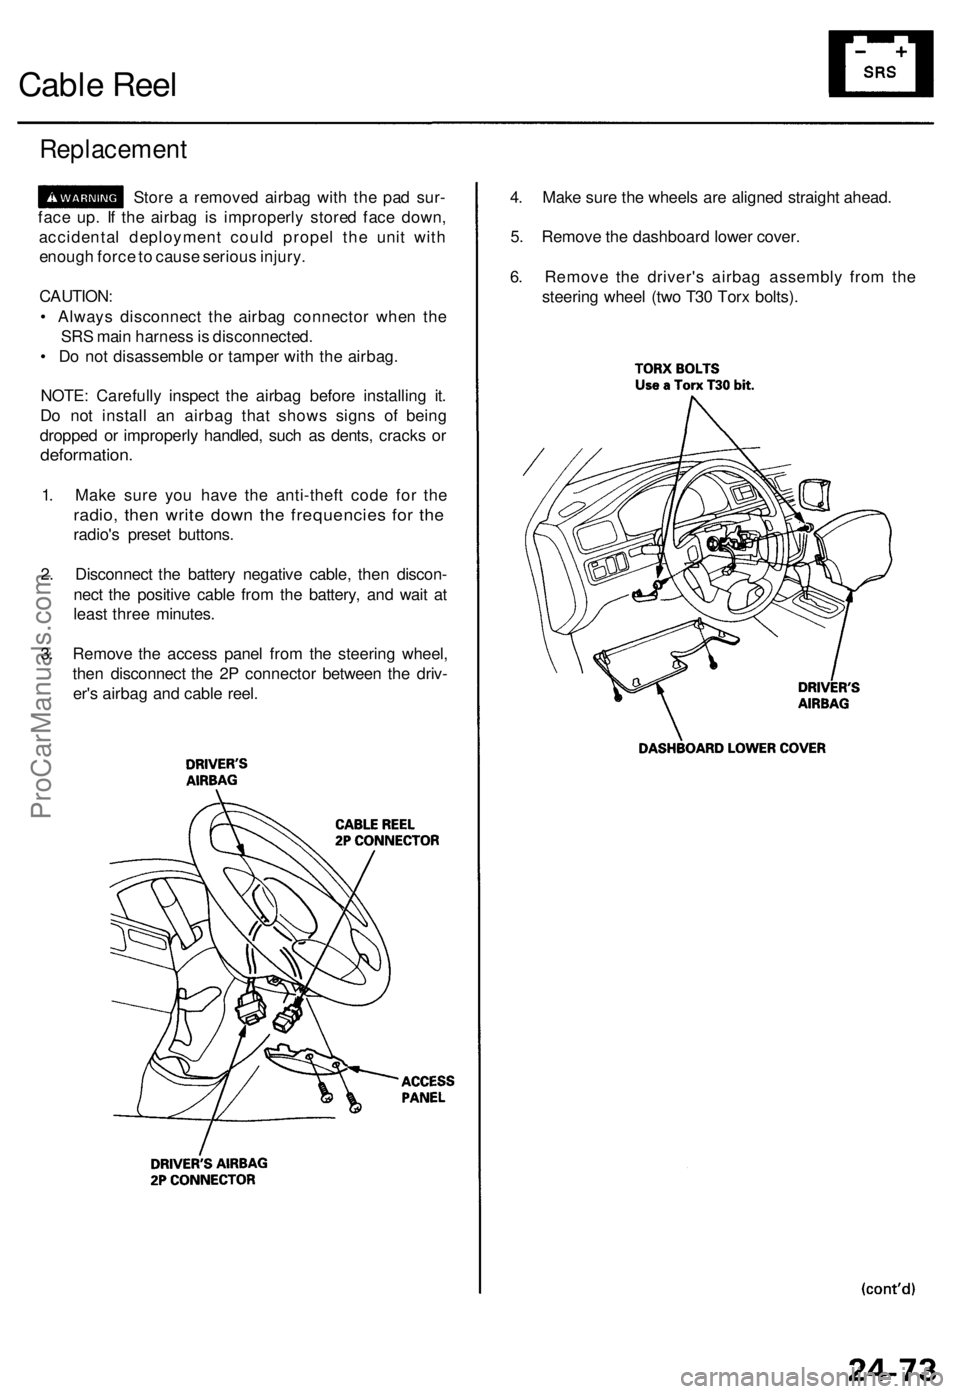
3 . Remov e th e acces s pane l fro m th e steerin g wheel ,
the n disconnec t th e 2 P connecto r betwee n th e driv -
er' s airba g an d cabl e reel . 4
. Mak e sur e th e wheel s ar e aligne d straigh t ahead .
5 . Remov e th e dashboar d lowe r cover .
6 . Remov e th e driver' s airba g assembl y fro m th e
steerin g whee l (tw o T3 0 Tor x bolts) .
ProCarManuals.com
Page 1769 of 1771
SRS Uni t
Replacemen t
CAUTION:
• Durin g installatio n o r replacement , d o no t bum p
(impac t wrench , hamme r etc. ) th e are a nea r th e SR S
unit .
• D o no t damag e th e SR S uni t terminal s o r connec -
tors .
• D o no t disassembl e th e SR S unit ; i t ha s n o service -
abl e parts .
• Stor e th e SR S uni t i n a clean , dr y area .
• D o no t us e an y SR S uni t whic h ha s bee n subjecte d
t o wate r damag e o r show s sign s o f bein g droppe d o r
improperl y handled , suc h a s dents , crack s o r defor -
mation .
1 . Mak e sur e yo u hav e th e anti-thef t cod e fo r th e
radio , the n writ e dow n th e frequencie s fo r th e
radio' s prese t buttons .
2 . Disconnec t th e batter y negativ e cable , the n discon -
nec t th e positiv e cabl e fro m th e battery , an d wai t a t
leas t thre e minutes .
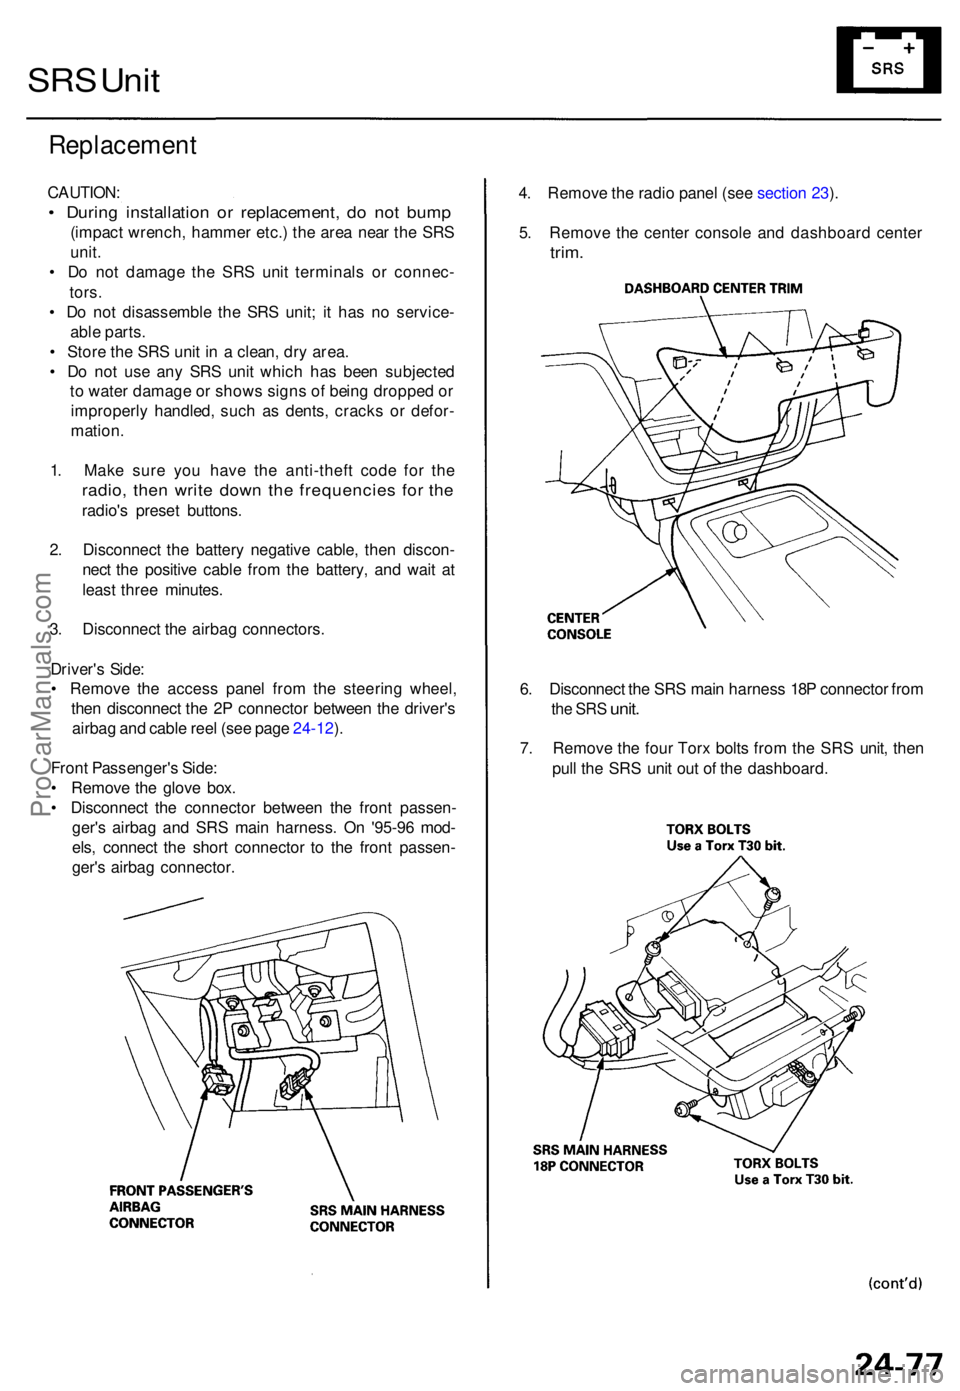
3 . Disconnec t th e airba g connectors .
Driver' s Side :
• Remov e th e acces s pane l fro m th e steerin g wheel ,
the n disconnec t th e 2 P connecto r betwee n th e driver' s
airba g an d cabl e ree l (se e pag e 24-12 ).
Fron t Passenger' s Side :
• Remov e th e glov e box .
• Disconnec t th e connecto r betwee n th e fron t passen -
ger' s airba g an d SR S mai n harness . O n '95-9 6 mod -
els , connec t th e shor t connecto r t o th e fron t passen -
ger' s airba g connector . 4
. Remov e th e radi o pane l (se e sectio n 23 ).
5 . Remov e th e cente r consol e an d dashboar d cente r
trim.
6. Disconnec t th e SR S mai n harnes s 18 P connecto r fro m
the SR S unit .
7. Remov e th e fou r Tor x bolt s fro m th e SR S unit , the n
pul l th e SR S uni t ou t o f th e dashboard .
ProCarManuals.com