1994 JAGUAR XJ6 battery
[x] Cancel search: batteryPage 256 of 521

Body Components & Trim
13.1 GENERAL DESCRIPTION
This section covers the following areas of the vehicle body:
0 Battery cover
0 Carpets - passenger compartment, trunk
0 Console - including radio, glovebox
0 Doors -frames, sealing, locks, trim, glazing
0 Fascia
0 Fuel filler flap assembly
0 Footrest
0 Hood - liners, gas strut, locking,
0 Illuminated sunvisor - inc mirror
0 Interior trim - trim pads, finishers, veneers
0 Mirrors - internal, external
0 Rear parcel tray
0 Roof console
0 Roof lining (headlining)
o Seats -front, rear -
0 Seat belts - front, rear
0 Sliding roof
0 Steering column cowl
0 Underscuttle pad
Refer to Appendix
A4 - Body Systems & Body Repair for information relating to crash-damage repairs and to the fol- lowing external components: exterior trim, bumpers, windscreen and rear screen, closures and sealing.
Refer to Section 15, Electrical for details of the following motors and solenoids: driver's and interior mirrors, window
lift, sunroof, seat / headrest and locking mechanisms (doors, trunk and filler cap).
Refer to Section 15, Electrical and Electrical Diagnostic Manual (EDM) for details of the passenger and driver airbags.
X300 VSM 1 Issue 1 August 1994
Page 261 of 521

Body Components & Trim -
13.2.10 Front Door Upper Trim Pad, Renew
. Disconnect vehicle battery ground lead.
. Remove the front door veneer panel.
. Remove the upper trim pad securing clip and screws.
. Lift the trim pad to release it from the door and remove the
To refit, carry out reversal of the above procedure.
inner
waist rail seal.
13.2.1 1 Front Door lower Trim Pad, Renew
. Disconnect vehicle battery ground lead.
Remove armrest.
. From inside door pocket, release guard retainer, discon-
. Carefully prise the trim pad away from the door and re-
With the trim pad moved for access, disconnect loud-
. Feed guard lamp harness through aperture and place trim
. Remove front door pocket and trim pad retainers.
. To refit, carry out reversal of the above procedure. Check
the trim pad retainers for damage before refitting.
nect
multi
-plug and remove lamp.
lease from the upper retainer.
speaker and window
lift switch multi-plugs.
pad on a clean workbench.
13.2.12 Door lock Barrel, Renew
. Disconnect vehicle battery ground lead.
. Remove the door trim veneer, door upper trim pad, door
. Remove the handle assembly to a clean workbench.
. Remove the lock barrel from its bayonet type mounting.
. Carefully remove the barrel components noting the order
. To refit, carry out reversal of the above procedure, ensur-
lower trim pad and door handle.
and position if reassembly is required.
ing that the components are lightly greased.
13.2.13 Front or Rear Door Lock Striker, Renew
. Note position of striker before removal.
. Remove two screws attaching striker to pillar.
Remove striker from pillar.
. To refit, carry out reversal of the above procedure, ensur- ing that the striker is correctly aligned with the door lock
before final torque tightening.
13.2.14 Front or Rear Door Outer Handle Operating
Rod, Renew
. Disconnect vehicle battery ground lead.
. Remove the door trim veneer, door upper trim pad, door
lower trim pad.
. Disengage the handle operating rod retaining clip and free
the rod from the operating pivot.
. Allowthe latch levertocontact the release mechanism, re- position the operating rod and replace the retaining clip.
. Check that the setting is correct by operating the door
mechanism.
To refit, carry out reversal of the above procedure.
/ 2 176 -1053
1. Water shedder 2. Multi connector 3. Armrest support
Fig. 1 Door Interior Components
Issue 1 August 1994 6 X300 VSM
Page 262 of 521

Body Components & Trim -
0 13.2.15 Front Armrest, Renew
. Disconnect vehicle battery ground lead.
. Remove access covers to armrest fixings.
. Remove screws securing armrest to support bracket.
. Remove armrest and remove fixing screw inserts from
. To refit, carry out reversal of the above procedure.
armrest.
13.2.16
Front or Rear Armrest Support, Renew
. Disconnect vehicle battery ground lead.
Remove door armrest.
. Remove lower trim pad from door.
. Drill out rivets and remove retaining screwsfromfront and
rear armrest support brackets.
. Remove drilling debris and swarf.
. Make good any damage to body finish caused by drilling;
use zinc primer and body colour.
. To refit, carry out reversal of the above procedure.
13.2.17 Front Door Pocket, Renew e
. Disconnect vehicle battery ground lead.
. Remove armrest.
Remove lower trim pad and place on a clean workbench.
. Remove fixings and remove door pocket.
. Remove veneer panel, switch assembly, loudspeaker and
To refit, carry out reversal of the above procedure.
loudspeaker
grille.
J76-'552
1. Primary seal 5. Uppertrim
2. Secondary seal 6. Lower trim 3. Armrest
4. Door pocket
7. Coin box
Fig.
1 Door With Full Trim
0
Issue 1 August 1994 x300 VSM 7
Page 263 of 521

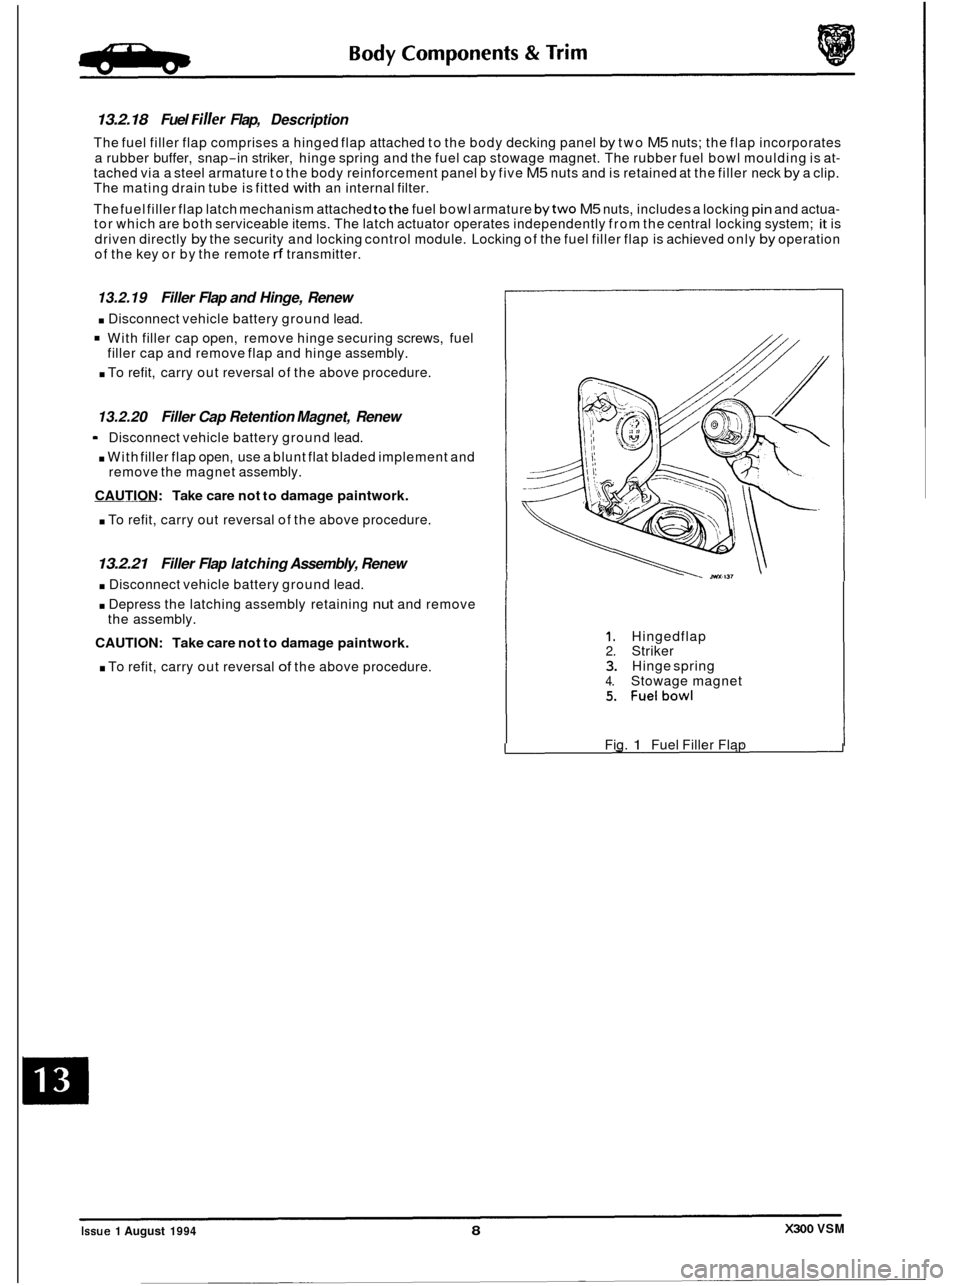
13.2.18 Fuel Filler Flap, Description
The fuel filler flap comprises a hinged flap attached to the body decking panel by two M5 nuts; the flap incorporates
a rubber buffer, snap
-in striker, hinge spring and the fuel cap stowage magnet. The rubber fuel bowl moulding is at- tached via a steel armature to the body reinforcement panel by five M5 nuts and is retained at the filler neck by a clip.
The mating drain tube is fitted with an internal filter.
The fuel filler flap latch mechanism attached
tothe fuel bowl armature bytwo M5 nuts, includes a locking pin and actua- tor which are both serviceable items. The latch actuator operates independently from the central locking system; it is
driven directly
by the security and locking control module. Locking of the fuel filler flap is achieved only by operation
of the key or by the remote rf transmitter.
13.2.19 Filler Flap and Hinge, Renew
. Disconnect vehicle battery ground lead.
With filler cap open, remove hinge securing screws, fuel
. To refit, carry out reversal of the above procedure.
filler cap
and remove flap and hinge assembly.
13.2.20 Filler Cap Retention Magnet, Renew
. With filler flap open, use a blunt flat bladed implement and
CAUTION: Take care not to damage paintwork.
. To refit, carry out reversal of the above procedure.
Disconnect
vehicle battery ground lead.
remove the magnet assembly.
13.2.21 Filler Flap latching Assembly, Renew
. Disconnect vehicle battery ground lead.
. Depress the latching assembly retaining nut and remove
CAUTION: Take care not to damage paintwork.
. To refit, carry out reversal of the above procedure.
the
assembly.
1. Hingedflap 2. Striker 3. Hinge spring 4. Stowage magnet 5. Fuelbowl
Fig. 1 Fuel Filler Flap
X300 VSM Issue 1 August 1994 8
e
0
0
Page 264 of 521

Body Components & Trim
13.3 PASSENGER COMPARTMENT
13.3.1
SRO 76.25.01/90
9 Remove the battery cover. Disconnect the battery.
* Remove the drivers side underscuttle pad, see sub-sec- tion 13.3.19.
. Remove the passenger side underscuttle pad, see sub- section 13.3.20.
Remove the console ashtray, see sub-section 13.3.28.
. Remove the console finisher veneer panel, see sub-sec- tion 13.3.24.
. Remove the radio console, see sub-section 13.3.10.
. Remove the fascia center veneer panel, see sub-section
9 Undo and remove the console upper securing screws.
. Displace and reposition the rear air distribution outlet box.
. Disconnect the cigar lighter multi-plug (where fitted).
. Disconnect the security system valet switch harness
mult i-plug ,
9 Remove the rear air distribution outlet box.
. Undo and removethecenter console rear mounting secur- ing screw.
Displace and remove the console assembly and place on
the bench.
. Place the console in position in the vehicle.
. Fit and tighten the console front securing screws.
. Fit and tighten the console rear securing screw.
. Reconnect the security system valet switch multi-plug.
. Place the air distribution outlet in position.
. Connect the rear cigar lighter harness multi-plug (where
. Fit and fully seat the air distribution outlet.
. Refit the fascia center veneer panel.
Refit the radio console.
. Refit the console finisher veneer panel.
Console Assembly - Remove For Access And
Refit
13.3.23.
fitted).
Refit the console ashtray.
Refit the underscuttle pads.
. Reconnect the battery. Refit the battery cover.
X300 VSM 9 Issue 1 August 1994
Page 265 of 521

Body Components & Trim -
13.3.2
SRO 76.25.01/50
. Remove the console rear extension finisher, see sub-sec-
. Remove the console rear extension veneer panel, see sub-
. Remove the console rear extension, see sub-section
. Remove the drivers side underscuttle pad, see sub-sec-
. Remove the passenger side underscuttle pad, see sub-
. Remove the console ashtray, see sub-section 13.3.28.
. Remove the console finisher veneer panel, see sub-sec-
. Remove the radio console, see sub-section 13.3.10.
Remove the fascia center veneer panel, see sub-section
Undo and remove the console upper securing screws.
. Displace and reposition the rear air distribution outlet box.
. Disconnect the cigar lighter multi-plug (where fitted).
. Disconnect the security system valet switch harness
multi
-plug.
. Remove the air distribution outlet box.
9 Undo and remove the center console rear mounting secur- ing screw.
. Displace and remove the console assembly and place on
the bench.
. Displace and remove the spire clips from the console as- sembly.
. Open the glove box lid.
. Remove the glove box lid latch.
. Undo and remove the glove box lid rear securing screws.
. Displace and remove the glove box lid /glove box assem- bly.
. Place the console aside.
. Place the new console to the front.
. Fit and align the glove box lid /glove box assembly.
. Fit but do not fully tighten the glove box lid securing screw.
. Close the glove box lid and check the adjustment.
. Open and adjust the lid.
. Finally tighten the securing screws.
. Fit and align the glove box lid latch.
. Close the glove box lid.
. Fit and align the spire clips to the console.
Console Assembly - Renew (Daimler / VDP)
Remove the battery cover. Disconnect the battery.
tion 13.3.5.
section 13.3.27.
13.3.6.
tion 13.3.19.
section
13.3.20.
tion 13.3.24.
13.3.23.
Issue 1 August 1994 10 X300 VSM
Page 266 of 521

Body Components & Trim -
. Place the console in position in the vehicle.
. Fit and tighten the front securing screws.
. Fit and tighten the rear securing screw.
. Reconnect the security system valet switch multi-plug.
= Place the air distribution outlet in position.
. Connect the rear cigar lighter harness multi-plug (where
9 Fit and fully seat the air distribution outlet.
Refit the fascia center veneer panel.
. Refit the radio console.
. Refit the console veneer panel.
. Refit the console ashtray.
. Refit the console finisher.
9 Refit the underscuttle pads.
. Refit the console extension.
. Refit the console extension veneer panel.
. Refit the console rear extension finishe.
. Reconnect the batten/. Refit the battery cover.
fitted).
Issue 1 August 1994 X300 VSM 11
Page 267 of 521

Body Components & Trim
0 13.3.3
SRO 76.25.01/91
. Remove the battery cover. Disconnect the battery.
. Remove the console rear extension finisher, see sub-sec-
8 Remove the console rear extension veneer panel, see sub-
. Remove the console rear extension, see sub-section
. Remove the drivers side underscuttle pad, see sub-sec-
. Remove the passenger side underscuttle pad, see sub-
. Remove the console ashtray, see sub-section 13.3.28.
. Remove the console finisher veneer panel, see sub-sec-
. Remove the radio console, see sub-section 13.3.10.
. Remove the fascia center veneer panel, see sub-section 13.2.23.
Undo and remove the console upper securing screws.
. Displace and reposition the rear air distribution outlet box.
. Disconnect the cigar lighter multi-plug (where fitted).
. Disconnect the security system valet switch harness
multi
-plug.
. Remove the air distribution outlet box.
. Undo and remove the center console rear mounting secur-
ing screw.
. Displace and remove the console assembly and place on
the bench.
. Place the console in position in the vehicle.
. Fit and tighten the front securing screws.
. Fit and tighten the rear securing screw.
. Reconnect the security system valet switch multi-plug.
Place the air distribution outlet in position.
. Connect the rear cigar lighter harness multi-plug (where
. Fit and fully seat the air distribution outlet.
Refit the center vent veneer panel assembly.
Refit the radio console.
. Refit the console veneer panel.
. Refit the console ashtray.
. Refit the console finisher.
. Refit the underscuttle pads.
. Refit the console extension.
. Refit the console extension veneer panel.
. Refit the console rear finishe.
. Reconnect the battery. Refit the battery cover.
Console Assembly - Remove For Access And
Refit (Daimler
/ VDP)
tion 13.3.5.
section 13.3.27.
13.3.6.
tion 13.3.19.
section 13.3.20.
tion 13.3.24.
0
fitted).
0
m
0
X300 VSM Issue 1 August 1994 12