1994 JAGUAR XJ6 wiring
[x] Cancel search: wiringPage 183 of 327

E I ect r ical rl
Fault:
Possible causes:
Remedy:
Fault:
Possible causes:
Remedy:
Fault:
Possible causes:
Remedy: Resume
facility (only) not operating correctly
1. Switch faulty.
2.
1.
2.
System will not disable at paddle switch
1. Switch faulty.
2. Harness wiring or connector faulty
1. Check switch operation renew if necessary.
2. Examine harness wiring from switch to SCCM and from switch to ground.
Examine connectors for corroded, damaged or distorted pins.
Set speed not steady
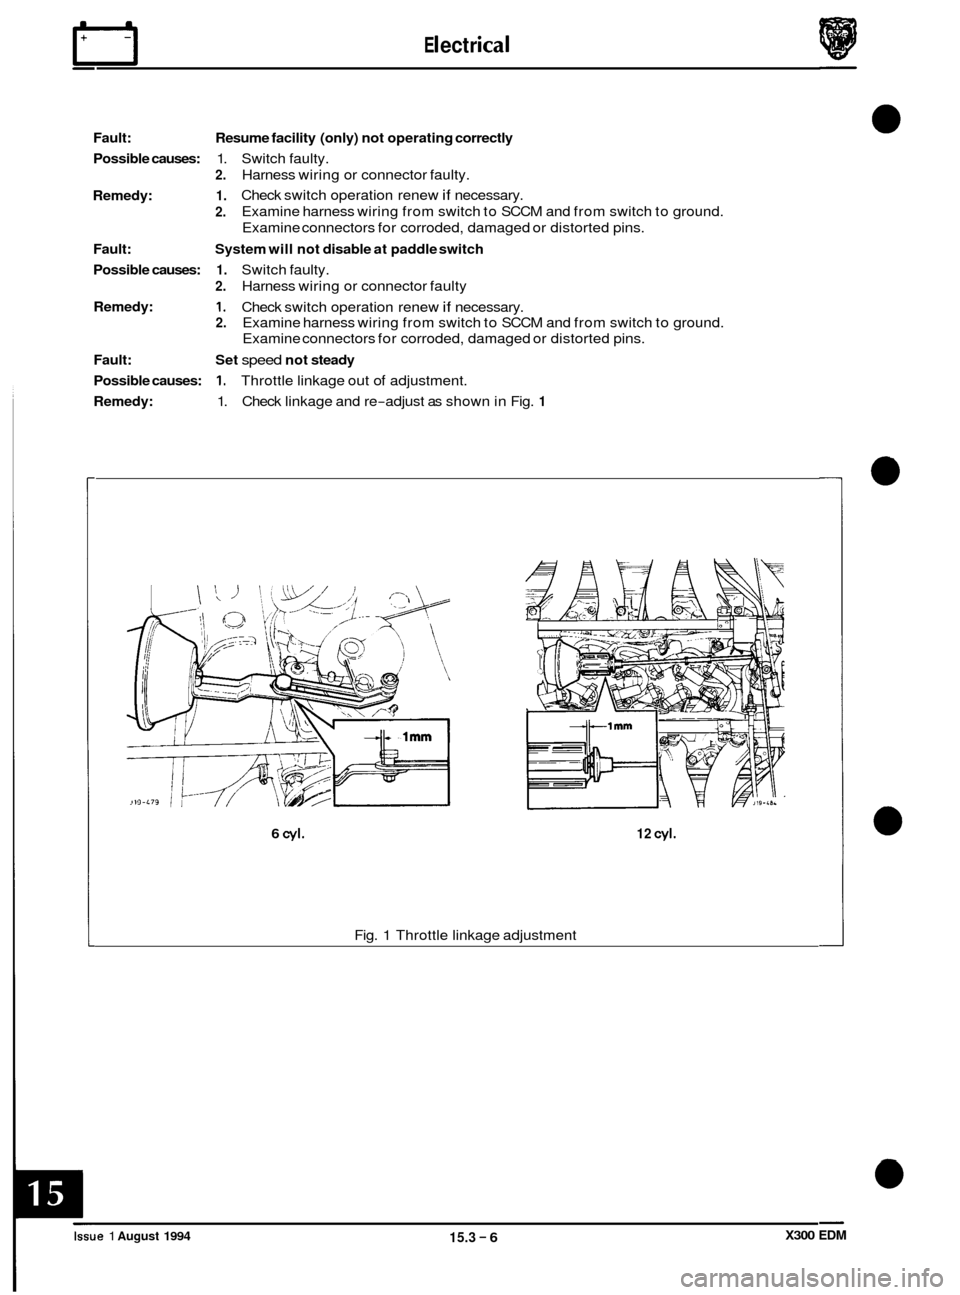
1. Throttle linkage out of adjustment.
1. Check linkage and re-adjust as shown in Fig. 1
Harness wiring or connector faulty.
Check switch operation renew
if necessary.
Examine harness wiring from switch to SCCM and from switch to ground.
Examine connectors for corroded, damaged or distorted pins.
6 cyl. 12 cyl.
Fig. 1 Throttle linkage adjustment
X300 EDM Issue 1 August 1994 15.3 - 6
Page 184 of 327

15.3.5 PIN-POINT TESTS
The following tests give detailed information on component fault diagnosis.
1. Power supply
a. Check fuse FIO in LH 'A' post base fuse-box is intact.
b. Unplug harness connector from SCCM and check for battery supply voltage to ground, at pins 1 and 2
with ignition on. If supply is not recorded on either pin switch off ignition and check harness wiring
continuity from LH
'A' post base fuse-box to splice FCS16.
If supply is recorded at pin 1 only check brake and clutch (where fitted) switch contacts (closed when
pedals not operated). For vehicles with automatic transmission ensure clutch pedal switch link is
correctly fitted. Examine harness wiring and check continuity between pin
2 and splice FCS16.
If supply is recorded at pin 2 only examine harness wiring and check continuity from pin 1 to splice
FCS
16.
c.
d.
m
P1I
1
k wv I wu I
I-------
*+12V Present Only When Ignition ON
1. Speed Control Control Module (SC CM) 7. Dump Valve
2. Clutch Switch / Link 8. Control Valve / Pump Unit
3. Brake Switch
9. Gear Position Module 4. LH 'A' Post Base Fuse-box 10. ABS Control Module 5. Switch Pack 11. Instrument Pack
6. Column Switchgear Dimmer
Fig. 1 Speed Control Power Supply
Issue 1 August 1994 X300 EDM 15.3 - 7
Page 185 of 327

n Electrical
2. Switch pack assembly
a. Unplug switch pack connector and check for battery voltage between pin 4 and ground with
ignition
off. If battery voltage is not present, switch ignition off and examine wiring harness,
checking continuity between pin
4 and splice FCS16.
b. Test operation of switches between pins as follows:
ON: Normally open; closes on operation completing circuit between pins
4 and 5 and pins 1
and 5. A resistance of less than IQ should be recorded when testing pins 4 and 5.
Minimal resistance should be recorded when testing pins 1 and 5.
SET: Normally open; closes on operation completing circuit between pins 2 and 5.
A resistance of approximately 100Q should be recorded.
RES: Normally open; closes on operation completing circuit between pins
2 and 5.
A resistance of approximately 330Q should be recorded.
c. Examine wiring harness and check continuity between pin
5 and ground.
Ptl
PI1
1
m) su
I U0
I
*+12V Present Only When Ignition ON
1. Speed Control Control Module (SC CM)
7. Dump Valve 2. Clutch Switch I Link 8. Control Valve / Pump Unit 3. Brake Switch 9. Gear Position Module
4. LH ‘A’ Post Base Fuse-box 10. ABS Control Module
5. Switch Pack 11. Instrument Pack
6. Column Switchgear Dimmer
Fig. 1 Speed Control Switches
0
0
0
0
Issue 1 August 1994 15.3 - 8 X300 EDM
Page 186 of 327

E I ect r ica I n
3. Brakeswitches
a. Unplug switch connector and check for battery voltage between pin 3 and ground with ignition
b.
on. If battery voltage is not present switch off ignition and examine harness, checking
continuity between pin 3 and splice
FCS16.
Test switch continuity across pins as follows:
Pin
3 - Pin 2; normally closed, opens on pedal operation breaking circuit continuity. Also,
checkcontinuity from pin
2 to clutch switch (where fitted) or link pin 1.
Pin 1
- Pin 4; normally open, closes on pedal operation completing circuit continuity. Also,
check continuity from switch pin 1 to
SC CM pin 15 and switch pin 4 to ground.
4. Clutch switch (where fitted) or link
a. Unplug switch connector and check for battery voltage between pin 1 and ground with ignition
on. If battery voltage is not present switch
off ignition and examine harness, checking continuity
between pin 1 and splice
FCS16.
Check continuity across switch pins 1 and 2, switch (where fitted) is normally closed and opens
on pedal operation.
Examine wiring harness, checking continuity between pin
2 and SC CM pin 12.
b.
C.
1
.---I
1. Speed Control Control Module (SC CM) 7. Dump Valve
2. Clutch Switch 1 Link 8. Control Valve / Pump Unit
3. Brake Switch 9. Gear Position Module 4. LH 'A' Post Base Fuse-box 10. ABS Control Module
5. Switch Pack 11. Instrument Pack
6. Column Switchgear Dimmer
Fig. 1 Brake and Clutch Switches
X300 EDM 15.3 - 9 Issue 1 August 1994
Page 187 of 327

rl E I ect r ica I
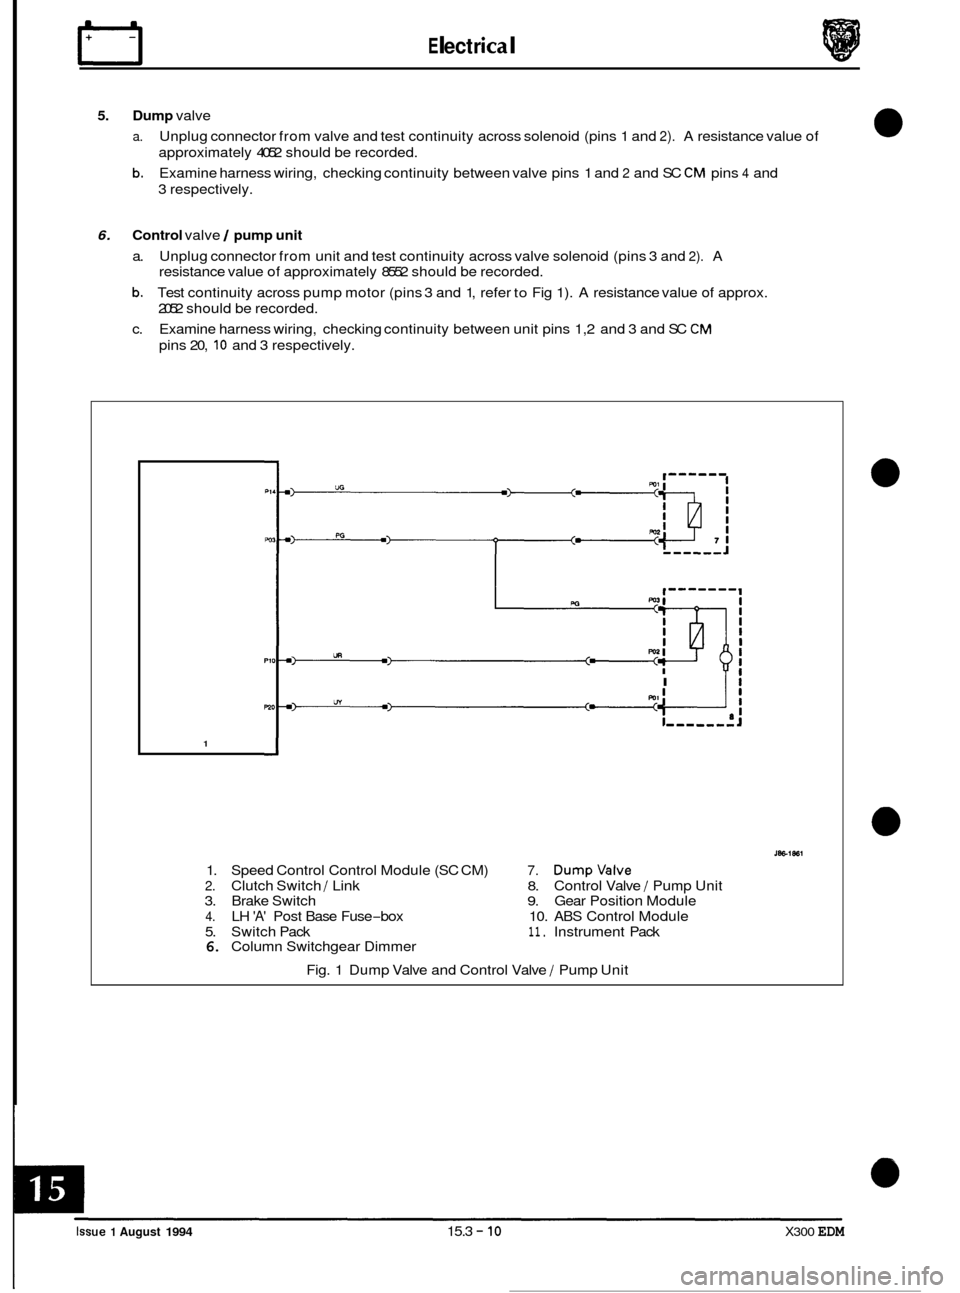
5. Dump valve
a.
b.
Unplug connector from valve and test continuity across solenoid (pins 1 and 2). A resistance value of
approximately 4052 should be recorded.
Examine harness wiring, checking continuity between valve pins 1 and
2 and SC CM pins 4 and
3 respectively.
6. Control valve / pump unit
a. Unplug connector from unit and test continuity across valve solenoid (pins 3 and 2). A
resistance value of approximately 8552 should be recorded.
b. Test continuity across pump motor (pins 3 and 1, refer to Fig 1). A resistance value of approx.
2052 should be recorded.
c. Examine harness wiring, checking continuity between unit pins 1,2 and 3 and SC
CM
pins 20, 10 and 3 respectively.
I Ii
1
1. Speed Control Control Module (SC CM) 7. Dumpvalve
2. Clutch Switch / Link 8. Control Valve / Pump Unit
3. Brake Switch 9. Gear Position Module
4. LH 'A' Post Base Fuse-box 10. ABS Control Module
5. Switch Pack
11. Instrument Pack 6. Column Switchgear Dimmer
Fig. 1 Dump Valve and Control Valve
/ Pump Unit
0
0
0
0
Issue 1 August 1994 15.3 - 10 X300 EDM
Page 188 of 327

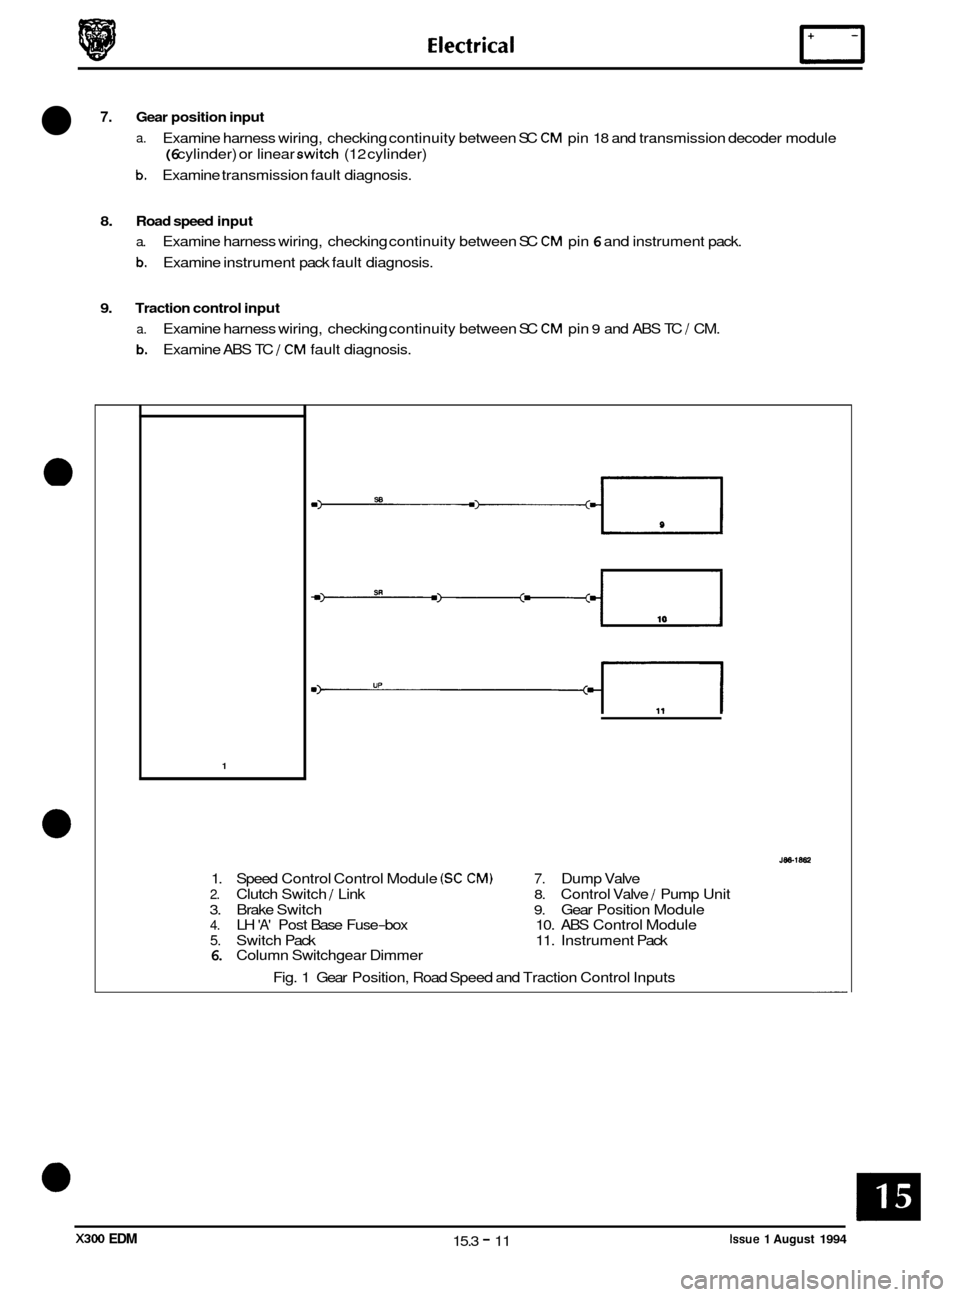
7. Gear position input
a. Examine harness wiring, checking continuity between SC CM pin 18 and transmission decoder module
(6 cylinder) or linear switch (12 cylinder)
b. Examine transmission fault diagnosis.
8. Road speed input
a. Examine harness wiring, checking continuity between SC CM pin 6 and instrument pack.
b. Examine instrument pack fault diagnosis.
9. Traction control input
a.
b.
Examine harness wiring, checking continuity between SC CM pin 9 and ABS TC J CM.
Examine ABS TC
J CM fault diagnosis.
1
1. Speed Control Control Module (SC CM) 7. Dump Valve
2. Clutch Switch J Link 8. Control Valve / Pump Unit
3. Brake Switch
9. Gear Position Module 4. LH 'A' Post Base Fuse-box 10. ABS Control Module
5. Switch Pack 11. Instrument Pack 6. Column Switchgear Dimmer
Fig. 1 Gear Position, Road Speed and Traction Control Inputs
Issue 1 August 1994 15.3 - 11 X300 EDM
Page 200 of 327

15.4.1.4 Remote Recall
Remote activation of memory positions 1 and 2 can be achieved using the key fob transmitters (one per set of keys).
lfthe vehicle is unlocked using the remote transmitter the stored driving position will be adopted automatically. If the
vehicle is unlocked using the remote transmitter and an exit position is already set the corresponding entry position
will be adopted until the ignition key is inserted, the stored driving position will then be restored. 0 ~
15.4.1.5
Reverse Mirror Dip
On selection of reverse gear and operation of the mirror toggle switch downwards, the passenger side rear view mirror
will automatically tilt downwards to assist reverse parking. Upward adjustment disables reverse dip, a further down- ward adjustment when still in reverse gear reinstates reverse dip. The mirror will return to normal position when any
other gear position is selected.
15.4.2 SYSTEM COMPONENTS
15.4.2.1 Seats
- Driver and Passenger
The driver and passenger seat adjustment systems comprises the following components:
o Fore / aft motor
o Front raise / lower motor
o Rear raise / lower motor
0 Squab recline motor
0 Headrest motor
0 Lumbarpump
0 Squab heater
0 Inner cushion heater
0 Outer cushion heater
0 Heater thermostat
0 Switch pack
o Seat Control Module (SCM)
o Wiring harness
15.4.2.2 Motors
The five seat position adjustment motors are located below the seat cushions (horizontal and vertical adjustment) and
behind the squab (recline and headrest adjustment). Each motor unit incorporates a potentiometer which provides
directional movement position control via feedbackvoltage variations to the SCM. Positional variations are activated
by the SCM in response to signals from switches mounted on the seat switch pack.
15.4.2.3 Lumbar Pump
The lumbar pump, located behind the seat squab allows adjustment of seat rigidity by increasing/decreasing air pres- sure in the lumbar pad. The pump motor is controlled from a switch on theseat switch pack and governed by an in-line
pressure switch.
A solenoid valve is used to regulate air flow to the lumbar pad.
15.4.2.4 Heaters and Thermostats
The two cushion heaters and squab heater are regulated by a single in-line thermostat and operated by a switch
mounted on thecenter console switch pack. Operation of this switch causesthe Body Processor Unit (BPU) to energize a timed input to SCM (for 11 minute f 1) which in turn causes SCM to energize the heater supply. The supply will
remain on until timed out, although the heater circuit will be broken by the thermostat if the set temperature is ex- ceeded.
Note: Heatingcan only occur when the ignition switch is position I1 and the ambient temperature is belowthe thermo- stat pre-set value of 26°C.
X300 EDM 15.4 - 3 Issue 1 August 1994
Page 214 of 327

Electrical rl
15.4.8 DlAG NOSTIC SUB-ROU T1 NES
0
The following information details possible fault conditions, causes and remedies. Detail test procedures for compo-
nents are covered in 'PIN-POINT TESTS' (Sub-Section 15.4.9).
Fault:
Possible causes:
Remedy:
Fault: Possible causes:
Remedy:
0
Fault:
Possible causes:
Remedy:
Fault:
Possible causes:
Remedy: Driver's
seat adjustment inoperative
1.
2.
3. Mechanical mechanism fault.
1.
2.
3.
No power supply to SCM.
Wiring harness or connectors faulty.
Check fuses
in 'A' post base fuse boxes.
Check harness and connectors between
SCM -fuse box,
SCM
-switch pack and SCM - motors.
Identify and repair mechanical faults.
Seat positional adjustment restricted
1.
2. Motor faulty.
3. Switch faulty.
4. Mechanical mechanism fault.
5. SCM faulty.
1.
2. Renew motor.
3. Renew switch pack.
4.
5. SCM faulty.
Harness
wiring or connector fault.
Examine wiring and connectors between SCM
- switch
pack and SCM
- motors.
Identify and repair mechanical faults.
Seat lumbar pump only inoperative
1.
2.
3. Motor faulty.
4. Switch faulty.
5. Mechanical mechanism
fault.
1.
2.
3. Renew motor.
4. Renew switch.
5. No
power supply to SCM.
Harness wiring or connector fault.
Check fuses in
'A' post base fuse boxes.
Examine wiring and connectors between SCM
- switch
pack and SCM
- motors.
Identify and repair mechanical faults.
Seat heaters only inoperative
1.
2.
3. Heater element faulty.
4. Heater thermostat faulty.
5. Heater switch faulty.
6. Body processor signal fault.
1.
2.
3.
4. Renew faulty switch.
5.
No power supply to SCM.
Wiring harness or connectors faulty.
Check fuses in
'A' post base fuse boxes.
Examine harness and connectors between SCM
- heater
circuit and SCM
- BPU.
Locate and renew faulty heater and thermostat unit.
Refer to BPU fault diagnosis.
X300 EDM 15.4 - 17 Issue 1 August 1994