1993 DODGE TRUCK brake fluid
[x] Cancel search: brake fluidPage 236 of 1502
•
BRAKES
5 - 49 (2) Adjust brake shoes to drum with a brake
gauge. (3) Install and secure drum to wheel studs with
new retaining nuts/clips.
(4) Install rubber access plugs in support plate if
removed.
(5) Install wheel and tire.
BRAKE
SUPPORT PLATE REMOVAL
(1) Remove wheel and tire and brake drum.
(2) Remove axle shaft and retainer. Refer to Group
3 for procedures. (3) Remove primary brakeshoe for access to park
ing brake cable if necessary. (4) Compress parking brake cable retainer tabs
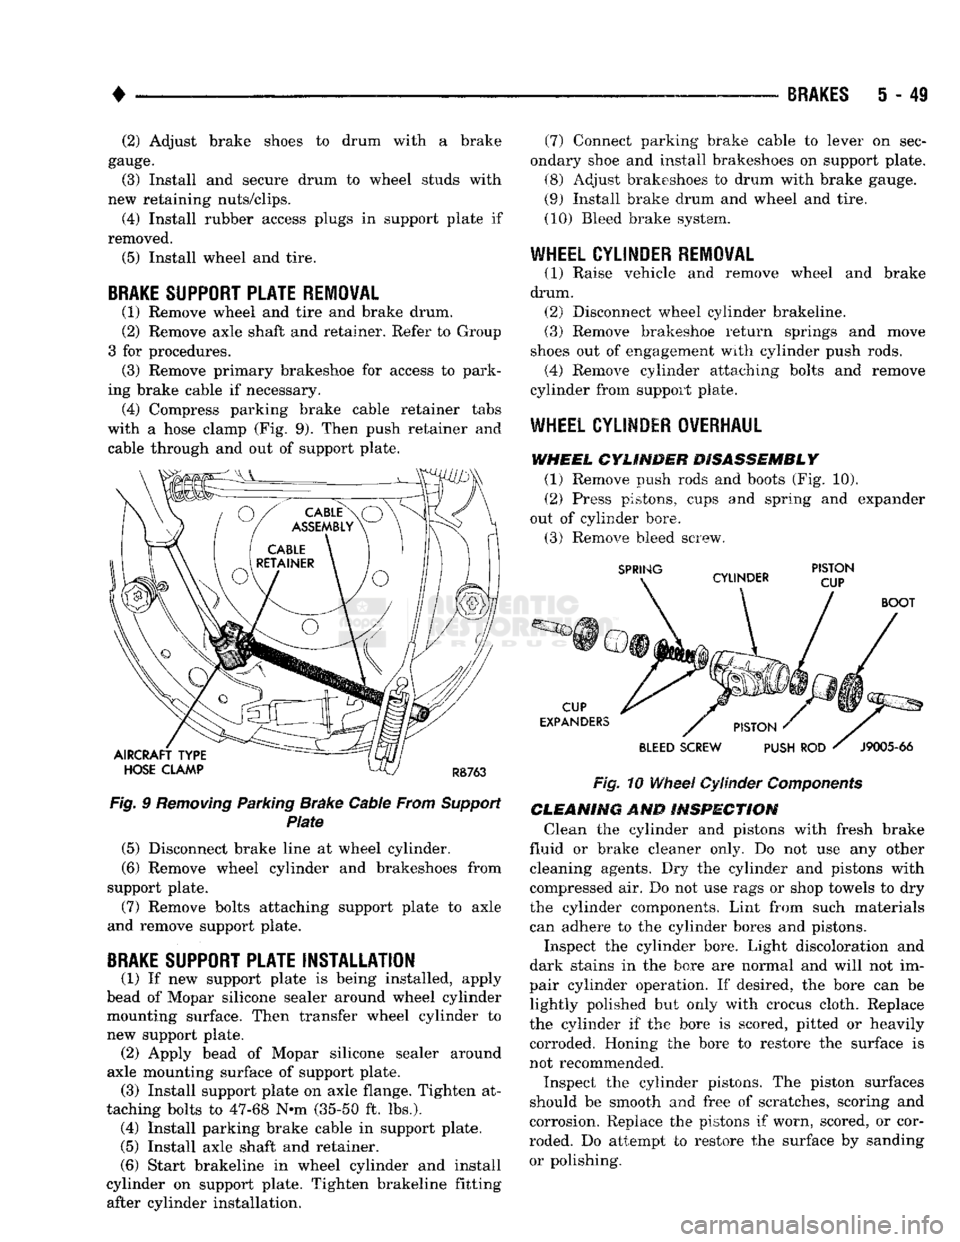
with a hose clamp (Fig. 9). Then push retainer and cable through and out of support plate.
AIRCRAFT TYPE
HOSE
CLAMP
RB763
Fig.
9
Removing
Parking Brake Cable From
Support
Plate
(5) Disconnect brake line at wheel cylinder.
(6) Remove wheel cylinder and brakeshoes from
support plate.
(7) Remove bolts attaching support plate to axle
and remove support plate.
BRAKE
SUPPORT PLATE INSTALLATION
(1) If new support plate is being installed, apply
bead of Mopar silicone sealer around wheel cylinder mounting surface. Then transfer wheel cylinder to
new support plate. (2) Apply bead of Mopar silicone sealer around
axle mounting surface of support plate. (3) Install support plate on axle flange. Tighten at
taching bolts to 47-68 N-m (35-50 ft. lbs.). (4) Install parking brake cable in support plate.
(5) Install axle shaft and retainer.
(6) Start brakeline in wheel cylinder and install
cylinder on support plate. Tighten brakeline fitting after cylinder installation. (7) Connect parking brake cable to lever on sec
ondary shoe and install brakeshoes on support plate.
(8) Adjust brakeshoes to drum with brake gauge.
(9) Install brake drum and wheel and tire.
(10) Bleed brake system.
WHEEL CYLINDER REMOVAL
(1) Raise vehicle and remove wheel and brake
drum. (2) Disconnect wheel cylinder brakeline.
(3) Remove brakeshoe return springs and move
shoes out of engagement with cylinder push rods. (4) Remove cylinder attaching bolts and remove
cylinder from support plate.
WHEEL
CYLINDER OVERHAUL
WHEEL
CYLINDER DISASSEMBLY
(1) Remove push rods and boots (Fig. 10).
(2) Press pistons, cups and spring and expander
out of cylinder bore.
(3) Remove bleed screw.
SPRING
CYLINDER PISTON
CUP
CUP
EXPANDERS
BOOT
PISTON
'
BLEED
SCREW PUSH
ROD '
J9005-66
Fig.
10
Wheel
Cylinder
Components
CLEANING
AND
INSPECTION
Clean the cylinder and pistons with fresh brake
fluid or brake cleaner only. Do not use any other cleaning agents. Dry the cylinder and pistons with
compressed air. Do not use rags or shop towels to dry
the cylinder components. Lint from such materials
can adhere to the cylinder bores and pistons.
Inspect the cylinder bore. Light discoloration and
dark stains in the bore are normal and will not im
pair cylinder operation. If desired, the bore can be lightly polished but only with crocus cloth. Replace
the cylinder if the bore is scored, pitted or heavily
corroded. Honing the bore to restore the surface is
not recommended.
Inspect the cylinder pistons. The piston surfaces
should be smooth and free of scratches, scoring and
corrosion. Replace the pistons if worn, scored, or cor
roded. Do attempt to restore the surface by sanding or polishing.
Page 237 of 1502
5
- 50
BRAKES
• Discard
the old
piston cups
and the
spring
and ex
pander. These parts
are not
reusable.
The
original
dust boots
may be
reused
but
only
if
they
are in
good condition.
ASSEMBLING
WHEEL
CYLINDER
(1) Lubricate wheel cylinder bore, pistons, piston
cups
and
spring
and
expander with clean brake fluid. (2) Install first piston
in
cylinder bore. Then
in
stall
cup in
bore
and
against piston.
Be
sure
lip of
piston
cup is
facing inward (toward spring
and
expander)
and
flat side
is
against piston.
(3) Install spring
and
expanders followed
by re
maining piston
cup and
piston.
(4) Install boots
on
each
end of
cylinder
and
insert
push rods
in
boots.
(5)
Install cylinder bleed screw.
WHEEL
CYLINDER INSTALLATION
(1) Apply bead
of
Mopar silicone sealer around cyl
inder mounting surface
of
support plate. (2) Connect brake line
to
cylinder. Mount cylinder
on support plate
and
install cylinder attaching bolts. (3) Install wheel brake components.
(4) Install brake drum
and
wheel
and
bleed
brakes.
DRUM
BRAKES—TWELVE INCH
INDEX
page
Brake Drum
Installation
54
Brake Drum Removal
52
Brake Drum Service
54
Brake
Shoe
Installation
53
Brakeshoe
Removal
52
Cleaning
and
Inspection
52
GENERAL
INFORMATION
Twelve inch rear drum brakes
are
used
on D and
W 250/350 models
(Fig. 1). All
applications
are
dual
shoe,
internal expanding units with
a
self adjusting
mechanism.
A
single wheel cylinder
is
used
to ex-
page
General
Information
50
Support
Plate
Installation
55
Support
Plate
Removal
55
Wheel
Cylinder
Installation
55
Wheel
Cylinder
Overhaul
...................
54
Wheel
Cylinder
Removal
. 54
pand
the
dual brakeshoes.
The
lower ends
of the
brake shoes
are
connected
by a
star wheel adjuster screw which
is
part
of the
self adjusting mechanism
(Fig.
1).
Page 241 of 1502
5
- 54
BRAKES
• (11) Attach adjuster cable to adjuster lever. Be
sure cable is properly routed.
(12) Adjust brakeshoes to drum with brake gauge.
BRAKE
DRUM INSTALLATION
(1) Position drum on axle housing.
(2) Install bearing and inner nut. Adjust bearing
as described in Group 3. (3) Install locking washer and outer nut. Bend
locking washer to secure it. (4) Place new gasket on hub and install axle shaft,
cones,
lock washers and nuts. (5) Install wheel and tire assembly.
(6) Remove support stands and lower vehicle.
BRAKE
DRUM
SERVICE
BRAKE DRUM REFINISHING The brake drums can be resurfaced on a drum
lathe when necessary. Initial machining cuts should
be limited to 0.12 - 0.20 mm (0.005 - 0.008 in.) at a time as heavier feed rates can produce taper and sur
face variation. Final finish cuts of 0.025 to 0.38 mm (0.001 to 0.0015 in) are recommended and will gen
erally provide the best surface finish.
Be sure the drum is securely mounted in the lathe
before machining operations. A damper strap should always be used around the drum to reduce vibration
and avoid chatter marks.
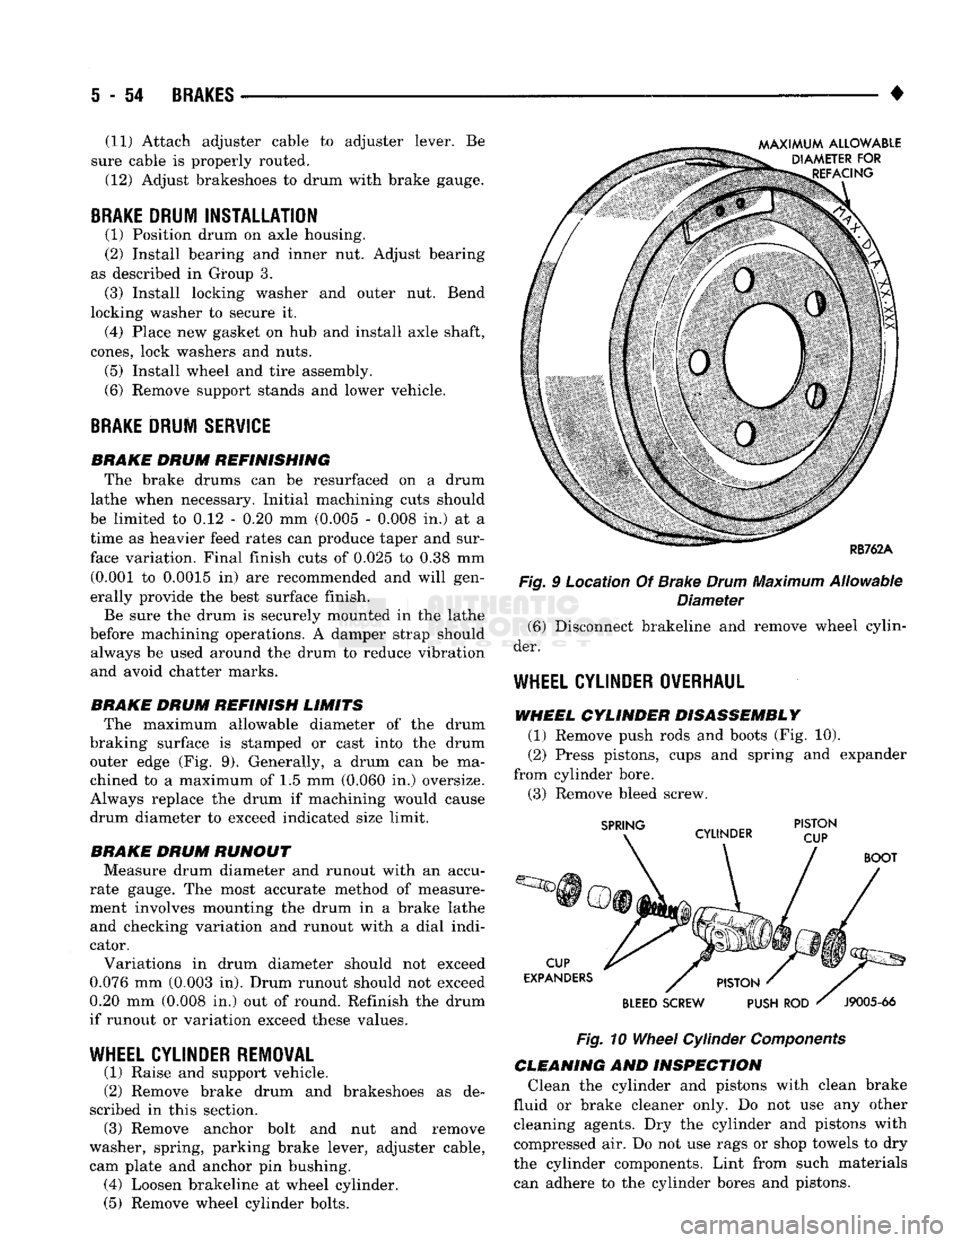
BRAKE DRUM REFINISH LIMITS The maximum allowable diameter of the drum
braking surface is stamped or cast into the drum outer edge (Fig. 9). Generally, a drum can be ma
chined to a maximum of 1.5 mm (0.060 in.) oversize.
Always replace the drum if machining would cause
drum diameter to exceed indicated size limit.
BRAKE DRUM RUNOUT Measure drum diameter and runout with an accu
rate gauge. The most accurate method of measure
ment involves mounting the drum in a brake lathe and checking variation and runout with a dial indi
cator.
Variations in drum diameter should not exceed
0.076 mm (0.003 in). Drum runout should not exceed
0.20 mm (0.008 in.) out of round. Refinish the drum
if runout or variation exceed these values.
WHEEL
CYLINDER REMOVAL
(1) Raise and support vehicle.
(2) Remove brake drum and brakeshoes as de
scribed in this section. (3) Remove anchor bolt and nut and remove
washer, spring, parking brake lever, adjuster cable, cam plate and anchor pin bushing. (4) Loosen brakeline at wheel cylinder.
(5) Remove wheel cylinder bolts. Fig. 9 Location Of Brake
Drum
Maximum Allowable
Diameter (6) Disconnect brakeline and remove wheel cylin
der.
WHEEL
CYLINDER OVERHAUL
WHEEL CYLINDER DISASSEMBLY (1) Remove push rods and boots (Fig. 10).
(2) Press pistons, cups and spring and expander
from cylinder bore. (3) Remove bleed screw.
Fig.
10
Wheel
Cylinder
Components
CLEANING AND INSPECTION Clean the cylinder and pistons with clean brake
fluid or brake cleaner only. Do not use any other cleaning agents. Dry the cylinder and pistons with
compressed air. Do not use rags or shop towels to dry
the cylinder components. Lint from such materials can adhere to the cylinder bores and pistons.
Page 242 of 1502
•
BRAKES
5 - 55 Inspect the cylinder bore. Light discoloration and
dark stains in the bore are normal and will not im
pair cylinder operation. If desired, the bore can be lightly polished but only with crocus cloth. Replace
the cylinder if the bore is scored, pitted or heavily corroded. Honing the bore to restore the surface is not recommended.
Inspect the cylinder pistons. The piston surfaces
should be smooth and free of scratches, scoring and
corrosion. Replace the pistons if worn, scored, or cor
roded. Do attempt to restore the surface by sanding or polishing.
Discard the old piston cups and the spring and ex
pander. These parts are not reusable. The original
dust boots may be reused but only if they are in good condition.
ASSEMBLING
WHEEL CYLINDER
(1) Lubricate wheel cylinder bore, pistons, piston
cups and spring and expander with ^clean brake fluid. (2) Install first piston in cylinder bore. Then in
stall cup in bore and against piston. Be sure lip of
piston cup is facing inward (toward spring and
expander) and flat side is against piston.
(3) Install spring and expanders followed by re
maining piston cup and piston.
(4) Install boots on each end of cylinder and insert
push rods in boots.
(5)
Install cylinder bleed screw.
WHEEL
CYLINDER INSTALLATION
(1) Start brakeline into cylinder.
(2) Position cylinder on support plate and install
cylinder attaching bolts. (3) Tighten brakeline fitting and cylinder attach
ing bolts. (4) Install anchor pin bushing, cam plate, adjuster
cable, parking brake lever, spring washer and anchor
bolt and nut.
(5) Install brakeshoes and brake drum as described
in this section. (6) Install axle shaft.
(7) Install wheel and tire.
(8) Remove supports and lower vehicle.
SUPPORT
PLATE REMOVAL
(1) Raise and support vehicle.
(2) Remove wheel and tire.
(3) Remove axle shaft.
(4) Remove brake drum, brake shoes and wheel
cylinder as described in this section. (5) Remove bolts/nuts attaching support plate to
axle and remove support plate.
SUPPORT PLATE INSTALLATION
(1) Transfer wheel cylinder and parking brake le
ver components to replacement support plate. (2) Position support plate on axle and install at
taching bolts/nuts. (3) Lubricate shoe contact surfaces of support plate
with Mopar multi-purpose, or high temperature bear ing grease. (4) Install brakeshoes. Adjust shoes to drum with
brake gauge. (5) Install brake drum.
(6) Install axle shaft.
(7) Install wheel and tire.
(8) Remove supports and lower vehicle.
Page 246 of 1502
•
BRAKES
5 - 59
REAR
WHEEL
ANTILOCK
(RWAL) BRAKES
page
Antilock
Component Service
63
Antilock
Service Diagnosis
62
Checking
Speed
Sensor
Air
Gap .............
64
Clearing
A
Fault
Code .....................
63
Electronic
Control
Module Replacement
........
64
Fault Code Capacity
62
Fault Code
Identification
62
page
General
Information
59
Hydraulic Valve Replacement
63
Speed
Sensor
Replacement
................
64
System
Components
......................
59
System
Fault
Codes
......................
62
System
Operation
61
GENERAL
INFORMATION
A rear wheel antilock brake system
is
standard
equipment
on all AD
models.
It is an
electronically operated system designed
to
retard rear wheel lockup
during periods
of
high wheel slip
and
deceleration.
Retarding lockup
is
accomplished
by
modulating
fluid pressure
to the
rear brake units. Rear brake fluid apply pressure
is
modulated
ac
cording
to
wheel speed, degree
of
wheel slip
and
rate
of deceleration.
A
sensor located
in the
rear axle
housing converts differential rotating speed into elec
tronic signals.
The
signals
are
transmitted
to the
electronic brake control module
for
processing.
The
control unit determines rate
of
deceleration
and
wheel slip from these signals.
SYSTEM
COMPONENTS
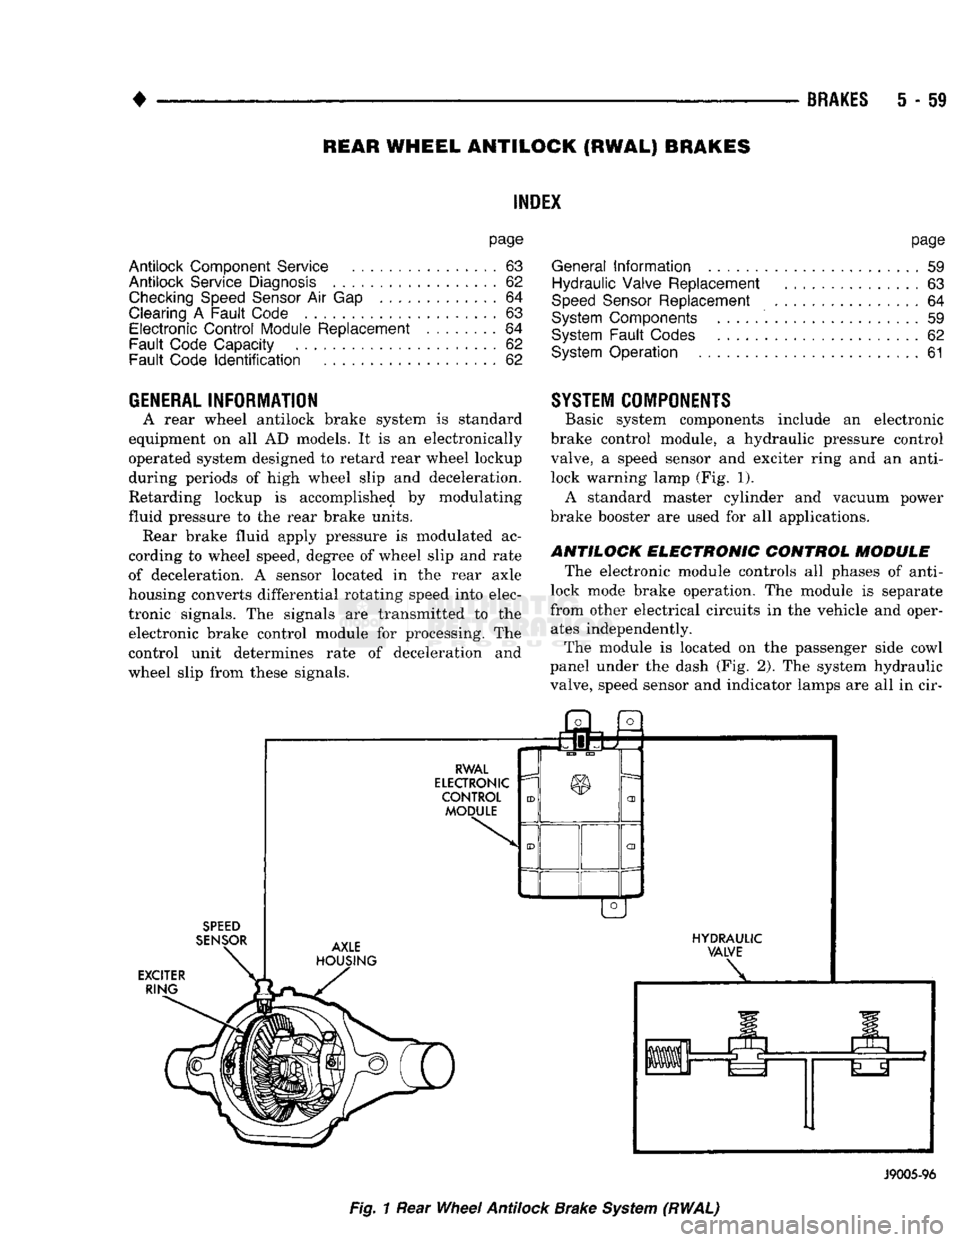
Basic system components include
an
electronic
brake control module,
a
hydraulic pressure control
valve,
a
speed sensor
and
exciter ring
and an
anti- lock warning lamp (Fig.
1).
A standard master cylinder
and
vacuum power
brake booster
are
used
for all
applications.
ANTILOCK ELECTRONIC CONTROL MODULE
The electronic module controls
all
phases
of
anti-
lock mode brake operation.
The
module
is
separate
from other electrical circuits
in the
vehicle
and
oper ates independently.
The module
is
located
on the
passenger side cowl
panel under
the
dash
(Fig.
2).
The
system hydraulic
valve, speed sensor
and
indicator lamps
are all in cir-
SPEED
SENSOR
EXCITER RING j3l
a
RWAL
ELECTRONIC
CONTROL MODULE AXLE
HOUSING HYDRAULIC
VALVE
J9005-96
Fig.
1
Rear
Wheel
Antilock
Brake
System
(RWAL)
Page 247 of 1502
5
- 60
BRAKES
Fig.
2
Antilock
Electronic Control
Module
RWAL
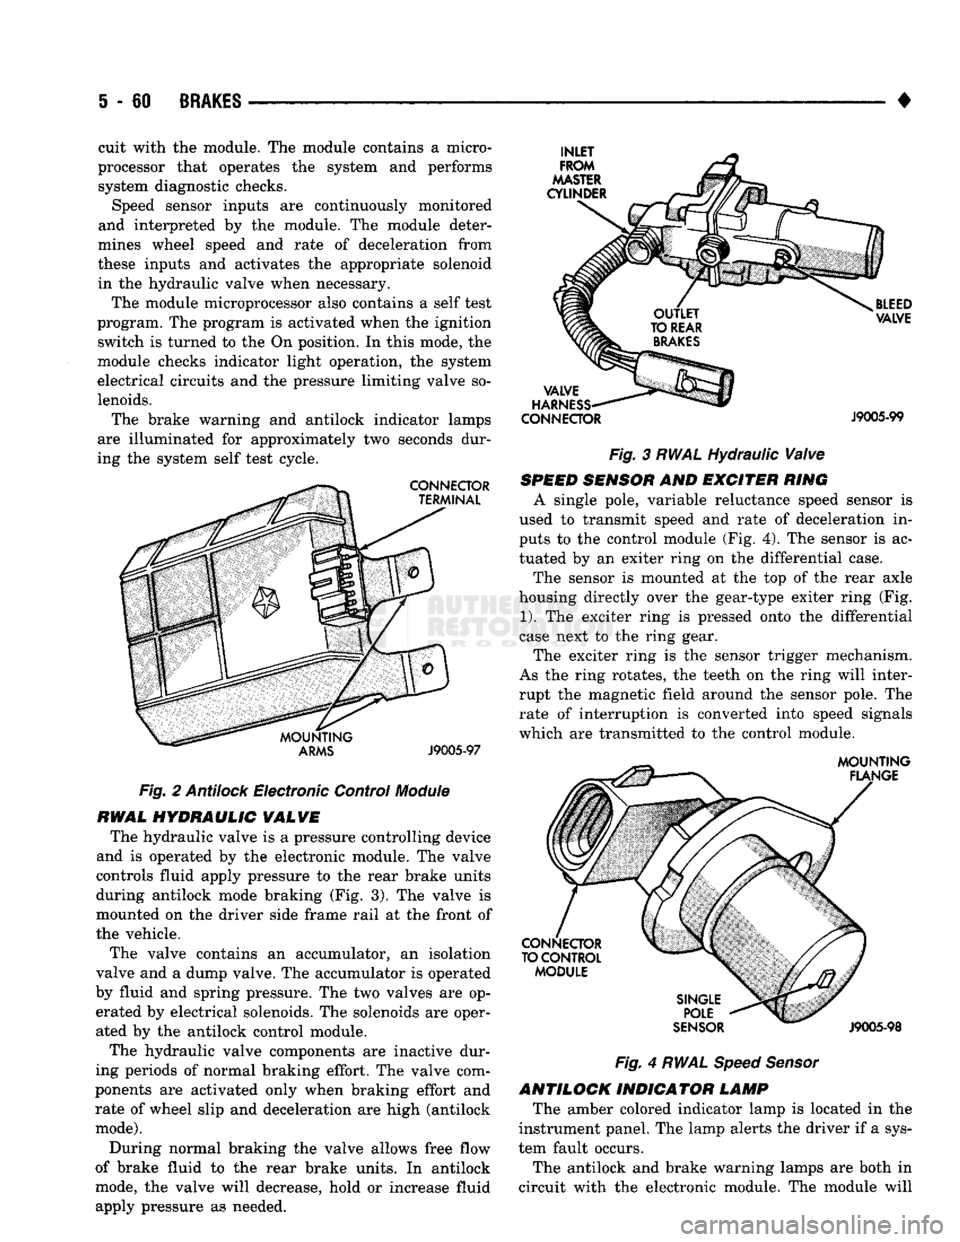
HYDRAULIC
VALVE
The hydraulic valve is a pressure controlling device
and is operated by the electronic module. The valve
controls fluid apply pressure to the rear brake units
during antilock mode braking (Fig. 3). The valve is
mounted on the driver side frame rail at the front of
the vehicle.
The valve contains an accumulator, an isolation
valve and a dump valve. The accumulator is operated
by fluid and spring pressure. The two valves are op erated by electrical solenoids. The solenoids are oper
ated by the antilock control module.
The hydraulic valve components are inactive dur
ing periods of normal braking effort. The valve com
ponents are activated only when braking effort and rate of wheel slip and deceleration are high (antilock
mode).
During normal braking the valve allows free flow
of brake fluid to the rear brake units. In antilock
mode, the valve will decrease, hold or increase fluid
apply pressure as needed. •
CONNECTOR
J9005-99
Fig. 3 RWAL Hydraulic Valve
SPEED
SENSOR
AND EXCITER RING
A single pole, variable reluctance speed sensor is
used to transmit speed and rate of deceleration in
puts to the control module (Fig. 4). The sensor is ac
tuated by an exiter ring on the differential case.
The sensor is mounted at the top of the rear axle
housing directly over the gear-type exiter ring (Fig.
1).
The exciter ring is pressed onto the differential
case next to the ring gear.
The exciter ring is the sensor trigger mechanism.
As the ring rotates, the teeth on the ring will inter
rupt the magnetic field around the sensor pole. The rate of interruption is converted into speed signals
which are transmitted to the control module.
Fig.
4
RWAL Speed Sensor
ANTILOCK INDICATOR LAMP The amber colored indicator lamp is located in the
instrument panel. The lamp alerts the driver if a sys
tem fault occurs.
The antilock and brake warning lamps are both in
circuit with the electronic module. The module will
cuit with the module. The module contains a micro
processor that operates the system and performs system diagnostic checks. Speed sensor inputs are continuously monitored
and interpreted by the module. The module deter
mines wheel speed and rate of deceleration from
these inputs and activates the appropriate solenoid in the hydraulic valve when necessary.
The module microprocessor also contains a self test
program. The program is activated when the ignition switch is turned to the On position. In this mode, the
module checks indicator light operation, the system
electrical circuits and the pressure limiting valve so
lenoids.
The brake warning and antilock indicator lamps
are illuminated for approximately two seconds dur
ing the system self test cycle.
Page 248 of 1502
•
BRAKES
5 - 61 cause the two lamps to illuminate or flash to alert
the driver that system operation is either normal or
that a fault has occurred.
SYSTEM
OPERATION
During light brake applications, rear wheel decel
eration and/or slip is not sufficient to activate the an
tilock system. Brake fluid apply pressure at the rear
wheels is normal. However, when braking effort, de gree of wheel slip and rate of deceleration approach
programmed limits, sensor inputs will cause the module to activate the system.
Normal
Braking
Mode
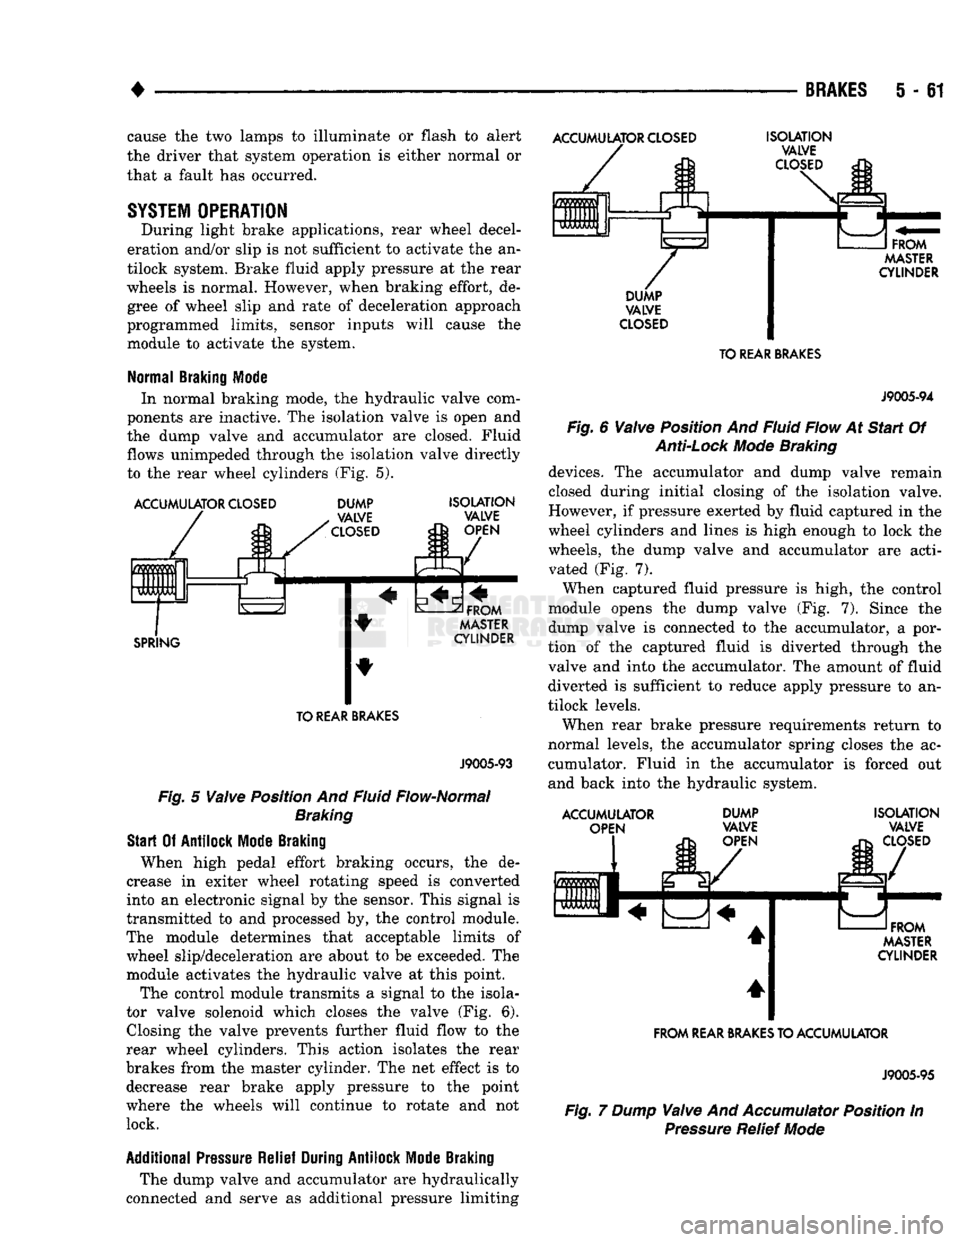
In normal braking mode, the hydraulic valve com
ponents are inactive. The isolation valve is open and
the dump valve and accumulator are closed. Fluid
flows unimpeded through the isolation valve directly
to the rear wheel cylinders (Fig. 5).
ACCUMULATOR
CLOSED
ACCUMULATOR
CLOSED
0 m
m
0 UUb Ft
L DUMP
VALVE
CLOSED
SPRING
ISOLATION
VALVE
OPEN
FROM
MASTER
CYLINDER TO
REAR
BRAKES
J9005-93
Fig.
5
Valve
Position And Fluid Flow-Normal
Braking
Start
Of
Antilock
Mode
Braking
When high pedal effort braking occurs, the de
crease in exiter wheel rotating speed is converted
into an electronic signal by the sensor. This signal is
transmitted to and processed by, the control module.
The module determines that acceptable limits of wheel slip/deceleration are about to be exceeded. The
module activates the hydraulic valve at this point.
The control module transmits a signal to the isola
tor valve solenoid which closes the valve (Fig. 6). Closing the valve prevents further fluid flow to the
rear wheel cylinders. This action isolates the rear
brakes from the master cylinder. The net effect is to decrease rear brake apply pressure to the point
where the wheels will continue to rotate and not lock.
Additional
Pressure
Relief
During
Antilock
Mode
Braking
The dump valve and accumulator are hydraulically
connected and serve as additional pressure limiting
ISOLATION
VALVE
CLOSED
FROM
MASTER
CYLINDER
DUMP
VALVE
CLOSED
TO
REAR
BRAKES
J9005-94
Fig.
6
Valve
Position And Fluid Flow At
Start
Of
Anti-Lock
Mode
Braking
devices. The accumulator and dump valve remain
closed during initial closing of the isolation valve.
However, if pressure exerted by fluid captured in the
wheel cylinders and lines is high enough to lock the
wheels, the dump valve and accumulator are acti vated (Fig. 7).
When captured fluid pressure is high, the control
module opens the dump valve (Fig. 7). Since the
dump valve is connected to the accumulator, a por
tion of the captured fluid is diverted through the
valve and into the accumulator. The amount of fluid diverted is sufficient to reduce apply pressure to an
tilock levels.
When rear brake pressure requirements return to
normal levels, the accumulator spring closes the ac cumulator. Fluid in the accumulator is forced out
and back into the hydraulic system.
ACCUMULATOR OPEN DUMP
VALVE
OPEN ISOLATION
VALVE
CLOSED
FROM
MASTER
CYLINDER
FROM
REAR
BRAKES
TO ACCUMULATOR
J9005-95
Fig.
7 Dump
Valve
And
Accumulator
Position In
Pressure
Relief
Mode
Page 249 of 1502
i - 62
BRAKES
•
Isolation/Dump
Valve Cycle Times
Activation (opening/closing) of the isolation and
dump valves is continuous during antilock operation.
The valves cycle rapidly in response to speed sensor inputs and control module signal commands. Cycle
times are measured in milliseconds.
As the demand for antilock mode brake operation
is decreased, the module deactivates the hydraulic
valve components to restore normal brake operation.
ANTILOCK
SERVICE
DIAGNOSIS
GENERAL INFORMATION An antilock system malfunction will be indicated
by illumination of the amber antilock warning lamp.
The red brake warning lamp may also illuminate.
If a problem occurs, system diagnosis should begin
with a fluid level check followed by a visual exami
nation of the system electrical and hydraulic connec
tions.
If obvious defects (low fluid, leaks, loose connections, etc.) are not evident, road test the vehi
cle.
A road test should help determine if a malfunc
tion is actually related to an antilock component.
During the road test, note if other conditions are
evident such as a low pedal, pull, grab, or similar condition. Remember that brake malfunctions such as low fluid, system leaks, parking brakes partially
applied, will also affect the antilock system. The idea
is to determine if a malfunction is actually related to
an anti-lock component.
If a road test does reveal a problem, repeat the
road test with the owner driving. Make sure the owner is not riding the brake pedal, or has forgotten
to release the parking brakes. Either situation will
generate a fault and cause the antilock light to illu
minate.
SYSTEM FAULT
CODES
The antilock control module generates flash codes
to help identify the cause of an antilock system fault. Two different control modules are used with the
1992/1993 RWAL system. A type I module is used in
some early production models. All remaining produc
tion models are equipped with a type II module. The type I and II modules are identified by the way
fault codes 9 and 11 are processed. If the vehicle has a type I module, codes 9 and 11 are not erased when
the ignition switch is turned to Off position. If the vehicle has a type II module, codes 9 and 11 are
erased when the switch is turned to Off.
FAULT CODES WITH TYPE I CONTROL
MODULE
The microprocessor in the electronic control module
has a memory and a self test feature. The self test
feature is activated whenever the ignition switch is
turned to Accessory or Run position. If a system fault is detected, the control module il
luminates the antilock light and stores the fault code
in memory. Fault codes are retained in memory even after turning the ignition switch to Off position.
FAULT CODES WITH TYPE II CONTROL
MODULE The microprocessor in the electronic control module
has a memory and a self test feature. The self test
feature is activated whenever the ignition switch is
turned to Accessory or Run position.
If a system fault is detected, the control module
will illuminate the antilock indicator lamp and store
fault codes 1 through 8, 10 and 12 through 15 in the
microprocessor memory. When one of these fault
codes is generated, the control module will retain the code after the ignition switch is turned to the Off po
sition.
When fault code 9 is generated, the code only re
mains in microprocessor memory while the ignition switch is in Run position. Turning the ignition
switch to Off position erases fault code 9. However, if
the problem still exists when the switch is turned
back to Run position, code 9 will reappear in memory after 20 seconds and the antilock light will illumi
nate once again.
When fault code 11 is generated, the antilock light
will illuminate when vehicle speed exceeds approxi mately 60.35 km/h (37.5 mph). Code 11 only remains in memory while the ignition switch is in the Run
position and the fault is present.
When the cause of a fault code 11 is corrected, the
antilock light goes off. Code 11 is erased when the ig
nition switch is turned to Off position. However, if
the problem cause still exists when the ignition switch is turned to Run position, code 11 will reap
pear when vehicle speed exceeds approximately 60.35 km/h (37.5 mph).
FAULT
CODE
CAPACITY
The microprocessor memory will store and display
only one fault code at a time. The stored code can be
displayed by grounding the RWAL diagnostic connec
tor.
FAULT
CODE
IDENTIFICATION
To determine what the fault code is, momentarily
ground the RWAL diagnostic connector and count
the number of times the amber antilock lamp flashes. Fault codes and typical malfunctions are outlined in Figure 8. Note that when a fault code is gen
erated, the red brake warning lamp will also
illuminate. The initial flash will be a long flash followed by a
number of short flashes. The long flash indicates the
beginning of the fault number sequence and the short flashes are a continuation of that sequence.