1993 DODGE TRUCK wheel torque
[x] Cancel search: wheel torquePage 191 of 1502
5
- 4
BRAKES
• (3) During road test, make normal and firm brake
stops in 25-40 mph (40-64 Km/h) range. Note faulty
brake operation such as pull, grab, drag, noise, low
pedal, etc.
(4) Inspect suspect brake components and refer to
problem diagnosis information for causes of various
brake conditions.
COMPONENT
INSPECTION
Fluid leak points and dragging brake units can usu
ally be located without removing any components. The
area around a leak point will be wet with fluid. The
components at a dragging brake unit (wheel, tire, rotor)
will be quite warm or hot to the touch.
Other brake problem conditions will require compo
nent removal for proper inspection. Raise the vehicle and remove the necessary wheels for better visual ac
cess.
DIAGNOSING BRAKE
PROBLEMS
PEDAL FALLS
AWAY
A
brake pedal that falls away under steady foot
pressure is the result of a system leak. The leak
point could be at a brakeline, fitting, hose, or caliper. Internal leakage in the master cylinder caused by
worn or damaged piston cups, may also be the prob lem cause.
If leakage is severe, fluid will be evident at or around
the leaking component. However, internal leakage in
the master cylinder may not be physically evident. Re fer to the cylinder test procedure in this section.
LOW PEDAL
If a low pedal is experienced, pump the pedal sev
eral times. If the pedal comes back up, worn lining
and worn rotors or drums are the likely causes.
A decrease in fluid level in the master cylinder res
ervoirs may only be the result of normal lining wear.
Fluid level can be expected to decrease in proportion to wear. It is a result of the outward movement of
caliper and wheel cylinder pistons to compensate for
normal wear. Top off the reservoir fluid level and
check brake operation to verify proper brake action.
SPONGY PEDAL. A spongy pedal is most often caused by air in the sys
tem. Thin brake drums or substandard brake lines and
hoses can also cause a spongy pedal. The proper course
of action is to bleed the system and replace thin drums and suspect quality brake lines and hoses.
HARD PEDAL
OR
HIGH
PEDAL
EFFORT
A hard pedal or high pedal effort may be due to
lining that is water soaked, contaminated, glazed, or
badly worn. The power booster or check valve could also be faulty. On diesel engine models, high pedal effort may be
the result of a low vacuum condition. If the booster and check valve are OK, the problem may be related
to a vacuum pump hose, hose connection, hose fit
ting, pump diaphragm, or drive gear. Vacuum pump output can be checked with a standard vacuum
gauge. Vacuum output should range from 8.5 to 25 inches vacuum. If vacuum pump output is within
limits,
check the power booster and check valve as
described in this section.
BRAKE DRAG
Brake drag occurs when the lining is in constant
contact with the rotor or drum. Drag can occur at
one wheel, all wheels, fronts only, or rears only. It is a product of incomplete brakeshoe release. Drag can
be minor or severe enough to overheat the linings,
rotors and drums.
Brake drag can also effect fuel economy. If undetec
ted, minor brake drag can be misdiagnosed as an en gine or transmission/torque converter problem.
Minor drag will usually cause slight surface charring
of the lining. It can also generate hard spots in rotors and drums from the overheat-cool down process. In most
cases,
the rotors, drums, wheels and tires are quite
warm to the touch after the vehicle is stopped.
Severe drag can char the brake lining all the way
through. It can also distort and score rotors and drums to the point of replacement. The wheels, tires and brake components will be extremely hot. In se
vere cases, the lining may generate smoke as it chars
from overheating.
Some common causes of brake drag are:
• seized or improperly adjusted parking brake cables
• loose/worn wheel bearing
• seized caliper or wheel cylinder piston
• caliper binding on corroded bushings or rusted
slide surfaces
• loose caliper mounting bracket
• drum brakeshoes binding on worn or damaged sup
port plates
• misassembled components. If brake drag occurs at all wheels, the problem may
be related to a blocked master cylinder return port, or faulty power booster that binds and does not release.
BRAKE FADE
Brake fade is a product of overheating caused by
brake drag. However, brake overheating and subse quent fade can also be caused by riding the brake
pedal, making repeated high deceleration stops in a short time span, or constant braking on steep moun
tain roads. Refer to the Brake Drag information in
this section for additional causes.
PEDAL
PULSA
TION
Pedal pulsation is caused by components that are
loose, out of round, or worn beyond tolerance limits.
Page 196 of 1502
BRAKES
i - 9
Fig.
4 Metering
Valve
Hold
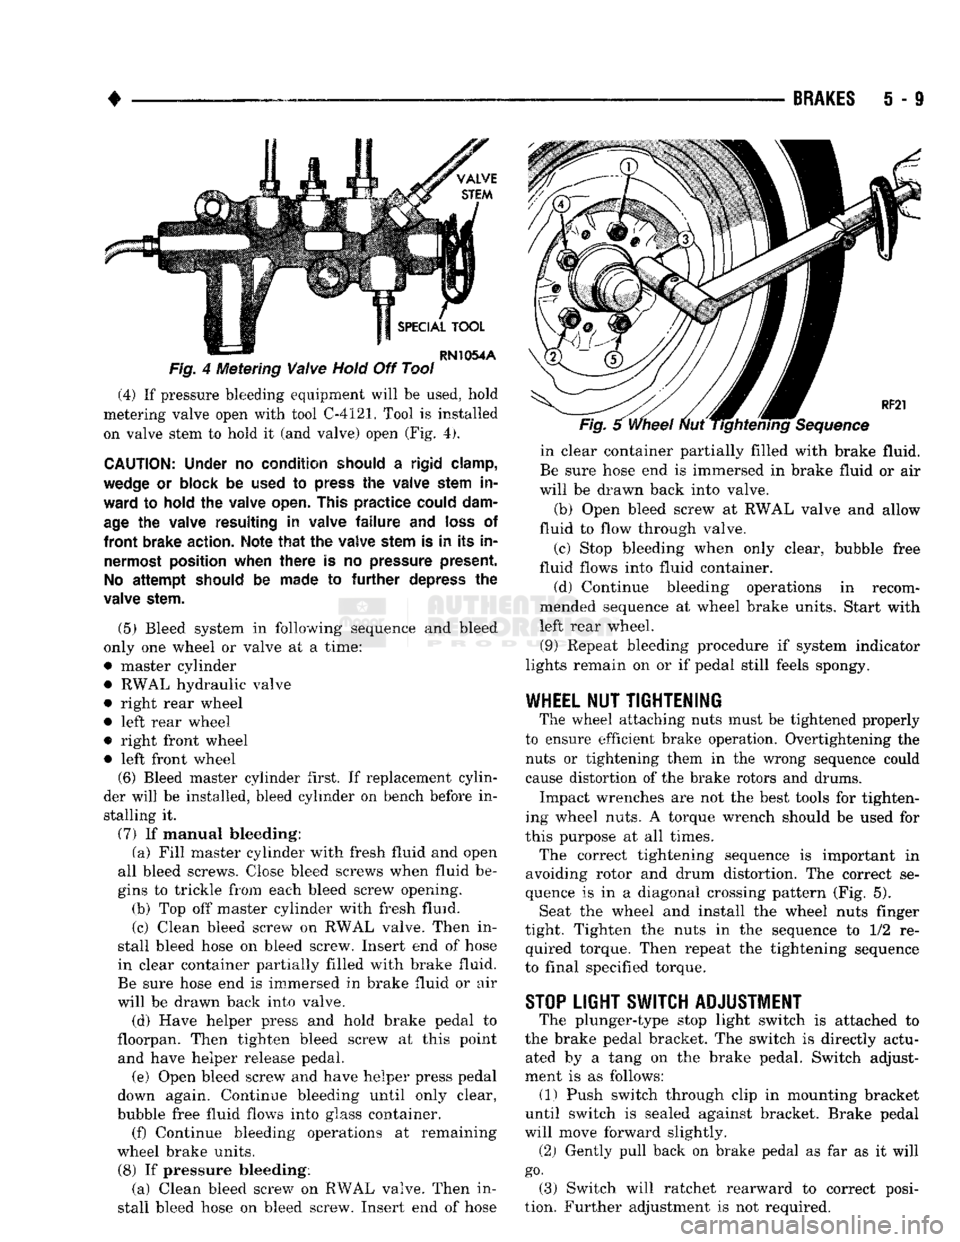
Off Tool (4) If pressure bleeding equipment will be used, hold
metering valve open with tool C-4121. Tool is installed on valve stem to hold it (and valve) open (Fig. 4).
CAUTION:
Under
no
condition should
a
rigid clamp,
wedge
or
block
be
used
to
press
the
valve stem
in
ward
to
hold
the
valve open. This
practice
could dam
age
the
valve resulting
in
valve
failure and
loss
of
front
brake action. Note
that the
valve stem
is in its in
nermost position when
there
is no
pressure present.
No
attempt
should
be
made
to further
depress
the
valve stem.
(5) Bleed system in following sequence and bleed
only one wheel or valve at a time:
• master cylinder • RWAL hydraulic valve
• right rear wheel
• left rear wheel
• right front wheel • left front wheel (6) Bleed master cylinder first. If replacement cylin
der will be installed, bleed cylinder on bench before in stalling it.
(7) If manual bleeding: (a) Fill master cylinder with fresh fluid and open
all bleed screws. Close bleed screws when fluid be
gins to trickle from each bleed screw opening. (b) Top off master cylinder with fresh fluid.
(c) Clean bleed screw on RWAL valve. Then in
stall bleed hose on bleed screw. Insert end of hose
in clear container partially filled with brake fluid.
Be sure hose end is immersed in brake fluid or air
will be drawn back into valve.
(d) Have helper press and hold brake pedal to
floorpan. Then tighten bleed screw at this point and have helper release pedal.
(e) Open bleed screw and have helper press pedal
down again. Continue bleeding until only clear,
bubble free fluid flows into glass container. (f) Continue bleeding operations at remaining
wheel brake units.
(8) If pressure bleeding: (a) Clean bleed screw on RWAL valve. Then in
stall bleed hose on bleed screw. Insert end of hose in clear container partially filled with brake fluid.
Be sure hose end is immersed in brake fluid or air
will be drawn back into valve.
(b) Open bleed screw at RWAL valve and allow
fluid to flow through valve.
(c) Stop bleeding when only clear, bubble free
fluid flows into fluid container.
(d) Continue bleeding operations in recom
mended sequence at wheel brake units. Start with
left rear wheel.
(9) Repeat bleeding procedure if system indicator
lights remain on or if pedal still feels spongy.
WHEEL
NUT
TIGHTENING
The wheel attaching nuts must be tightened properly
to ensure efficient brake operation. Overtightening the nuts or tightening them in the wrong sequence could
cause distortion of the brake rotors and drums.
Impact wrenches are not the best tools for tighten
ing wheel nuts. A torque wrench should be used for
this purpose at all times.
The correct tightening sequence is important in
avoiding rotor and drum distortion. The correct se
quence is in a diagonal crossing pattern (Fig. 5). Seat the wheel and install the wheel nuts finger
tight. Tighten the nuts in the sequence to 1/2 re quired torque. Then repeat the tightening sequence
to final specified torque.
STOP
LIGHT SWITCH ADJUSTMENT
The plunger-type stop light switch is attached to
the brake pedal bracket. The switch is directly actu ated by a tang on the brake pedal. Switch adjust
ment is as follows: (1) Push switch through clip in mounting bracket
until switch is sealed against bracket. Brake pedal
will move forward slightly.
(2) Gently pull back on brake pedal as far as it will
go.
(3) Switch will ratchet rearward to correct posi
tion. Further adjustment is not required.
Page 204 of 1502
TUBE ASSEMBLY MASTER
CYLINDER TO BRAKE
VALVE REAR (SECONDARY)
BRACKET
AND SHIELD
BRAKE
HOSE AND RWAL
SENSOR
WIRING LET.
TORQUE
LET. POUNDS NEWTON
METRES
x!^ 145 IN.
16
XX 35 FT.
47
170 IN. 19
100 IN.
11
125
IN.
14
BRAKE
VALVE TUBE
TO RIGHT FRONT
BRAKE
HOSE
VIEW IN DIRECTION OF ARROW A
SCREW
<§>
GASKET
8905-54
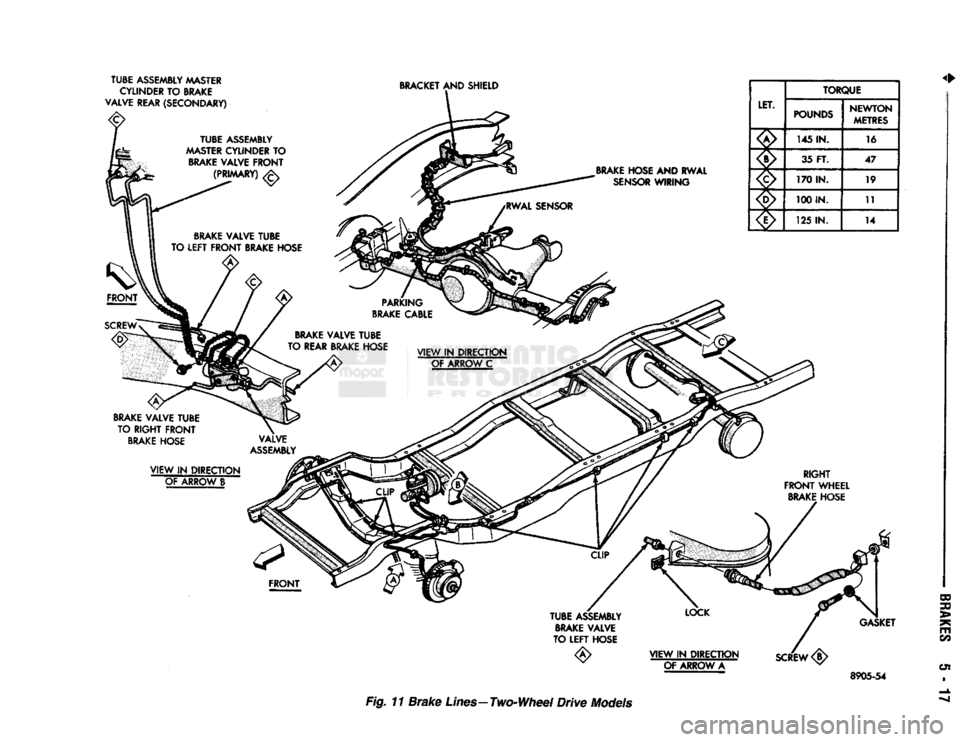
Fig. 11
Brake
Lines—Two-Wheel
Drive
Models
Page 205 of 1502
LET.
TORQUE
LET. POUNDS
NEWTON
METRES
145 IN. 16
125 IN. 14
100 IN. 11
170 IN. 19
SCREW
RIGHT
BRAKE
TUBE
RIGHT
BRAKE
TUBE
BRAKE HOSE BRAKE
VALVE
TUBE
TO
FRONT
BRAKE HOSE
VALVE
VIEW
IN
DIRECTION
OF
ARROW
B
ASSEMBLY
8905-55
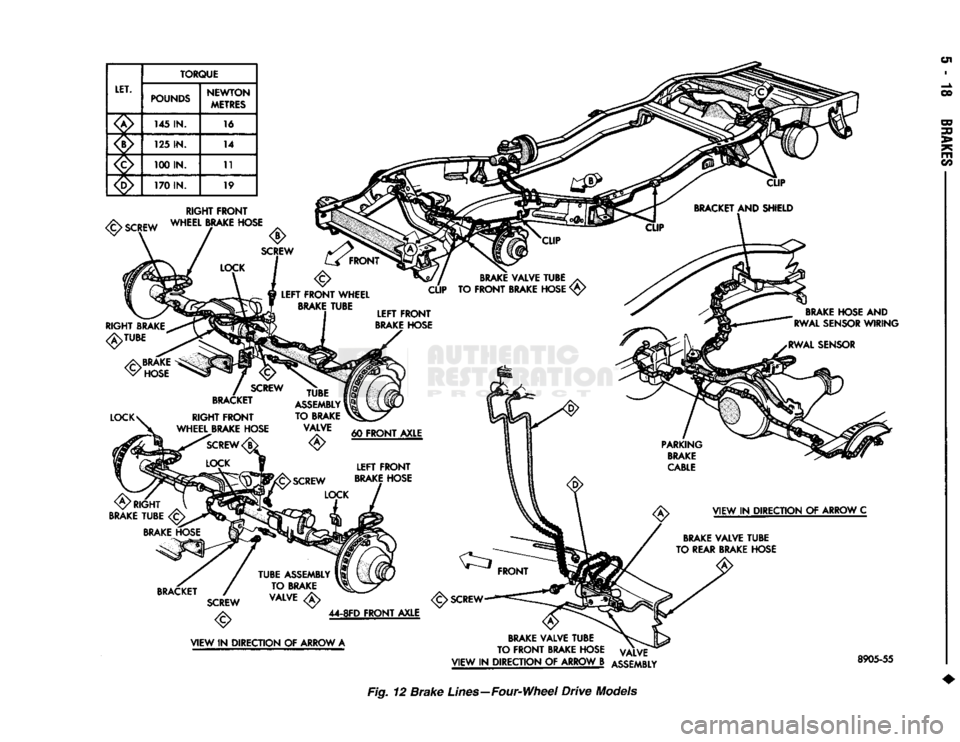
Fig. 12 Brake Lines—Four-Wheel Drive Models
Page 213 of 1502
5
- 26
BRAKES
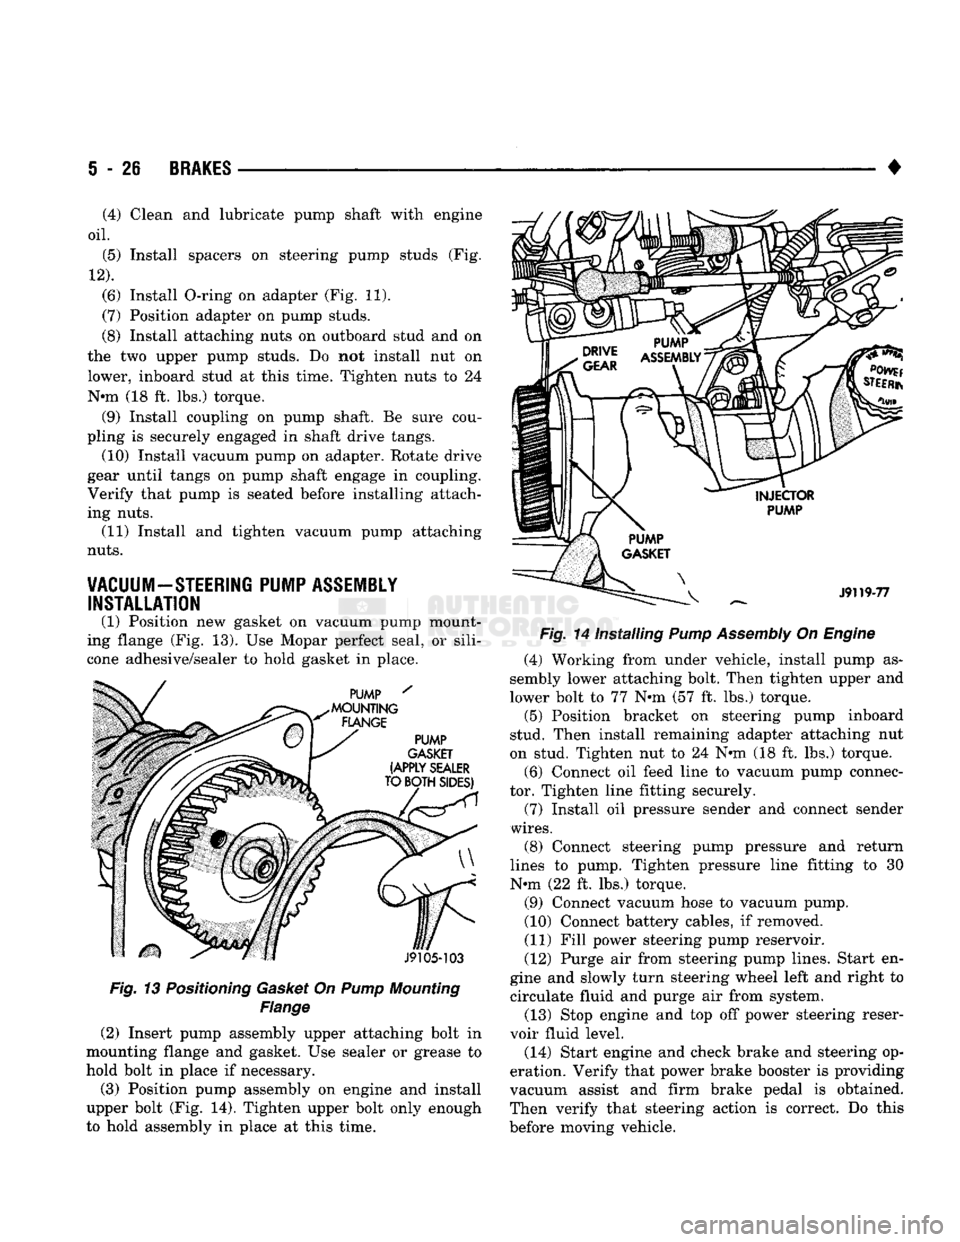
Fig. 13 Positioning Gasket On Pump Mounting
Flange
(2) Insert pump assembly upper attaching bolt in
mounting flange and gasket. Use sealer or grease to
hold bolt in place if necessary.
(3) Position pump assembly on engine and install
upper bolt (Fig. 14). Tighten upper bolt only enough
to hold assembly in place at this time. •
Fig. 14 Installing Pump Assembly On Engine (4) Working from under vehicle, install pump as
sembly lower attaching bolt. Then tighten upper and
lower bolt to 77 N»m (57 ft. lbs.) torque. (5) Position bracket on steering pump inboard
stud. Then install remaining adapter attaching nut
on stud. Tighten nut to 24 N«m (18 ft. lbs.) torque.
(6) Connect oil feed line to vacuum pump connec
tor. Tighten line fitting securely.
(7) Install oil pressure sender and connect sender
wires.
(8) Connect steering pump pressure and return
lines to pump. Tighten pressure line fitting to 30
N-m (22 ft. lbs.) torque.
(9) Connect vacuum hose to vacuum pump.
(10) Connect battery cables, if removed.
(11) Fill power steering pump reservoir.
(12) Purge air from steering pump lines. Start en
gine and slowly turn steering wheel left and right to circulate fluid and purge air from system.
(13) Stop engine and top off power steering reser
voir fluid level.
(14) Start engine and check brake and steering op
eration. Verify that power brake booster is providing
vacuum assist and firm brake pedal is obtained.
Then verify that steering action is correct. Do this
before moving vehicle.
(4) Clean and lubricate pump shaft with engine
oil.
(5) Install spacers on steering pump studs (Fig.
12).
(6) Install O-ring on adapter (Fig. 11).
(7) Position adapter on pump studs.
(8) Install attaching nuts on outboard stud and on
the two upper pump studs. Do not install nut on
lower, inboard stud at this time. Tighten nuts to 24
N-m (18 ft. lbs.) torque. (9) Install coupling on pump shaft. Be sure cou
pling is securely engaged in shaft drive tangs. (10) Install vacuum pump on adapter. Rotate drive
gear until tangs on pump shaft engage in coupling.
Verify that pump is seated before installing attach
ing nuts. (11) Install and tighten vacuum pump attaching
nuts.
VACUUM-STEERING PUMP ASSEMBLY INSTALLATION
(1) Position new gasket on vacuum pump mount
ing flange (Fig. 13). Use Mopar perfect seal, or sili
cone adhesive/sealer to hold gasket in place.
Page 216 of 1502
•
BRAKES
5 - 29 presses the outboard shoe lining against the opposite
side of the rotor to complete braking action.
The application or release of fluid pressure causes
only a very slight movement of the caliper and pis
ton. At brake release, the piston and caliper return
to the non-applied position.
The brakeshoes do not retract an appreciable dis
tance from the rotor. The minimal running clearance
between the lining and rotor provides improved re sponse and reduced pedal travel. It also helps in pre
venting dirt and foreign material from lodging
between the shoe and rotor surfaces.
DISC
BRAKE
LINING WEAR COMPENSATION
Normal lining wear is compensated for by extension
of the caliper piston and by lateral movement of the cal
iper in the adapter. Piston position is also determined
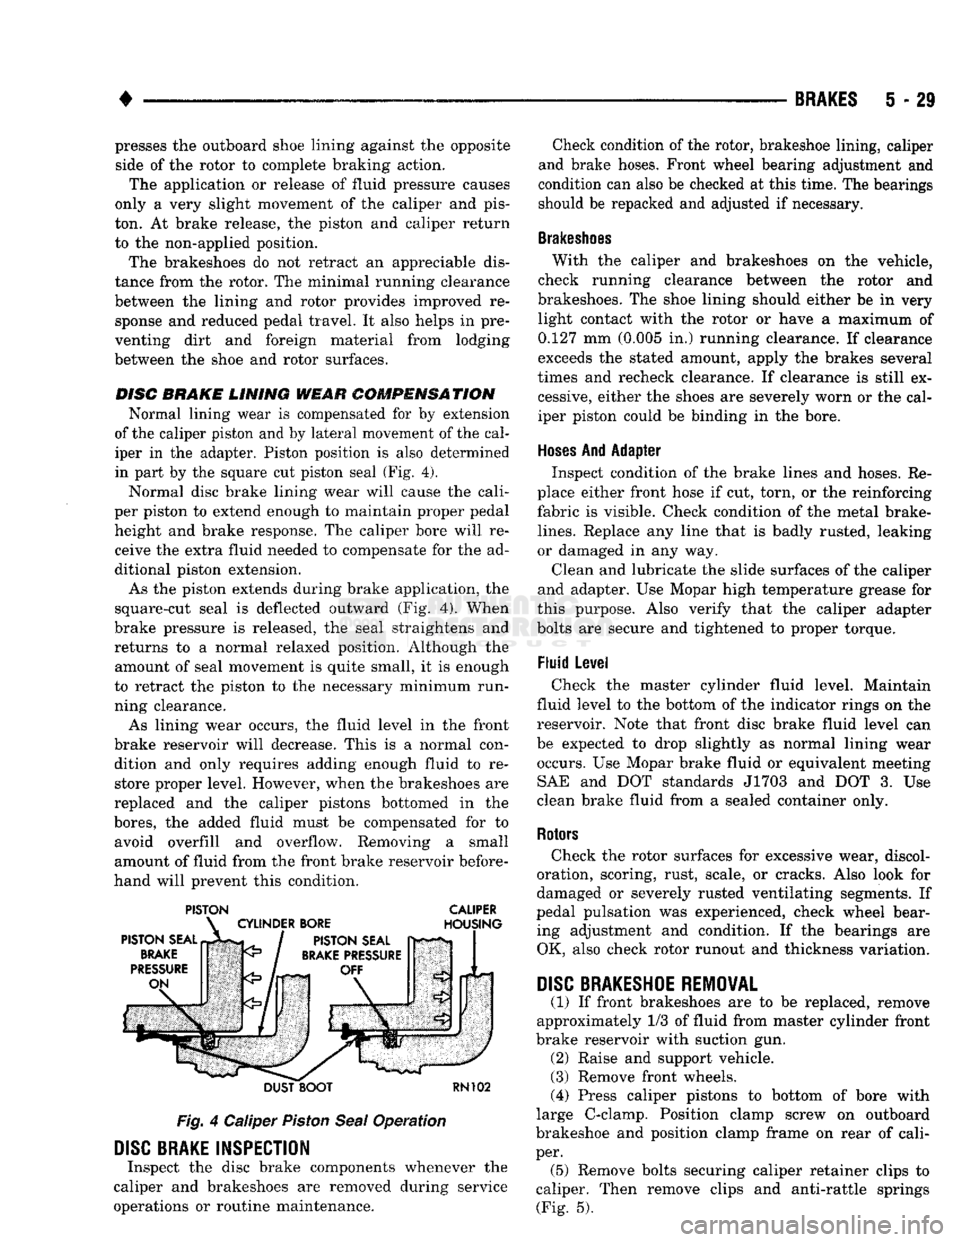
in part by the square cut piston seal (Fig. 4).
Normal disc brake lining wear will cause the cali
per piston to extend enough to maintain proper pedal height and brake response. The caliper bore will receive the extra fluid needed to compensate for the ad
ditional piston extension.
As the piston extends during brake application, the
square-cut seal is deflected outward (Fig. 4). When
brake pressure is released, the seal straightens and
returns to a normal relaxed position. Although the amount of seal movement is quite small, it is enough
to retract the piston to the necessary minimum run
ning clearance.
As lining wear occurs, the fluid level in the front
brake reservoir will decrease. This is a normal con dition and only requires adding enough fluid to restore proper level. However, when the brakeshoes are
replaced and the caliper pistons bottomed in the
bores,
the added fluid must be compensated for to avoid overfill and overflow. Removing a small
amount of fluid from the front brake reservoir before
hand will prevent this condition.
PISTON CALIPER
DUST BOOT
RN102
Fig.
4 Caliper
Piston
Seal
Operation
DISC
BRAKE INSPECTION
Inspect the disc brake components whenever the
caliper and brakeshoes are removed during service
operations or routine maintenance. Check condition of the rotor, brakeshoe lining, caliper
and brake hoses. Front wheel bearing adjustment and
condition can also be checked at this time. The bearings
should be repacked and adjusted if necessary.
Brakeshoes
With the caliper and brakeshoes on the vehicle,
check running clearance between the rotor and
brakeshoes. The shoe lining should either be in very light contact with the rotor or have a maximum of
0.127 mm (0.005 in.) running clearance. If clearance
exceeds the stated amount, apply the brakes several
times and recheck clearance. If clearance is still ex cessive, either the shoes are severely worn or the cal
iper piston could be binding in the bore.
Hoses
And Adapter Inspect condition of the brake lines and hoses. Re
place either front hose if cut, torn, or the reinforcing
fabric is visible. Check condition of the metal brake-
lines.
Replace any line that is badly rusted, leaking
or damaged in any way.
Clean and lubricate the slide surfaces of the caliper
and adapter. Use Mopar high temperature grease for
this purpose. Also verify that the caliper adapter
bolts are secure and tightened to proper torque.
Fluid Level Check the master cylinder fluid level. Maintain
fluid level to the bottom of the indicator rings on the
reservoir. Note that front disc brake fluid level can
be expected to drop slightly as normal lining wear occurs. Use Mopar brake fluid or equivalent meeting SAE and DOT standards J1703 and DOT 3. Use
clean brake fluid from a sealed container only.
Rotors
Check the rotor surfaces for excessive wear, discol
oration, scoring, rust, scale, or cracks. Also look for
damaged or severely rusted ventilating segments. If
pedal pulsation was experienced, check wheel bear ing adjustment and condition. If the bearings are OK, also check rotor runout and thickness variation.
DISC
BRAKESHOE
REMOVAL
(1) If front brakeshoes are to be replaced, remove
approximately 1/3 of fluid from master cylinder front
brake reservoir with suction gun. (2) Raise and support vehicle.
(3) Remove front wheels.
(4) Press caliper pistons to bottom of bore with
large C-clamp. Position clamp screw on outboard
brakeshoe and position clamp frame on rear of cali
per. (5) Remove bolts securing caliper retainer clips to
caliper. Then remove clips and anti-rattle springs (Fig. 5).
Page 218 of 1502
•
BRAKES
5 - 31 board lining. Also check condition of the caliper pis
ton dust boot. If leakage is evident or if the boot is
cut, torn, or damaged in any way, it will be necessary to overhaul the caliper.
Remove the O-ring from the caliper adapter and clean
the slide surfaces of the adapter and the machined ways on the caliper with a wire brush and sandpaper.
DISC
BRAKESHOE
INSTALLATION
(1) Install inboard brakeshoe in adapter (Fig. 8).
(2) If new brakeshoes are being installed, remove
protective paper from noise suppression gasket on outboard shoe. (3) Install and adjust outboard brakeshoe in cali
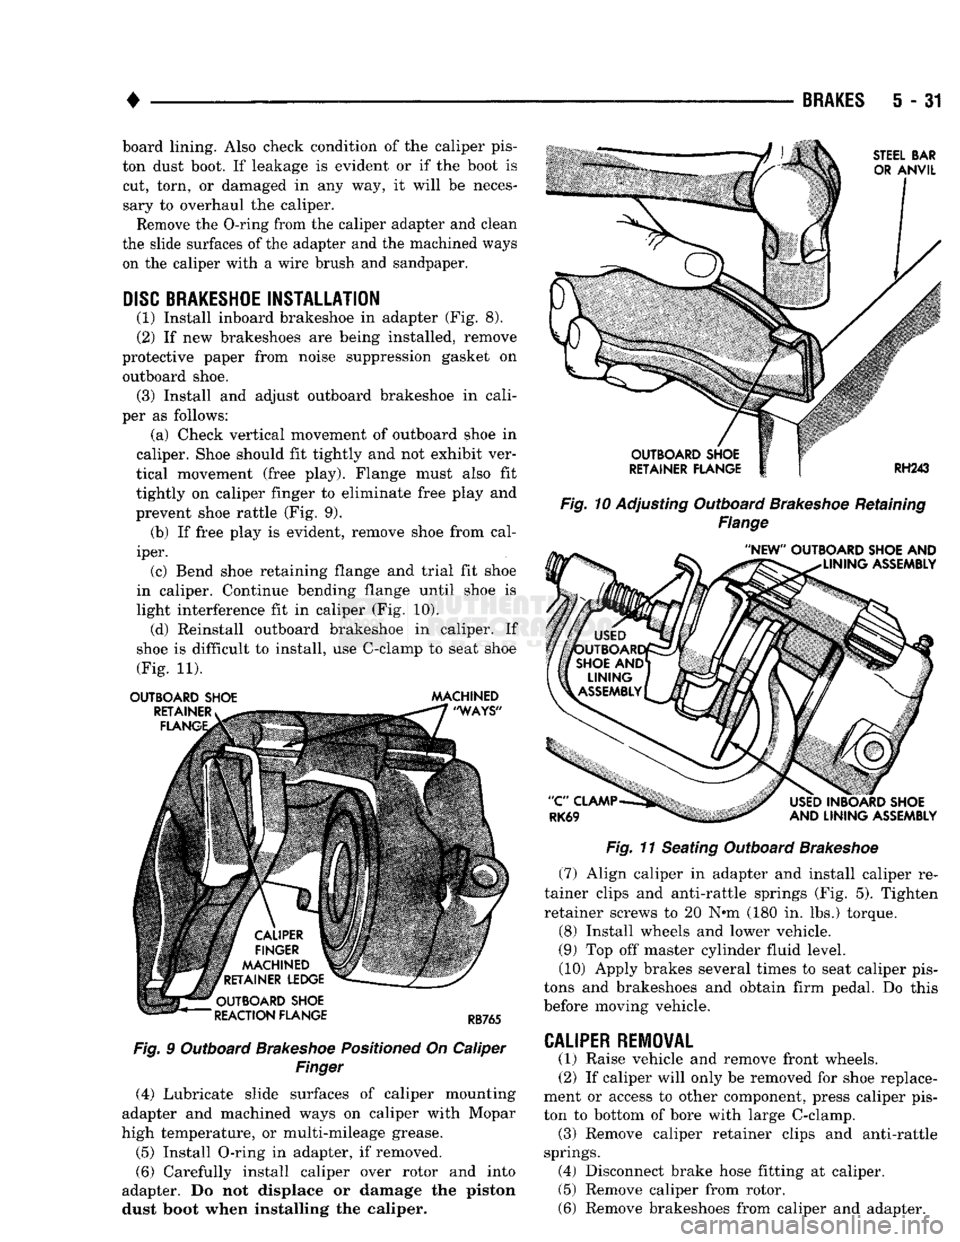
per as follows: (a) Check vertical movement of outboard shoe in
caliper. Shoe should fit tightly and not exhibit ver
tical movement (free play). Flange must also fit
tightly on caliper finger to eliminate free play and
prevent shoe rattle (Fig. 9). (b) If free play is evident, remove shoe from cal
iper. (c) Bend shoe retaining flange and trial fit shoe
in caliper. Continue bending flange until shoe is
light interference fit in caliper (Fig. 10). (d) Reinstall outboard brakeshoe in caliper. If
shoe is difficult to install, use C-clamp to seat shoe
(Fig. 11).
OUTBOARD SHOE MACHINED
Fig.
9 Outboard
Brakeshoe
Positioned
On Caliper
Finger
(4) Lubricate slide surfaces of caliper mounting
adapter and machined ways on caliper with Mopar
high temperature, or multi-mileage grease.
(5) Install O-ring in adapter, if removed.
(6) Carefully install caliper over rotor and into
adapter. Do not displace or damage the piston dust boot when installing the caliper.
Fig. 10
Adjusting Outboard
Brakeshoe
Retaining
Flange
Fig.
11 Seating Outboard
Brakeshoe
(7) Align caliper in adapter and install caliper re
tainer clips and anti-rattle springs (Fig. 5). Tighten
retainer screws to 20 N«m (180 in. lbs.) torque.
(8) Install wheels and lower vehicle.
(9) Top off master cylinder fluid level. (10) Apply brakes several times to seat caliper pis
tons and brakeshoes and obtain firm pedal. Do this
before moving vehicle.
CALIPER
REMOVAL
(1) Raise vehicle and remove front wheels.
(2) If caliper will only be removed for shoe replace
ment or access to other component, press caliper pis
ton to bottom of bore with large C-clamp. (3) Remove caliper retainer clips and anti-rattle
springs. (4) Disconnect brake hose fitting at caliper. (5) Remove caliper from rotor.
(6) Remove brakeshoes from caliper and adapter.
Page 221 of 1502
5
- 34
BRAKES
•
boot
>TALLir TOOL
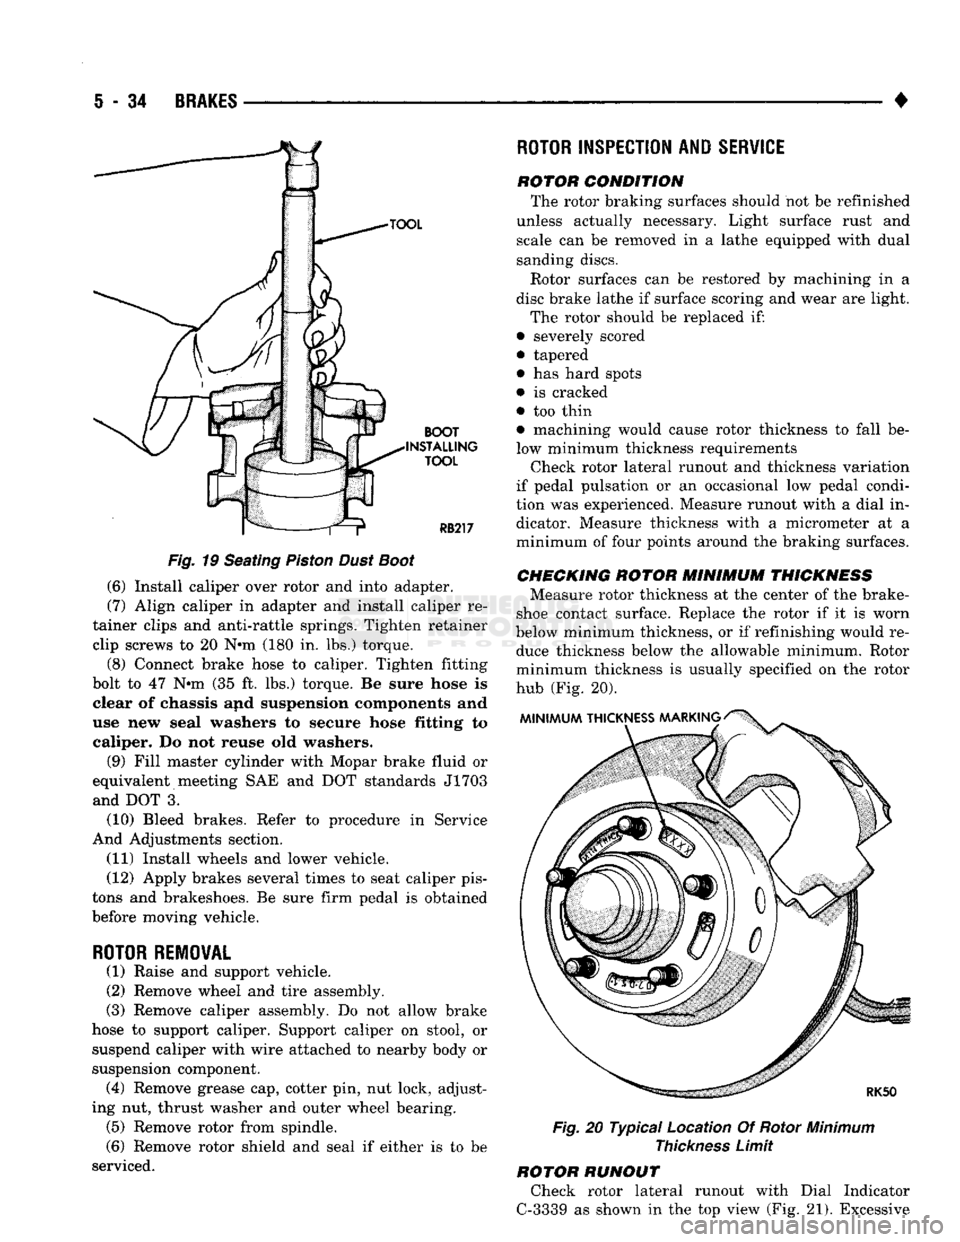
Fig.
19 Seating
Piston
Dust
Boot
(6) Install caliper over rotor and into adapter.
(7) Align caliper in adapter and install caliper re
tainer clips and anti-rattle springs. Tighten retainer clip screws to 20 N*m (180 in. lbs.) torque.
(8) Connect brake hose to caliper. Tighten fitting
bolt to 47 N»m (35 ft. lbs.) torque. Be sure hose is clear of chassis and suspension components and
use new seal washers to secure hose fitting to caliper. Do not reuse old washers.
(9) Fill master cylinder with Mopar brake fluid or
equivalent meeting SAE and DOT standards J1703 and DOT 3.
(10) Bleed brakes. Refer to procedure in Service
And Adjustments section.
(11) Install wheels and lower vehicle.
(12) Apply brakes several times to seat caliper pis
tons and brakeshoes. Be sure firm pedal is obtained
before moving vehicle.
ROTOR REMOVAL
(1) Raise and support vehicle.
(2) Remove wheel and tire assembly.
(3) Remove caliper assembly. Do not allow brake
hose to support caliper. Support caliper on stool, or suspend caliper with wire attached to nearby body or
suspension component. (4) Remove grease cap, cotter pin, nut lock, adjust
ing nut, thrust washer and outer wheel bearing. (5) Remove rotor from spindle.
(6) Remove rotor shield and seal if either is to be
serviced.
ROTOR
INSPECTION AND
SERVICE
rotor condition The rotor braking surfaces should not be refinished
unless actually necessary. Light surface rust and scale can be removed in a lathe equipped with dual
sanding discs.
Rotor surfaces can be restored by machining in a
disc brake lathe if surface scoring and wear are light.
The rotor should be replaced if:
• severely scored
• tapered
• has hard spots
• is cracked
• too thin • machining would cause rotor thickness to fall be
low minimum thickness requirements Check rotor lateral runout and thickness variation
if pedal pulsation or an occasional low pedal condi
tion was experienced. Measure runout with a dial in dicator. Measure thickness with a micrometer at a
minimum of four points around the braking surfaces.
CHECKING
ROTOR
MINIMUM
THICKNESS
Measure rotor thickness at the center of the brake-
shoe contact surface. Replace the rotor if it is worn
below minimum thickness, or if refinishing would re duce thickness below the allowable minimum. Rotor
minimum thickness is usually specified on the rotor
hub (Fig. 20).
Fig.
20 Typical Location Of Rotor
Minimum
Thickness
Limit
ROTOR RUNOUT Check rotor lateral runout with Dial Indicator
C-3339 as shown in the top view (Fig. 21). Excessive