1993 CHEVROLET DYNASTY service
[x] Cancel search: servicePage 1889 of 2438
tion timing from the crankshaft position sensor. Once
crankshaft position has been determined, the PCM
begins energizing the injectors in sequence. The crankshaft position sensor is located in the
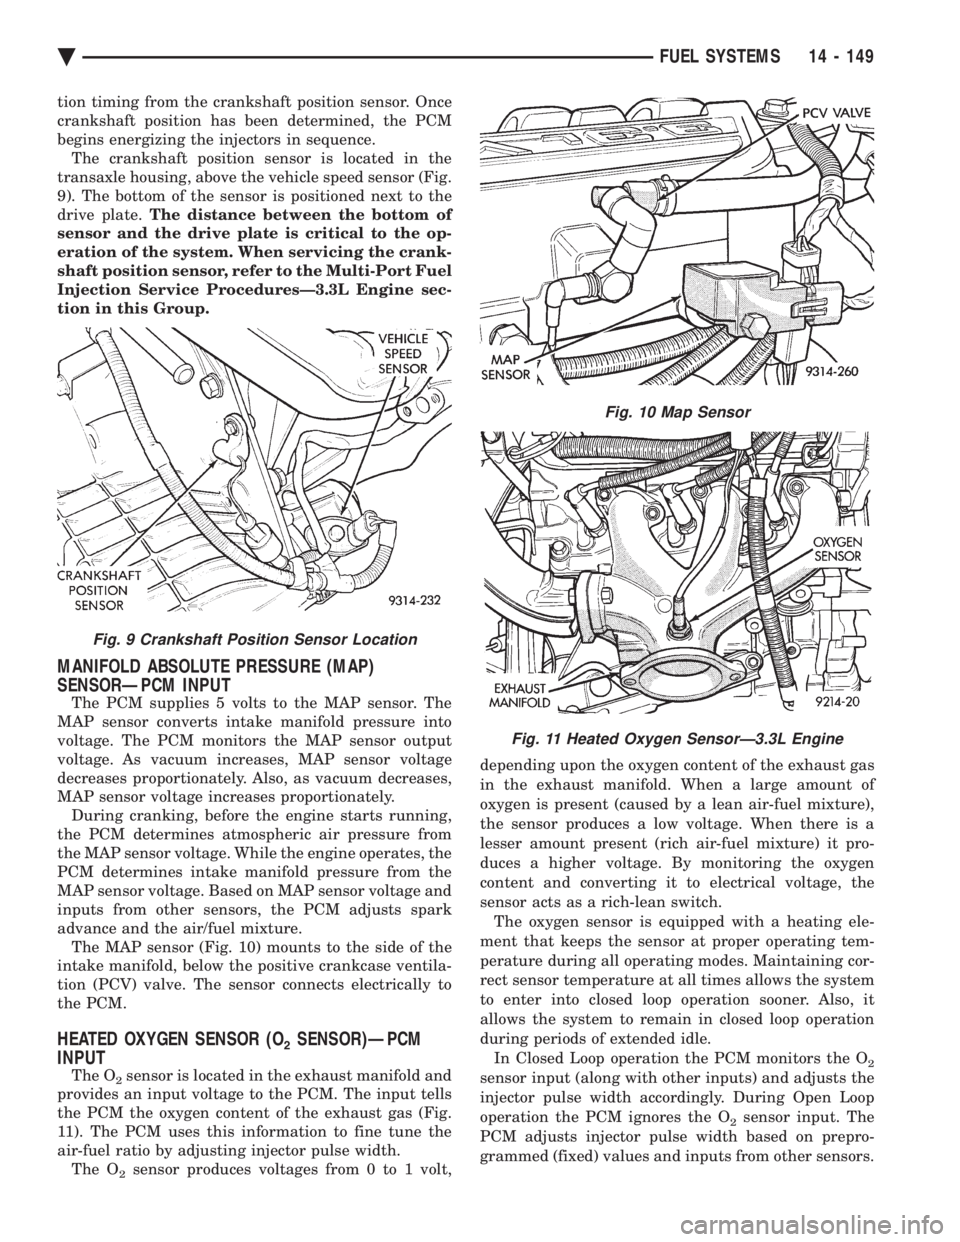
transaxle housing, above the vehicle speed sensor (Fig.
9). The bottom of the sensor is positioned next to the
drive plate. The distance between the bottom of
sensor and the drive plate is critical to the op-
eration of the system. When servicing the crank-
shaft position sensor, refer to the Multi-Port Fuel
Injection Service ProceduresÐ3.3L Engine sec-
tion in this Group.
MANIFOLD ABSOLUTE PRESSURE (MAP)
SENSORÐPCM INPUT
The PCM supplies 5 volts to the MAP sensor. The
MAP sensor converts intake manifold pressure into
voltage. The PCM monitors the MAP sensor output
voltage. As vacuum increases, MAP sensor voltage
decreases proportionately. Also, as vacuum decreases,
MAP sensor voltage increases proportionately. During cranking, before the engine starts running,
the PCM determines atmospheric air pressure from
the MAP sensor voltage. While the engine operates, the
PCM determines intake manifold pressure from the
MAP sensor voltage. Based on MAP sensor voltage and
inputs from other sensors, the PCM adjusts spark
advance and the air/fuel mixture. The MAP sensor (Fig. 10) mounts to the side of the
intake manifold, below the positive crankcase ventila-
tion (PCV) valve. The sensor connects electrically to
the PCM.
HEATED OXYGEN SENSOR (O2SENSOR)ÐPCM
INPUT
The O2sensor is located in the exhaust manifold and
provides an input voltage to the PCM. The input tells
the PCM the oxygen content of the exhaust gas (Fig.
11). The PCM uses this information to fine tune the
air-fuel ratio by adjusting injector pulse width. The O
2sensor produces voltages from 0 to 1 volt, depending upon the oxygen content of the exhaust gas
in the exhaust manifold. When a large amount of
oxygen is present (caused by a lean air-fuel mixture),
the sensor produces a low voltage. When there is a
lesser amount present (rich air-fuel mixture) it pro-
duces a higher voltage. By monitoring the oxygen
content and converting it to electrical voltage, the
sensor acts as a rich-lean switch. The oxygen sensor is equipped with a heating ele-
ment that keeps the sensor at proper operating tem-
perature during all operating modes. Maintaining cor-
rect sensor temperature at all times allows the system
to enter into closed loop operation sooner. Also, it
allows the system to remain in closed loop operation
during periods of extended idle. In Closed Loop operation the PCM monitors the O
2
sensor input (along with other inputs) and adjusts the
injector pulse width accordingly. During Open Loop
operation the PCM ignores the O
2sensor input. The
PCM adjusts injector pulse width based on prepro-
grammed (fixed) values and inputs from other sensors.
Fig. 9 Crankshaft Position Sensor Location
Fig. 10 Map Sensor
Fig. 11 Heated Oxygen SensorÐ3.3L Engine
Ä FUEL SYSTEMS 14 - 149
Page 1892 of 2438
operator that the PCM has entered a Limp-in mode.
During Limp-in Mode, the PCM attempts to keep the
system operational. The malfunction indicator signals
the need for immediate service. In limp-in mode, the
PCM compensates for the failure of certain components
that send incorrect signals. The PCM substitutes for
the incorrect signals with inputs from other sensors. Signals that can trigger the Malfunction Indi-
cator lamp (Check Engine Lamp).
² Engine Coolant Temperature Sensor
² Manifold Absolute Pressure Sensor
² Throttle Position Sensor
² Battery Voltage Input
² An Emission Related System (California vehicles)
² Charging system
The malfunction indicator (Check Engine Lamp) can
also display diagnostic trouble codes. Cycle the ignition
switch on, off, on, off, on, within five seconds and any
diagnostic trouble codes stored in the PCM will be
displayed. Refer to the 3.3L and 3.8L Multi-Port Fuel
InjectionÐOn-Board Diagnostics section of this Group
for Diagnostic Trouble Code Descriptions.
DATA LINK CONNECTORÐPCM OUTPUT
The data link connector provides the technician with
the means to connect the DRBII scan tool to diagnosis
the vehicle.
TRANSAXLE CONTROL MODULEÐPCM OUTPUT
The PCM supplies the following information to the
electronic automatic transaxle control module through
the CCD Bus:
² battery temperature
² brake switch input
² engine coolant temperature
² manifold absolute pressure (MAP)
² speed control information
ELECTRIC EGR TRANSDUCER (EET)
SOLENOIDÐPCM OUTPUT
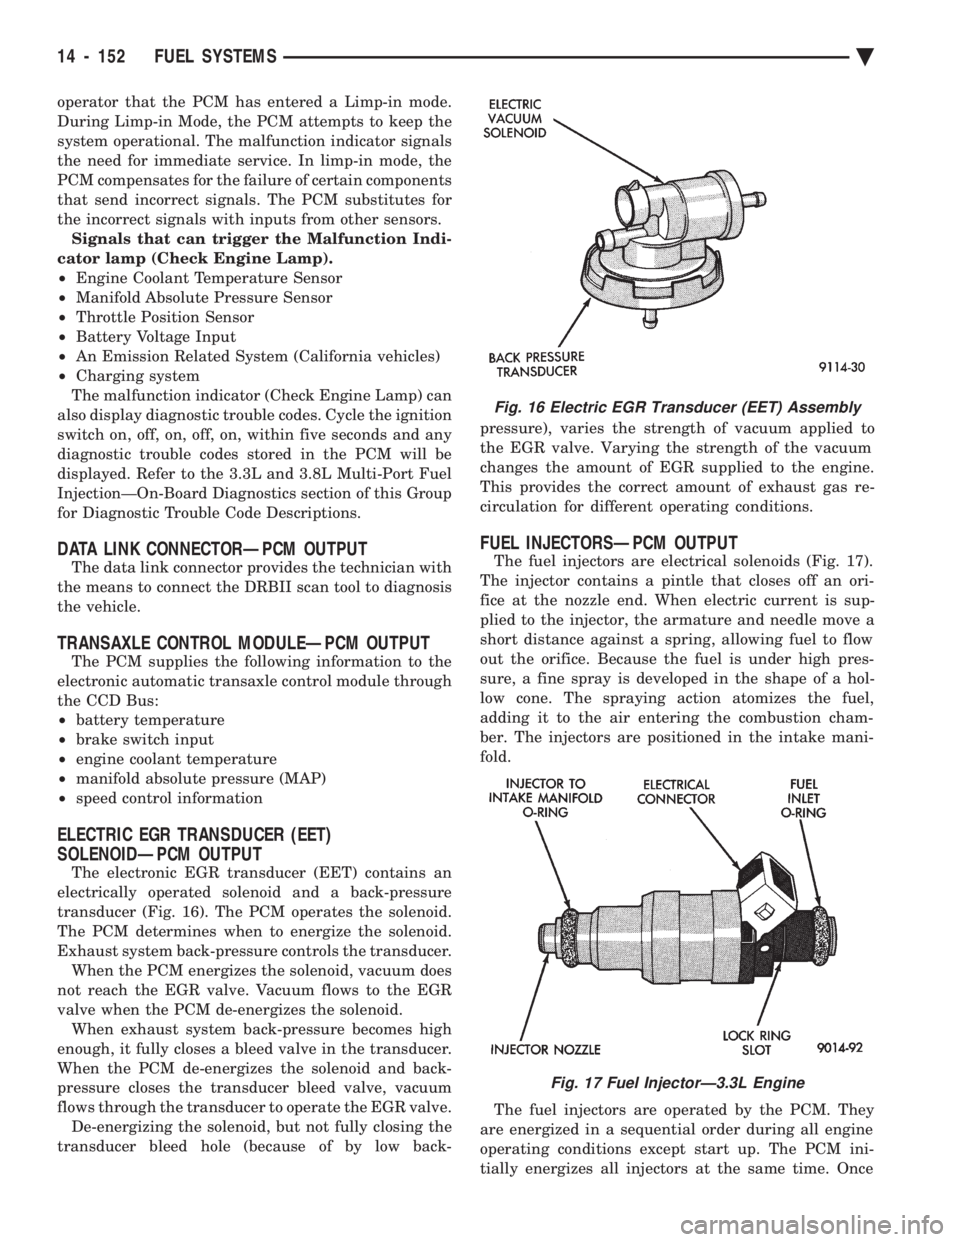
The electronic EGR transducer (EET) contains an
electrically operated solenoid and a back-pressure
transducer (Fig. 16). The PCM operates the solenoid.
The PCM determines when to energize the solenoid.
Exhaust system back-pressure controls the transducer. When the PCM energizes the solenoid, vacuum does
not reach the EGR valve. Vacuum flows to the EGR
valve when the PCM de-energizes the solenoid. When exhaust system back-pressure becomes high
enough, it fully closes a bleed valve in the transducer.
When the PCM de-energizes the solenoid and back-
pressure closes the transducer bleed valve, vacuum
flows through the transducer to operate the EGR valve. De-energizing the solenoid, but not fully closing the
transducer bleed hole (because of by low back- pressure), varies the strength of vacuum applied to
the EGR valve. Varying the strength of the vacuum
changes the amount of EGR supplied to the engine.
This provides the correct amount of exhaust gas re-
circulation for different operating conditions.
FUEL INJECTORSÐPCM OUTPUT
The fuel injectors are electrical solenoids (Fig. 17).
The injector contains a pintle that closes off an ori-
fice at the nozzle end. When electric current is sup-
plied to the injector, the armature and needle move a
short distance against a spring, allowing fuel to flow
out the orifice. Because the fuel is under high pres-
sure, a fine spray is developed in the shape of a hol-
low cone. The spraying action atomizes the fuel,
adding it to the air entering the combustion cham-
ber. The injectors are positioned in the intake mani-
fold.
The fuel injectors are operated by the PCM. They
are energized in a sequential order during all engine
operating conditions except start up. The PCM ini-
tially energizes all injectors at the same time. Once
Fig. 16 Electric EGR Transducer (EET) Assembly
Fig. 17 Fuel InjectorÐ3.3L Engine
14 - 152 FUEL SYSTEMS Ä
Page 1909 of 2438
3.3L AND 3.8L MULTI-PORT FUEL INJECTIONÐSERVICE PROCEDURES INDEX
page page
Camshaft Position Sensor Service ........... 176
Crankshaft Position Sensor ................ 176
EVAP Canister Purge Solenoid Service ....... 175
Fuel Injector ........................... 174
Fuel Injector Rail Assembly ................ 170
Fuel Pressure Regulator .................. 173
Fuel System Pressure Release Procedure ..... 169 Heated Oxygen Sensor (O
2Sensor) Service . . . 177
Idle Air Control Motor .................... 170
Manifold Absolute Pressure (MAP) Sensor ..... 175
PCM Service ........................... 175
Throttle Body ........................... 169
Throttle Body Removal ................... 169
Throttle Position Sensor .................. 169
THROTTLE BODY REMOVAL
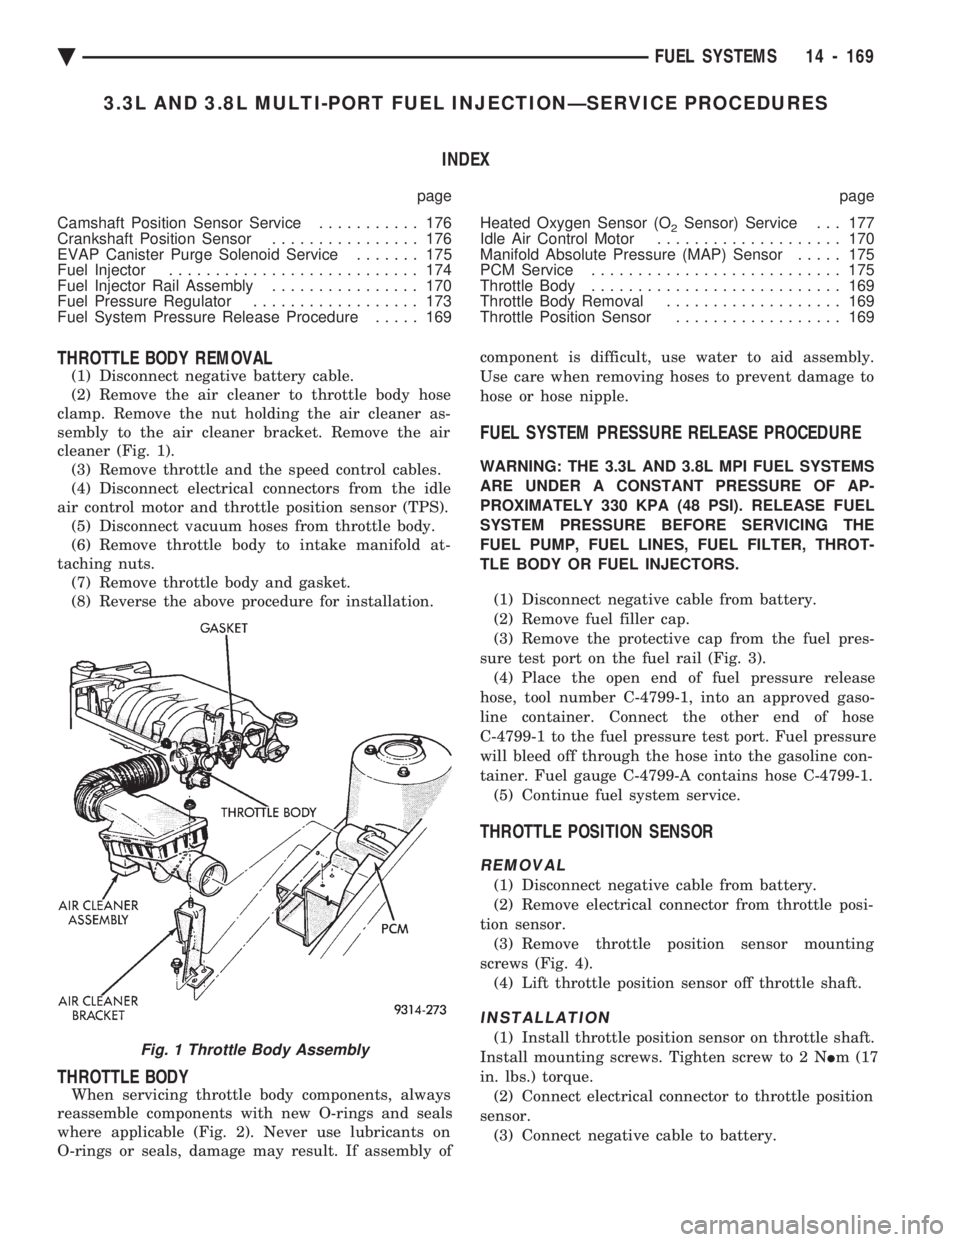
(1) Disconnect negative battery cable.
(2) Remove the air cleaner to throttle body hose
clamp. Remove the nut holding the air cleaner as-
sembly to the air cleaner bracket. Remove the air
cleaner (Fig. 1). (3) Remove throttle and the speed control cables.
(4) Disconnect electrical connectors from the idle
air control motor and throttle position sensor (TPS). (5) Disconnect vacuum hoses from throttle body.
(6) Remove throttle body to intake manifold at-
taching nuts. (7) Remove throttle body and gasket.
(8) Reverse the above procedure for installation.
THROTTLE BODY
When servicing throttle body components, always
reassemble components with new O-rings and seals
where applicable (Fig. 2). Never use lubricants on
O-rings or seals, damage may result. If assembly of component is difficult, use water to aid assembly.
Use care when removing hoses to prevent damage to
hose or hose nipple.
FUEL SYSTEM PRESSURE RELEASE PROCEDURE
WARNING: THE 3.3L AND 3.8L MPI FUEL SYSTEMS
ARE UNDER A CONSTANT PRESSURE OF AP-
PROXIMATELY 330 KPA (48 PSI). RELEASE FUEL
SYSTEM PRESSURE BEFORE SERVICING THE
FUEL PUMP, FUEL LINES, FUEL FILTER, THROT-
TLE BODY OR FUEL INJECTORS.
(1) Disconnect negative cable from battery.
(2) Remove fuel filler cap.
(3) Remove the protective cap from the fuel pres-
sure test port on the fuel rail (Fig. 3). (4) Place the open end of fuel pressure release
hose, tool number C-4799-1, into an approved gaso-
line container. Connect the other end of hose
C-4799-1 to the fuel pressure test port. Fuel pressure
will bleed off through the hose into the gasoline con-
tainer. Fuel gauge C-4799-A contains hose C-4799-1. (5) Continue fuel system service.
THROTTLE POSITION SENSOR
REMOVAL
(1) Disconnect negative cable from battery.
(2) Remove electrical connector from throttle posi-
tion sensor. (3) Remove throttle position sensor mounting
screws (Fig. 4). (4) Lift throttle position sensor off throttle shaft.
INSTALLATION
(1) Install throttle position sensor on throttle shaft.
Install mounting screws. Tighten screw to 2 N Im (17
in. lbs.) torque. (2) Connect electrical connector to throttle position
sensor. (3) Connect negative cable to battery.Fig. 1 Throttle Body Assembly
Ä FUEL SYSTEMS 14 - 169
Page 1915 of 2438
(3) Rotate injector and pull injector out of fuel rail.
The clip will stay on the injector. (4) Check injector O-ring for damage. If O-ring is
damaged, it must be replaced. If injector is reused, a
protective cap must be installed on the injector tip to
prevent damage. Replace the injector clip if it is
damaged. (5) Repeat for remaining injectors.
INSTALLATION
(1) Before installing an injector the rubber O-ring
must be lubricated with a drop of clean engine oil to
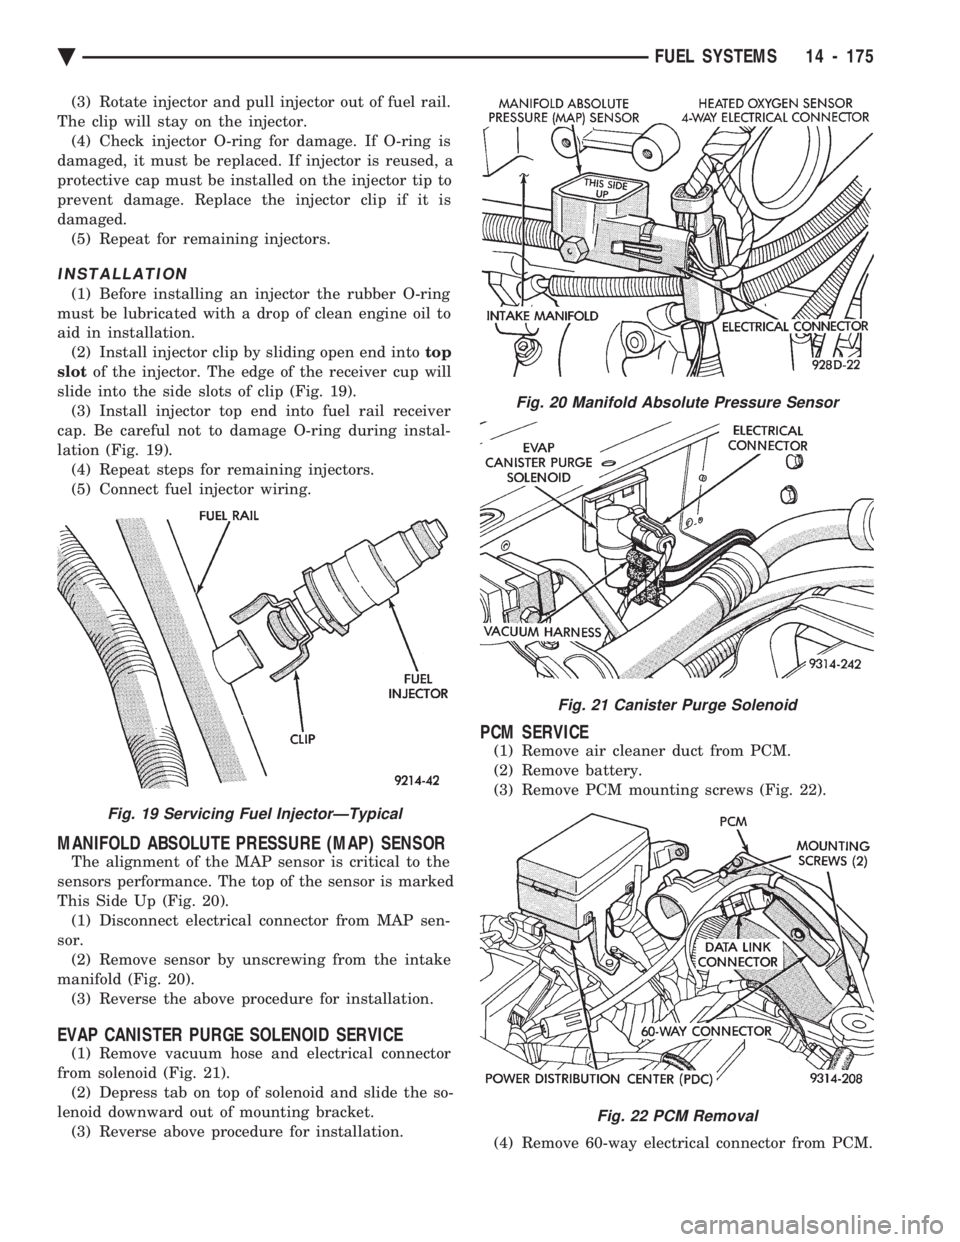
aid in installation. (2) Install injector clip by sliding open end into top
slot of the injector. The edge of the receiver cup will
slide into the side slots of clip (Fig. 19). (3) Install injector top end into fuel rail receiver
cap. Be careful not to damage O-ring during instal-
lation (Fig. 19). (4) Repeat steps for remaining injectors.
(5) Connect fuel injector wiring.
MANIFOLD ABSOLUTE PRESSURE (MAP) SENSOR
The alignment of the MAP sensor is critical to the
sensors performance. The top of the sensor is marked
This Side Up (Fig. 20). (1) Disconnect electrical connector from MAP sen-
sor. (2) Remove sensor by unscrewing from the intake
manifold (Fig. 20). (3) Reverse the above procedure for installation.
EVAP CANISTER PURGE SOLENOID SERVICE
(1) Remove vacuum hose and electrical connector
from solenoid (Fig. 21). (2) Depress tab on top of solenoid and slide the so-
lenoid downward out of mounting bracket. (3) Reverse above procedure for installation.
PCM SERVICE
(1) Remove air cleaner duct from PCM.
(2) Remove battery.
(3) Remove PCM mounting screws (Fig. 22).
(4) Remove 60-way electrical connector from PCM.
Fig. 19 Servicing Fuel InjectorÐTypical
Fig. 20 Manifold Absolute Pressure Sensor
Fig. 21 Canister Purge Solenoid
Fig. 22 PCM Removal
Ä FUEL SYSTEMS 14 - 175
Page 1916 of 2438
(5) Reverse the above procedure for installation.
CRANKSHAFT POSITION SENSOR
REMOVAL
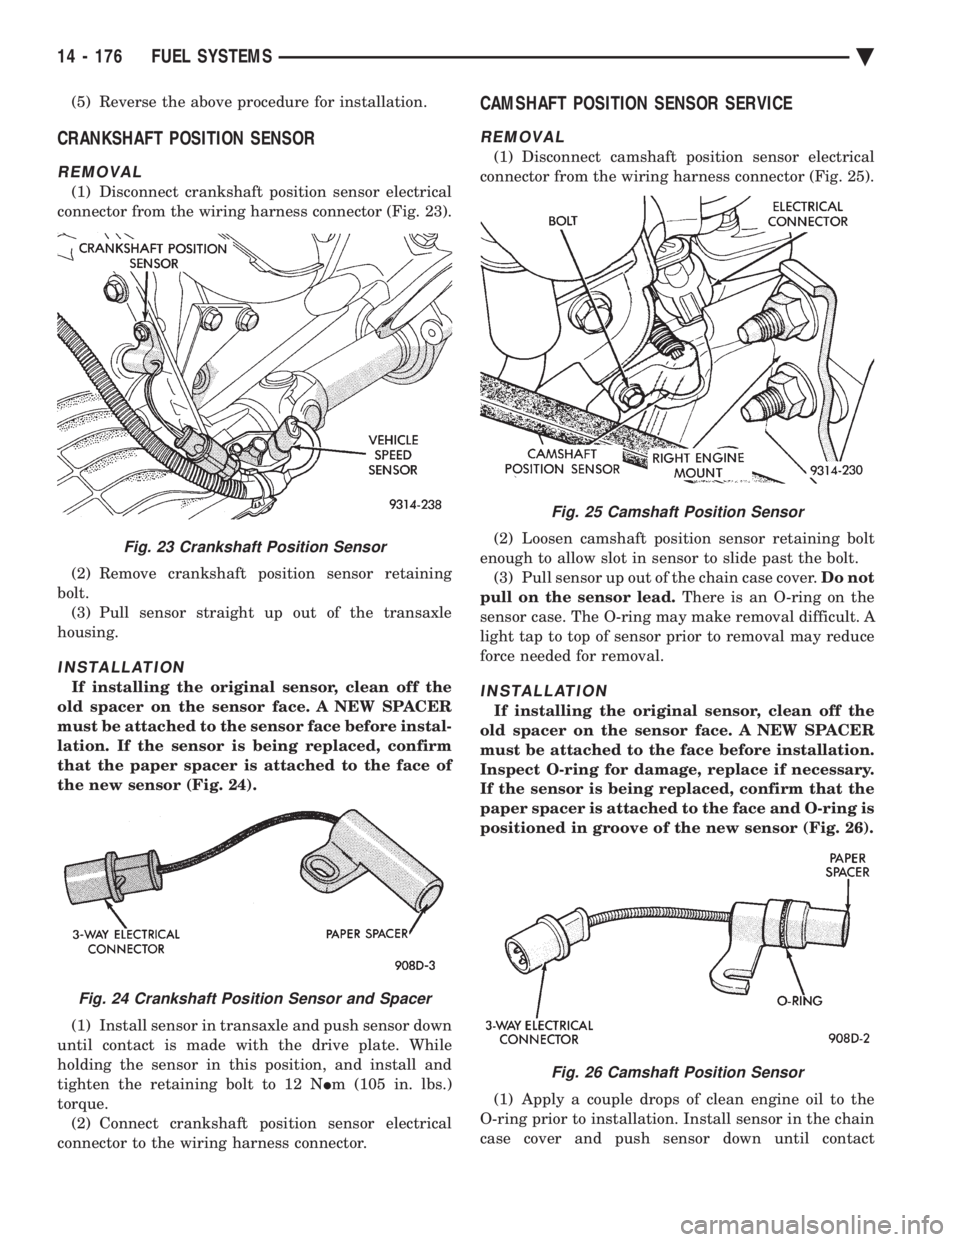
(1) Disconnect crankshaft position sensor electrical
connector from the wiring harness connector (Fig. 23).
(2) Remove crankshaft position sensor retaining
bolt. (3) Pull sensor straight up out of the transaxle
housing.
INSTALLATION
If installing the original sensor, clean off the
old spacer on the sensor face. A NEW SPACER
must be attached to the sensor face before instal-
lation. If the sensor is being replaced, confirm
that the paper spacer is attached to the face of
the new sensor (Fig. 24).
(1) Install sensor in transaxle and push sensor down
until contact is made with the drive plate. While
holding the sensor in this position, and install and
tighten the retaining bolt to 12 N Im (105 in. lbs.)
torque. (2) Connect crankshaft position sensor electrical
connector to the wiring harness connector.
CAMSHAFT POSITION SENSOR SERVICE
REMOVAL
(1) Disconnect camshaft position sensor electrical
connector from the wiring harness connector (Fig. 25).
(2) Loosen camshaft position sensor retaining bolt
enough to allow slot in sensor to slide past the bolt. (3) Pull sensor up out of the chain case cover. Do not
pull on the sensor lead. There is an O-ring on the
sensor case. The O-ring may make removal difficult. A
light tap to top of sensor prior to removal may reduce
force needed for removal.
INSTALLATION
If installing the original sensor, clean off the
old spacer on the sensor face. A NEW SPACER
must be attached to the face before installation.
Inspect O-ring for damage, replace if necessary.
If the sensor is being replaced, confirm that the
paper spacer is attached to the face and O-ring is
positioned in groove of the new sensor (Fig. 26).
(1) Apply a couple drops of clean engine oil to the
O-ring prior to installation. Install sensor in the chain
case cover and push sensor down until contact
Fig. 23 Crankshaft Position Sensor
Fig. 24 Crankshaft Position Sensor and Spacer
Fig. 25 Camshaft Position Sensor
Fig. 26 Camshaft Position Sensor
14 - 176 FUEL SYSTEMS Ä
Page 1917 of 2438
is made with the camshaft gear. While holding the
sensor in this position, install and tighten the retain-
ing bolt 12 N Im (105 in. lbs.) torque.
(2) Connect camshaft position sensor electrical con-
nector to harness connector. Position connector away
from the accessory belt.
HEATED OXYGEN SENSOR (O2SENSOR) SERVICE
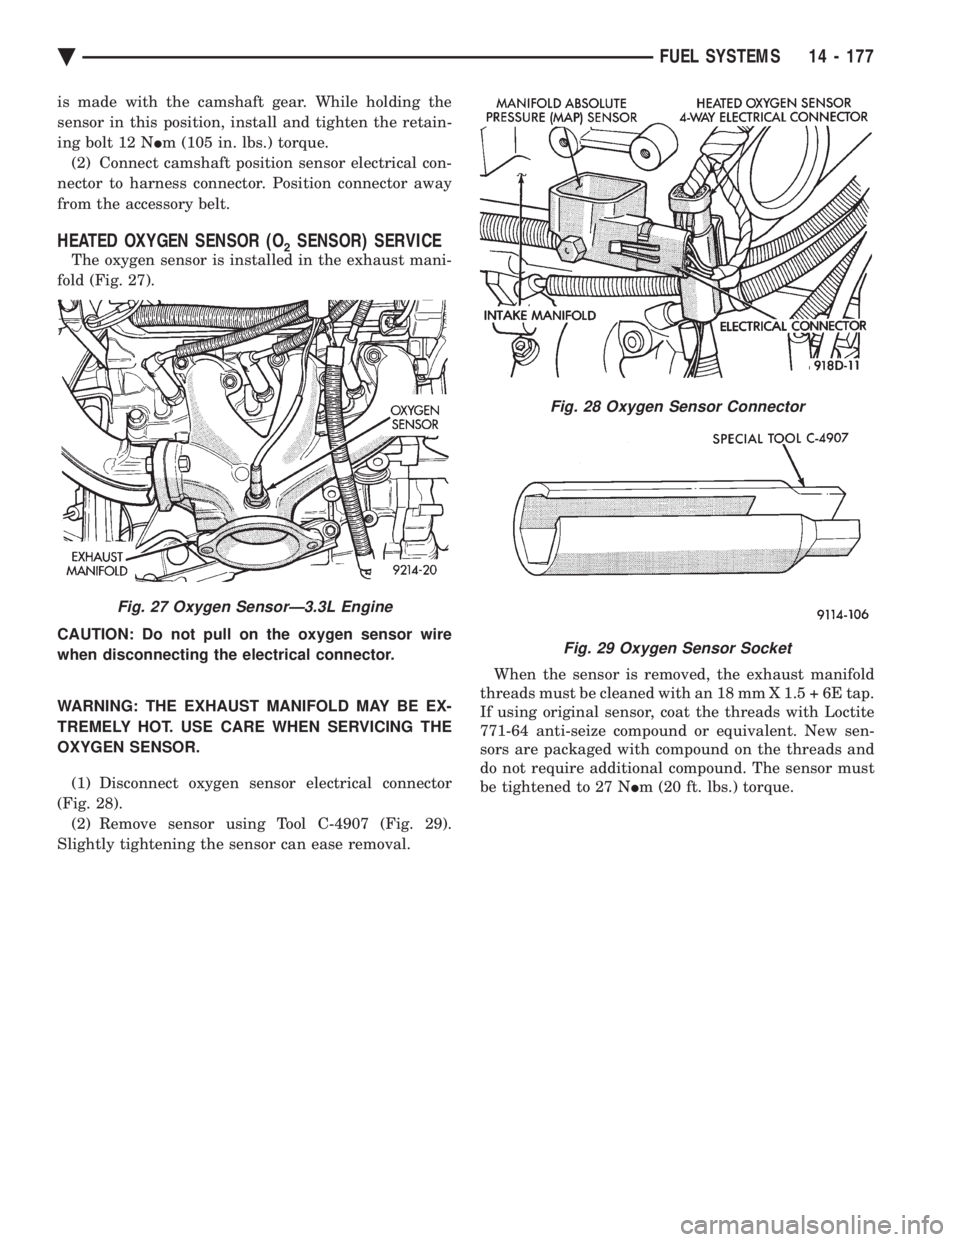
The oxygen sensor is installed in the exhaust mani-
fold (Fig. 27).
CAUTION: Do not pull on the oxygen sensor wire
when disconnecting the electrical connector.
WARNING: THE EXHAUST MANIFOLD MAY BE EX-
TREMELY HOT. USE CARE WHEN SERVICING THE
OXYGEN SENSOR.
(1) Disconnect oxygen sensor electrical connector
(Fig. 28). (2) Remove sensor using Tool C-4907 (Fig. 29).
Slightly tightening the sensor can ease removal. When the sensor is removed, the exhaust manifold
threads must be cleaned with an 18 mm X 1.5 + 6E tap.
If using original sensor, coat the threads with Loctite
771-64 anti-seize compound or equivalent. New sen-
sors are packaged with compound on the threads and
do not require additional compound. The sensor must
be tightened to 27 N Im (20 ft. lbs.) torque.
Fig. 27 Oxygen SensorÐ3.3L Engine
Fig. 28 Oxygen Sensor Connector
Fig. 29 Oxygen Sensor Socket
Ä FUEL SYSTEMS 14 - 177
Page 1919 of 2438
STEERING
CONTENTS
page page
ACUSTAR STANDARD AND TILT STEERING COLUMN ............................ 28
AUTOMATIC TRANSMISSION SHIFTER/IGNITION INTERLOCK .......................... 36
GENERAL INFORMATION .................. 1 POWER STEERING GEAR
................ 25
POWER STEERING PUMPS ................ 1
SPECIFICATIONS AND TIGHTENING REFERENCE .......................... 42
GENERAL INFORMATION
Safety goggles should be worn at all times
when working on any steering gear or pump. Throughout this group, references may be made to
a particular vehicle by letter or number designation.
A chart showing the breakdown of these designations
is included in the Introduction Section at the front of
this service manual. The power steering system consists of these four
major components. Power Steering Pump, Power
Steering Gear, Pressure Hose, and Return Line.
Turning of the steering wheel is converted into lin-
ear travel through the meshing of the helical pinion teeth with the rack teeth. Power assist steering is
provided by an open center, rotary type control valve.
It is used to direct oil from the power steering pump
to either side of the integral steering rack piston. Road feel is controlled by the diameter of a torsion
bar which initially steers the vehicle. As steering ef-
fort increases as in a turn, the torsion bar twists,
causing relative rotary motion between the rotary
valve body and valve spool. This movement directs
oil behind the integral rack piston, which in turn,
builds up hydraulic pressure and assists in the turn-
ing effort.
POWER STEERING PUMPS
INDEX
page page
Checking Power Steering Fluid Level .......... 9
Flow Control Valve Fitting O-Ring Seal ........ 23
General Information ........................ 1
Power Steering Hoses ..................... 11
Power Steering Pressure Switch ............. 10
Power Steering Pump Fluid Reservoirs ........ 22 Power Steering Pump Pressure Test
........... 9
Power Steering Pump Pulley Service .......... 20
Power Steering Pump Removal .............. 12
Power Steering Pump Service ................ 2
Power Steering PumpÐInitial Operation ....... 24
Steering Components Service Diagnosis ........ 2
GENERAL INFORMATION
Hydraulic pressure for operation of the power
steering gear is provided by a belt driven power
steering pump. The power steering pump is a con-
stant flow rate and displacement, vane type pump.
Different styles of Saginaw power steering pumps are
used depending on the engine application of the ve-
hicle. On all four cylinder and 3.0-liter V-6 applications
the Saginaw Ham Can power steering pump is used
(Fig. 1). On the 3.3 & 3.8-liter V-6 and Turbo III applica-
tions, different versions of the Saginaw T/C style
power steering pump is used (Fig. 2). The 3.3 & 3.8 liter V-6 engine application uses the T/C style power
steering pump with a remote mounted reservoir for
the power steering fluid. On the Turbo III application
of the T/C style power steering pump, the power
steering fluid reservoir is integral to the power steer-
ing pump. On the integral reservoir type pump (Fig. 1) the
pump housing and internal components are combined
with the reservoir to form a one-piece mechanism. The Saginaw T/C style power steering pump (Fig.
2), consists of the power steering pump internal com-
ponents and pump housing. The Saginaw T/C style
power steering pump though has no internal reser-
voir for the power steering fluid. Depending on vehi-
Ä STEERING 19 - 1
Page 1920 of 2438
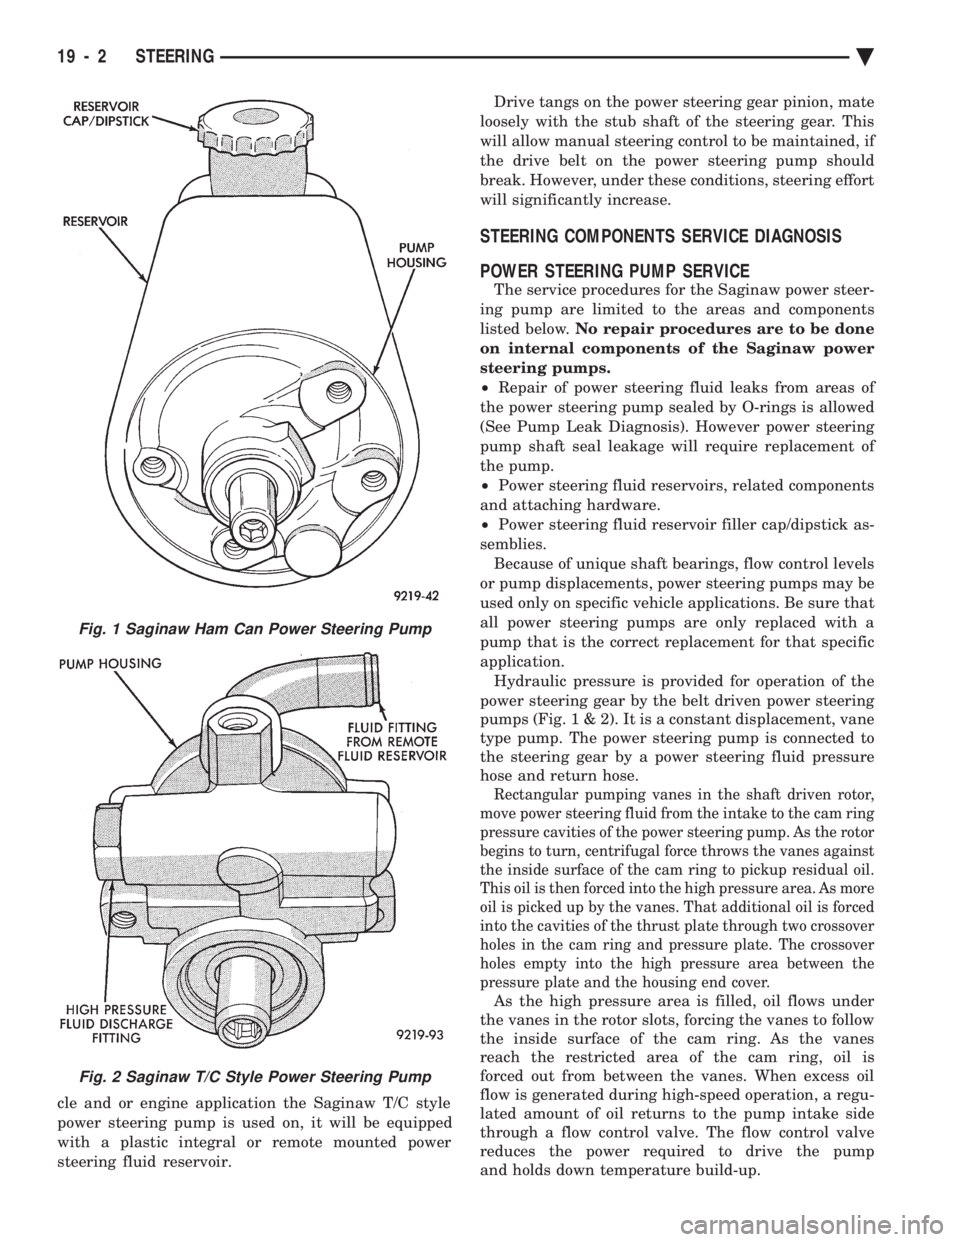
cle and or engine application the Saginaw T/C style
power steering pump is used on, it will be equipped
with a plastic integral or remote mounted power
steering fluid reservoir. Drive tangs on the power steering gear pinion, mate
loosely with the stub shaft of the steering gear. This
will allow manual steering control to be maintained, if
the drive belt on the power steering pump should
break. However, under these conditions, steering effort
will significantly increase.
STEERING COMPONENTS SERVICE DIAGNOSIS
POWER STEERING PUMP SERVICE
The service procedures for the Saginaw power steer-
ing pump are limited to the areas and components
listed below. No repair procedures are to be done
on internal components of the Saginaw power
steering pumps.
² Repair of power steering fluid leaks from areas of
the power steering pump sealed by O-rings is allowed
(See Pump Leak Diagnosis). However power steering
pump shaft seal leakage will require replacement of
the pump.
² Power steering fluid reservoirs, related components
and attaching hardware.
² Power steering fluid reservoir filler cap/dipstick as-
semblies. Because of unique shaft bearings, flow control levels
or pump displacements, power steering pumps may be
used only on specific vehicle applications. Be sure that
all power steering pumps are only replaced with a
pump that is the correct replacement for that specific
application. Hydraulic pressure is provided for operation of the
power steering gear by the belt driven power steering
pumps (Fig . 1 & 2). It is a constant displacement, vane
type pump. The power steering pump is connected to
the steering gear by a power steering fluid pressure
hose and return hose.
Rectangular pumping vanes in the shaft driven rotor,
move power steering fluid from the intake to the cam ring
pressure cavities of the power steering pump. As the rotor
begins to turn, centrifugal force throws the vanes against
the inside surface of the cam ring to pickup residual oil.
This oil is then forced into the high pressure area. As more
oil is picked up by the vanes. That additional oil is forced
into the cavities of the thrust plate through two crossover
holes in the cam ring and pressure plate. The crossover
holes empty into the high pressure area between the
pressure plate and the housing end cover.
As the high pressure area is filled, oil flows under
the vanes in the rotor slots, forcing the vanes to follow
the inside surface of the cam ring. As the vanes
reach the restricted area of the cam ring, oil is
forced out from between the vanes. When excess oil
flow is generated during high-speed operation, a regu-
lated amount of oil returns to the pump intake side
through a flow control valve. The flow control valve
reduces the power required to drive the pump
and holds down temperature build-up.
Fig. 1 Saginaw Ham Can Power Steering Pump
Fig. 2 Saginaw T/C Style Power Steering Pump
19 - 2 STEERING Ä