Page 2414 of 2438
FOREWORD
The information contained in this Service Manual has been prepared for the professional automotive
technician involved in daily repair operations. Information describing the operation and use of standard and
optional equipment is included in the Owner's Manual provided with the vehicle.
These diagrams contain the latest information at the time of publication and incorporate the wiring schematic
for the basic vehicle and available optional equipment.
The diagrams are grouped by body type and sales division. The body codes are explained in the General
Information section. (ExampleÐAP-D, P=Shadow, Sundance). To locate a system or component refer to the black
index tabs on the next page. The tab will assist you in locating the desired area of the manual.
An alphabetical index is provided at the beginning of each section to help you in locating a system or
component. All diagrams are identified by SHEET NUMBER which is found in the lower right- or left-hand corner
of the page.
A Service Manual Comment form is included at the rear of this manual. Use the form to provide Chrysler
Corporation with your comments and suggestions.
Chrysler Corporation reserves the right to change testing procedures, specifications, diagnosis, repair
methods, or vehicle wiring at any time without prior notice or incurring obligation.
NOTE: The acronyms, terminology and nomenclature used to identify emissions related components in this
manual may have changed from prior publications. These new terms are in compliance with S.A.E.
recommended practice J1930. This terminology standard (J1930) is required to comply with the 1993
California Air Research Board (CARB) requirements.
NEXT PAGE ©
Page 2415 of 2438
GROUP TAB LOCATOR
ENGINE, CHASSIS BODY
ELECTRICAL, FUEL EMISSION SYSTEMS
WIRING DIAGRAMS
SUPPLEMENTS
Service Manual Comment Forms (Rear of Manual)
Page 2416 of 2438
INTRODUCTION
CONTENTS
page page
BODY CODE PLATE LOCATION AND DECODING INFORMATION ........................ 2
INTERNATIONAL SYMBOLS ................ 9
METRIC SYSTEM ........................ 6
METRIC THREAD AND GRADE IDENTIFICATION ....................... 6 TORQUE REFERENCES
.................... 6
VEHICLE FAMILY IDENTIFICATION ........... 1
VEHICLE IDENTIFICATION NUMBER ......... 1
VEHICLE SAFETY CERTIFICATION LABEL ..... 1
VEHICLE FAMILY IDENTIFICATION
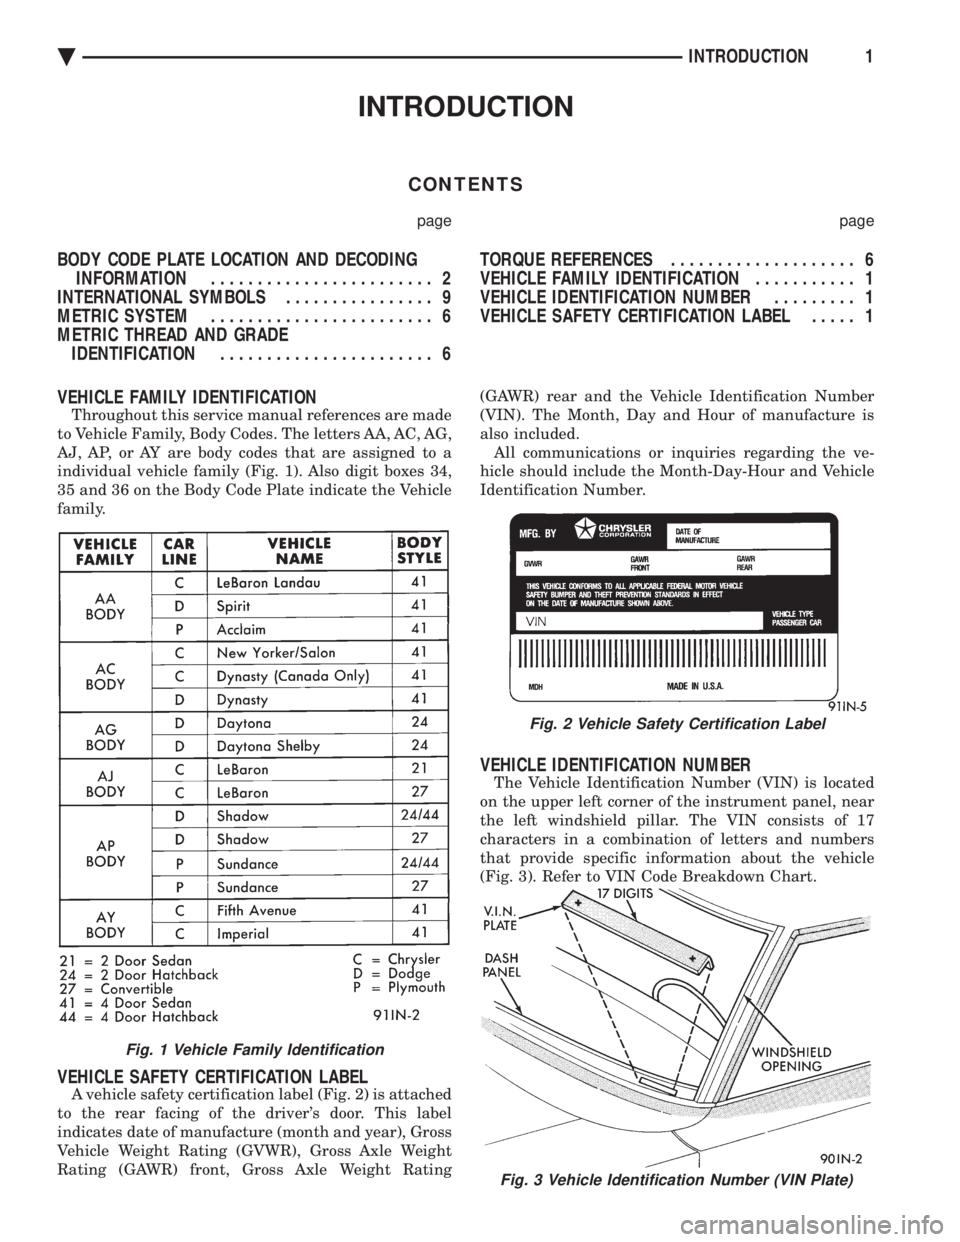
Throughout this service manual references are made
to Vehicle Family, Body Codes. The letters AA, AC, AG,
AJ, AP, or AY are body codes that are assigned to a
individual vehicle family (Fig. 1). Also digit boxes 34,
35 and 36 on the Body Code Plate indicate the Vehicle
family.
VEHICLE SAFETY CERTIFICATION LABEL
A vehicle safety certification label (Fig. 2) is attached
to the rear facing of the driver's door. This label
indicates date of manufacture (month and year), Gross
Vehicle Weight Rating (GVWR), Gross Axle Weight
Rating (GAWR) front, Gross Axle Weight Rating (GAWR) rear and the Vehicle Identification Number
(VIN). The Month, Day and Hour of manufacture is
also included. All communications or inquiries regarding the ve-
hicle should include the Month-Day-Hour and Vehicle
Identification Number.
VEHICLE IDENTIFICATION NUMBER
The Vehicle Identification Number (VIN) is located
on the upper left corner of the instrument panel, near
the left windshield pillar. The VIN consists of 17
characters in a combination of letters and numbers
that provide specific information about the vehicle
(Fig. 3). Refer to VIN Code Breakdown Chart.
Fig. 3 Vehicle Identification Number (VIN Plate)
Fig. 1 Vehicle Family Identification
Fig. 2 Vehicle Safety Certification Label
Ä INTRODUCTION1
Page 2421 of 2438
TORQUE REFERENCES
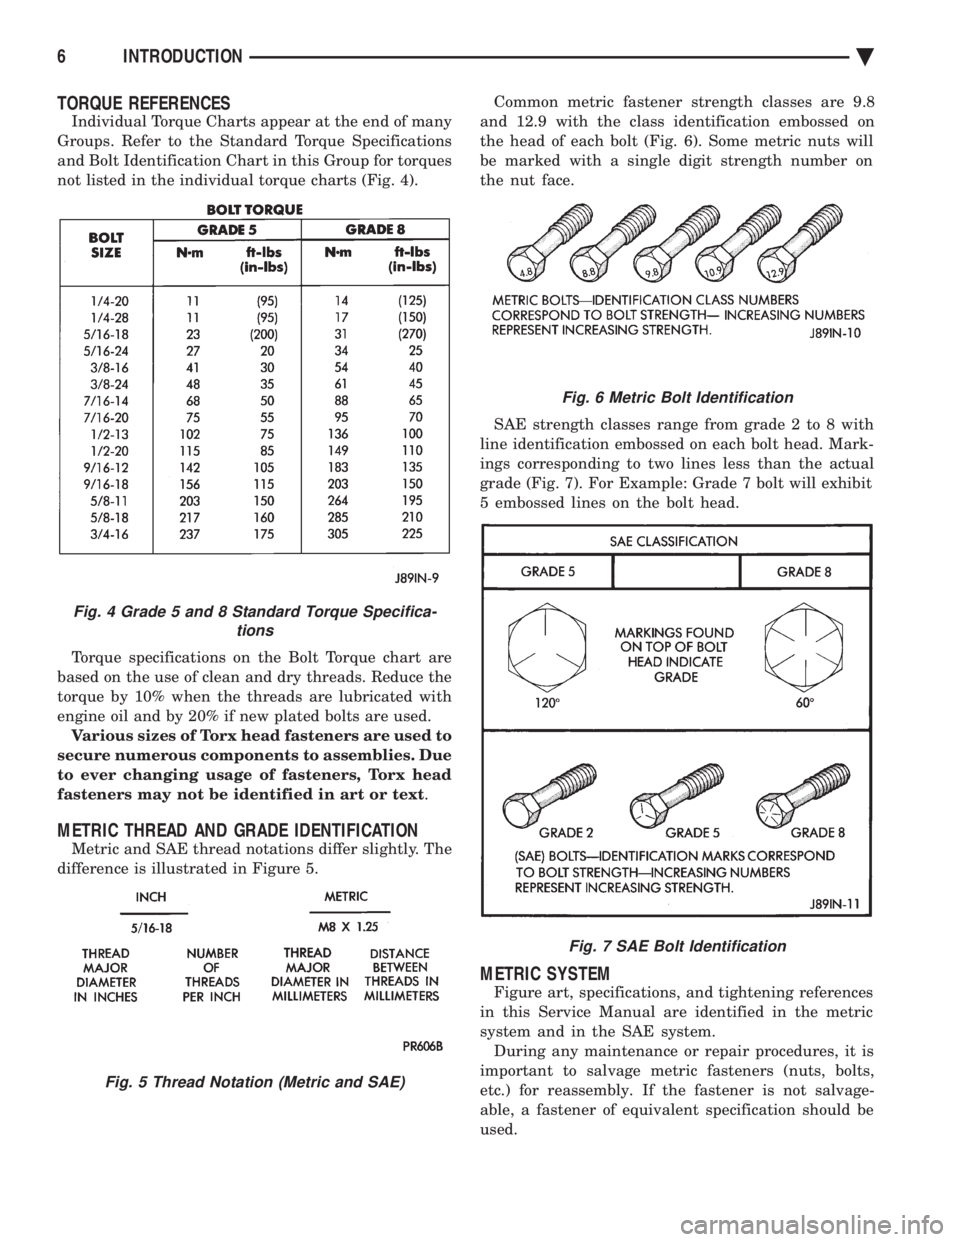
Individual Torque Charts appear at the end of many
Groups. Refer to the Standard Torque Specifications
and Bolt Identification Chart in this Group for torques
not listed in the individual torque charts (Fig. 4).
Torque specifications on the Bolt Torque chart are
based on the use of clean and dry threads. Reduce the
torque by 10% when the threads are lubricated with
engine oil and by 20% if new plated bolts are used. Various sizes of Torx head fasteners are used to
secure numerous components to assemblies. Due
to ever changing usage of fasteners, Torx head
fasteners may not be identified in art or text .
METRIC THREAD AND GRADE IDENTIFICATION
Metric and SAE thread notations differ slightly. The
difference is illustrated in Figure 5. Common metric fastener strength classes are 9.8
and 12.9 with the class identification embossed on
the head of each bolt (Fig. 6). Some metric nuts will
be marked with a single digit strength number on
the nut face.
SAE strength classes range from grade 2 to 8 with
line identification embossed on each bolt head. Mark-
ings corresponding to two lines less than the actual
grade (Fig. 7). For Example: Grade 7 bolt will exhibit
5 embossed lines on the bolt head.
METRIC SYSTEM
Figure art, specifications, and tightening references
in this Service Manual are identified in the metric
system and in the SAE system. During any maintenance or repair procedures, it is
important to salvage metric fasteners (nuts, bolts,
etc.) for reassembly. If the fastener is not salvage-
able, a fastener of equivalent specification should be
used.
Fig. 6 Metric Bolt Identification
Fig. 7 SAE Bolt Identification
Fig. 4 Grade 5 and 8 Standard Torque Specifica- tions
Fig. 5 Thread Notation (Metric and SAE)
6 INTRODUCTION Ä
Page 2426 of 2438
UNITED STATES
The special service tools referred to herein are required for certain service operations. These special service tools
or their equivalent, if not obtainable through a local source, are available through the following outlet.
28635 Mound Road, Warren, Michigan 48092, U.S.A.
MILLER SPECIAL TOOLS
OTC Division, SPX Corporation
Telephone 1-800-801-5420 FAX 1-800-578-7375
CANADA
The special service tools referred to herein are required for certain service operations. These special service tools
or their equivalent, if not obtainable through a local source, are available through the following outlet.
C & D Riley Enterprises Ltd., P.O. Box 243, Amherstburg, Ontario N9V 2Z4
Telephone (519) 736-4600 FAX (519) 736-8433
INTERNATIONAL
The special service tools referred to herein are required for certain service operations. These special service tools
or their equivalent, if not obtainable through a local source, are available through the following outlet.
28635 Mound Road, Warren, Michigan 48092, U.S.A.
MILLER SPECIAL TOOLS
OTC Division, SPX Corporation
Telephone 1-800-801-5420 FAX 1-800-578-7375
NEXT PAGE ©
Page 2427 of 2438
CAUTION
ALL SERVICE AND REBUILDING INSTRUCTIONS CONTAINED HEREIN
ARE APPLICABLE TO, AND FOR THE CONVENIENCE OF, THE AUTOMOTIVE
TRADE ONLY. All test and repair procedures on components or assemblies in
non-automotive applications should be repaired in accordance with instructions
supplied by the manufacturer of the total product.
Proper service and repair is important to the safe, reliable, operation of all motor
vehicles. The service procedures recommended and described in this publication were
developed for professional service personnel and are effective methods for performing
vehicle repair. Following these procedures will help assure efficient economical vehicle
performance and service reliability. Some of these service procedures require the use
of special tools designed for specific procedures. These special tools should be used
when recommended throughout this publication.
Special attention should be exercised when working with spring or tension loaded
fasteners and devices such as E-Clips, Circlips, Snap rings, etc., as careless removal
may cause personal injury. Always wear safety goggles whenever working on vehicles
or vehicle components.
It is important to note that this publication contains various CautionsandWarnings.
These should be carefully read in order to minimize the risk of personal injury, or the
possibility that improper service methods may damage the vehicle or render it unsafe.
It is important to note that these CautionsandWarnings cover only the situations
and procedures DaimlerChrysler Corporation has encountered and recommended.
DaimlerChrysler Corporation could not possibly know, evaluate, and advise the
service trade of all conceivable ways that service may be performed, or of the possible
hazards of each. Consequently, DaimlerChrysler Corporation has not undertaken any
such broad service review. Accordingly, anyone who uses a service procedure, or tool,
that is not recommended in this publication must assure oneself thoroughly that
neither personal safety, nor vehicle safety, be jeopardized by the service methods they
select.
SERVICE AND OWNER MANUALS
Available for Chrysler, Plymouth, Dodge, Dodge Truck, and Jeep
Tvehicles.
Telephone orders may be placed at the number below.
Credit cards are accepted (no CODs). Please have your
order information available at time of call.
CALL: (800) 890-4038 OR FAX: (440) 572-0815
FOR A FREE CATALOG OR TO PLACE AN ORDER.
NEXT PAGE ©
llllllllllll
Page 2430 of 2438
2
1.0 Viewing A Manual In Windows98/95/NT
To view the contents of A CD-ROM, you will need to keep the CD-ROM in
the CD-ROM drive. The Acrobat Reader runs off the hard drive and
uses the CD-ROM drive to access the document content.
1. Click the START button, point to the Programs Group, then point to the desired DaimlerChrysler manual group. Figure 1.0-1 shows the selection for
the 1995 Service Manual CD-ROM.
Figure 1.0-1
2. Proceed to Section 3.0 of this instruction booklet.
Page 2431 of 2438
Page 3
03/30/99
Rev. 0
2.0 Viewing A Service Manual In Windows3.1
To view the contents of A CD-ROM, you will need to keep the CD-ROM in
the CD-ROM drive. The Acrobat Reader runs off the hard drive and
uses the CD-ROM drive to access the document content.
1. Double click on the Program Group icon for the DaimlerChrysler Manual. Figure 3.0-1 shows the icon for the 1995 Service Manual.
Figure 2.01-1
2. Proceed to Section 4.0 of this instruction booklet.