1993 CHEVROLET DYNASTY service
[x] Cancel search: servicePage 289 of 2438
SERVICE ADJUSTMENTS INDEX
page page
Bleeding Bendix Antilock 4 Brake System ....... 3
Master Cylinder Fluid Level .................. 3 Testing for Fluid Contamination
............... 4
MASTER CYLINDER FLUID LEVEL
Check master cylinder reservoir brake fluid level a
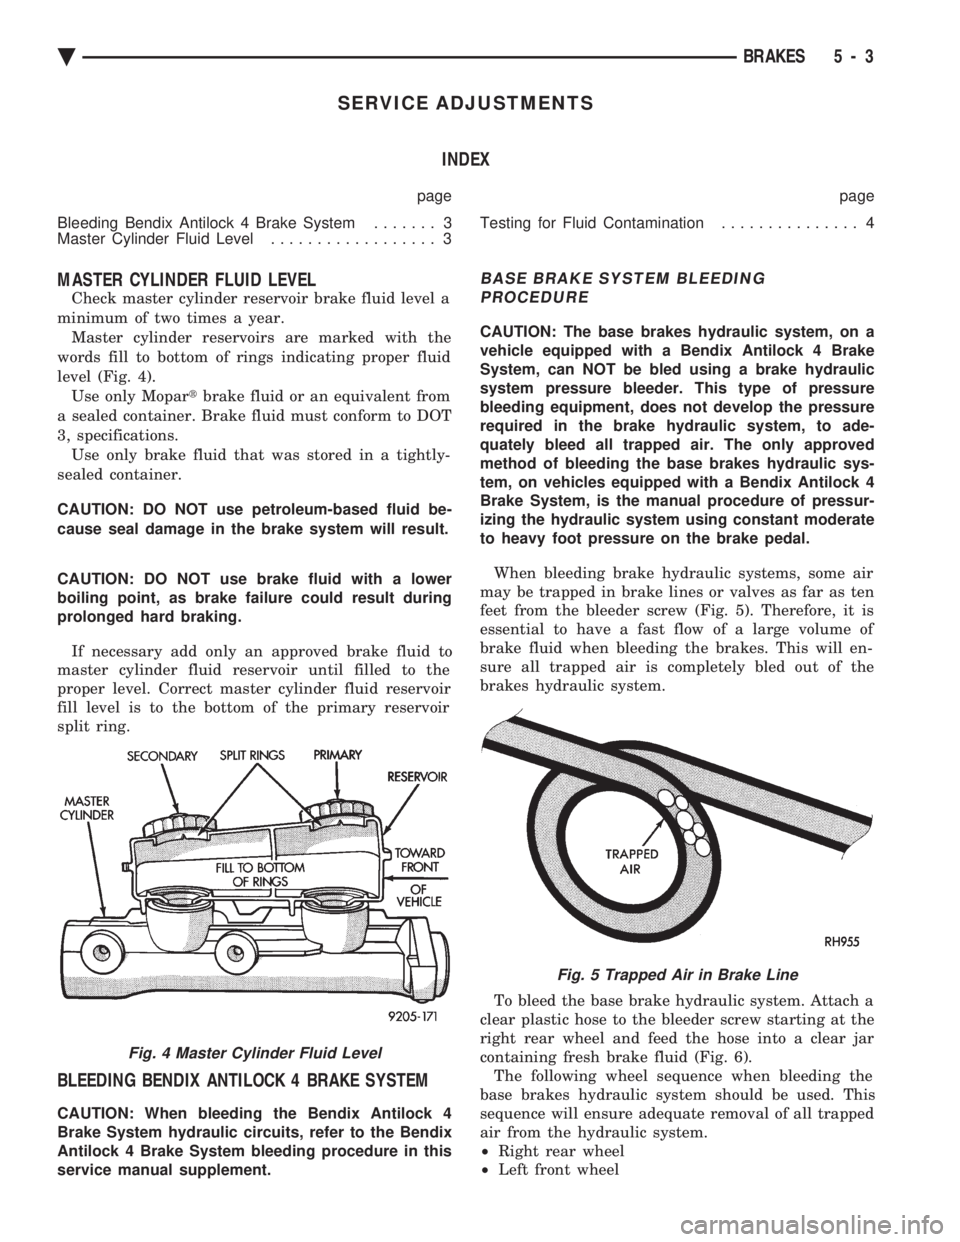
minimum of two times a year. Master cylinder reservoirs are marked with the
words fill to bottom of rings indicating proper fluid
level (Fig. 4). Use only Mopar tbrake fluid or an equivalent from
a sealed container. Brake fluid must conform to DOT
3, specifications. Use only brake fluid that was stored in a tightly-
sealed container.
CAUTION: DO NOT use petroleum-based fluid be-
cause seal damage in the brake system will result.
CAUTION: DO NOT use brake fluid with a lower
boiling point, as brake failure could result during
prolonged hard braking.
If necessary add only an approved brake fluid to
master cylinder fluid reservoir until filled to the
proper level. Correct master cylinder fluid reservoir
fill level is to the bottom of the primary reservoir
split ring.
BLEEDING BENDIX ANTILOCK 4 BRAKE SYSTEM
CAUTION: When bleeding the Bendix Antilock 4
Brake System hydraulic circuits, refer to the Bendix
Antilock 4 Brake System bleeding procedure in this
service manual supplement.
BASE BRAKE SYSTEM BLEEDING PROCEDURE
CAUTION: The base brakes hydraulic system, on a
vehicle equipped with a Bendix Antilock 4 Brake
System, can NOT be bled using a brake hydraulic
system pressure bleeder. This type of pressure
bleeding equipment, does not develop the pressure
required in the brake hydraulic system, to ade-
quately bleed all trapped air. The only approved
method of bleeding the base brakes hydraulic sys-
tem, on vehicles equipped with a Bendix Antilock 4
Brake System, is the manual procedure of pressur-
izing the hydraulic system using constant moderate
to heavy foot pressure on the brake pedal.
When bleeding brake hydraulic systems, some air
may be trapped in brake lines or valves as far as ten
feet from the bleeder screw (Fig. 5). Therefore, it is
essential to have a fast flow of a large volume of
brake fluid when bleeding the brakes. This will en-
sure all trapped air is completely bled out of the
brakes hydraulic system.
To bleed the base brake hydraulic system. Attach a
clear plastic hose to the bleeder screw starting at the
right rear wheel and feed the hose into a clear jar
containing fresh brake fluid (Fig. 6). The following wheel sequence when bleeding the
base brakes hydraulic system should be used. This
sequence will ensure adequate removal of all trapped
air from the hydraulic system.
² Right rear wheel
² Left front wheel
Fig. 4 Master Cylinder Fluid Level
Fig. 5 Trapped Air in Brake Line
Ä BRAKES 5 - 3
Page 296 of 2438
HYDRAULIC SYSTEM CONTROL VALVES INDEX
page page
General Information ....................... 10
Hydraulic System Service Procedures ......... 11 Pressure Differential Warning Light Switch
...... 10
GENERAL INFORMATION
All models equipped with a Bendix Antilock 4 Brake
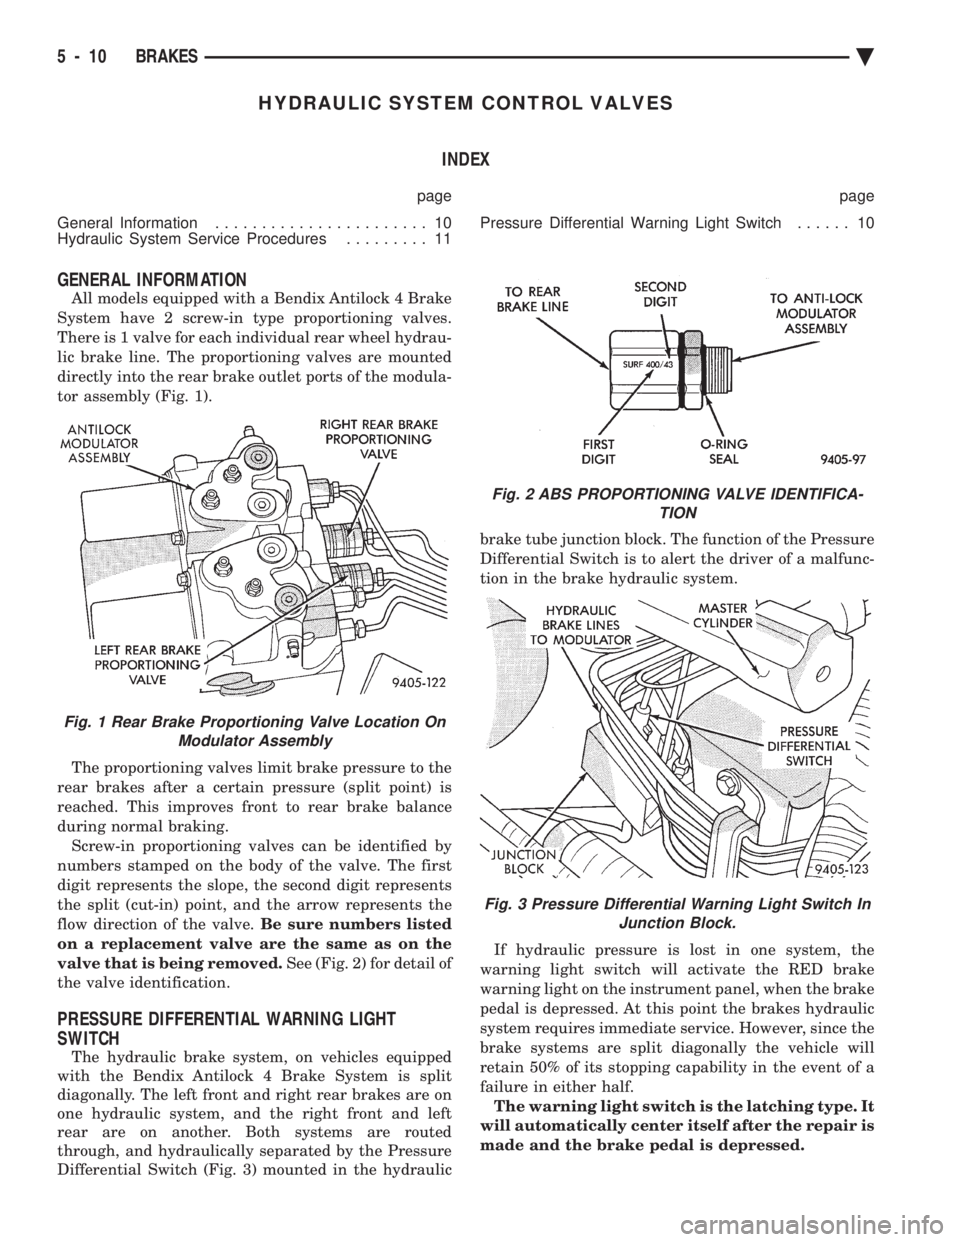
System have 2 screw-in type proportioning valves.
There is 1 valve for each individual rear wheel hydrau-
lic brake line. The proportioning valves are mounted
directly into the rear brake outlet ports of the modula-
tor assembly (Fig. 1).
The proportioning valves limit brake pressure to the
rear brakes after a certain pressure (split point) is
reached. This improves front to rear brake balance
during normal braking. Screw-in proportioning valves can be identified by
numbers stamped on the body of the valve. The first
digit represents the slope, the second digit represents
the split (cut-in) point, and the arrow represents the
flow direction of the valve. Be sure numbers listed
on a replacement valve are the same as on the
valve that is being removed. See (Fig. 2) for detail of
the valve identification.
PRESSURE DIFFERENTIAL WARNING LIGHT
SWITCH
The hydraulic brake system, on vehicles equipped
with the Bendix Antilock 4 Brake System is split
diagonally. The left front and right rear brakes are on
one hydraulic system, and the right front and left
rear are on another. Both systems are routed
through, and hydraulically separated by the Pressure
Differential Switch (Fig. 3) mounted in the hydraulic brake tube junction block. The function of the Pressure
Differential Switch is to alert the driver of a malfunc-
tion in the brake hydraulic system.
If hydraulic pressure is lost in one system, the
warning light switch will activate the RED brake
warning light on the instrument panel, when the brake
pedal is depressed. At this point the brakes hydraulic
system requires immediate service. However, since the
brake systems are split diagonally the vehicle will
retain 50% of its stopping capability in the event of a
failure in either half. The warning light switch is the latching type. It
will automatically center itself after the repair is
made and the brake pedal is depressed.
Fig. 1 Rear Brake Proportioning Valve Location On Modulator Assembly
Fig. 2 ABS PROPORTIONING VALVE IDENTIFICA- TION
Fig. 3 Pressure Differential Warning Light Switch InJunction Block.
5 - 10 BRAKES Ä
Page 297 of 2438
The instrument panel bulb can be checked each
time the ignition switch is turned to the start posi-
tion or the parking brake is set.
HYDRAULIC SYSTEM SERVICE PROCEDURES
BRAKE WARNING SYSTEM
CHECKING BRAKE WARNING SWITCH UNIT
The Red Brake Warning light will come on when the
parking brake is applied with the ignition key turned
ON. The same light will also illuminate should one of
the two service brake hydraulic systems fail.
CAUTION:Make sure air does not enter the hydraulic
system during this test procedure. See bleeding with-
out a pressure bleeder at the beginning of this section
for master cylinder fluid level checking procedures.
To test the service brake warning system lamp.
Raise vehicle on a hoist and open a wheel cylinder
bleeder while a helper depresses the brake pedal and
observes the warning light.
If light fails to come on, inspect for a burned out bulb,
disconnected socket, or a broken or disconnected wire at
the switch. If the bulb is not burned out and the wire
continuity is not interrupted. Check the service brake
warning switch operation with a test lamp between the
switch terminal and a known good ground. Be sure to
fill master cylinder and bleed brake system after correc-
tion has been made, if necessary.
TESTING ANTILOCK PROPORTIONING VALVES
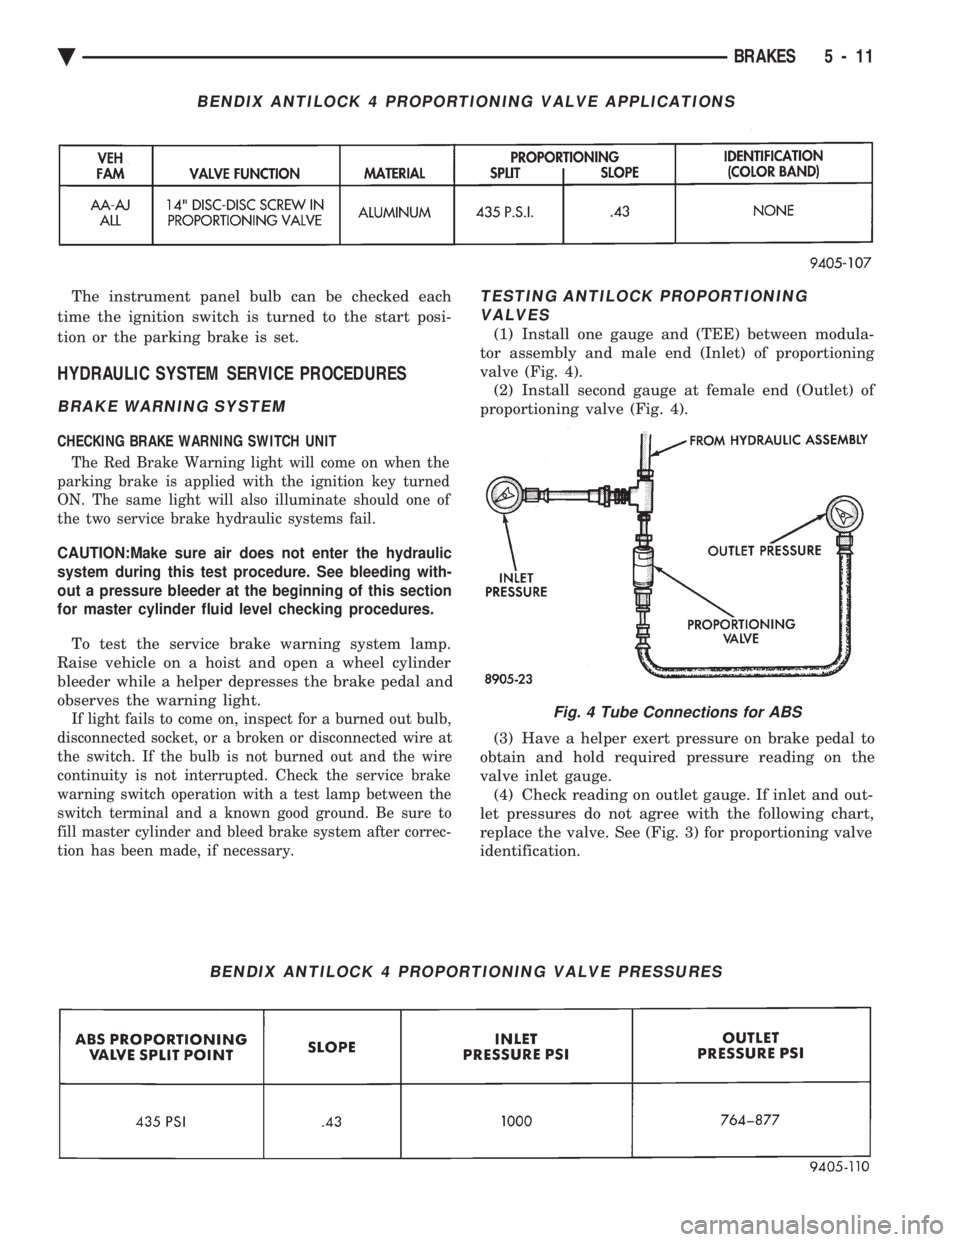
(1) Install one gauge and (TEE) between modula-
tor assembly and male end (Inlet) of proportioning
valve (Fig. 4). (2) Install second gauge at female end (Outlet) of
proportioning valve (Fig. 4).
(3) Have a helper exert pressure on brake pedal to
obtain and hold required pressure reading on the
valve inlet gauge. (4) Check reading on outlet gauge. If inlet and out-
let pressures do not agree with the following chart,
replace the valve. See (Fig. 3) for proportioning valve
identification.
BENDIX ANTILOCK 4 PROPORTIONING VALVE APPLICATIONS
BENDIX ANTILOCK 4 PROPORTIONING VALVE PRESSURES
Fig. 4 Tube Connections for ABS
Ä BRAKES 5 - 11
Page 298 of 2438
BENDIX ANTILOCK 4 BRAKE SYSTEM INDEX
page page
ABS Brake System Diagnostic Features ....... 24
ABS Computer System Service Precautions .... 23
ABS General Service Precautions ............ 23
Antilock Brake System Components .......... 16
Antilock Brake System Definitions ............ 14
Antilock Brakes Operation and Performance .... 15
Antilock System Relays and Warning Lamps .... 19
Bendix Antilock 4 Brake System Diagnostics .... 22
Bleeding Bendix Antilock 4 Brake System ...... 25
Controller Antilock Brake Cab ............... 18
Diagnostic Connector ..................... 19 Electronic Components
.................... 41
General Information ....................... 12
Hydraulic Circuits and Valve Operation ........ 20
Major Components ....................... 14
Mechanical Diagnostics and Service Procedures . 24
Normal Brake System Function .............. 14
On-Car ABS Brake System Service ........... 25
Specifications ........................... 46
System Self-Diagnostics ................... 15
Vehicle Performance ...................... 15
Warning Systems Operation ................ 16
GENERAL INFORMATION
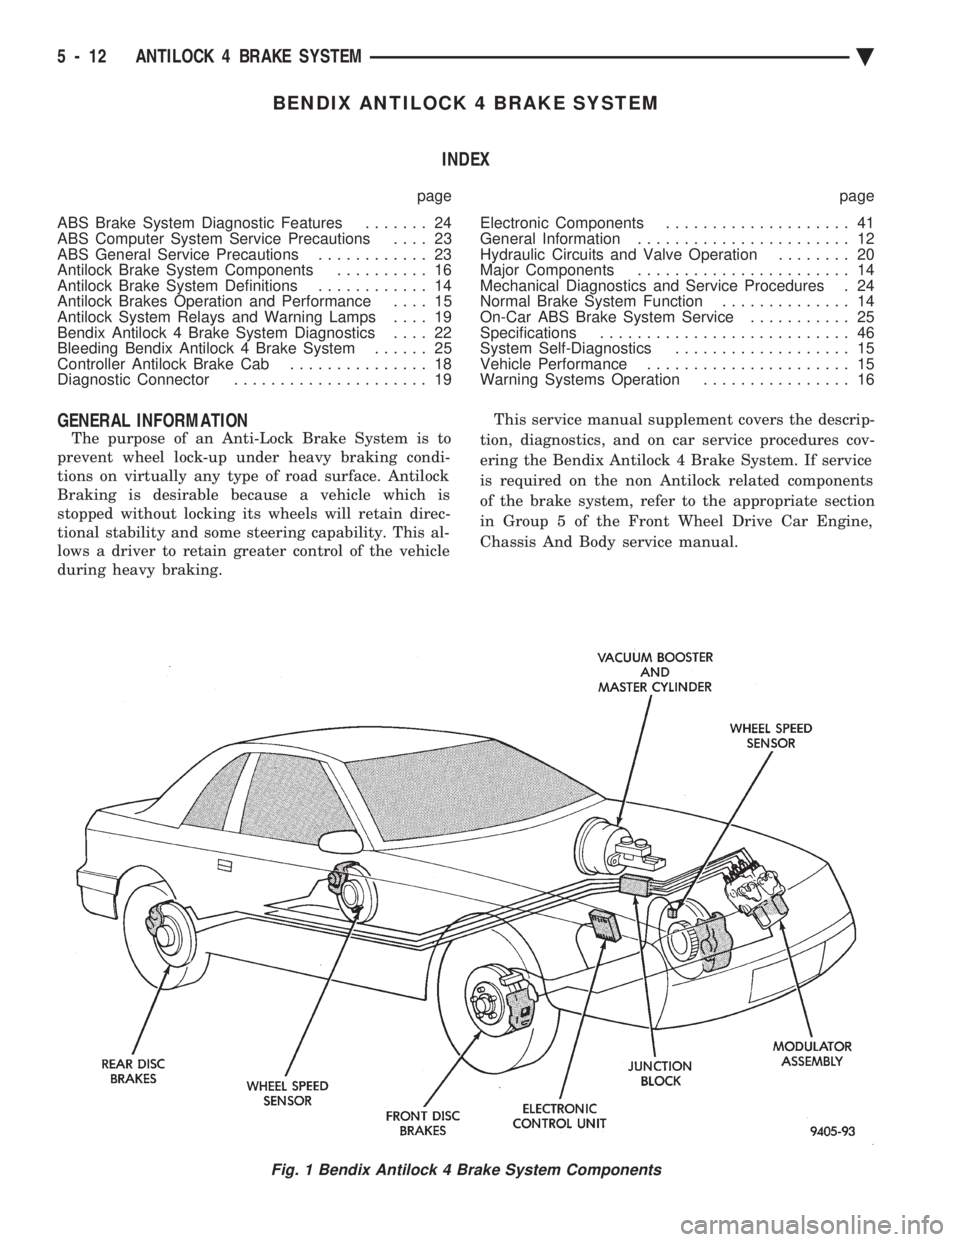
The purpose of an Anti-Lock Brake System is to
prevent wheel lock-up under heavy braking condi-
tions on virtually any type of road surface. Antilock
Braking is desirable because a vehicle which is
stopped without locking its wheels will retain direc-
tional stability and some steering capability. This al-
lows a driver to retain greater control of the vehicle
during heavy braking. This service manual supplement covers the descrip-
tion, diagnostics, and on car service procedures cov-
ering the Bendix Antilock 4 Brake System. If service
is required on the non Antilock related components
of the brake system, refer to the appropriate section
in Group 5 of the Front Wheel Drive Car Engine,
Chassis And Body service manual.
Fig. 1 Bendix Antilock 4 Brake System Components
5 - 12 ANTILOCK 4 BRAKE SYSTEM Ä
Page 302 of 2438

(2) The voltage output from each of the wheel
speed sensors is verified to be within the correct op-
erating range. If a vehicle is not set in motion within 3 minutes
from the time the ignition switch is turned to the on
position. The solenoid valve test is bypassed but the
pump/motor is activated briefly to verify that it is op-
erating correctly.
WARNING SYSTEMS OPERATION
The ABS system uses an Amber Antilock Warning
Lamp, located in the instrument cluster. The purpose
of the warning lamp is discussed in detail below. The Amber Antilock Warning Light will turn on
whenever the CAB detects a condition which results
in a shutdown of the Antilock brake system. The
Amber Antilock Warning Lamp is normally on until
the CAB completes its self tests and turns the lamp
off (approximately 1-2 seconds). When the Amber
Antilock Warning Light is on, only the Antilock
brake function of the brake system if affected. The
standard brake system and the ability to stop the car
will not be affected when only the Amber Antilock
Warning Light is on.
NORMAL OPERATION OF WARNING LAMP
With ignition key turned to the Crank position, the
Red Brake Warning Lamp and Amber Antilock
Warning Lamp will turn on as a bulb check. The
Amber Antilock Warning Lamp will stay on for 1-2
seconds then turn off, once verification of Antilock
Brake System self diagnosis is completed.
ANTILOCK BRAKE SYSTEM COMPONENTS
The following is a detailed description of the Ben-
dix Antilock 4 Brake System components. For infor-
mation on servicing the Four Wheel Disc Brake
System, see the standard Brake section in the Front
Wheel Drive Car, chassis service manual.
MODULATOR ASSEMBLY
WARNING: THE ONLY COMPONENTS OF THE
MODULATOR ASSSEMBLY THAT ARE SERVICE-
ABLE, ARE THE 2 PROPORTIONING VALVES,
BLEED SCREWS AND THREAD SAVERS. THE RE-
MAINING COMPONENTS OF THE MODULATOR AS-
SEMBLY ARE NOT INTENDED TO BE
SERVICEABLE ITEMS. NO ATTEMPT SHOULD BE
MADE TO REMOVE OR SERVICE ANY OTHER COM-
PONENTS OF THE MODEULATOR ASSEMBLY.
The Modulator Assembly (Fig. 1) is located under
the battery tray and is covered with an acid shield.
The Modulator Assembly contains the following com-
ponents for controlling the Antilock brake system. 4
Build/Decay Valves, 4 Shuttle Orifices, 2 Fluid
Sumps, 2 Accumulators, and a Pump/Motor assem- bly. Also attached to the Modulator Assembly are 6
brake tubes which are connected to a 12 way junc-
tion block. The junction block (Fig. 2) is mounted to
the left frame rail below the master cylinder in the
same location as the non ABS equipped combination
valve. The wheel brake lines are attached to the sys-
tem via the connector block.BUILD/DECAY VALVES
There are 4 Build/Decay valves, one for each
wheel. In the released position they provide a fluid
path direct to the wheel brakes. In the actuated (de-
cay) position, they provide a fluid path from the
wheel brakes to the sump. The Build/Decay valves
are spring loaded in the released (build) position.
SHUTTLE ORIFICE
There are 4 Shuttle Orifice Valves, one for each
wheel. The Shuttle Orifice Valve is a hydraulically
actuated valve which shuttles when the Build/Decay
valve is actuated. Actuating of the Build/Decay valve
causes a pressure differential to be created across the
Shuttle Orifice Valve. This acts like placing an ori-
Fig. 1 Modulator Assembly
Fig. 2 Antilock Brake Junction Block
5 - 16 ANTILOCK 4 BRAKE SYSTEM Ä
Page 303 of 2438
fice (restriction) in the line between the wheel and
the Build/Decay Valve. This restriction provides a
controlled build rate to each wheel brake during an
Antilock stop. The Shuttle Orifice Valve will remain
in the orificed position until the ABS cycle is com-
plete. When the ABS cycle has been completed the
Build/Decay valves will return to their released posi-
tion which will equalize the pressure across the
Shuttle Orifice Valves. When the pressure equalizes,
the spring loaded Shuttle Orifice valves will return
to the unrestricted position.
FLUID SUMPS
There are two Fluid Sumps in the Hydraulic As-
sembly, one for the primary and secondary hydraulic
circuits. The Fluid Sumps store the brake fluid that
is decayed from the wheel brakes during an ABS cy-
cle. This fluid is then pumped to an accumulator
and/or the hydraulic system in order to provide build
pressure. The typical pressure in the sumps is 50 psi,
during ABS operation only.
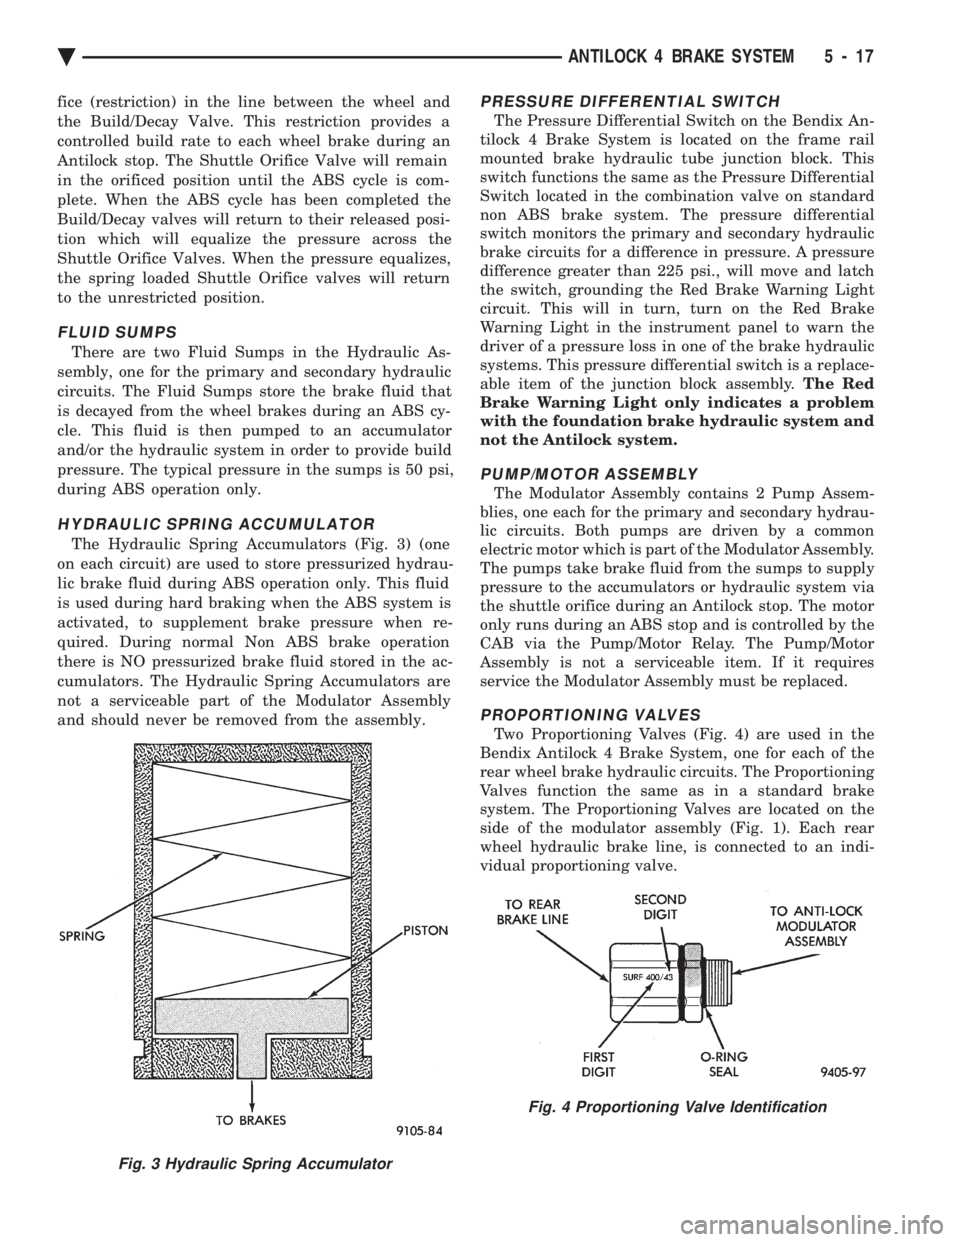
HYDRAULIC SPRING ACCUMULATOR
The Hydraulic Spring Accumulators (Fig. 3) (one
on each circuit) are used to store pressurized hydrau-
lic brake fluid during ABS operation only. This fluid
is used during hard braking when the ABS system is
activated, to supplement brake pressure when re-
quired. During normal Non ABS brake operation
there is NO pressurized brake fluid stored in the ac-
cumulators. The Hydraulic Spring Accumulators are
not a serviceable part of the Modulator Assembly
and should never be removed from the assembly.
PRESSURE DIFFERENTIAL SWITCH
The Pressure Differential Switch on the Bendix An-
tilock 4 Brake System is located on the frame rail
mounted brake hydraulic tube junction block. This
switch functions the same as the Pressure Differential
Switch located in the combination valve on standard
non ABS brake system. The pressure differential
switch monitors the primary and secondary hydraulic
brake circuits for a difference in pressure. A pressure
difference greater than 225 psi., will move and latch
the switch, grounding the Red Brake Warning Light
circuit. This will in turn, turn on the Red Brake
Warning Light in the instrument panel to warn the
driver of a pressure loss in one of the brake hydraulic
systems. This pressure differential switch is a replace-
able item of the junction block assembly. The Red
Brake Warning Light only indicates a problem
with the foundation brake hydraulic system and
not the Antilock system.
PUMP/MOTOR ASSEMBLY
The Modulator Assembly contains 2 Pump Assem-
blies, one each for the primary and secondary hydrau-
lic circuits. Both pumps are driven by a common
electric motor which is part of the Modulator Assembly.
The pumps take brake fluid from the sumps to supply
pressure to the accumulators or hydraulic system via
the shuttle orifice during an Antilock stop. The motor
only runs during an ABS stop and is controlled by the
CAB via the Pump/Motor Relay. The Pump/Motor
Assembly is not a serviceable item. If it requires
service the Modulator Assembly must be replaced.
PROPORTIONING VALVES
Two Proportioning Valves (Fig. 4) are used in the
Bendix Antilock 4 Brake System, one for each of the
rear wheel brake hydraulic circuits. The Proportioning
Valves function the same as in a standard brake
system. The Proportioning Valves are located on the
side of the modulator assembly (Fig. 1). Each rear
wheel hydraulic brake line, is connected to an indi-
vidual proportioning valve.
Fig. 3 Hydraulic Spring Accumulator
Fig. 4 Proportioning Valve Identification
Ä ANTILOCK 4 BRAKE SYSTEM 5 - 17
Page 304 of 2438

WHEEL SPEED SENSORS
One Wheel Speed Sensor (WSS), is located at each
wheel (Fig. 5 and 6), and sends a small AC signal to the
control module CAB. This signal is generated by mag-
netic induction. The magnetic induction is created,
when a toothed sensor ring (Tone Wheel) (Fig. 7) passes
a stationary magnetic Wheel Speed Sensor. The CAB
converts the AC signal generated at each wheel into a
digital signal. If a wheel locking tendency is detected,
the CAB will then modulate hydraulic pressure to pre-
vent the wheel or wheels from locking.
The front Wheel Speed Sensor is attached to a boss
in the steering knuckle (Fig. 5). The tone wheel is
part of the outboard constant velocity joint (Fig. 5). The rear Wheel Speed Sensor is mounted to the cal-
iper adapter (Fig. 6) and the rear tone wheel is an
integral part of the rear wheel hub (Fig. 7). The
speed sensor air gap is NOT adjustable.
The four Wheel Speed Sensors are serviced individ-
ually. The front Tone Wheels are serviced as an as-
sembly with the outboard constant velocity joint. The
rear Tone Wheels are serviced as an assembly with
the rear brake hub. Correct Antilock system operation is dependent on
the vehicle's wheel speed signals, that are generated
by the Wheel Speed Sensors. The vehicle's wheels
and tires must all be the same size and type to gen-
erate accurate signals. In addition, the tires must be
inflated to the recommended pressures for optimum
system operation. Variations in wheel and tire size
or significant variations in inflation pressure can
produce inaccurate wheel speed signals.
CONTROLLER ANTILOCK BRAKE CAB
The Antilock Brake Controller is a small micropro-
cessor based device which monitors the brake system
and controls the system while it functions in the An-
tilock mode. The CAB is mounted on the top of the
right front frame rail and uses a 60-way system con-
nector (Fig. 8). The power source for the CAB is
through the ignition switch in the Run or On posi-
tion. THE CONTROLLER ANTILOCK BRAKE
CAB IS NOT ON THE CCD BUS The primary functions of the CAB are:
(1) Detect wheel locking tendencies.
(2) Control fluid modulation to the brakes while in
Antilock mode. (3) Monitor the system for proper operation.
Fig. 5 Front Wheel Speed Sensor
Fig. 6 Rear Wheel Speed Sensor
Fig. 7 Rear Tone Wheel (Typical)
5 - 18 ANTILOCK 4 BRAKE SYSTEM Ä
Page 308 of 2438
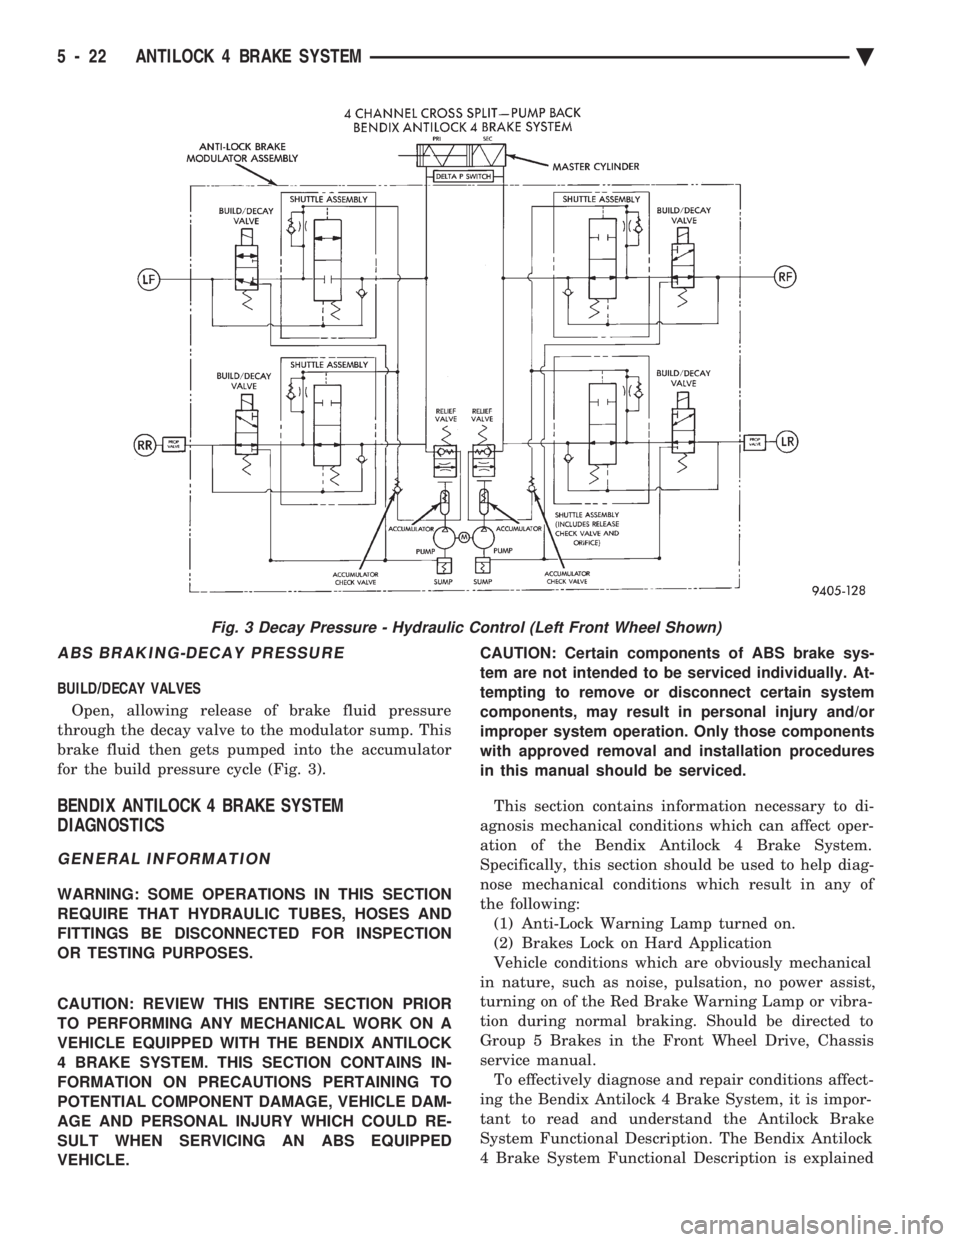
ABS BRAKING-DECAY PRESSURE
BUILD/DECAY VALVES Open, allowing release of brake fluid pressure
through the decay valve to the modulator sump. This
brake fluid then gets pumped into the accumulator
for the build pressure cycle (Fig. 3).
BENDIX ANTILOCK 4 BRAKE SYSTEM
DIAGNOSTICS
GENERAL INFORMATION
WARNING: SOME OPERATIONS IN THIS SECTION
REQUIRE THAT HYDRAULIC TUBES, HOSES AND
FITTINGS BE DISCONNECTED FOR INSPECTION
OR TESTING PURPOSES.
CAUTION: REVIEW THIS ENTIRE SECTION PRIOR
TO PERFORMING ANY MECHANICAL WORK ON A
VEHICLE EQUIPPED WITH THE BENDIX ANTILOCK
4 BRAKE SYSTEM. THIS SECTION CONTAINS IN-
FORMATION ON PRECAUTIONS PERTAINING TO
POTENTIAL COMPONENT DAMAGE, VEHICLE DAM-
AGE AND PERSONAL INJURY WHICH COULD RE-
SULT WHEN SERVICING AN ABS EQUIPPED
VEHICLE. CAUTION: Certain components of ABS brake sys-
tem are not intended to be serviced individually. At-
tempting to remove or disconnect certain system
components, may result in personal injury and/or
improper system operation. Only those components
with approved removal and installation procedures
in this manual should be serviced.
This section contains information necessary to di-
agnosis mechanical conditions which can affect oper-
ation of the Bendix Antilock 4 Brake System.
Specifically, this section should be used to help diag-
nose mechanical conditions which result in any of
the following: (1) Anti-Lock Warning Lamp turned on.
(2) Brakes Lock on Hard Application
Vehicle conditions which are obviously mechanical
in nature, such as noise, pulsation, no power assist,
turning on of the Red Brake Warning Lamp or vibra-
tion during normal braking. Should be directed to
Group 5 Brakes in the Front Wheel Drive, Chassis
service manual. To effectively diagnose and repair conditions affect-
ing the Bendix Antilock 4 Brake System, it is impor-
tant to read and understand the Antilock Brake
System Functional Description. The Bendix Antilock
4 Brake System Functional Description is explained
Fig. 3 Decay Pressure - Hydraulic Control (Left Front Wheel Shown)
5 - 22 ANTILOCK 4 BRAKE SYSTEM Ä