1993 CHEVROLET DYNASTY service
[x] Cancel search: servicePage 207 of 2438
PARKING BRAKES INDEX
page page
Adjust Parking Brake (AG & AJ Body) ........ 61
General Information ....................... 57
Installing Parking Brake Front Cable (AA, AC, AP AY Body) ............................. 62
Installing Parking Brake Shoes .............. 64
Parking Brake Hand Lever Assembly Removal and Installation ............................ 63
Rear Parking Brake Cable Installation ......... 62 Rear Parking Brake Cable Removal (AA, AC, AP,
AY Body) ............................. 61
Removal and Installation Parking Brake Shoes . . 63
Removing Parking Brake Front Cable (AA, AC, AP, AY Body) ............................. 62
Self Adjusting Procedures (AG & AJ Body) ..... 61
Service Procedures ....................... 57
GENERAL INFORMATION
The parking brake mechanism on vehicles with
rear disc brake applications. Consists of a small duo-
servo brake which is mounted to the adapter. The
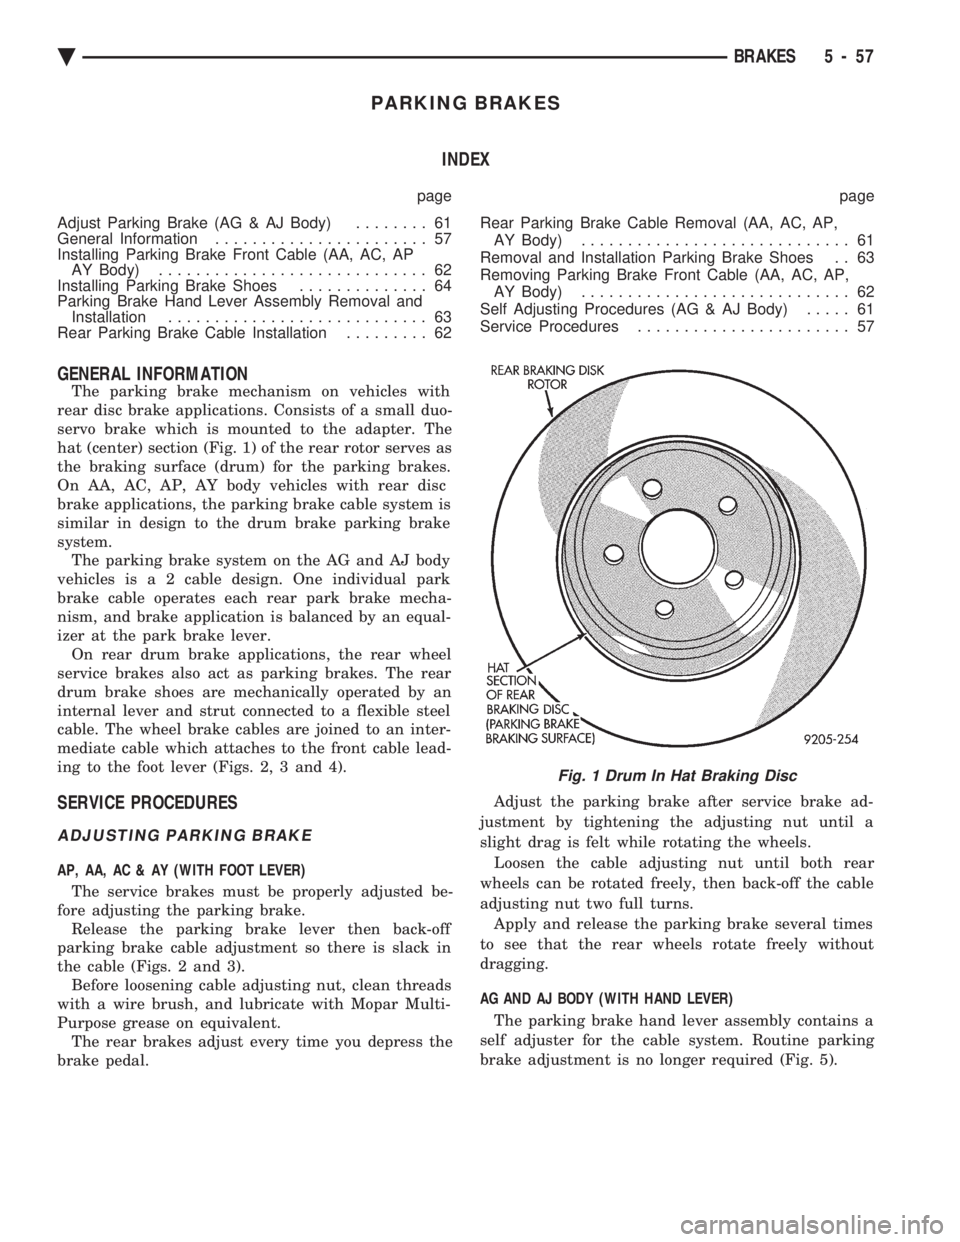
hat (center) section (Fig. 1) of the rear rotor serves as
the braking surface (drum) for the parking brakes.
On AA, AC, AP, AY body vehicles with rear disc
brake applications, the parking brake cable system is
similar in design to the drum brake parking brake
system. The parking brake system on the AG and AJ body
vehicles i s a 2 cable design. One individual park
brake cable operates each rear park brake mecha-
nism, and brake application is balanced by an equal-
izer at the park brake lever. On rear drum brake applications, the rear wheel
service brakes also act as parking brakes. The rear
drum brake shoes are mechanically operated by an
internal lever and strut connected to a flexible steel
cable. The wheel brake cables are joined to an inter-
mediate cable which attaches to the front cable lead-
ing to the foot lever (Figs. 2, 3 and 4).
SERVICE PROCEDURES
ADJUSTING PARKING BRAKE
AP, AA, AC & AY (WITH FOOT LEVER)
The service brakes must be properly adjusted be-
fore adjusting the parking brake. Release the parking brake lever then back-off
parking brake cable adjustment so there is slack in
the cable (Figs. 2 and 3). Before loosening cable adjusting nut, clean threads
with a wire brush, and lubricate with Mopar Multi-
Purpose grease on equivalent. The rear brakes adjust every time you depress the
brake pedal. Adjust the parking brake after service brake ad-
justment by tightening the adjusting nut until a
slight drag is felt while rotating the wheels. Loosen the cable adjusting nut until both rear
wheels can be rotated freely, then back-off the cable
adjusting nut two full turns. Apply and release the parking brake several times
to see that the rear wheels rotate freely without
dragging.
AG AND AJ BODY (WITH HAND LEVER) The parking brake hand lever assembly contains a
self adjuster for the cable system. Routine parking
brake adjustment is no longer required (Fig. 5).
Fig. 1 Drum In Hat Braking Disc
Ä BRAKES 5 - 57
Page 212 of 2438
(2) Disconnect parking brake cable from brake
shoe lever. (3) Using an aircraft type hose clamp compress re-
tainers on end of cable housing and start cable out of
retaining hole in the adapter. Remove clamp when
retainers are free of mounting hole in the adapter
(Fig. 6). (4) Remove clip from parking brake cable at
hanger bracket and pull cable away from trailing
arm.
REAR PARKING BRAKE CABLE INSTALLATION
DRUM BRAKES (AA, AC, AP, AY BODY)
(1) Route parking brake cable assembly through
trailing arm and hanger bracket. (2) Install parking brake cable retaining clip.
(3) Install parking brake cable into rear brake sup-
port plate. Be sure all retainers are expanded around
mounting hole in brake support plate, and then con-
nect parking brake cable end to brake shoe lever. (4) Insert forward end of parking brake cable into
connector. (5) Install brake drum, and wheel and tire assem-
bly.
DRUM BRAKES (AG & AJ BODY)
(1) Route each parking brake cable assembly
through trailing arm and mounting bracket. (2) Install parking brake cable retaining clip.
(3) Install parking brake cable into rear brake sup-
port plate. Be sure the retainers are expanded
around mounting hole in the brake support plate and
connect parking brake cable end to brake shoe lever. (4) Insert forward end of parking brake cable into
floor pan of vehicle. Then connector park brake cable
to equalizer at park brake hand lever. (5) Install brake drum, and wheel and tire assem-
bly.
DISC BRAKES (AA, AC, AP, AY BODY)
(1) Route parking brake cable assembly through
trailing arm and parking brake cable hanger
bracket. (2) Install parking brake cable to hanger bracket
retaining clip. (3) Install parking brake cable into rear brake
adapter. Be sure all cable retainers on parking brake
cable are expanded around mounting hole in adapter
and connect cable end to brake shoe lever. (4) Insert forward end of cable into connector.
(5) Adjust parking brake shoe diameter to 171 mm
(6.75 inch). (6) Install rear braking disc, caliper assembly and
wheel and tire assembly.
DISC BRAKES (AG & AJ BODY)
(1) Route each individual parking brake cable as-
sembly through trailing arm and parking brake ca-
ble mounting bracket. (2) Install parking brake cable to mounting
bracket retaining clip. (3) Install parking brake cable into rear disc brake
adapter. Be sure all cable retainers on parking brake
cable are expanded around mounting hole in adapter,
and then connect cable end to brake shoe lever. (4) Insert forward end of parking brake cable into
floor pan of vehicle. Then connector park brake cable
to equalizer at park brake hand lever. (5) Adjust parking brake shoe diameter to 171 mm
(6.75 inch). (6) Install rear braking disc, caliper assembly and
wheel and tire assembly.
REMOVING PARKING BRAKE FRONT CABLE (AA,
AC, AP, AY BODY)
(1) Loosen parking brake cable adjusting nut un-
der car. Disengage front cable from intermediate ca-
ble connector (Fig. 2). (2) Remove park brake cable retaining clip from
floor pan of vehicle. (3) Lift floor mat for access to floor pan.
(4) Remove floor pan seal.
(5) Pull parking brake cable strand end forward
and disconnect from foot lever clevis. Separate park-
ing brake cable from parking brake foot lever and
bracket on body rail. (6) Pull parking brake cable assembly through
hole in floor pan and up into vehicle.
INSTALLING PARKING BRAKE FRONT CABLE (AA,
AC, AP AY Body)
(1) Insert parking brake cable housing retainers
into hole in rail bracket and parking brake foot lever
assembly (Fig. 2). (2) Feed parking brake cable end through holes in
floor pan and rail bracket, from the interior of the
vehicle. (3) Install floor pan seal.
(4) Engage parking brake cable strand end in foot
lever clevis. Seat cable ends in parking brake assem-
bly and parking brake cable rail bracket. (5) Replace floor mat.
(6) Attach park brake cable retaining clip to floor
pan of vehicle. (7) Engage rear parking brake cable end to inter-
mediate cable connector. (8) Adjust service and parking brakes.
5 - 62 BRAKES Ä
Page 216 of 2438

MASTER CYLINDER INDEX
page page
Brake Fluid Level Sensor .................. 66
General Information ....................... 66 Master Cylinder Service Procedures
.......... 67
Testing the Master Cylinder ................. 66
GENERAL INFORMATION
The tandem master cylinder (Fig. 1) has a glass re-
inforced nylon reservoir and an anodized aluminum
body. Do not hone the bore of the cylinder, as this will
remove the anodized surface. The reservoir is indexed to prevent installation in
the wrong direction (Fig. 2). The cap diaphragms are
slit to allow atmospheric pressure to equalize on both
sides of the diaphragm. The primary and secondary outlet tubes from the
master cylinder are connected to the valve mounted
under the master cylinder. The front part of this
block connects to the secondary outlet tube and sup-
plies the right rear and left front brakes. The rear
portion of the block connects to the primary outlet
tube and supplies the right front and left rear
brakes.
BRAKE FLUID LEVEL SENSOR
The Brake Fluid Level sensor is found only in the
AJ body vehicles with the visual electronic message
center. The purpose of the sensor is to provide the
driver with an early warning message that brake
fluid in master cylinder reservoir has dropped to a
below normal. As the fluid drops below the design level the sensor
closes the warning message circuit. Approximately
15 seconds later the message BRAKE FLUID LOW
appears on the instrument panel. At this time the master cylinder reservoir should be checked and filled
to the bottom of the rings with DOT 3 brake fluid. To check the operation of the Brake Fluid Level
sensor, with ignition on and wiring still attache-
d,remove sensor from master cylinder and hold in
upright position. Within 30 seconds the instrument
panel message BRAKE FLUID LOW should appear.
Next invert the sensor. The instrument panel message
should turn off immediately. If the above sequence
occurs the sensor is operating properly. If the message
does not appear remove the wiring from the sensor and
using a jumper wire connect both sides of the plug. The
instrumental panel message BRAKE FLUID LOW
should appear within 30 seconds. If the message does
not appear a problem exists in the wiring or instru-
mentation. If the message does appear the sensor is
faulty and must be replaced. The Brake Fluid Level
sensor is not a repairable item (Fig. 2).
TESTING THE MASTER CYLINDER
Be sure master cylinder vents at both ports.
Apply pedal lightly with engine running and look for
fluid squirting or swirling into reservoirs. In this master cylinder, a special baffle reduces the
amount of fluid entering the secondary reservoir only a
small disturbance may be seen.
Fig. 1 Aluminum Master Cylinder (Cutaway View)
Fig. 2 Brake Fluid Level Sensor
5 - 66 BRAKES Ä
Page 217 of 2438
MASTER CYLINDER SERVICE PROCEDURES
MASTER CYLINDER REMOVAL
Disconnect primary and secondary brake tubes from
master cylinder housing. Install plugs at brake tube
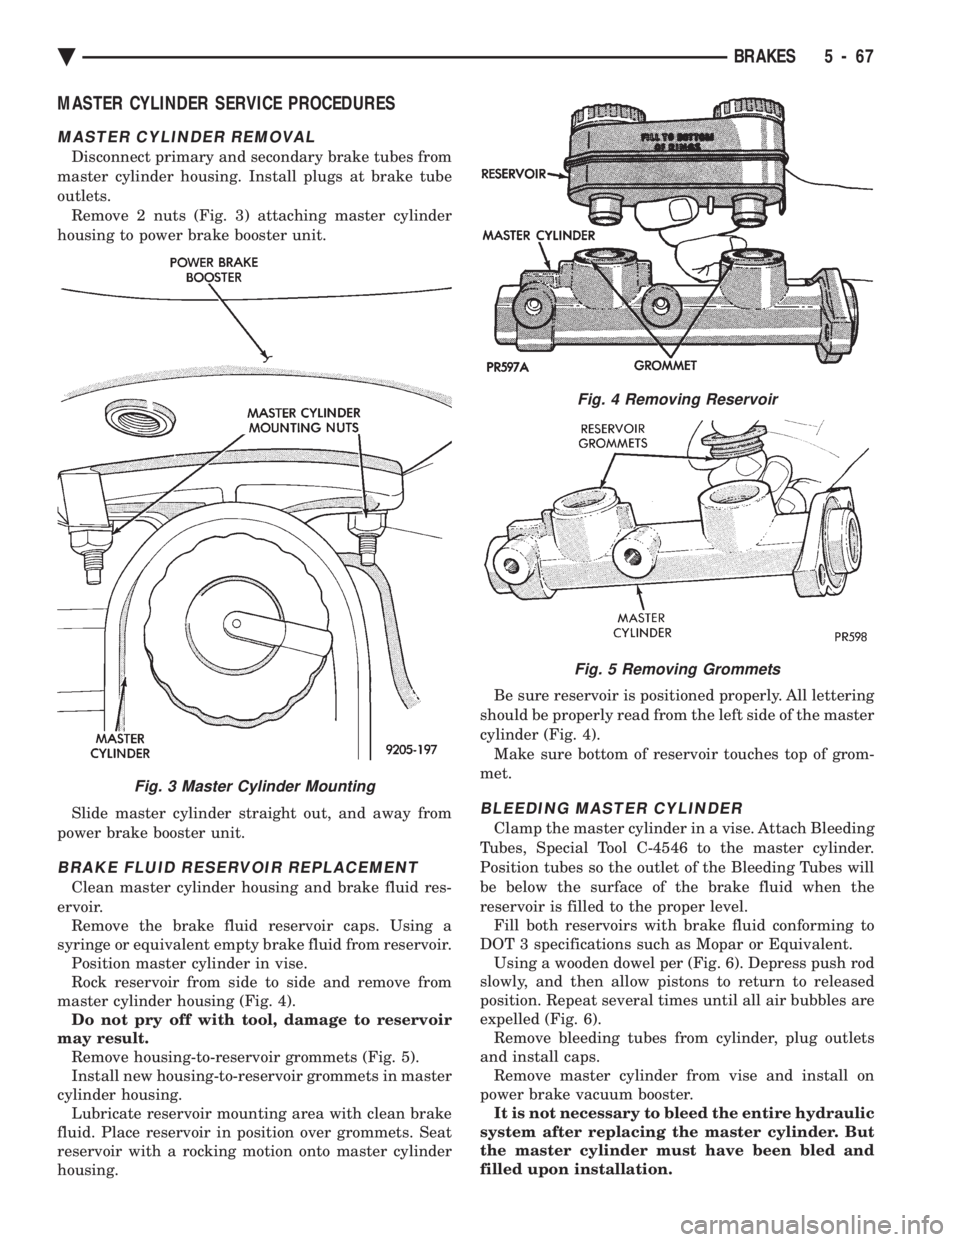
outlets. Remove 2 nuts (Fig. 3) attaching master cylinder
housing to power brake booster unit.
Slide master cylinder straight out, and away from
power brake booster unit.
BRAKE FLUID RESERVOIR REPLACEMENT
Clean master cylinder housing and brake fluid res-
ervoir. Remove the brake fluid reservoir caps. Using a
syringe or equivalent empty brake fluid from reservoir. Position master cylinder in vise.
Rock reservoir from side to side and remove from
master cylinder housing (Fig. 4). Do not pry off with tool, damage to reservoir
may result. Remove housing-to-reservoir grommets (Fig. 5).
Install new housing-to-reservoir grommets in master
cylinder housing. Lubricate reservoir mounting area with clean brake
fluid. Place reservoir in position over grommets. Seat
reservoir with a rocking motion onto master cylinder
housing. Be sure reservoir is positioned properly. All lettering
should be properly read from the left side of the master
cylinder (Fig. 4). Make sure bottom of reservoir touches top of grom-
met.
BLEEDING MASTER CYLINDER
Clamp the master cylinder in a vise. Attach Bleeding
Tubes, Special Tool C-4546 to the master cylinder.
Position tubes so the outlet of the Bleeding Tubes will
be below the surface of the brake fluid when the
reservoir is filled to the proper level. Fill both reservoirs with brake fluid conforming to
DOT 3 specifications such as Mopar or Equivalent. Using a wooden dowel per (Fig. 6). Depress push rod
slowly, and then allow pistons to return to released
position. Repeat several times until all air bubbles are
expelled (Fig. 6). Remove bleeding tubes from cylinder, plug outlets
and install caps. Remove master cylinder from vise and install on
power brake vacuum booster. It is not necessary to bleed the entire hydraulic
system after replacing the master cylinder. But
the master cylinder must have been bled and
filled upon installation.
Fig. 4 Removing Reservoir
Fig. 5 Removing Grommets
Fig. 3 Master Cylinder Mounting
Ä BRAKES 5 - 67
Page 219 of 2438
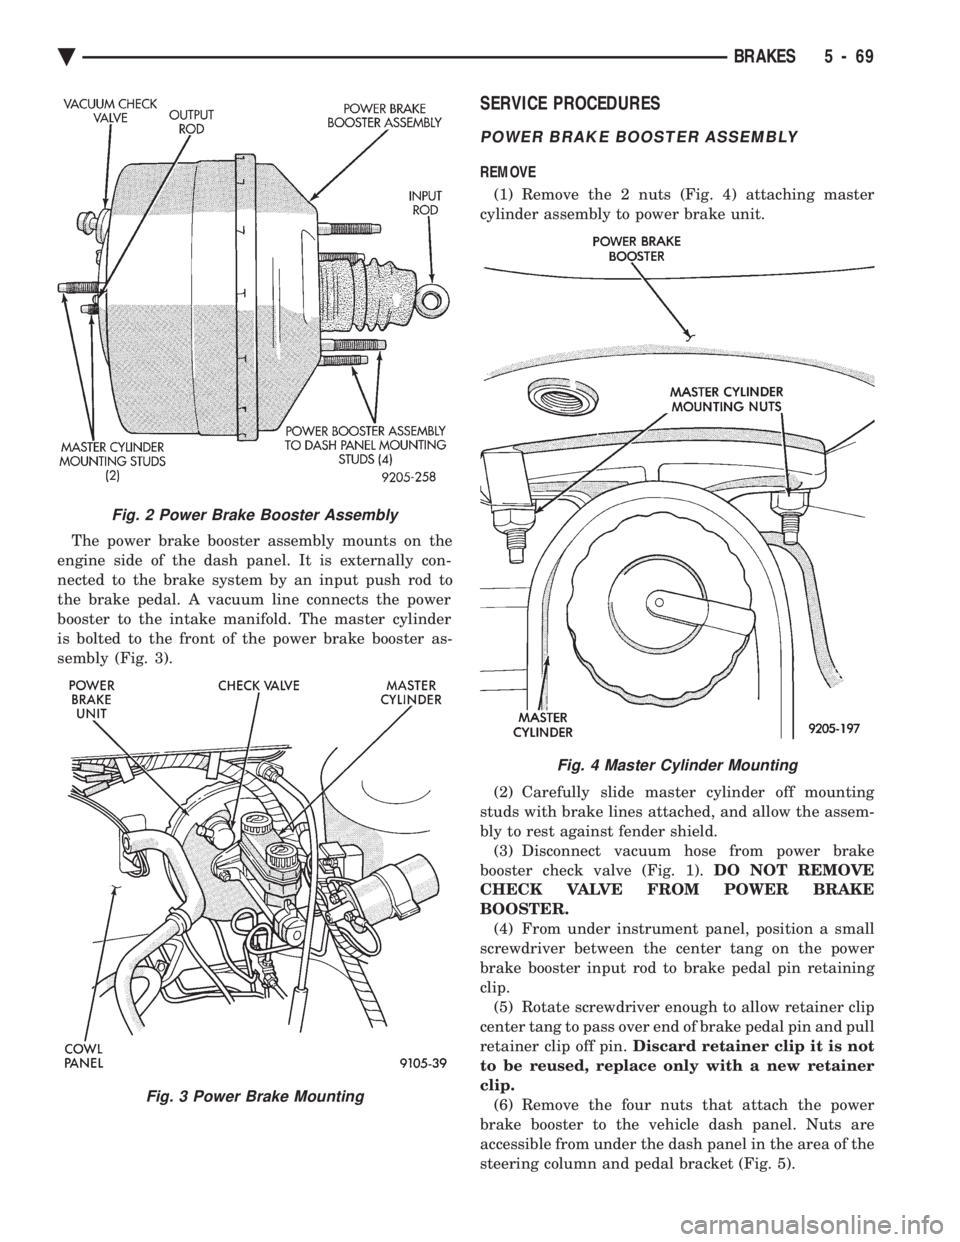
The power brake booster assembly mounts on the
engine side of the dash panel. It is externally con-
nected to the brake system by an input push rod to
the brake pedal. A vacuum line connects the power
booster to the intake manifold. The master cylinder
is bolted to the front of the power brake booster as-
sembly (Fig. 3).
SERVICE PROCEDURES
POWER BRAKE BOOSTER ASSEMBLY
REMOVE
(1) Remove the 2 nuts (Fig. 4) attaching master
cylinder assembly to power brake unit.
(2) Carefully slide master cylinder off mounting
studs with brake lines attached, and allow the assem-
bly to rest against fender shield. (3) Disconnect vacuum hose from power brake
booster check valve (Fig. 1). DO NOT REMOVE
CHECK VALVE FROM POWER BRAKE
BOOSTER. (4) From under instrument panel, position a small
screwdriver between the center tang on the power
brake booster input rod to brake pedal pin retaining
clip. (5) Rotate screwdriver enough to allow retainer clip
center tang to pass over end of brake pedal pin and pull
retainer clip off pin. Discard retainer clip it is not
to be reused, replace only with a new retainer
clip. (6) Remove the four nuts that attach the power
brake booster to the vehicle dash panel. Nuts are
accessible from under the dash panel in the area of the
steering column and pedal bracket (Fig. 5).
Fig. 2 Power Brake Booster Assembly
Fig. 3 Power Brake Mounting
Fig. 4 Master Cylinder Mounting
Ä BRAKES 5 - 69
Page 220 of 2438
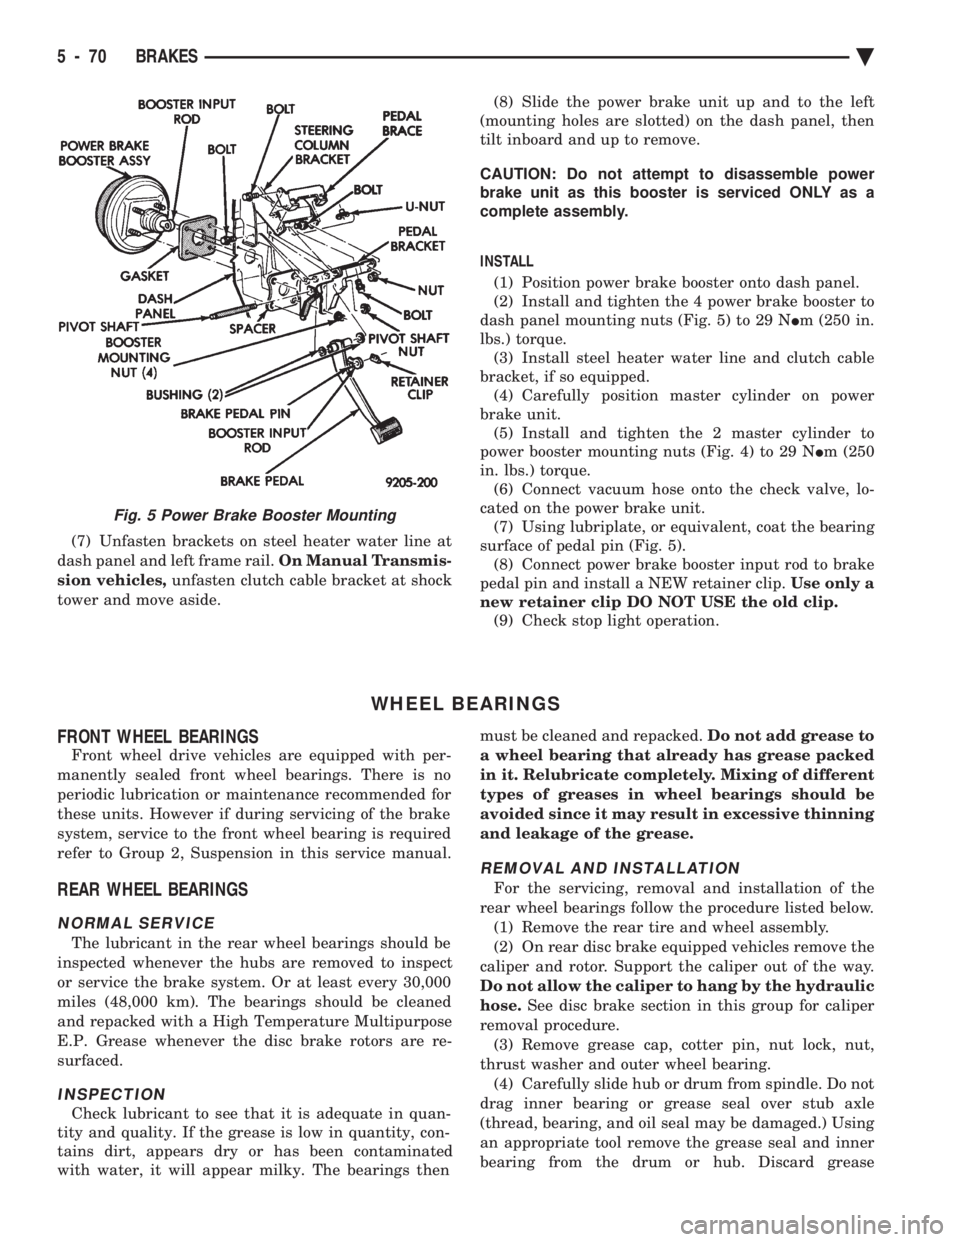
(7) Unfasten brackets on steel heater water line at
dash panel and left frame rail. On Manual Transmis-
sion vehicles, unfasten clutch cable bracket at shock
tower and move aside. (8) Slide the power brake unit up and to the left
(mounting holes are slotted) on the dash panel, then
tilt inboard and up to remove.
CAUTION: Do not attempt to disassemble power
brake unit as this booster is serviced ONLY as a
complete assembly.
INSTALL (1) Position power brake booster onto dash panel.
(2) Install and tighten the 4 power brake booster to
dash panel mounting nuts (Fig. 5) to 29 N Im (250 in.
lbs.) torque. (3) Install steel heater water line and clutch cable
bracket, if so equipped. (4) Carefully position master cylinder on power
brake unit. (5) Install and tighten the 2 master cylinder to
power booster mounting nuts (Fig. 4) to 29 N Im (250
in. lbs.) torque. (6) Connect vacuum hose onto the check valve, lo-
cated on the power brake unit. (7) Using lubriplate, or equivalent, coat the bearing
surface of pedal pin (Fig. 5). (8) Connect power brake booster input rod to brake
pedal pin and install a NEW retainer clip. Use only a
new retainer clip DO NOT USE the old clip. (9) Check stop light operation.
WHEEL BEARINGS
FRONT WHEEL BEARINGS
Front wheel drive vehicles are equipped with per-
manently sealed front wheel bearings. There is no
periodic lubrication or maintenance recommended for
these units. However if during servicing of the brake
system, service to the front wheel bearing is required
refer to Group 2, Suspension in this service manual.
REAR WHEEL BEARINGS
NORMAL SERVICE
The lubricant in the rear wheel bearings should be
inspected whenever the hubs are removed to inspect
or service the brake system. Or at least every 30,000
miles (48,000 km). The bearings should be cleaned
and repacked with a High Temperature Multipurpose
E.P. Grease whenever the disc brake rotors are re-
surfaced.
INSPECTION
Check lubricant to see that it is adequate in quan-
tity and quality. If the grease is low in quantity, con-
tains dirt, appears dry or has been contaminated
with water, it will appear milky. The bearings then must be cleaned and repacked.
Do not add grease to
a wheel bearing that already has grease packed
in it. Relubricate completely. Mixing of different
types of greases in wheel bearings should be
avoided since it may result in excessive thinning
and leakage of the grease.
REMOVAL AND INSTALLATION
For the servicing, removal and installation of the
rear wheel bearings follow the procedure listed below. (1) Remove the rear tire and wheel assembly.
(2) On rear disc brake equipped vehicles remove the
caliper and rotor. Support the caliper out of the way.
Do not allow the caliper to hang by the hydraulic
hose. See disc brake section in this group for caliper
removal procedure. (3) Remove grease cap, cotter pin, nut lock, nut,
thrust washer and outer wheel bearing. (4) Carefully slide hub or drum from spindle. Do not
drag inner bearing or grease seal over stub axle
(thread, bearing, and oil seal may be damaged.) Using
an appropriate tool remove the grease seal and inner
bearing from the drum or hub. Discard grease
Fig. 5 Power Brake Booster Mounting
5 - 70 BRAKES Ä
Page 222 of 2438

ANTI-LOCK BRAKE SYSTEMÐBENDIX ANTI-LOCK 10 AC/Y BODY INDEX
page page
ABS Brake System Diagnostic Features ....... 92
ABS Braking System Diagnosis .............. 87
ABS Controller Anti-Lock Brake (CAB) Service Precautions ........................... 88
ABS Equipped Vehicle Performance .......... 75
ABS Hydraulic Circuits and Valve Operation .... 85
ABS System Diagnostic Connector ........... 82
ABS System General Service Precautions ...... 88
ABS System Self-Diagnostics ............... 75
ABS Warning Systems Operation ............ 75
Anti-Lock Brake System Components ......... 76 Anti-Lock Brake System Definitions
........... 72
Anti-Lock Operation and Performance ......... 73
Anti-Lock System Relays and Warning Lamps . . . 82
Controller Anti-Lock Brake (CAB) ............. 80
Electronic Components ................... 103
General Information ....................... 72
General Service Precautions ................ 93
Major ABS Components ................... 73
Mechanical Diagnostics and Service Procedures . 89
Normal Braking System Function ............. 72
On Car Hydraulic ABS Component Service ..... 93
GENERAL INFORMATION
The purpose of the Anti-Lock Brake System (ABS)
is to prevent wheel lock-up under heavy braking con-
ditions on virtually any type of road surface. Anti-
Lock Braking is desirable because a vehicle which is
stopped without locking the wheels will retain direc-
tional stability and some steering capability. This al-
lows the driver to retain greater control of the
vehicle during heavy braking.
ANTI-LOCK BRAKE SYSTEM DEFINITIONS
In this section of the manual several abbreviations
are used for the components that are in the Anti-
Lock Braking System They are listed below for your
reference.
² CABÐController Anti-Lock Brake
² ABSÐAnti-Lock Brake System
² PSIÐPounds per Square Inch (pressure)
² WSSÐWheel Speed Sensor
NORMAL BRAKING SYSTEM FUNCTION
Under normal braking conditions, the ABS System
functions much the same as a standard brake system
with a diagonally split master cylinder. The primary
difference is that power assist is provided by hydrau-
lic power assist instead of the conventional vacuum
assist. If a wheel locking tendency is noticed during a
brake application, the system will enter Anti-Lock
mode. During Anti-Lock braking, hydraulic pressure
in the four wheel circuits is modulated to prevent
any wheel from locking. Each wheel of the vehicle
has a set of electrical solenoid valves and hydraulic
line to provide hydraulic modulation. For vehicle sta-
bility, though both rear wheel valves receive the
same electrical signal. The system can build, hold or
reduce pressure at each wheel of the vehicle. This is
determined by the signals generated by the wheel
Four-Wheel Anti-Lock Brake System
5 - 72 ANTI-LOCK 10 BRAKE SYSTEM Ä
Page 227 of 2438
circuits are hydraulically isolated so a leak or mal-
function in one circuit will allow continued braking
ability in the other.When force is applied to the brake pedal, the input
pushrod applies force to the boost control valve. As
the boost control valve is moved, it allows the pres-
surized fluid from the accumulator to flow into the
master cylinder booster chamber. The pressure gen-
erated in the booster chamber is directly propor-
tioned to the brake pedal force exerted by the driver.
This pressure in the booster servo in turn applies
pressure to the primary master cylinder piston that
in turn applies pressure to the secondary master cyl-
inder piston. The pressure generated in the primary
and secondary circuits are used to apply the brakes
during normal braking.
WARNING: THE HYDRAULIC ACCUMULATORS
CONTAIN BRAKE FLUID AND NITROGEN GAS AT
HIGH PRESSURE. CERTAIN PORTIONS OF THE
BRAKE SYSTEM ALSO CONTAIN BRAKE FLUID AT
HIGH PRESSURE. REMOVAL OR DISASSEMBLY
MAY RESULT IN PERSONAL INJURY AND IM-
PROPER SYSTEM OPERATION. REFER TO THE AP-
PROPRIATE SERVICE MANUAL FOR PROPER
SERVICE PROCEDURES.
HYDRAULIC BLADDER ACCUMULATOR
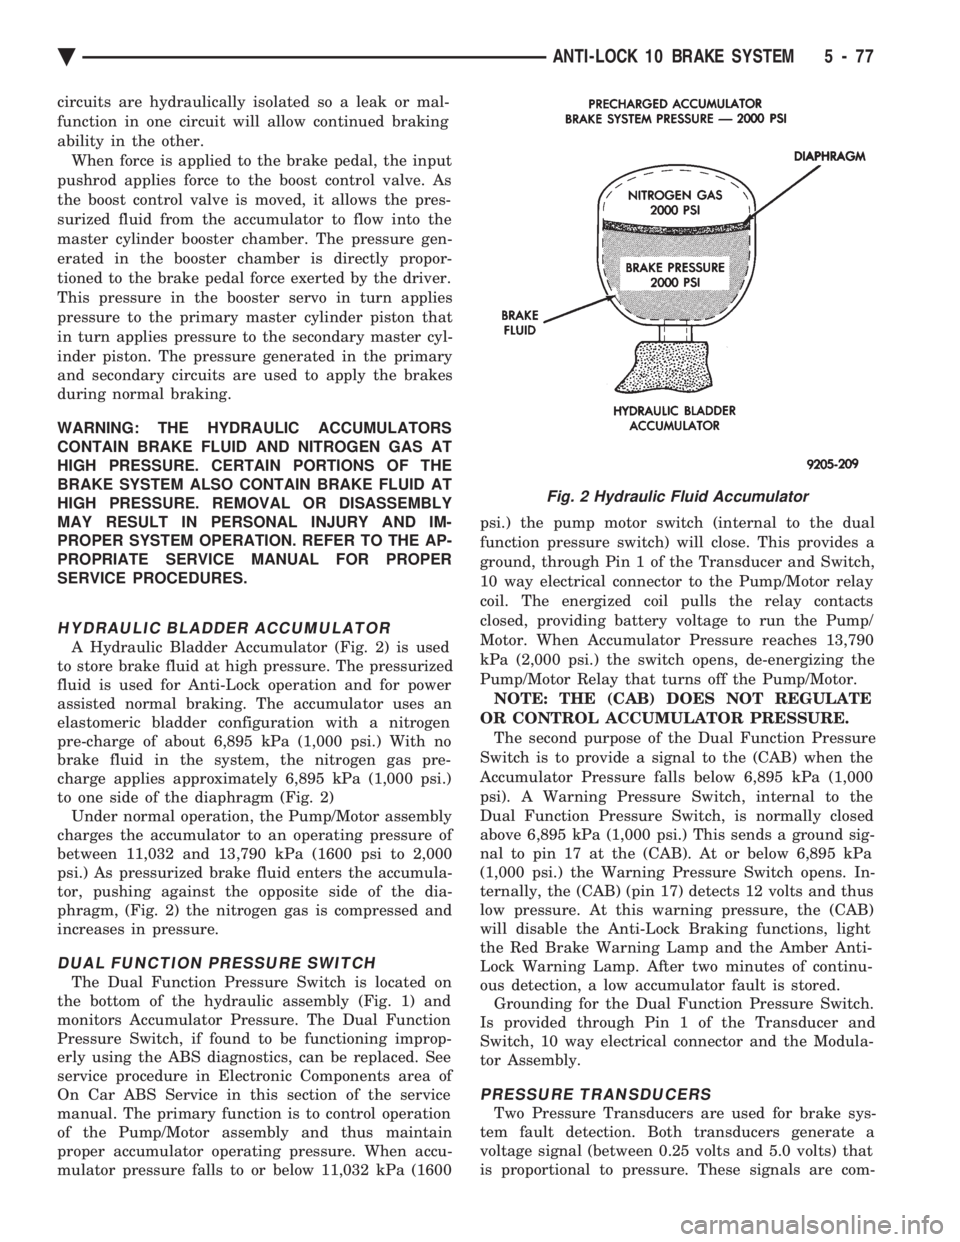
A Hydraulic Bladder Accumulator (Fig. 2) is used
to store brake fluid at high pressure. The pressurized
fluid is used for Anti-Lock operation and for power
assisted normal braking. The accumulator uses an
elastomeric bladder configuration with a nitrogen
pre-charge of about 6,895 kPa (1,000 psi.) With no
brake fluid in the system, the nitrogen gas pre-
charge applies approximately 6,895 kPa (1,000 psi.)
to one side of the diaphragm (Fig. 2) Under normal operation, the Pump/Motor assembly
charges the accumulator to an operating pressure of
between 11,032 and 13,790 kPa (1600 psi to 2,000
psi.) As pressurized brake fluid enters the accumula-
tor, pushing against the opposite side of the dia-
phragm, (Fig. 2) the nitrogen gas is compressed and
increases in pressure.
DUAL FUNCTION PRESSURE SWITCH
The Dual Function Pressure Switch is located on
the bottom of the hydraulic assembly (Fig. 1) and
monitors Accumulator Pressure. The Dual Function
Pressure Switch, if found to be functioning improp-
erly using the ABS diagnostics, can be replaced. See
service procedure in Electronic Components area of
On Car ABS Service in this section of the service
manual. The primary function is to control operation
of the Pump/Motor assembly and thus maintain
proper accumulator operating pressure. When accu-
mulator pressure falls to or below 11,032 kPa (1600 psi.) the pump motor switch (internal to the dual
function pressure switch) will close. This provides a
ground, through Pin 1 of the Transducer and Switch,
10 way electrical connector to the Pump/Motor relay
coil. The energized coil pulls the relay contacts
closed, providing battery voltage to run the Pump/
Motor. When Accumulator Pressure reaches 13,790
kPa (2,000 psi.) the switch opens, de-energizing the
Pump/Motor Relay that turns off the Pump/Motor. NOTE: THE (CAB) DOES NOT REGULATE
OR CONTROL ACCUMULATOR PRESSURE. The second purpose of the Dual Function Pressure
Switch is to provide a signal to the (CAB) when the
Accumulator Pressure falls below 6,895 kPa (1,000
psi). A Warning Pressure Switch, internal to the
Dual Function Pressure Switch, is normally closed
above 6,895 kPa (1,000 psi.) This sends a ground sig-
nal to pin 17 at the (CAB). At or below 6,895 kPa
(1,000 psi.) the Warning Pressure Switch opens. In-
ternally, the (CAB) (pin 17) detects 12 volts and thus
low pressure. At this warning pressure, the (CAB)
will disable the Anti-Lock Braking functions, light
the Red Brake Warning Lamp and the Amber Anti-
Lock Warning Lamp. After two minutes of continu-
ous detection, a low accumulator fault is stored. Grounding for the Dual Function Pressure Switch.
Is provided through Pin 1 of the Transducer and
Switch, 10 way electrical connector and the Modula-
tor Assembly.
PRESSURE TRANSDUCERS
Two Pressure Transducers are used for brake sys-
tem fault detection. Both transducers generate a
voltage signal (between 0.25 volts and 5.0 volts) that
is proportional to pressure. These signals are com-
Fig. 2 Hydraulic Fluid Accumulator
Ä ANTI-LOCK 10 BRAKE SYSTEM 5 - 77