1991 MITSUBISHI ECLIPSE lock
[x] Cancel search: lockPage 1135 of 1216
-
BODY - Front Seat23-91
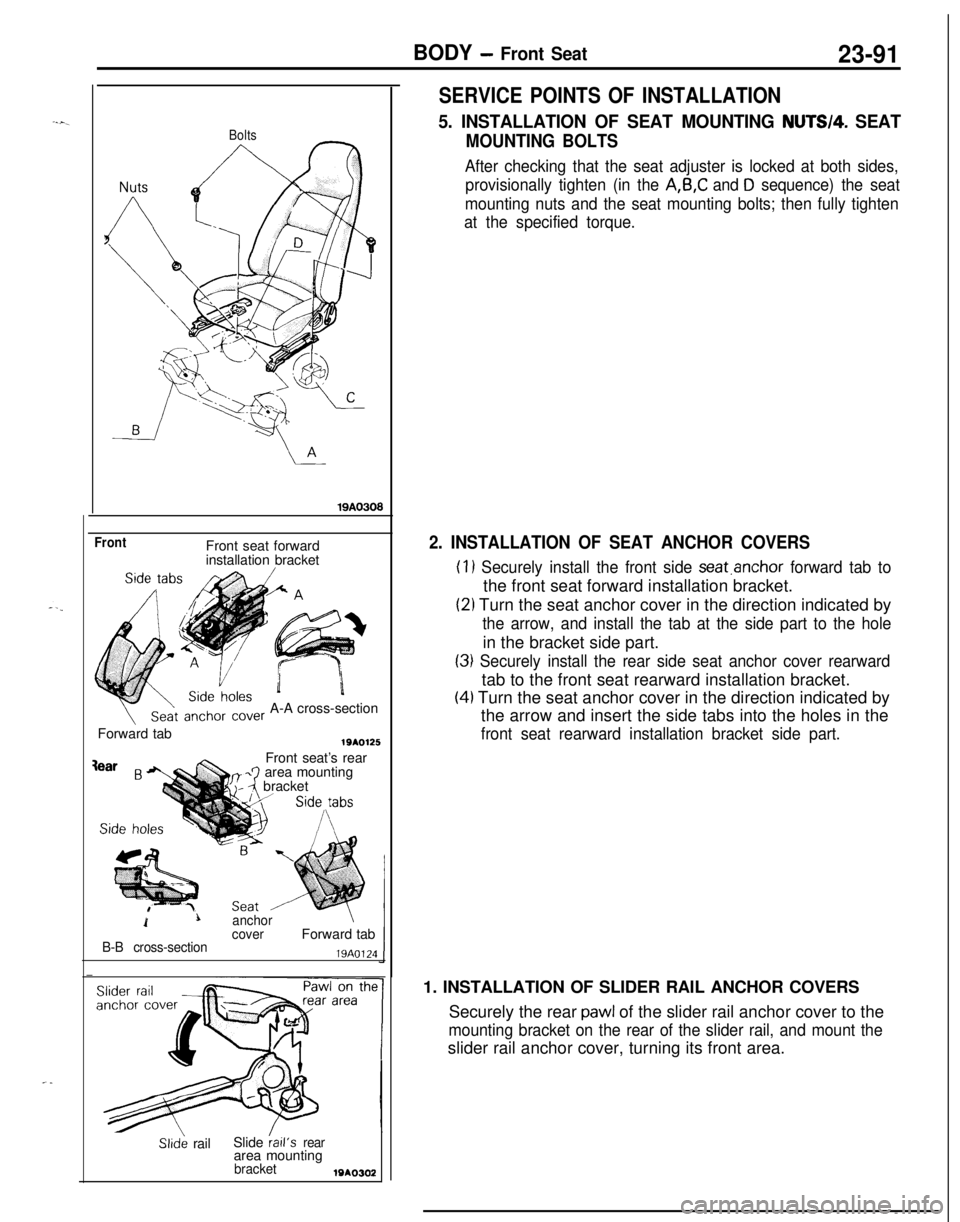
Bolts
19AO308
FrontFront seat forward
installation bracket
A-A cross-section
Forward tab
.)\&Front seat’s rearz-2 bracketarea mounting
1Lanchor\
coverForward tabB-B cross-section19A0124
Slid; railSlide kail’sreararea mounting
bracketWA0302
SERVICE POINTS OF INSTALLATION
5. INSTALLATION OF SEAT MOUNTING NUTW4. SEAT
MOUNTING BOLTS
After checking that the seat adjuster is locked at both sides,
provisionally tighten (in the
A,B,C and D sequence) the seat
mounting nuts and the seat mounting bolts; then fully tighten
at the specified torque.
2. INSTALLATION OF SEAT ANCHOR COVERS
(1) Securely install the front side seat.anchor forward tab tothe front seat forward installation bracket.
(21 Turn the seat anchor cover in the direction indicated by
the arrow, and install the tab at the side part to the holein the bracket side part.
(3) Securely install the rear side seat anchor cover rearwardtab to the front seat rearward installation bracket.
(4) Turn the seat anchor cover in the direction indicated by
the arrow and insert the side tabs into the holes in the
front seat rearward installation bracket side part.1. INSTALLATION OF SLIDER RAIL ANCHOR COVERS
Securely the rear
pawl of the slider rail anchor cover to the
mounting bracket on the rear of the slider rail, and mount theslider rail anchor cover, turning its front area.
Page 1156 of 1216

24-12 HEATERS AND AIR CONDITIONING - Service Adjustment Procedures
------__--210 2352,100 Pressure
(30) (33)(299) 2&
kPa(psi)2OPOO14(3) If the sight glass is clear and the magnetic clutch is
disengaged; the clutch is faulty or, the system is out of
refrigerant. Perform low pressure switch test to determine
condition. Check low pressure switch, and clutch coil for
electrical continuity.
(4) If the sight glass shows foam or bubbles, the system could
be low on charge. Occasional foam or bubbles are normal
when the ambient temperature is above
43°C (110°F) or
below
21°C (70°F).Adjust the engine speed to 1,500 rpm. Block the air-flow
thru the condenser to increase the compressor discharge
pressure to 1,422 to 1,520
kPa (206 to 220 psi). If sight
glass still shows bubbles or foam, system charge level is
low.The refrigerant system will not be low on charge unless
there is a leak. Find and repair the leak. If the leak can be
repaired without discharging the system an oil level check
is not necessary. Use the procedure for correcting low
refrigerant level found in the Refrigerant System Service
Procedure Section.DUAL PRESSURE SWITCH
The dual-pressure switch is a combination of the low-pressureswitch (for checking the quantity of refrigerant) and the,
high-pressure switch (for prevention of overheating); it is
installed on the tube, and, when the pressure becomes
approximately 210 kPa (30 psi) or lower, the compressor stops,thus preventing the compressor from being damaged by heat.
When the pressure reaches 2,700
kPa (384 psi) or higher, the
compressor stops, thus preventing overheating. There is
generally no necessity for inspection; if, however, an unusual
condition, such as non-operation of the compressor is encoun-tered, check by following the procedures below.
(1) Check for continuity of the dual-pressure switch.
NOTEIf the air temperature drops to
0°C (32°F) or lower during
cold weather, the air conditioner will not operate (no
continuity).(2) If there is an insufficient amount of refrigerant, check the
refrigerant amount by looking through the sight glass of thereceiver; supply refrigerant if necessary.
(Refer to P.24-21.)
Page 1159 of 1216
HEATERS AND AIR CONDITIONING - Service Adjustment Procedures 24-15
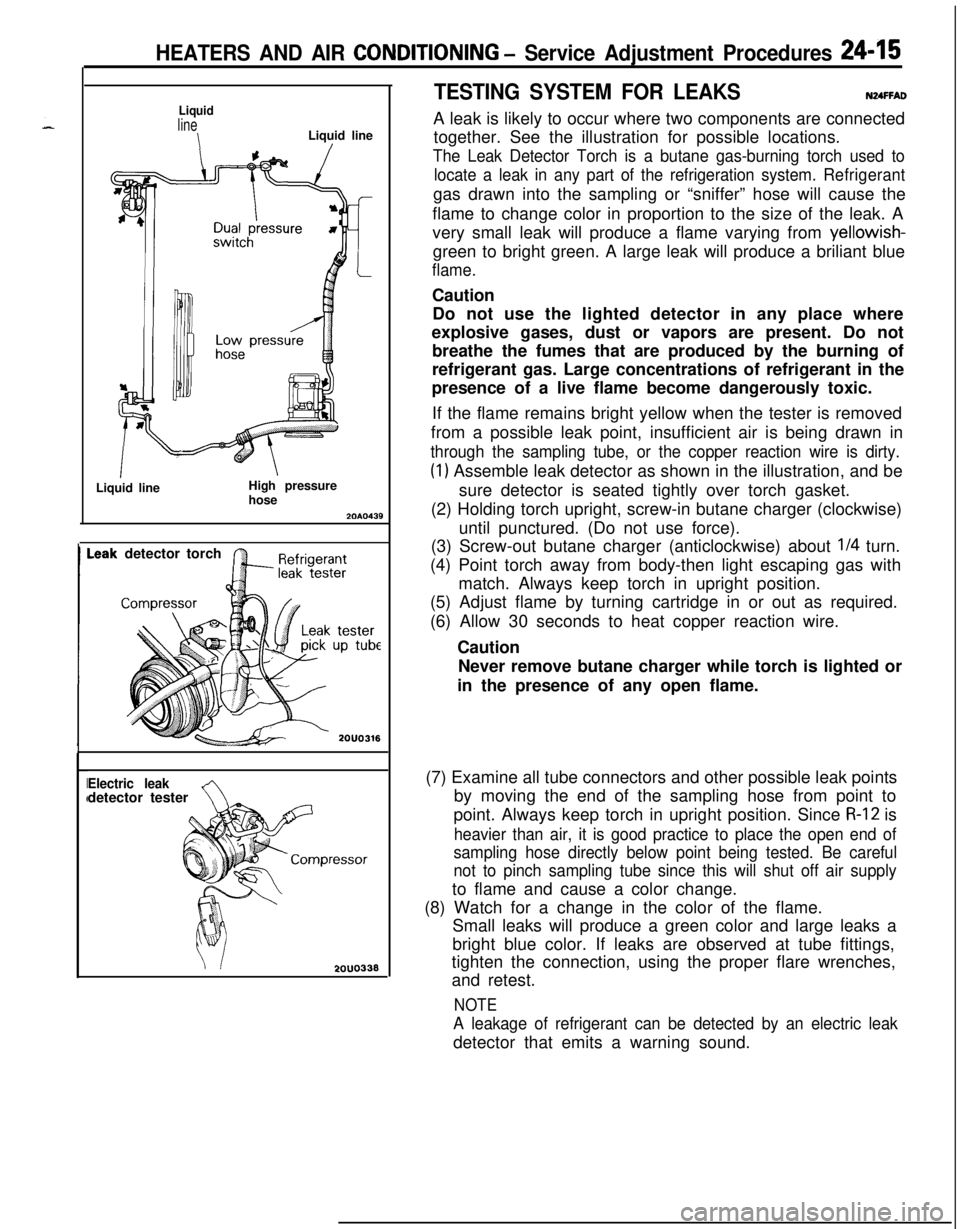
Liquid
line
\Liquid lineI
ILiquid lineHigh pressure
hose2010439
detector torch
Electric leakAdetector tester
2OUO338
TESTING SYSTEM FOR LEAKSNUFFADA leak is likely to occur where two components are connected
together. See the illustration for possible locations.
The Leak Detector Torch is a butane gas-burning torch used to
locate a leak in any part of the refrigeration system.Refrigerantgas drawn into the sampling or “sniffer” hose will cause the
flame to change color in proportion to the size of the leak. A
very small leak will produce a flame varying from yellowish-
green to bright green. A large leak will produce a briliant blue
flame.Caution
Do not use the lighted detector in any place where
explosive gases, dust or vapors are present. Do not
breathe the fumes that are produced by the burning of
refrigerant gas. Large concentrations of refrigerant in the
presence of a live flame become dangerously toxic.
If the flame remains bright yellow when the tester is removed
from a possible leak point, insufficient air is being drawn in
through the sampling tube, or the copper reaction wire is dirty.
(1) Assemble leak detector as shown in the illustration, and be
sure detector is seated tightly over torch gasket.
(2) Holding torch upright, screw-in butane charger (clockwise)
until punctured. (Do not use force).
(3) Screw-out butane charger (anticlockwise) about
l/4 turn.
(4) Point torch away from body-then light escaping gas with
match. Always keep torch in upright position.
(5) Adjust flame by turning cartridge in or out as required.
(6) Allow 30 seconds to heat copper reaction wire.
Caution
Never remove butane charger while torch is lighted or
in the presence of any open flame.
(7) Examine all tube connectors and other possible leak points
by moving the end of the sampling hose from point to
point. Always keep torch in upright position. Since
R-12 is
heavier than air, it is good practice to place the open end of
sampling hose directly below point being tested. Be careful
not to pinch sampling tube since this will shut off air supplyto flame and cause a color change.
(8) Watch for a change in the color of the flame.
Small leaks will produce a green color and large leaks a
bright blue color. If leaks are observed at tube fittings,
tighten the connection, using the proper flare wrenches,
and retest.
NOTE
A leakage of refrigerant can be detected by an electric leakdetector that emits a warning sound.
Page 1162 of 1216
24-18 HEATERS AND AIR CONDITIONING - Service Adjustment Procedures
(5) Screw a can of R-12 to the opened manifold valve. Be sure
gasket is in place and in good condition. Tighten refrigerantcan and manifold locking nut to insure a good seal. Do not
overtighten 8 to
11 Nm (6 to 8 ft.lbs.) is sufficient if gasket
is in good condition.
(6) Turn manifold valve (above the refrigerant can) completely
clockwise to puncture the can. This closes the valve and
seals the refrigerant in the can.
Caution
Never heat small cans of refrigerant over
40°C (104°F)as they may explode.
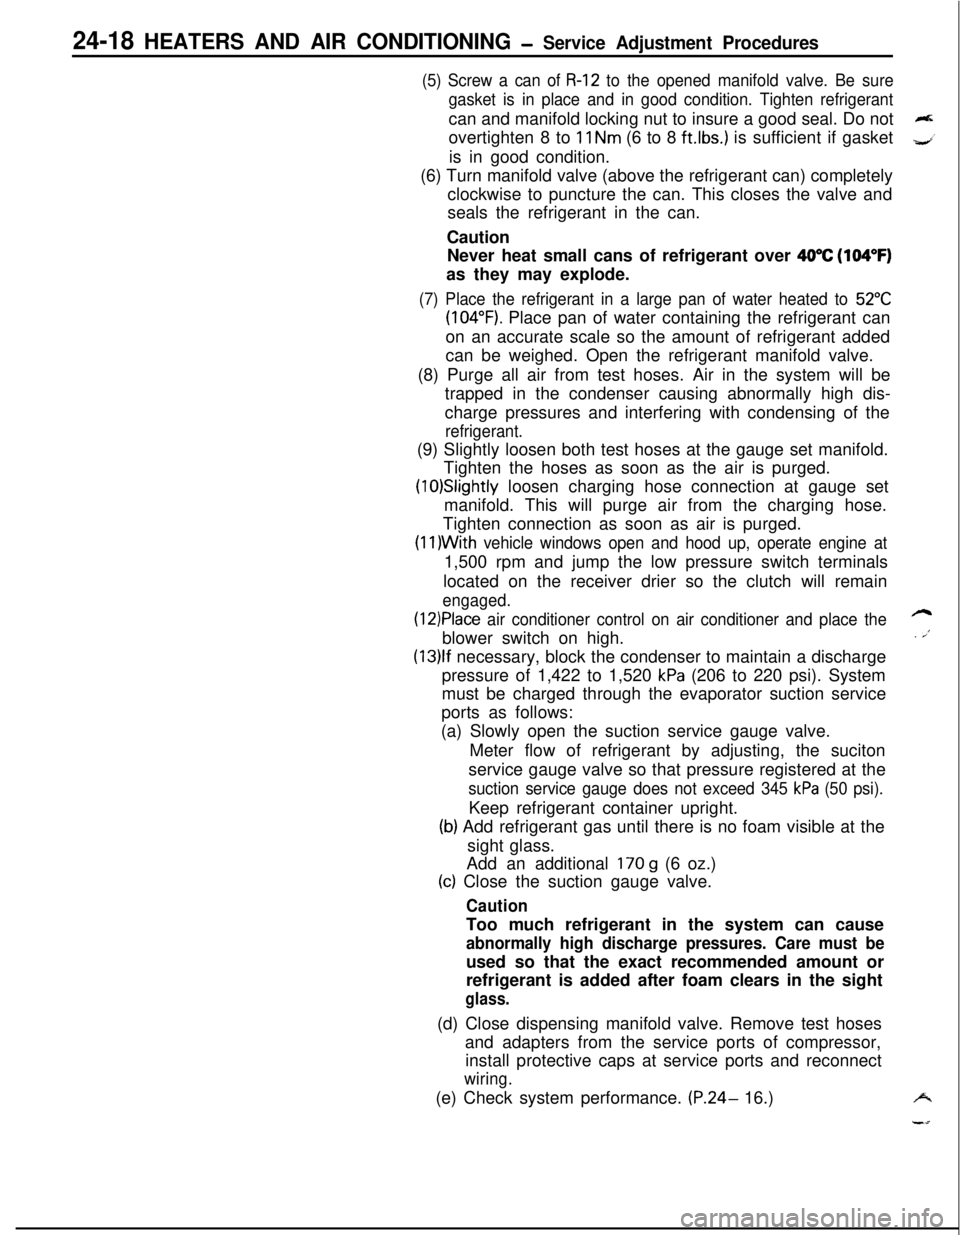
(7) Place the refrigerant in a large pan of water heated to 52°C
(104°F). Place pan of water containing the refrigerant can
on an accurate scale so the amount of refrigerant added
can be weighed. Open the refrigerant manifold valve.
(8) Purge all air from test hoses. Air in the system will be
trapped in the condenser causing abnormally high dis-
charge pressures and interfering with condensing of the
refrigerant.(9) Slightly loosen both test hoses at the gauge set manifold.
Tighten the hoses as soon as the air is purged.
(10)Slightly loosen charging hose connection at gauge set
manifold. This will purge air from the charging hose.
Tighten connection as soon as air is purged.
(I l)With vehicle windows open and hood up, operate engine at1,500 rpm and jump the low pressure switch terminals
located on the receiver drier so the clutch will remain
engaged.
(12)Place air conditioner control on air conditioner and place theblower switch on high.
(13)lf necessary, block the condenser to maintain a discharge
pressure of 1,422 to 1,520
kPa (206 to 220 psi). System
must be charged through the evaporator suction service
ports as follows:
(a) Slowly open the suction service gauge valve.
Meter flow of refrigerant by adjusting, the suciton
service gauge valve so that pressure registered at the
suction service gauge does not exceed 345 kPa (50 psi).Keep refrigerant container upright.
(b) Add refrigerant gas until there is no foam visible at the
sight glass.
Add an additional
170 g (6 oz.)
(c) Close the suction gauge valve.
CautionToo much refrigerant in the system can cause
abnormally high discharge pressures. Care must beused so that the exact recommended amount or
refrigerant is added after foam clears in the sight
glass.(d) Close dispensing manifold valve. Remove test hoses
and adapters from the service ports of compressor,
install protective caps at service ports and reconnect
wiring.(e) Check system performance.
(P.24- 16.)
e
. i”
A
i-4
Page 1165 of 1216
i
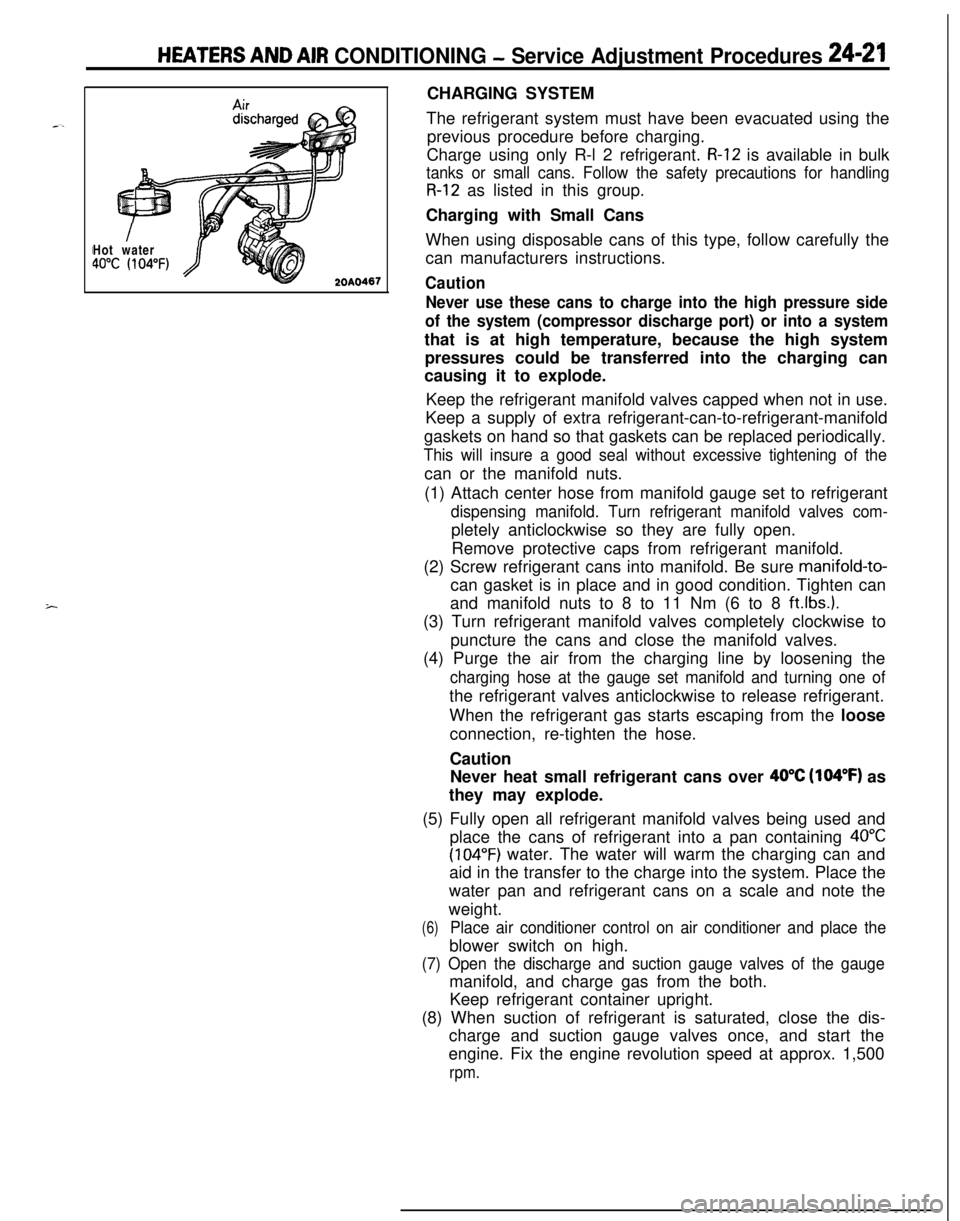
HEATERS AND AIR CONDITIONING - Service Adjustment Procedures 24-21Hot water40°C (104°F)
1467CHARGING SYSTEM
The refrigerant system must have been evacuated using the
previous procedure before charging.
Charge using only R-l 2 refrigerant.
R-12 is available in bulk
tanks or small cans. Follow the safety precautions for handling
R-12 as listed in this group.
Charging with Small Cans
When using disposable cans of this type, follow carefully the
can manufacturers instructions.
Caution
Never use these cans to charge into the high pressure side
of the system (compressor discharge port) or into a systemthat is at high temperature, because the high system
pressures could be transferred into the charging can
causing it to explode.
Keep the refrigerant manifold valves capped when not in use.
Keep a supply of extra refrigerant-can-to-refrigerant-manifold
gaskets on hand so that gaskets can be replaced periodically.
This will insure a good seal without excessive tightening of thecan or the manifold nuts.
(1) Attach center hose from manifold gauge set to refrigerant
dispensing manifold. Turn refrigerant manifold valves com-pletely anticlockwise so they are fully open.
Remove protective caps from refrigerant manifold.
(2) Screw refrigerant cans into manifold. Be sure
manifold-to-can gasket is in place and in good condition. Tighten can
and manifold nuts to 8 to 11 Nm (6 to 8
ft.lbs.).(3) Turn refrigerant manifold valves completely clockwise to
puncture the cans and close the manifold valves.
(4) Purge the air from the charging line by loosening the
charging hose at the gauge set manifold and turning one ofthe refrigerant valves anticlockwise to release refrigerant.
When the refrigerant gas starts escaping from the loose
connection, re-tighten the hose.
Caution
Never heat small refrigerant cans over
40°C (104°F) as
they may explode.
(5) Fully open all refrigerant manifold valves being used and
place the cans of refrigerant into a pan containing
40°C
(104°F) water. The water will warm the charging can and
aid in the transfer to the charge into the system. Place the
water pan and refrigerant cans on a scale and note the
weight.
(6)Place air conditioner control on air conditioner and place theblower switch on high.
(7) Open the discharge and suction gauge valves of the gaugemanifold, and charge gas from the both.
Keep refrigerant container upright.
(8) When suction of refrigerant is saturated, close the dis-
charge and suction gauge valves once, and start the
engine. Fix the engine revolution speed at approx. 1,500
rpm.
Page 1170 of 1216
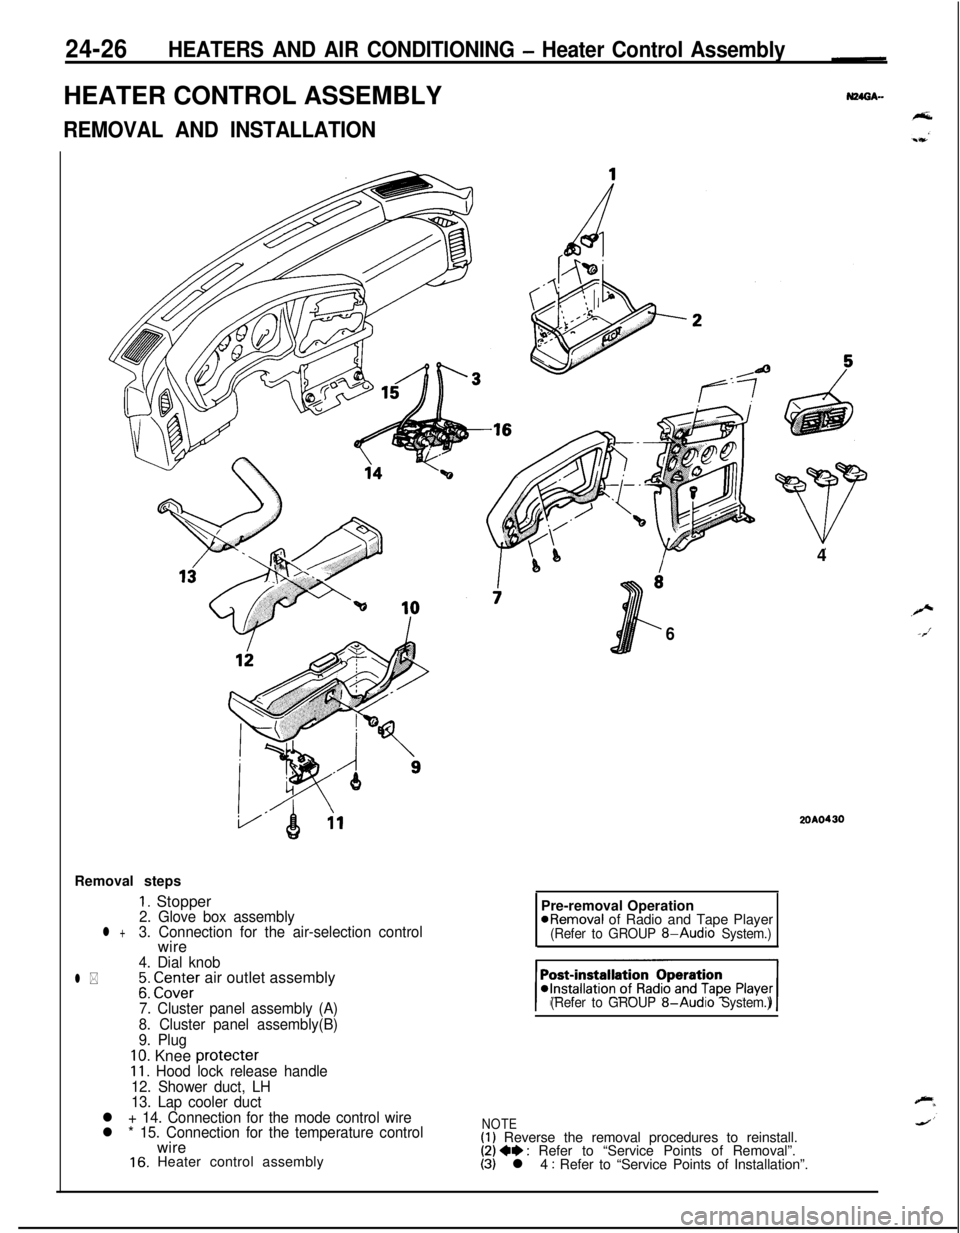
24-26HEATERS AND AIR CONDITIONING - Heater Control AssemblyHEATER CONTROL ASSEMBLY
REMOVAL AND INSTALLATIONRemoval steps
1. Stopper2. Glove box assemblyl +3. Connection for the air-selection controlwire
4. Dial knob
l *;: CI.Z;Er air outlet assembly
7. Cluster panel assembly (A)
8. Cluster panel assembly(B)
9. Plug
10. Knee protecter11. Hood lock release handle
12. Shower duct, LH
13. Lap cooler duct
l + 14. Connection for the mode control wire
l * 15. Connection for the temperature controlwire
16. Heater control assembly4
6
2OAO430Pre-removal Operation
@Removal of Radio and Tape Player(Refer to GROUP 8-Audio System.)
(Refer to GROUP
8-Audio System.)
NOTE(1) Reverse the removal procedures to reinstall.(2) 4e : Refer to “Service Points of Removal”.(3) l 4 : Refer to “Service Points of Installation”.
Page 1193 of 1216
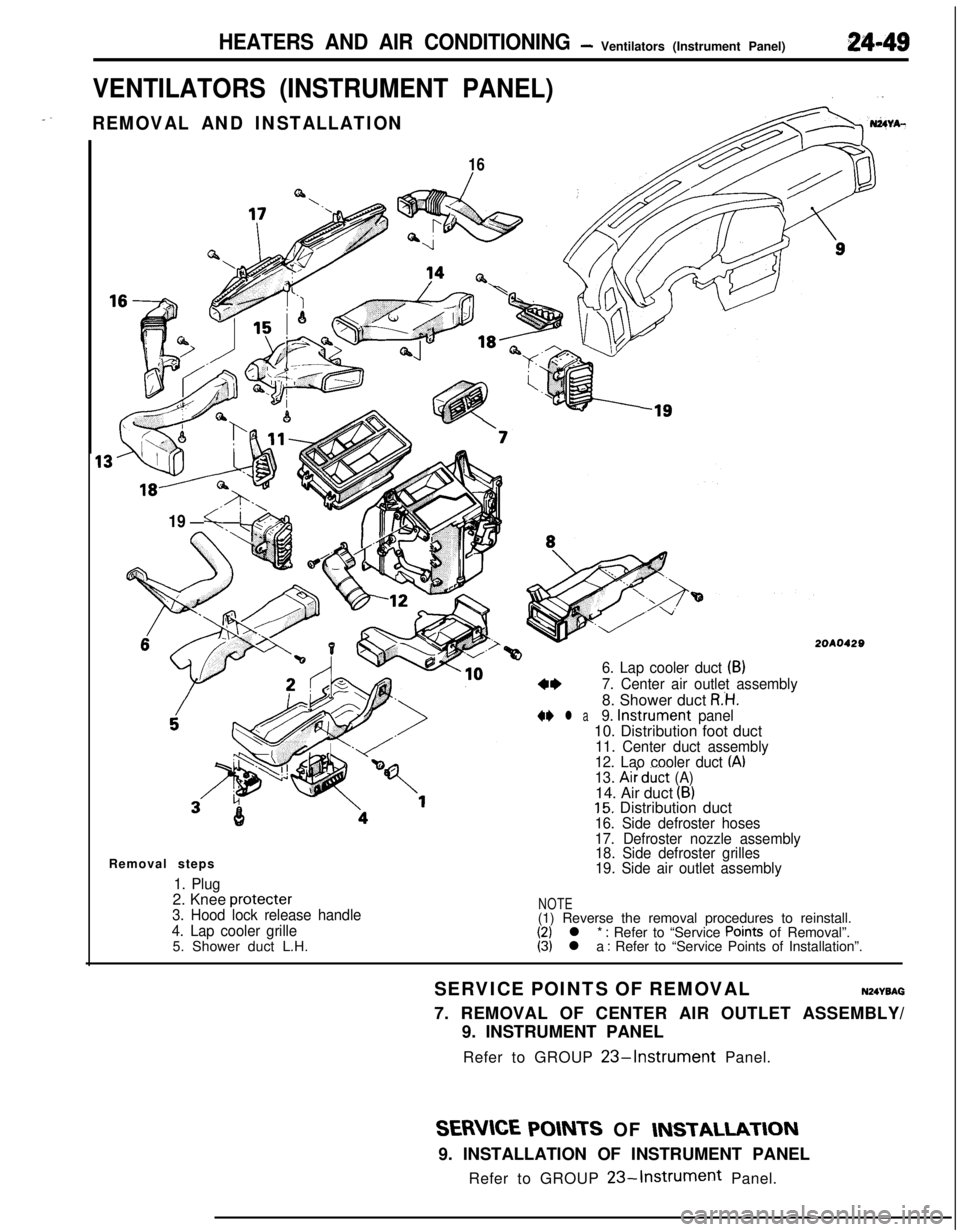
HEATERS AND AIR CONDITIONING- Ventilators (Instrument Panel)24-49
16
VENTILATORS (INSTRUMENT PANEL)
I- -REMOVAL AND INSTALLATION
,’ !‘\
19< !.an
6. Lap cooler duct (B)
2OAO420
a*7. Center air outlet assembly8. Shower duct
R’H.+* l a9. Instrument panel10. Distribution foot duct
11. Center duct assembly
12. Lao cooler duct IA)13. AiFduct (A)14. Air duct (B)15. Distribution duct16. Side defroster hoses
17. Defroster nozzle assembly
18. Side defroster grilles
19. Side air outlet assemblyRemoval steps
1. Plug2. Knee protecter
3. Hood lock release handle
4. Lap cooler grilleNOTE(1) Reverse the removal procedures to reinstall.
(2) l * : Refer to “Service Points of Removal”.
5. Shower duct L.H.(3) l a : Refer to “Service Points of Installation”.
SERVICE POINTS OF REMOVAL
NZNBAG7. REMOVAL OF CENTER AIR OUTLET ASSEMBLY/
9. INSTRUMENT PANEL
Refer to GROUP
23-Instrument Panel.
SERVICE POINTS OF INSTAUAT-ION9. INSTALLATION OF INSTRUMENT PANEL
Refer to GROUP
23-Instrument Panel.