Page 592 of 1216

14-138AUTO-CRUISE CONTROL SYSTEM - Service Adjustment Procedures
07A0051
07AOO50
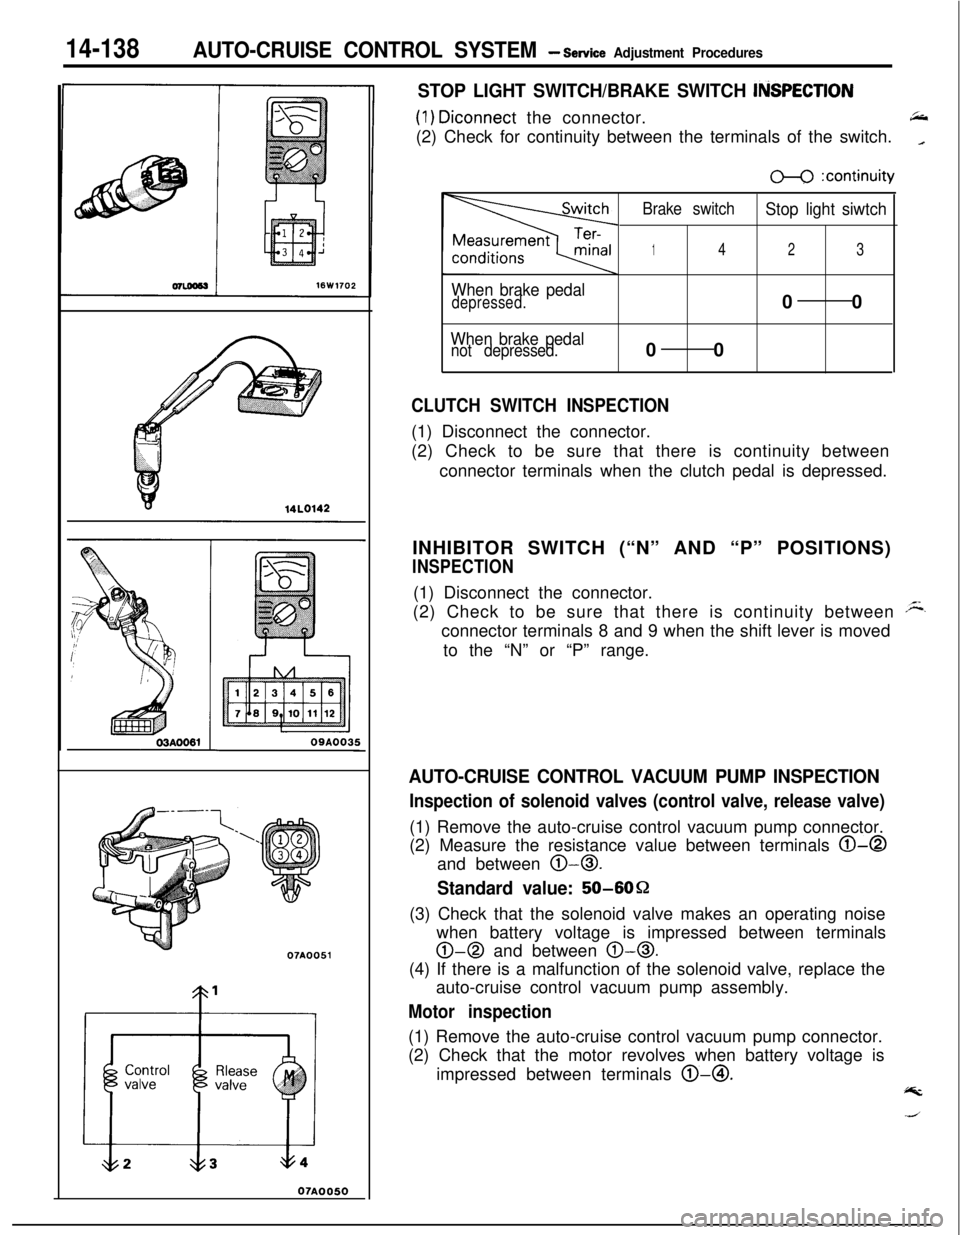
STOP LIGHT SWITCH/BRAKE SWITCH ItiSPECTlON
(1) Diconnect the connector.66(2) Check for continuity between the terminals of the switch.
_
When brake pedaldepressed.
When brake pedalnot depressed.
m :continuity
Brake switch
Stop light siwtch
142300
00
CLUTCH SWITCH INSPECTION(1) Disconnect the connector.
(2) Check to be sure that there is continuity between
connector terminals when the clutch pedal is depressed.
INHIBITOR SWITCH (“N” AND “P” POSITIONS)
INSPECTION(1) Disconnect the connector.
(2) Check to be sure that there is continuity between
Aconnector terminals 8 and 9 when the shift lever is moved
to the “N” or “P” range.
AUTO-CRUISE CONTROL VACUUM PUMP INSPECTION
Inspection of solenoid valves (control valve, release valve)(1) Remove the auto-cruise control vacuum pump connector.
(2) Measure the resistance value between terminals
0-0and between
0-0.
Standard value: 50-6OQ
(3) Check that the solenoid valve makes an operating noise
when battery voltage is impressed between terminals
0-0 and between 0-0.(4) If there is a malfunction of the solenoid valve, replace the
auto-cruise control vacuum pump assembly.
Motor inspection(1) Remove the auto-cruise control vacuum pump connector.
(2) Check that the motor revolves when battery voltage is
impressed between terminals @-@I.
@k
Page 593 of 1216
AUTO-CRUISE CONTROL SYSTEM - service Adjustment ~rocehre~
ACTUATOR INSPECTlCfN
(1) Remove the actuator.
(2) Apply negative pressure to the actuator with
the! &c&mpump and check that the holder moves more than 35
,mm(1.38 in.). In addition, check that there is no change
iii the
position of the holder when negative pressure is main-
tained in that condition.
(3) First install the actuator and then inspect and adjust the
cruise control cable (Refer to
P.14-136.).
I,_1I-35 mm (1.38 in.) or more07AOO52
VEHICLE-SPEED SENSOR INSPECTION
Refer to GROUP 8-Meters and Gauges for checking of vehiclespeed sensor.
ACCELERATOR SWITCH INSPECTIONRefer to GROUP 21 -Troubleshooting.
Page 594 of 1216
Page 595 of 1216
AUTO-CRUISE CONTROL SYSTEM - Auto-cruise Control14-141
SERVICE POINTS OF REMOVAL?trmNWpBC
15. REMOVAL OF AUTO-CRUISE CONTROL SWITCHRefer to GROUP
8-Column Switch.
16. REMOVAL OF VEHICLE SPEED SENSORRefer to GROUP
8-Meters and Gauges.
17. REMOVAL OF AUTO-CRUISE CONTROL INDICATOR
LIGHTRefer to GROUP
8-Meters and Gauges.
INSPECTIONN14lDCEl Check the inner and outer cable for damage.
l Check the cable for smooth movement.
l Check the link protector for damage.
CHECKING THE AUTO-CRUISE CONTROL ACTUATORRefer to
P.14-138.
SERVICE POINTS OF INSTALLATIONN14TDDDD
17. INSTALLATION OF AUTO-CRUISE CONTROL INDICA-
TOR LIGHTRefer to GROUP
8-Meters and Gauges.
16. INSTALLATION OF AUTO-CRUISE CONTROL SWITCHRefer to GROUP
8-Column Switch.
15. INSTALLATION OF VEHICLE SPEED SENSORRefer to GROUP
8-Meter and Gauges.
Page 597 of 1216
, d-a:-;._‘PROPELLER
=. ’SHAFT
CONTENTSNlBAA-
PROPELLER SHAFT........................................4Lubricants......................................................3
2
SPECIAL TOOLS3ServiceSpecifications.................................................................................
TorqueSpecifications...................................2
SPECIFICATIONS.............................................2
TROUBLESHOOTING......................................3
General
Specifications..................................21
Page 598 of 1216

16-2PROPELLER SHAFT - Specifications
SPECIFICATIONS
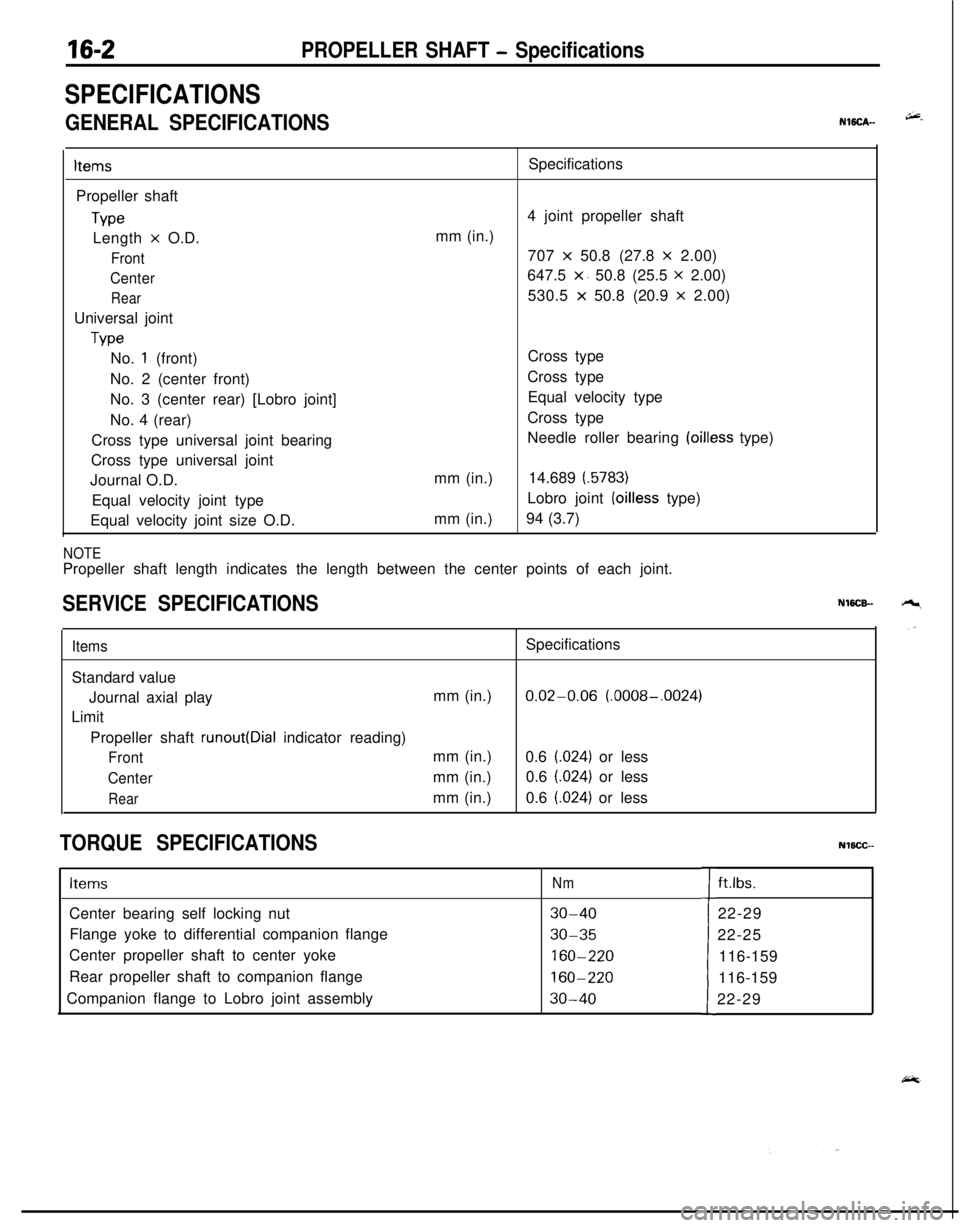
GENERAL SPECIFICATIONSNWCA--
ItemsPropeller shaft
TypeLength
x O.D.
Front
Center
RearUniversal joint
TypeSpecifications
4 joint propeller shaft
mm (in.)
707
x 50.8 (27.8 x 2.00)
647.5
x. 50.8 (25.5 x 2.00)
530.5
x 50.8 (20.9 x 2.00)
No.
1 (front)
No. 2 (center front)
No. 3 (center rear) [Lobro joint]
No. 4 (rear)
Cross type universal joint bearing
Cross type universal joint
Journal O.D.
Equal velocity joint type
Equal velocity joint size O.D.mm (in.)
mm (in.)Cross type
Cross type
Equal velocity type
Cross type
Needle roller bearing
(oilless type)
14.689
(.5783)Lobro joint
(oilless type)
94 (3.7)
NOTEPropeller shaft length indicates the length between the center points of each joint.
SERVICE SPECIFICATIONSNWCB-
ItemsSpecifications
Standard value
Journal axial playmm (in.)
0.02-0.06 (.0008-.0024)
Limit
Propeller shaft
runout(Dial indicator reading)
Frontmm (in.)
0.6 (.024) or less
Centermm (in.)0.6 (.024) or less
Rearmm (in.)0.6 (.024) or less
TORQUE SPECIFICATIONSNlBCC--
ItemsNmCenter bearing self locking nut
30-40Flange yoke to differential companion flange
30-35Center propeller shaft to center yoke
160-220Rear propeller shaft to companion flange
160-220Companion flange to Lobro joint assembly
30-40tft.lbs.
22-29
22-25
116-159
116-159
22-29
Page 600 of 1216

16-4PROPELLER SHAFT - Propeller Shaft
PROPELLER SHAFT
REMOVAL AND INSTALLATIONNlffiA--
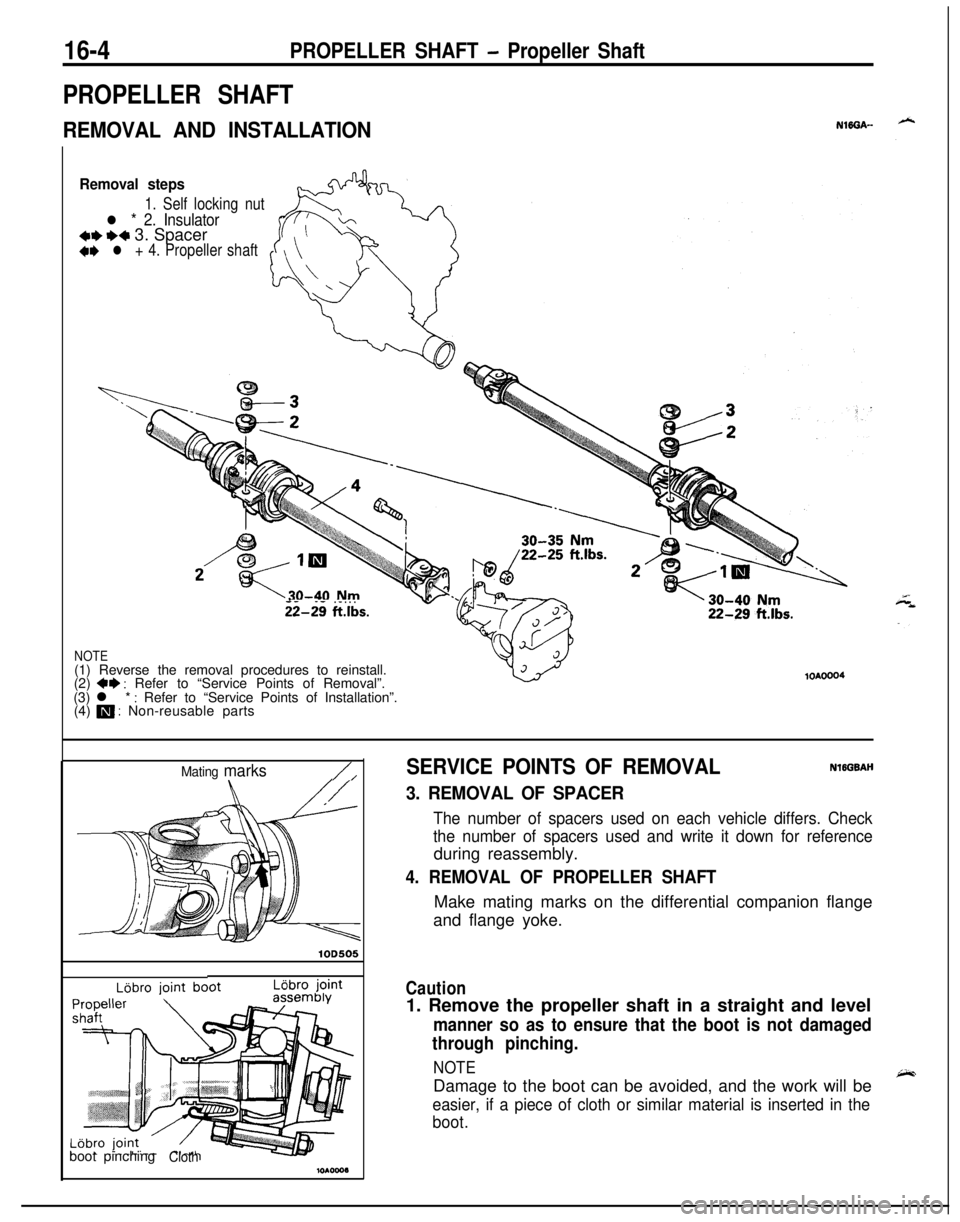
Removal steps
1. Self locking nut
l * 2. Insulator*I)+* 3. Spacer+e l + 4. Propeller shaft
- -. - . . .ii-29 ftlbs.
NOTE(1) Reverse the removal procedures to reinstall.
(2)
+* : Refer to “Service Points of Removal”.
(3) l * : Refer to “Service Points of Installation”.
(4) m : Non-reusable parts
lOAOOO4
Mating marks/,
lOD505
LBbro jointboot pinching
Cloth
SERVICE POINTS OF REMOVALNlEGBAH
3. REMOVAL OF SPACER
The number of spacers used on each vehicle differs. Check
the number of spacers used and write it down for referenceduring reassembly.
4. REMOVAL OF PROPELLER SHAFTMake mating marks on the differential companion flange
and flange yoke.
Caution1. Remove the propeller shaft in a straight and level
manner so as to ensure that the boot is not damaged
through pinching.
NOTEDamage to the boot can be avoided, and the work will be
easier, if a piece of cloth or similar material is inserted in the
boot.
Page 601 of 1216

PROPELLER SHAFT - Propeller Shaft
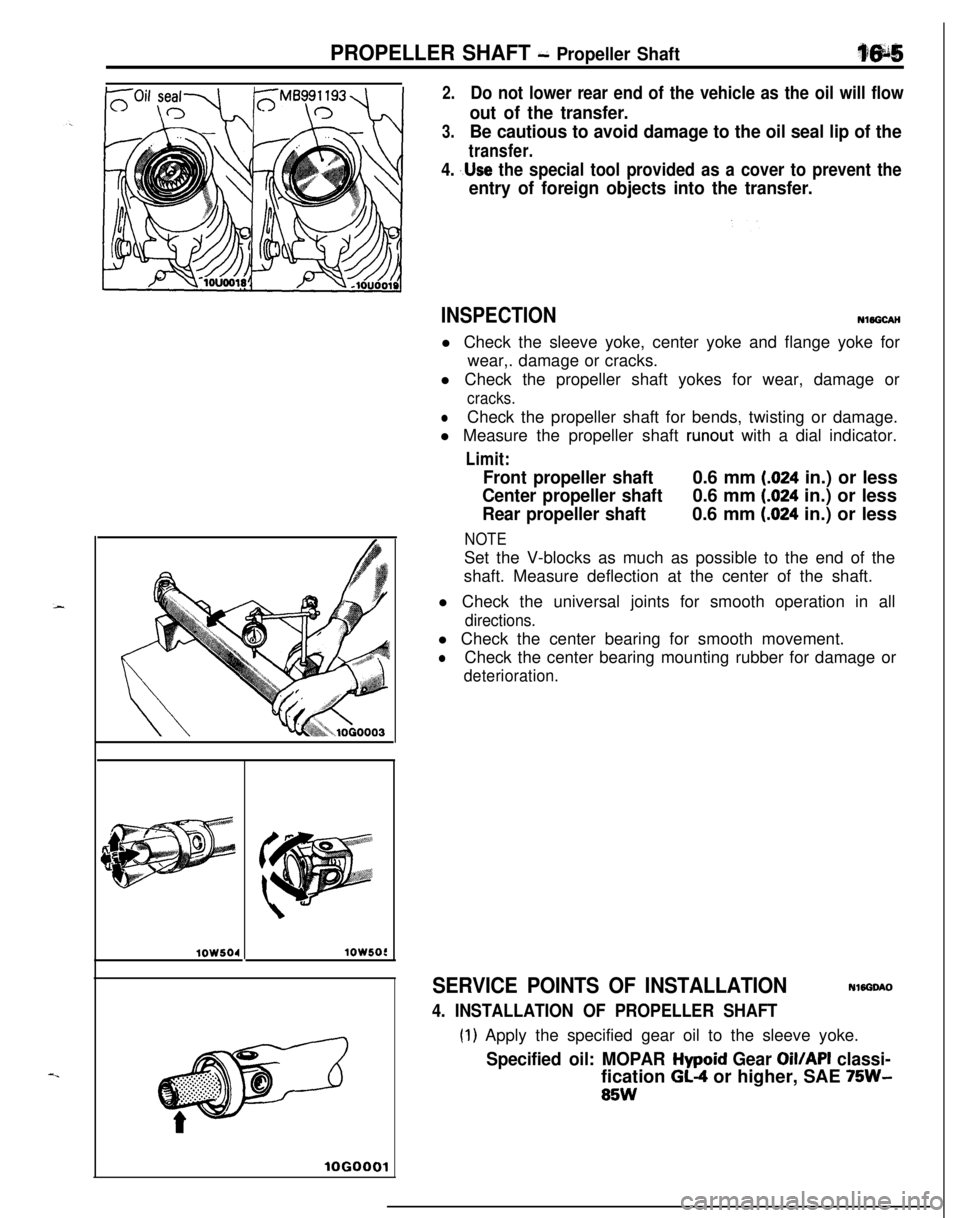
2.Do not lower rear end of the vehicle as the oil will flow
out of the transfer.
3.Be cautious to avoid damage to the oil seal lip of the
transfer.
4. ,.Use the special tool provided as a cover to prevent the
entry of foreign objects into the transfer.
lOW504lOW5OC
lOGO
INSPECTIONNl5GCAH
l Check the sleeve yoke, center yoke and flange yoke for
wear,. damage or cracks.
l Check the propeller shaft yokes for wear, damage or
cracks.
lCheck the propeller shaft for bends, twisting or damage.
l Measure the propeller shaft
runout with a dial indicator.
Limit:
Front propeller shaft0.6 mm (.024 in.) or less
Center propeller shaft0.6 mm (.024 in.) or less
Rear propeller shaft0.6 mm (.024 in.) or less
NOTESet the V-blocks as much as possible to the end of the
shaft. Measure deflection at the center of the shaft.
l Check the universal joints for smooth operation in all
directions.l Check the center bearing for smooth movement.
lCheck the center bearing mounting rubber for damage or
deterioration.
SERVICE POINTS OF INSTALLATIONNWGOAO
4. INSTALLATION OF PROPELLER SHAFT
(1) Apply the specified gear oil to the sleeve yoke.
Specified oil: MOPAR Hypoid Gear Oil/API classi-fication
GL-4 or higher, SAE 75W-
85W