Page 361 of 392

SOLENOID PULL-IN TEST
Connect positive battery lead to solenoid "S" terminal and negative battery lead to solenoid case. Starter pinion
drive gear should extend quickly and maintain this position. If starter pinion drive gear does not extend, replace
solenoid. See Fig. 2
.
SOLENOID RETURN TEST
Connect positive battery lead to solenoid "M" terminal and ground negative battery lead to starter body. Using
screwdriver, pry overrunning clutch pinion drive outward. Release screwdriver and ensure overrunning clutch
pinion drive returns to original position. See Fig. 2 .
SOLENOID
1. Disconnect all wires to solenoid. Using ohmmeter, ensure continuity between "S" and "M" terminals, and
between "S" terminal and solenoid body. See Fig. 1
. If continuity does not exist between these terminals,
solenoid must be replaced.
2. Next ensure continuity does not exist between "M" and "B" terminals. If continuity exists between these
terminals, solenoid is shorted and must be replaced.
PINION GAP ADJUSTMENT
1. Ensure field wire is disconnected from solenoid "M" terminal. Connect positive battery lead to "S"
terminal and negative battery lead to starter case. Starter pinion drive gear will extend outward and stop.
2. Quickly measure pinion gap clearance between end of pinion drive and circlip retainer. See Fig. 3
. DO
NOT operate starter solenoid for more than 10 seconds. Pinion gap clearance should be .02-.08" (0.5-2.0
mm).
3. If pinion gap clearance is not within specification, adjust by increasing or decreasing thickness of
solenoid shims located between solenoid and drive housin
g. NOTE: Solenoid tests must be performed with starter assembled and field lead ("M"
terminal wire) disconnected at the solenoid.
CAUTION: Do not engage starter solenoid for more than 10 seconds during testing or
damage to coil winding may result.
1991 Mazda MX-5 Miata
STARTER - DIRECT DRIVE 1990-92 ELECTRICAL Mazda Starters - Direct Drive
Microsoft
Sunday, July 05, 2009 2:13:20 PMPage 5 © 2005 Mitchell Repair Information Company, LLC.
Page 362 of 392
Fig. 3: Adjusting Pinion Gap
Courtesy of MAZDA MOTORS CORP.
BENCH TESTING (DISASSEMBLED)
1991 Mazda MX-5 Miata
STARTER - DIRECT DRIVE 1990-92 ELECTRICAL Mazda Starters - Direct Drive
Microsoft
Sunday, July 05, 2009 2:13:20 PMPage 6 © 2005 Mitchell Repair Information Company, LLC.
Page 363 of 392

ARMATURE TESTING
1. Place armature in growler. Turn on growler and hold a piece of hacksaw blade over armature. Slowly
rotate armature. If hacksaw blade is attracted to core or if it vibrates, replace armature.
2. Remove armature from growler. Using an ohmmeter, check continuity between commutator and core. If
continuity exists, the armature is shorted and must be replaced. Check continuity between commutator
and shaft. If continuity exists, replace armature.
3. Check continuity between each commutator segment. If an open exists between any 2 segments, replace
armature.
COMMUTATOR TESTING
1. Clean surface and polish with No. 400 sandpaper if required. If surface is scored, out of round or pitted,
turn commutator in a lathe.
2. Maximum commutator runout and minimum diameter of commutator must not exceed specification after
turning. See COMMUTATOR SPECIFICATIONS table.
3. Commutator mica undercut depth should be .02 -.03" (.5 -.8 mm). Minimum mica undercut depth
is .008" (.20 mm). If not within specification, undercut to standard depth.
COMMUTATOR SPECIFICATIONS
BRUSH TESTING
1. Connect ohmmeter lead to positive brush holder and other lead to negative brush holder. If continuity
exists, brush holder assembly is shorted and must be replaced.
2. Check brush length. If less than specification, replace brushes. See BRUSH LENGTH
SPECIFICATIONS table. Use brush spring scale to check spring tension. Spring tension is measured at
point where spring separates from brush.Tension should be greater than 2 lbs. (0.9 kg). Tension
specification for a new spring is 3.1-5.7 lbs. (1.4-2.6 kg). Brushes must move freely in holders.
BRUSH LENGTH SPECIFICATIONS
FIELD COIL TESTING
1. Connect one ohmmeter lead to field coil lead ("M" terminal lead). Connect other lead to soldered portion
of brush lead. If continuity does not exist, repair or replace field coil.
2. Check field coil for shorts to
ground by connecting ohmmeter lead to field coil lead. Connect other lead
Application
Maximum Runout In.
(mm)Minimum Diameter
In. (mm)
B2200 (M/T)
Protege (M/T) & 323.004 (.10)1.22 (31)
Miata.001 (.03)1.22 (31)
ApplicationStandard In. (mm)Minimum In. (mm)
All Models.67 (17.0).45 (11.5)
1991 Mazda MX-5 Miata
STARTER - DIRECT DRIVE 1990-92 ELECTRICAL Mazda Starters - Direct Drive
Microsoft
Sunday, July 05, 2009 2:13:20 PMPage 7 © 2005 Mitchell Repair Information Company, LLC.
Page 364 of 392

to field coil housing. If continuity exists, repair or replace field coil.
OVERRUNNING CLUTCH PINION DRIVE
Hold overrunning clutch housing and turn pinion gear by hand. If pinion turns in both directions, clutch is faulty
and must be replaced. DO NOT clean overrunning clutch with solvent, as it is packed with grease and sealed by
manufacturer.
REMOVAL & INSTALLATION
1. Disconnect negative battery cable. Raise vehicle on hoist. Remove undercover. Disconnect wiring from
starter. Remove differential lock assembly (4WD models). On Protege (M/T) and 323 models, remove
support brace from under intake manifold. Remove starter mounting bolts. Remove lowest mounting bolt
last. Remove starter from under side of vehicle.
2. To install starter, reverse removal procedure. Tighten mounting bolts to 23-24 ft. lbs. (31-46 N.m).
Tighten battery terminal nut to 87-104 INCH lbs. (9.8-12 N.m).
OVERHAUL
DISASSEMBLY & ASSEMBLY
1. Mark rear cover, field coil housing and front drive housing for reassembly reference. Remove solenoid
and shims, rear cover and brush plate. Remove field coil housing and pull armature and yoke lever from
front drive housing. See Fig. 4
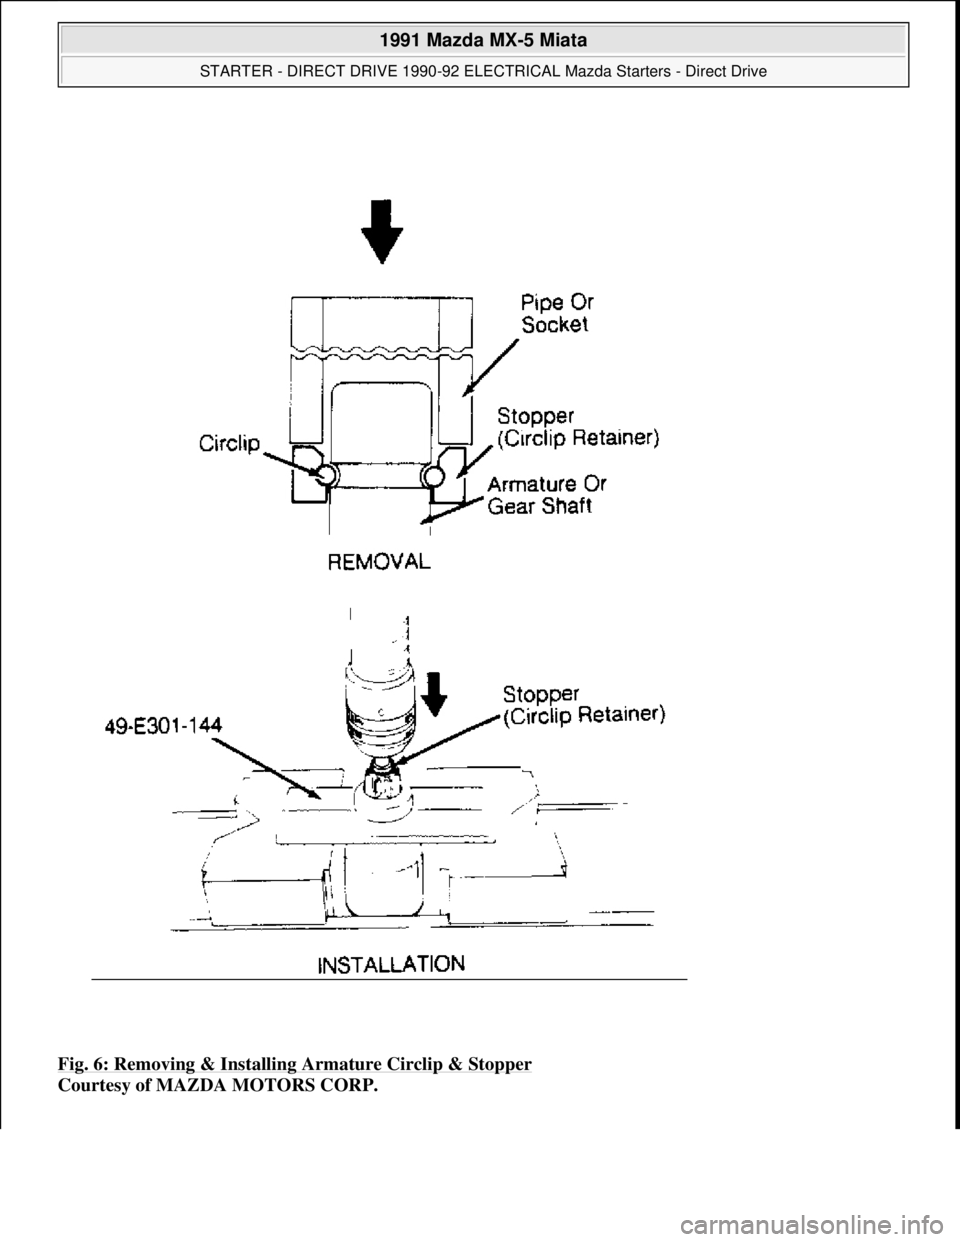
& Fig. 5. Use arbor press to remove circlip, stopper and pinion drive from
armature shaft. See Fig. 6
.
2. To assemble, reverse removal procedures. Lubricate solenoid plunger, yoke lever and armature bushings.
Use arbor press and pinion drive to install stopper and circlip on armature shaft. See Fig. 6
. Ensure brush
plate, rear cover and field coil housin
g are aligned when installing through bolts.
1991 Mazda MX-5 Miata
STARTER - DIRECT DRIVE 1990-92 ELECTRICAL Mazda Starters - Direct Drive
Microsoft
Sunday, July 05, 2009 2:13:20 PMPage 8 © 2005 Mitchell Repair Information Company, LLC.
Page 365 of 392
Fig. 4: View of Direct Drive Starters (Miata, Protege, 323 & MX-3)
Courtesy of MAZDA MOTORS CORP.
1991 Mazda MX-5 Miata
STARTER - DIRECT DRIVE 1990-92 ELECTRICAL Mazda Starters - Direct Drive
Microsoft
Sunday, July 05, 2009 2:13:20 PMPage 9 © 2005 Mitchell Repair Information Company, LLC.
Page 366 of 392
Fig. 5: Exploded View of Direct Drive Starters (B2200)
Courtesy of MAZDA MOTORS CORP.
1991 Mazda MX-5 Miata
STARTER - DIRECT DRIVE 1990-92 ELECTRICAL Mazda Starters - Direct Drive
Microsoft
Sunday, July 05, 2009 2:13:20 PMPage 10 © 2005 Mitchell Repair Information Company, LLC.
Page 367 of 392
Fig. 6: Removing & Installing Armature Circlip & Stopper
Courtesy of MAZDA MOTORS CORP.
1991 Mazda MX-5 Miata
STARTER - DIRECT DRIVE 1990-92 ELECTRICAL Mazda Starters - Direct Drive
Microsoft
Sunday, July 05, 2009 2:13:20 PMPage 11 © 2005 Mitchell Repair Information Company, LLC.
Page 368 of 392

STEERING COLUMN
1991 STEERING Mazda - Steering Columns
DESCRIPTION
The steering column consists of solid steering shaft with a lower joint assembly. Miata and RX7 convertible
models are equipped with Air Bag Restraint System consisting of an air bag module and clockspring connector
assembly located in the steering column.
REMOVAL & INSTALLATION
STEERING WHEEL & HORN PAD
Removal & Installation (B2200, B2600i, MPV & 929)
Unsnap horn pad cover. Remove steering wheel lock nut. Use a puller to remove steering wheel. To install,
reverse removal procedure.
Removal & Installation (Miata & RX7)
1. On Miata and RX7 convertible models, remove air bag module. See AIR BAG RESTRAINT SYSTEM
article in the ACCESSORIES/SAFETY EQUIPMENT section. For all models, remove horn cap (if
equipped).
2. Remove steering wheel nut. Remove steering wheel with steering wheel puller. To install, reverse
removal procedure. Tighten steering wheel nut and air bag nuts to specification. See TORQUE
SPECIFICATIONS TABLE at end of article. WARNING:Wait about 10 minutes after disabling air bag system before servicing. Air
bag system voltage is maintained for about 10 minutes after system is
disabled. Failure to wait 10 minutes before servicing system may cause
accidental air bag deployment and possible personal injury.
CAUTION: DO NOT strike steering shaft with a hammer as it may collapse.
WARNING:Before servicing Miata and RX7 convertible models, disconnect and
shield battery ground. Use caution when working around steering column
as air bag could deploy.
WARNING:Wait about 10 minutes after disabling air bag system before servicing. Air
bag system voltage is maintained for about 10 minutes after system is
disabled. Failure to wait 10 minutes before servicing system may cause
accidental air bag deployment and possible personal injury.
1991 Mazda MX-5 Miata
STEERING COLUMN 1991 STEERING Mazda - Steering Columns
1991 Mazda MX-5 Miata
STEERING COLUMN 1991 STEERING Mazda - Steering Columns
Microsoft
Sunday, July 05, 2009 2:10:42 PMPage 1 © 2005 Mitchell Repair Information Company, LLC.
Microsoft
Sunday, July 05, 2009 2:10:45 PMPage 1 © 2005 Mitchell Repair Information Company, LLC.