Page 1916 of 4087
INSTALLATION OF THROTTLE BODY
(See Components o page FI±69)
1. INSTALL THROTTLE BODY (a) Install the two water by±pass hoses and pipe to thethrottle body.
(b) Connect the following hoses: (1) PCV hose to throttle body
(2) Water by±pass hose to throttle body
(c) Install a new gasket and throttle body with the two bolts and two nuts.
Torque: 18 N Vm (185 kgf Vcm, 13 ft Vlbf)
HINT: Use bolts 40 mm (1.57 in.) in length.
(d) Install the water by±pass pipe (from rear water by±pass
joint) to the clamp on the engine wire cover.
(e) Connect the following hoses: (1) Water by±pass hose to the ISC valve
(2) (USA Spec.) Vacuum hose to throttle body
(3) (Exc. USA Spec.) Three vacuum hoses to throttle body FI±77
EFI SYSTEM
± Air Induction System (Throttle Body)
WhereEverybodyKnowsYourName
Page 1918 of 4087
(d) Connect the following hoses:(1) Air hose to ISC valve
(2) Air hose (from PS air control valve) to intake air con-
nector
4. CONNECT CONTROL CABLES TO THROTTLE BODY Connect the following cables:(1) Accelerator cable
(2) A/T throttle control cable
(3) (w/ Cruise Control System) Cruise control actuator cable
5. INSTALL THROTTLE BODY COVER Install the throttle body cover and hose clamp with the two
bolts and cap nut.
6. CONNECT CABLE TO NEGATIVE TERMINAL OF BATTERY
7. FILL WITH ENGINE COOLANT (See page CO±7)FI±79
EFI SYSTEM
± Air Induction System (Throttle Body)
WhereEverybodyKnowsYourName
Page 1919 of 4087
11. RECONNECT DRIVER BELTInstall the drive belt by turning the drive belt tensioner clock-
wise.
12. RECONNECT CABLE FROM NEGATIVE TERMINAL OF BATTERY
13. REFILL WITH ENGINE COOLANT
Knock Sensors
INSPECTION OF KNOCK SENSORS
1. DISCONNECT CABLE FROM NEGATIVE TERMINAL OF BATTERY
CAUTION: Turn the ignition switch to ºLOCKº. Discon-
nect the cable from the negative (±) terminal of the bat-
tery. Wait at least 20 seconds before proceeding with
work.
±
EFI SYSTEM Electronic Control System (Water Temperature Sensor)FI±69
WhereEverybodyKnowsYourName
Page 1923 of 4087
Main Oxygen Sensors
INSPECTION OF MAIN OXYGEN
SENSORS
1. WARM UP ENGINEAllow the engine to warm up to normal operating tempera-
ture.
2. INSPECT FEEDBACK VOLTAGE Connect the positive (+) probe of a voltmeter to terminal VF1
(for No.1) or VF2 (for No.2) of the check (ºDIAGNOSISº) con-\
nector, and negative (±) probe to terminal E1. Perform the
test as follows described on the next page.
HINT: Use SST when connecting between terminals TE1 and
E1 of the check connector.
SST 09843±18020
±
EFI SYSTEM Electronic Control System (Main Oxygen Sensors)FI±73
WhereEverybodyKnowsYourName
Page 1924 of 4087

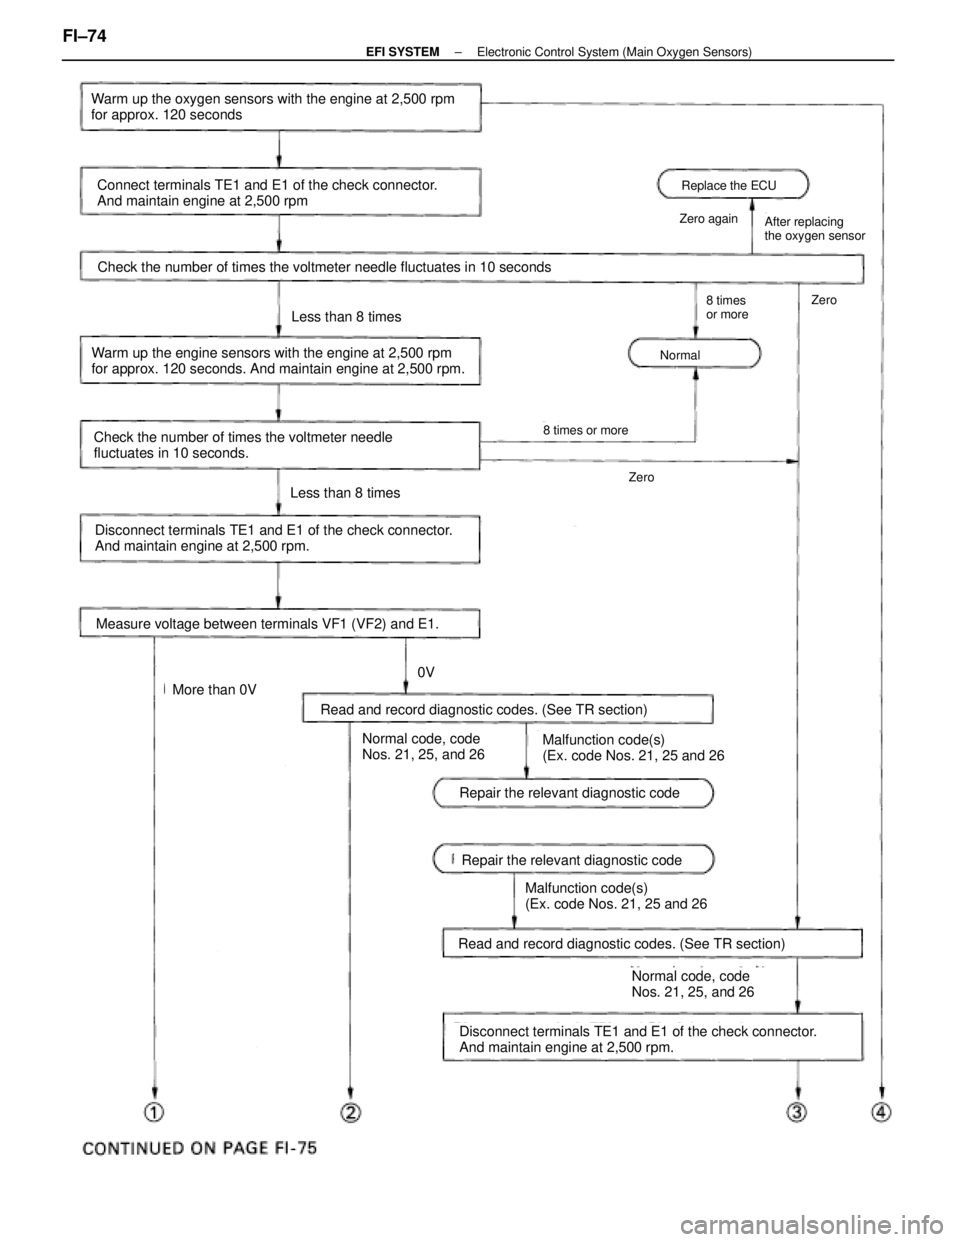
Replace the ECU
Zero againAfter replacing
the oxygen sensor
Normal
8 times
or moreZero
Check the number of times the voltmeter needle fluctuates in 10 seconds
Zero
8 times or more
Warm up the oxygen sensors with the engine at 2,500 rpm
for approx. 120 seconds
Connect terminals TE1 and E1 of the check connector.
And maintain engine at 2,500 rpm
Warm up the engine sensors with the engine at 2,500 rpm
for approx. 120 seconds. And maintain engine at 2,500 rpm.
Check the number of times the voltmeter needle
fluctuates in 10 seconds.
Less than 8 times
Disconnect terminals TE1 and E1 of the check connector.
And maintain engine at 2,500 rpm.
Measure voltage between terminals VF1 (VF2) and E1.
Less than 8 times
More than 0V
0V
Normal code, code
Nos. 21, 25, and 26Malfunction code(s)
(Ex. code Nos. 21, 25 and 26
Read and record diagnostic codes. (See TR section)
Repair the relevant diagnostic code
Disconnect terminals TE1 and E1 of the check connector.
And maintain engine at 2,500 rpm.
Read and record diagnostic codes. (See TR section)
Malfunction code(s)
(Ex. code Nos. 21, 25 and 26
Normal code, code
Nos. 21, 25, and 26
Repair the relevant diagnostic code
FI±74±
EFI SYSTEM Electronic Control System (Main Oxygen Sensors)
WhereEverybodyKnowsYourName
Page 1925 of 4087
Measure voltage between terminals VF1 (VF2) and E1.
Disconnect terminals TE1 and E1 of the check connector.
And maintain engine at 2,500 rpm.
Measure voltage between terminals VF1 (VF2) and E1.
Disconnect the PCV hose.
0V
5V
More than 0V
Repair (Over rich)
Disconnect the water temp. sensor connector and connect
resistor with a resistance of 4 ± 8 kW or another coded water
temp. sensor.
Connect terminals TE1 and E1 of the check connector.
Warm up the oxygen sensors with the engine at 2,500 rpm for
approx. 120 seconds, and maintain engine at 2,500 rpm
Measure voltage between terminals VF1 (VF2) and E1.
Replace the oxygen sensor.Repair (Over lean)
5V
0V
±
EFI SYSTEM Electronic Control System (Main Oxygen Sensors)FI±75
WhereEverybodyKnowsYourName
Page 1931 of 4087
Idle Speed Control (ISC) Valve
ON±VEHICLE INSPECTION
INSPECT ISC VALVE FOR OPERATING SOUNDCheck that there is a clicking sound immediately after stop-
ping the engine.
If the rpm operation is not as specified, check the ISC valve,
wiring and ECU.
FI±80
± Air Induction System (Idle Speed Control (ISC\
) Valve)EFI SYSTEM
WhereEverybodyKnowsYourName
Page 1940 of 4087
EFI Main Relay
INSPECTION OF EFI MAIN RELAY
1. REMOVE EFI MAIN RELAY FROM RELAY BOX IN ENGINE
COMPARTMENT
2. INSPECT EFI MAIN RELAY
A. Inspect relay continuity (a) Using an ohmmeter, check that there is continuity
between terminals 1 and 3.
(b) Check that there is no continuity between terminals 2 and 4.
If continuity is not as specified, replace the relay.
B. Inspect relay operation (a) Apply battery voltage across terminals 1 and 3.
(b) Using an ohmmeter, check that there is continuity
between terminals 2 and 4.
If operation is not as specified, replace the relay.
3. REINSTALL EFI MAIN RELAY FI±85
± Electronic Control System (EFI Main Relay\
)EFI SYSTEM
WhereEverybodyKnowsYourName