Page 1856 of 4087

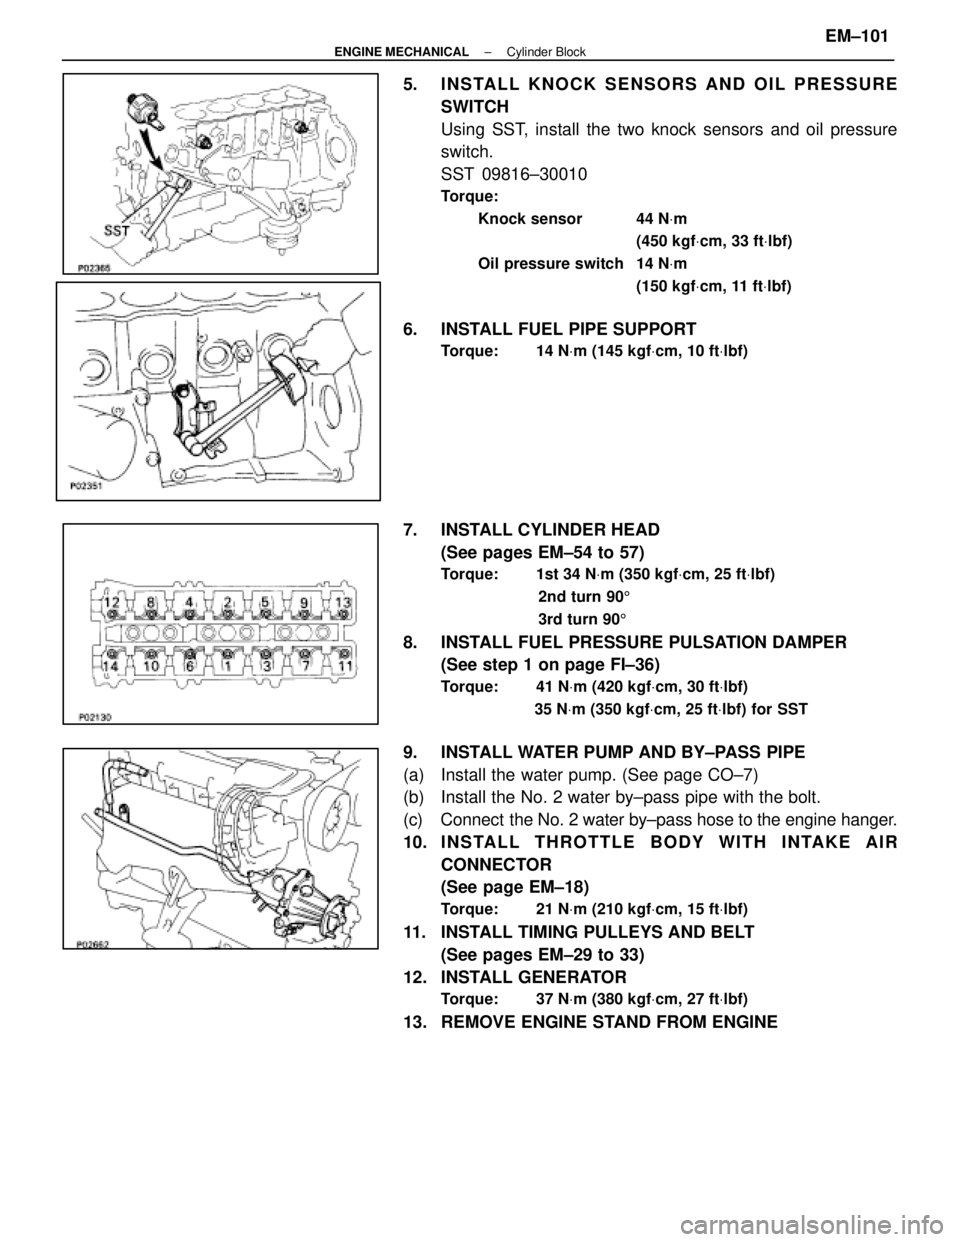
5. INSTALL KNOCK SENSORS AND OIL PRESSURESWITCH
Using SST, install the two knock sensors and oil pressure
switch.
SST 09816±30010
Torque:
Knock sensor 44 N Vm
(450 kgf Vcm, 33 ft Vlbf)
Oil pressure switch 14 N Vm
(150 kgf Vcm, 11 ft Vlbf)
6. INSTALL FUEL PIPE SUPPORT
Torque: 14 N Vm (145 kgf Vcm, 10 ft Vlbf)
7. INSTALL CYLINDER HEAD
(See pages EM±54 to 57)
Torque: 1st 34 N Vm (350 kgf Vcm, 25 ft Vlbf)
2nd turn 90 5
3rd turn 90 5
8. INSTALL FUEL PRESSURE PULSATION DAMPER
(See step 1 on page FI±36)
Torque: 41 N Vm (420 kgf Vcm, 30 ft Vlbf)
35 N Vm (350 kgf Vcm, 25 ft Vlbf) for SST
9. INSTALL WATER PUMP AND BY±PASS PIPE
(a) Install the water pump. (See page CO±7)
(b) Install the No. 2 water by±pass pipe with the bolt.
(c) Connect the No. 2 water by±pass hose to the engine hanger.
10. INSTALL THROTTLE BODY WITH INTAKE AIR
CONNECTOR
(See page EM±18)
Torque: 21 N Vm (210 kgf Vcm, 15 ft Vlbf)
11. INSTALL TIMING PULLEYS AND BELT
(See pages EM±29 to 33)
12. INSTALL GENERATOR
Torque: 37 N Vm (380 kgf Vcm, 27 ft Vlbf)
13. REMOVE ENGINE STAND FROM ENGINE
±
ENGINE MECHANICAL Cylinder BlockEM±101
WhereEverybodyKnowsYourName
Page 1857 of 4087
14. (M/T)INSTALL FLYWHEEL
HINT: The flywheel bolts are tightened in two progressive
steps, (b) and (d).
(a) Install the flywheel on the crankshaft.
(b) Install and uniformly tighten the eight mount bolts inseveral passes in the sequence shown.
Torque: 49 N Vm (500 kgf Vcm, 36 ft Vlbf)
(c) Mark the flywheel bolt with paint.
(d) Second, retighten the flywheel bolts by an additional
90�.
(e) Check that the painted mark is now at a 90 � angle to (c).
15. (A/T) INSTALL DRIVE PLATE
(a) Apply adhesive to two or three threads of the mountingbolt end.
Adhesive: Part No. 08833±00070, THREE BOND 1324 or
equivalent
(b) Install the front spacer, drive plate and rear spacer on the crankshaft.
(c) Install and uniformly tighten the eight mounting bolts in
several passes in the sequence shown.
Torque: 98 N Vm (1,000 kgf Vcm, 72 ft Vlbf)
EM±102±
ENGINE MECHANICAL Cylinder Block
WhereEverybodyKnowsYourName
Page 1858 of 4087
ASSEMBLY OF ENGINE AND
TRANSMISSION
(See Components on page EM±73)1. (M/T) INSTALL CLUTCH DISC AND COVER
Torque: 19 N Vm (195 kgf Vcm, 14 ft Vlbf)
2. ASSEMBLE ENGINE AND TRANSMISSION
(See page AT±31)
Torque:
14 mm head bolt 37 N Vm (380 kgf Vcm, 27 ft Vlbf)
17 mm head bolt 72 N Vm (730 kgf Vcm, 53 ft Vlbf)
3. INSTALL STARTER
Torque: 39 N Vm (400 kgf Vcm, 29 ft Vlbf)
4. CONNECT ENGINE WIRE TO TRANSMISSION
5. (A/T)
INSTALL OIL COOLER PIPE
Torque: 34 N Vm (350 kgf Vcm, 25 ft Vlbf)
6. (A/T)
INSTALL OIL DIPSTICK GUIDE FOR TRANSMISSION
±
ENGINE MECHANICAL Cylinder BlockEM±103
WhereEverybodyKnowsYourName
Page 1859 of 4087

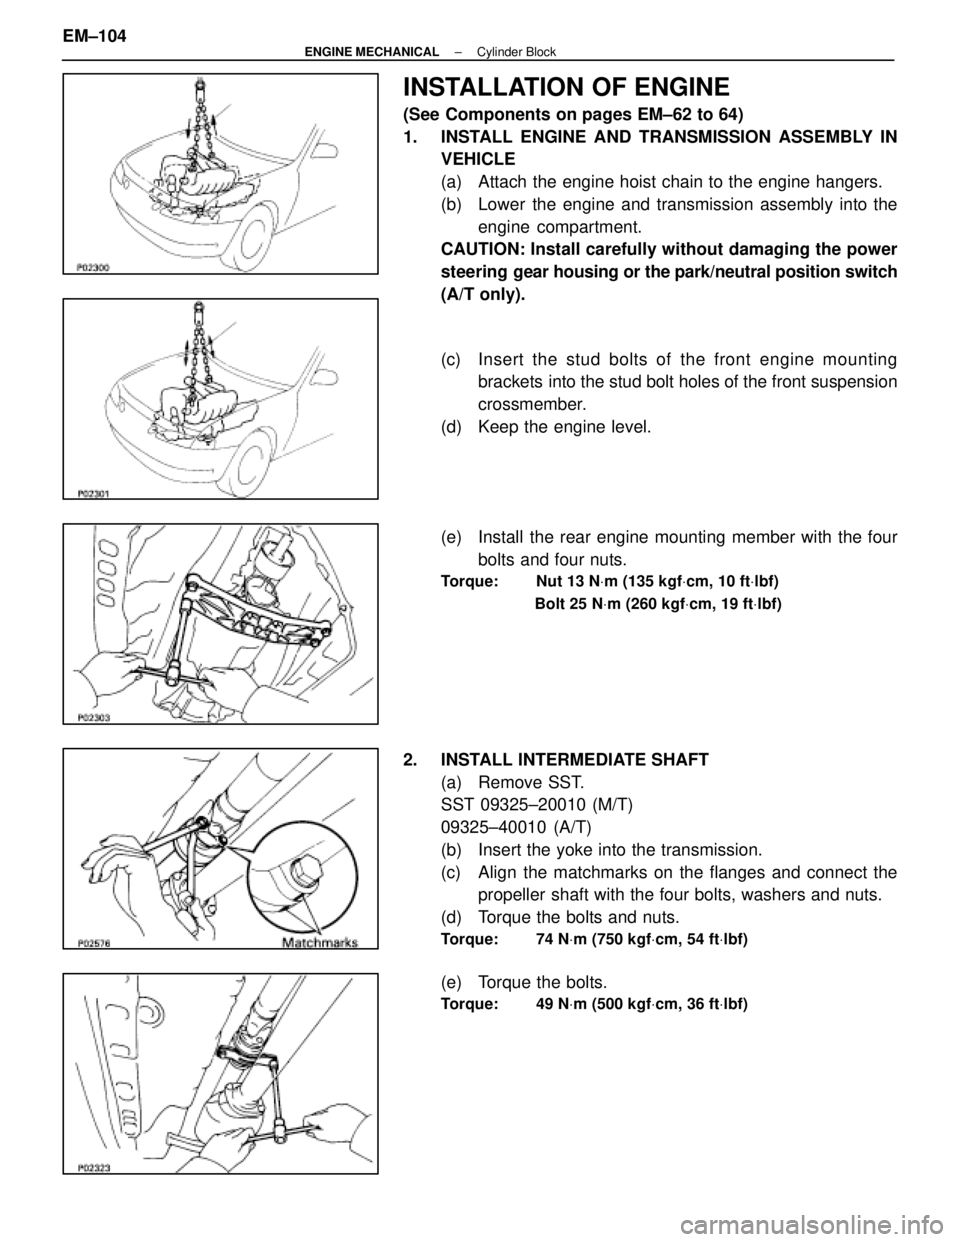
INSTALLATION OF ENGINE
(See Components on pages EM±62 to 64)
1. INSTALL ENGINE AND TRANSMISSION ASSEMBLY INVEHICLE
(a) Attach the engine hoist chain to the engine hangers.
(b) Lower the engine and transmission assembly into the
engine compartment.
CAUTION: Install carefully without damaging the power
steering gear housing or the park/neutral position switch
(A/T only).
(c) Insert the stud bolts of the front engine m ounting
brackets into the stud bolt holes of the front suspension
crossmember.
(d) Keep the engine level.
(e) Install the rear engine mounting member with the four bolts and four nuts.
Torque: Nut 13 N Vm (135 kgf Vcm, 10 ft Vlbf)
Bolt 25 N Vm (260 kgf Vcm, 19 ft Vlbf)
2. INSTALL INTERMEDIATE SHAFT
(a) Remove SST.
SST 09325±20010 (M/T)
09325±40010 (A/T)
(b) Insert the yoke into the transmission.
(c) Align the matchmarks on the flanges and connect thepropeller shaft with the four bolts, washers and nuts.
(d) Torque the bolts and nuts.
Torque: 74 N Vm (750 kgf Vcm, 54 ft Vlbf)
(e) Torque the bolts.
Torque: 49 N Vm (500 kgf Vcm, 36 ft Vlbf)
EM±104±
ENGINE MECHANICAL Cylinder Block
WhereEverybodyKnowsYourName
Page 1860 of 4087
HINT: Adjust the center support bearing to keep the intervals
as shown with the vehicle in the unladen condition.
Under the same condition, check if the center line of the cen-
ter support bearing is at right angles to the shaft axial direc-
tion.
(f) Inspect the joint angle. (See page PR±13)
3. (A/T) CONNECT TRANSMISSION CONTROL ROD
Connect the control rod to the shift lever with the nut.
4. INSTALL EXHAUST PIPE HEAT INSULATOR Install the heat insulator with the four nuts as shown.
5. INSTALL NO. 2 FRONT EXHAUST PIPE (a) Install new two gaskets and No. 2 front exhaust pipe with
new four nuts.
Torque: 62 N Vm (630 kgf Vcm, 46 ft Vlbf)
(b) Install a new gasket and the No. 2 front exhaust pipe to
the front exhaust pipe with the two bolts and nuts.
Torque: 43 N Vm (440 kgf Vcm, 32 ft Vlbf)
±
ENGINE MECHANICAL Cylinder BlockEM±105
WhereEverybodyKnowsYourName
Page 1861 of 4087
6. (M/T)INSTALL CLUTCH RELEASE CYLINDER
Install the clutch release cylinder and torque the two bolts.
Torque: 12 N Vm (120 kgf Vcm, 9 ft Vlbf)
7. INSTALL GROUND STRAP, STARTER WIRE AND HOSE
(a) Install the ground strap to the transmission.
(b) Install the starter wire with the nuts.
(c) Install the starter wire with the wire clamp.
(d) Install two new gaskets and fuel inlet hose with the union
bolt.
Torque: 34 N Vm (350 kgf Vcm, 25 ft Vlbf)
8. INSTALL PS PIPE
Install the PS pipe with the two clamp bolts.
9. CONNECT ENGINE WIRE TO CABIN (a) Push in the engine wire through the cowl panel.
(b) Connect the following connectors:(1) Two connectors to ECM
(2) Connectors to ABS & TRAC ECU
(3) Two connectors to TRAC ECU
(4) Four connectors to connector cassette
(5) Connector to A/C control assembly
EM±106
±
ENGINE MECHANICAL Cylinder Block
WhereEverybodyKnowsYourName
Page 1862 of 4087
(c) Install the engine (& ECT) ECU with the nut.
(d) Install the ECU cover with the two nuts.
(e) Install the floor carpet.
(f) Install the scuff plate.
(g) Connect the connectors.
(h) Install the lower instrument panel finish panel and glovecompartment door assembly with the four screws.
(i) Install the instrument panel under cover with the two clips.
±
ENGINE MECHANICAL Cylinder BlockEM±107
WhereEverybodyKnowsYourName
Page 1863 of 4087
10. (M/T)INSTALL TRANSMISSION SHIFT LEVER
(a) Install the shift lever with the eight bolts.
(b) Fit the upper console panel to the console box with fiveclips.
(c) Install the upper console panel with the six screws.
(d) Fit the upper rear console panel to the console box with
the four clips.
(e) Install the shift lever knob.
(f) Fit the cup holder to the console box.
11. CONNECT ENGINE WIRE AND HOSE (a) Install the engine wire clamp with the two nuts.
(b) Install the bolt holding the engine wire protector to thewater valve bracket.
EM±108
±
ENGINE MECHANICAL Cylinder Block
WhereEverybodyKnowsYourName