Page 1771 of 4087
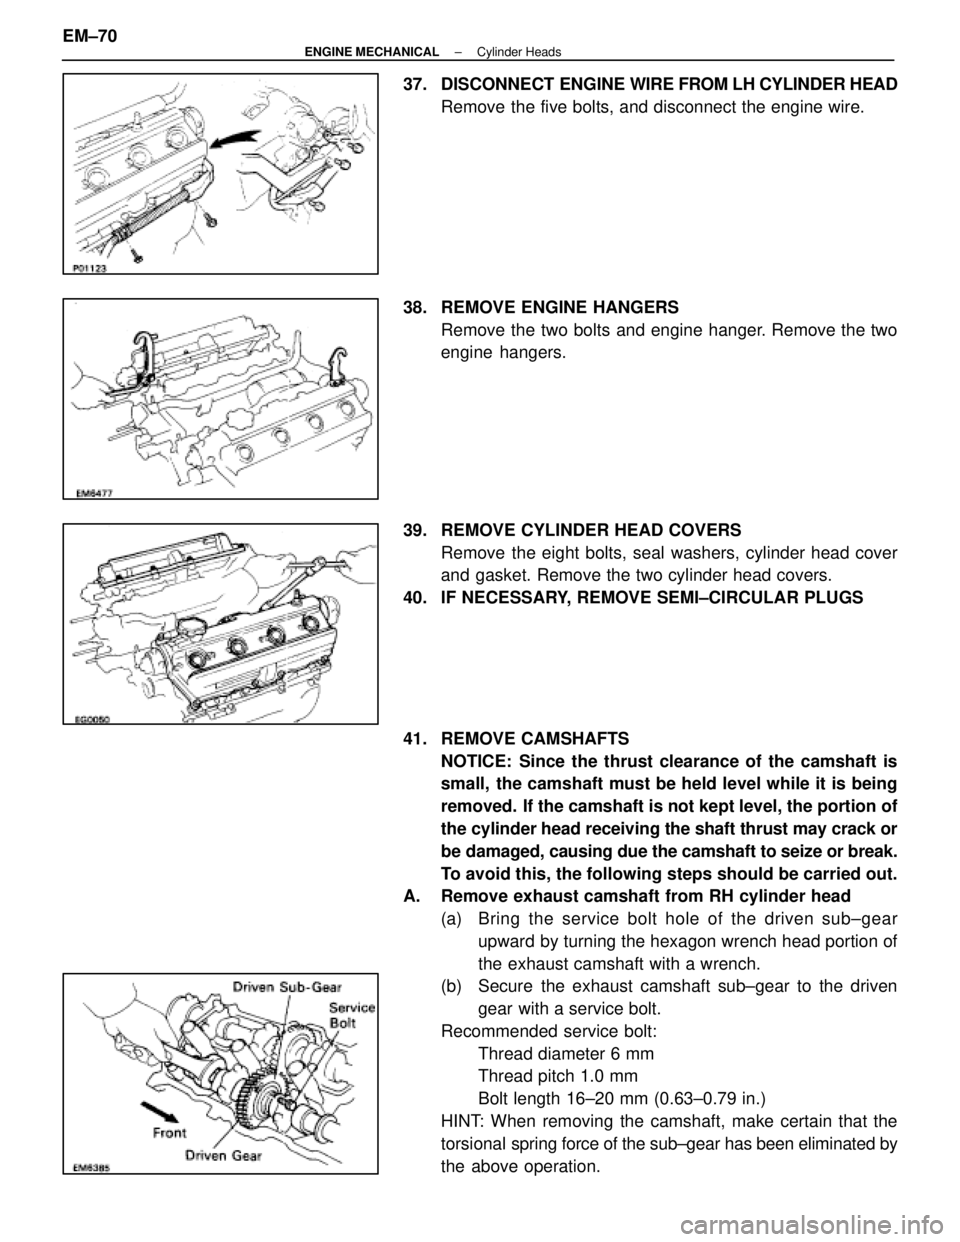
37. DISCONNECT ENGINE WIRE FROM LH CYLINDER HEAD
Remove the five bolts, and disconnect the engine wire.
38. REMOVE ENGINE HANGERS Remove the two bolts and engine hanger. Remove the two
engine hangers.
39. REMOVE CYLINDER HEAD COVERS Remove the eight bolts, seal washers, cylinder head cover
and gasket. Remove the two cylinder head covers.
40. IF NECESSARY, REMOVE SEMI±CIRCULAR PLUGS
41. REMOVE CAMSHAFTS NOTICE: Since the thrust clearance of the camshaft is
small, the camshaft must be held level while it is being
removed. If the camshaft is not kept level, the portion of
the cylinder head receiving the shaft thrust may crack or
be damaged, causing due the camshaft to seize or break.
To avoid this, the following steps should be carried out.
A. Remove exhaust camshaft from RH cylinder head
(a) Bring the service bolt hole of the driven s ub±gear
upward by turning the hexagon wrench head portion of
the exhaust camshaft with a wrench.
(b) Secure the exhaust camshaft sub±gear to the driven
gear with a service bolt.
Recommended service bolt: Thread diameter 6 mm
Thread pitch 1.0 mm
Bolt length 16±20 mm (0.63±0.79 in.)
HINT: When removing the camshaft, make certain that the
torsional spring force of the sub±gear has been eliminated by
the above operation.
EM±70
±
ENGINE MECHANICAL Cylinder Heads
WhereEverybodyKnowsYourName
Page 1773 of 4087
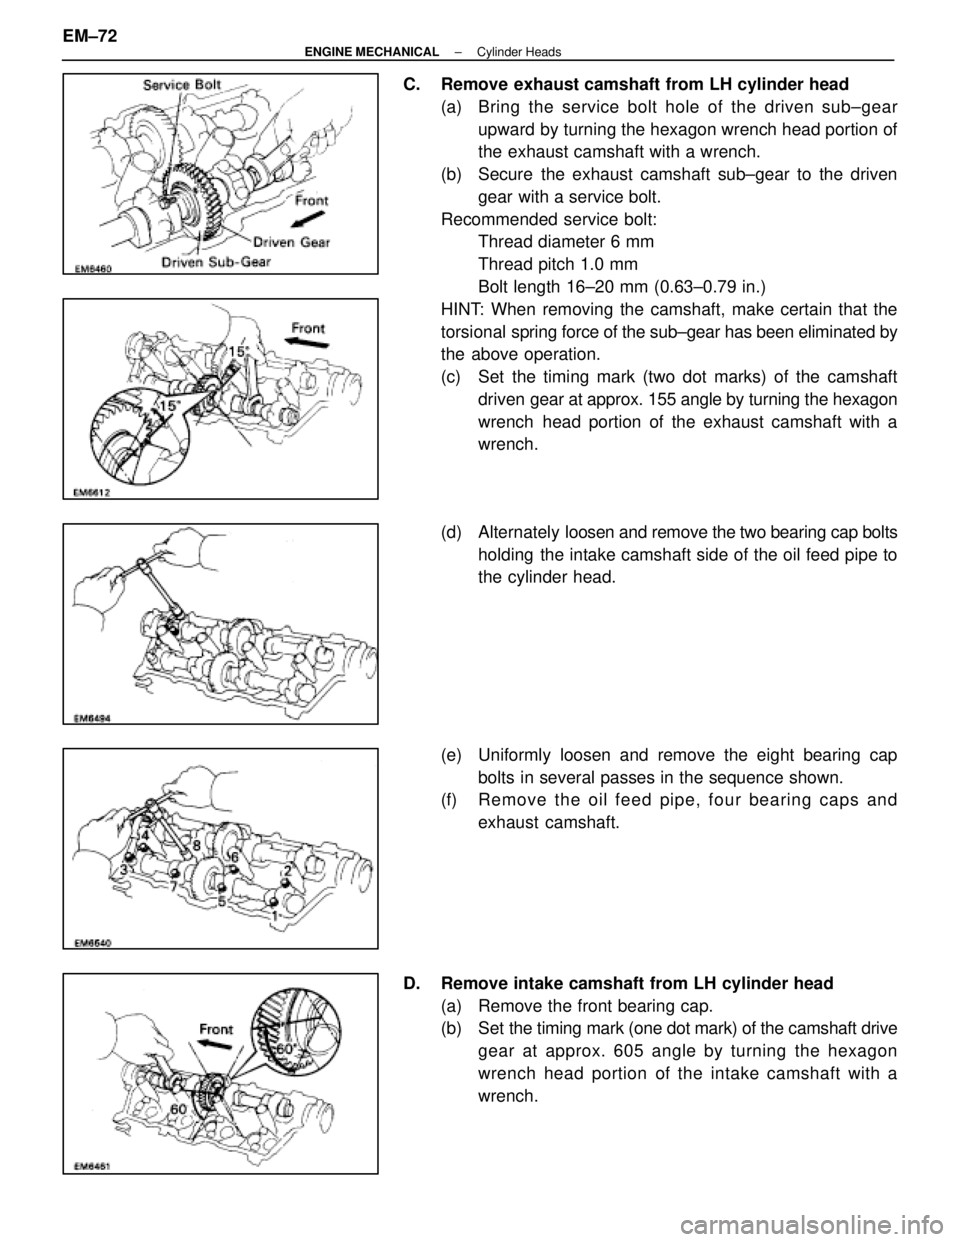
C. Remove exhaust camshaft from LH cylinder head(a) Bring the service bolt hole of the driven s ub±gear
upward by turning the hexagon wrench head portion of
the exhaust camshaft with a wrench.
(b) Secure the exhaust camshaft sub±gear to the driven gear with a service bolt.
Recommended service bolt: Thread diameter 6 mm
Thread pitch 1.0 mm
Bolt length 16±20 mm (0.63±0.79 in.)
HINT: When removing the camshaft, make certain that the
torsional spring force of the sub±gear has been eliminated by
the above operation.
(c) Set the timing mark (two dot marks) of the camshaft
driven gear at approx. 155 angle by turning the hexagon
wrench head portion of the exhaust camshaft with a
wrench.
(d) Alternately loosen and remove the two bearing cap bolts
holding the intake camshaft side of the oil feed pipe to
the cylinder head.
(e) Uniformly loosen and remove the eight bearing cap bolts in several passes in the sequence shown.
(f) Re mo ve th e oil fe e d pip e , fo u r be a rin g ca p s an d
exhaust camshaft.
D. Remove intake camshaft from LH cylinder head (a) Remove the front bearing cap.
(b) Set the timing mark ( one dot mark) of the camshaft drive
gear at approx. 605 angle by turning the hexagon
wrench head portion of the intake camshaft with a
wrench.
EM±72
±
ENGINE MECHANICAL Cylinder Heads
WhereEverybodyKnowsYourName
Page 1784 of 4087
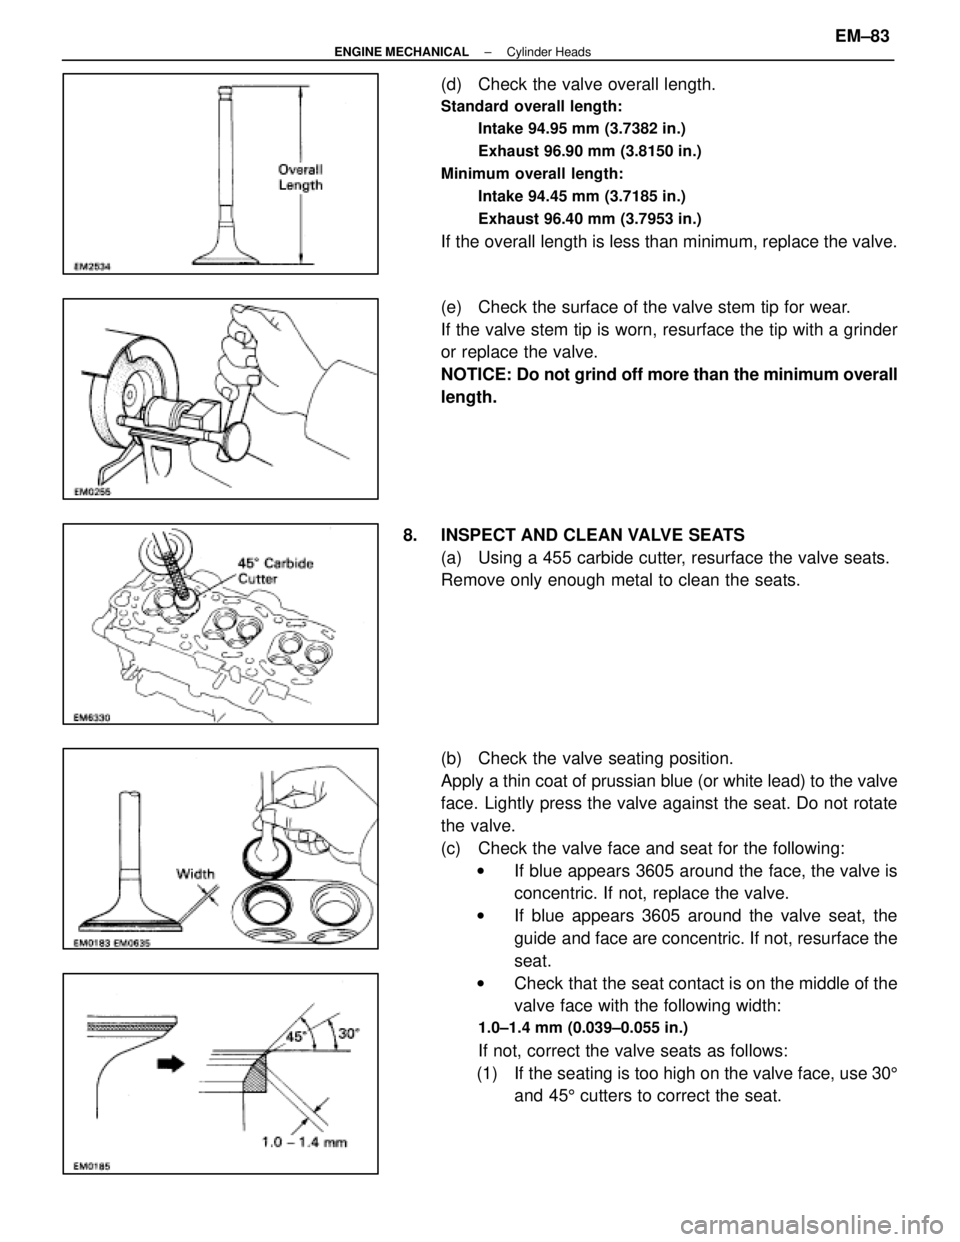
(d) Check the valve overall length.
Standard overall length:Intake 94.95 mm (3.7382 in.)
Exhaust 96.90 mm (3.8150 in.)
Minimum overall length: Intake 94.45 mm (3.7185 in.)
Exhaust 96.40 mm (3.7953 in.)
If the overall length is less than minimum, replace the valve.
(e) Check the surface of the valve stem tip for wear.
If the valve stem tip is worn, resurface the tip with a grinder
or replace the valve.
NOTICE: Do not grind off more than the minimum overall
length.
8. INSPECT AND CLEAN VALVE SEATS (a) Using a 455 carbide cutter, resurface the valve seats.
Remove only enough metal to clean the seats.
(b) Check the valve seating position.
Apply a thin coat of prussian blue (or white lead) to the valve
face. Lightly press the valve against the seat. Do not rotate
the valve.
(c) Check the valve face and seat for the following:w If blue appears 3605 around the face, the valve is
concentric. If not, replace the valve.
w If blue appears 3605 around the valve seat, the
guide and face are concentric. If not, resurface the
seat.
w Check that the seat contact is on the middle of the
valve face with the following width:
1.0±1.4 mm (0.039±0.055 in.)
If not, correct the valve seats as follows:
(1) If the seating is too high on the valve face, use 30 5
and 45 5 cutters to correct the seat.
±
ENGINE MECHANICAL Cylinder HeadsEM±83
WhereEverybodyKnowsYourName
Page 1785 of 4087
(2) If the seating is too low on the valve face, use 755
and 45 5 cutters to correct the seat.
(d) Hand±lap the valve and valve seat with an abrasive compound.
(e) After hand±lapping, clean the valve and valve seat.
9. INSPECT VALVE SPRINGS (a) Using a steel square, measure the squareness of thevalve spring.
Maximum squareness: 2.0 mm (0.079 in.)
If squareness is greater than maximum, replace the valve
spring.
(b) Using a vernier caliper, measure the free length of the
valve spring.
Free length: 43.6 mm (1.717 in.)
If the free length is not as specified, replace the valve spring.
(c) Using a spring tester, measure the tension of the valvespring at the specified installed length.
Installed tension (at 32.9 mm (1.295 in.):
186±206 N (19.0±21.0 kgf, 41.9±46.3 lbf)
If the installed tension is not as specified, replace the valve
spring.
EM±84
±
ENGINE MECHANICAL Cylinder Heads
WhereEverybodyKnowsYourName
Page 1795 of 4087
(b) Remove any old packing (FIPG) material.
(c) Apply seal packing to the bearing caps as shown.
Seal packing: Part No. 08826±00080 or equivalent
(d) (RH Cylinder Head)Install the bearing cap (mark ºI1º) in position with the ar-
row mark facing rearward.
(e) (LH Cylinder Head) Install the bearing cap (mark ºI6º) in position with the ar-
row mark facing forward.
(f) Install a new seal washer to the bearing cap bolt.
(g) Apply a light of engine oil on the threads of the bearing
cap bolt.
(h) Install the four bearing cap bolts.
Torque: 16 N Vm (160 kgf Vcm, 12 ft Vlbf)
HINT: Use silver colored bolts 38 mm (1.50 in.) in length.
6. ASSEMBLE EXHAUST CAMSHAFTS (a) Install the following parts:(1) Camshaft gear spring
(2) Camshaft sub±gear
(3) Wave washer
(b) Using snap ring pliers, install the snap ring.
(c) M ount the hexagon wrench head portion of the
camshaft in a vice.
EM±94
±
ENGINE MECHANICAL Cylinder Heads
WhereEverybodyKnowsYourName
Page 1797 of 4087
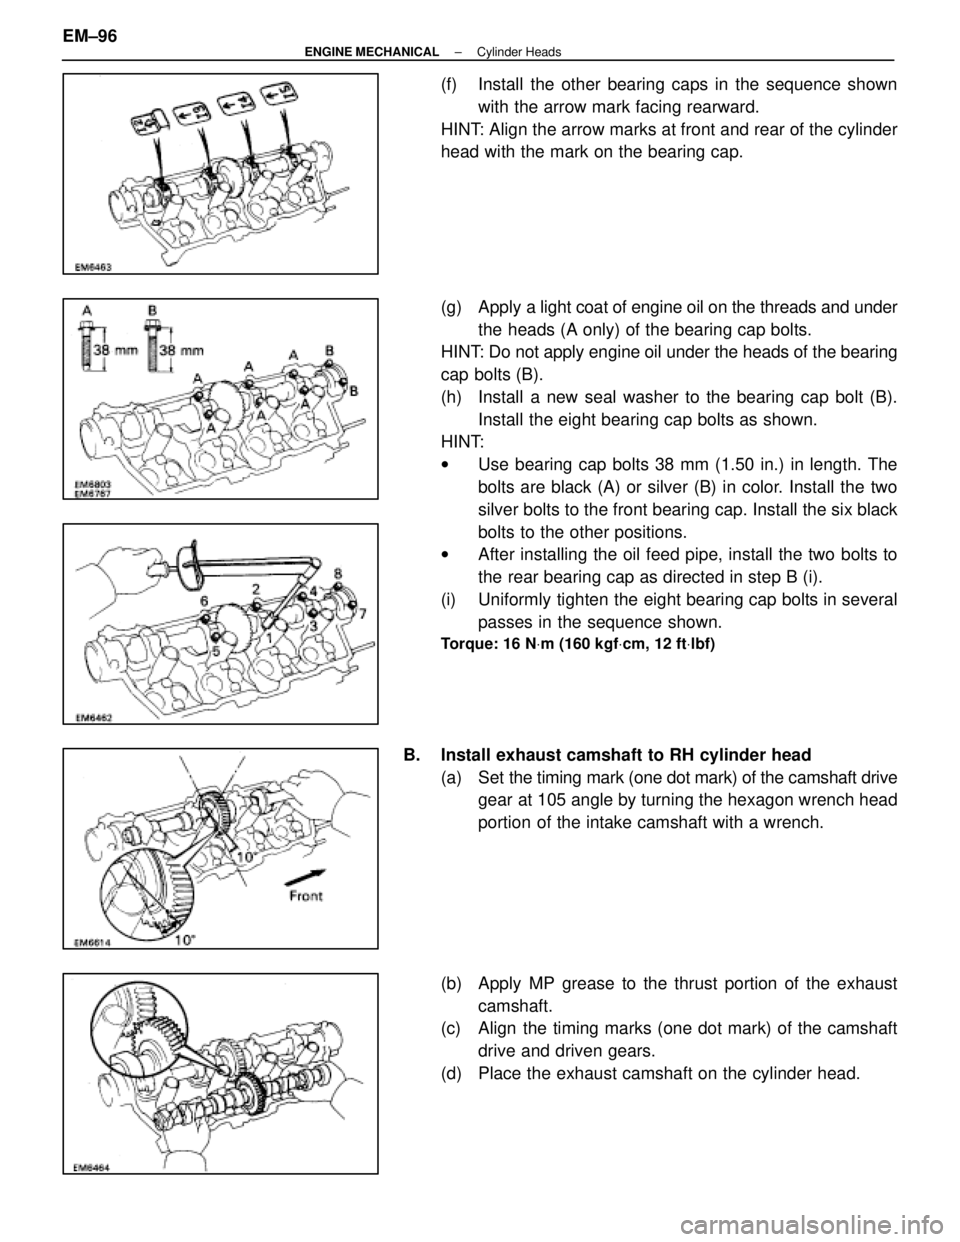
(f) Install the other bearing caps in the sequence shownwith the arrow mark facing rearward.
HINT: Align the arrow marks at front and rear of the cylinder
head with the mark on the bearing cap.
(g) Apply a light coat of engine oil on the threads and under
the heads (A only) of the bearing cap bolts.
HINT: Do not apply engine oil under the heads of the bearing
cap bolts (B).
(h) Install a new seal washer to the bearing cap bolt (B).
Install the eight bearing cap bolts as shown.
HINT:
w Use bearing cap bolts 38 mm (1.50 in.) in length. The
bolts are black (A) or silver (B) in color. Install the two
silver bolts to the front bearing cap. Install the six black
bolts to the other positions.
w After installing the oil feed pipe, install the two bolts to
the rear bearing cap as directed in step B (i).
(i) Uniformly tighten the eight bearing cap bolts in several passes in the sequence shown.
Torque: 16 N Vm (160 kgf Vcm, 12 ft Vlbf)
B. Install exhaust camshaft to RH cylinder head
(a) Set the timing mark ( one dot mark) of the camshaft drive
gear at 105 angle by turning the hexagon wrench head
portion of the intake camshaft with a wrench.
(b) Apply MP grease to the thrust portion of the exhaust camshaft.
(c) Align the timing marks (one dot mark) of the camshaft
drive and driven gears.
(d) Place the exhaust camshaft on the cylinder head.
EM±96
±
ENGINE MECHANICAL Cylinder Heads
WhereEverybodyKnowsYourName
Page 1798 of 4087
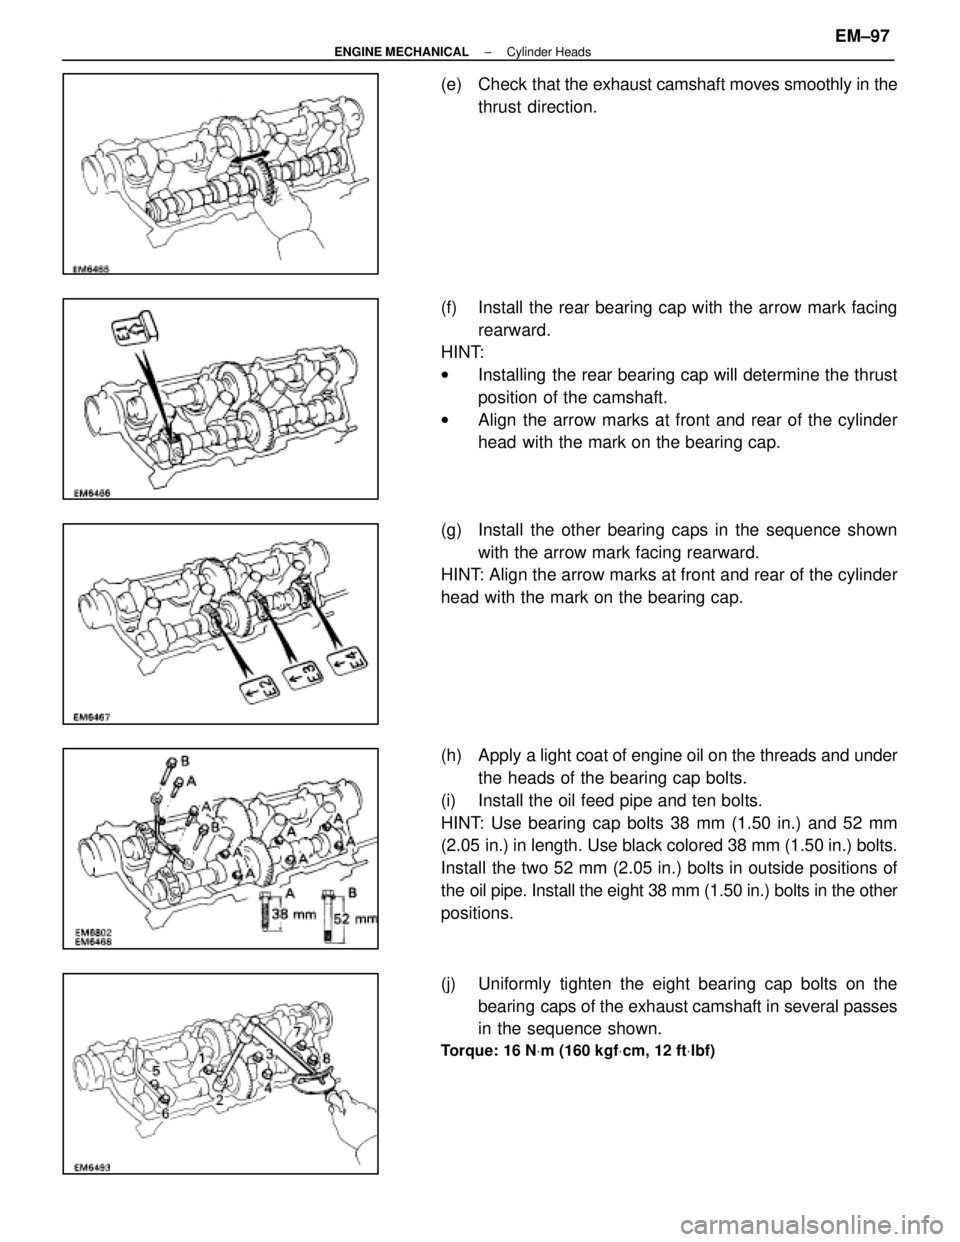
(e) Check that the exhaust camshaft moves smoothly in the
thrust direction.
(f) Install the rear bearing cap with the arrow mark facing rearward.
HINT:
w Installing the rear bearing cap will determine the thrust
position of the camshaft.
w Align the arrow marks at front and rear of the cylinder
head with the mark on the bearing cap.
(g) Install the other bearing caps in the sequence shown with the arrow mark facing rearward.
HINT: Align the arrow marks at front and rear of the cylinder
head with the mark on the bearing cap.
(h) Apply a light coat of engine oil on the threads and under
the heads of the bearing cap bolts.
(i) Install the oil feed pipe and ten bolts.
HINT: Use bearing cap bolts 38 mm (1.50 in.) and 52 mm
(2.05 in.) in length. Use black colored 38 mm (1.50 in.) bolts.
Install the two 52 mm (2.05 in.) bolts in outside positions of
the oil pipe. Install the eight 38 mm (1.50 in.) bolts in the other
positions.
(j) Uniformly tighten the eight bearing cap bolts on the bearing caps of the exhaust camshaft in several passes
in the sequence shown.
Torque: 16 N Vm (160 kgf Vcm, 12 ft Vlbf)
±
ENGINE MECHANICAL Cylinder HeadsEM±97
WhereEverybodyKnowsYourName
Page 1800 of 4087
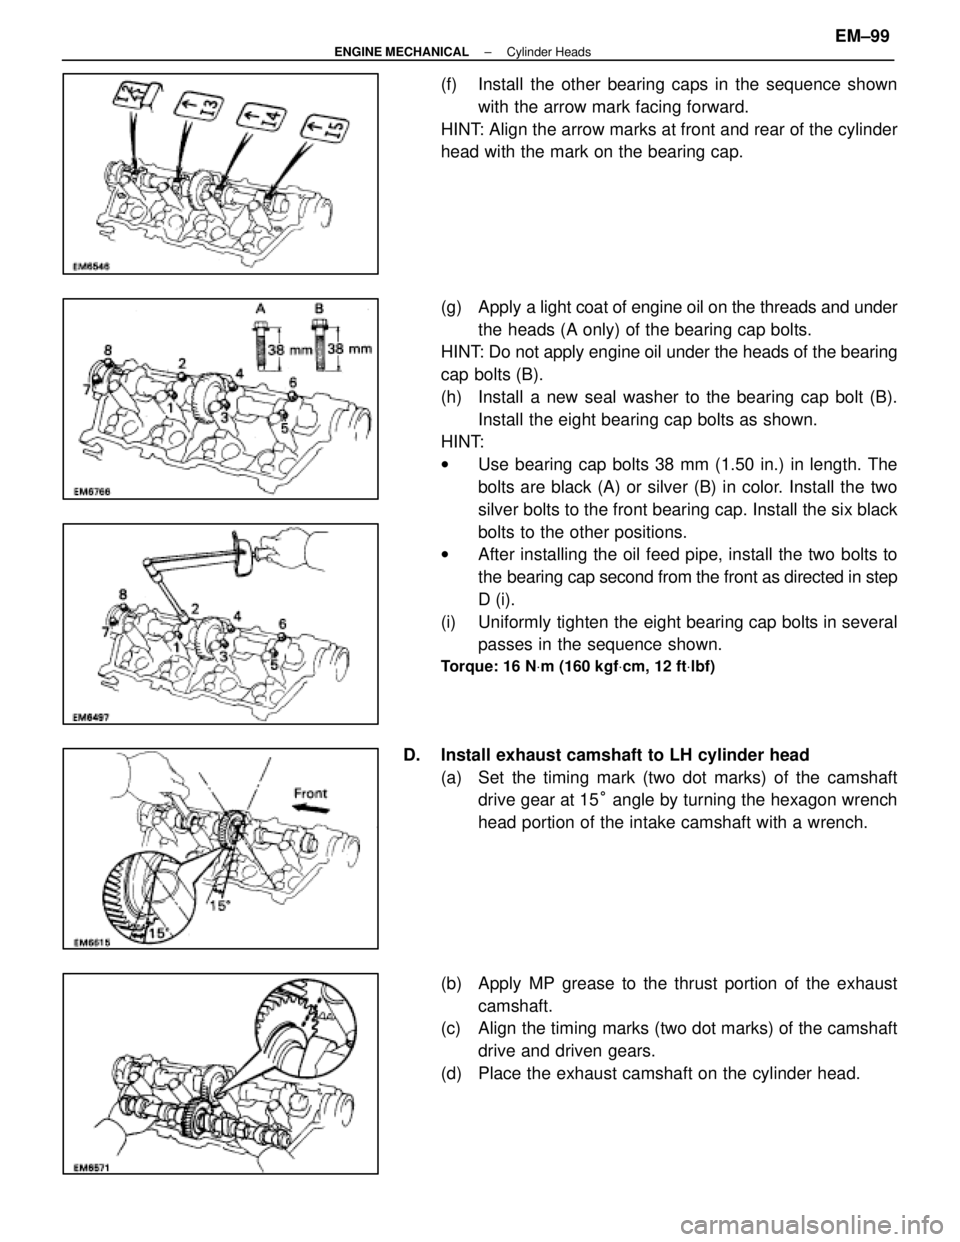
(f) Install the other bearing caps in the sequence shownwith the arrow mark facing forward.
HINT: Align the arrow marks at front and rear of the cylinder
head with the mark on the bearing cap.
(g) Apply a light coat of engine oil on the threads and under
the heads (A only) of the bearing cap bolts.
HINT: Do not apply engine oil under the heads of the bearing
cap bolts (B).
(h) Install a new seal washer to the bearing cap bolt (B).
Install the eight bearing cap bolts as shown.
HINT:
w Use bearing cap bolts 38 mm (1.50 in.) in length. The
bolts are black (A) or silver (B) in color. Install the two
silver bolts to the front bearing cap. Install the six black
bolts to the other positions.
w After installing the oil feed pipe, install the two bolts to
the bearing cap second from the front as directed in step
D (i).
(i) Uniformly tighten the eight bearing cap bolts in several passes in the sequence shown.
Torque: 16 N Vm (160 kgf Vcm, 12 ft Vlbf)
D. Install exhaust camshaft to LH cylinder head
(a) Set the timing mark (two dot marks) of the camshaftdrive gear at 15 ° angle by turning the hexagon wrench
head portion of the intake camshaft with a wrench.
(b) Apply MP grease to the thrust portion of the exhaust camshaft.
(c) Align the timing marks (two dot marks) of the camshaft
drive and driven gears.
(d) Place the exhaust camshaft on the cylinder head.
±
ENGINE MECHANICAL Cylinder HeadsEM±99
WhereEverybodyKnowsYourName