Page 1872 of 4087

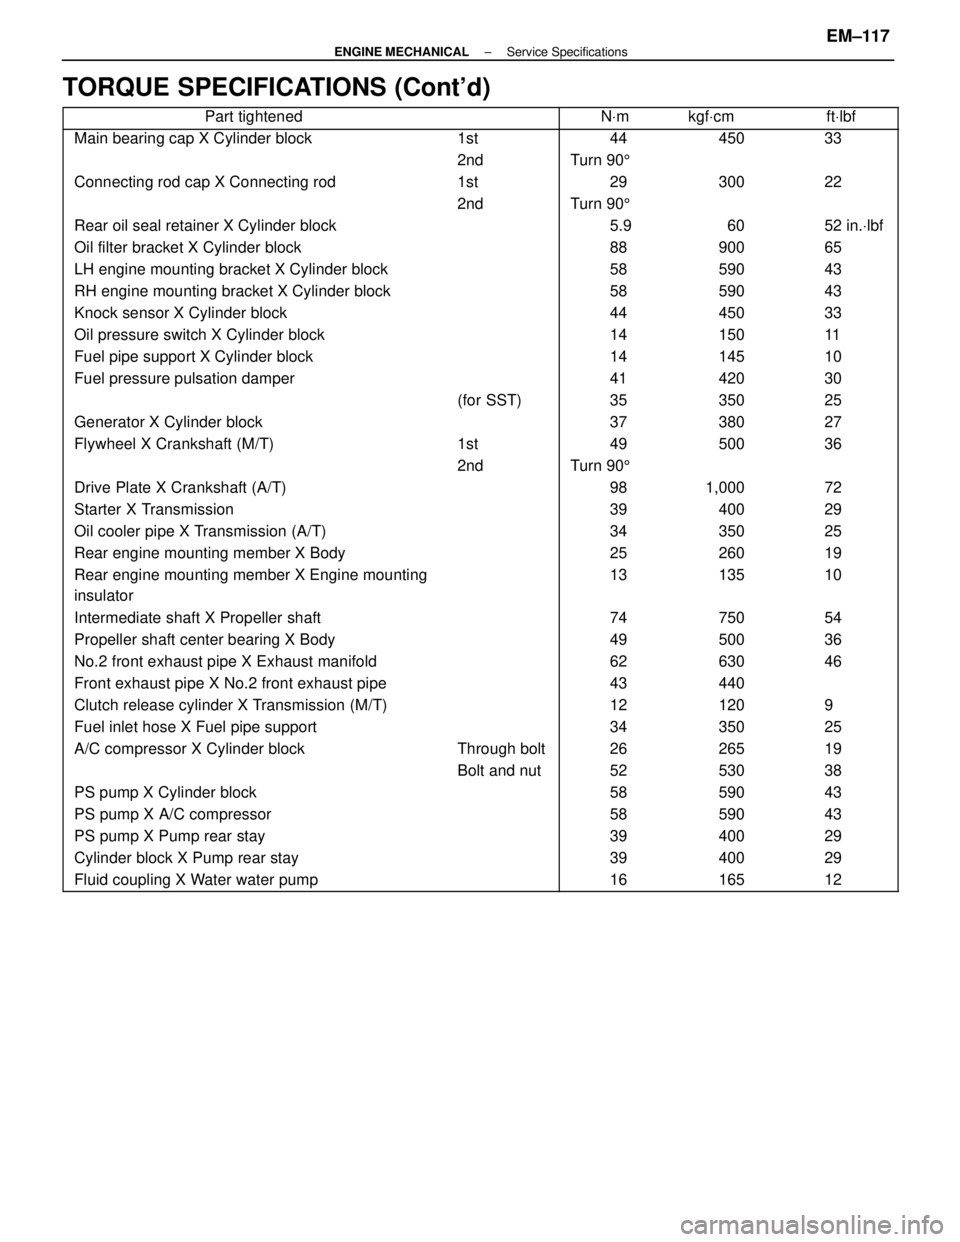
TORQUE SPECIFICATIONS (Cont'd)
����������������� �����������������Part tightened������ ����������� �����NVm������ ������kgf Vcm������ ������ft Vlbf
����������������� �����������������Main bearing cap X Cylinder block������ ������1st����� �����44������ ������450������ ������33
����������������� ����������������������� ������2nd����� �����Turn 90 5������ ������������ ������
����������������� �����������������Connecting rod cap X Connecting rod������ ������1st����� �����29������ ������300������ ������22
�����������������������2nd�����Turn 905����������������������������� �����������������Rear oil seal retainer X Cylinder block������ ����������� �����5.9������ ������60������ ������52 in.Vlbf����������������� �����������������Oil filter bracket X Cylinder block������ ����������� �����88������ ������900������ ������65����������������� �����������������LH engine mounting bracket X Cylinder block������ ����������� �����58������ ������590������ ������43����������������� �����������������RH engine mounting bracket X Cylinder block������ ����������� �����58������ ������590������ ������43
����������������� �����������������Knock sensor X Cylinder block������ ����������� �����44������ ������450������ ������33
����������������� �����������������Oil pressure switch X Cylinder block������ ����������� �����14������ ������150������ ������11
����������������� �����������������Fuel pipe support X Cylinder block������ ����������� �����14������ ������145������ ������10
����������������� �����������������Fuel pressure pulsation damper������ ����������� �����41������ ������420������ ������30
����������������� ����������������������� ������(for SST)����� �����35������ ������350������ ������25
����������������� �����������������Generator X Cylinder block������ ����������� �����37������ ������380������ ������27
�����������������Flywheel X Crankshaft (M/T)������1st�����49������500������36����������������� ����������������������� ������2nd����� �����Turn 90 5������ ������������ ������
����������������� �����������������Drive Plate X Crankshaft (A/T)������ ����������� �����98������ ������1,000������ ������72����������������� �����������������Starter X Transmission������ ����������� �����39������ ������400������ ������29����������������� �����������������Oil cooler pipe X Transmission (A/T)������ ����������� �����34������ ������350������ ������25
����������������� �����������������Rear engine mounting member X Body������ ����������� �����25������ ������260������ ������19
����������������� �
����������������
�����������������
Rear engine mounting member X Engine mounting
insulator������ �
�����
������
����� �
����
�����
13������ �
�����
������
135������ �
�����
������
10
����������������� �����������������Intermediate shaft X Propeller shaft������ ����������� �����74������ ������750������ ������54
����������������� �����������������Propeller shaft center bearing X Body������ ����������� �����49������ ������500������ ������36
�����������������No.2 front exhaust pipe X Exhaust manifold�����������62������630������46����������������� �����������������Front exhaust pipe X No.2 front exhaust pipe������ ����������� �����43������ ������440������ ������
����������������� �����������������Clutch release cylinder X Transmission (M/T)������ ����������� �����12������ ������120������ ������9����������������� �����������������Fuel inlet hose X Fuel pipe support������ ����������� �����34������ ������350������ ������25����������������� �����������������A/C compressor X Cylinder block������ ������Through bolt����� �����26������ ������265������ ������19
����������������� ����������������������� ������Bolt and nut����� �����52������ ������530������ ������38
����������������� �����������������PS pump X Cylinder block������ ����������� �����58������ ������590������ ������43
����������������� �����������������PS pump X A/C compressor������ ����������� �����58������ ������590������ ������43
����������������� �����������������PS pump X Pump rear stay������ ����������� �����39������ ������400������ ������29
����������������� �����������������Cylinder block X Pump rear stay������ ����������� �����39������ ������400������ ������29
����������������� �����������������Fluid coupling X Water water pump������ ����������� �����16������ ������165������ ������12
±
ENGINE MECHANICAL Service SpecificationsEM±117
WhereEverybodyKnowsYourName
Page 1910 of 4087
6. REMOVE UPPER HIGH±TENSION CORD COVER(a) Remove the two mounting bolts.
(b) Disconnect the front side claw groove of the cord coverfrom the claw of the lower cover, and remove the cord
cover.
7. REMOVE THROTTLE BODY (a) Disconnect the following connectors:(1) Throttle position sensor connector
(2) (w/ TRAC) Sub±throttle position sensor connector
(3) (w/ TRAC) Sub±throttle actuator connector
(b) Disconnect the following hoses: (1) Heater water hose from heater water valve
(2) Water by±pass hose from ISC valve
(3) (USA Spec.) Vacuum hose from throttle body
(4) (Exc. USA Spec.) Three vacuum hoses from throttle body FI±71
EFI SYSTEM
± Air Induction System (Throttle Body)
WhereEverybodyKnowsYourName
Page 1912 of 4087

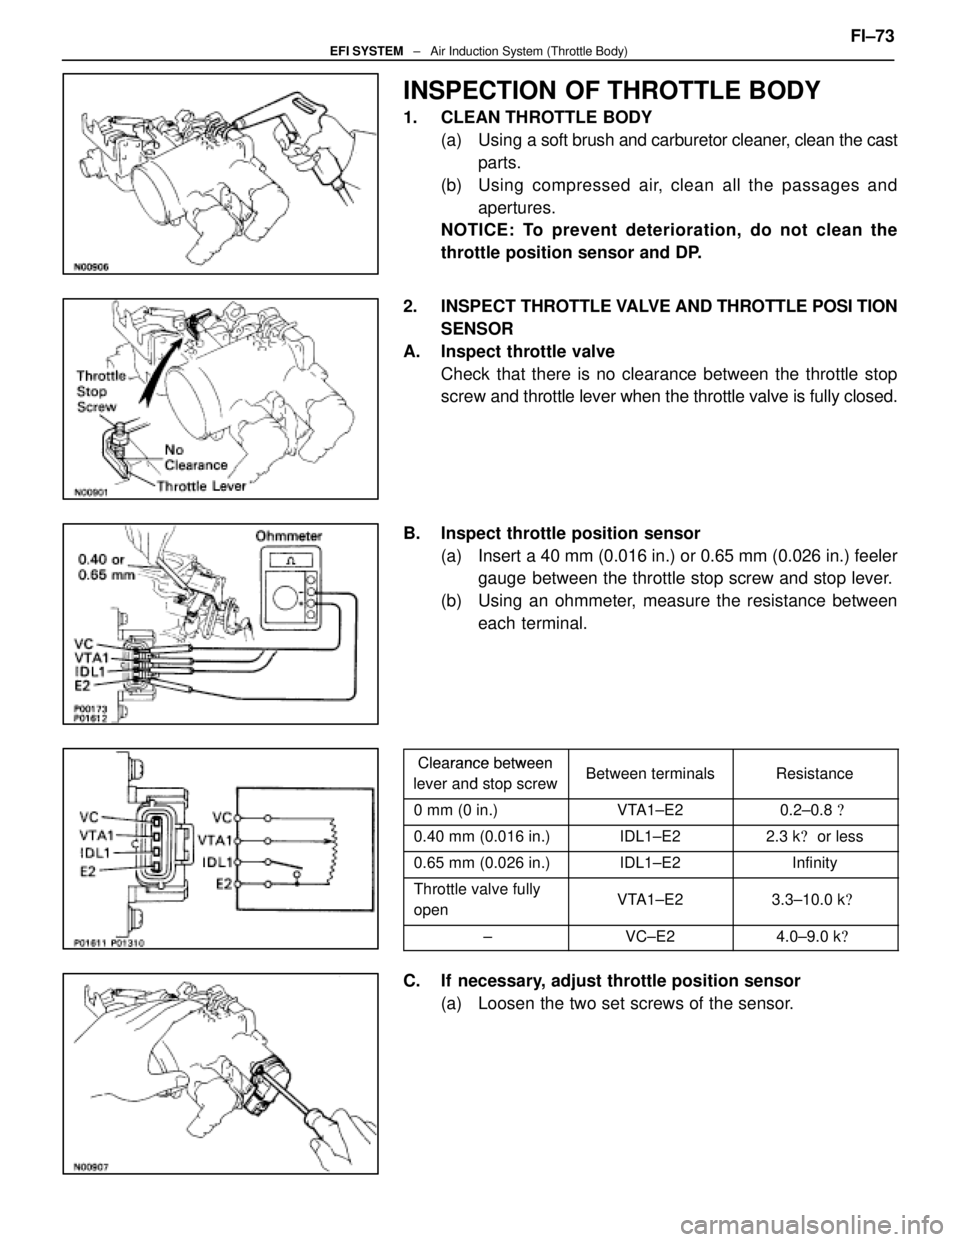
INSPECTION OF THROTTLE BODY
1. CLEAN THROTTLE BODY(a) Using a soft brush and carburetor cleaner, clean the cast
parts.
(b) Using compressed air, clean all the passages and apertures.
NOTICE: To prevent deterioration, do not clean the
throttle position sensor and DP.
2. INSPECT THROTTLE VALVE AND THROTTLE POSI TION
SENSOR
A. Inspect throttle valve Check that there is no clearance between the throttle stop
screw and throttle lever when the throttle valve is fully closed.
B. Inspect throttle position sensor (a) Insert a 40 mm (0.016 in.) or 0.65 mm (0.026 in.) feelergauge between the throttle stop screw and stop lever.
(b) Using an ohmmeter, measure the resistance between each terminal.
Clearance betweenClearance between
lever and stop screwBetween terminalsResistancelever and stop screwBetween terminalsResistance
0 mm (0 in.)VTA1±E20.2±0.8 �
0.40 mm (0.016 in.)IDL1±E22.3 k� or less
0.65 mm (0.026 in.)IDL1±E2Infinity
Throttle valve fully
openVTA1±E23.3±10.0 k �
±VC±E24.0±9.0 k�
C. If necessary, adjust throttle position sensor
(a) Loosen the two set screws of the sensor. FI±73
EFI SYSTEM
± Air Induction System (Throttle Body)
WhereEverybodyKnowsYourName
Page 1913 of 4087
(b) Insert a 0.40 mm (0.016 in.) feeler gauge, between thethrottle stop screw and stop lever.
(c) Connect the test probe of an ohmmeter to the terminals
IDL1 and E2 of the sensor.
(d) Gradually turn the sensor clockwise until the ohmmeter deflects, and secure it with the two set screws.
(e) Recheck the continuity between terminals IDL1 and E2.
Clearance between
lever and stop screwContinuity (IDL1±E2)
0.40 mm (0.016 in.)Continuity
0.65 mm (0.026 in.)No continuity
3. (w/ TRAC) INSPECT SUB±THROTTLE ACTUATOR, SUBTHROTTLE
VALVE AND SUB±THROTTLE POSITION SENSOR
A. Inspect sub±throttle actuator Using an ohmmeter, measure the resistance between the ter-
minals (ACM±A and �, BCM±B and B).
Resistance: 0.5±1.0 �
If the resistance is not as specified, replace the actuator
valve.
B. Inspect sub±throttle actuator Remove the three screws and sub±throttle actuator.
FI±74
EFI SYSTEM
± Air Induction System (Throttle Body)
WhereEverybodyKnowsYourName
Page 1914 of 4087

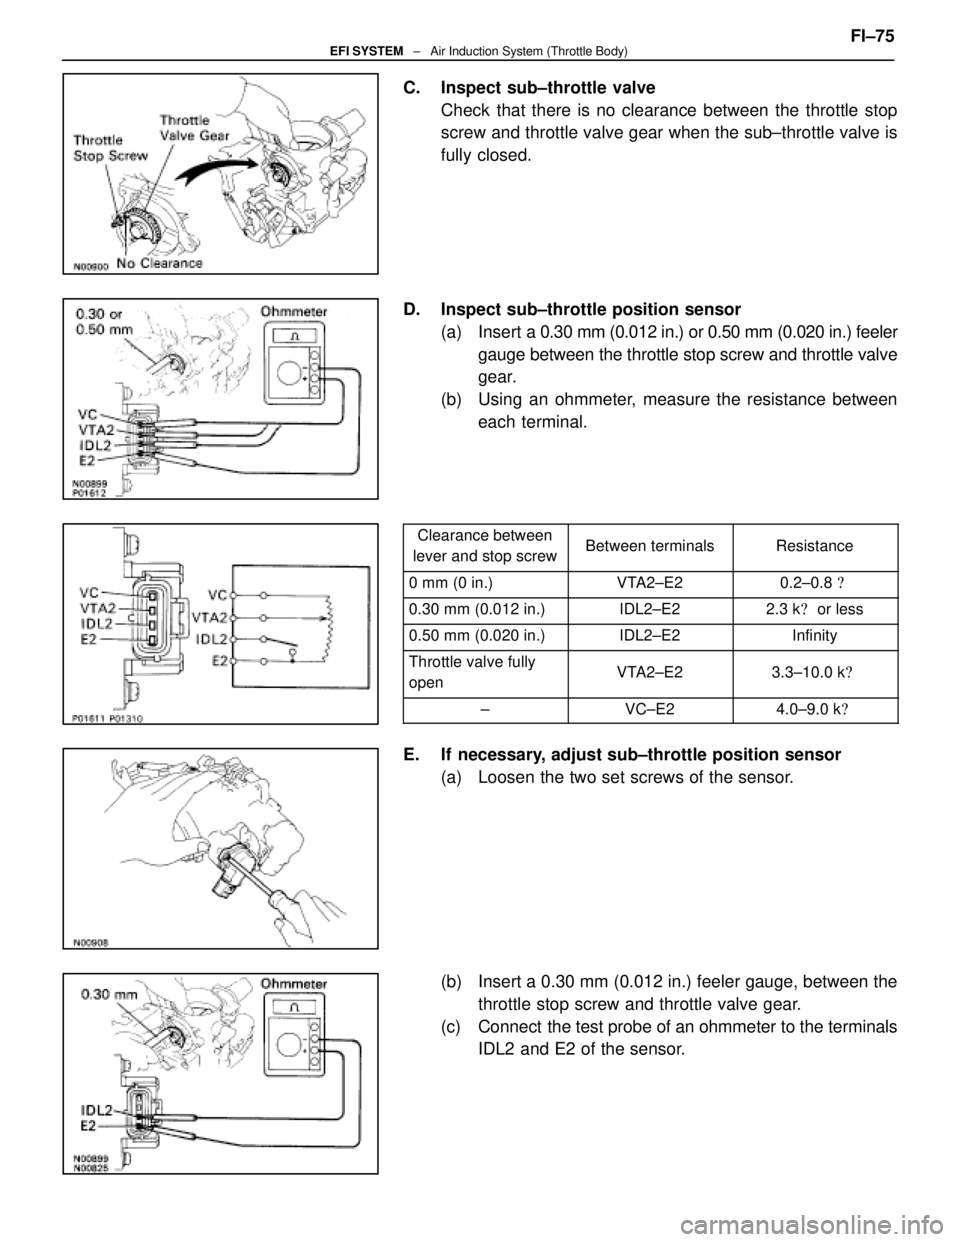
C. Inspect sub±throttle valveCheck that there is no clearance between the throttle stop
screw and throttle valve gear when the sub±throttle valve is
fully closed.
D. Inspect sub±throttle position sensor (a) Insert a 0.30 mm (0.012 in.) or 0.50 mm (0.020 in.) feeler
gauge between the throttle stop screw and throttle valve
gear.
(b) Using an ohmmeter, measure the resistance between each terminal.
Clearance between
lever and stop screwBetween terminalsResistance
0 mm (0 in.)VTA2±E20.2±0.8 �
0.30 mm (0.012 in.)IDL2±E22.3 k� or less
0.50 mm (0.020 in.)IDL2±E2Infinity
Throttle valve fully
openVTA2±E23.3±10.0 k �
±VC±E24.0±9.0 k�
E. If necessary, adjust sub±throttle position sensor
(a) Loosen the two set screws of the sensor.
(b) Insert a 0.30 mm (0.012 in.) feeler gauge, between thethrottle stop screw and throttle valve gear.
(c) Connect the test probe of an ohmmeter to the terminals IDL2 and E2 of the sensor. FI±75
EFI SYSTEM
± Air Induction System (Throttle Body)
WhereEverybodyKnowsYourName
Page 1915 of 4087
(d) Gradually turn the sensor clockwise until the ohmmeterdeflects, and secure it with the two set screws.
(e) Recheck the continuity between terminals IDL2 and E2.
Clearance between
lever and stop screwContinuity (IDL2±E2)
0.30 mm (0.012 in.)Continuity
0.50 mm (0.020 in.)No continuity
E. Reinstall sub±throttle actuator Install the sub±throttle actuator with the three screws.
FI±76
EFI SYSTEM
± Air Induction System (Throttle Body)
WhereEverybodyKnowsYourName
Page 1917 of 4087
(4) Heater water hose to heater water valve
(f) Connect the following connectors: (1) Throttle position sensor connector
(2) (w/ TRAC)
Sub±throttle position sensor connector
(3) (w/ TRAC) Sub±throttle actuator connector
2. INSTALL UPPER HIGH±TENSION CORD COVER (a) Fit portion A of the upper high±tension cover, matchingit with the top of the lower high±tension cord cover.
(b) Push the front side of the high±tension cord cover, and connect the front side claw groove of the upper
high±tension cord cover to the claw of the lower
high±tension cord cover.
(c) Install the upper high±tension cord cover with the two bolts.
3. INSTALL INTAKE AIR CONNECTOR (a) Connect the end portions of the intake air connector tothe throttle body and air cleaner hose.
(b) Tighten the two hose clamps.
(c) Install the bolt holding the intake air connector to the
cylinder head cover.
FI±78
EFI SYSTEM
± Air Induction System (Throttle Body)
WhereEverybodyKnowsYourName
Page 1919 of 4087
11. RECONNECT DRIVER BELTInstall the drive belt by turning the drive belt tensioner clock-
wise.
12. RECONNECT CABLE FROM NEGATIVE TERMINAL OF BATTERY
13. REFILL WITH ENGINE COOLANT
Knock Sensors
INSPECTION OF KNOCK SENSORS
1. DISCONNECT CABLE FROM NEGATIVE TERMINAL OF BATTERY
CAUTION: Turn the ignition switch to ºLOCKº. Discon-
nect the cable from the negative (±) terminal of the bat-
tery. Wait at least 20 seconds before proceeding with
work.
±
EFI SYSTEM Electronic Control System (Water Temperature Sensor)FI±69
WhereEverybodyKnowsYourName