Page 2691 of 4087
OKNG
OKNG
NOYES
7Check each item found to be a possible cause of problem.
Check each ciruit found to be a possible cause of trouble according to the re\
sults of the check in 1. The
numbers in the table below show the order in the which the checks should be per\
formed.
TR±132
TR±6
TR±51
TR±13
TR±114
TR±88
TR±68
TR±72
TR±72
Repair or replace.
8Check compression (See page EM±30).
Repair or replace.
9Does malfunction disappear when a good main oxygen sensor is installed?
Replace main oxygen sensor.
Check and replace engine & ECT ECU.
±
ENGINE TROUBLESHOOTING Circuit InspectionTR±80
WhereEverybodyKnowsYourName
Page 2693 of 4087
Diag. Code 27, 29Sub±Oxygen Sensor Circuit
CIRCUIT DESCRIPTION
The sub±oxygen sensor is installed on the exhaust pipe. Its construction\
and operation is the same as the main
oxygen sensor on page TR±62.
Code No.Diagnostic Code Detecting ConditionTrouble Area
(1) Open or short in heater circuit of sub±oxygen
sensor for 0.5 sec. or more.
�Open or short in heater circuit of sub±oxygen
sensor
� Sub±oxygen sensor heater.
� ECU
27
�
29(2) Main oxygen sensor signal is 0.45 V or more and sub±oxygen sensor signal is 0.45 V or less
under sonditions (a) and (b).
(2 trip detection logic) *
(a) Coolant temp.: 80 5C (176 5F) or more.
(b) Accel. pedal: Fully depressed for 2 sec. or more.
�Open or short in sub±oxygen sensor circuit.
� Sub±oxygen sensor
� ECU
*: See page TR±21.
HINT: Diag. code 27 is for the left bank sub±oxygen sensor circuit.
Diag. code 29 is for the right bank sub±oxygen sensor circuit.
TR±82
±
ENGINE TROUBLESHOOTING Circuit Inspection
WhereEverybodyKnowsYourName
Page 2694 of 4087

CIRCUIT DESCRIPTION (Cont'd)
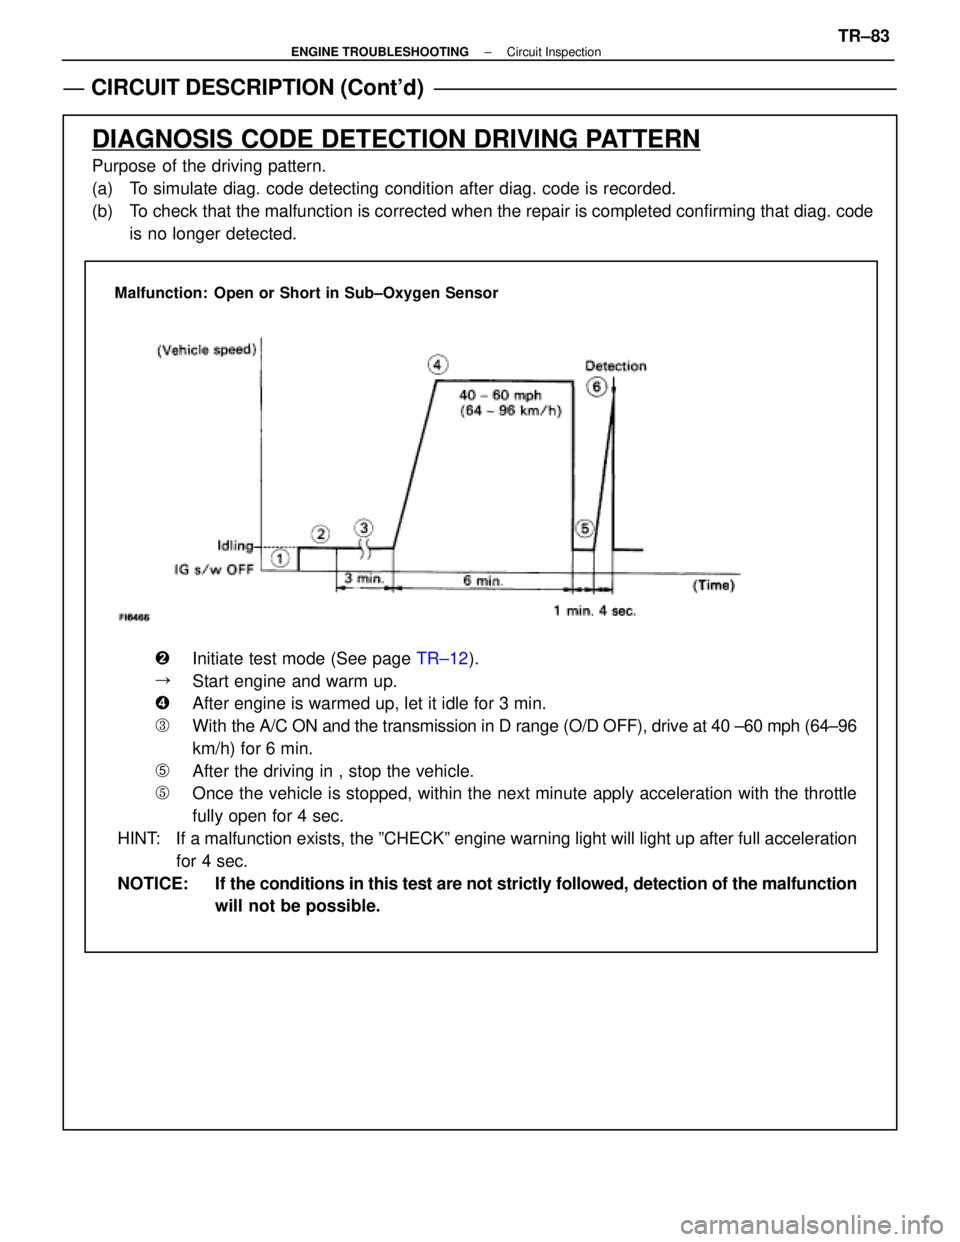
DIAGNOSIS CODE DETECTION DRIVING PATTERN
Purpose of the driving pattern.
(a) To simulate diag. code detecting condition after diag. code is recorded.
(b) To check that the malfunction is corrected when the repair is completed co\
nfirming that diag. codeis no longer detected.
Malfunction: Open or Short in Sub±Oxygen Sensor
�Initiate test mode (See page TR±12).
�Start engine and warm up.
�After engine is warmed up, let it idle for 3 min.
�With the A/C ON and the transmission in D range (O/D OFF), drive at 40 ±\
60 mph (64±96
km/h) for 6 min.
�After the driving in , stop the vehicle.
�Once the vehicle is stopped, within the next minute apply acceleration w\
ith the throttle
fully open for 4 sec.
HINT: If a malfunction exists, the ºCHECKº engine warning light will light\
up after full acceleration for 4 sec.
NOTICE: If the conditions in this test are not strictly followed, detection of the\
malfunction will not be possible.
±
ENGINE TROUBLESHOOTING Circuit InspectionTR±83
WhereEverybodyKnowsYourName
Page 2695 of 4087
DIAGNOSTIC CHART
DIAGNOSTIC
CHART
HINT:
wWhen other codes are output in addition to 27 and 29 at the same time, check the ci\
rcuits for other
codes first.
w If diag. code 27 is displayed, check left bank sub±oxygen sensor circ\
uit, and if 29 is displayed,
check right bank sub±oxygen sensor circuit.
WIRING DIAGRAM
Check voltage of terminals HTL2, HTR2.
Check resistance of sub±oxygen sensor heater.
Check and repair sub±oxygen sensor heater
circuit.
Check operation of sub±oxygen sensor heater.
Check and replace ECU. Replace main oxygen sensor.
*: In this case, oxygen sensor can be deteriorated.
Replace main oxygen sensor.*
TR±84±
ENGINE TROUBLESHOOTING Circuit Inspection
WhereEverybodyKnowsYourName
Page 2696 of 4087
NGOK
OKNG
INSPECTION PROCEDURE
1Disconnect the engine & ECT ECU connector.
C
OK
P(2) Connect the Check Harness A.(See page TR±30)
(2) Disconnect engine & ECT ECU connector.
(2) Turn ignition switch on.
Measure voltage between terminals HTL2, HTR2 of en-
gine & ECT ECU connector and body ground.
Voltage: 10 ± 14 V
Go to step [3].
2Check sub±oxygen sensor heater.
C
OK
PDisconnect sub±oxygen sensor connector.
Measure resistance between terminals 1 and 2 of sub±
oxygen sensor connector.
Resistance: 5.1 ± 6.3 � 20 �C (68 �F)
Replace sub±oxygen sensor.
Check and repair harness or connector between
main relay and sub±oxygen sensor, sub±oxygen
sensor and engine & ECT ECU.
±
ENGINE TROUBLESHOOTING Circuit InspectionTR±85
WhereEverybodyKnowsYourName
Page 2697 of 4087
NGOK
3Check voltage between terminals HTL2, HTR2 of engine & ECT ECU connector and \
body
ground.
C
OK
Hint
P(2) Connect engine & ECT ECU connector.
(2) Warm up engine to normal operating temperature.
Measure voltage between terminals HTL2, HTR2 of en-
gine & ECT ECU connector and body ground, when en-
gine is idling and racing at 4,000 rpm.
In the 4,000 rpm racing check , continue engine racing
at 4,000 prm for approx. 20 seconds or more.
Replace sub±oxygen sensor.**: In this case, oxygen sensor can be deteriorated.
Check and replace engine & ECT ECU.
TR±86±
ENGINE TROUBLESHOOTING Circuit Inspection
WhereEverybodyKnowsYourName
Page 2880 of 4087

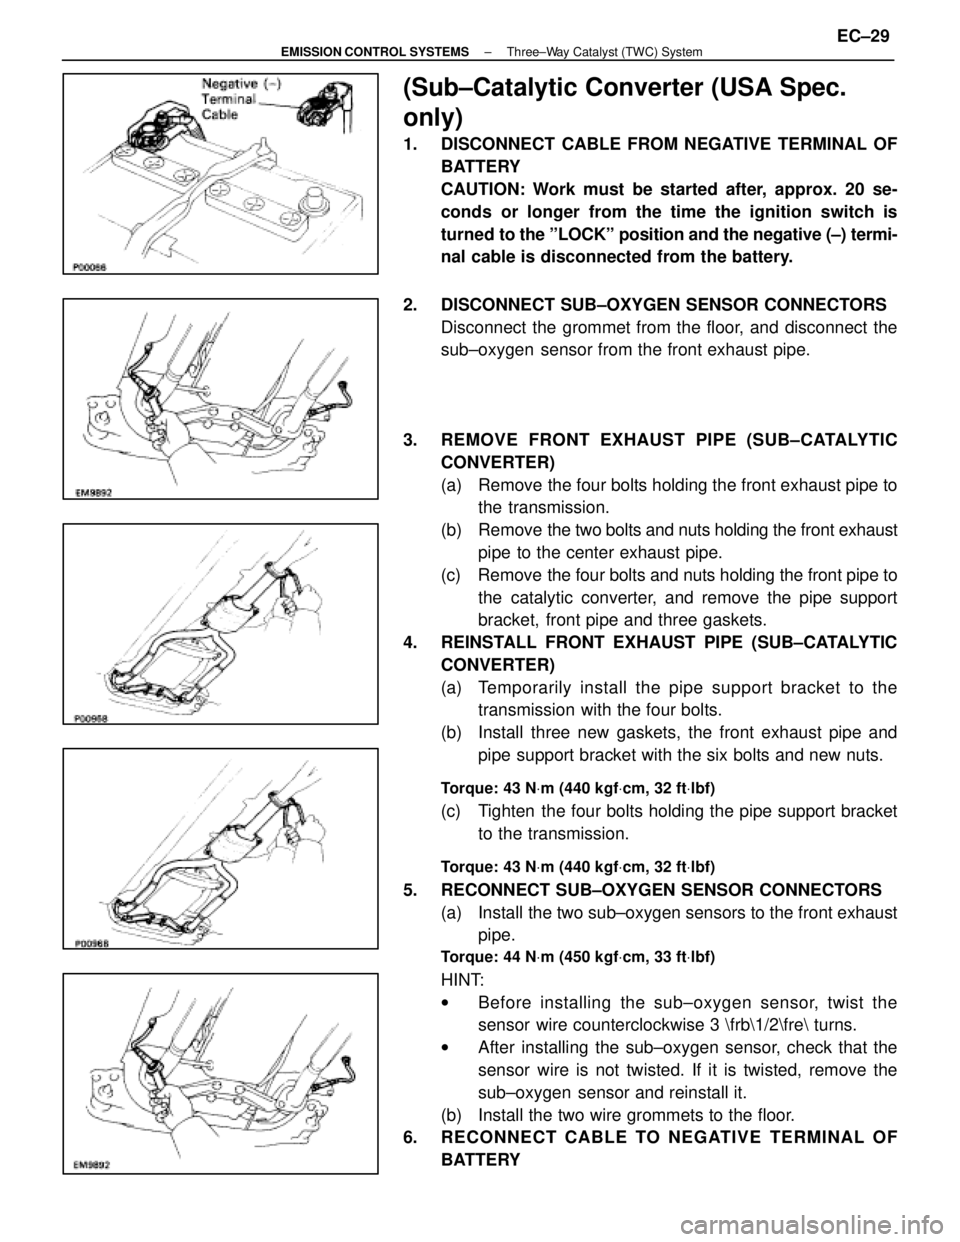
(Sub±Catalytic Converter (USA Spec.
only)
1. DISCONNECT CABLE FROM NEGATIVE TERMINAL OFBATTERY
CAUTION: Work must be started after, approx. 20 se-
conds or longer from the time the ignition switch is
turned to the ºLOCKº position and the negative (±) termi-
nal cable is disconnected from the battery.
2. DISCONNECT SUB±OXYGEN SENSOR CONNECTORS Disconnect the grommet from the floor, and disconnect the
sub±oxygen sensor from the front exhaust pipe.
3. REMOVE FRONT EXHAUST PIPE (SUB±CATALYTIC CONVERTER)
(a) Remove the four bolts holding the front exhaust pipe tothe transmission.
(b) Remove the two bolts and nuts holding the front exhaust
pipe to the center exhaust pipe.
(c) Remove the four bolts and nuts holding the front pipe to the catalytic converter, and remove the pipe support
bracket, front pipe and three gaskets.
4. REINSTALL FRONT EXHAUST PIPE (SUB±CATALYTIC CONVERTER)
(a) Temporarily install the pipe support bracket to thetransmission with the four bolts.
(b) Install three new gaskets, the front exhaust pipe and pipe support bracket with the six bolts and new nuts.
Torque: 43 N Vm (440 kgf Vcm, 32 ft Vlbf)
(c) Tighten the four bolts holding the pipe support bracket
to the transmission.
Torque: 43 N Vm (440 kgf Vcm, 32 ft Vlbf)
5. RECONNECT SUB±OXYGEN SENSOR CONNECTORS
(a) Install the two sub±oxygen sensors to the front exhaustpipe.
Torque: 44 N Vm (450 kgf Vcm, 33 ft Vlbf)
HINT:
w Before installing the s ub±oxygen sensor, twist the
sensor wire counterclockwise 3 \frb\1/2\fre turns.
w After installing the sub±oxygen sensor, check that the
sensor wire is not twisted. If it is twisted, remove the
sub±oxygen sensor and reinstall it.
(b) Install the two wire grommets to the floor.
6. RECONNECT CABLE TO NEGATIVE TERMINAL OF
BATTERY
±
EMISSION CONTROL SYSTEMS Three±Way Catalyst (TWC) SystemEC±29
WhereEverybodyKnowsYourName
Page 2881 of 4087
SERVICE SPECIFICATIONS
SERVICE DATA
VSVResistance30±34 �
for EVAP
VSVResistance33±39 �
for EGR
EGR valveResistance19.9±23.4 �
(CALIF. only)
TORQUE SPECIFICATIONS
Part tightenedNVmkgf Vcmft Vlbf
VSV for EGR X Air intake chamber (Exc. USA Spec.)1818513
EGR valve X Air intake chamber18185 13
Catalytic converter (Main) X Exhaust manifold62630 46
Catalytic converter (Main) X Front exhaust pipe43440 32
Front exhaust pipe support bracket X Transmission43440 32
Front exhaust pipe X Center exhaust pipe43440 32
Main oxygen sensor X Front exhaust pipe4445033
EC±30±
EMISSION CONTROL SYSTEMS Servuce Specifications
WhereEverybodyKnowsYourName