Page 24 of 4087
![LEXUS SC300 1991 Service Repair Manual
[2] HEAT METHOD: When the problem seems to occur when the suspect area is heated.
Heat the component that is the likely cause of the malfunc-
tion with a hair dryer or similar object. Check to see if LEXUS SC300 1991 Service Repair Manual
[2] HEAT METHOD: When the problem seems to occur when the suspect area is heated.
Heat the component that is the likely cause of the malfunc-
tion with a hair dryer or similar object. Check to see if](/manual-img/36/57052/w960_57052-23.png)
[2] HEAT METHOD: When the problem seems to occur when the suspect area is heated.
Heat the component that is the likely cause of the malfunc-
tion with a hair dryer or similar object. Check to see if the
malfunction occurs.
NOTICE:
(1) Do not heat to more than 60°C (140 °F).
(Temperature limit that no damage is done to the
component).
(2) Do not apply heat directly to parts in the ECU.
[3] WATER SPRINKLING METHOD: When the malfunction seems to occur on a
rainy\
day or in a high±humidity condition.
Sprinkle w ater onto the vehicle and check to see if the mal-
function occurs.
NOTICE:
(1) Never sprinkle water directly into the engine compartment, but indirectly change the tempera-
ture and humidity by applying water spray onto
the radiator front surface.
(2) Never apply water directly onto the electronic components.
(Service hint)
If a vehicle is subject to water leakage, the leaked water
may contaminate the ECU. When testing a vehicle with a
water leakage problem, special caution must be used.
[4] OTHER: When the malfunction seems to occur when electrical load is excessive.
Turn on all electrical loads including the heater blower,
head lights, rear window defogger, etc. and check to see
if the malfunction occurs.
±
INTRODUCTION TITLE±NAMEIN±21
WhereEverybodyKnowsYourName
Page 208 of 4087

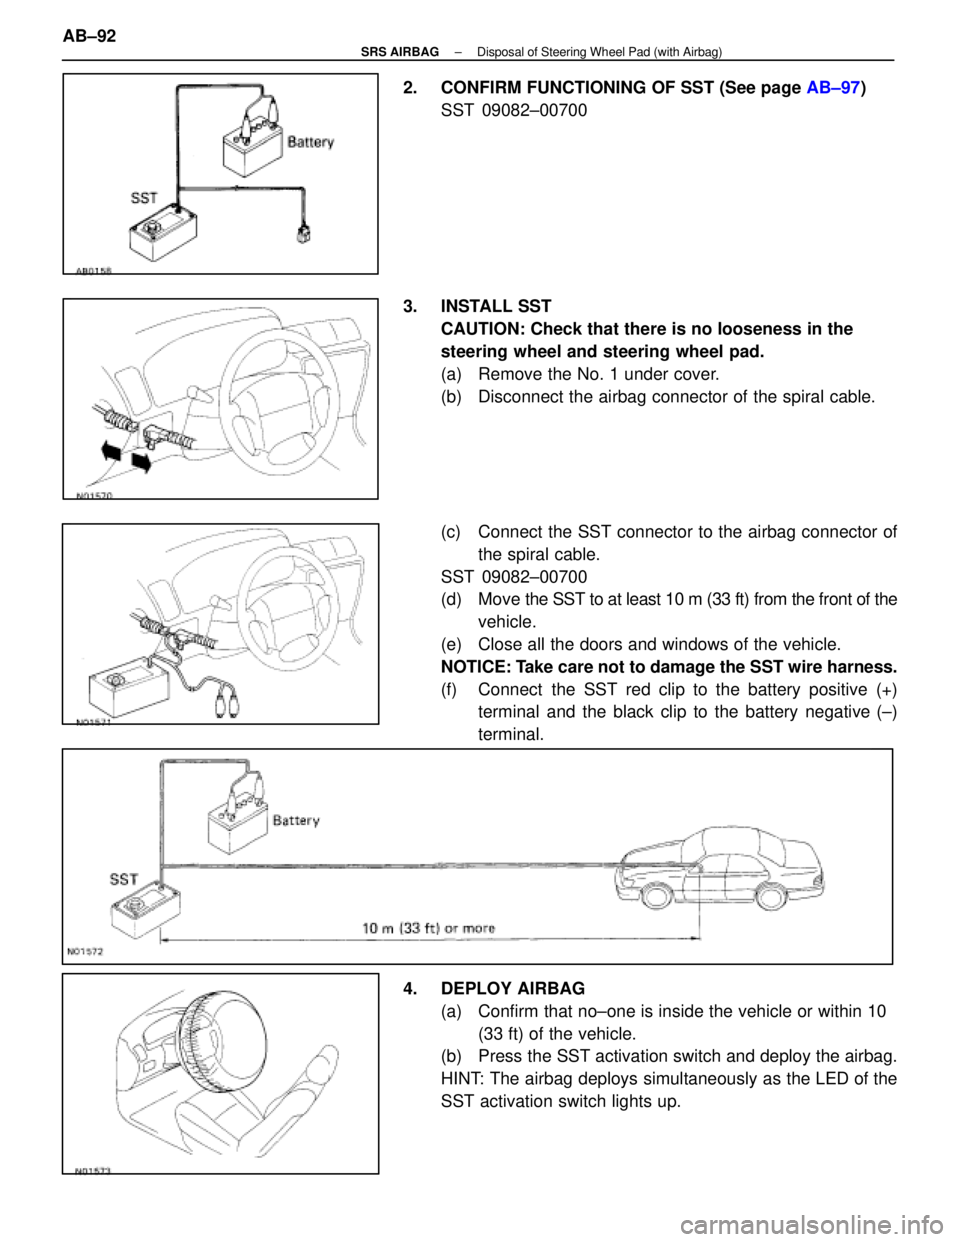
2. CONFIRM FUNCTIONING OF SST (See page AB±97)
SST 09082±00700
3. INSTALL SST CAUTION: Check that there is no looseness in the
steering wheel and steering wheel pad.
(a) Remove the No. 1 under cover.
(b) Disconnect the airbag connector of the spiral cable.
(c) Connect the SST connector to the airbag connector ofthe spiral cable.
SST 09082±00700
(d) Move the SST to at least 10 m (33 ft) from the front of the
vehicle.
(e) Close all the doors and windows of the vehicle.
NOTICE: Take care not to damage the SST wire harness.
(f) Connect the SST red clip to the battery positive (+) terminal and the black clip to the battery negative (±)
terminal.
4. DEPLOY AIRBAG (a) Confirm that no±one is inside the vehicle or within 10 (33 ft) of the vehicle.
(b) Press the SST activation switch and deploy the airbag.
HINT: The airbag deploys simultaneously as the LED of the
SST activation switch lights up.
AB±92
±
SRS AIRBAG Disposal of Steering Wheel Pad (with Airbag)
WhereEverybodyKnowsYourName
Page 408 of 4087
QUARTER WINDOW GLASS
COMPONENTS
REMOVAL OF QUARTER WINDOW
GLASS
1. REMOVE FOLLOWING PARTS:(a) Rear seat cushion and back
(b) Seat belt shoulder anchor
(c) Quarter trim and roof side inner garnish
2. REMOVE QUARTER WINDOW GLASS (a) Remove four nuts.
(b) Remove roof side rail weatherstrip.
BO±52
±
BODY Quarter Window Glass
WhereEverybodyKnowsYourName
Page 409 of 4087
(c) Push the piano wire through from the interior.
(d) Cut loose the adhesive and remove the glass.
HINT: Do not damage the body.
INSTALLATION OF QUARTER WINDOW
GLASS
(See page BO±52)
1. CLEAN BODY OR GLASS Wipe off any adhesive left on the body or glass with cleaner.
2. INSTALL QUARTER WINDOW GLASS (a) Apply the primer around the entire ceramic applicationarea.
(b) Install the seal to the glass.
(c) Install the window glass to the body with four bolts.
3. INSTALL FOLLOWING PARTS: (a) Quarter trim and roof side inner garnish
(b) Seat belt shoulder anchor
Torque: 43 N Vm (440 kgf Vcm, 32 ft Vlbf)
(c) Rear seat cushion and back
(See page BO±67)
±
BODY Quarter Window GlassBO±53
WhereEverybodyKnowsYourName
Page 410 of 4087
BACK WINDOW GLASS
COMPONENTS
REMOVAL OF BACK WINDOW GLASS
1. REMOVE FOLLOWING PARTS:(a) Rear seat back and cushion
(b) Roof side inner garnish
(c) Package tray trim
(d) Back window lower moulding
(e) Luggage compartment door
2. DISCONNECT REAR SIDE OF ROOF HEADLINING Pull out the rear end of roof headlining with your hand and
disconnect it.
BO±54
±
BODY Back Window Glass
WhereEverybodyKnowsYourName
Page 411 of 4087
3. DISCONNECT CONNECTORS ON BACK WINDOWGLASS
Disconnect three connectors on the glass.
4. REMOVE BACK WINDOW GLASS (a) Push the piano wire through from the interior.
(b) Tie both wire ends to a wooden block.
HINT: Apply adhesive tape to the outer surface to keep
the surface from being scratched.
(c) Cut the adhesive by pulling the piano wire around it.
HINT: Do not damage the two stopper with the wire.
(d) Remove the glass.
INSTALLATION OF BACK WINDOW
GLASS ASSEMBLY
(See page BO±54)
1. CLEAN AND SHAPE CONTACT SURFACE OF BODY (a) Using a knife, cut away any rough areas.
HINT: Leave a little urethane layer on the body.
(b) Clean the cutting surface of the urethane gum with apiece of shop rag saturated in cleaner.
HINT: Even if all the urethane has been removed, clean
the body.
2. IF NECESSARY, REPLACE DAMAGED STOPPER AND MOULDING
(a) Install the new stoppers as shown.
(b) Install the new moulding. (See page BO±101)
±
BODY Back Window GlassBO±55
WhereEverybodyKnowsYourName
Page 412 of 4087

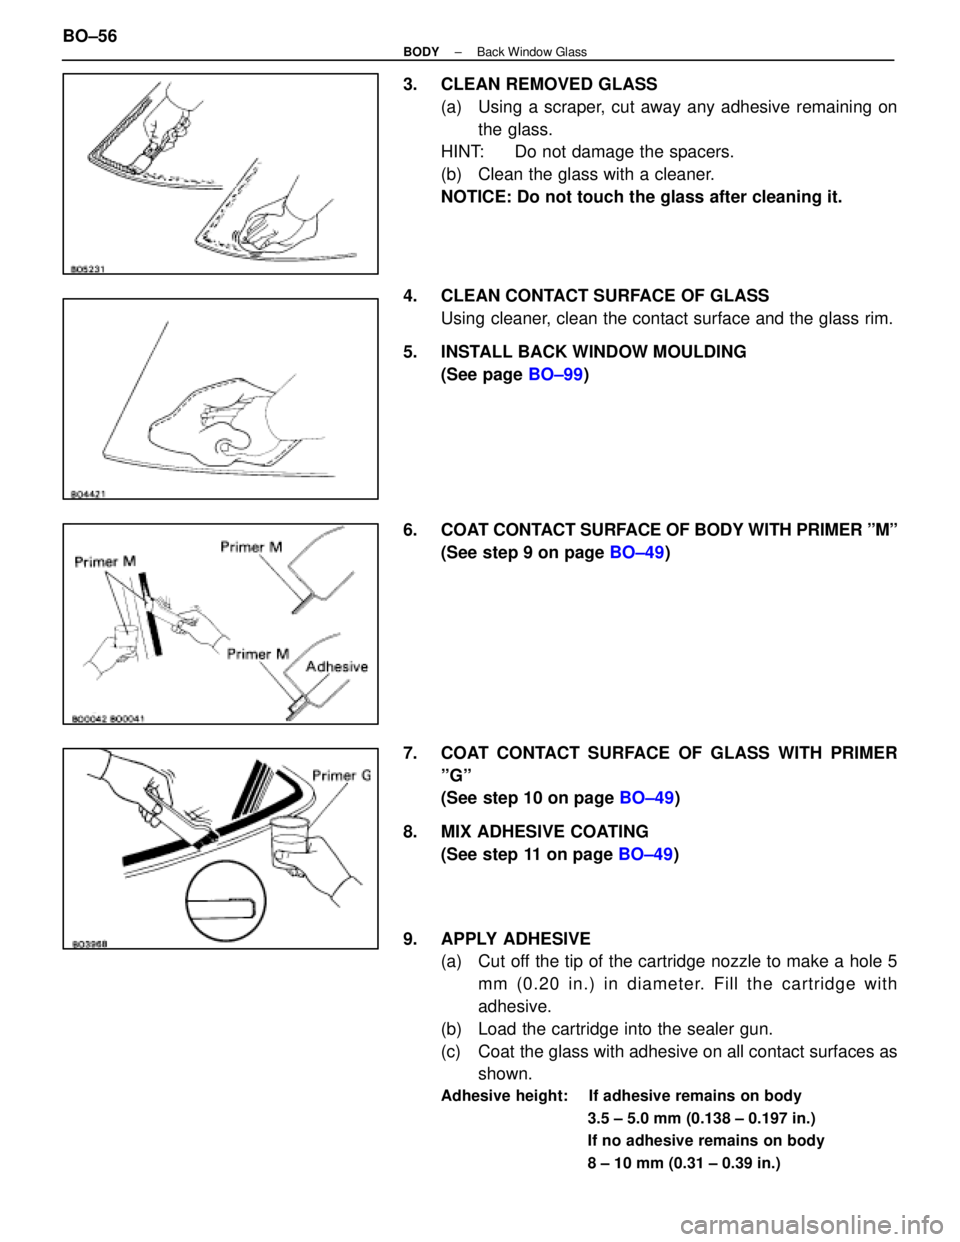
3. CLEAN REMOVED GLASS(a) Using a scraper, cut away any adhesive remaining onthe glass.
HINT: Do not damage the spacers.
(b) Clean the glass with a cleaner.
NOTICE: Do not touch the glass after cleaning it.
4. CLEAN CONTACT SURFACE OF GLASS Using cleaner, clean the contact surface and the glass rim.
5. INSTALL BACK WINDOW MOULDING (See page BO±99)
6. COAT CONTACT SURFACE OF BODY WITH PRIMER ºMº (See step 9 on page BO±49)
7. COAT CONTACT SURFACE OF GLASS WITH PRIMER ºGº
(See step 10 on page BO±49)
8. MIX ADHESIVE COATING (See step 11 on page BO±49)
9. APPLY ADHESIVE (a) Cut off the tip of the cartridge nozzle to make a hole 5
mm (0.20 in.) in diameter. Fill the cartridge with
adhesive.
(b) Load the cartridge into the sealer gun.
(c) Coat the glass with adhesive on all contact surfaces as shown.
Adhesive height: If adhesive remains on body
3.5 ± 5.0 mm (0.138 ± 0.197 in.)
If no adhesive remains on body
8 ± 10 mm (0.31 ± 0.39 in.)
BO±56±
BODY Back Window Glass
WhereEverybodyKnowsYourName
Page 413 of 4087
10. INSTALL GLASS(a) Position the glass so that the reference marks are linedup, and press in gently along the rim.
(b) U s e a s p a t u l a t o r e m o v e a n y e x c e s s p r o t r u d i n g adhesive.
(c) Fasten glass securely until the adhesive sets for about 24 hours.
11. INSPECT FOR LEAKS AND REPAIR (a) P e rfo rm a le a k te st afte r th e ha r dening time has
elapsed.
(b) Seal any leak with auto glass sealer.
Part No. 08833±00030 or equivalent
12. INSTALL FOLLOWING PARTS: (a) Back window lower moulding
(b) Luggage compartment door
(c) Package tray trim
(d) Roof side inner garnish
(e) Rear seat back and cushion
±
BODY Back Window GlassBO±57
WhereEverybodyKnowsYourName