Page 1304 of 4087

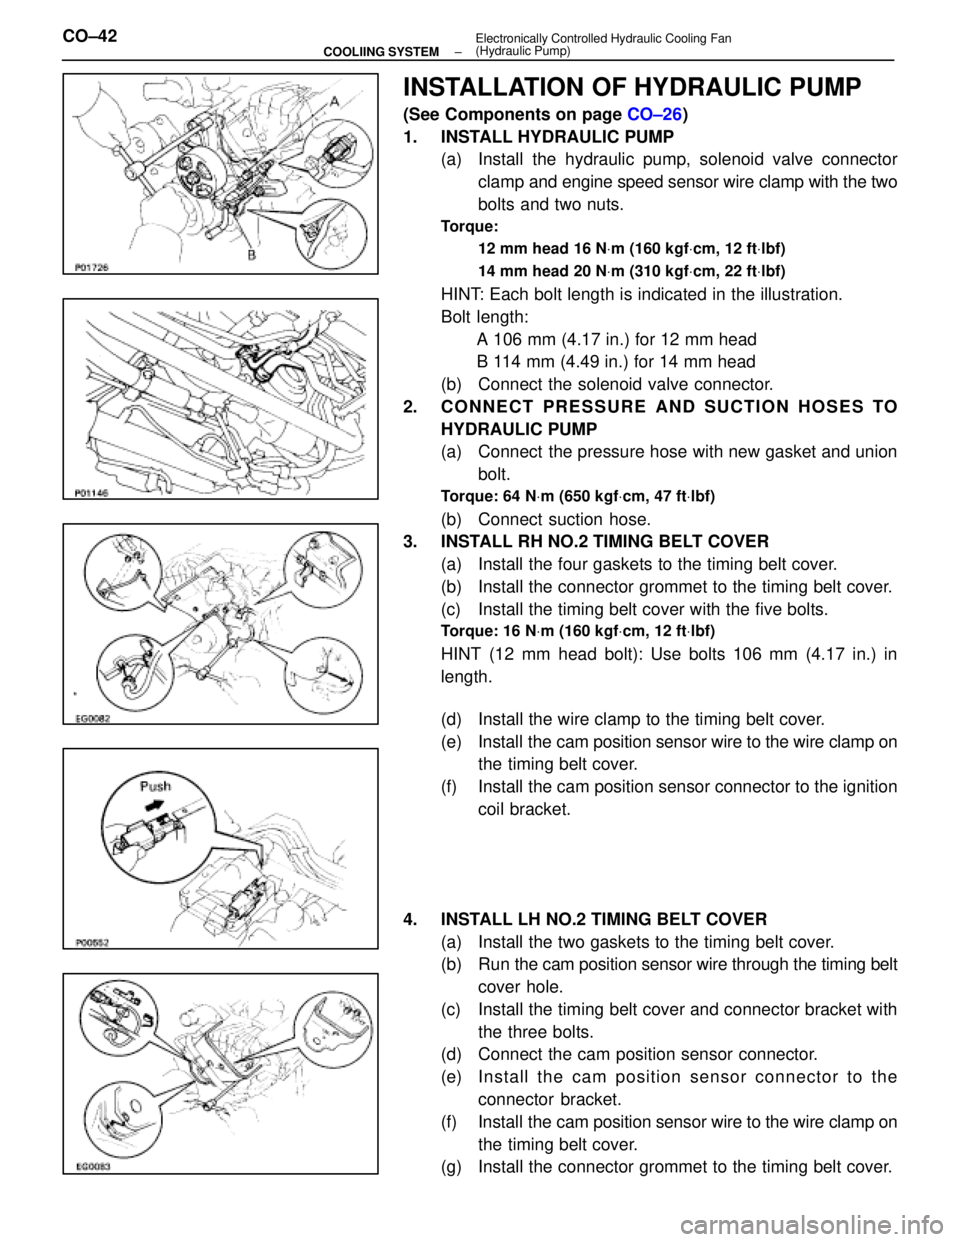
INSTALLATION OF HYDRAULIC PUMP
(See Components on page CO±26)
1. INSTALL HYDRAULIC PUMP (a) Install the hydraulic pump, solenoid valve connector
clamp and engine speed sensor wire clamp with the two
bolts and two nuts.
Torque:
12 mm head 16 N Vm (160 kgf Vcm, 12 ft Vlbf)
14 mm head 20 N Vm (310 kgf Vcm, 22 ft Vlbf)
HINT: Each bolt length is indicated in the illustration.
Bolt length:
A 106 mm (4.17 in.) for 12 mm head
B 114 mm (4.49 in.) for 14 mm head
(b) Connect the solenoid valve connector.
2. CONNECT PRESSURE AND SUCTION HOSES TO HYDRAULIC PUMP
(a) Connect the pressure hose with new gasket and unionbolt.
Torque: 64 N Vm (650 kgf Vcm, 47 ft Vlbf)
(b) Connect suction hose.
3. INSTALL RH NO.2 TIMING BELT COVER
(a) Install the four gaskets to the timing belt cover.
(b) Install the connector grommet to the timing belt cover.
(c) Install the timing belt cover with the five bolts.
Torque: 16 N Vm (160 kgf Vcm, 12 ft Vlbf)
HINT (12 mm head bolt): Use bolts 106 mm (4.17 in.) in
length.
(d) Install the wire clamp to the timing belt cover.
(e) Install the cam position sensor wire to the wire clamp on
the timing belt cover.
(f) Install the cam position sensor connector to the ignition coil bracket.
4. INSTALL LH NO.2 TIMING BELT COVER (a) Install the two gaskets to the timing belt cover.
(b) Run the cam po sition sensor wire through the timing belt
cover hole.
(c) Install the timing belt cover and connector bracket with the three bolts.
(d) Connect the cam position sensor connector.
(e) In sta ll th e ca m po sitio n se n so r c onnector to the
connector bracket.
(f) Install the cam position sensor wire to the wire clamp on
the timing belt cover.
(g) Install the connector grommet to the timing belt cover.
CO±42
±
COOLIING SYSTEM Electronically Controlled Hydraulic Cooling Fan
(Hydraulic Pump)
WhereEverybodyKnowsYourName
Page 1307 of 4087
14. INSTALL IGNITION COIL(a) Install the ignition coil with the two bolts.
(b) Connect the following connectors and cord:(1) Ignition coil connector
(2) Noise filter connector
(3) High±tension cord
15. INSTALL A/C COMPRESSOR (a) In sta ll th e A/C co mp re sso r, co mp re sso r sta y an dground cable with the three bolts and nut.
Torque: Bolt 49 N Vm (500 kgf Vcm, 36 ft Vlbf)
Nut 29 N Vm (300 kgf Vcm, 22 ft Vlbf)
(b) Connect the A/C compressor connector.
16. INSTALL DRIVE BELT Install the drive belt by turning the drive belt tensioner coun-
terclockwise.
HINT: The pulley bolt for the belt tensioner has a left±hand
thread.
17. CONNECT RADIATOR HOSE TO WATER INLET
±
COOLIING SYSTEM Electronically Controlled Hydraulic Cooling Fan
(Hydraulic Pump)CO±45
WhereEverybodyKnowsYourName
Page 1311 of 4087
6. DISCONNECT COOLING FAN INLET PIPE FROM FANSHROULD
Remove the two bolts, brackets and bushings, and discon-
nect the inlet pipe.
7. DISCONNECT COOLING FAN RESERVOIR TANK FROM FAN SHROULD
(a) Disconnect the suction hose from the clamp on the fanshrould.
(b) Remove the four bolts, and disconnect the reservoir tank.
8. REMOVE RADIATOR FAN SHROULD (a) Disconnect the wire clamp (for temperature sensor)from the radiator fan shrould.
(b) Remove the four bolts, and disconnect the fan shrould from the radiator.
(c) Slightly lift the fan shrould, and disconnect the two oil cooler hoses (for cooling fan) from the hose clamp on
the fan shrould.
(d) Remove the fan shrould.
±
COOLIING SYSTEM Electronically Controlled Hydraulic Cooling Fan
(Hydraulic Motor)CO±49
WhereEverybodyKnowsYourName
Page 1314 of 4087

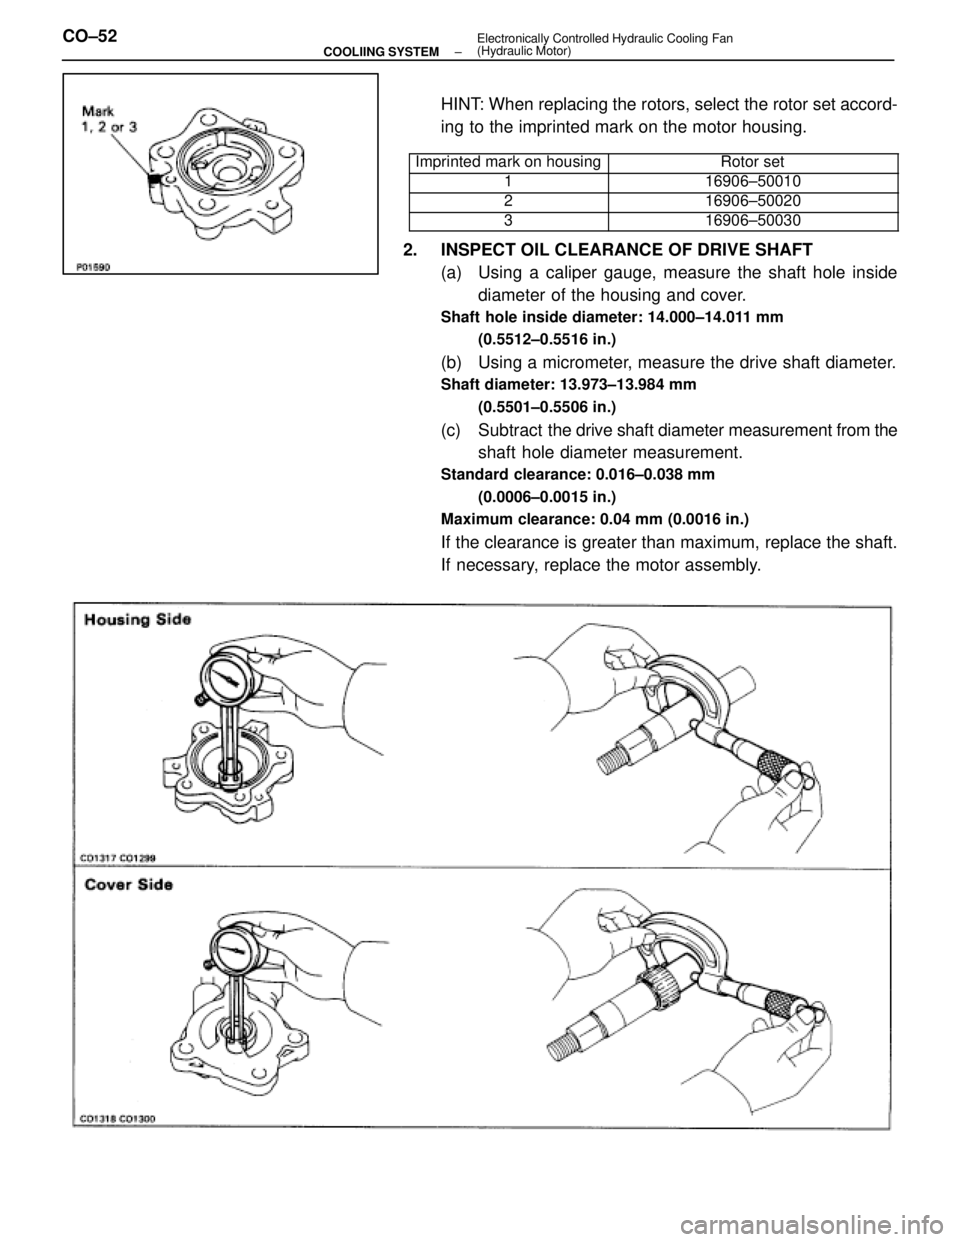
HINT: When replacing the rotors, select the rotor set accord-
ing to the imprinted mark on the motor housing.
���������� ����������Imprinted mark on housing������������� �������������Rotor set
����������1�������������16906±50010���������� ����������2������������� �������������16906±50020���������� ����������3������������� �������������16906±50030
2. INSPECT OIL CLEARANCE OF DRIVE SHAFT(a) Using a caliper gauge, measure the shaft hole insidediameter of the housing and cover.
Shaft hole inside diameter: 14.000±14.011 mm
(0.5512±0.5516 in.)
(b) Using a micrometer, measure the drive shaft diameter.
Shaft diameter: 13.973±13.984 mm
(0.5501±0.5506 in.)
(c) Subtract the drive shaft diameter measurement from the
shaft hole diameter measurement.
Standard clearance: 0.016±0.038 mm
(0.0006±0.0015 in.)
Maximum clearance: 0.04 mm (0.0016 in.)
If the clearance is greater than maximum, replace the shaft.
If necessary, replace the motor assembly.
CO±52±
COOLIING SYSTEM Electronically Controlled Hydraulic Cooling Fan
(Hydraulic Motor)
WhereEverybodyKnowsYourName
Page 1315 of 4087
REPLACEMENT OF OIL SEAL
1. REMOVE OIL SEAL(a) Using snap ring pliers, remove the snap ring and platewasher.
(b) Using a screwdriver, pry out the oil seal.
NOTICE: Be careful not to damage the housing.
2. INSTALL OIL SEAL (a) Using SST and a hammer, tap in a new oil seal to a depth
of 4.5±5.5 mm (0.177±0.217 in.) from the housing edge.
(b) Using snap ring pliers, install the plate washer and snap ring.
(c) Apply fluid to the oil seal lip.
±
COOLIING SYSTEM Electronically Controlled Hydraulic Cooling Fan
(Hydraulic Motor)CO±53
WhereEverybodyKnowsYourName
Page 1317 of 4087

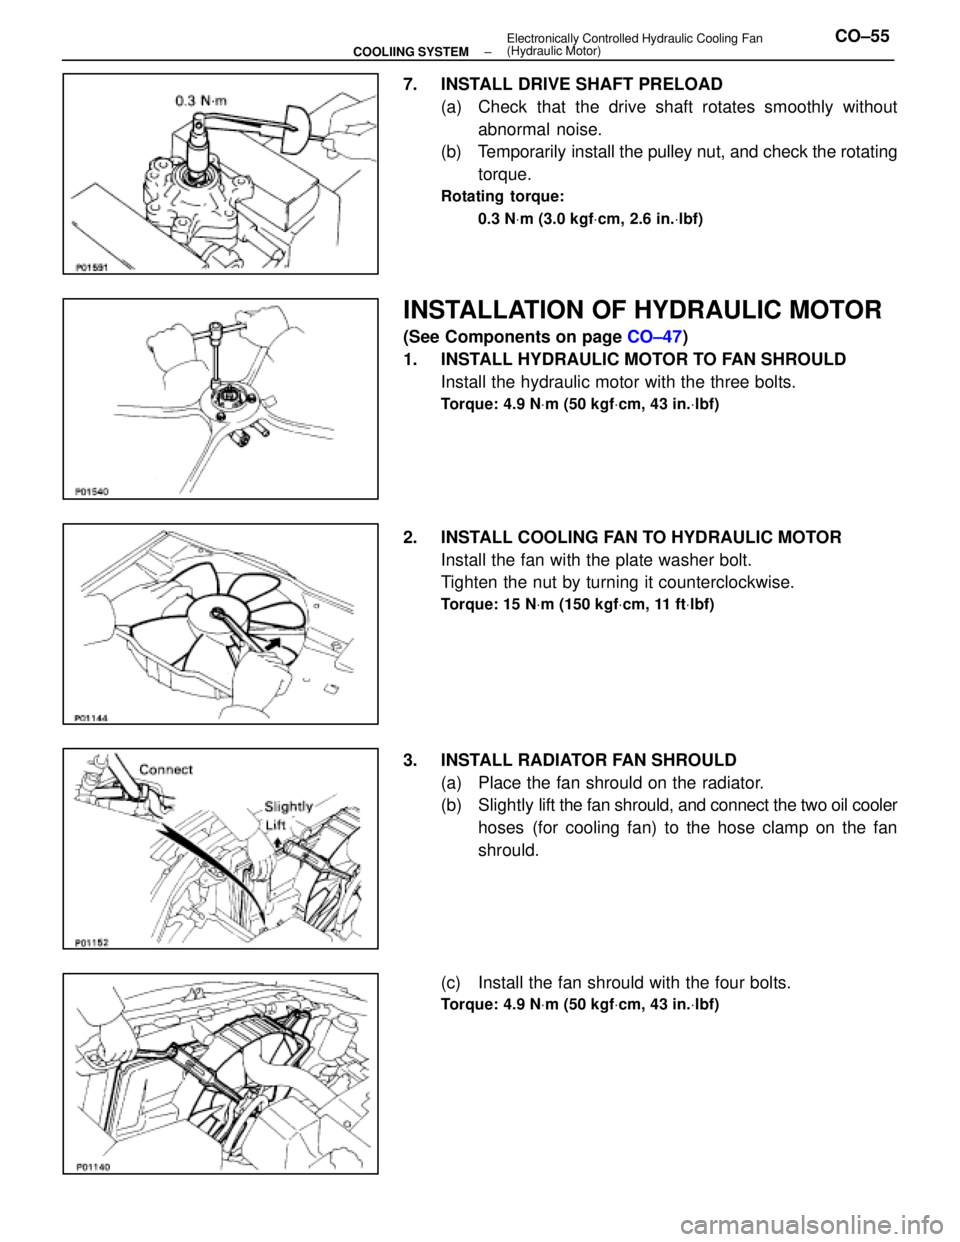
7. INSTALL DRIVE SHAFT PRELOAD(a) Check that the drive shaft rotates smoothly withoutabnormal noise.
(b) Temporarily install the pulley nut, and check the rotating
torque.
Rotating torque:
0.3 N Vm (3.0 kgf Vcm, 2.6 in. Vlbf)
INSTALLATION OF HYDRAULIC MOTOR
(See Components on page CO±47)
1. INSTALL HYDRAULIC MOTOR TO FAN SHROULD Install the hydraulic motor with the three bolts.
Torque: 4.9 N Vm (50 kgf Vcm, 43 in. Vlbf)
2. INSTALL COOLING FAN TO HYDRAULIC MOTOR
Install the fan with the plate washer bolt.
Tighten the nut by turning it counterclockwise.
Torque: 15 N Vm (150 kgf Vcm, 11 ft Vlbf)
3. INSTALL RADIATOR FAN SHROULD
(a) Place the fan shrould on the radiator.
(b) Slightly lift the fan shrould, and connect the two oil cooler
hoses (for cooling fan) to the hose clamp on the fan
shrould.
(c) Install the fan shrould with the four bolts.
Torque: 4.9 N Vm (50 kgf Vcm, 43 in. Vlbf)
±
COOLIING SYSTEM Electronically Controlled Hydraulic Cooling Fan
(Hydraulic Motor)CO±55
WhereEverybodyKnowsYourName
Page 1320 of 4087
Oil Cooler
COMPONENTS FOR REMOVAL AND
INSTALLATION
REMOVAL OF OIL COOLER
1. REMOVE FENDER LINER
2. DISCONNECT PS OIL COOLERRemove the two bolts, and disconnect the PS oil cooler from
cooling fan oil cooler.
3. DISCONNECT HOSES FROM OIL COOLER Disconnect the following hoses:(1) Inlet hose (from reservoir tank)
(2) Outlet hose (from hydraulic motor)
CO±58
±
COOLIING SYSTEM Electronically Controlled Hydraulic
Cooling Fan (Oil Cooler)
WhereEverybodyKnowsYourName
Page 1321 of 4087
4. REMOVE OIL COOLERRemove the three bolts and oil cooler.
INSPECTION OF OIL COOLER
INSPECT OIL COOLER
Check the oil cooler for damage or clogging.
If necessary, replace the oil cooler.
INSTALLATION OF OIL COOLER
(See Components on page CO±58)
1. INSTALL OIL COOLER Install the oil cooler with the three bolts.
Torque: 18 N Vm (180 kgf Vcm, 13 ft Vlbf)
2. CONNECT HOSES FROM OIL COOLER
Connect the following hoses:(1) Inlet hose (from reservoir tank)
(2) Outlet hose (from hydraulic motor)
3. INSTALL PS OIL COOLER Install the oil cooler with the two bolts.
4. REMOVE FENDER LINER
5. FILL COOLING FAN RESERVOIR TANK WITH FLUID
(See pages CO±23 and 24)
6. START ENGINE AND CHECK FOR LEAKS
±
COOLIING SYSTEM Electronically Controlled Hydraulic
Cooling Fan (Oil Cooler)CO±59
WhereEverybodyKnowsYourName