Page 57 of 136

Fuel vapor is extremely hazardous under certain conditions.
Always stop the engine before refueling, and never refuel near
sparks or open flames. CAUTION:
When reinstalling the f")
Gasoline (cont'd)
Fuel vapor is extremely hazardous under certain conditions.
Always stop the engine before refueling, and never refuel near
sparks or open flames. CAUTION:
When reinstalling the fuel cap, be sure both tabs on the cap are
engaged in the slots of the filler neck and turn the cap until it stops. If you replace the cap, use only a genuine Honda replacement part
or its equivalent. Failure to use the proper part could cause serious
fuel system problems.
How to Improve Your Gas Mileage: Drive at a smooth, steady pace to avoid unnecessary decele-
rations and stops — accelerating back to speed uses more fuel.Plan trips to avoid rush hour traffic if possible. Make sure the parking brake is completely released.
Consolidate trips whenever possible.
Keep vehicle weight to a minimum by removing unnecessary
items from the luggage area.
Whenever possible, use fresh air from the dash vents to keep
cool when driving; open windows, or use of the optional air
conditioning both affect fuel economy.
Keep the tires adjusted to the recommended pressure.
Tire Pressure (measured cold): STD Hatchback front 240 kPa (35 psi)
rear 220 kPa (32 psi)
DX Hatchback front 220 kPa (32 psi)
rear 220 kPa (32 psi)
Si Hatchback front 195 kPa (28 psi)
rear 195 kPa (28 psi)
DX Sedan front 220 kPa (32 psi)
rear 220 kPa (32 psi)
LX Sedan front 180 kPa (26 psi)
rear 180 kPa (26 psi)
EX Sedan front 180 kPa (26 psi)
rear 180 kPa (26 psi)
Condition of Your Car You can only get maximum fuel economy if your car is in toprunning condition. Have all required maintenance done at the proper
intervals. Check tire pressures and tire wear frequently. If tire wear is uneven, have the alignment checked by your Honda dealer.
Proper alignment saves gasoline and prolongs tire life.ProCarManuals.comMain Menu s t
Page 58 of 136

Ignition Switch
The combined ignition switch/anti-theft lock is located on the right side of the steering column and has four positions: 0-LOCK position: The key can be removed or inserted in this
position. To remove the key, push it in at position I, then turn it to
0 and pull it out. When the key is removed, the steering column
will lock.
NOTE:
On cars equipped with automatic transmissions, the transmission
must be in Park before pushing and turning the key to the 0-LOCK
position.
Never turn the ignition switch to the lock position or remove the
key while the car is in motion; the steering wheel can lock causing
a loss of directional control, and an accident could result. I-ACCESSORY position: In this position, the accessory circuit is
on, but the ignition circuit is off.
If the key is difficult to turn from the 0 to the I position, turn the
steering wheel slightly to relieve pressure on the lock. II-ON position: This is the normal running position.
III-START position: The starter will engage when the key is
turned to this position.
To remind you to remove the ignition key when leaving your car, a beeper will sound if the key is still in the ignition when you open the
driver's door. The beeper system is deactivated when you turn the ignition to 0 (Lock) and fully remove the key.ProCarManuals.comMain Menu s t
Page 59 of 136
. 3. Shift the transmission to neutral.
NOTE:
On cars e")
Starting the Engine
Before Starting
Manual Transmission:
1. Apply the parking brake.
2. Push the clutch pedal all the way in (see NOTE below). 3. Shift the transmission to neutral.
NOTE:
On cars equipped with manual transmissions, the engine will not
crank unless the clutch pedal is fully depressed.
Automatic Transmission:
1. Make sure the shift lever is in Park (P).
2. Apply the parking brake and the foot brake.
NOTE:
When starting in cold weather, keep all unnecessary electrical
circuits off (lights, defogger, etc.) for the best battery output.
Do not crank the engine for more than 15 seconds at a time. Wait
10 seconds before going to the next step.
Starting the Engine 1. With your foot off the accelerator start the engine by turning the key to the III position.
2. If the engine won't start within 15 seconds or starts but fails to continue to run, push the accelerator pedal halfway, and hold it
there while cranking the engine. Once the engine starts, release
the accelerator gradually as the engine speeds up.
3. If it doesn't start within 15 seconds, push the accelerator pedal down to the floor and hold it there while cranking in order to clearflooding. Try step 2 again.
Cold Weather at High Altitude Starting 1. When starting in cold weather at high altitude (above 8,000 feet), push the accelerator pedal about halfway and hold it there while
cranking the engine. Once the engine starts, release the accelerator gradually as the engine speeds up.
2. If it doesn't start within 15 seconds, push the accelerator pedal down to the floor and hold it there while cranking in order to clearflooding. Try step 1 again.
NOTE:
If the outside temperature is below freezing, or if your car has not
been driven for several days, warm up the engine for a few minutes
before driving.ProCarManuals.comMain Menu s t
Page 60 of 136

Safety Items
Before driving away, check that: The doors are closed properly.
The mirrors are properly adjusted, and the windows clean.
The driver and passengers are wearing properly adjusted seat
belts.
The head restraints are properly adjusted.
The warning and indicator lights are operating properly. The brake pedal feels normal.
All luggage and cargo is secured.
Nothing is interfering with the driver's feet or blocking vision to
the rear.
While driving remember to: Always drive defensively; expect the unexpected.Reduce your speed during night hours and bad weather.Follow at a safe distance; don't tailgate. Get off the highway when you are tired; stop and take a rest.
When stopping for repairs: Park the car well off the road.
Turn on the hazard warning flasher. Use flares or other warning devices to warn other motorists.
After parking your car: Apply the parking brake and shift to first gear if equipped with
manual transmission, or PARK on automatic transmission equip-ped cars.
Make sure the sunroof and windows are closed and the doors are
locked.
If parked on a hill:
1. Turn the front wheels away from the curb if facing uphill.
2. Turn the front wheels toward the curb if facing downhill.
Never leave children unattended in a parked car. Take your keys.ProCarManuals.comMain Menu s t
Page 61 of 136

Engine Exhaust Gas Warning
A properly maintained car is your best protection against exhaust
gas entering the passenger compartment.
The exhaust system should be thoroughly inspected by a compe-
tent mechanic whenever:
The car is raised for oil change.You notice a change in the sound of the exhaust. The exhaust system or the rear or underside of the car is
damaged.
Avoid breathing exhaust gases. They contain carbon monoxide,
which is a colorless, odorless gas that can cause loss of con-
sciousness and eventual death. If you suspect that exhaust gas is entering the passenger compartment, have the cause deter-mined and corrected as soon as possible. If you must driveunder these conditions, drive only with all windows fully open. Do not drive with the hatch/trunk lid open. An open hatch/trunk
may draw exhaust gases into the passenger compartment. If
you must drive with the hatch/trunk open, drive only with all the
windows wide open. Do not run the engine in confined areas, such as garages, any
longer than necessary to move the car in or out.
If you must sit in a parked car with the engine running for more
than a short time, adjust the heating/ventilation system as
follows:
1.Set the function lever to the position.
2.Set the temperature control dial for best comfort. 3.Set the recirculation lever to the position.
4.Turn the fan to the highest speed.
NOTE:
To insure proper operation of the car's ventilation system, keep the
front air inlet clear of snow, mud, leaves or other obstructions.ProCarManuals.comMain Menu s t
Page 62 of 136

Shifting the 4 or 5 Speed
The fully synchronized manual trans- mission is very easy to shift up or
down. When you slow down for
traffic, steep hills, or corners, shift
to a lower gear before the engine starts to labor. When descendingsteep grades, select a lower gear to
help maintain a safe speed and toprevent the brakes from overheat-
ing.
When shifting, depress the clutch pedal fully, shift gears and then release the clutch gradually. Do not speed-shift; allow time for the
gears to synchronize.
To prevent grinding the gears when shifting into reverse, hold the clutch pedal depressed briefly before shifting, or shift the lever into one of the forward gears before selecting reverse.
On 5 speed transmissions, a safety lockout prevents accidentalshifting straight from 5th to Reverse.
Avoid rapid acceleration or sudden deceleration when either or both driving wheels are on a slippery surface. Decreased traction
could cause loss of directional control.
Clutch Pedal Adjustment
Clutch pedal free travel must be adjusted periodically to
compensate for lining wear. There should be approximately 25 mm (1 in) of pedal free travel. If not, or if the clutch seems to slip or
you have difficulty shifting, have your dealer check the clutch adjustment.
CAUTION:
Do not drive with your foot on the clutch pedal as this will cause
premature wear of clutch components.
Do not shift into reverse while the car is moving. Driving with the clutch pedal free travel improperly adjusted can
cause premature wear of the clutch components.
(cont'd)ProCarManuals.comMain Menu s t
Page 63 of 136
Shifting the 4 or 5 Speed (cont'd)
Recommende
d
Shift Speeds
For best fuel economy, and effective emission control, shift at the
speeds shown:
STD Hatchback
DX Hatchback and Sedan
Si Hatchback
ProCarManuals.comMain Menu s t
Page 64 of 136
Maximum Allowable Speeds
The speeds shown below are the maximum at which the car can be driven or downshifted in each gear without over-revving the engine.ProCarManuals.comMain Menu s t
 1
1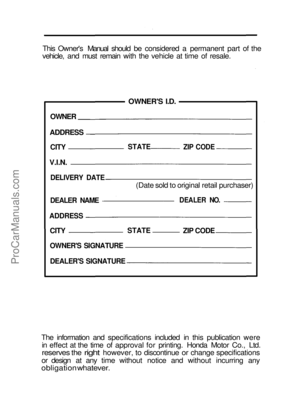 2
2 3
3 4
4 5
5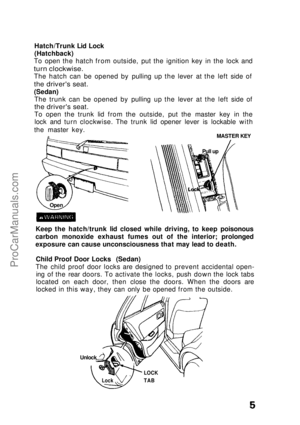 6
6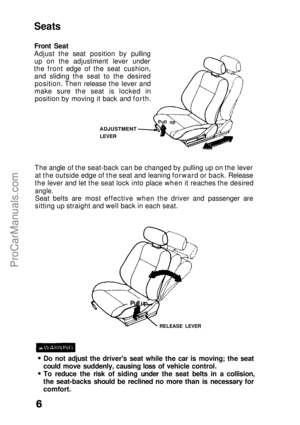 7
7 8
8 9
9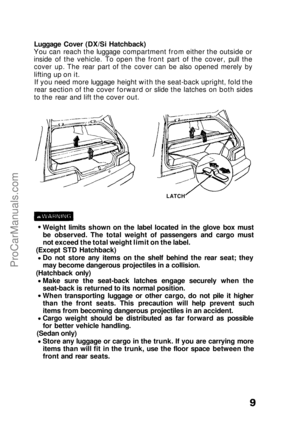 10
10 11
11 12
12 13
13 14
14 15
15 16
16 17
17 18
18 19
19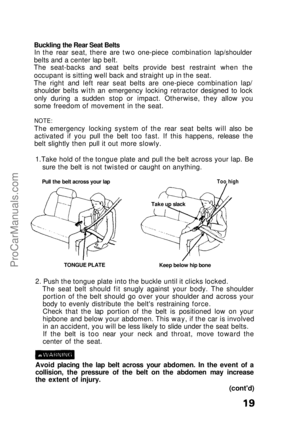 20
20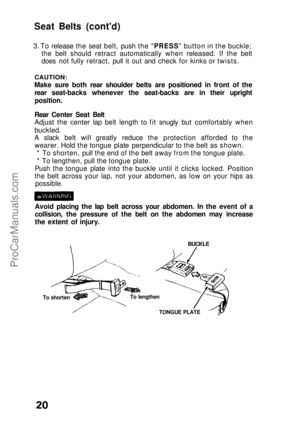 21
21 22
22 23
23 24
24 25
25 26
26 27
27 28
28 29
29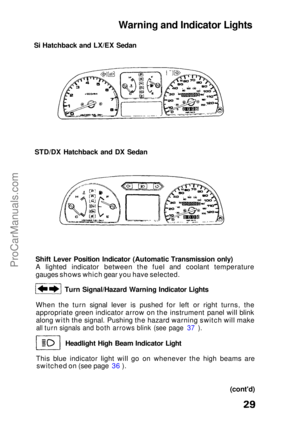 30
30 31
31 32
32 33
33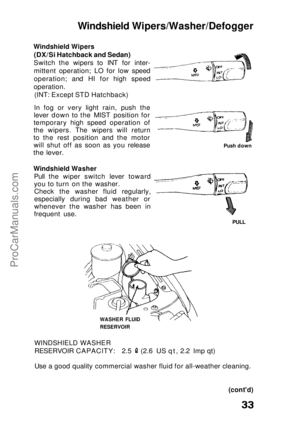 34
34 35
35 36
36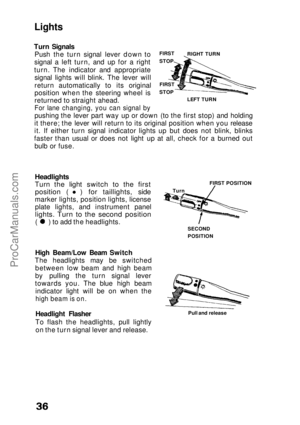 37
37 38
38 39
39 40
40 41
41 42
42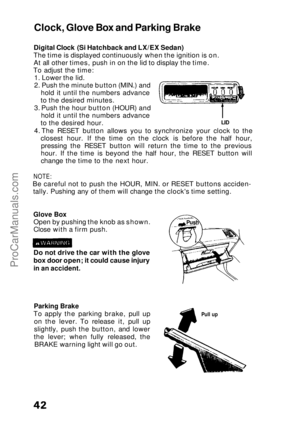 43
43 44
44 45
45 46
46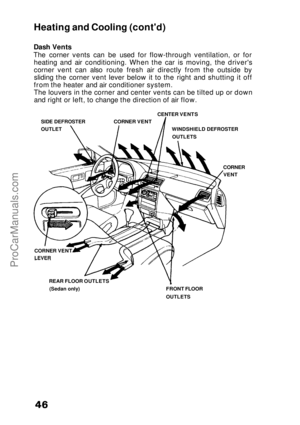 47
47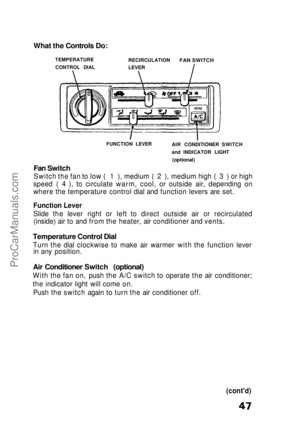 48
48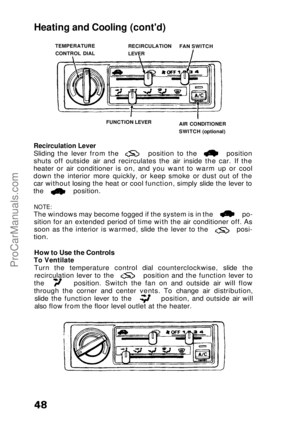 49
49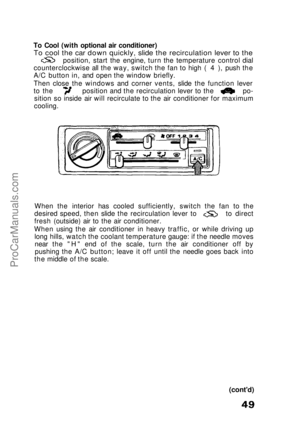 50
50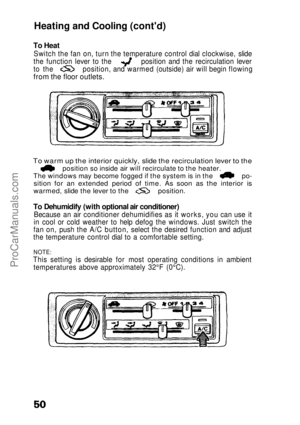 51
51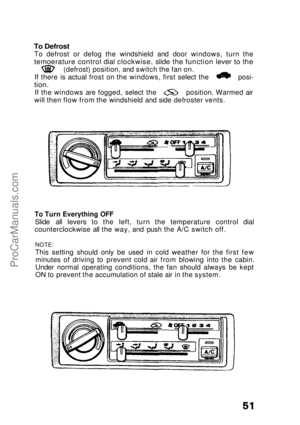 52
52 53
53 54
54 55
55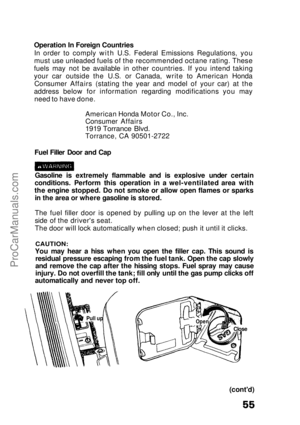 56
56 57
57 58
58 59
59 60
60 61
61 62
62 63
63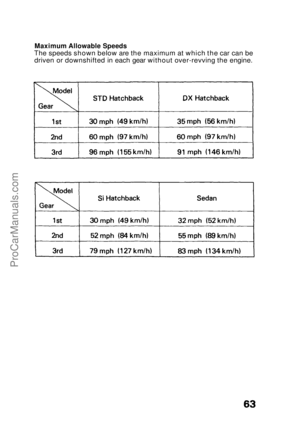 64
64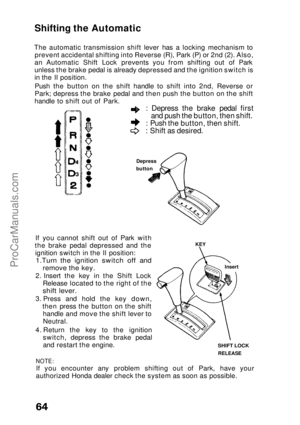 65
65 66
66 67
67 68
68 69
69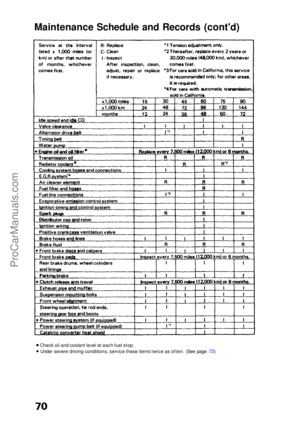 70
70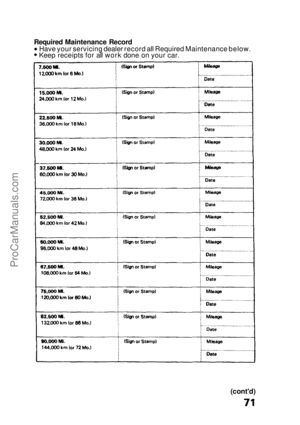 71
71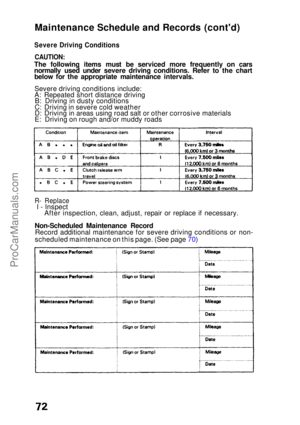 72
72 73
73 74
74 75
75 76
76 77
77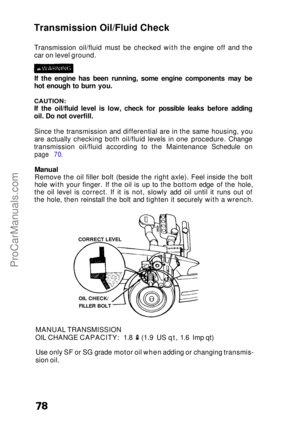 78
78 79
79 80
80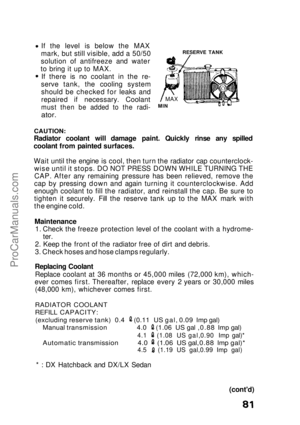 81
81 82
82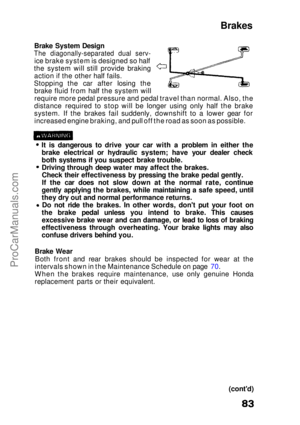 83
83 84
84 85
85 86
86 87
87 88
88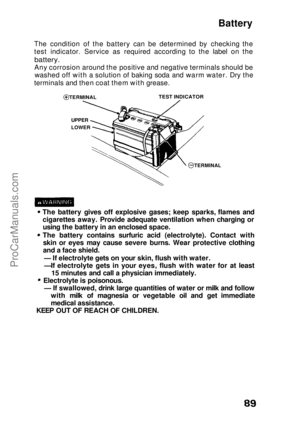 89
89 90
90 91
91 92
92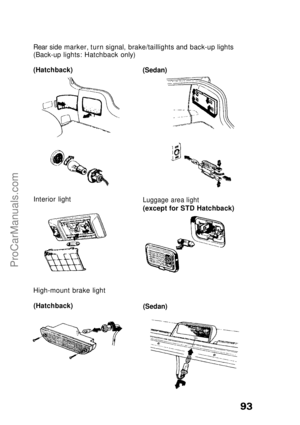 93
93 94
94 95
95 96
96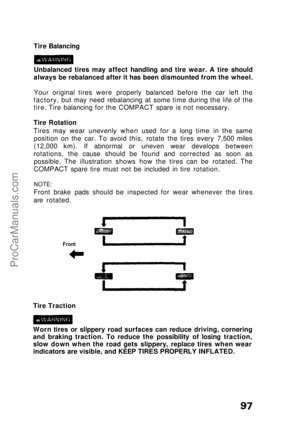 97
97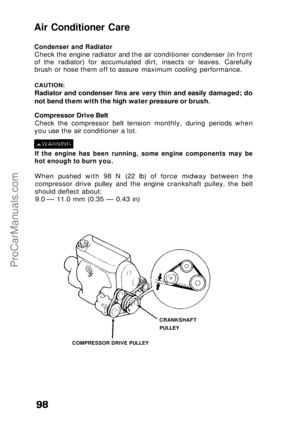 98
98 99
99 100
100 101
101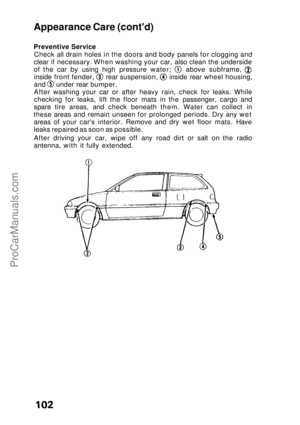 102
102 103
103 104
104 105
105 106
106 107
107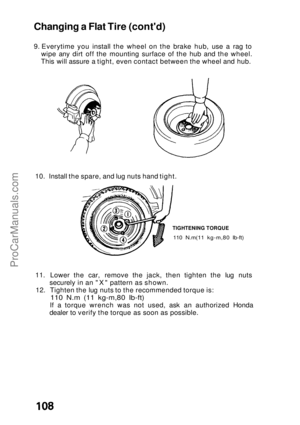 108
108 109
109 110
110 111
111 112
112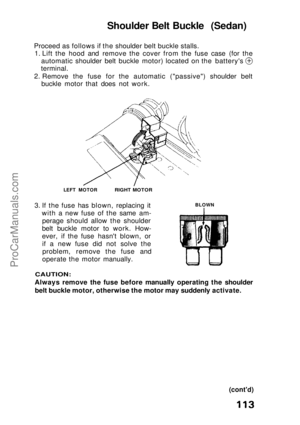 113
113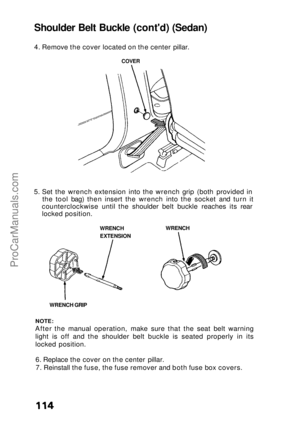 114
114 115
115 116
116 117
117 118
118 119
119 120
120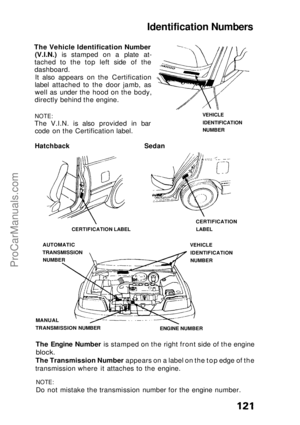 121
121 122
122 123
123 124
124 125
125 126
126 127
127 128
128 129
129 130
130 131
131 132
132 133
133 134
134 135
135
Recommende
d
Shift Speeds
For best fuel economy, and effective emission control, shift at the
speeds shown:
STD Hatchback
DX Hatchback and Sedan
Si Hatchback")
