1991 FORD FESTIVA wheel
[x] Cancel search: wheelPage 116 of 454
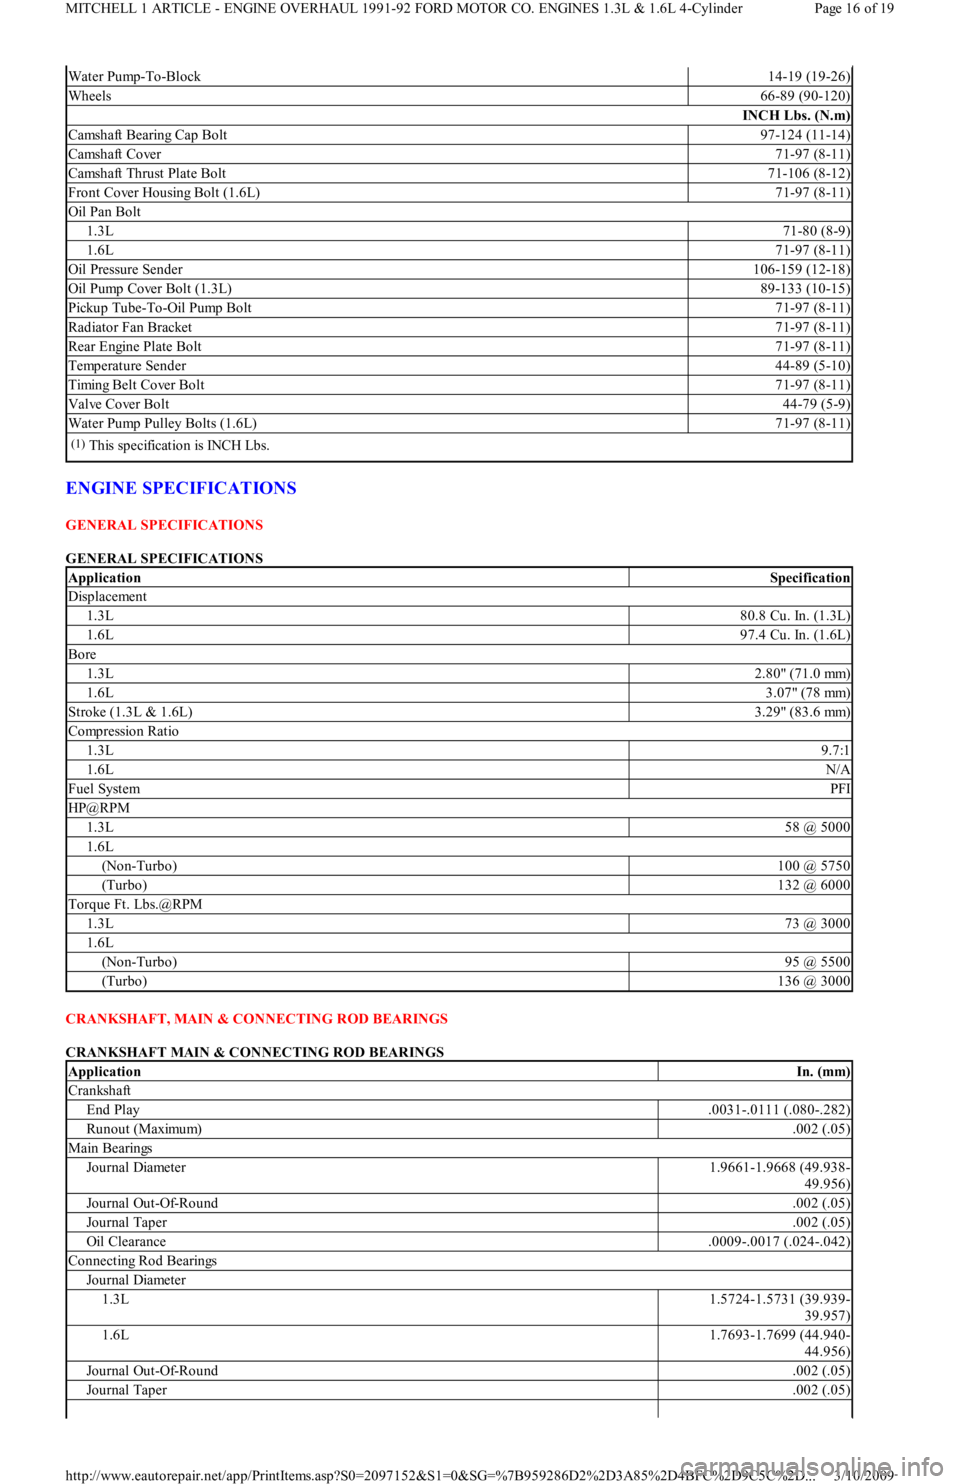
ENGINE SPECIFICATIONS
GENERAL SPECIFICATIONS
GENERAL SPECIFICATIONS
CRANKSHAFT, MAIN & CONNECTING ROD BEARINGS
CRANKSHAFT MAIN & CONNECTING ROD BEARINGS
Water Pump-To-Block14-19 (19-26)
Wheels66-89 (90-120)
INCH Lbs. (N.m)
Camshaft Bearing Cap Bolt97-124 (11-14)
Camshaft Cover71-97 (8-11)
Camshaft Thrust Plate Bolt71-106 (8-12)
Front Cover Housing Bolt (1.6L)71-97 (8-11)
Oil Pan Bolt
1.3L71-80 (8-9)
1.6L71-97 (8-11)
Oil Pressure Sender106-159 (12-18)
Oil Pump Cover Bolt (1.3L)89-133 (10-15)
Pickup Tube-To-Oil Pump Bolt71-97 (8-11)
Radiator Fan Bracket71-97 (8-11)
Rear Engine Plate Bolt71-97 (8-11)
Temperature Sender44-89 (5-10)
Timing Belt Cover Bolt71-97 (8-11)
Valve Cover Bolt44-79 (5-9)
Water Pump Pulley Bolts (1.6L)71-97 (8-11)
(1)This specification is INCH Lbs.
ApplicationSpecification
Displacement
1.3L80.8 Cu. In. (1.3L)
1.6L97.4 Cu. In. (1.6L)
Bore
1.3L2.80" (71.0 mm)
1.6L3.07" (78 mm)
Stroke (1.3L & 1.6L)3.29" (83.6 mm)
Compression Ratio
1.3L9.7:1
1.6LN/A
Fuel SystemPFI
HP@RPM
1.3L58 @ 5000
1.6L
(Non-Turbo)100 @ 5750
(Turbo)132 @ 6000
Torque Ft. Lbs.@RPM
1.3L73 @ 3000
1.6L
(Non-Turbo)95 @ 5500
(Turbo)136 @ 3000
ApplicationIn. (mm)
Crankshaft
End Play.0031-.0111 (.080-.282)
Runout (Maximum).002 (.05)
Main Bearings
Journal Diameter1.9661-1.9668 (49.938-
49.956)
Journal Out-Of-Round.002 (.05)
Journal Taper.002 (.05)
Oil Clearance.0009-.0017 (.024-.042)
Connecting Rod Bearings
Journal Diameter
1.3L1.5724-1.5731 (39.939-
39.957)
1.6L1.7693-1.7699 (44.940-
44.956)
Journal Out-Of-Round.002 (.05)
Journal Taper.002 (.05)
Page 16 of 19 MITCHELL 1 ARTICLE - ENGINE OVERHAUL 1991-92 FORD MOTOR CO. ENGINES 1.3L & 1.6L 4-Cylinder
3/10/2009 http://www.eautorepair.net/app/PrintItems.asp?S0=2097152&S1=0&SG=%7B959286D2%2D3A85%2D4BFC%2D9C5C%2D
...
Page 120 of 454
Back To Article
ST ART ER
1991 ELECT RICAL Starters
DESCRIPTION
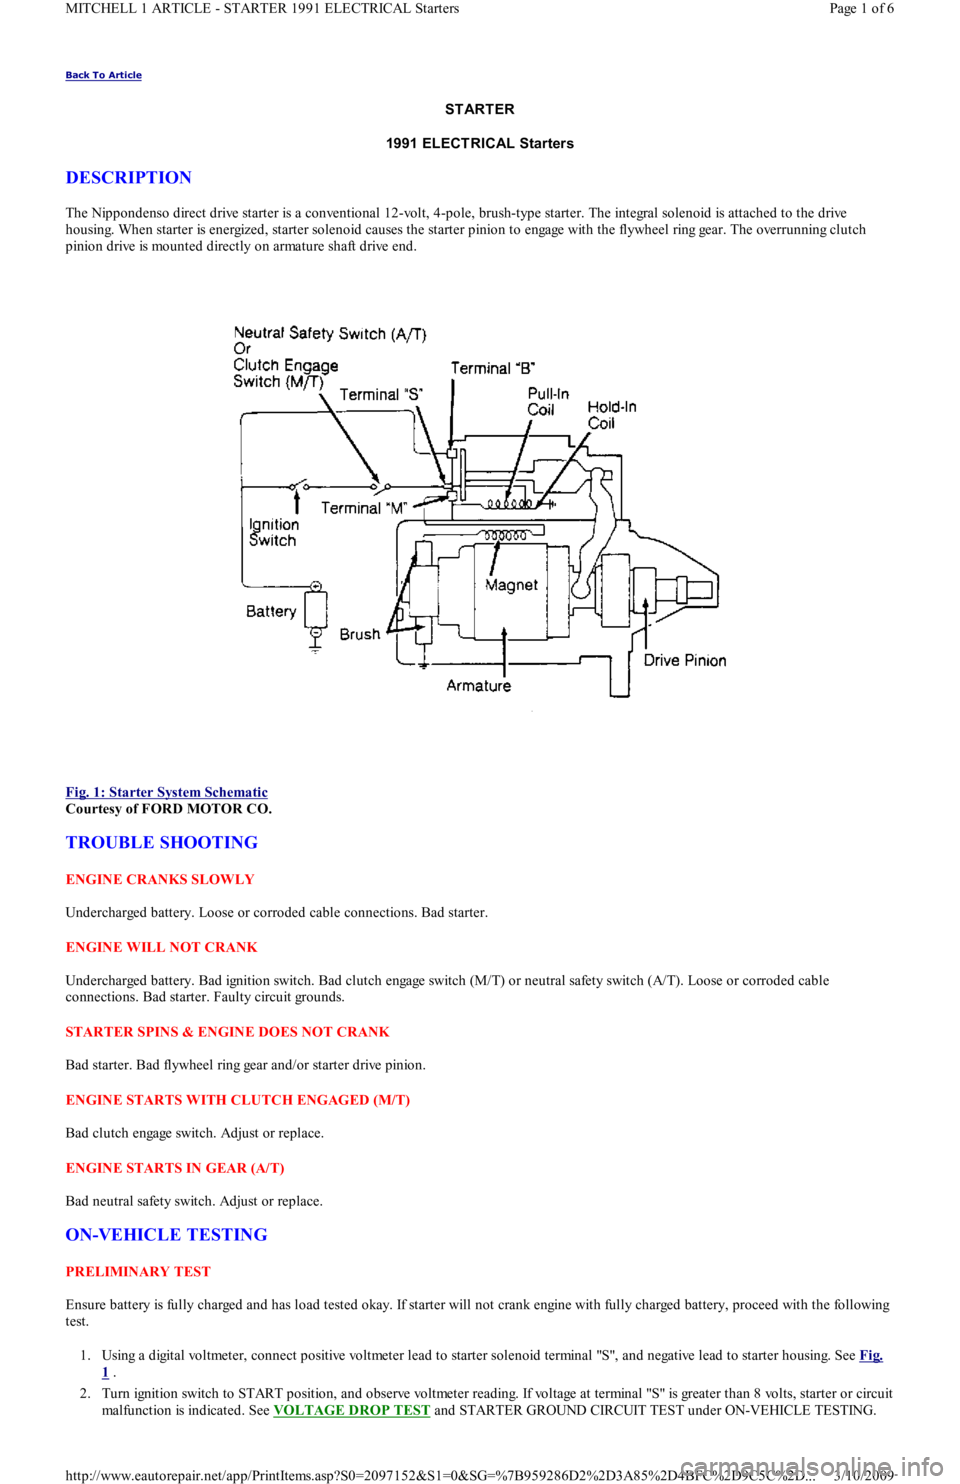
The Nippondenso direct drive starter is a conventional 12-volt, 4-pole, brush-type starter. The integral solenoid is attached to the drive
housing. When starter is energized, starter solenoid causes the starter pinion to engage with the flywheel ring gear. The overrunning clutch
pinion drive is mounted directly on armature shaft drive end.
Fig. 1: Starter System Schematic
Courtesy of FORD MOTOR CO.
TROUBLE SHOOTING
ENGINE CRANKS SLOWLY
Undercharged battery. Loose or corroded cable connections. Bad starter.
ENGINE WILL NOT CRANK
Undercharged battery. Bad ignition switch. Bad clutch engage switch (M/T) or neutral safety switch (A/T). Loose or corroded cable
connections. Bad starter. Faulty circuit grounds.
STARTER SPINS & ENGINE DOES NOT CRANK
Bad starter. Bad flywheel ring gear and/or starter drive pinion.
ENGINE STARTS WITH CLUTCH ENGAGED (M/T)
Bad clutch engage switch. Adjust or replace.
ENGINE STARTS IN GEAR (A/T)
Bad neutral safety switch. Adjust or replace.
ON-VEHICLE TESTING
PRELIMINARY TEST
Ensure battery is fully charged and has load tested okay. If starter will not crank engine with fully charged battery, proceed with the following
test.
1. Using a digital voltmeter, connect positive voltmeter lead to starter solenoid terminal "S", and negative lead to starter housing. See Fig.
1 .
2. Turn ignition switch to START position, and observe voltmeter reading. If voltage at terminal "S" is greater than 8 volts, starter or circuit
malfunction is indicated. See VOLTAGE DROP TEST
and STARTER GROUND CIRCUIT TEST under ON-VEHICLE TESTING.
Page 1 of 6 MITCHELL 1 ARTICLE - STARTER 1991 ELECTRICAL Starters
3/10/2009 http://www.eautorepair.net/app/PrintItems.asp?S0=2097152&S1=0&SG=%7B959286D2%2D3A85%2D4BFC%2D9C5C%2D
...
Page 163 of 454

POWER STEERING PRESSURE SWITCH
1. Start engine and run it at idle. Remove connector from switch. Connect ohmmeter to switch terminals. Turn steering wheel from side to
side while observing ohmmeter.
2. Replace power steering switch if continuity does not exist with front wheels turned, or if continuity exists with wheels straight ahead.
THROTTLE POSITION SENSOR (1.6L)
Unplug connector from sensor. Connect ohmmeter to sensor terminals TP and SIGRTN (Orange and Blue/Yellow wires on mating connector).
Measure resistance at each throttle opening specified in THROTTLE POSITION SENSOR RESISTANCE
. Replace sensor if resistance is
not within specification.
THROTTLE POSITION SENSOR RESISTANCE
THROTTLE POSITION SWITCH (1.3L)
1. Ensure idle speed and ignition timing are adjusted to specification. Stop engine. Disconnect negative battery cable.
2. Unplug TPS connector at throttle body. Insert appropriate feeler gauge between throttle stop screw and stop lever. Check for continuity
between specified terminals on TPS connector. See ON-VEHICLE ADJUSTMENTS article and TPS CONTINUITY table.
TPS CONTINUITY
VANE AIRFLOW (VAF) METER
1. Check all wiring, harnesses, connectors and components for evidence of damage, overheating, shorting or looseness. If any defect exists,
repair as necessary.
2. Inspect vane airflow meter for damage and ensure measuring plate moves smoothly. Install BOB. Turn ignition on. Measure voltage
between BOB test pins VAF and ground on 1.3L, or between VAF and SIGRTN on 1.6L. Voltage measurements must be as specified in
VANE AIRFLOW METER VOLTAG
.
VANE AIRFLOW METER VOLTAGE
VANE AIR TEMPERATURE (VAT) SENSOR
1. Unplug connector from VAF meter. On 1.3L, connect ohmmeter to terminals VAT and ground (Green/Black and Black wires on mating
connector). On 1.6L, connect ohmmeter to VAF meter terminals VAT and SIGRTN (Brown and Blue/Yellow wires on mating
connector).
2. Measure intake air temperature. Measure resistance between specified terminals. See VANE AIR TEMPERATURE RESISTANCE
.
Replace VAF if resistance is not as specified.
Throttle Opening(1) Ohms
1/8989
1/41104
3/81278
1/21462
5/81480
3/41459
7/81144
Fully Open1072
(1)Resistance may vary by plus or minus 15 percent.
CAUT ION: DO NOT tam per with throttle stop screw at throttle lever. Doing so m ay result in dam age to the
throttle body.
Test Condition (1) Cont. Between IDL-TLCont. Between PSW-TL
.02" (.5 mm)YesNo
.03" (.7 mm)NoNo
Wide Open ThrottleNoYes
(1)Insert specified feeler gauge between throttle adjustment screw and stop lever.
Door Opening(1) Volts: 1.3L(1) Volts: 1.6L
Fully Closed.5-1.5(2) *
1/8.593.24
1/41.195.60
3/81.785.62
1/22.385.83
5/82.976.02
3/43.566.57
7/84.167.48
Fully Open4.5-5.07.87
(1)Voltage may vary by plus or minus 15 percent.
(2)Voltage not specified.
Page 3 of 7 MITCHELL 1 ARTICLE - I - SYSTEM/COMPONENT TESTS 1991 ENGINE PERFORMANCE Ford Motor Co. - Ford/Merc
...
3/10/2009 http://www.eautorepair.net/app/PrintItems.asp?S0=2097152&S1=0&SG=%7B7DD6473C%2DB5BB%2D4F20%2D9D70%2D
...
Page 205 of 454

Federal
FI
Fuel Injection
FICU
Fuel Injection Control Unit
FIPL
Fuel Injector Pump Lever
FPR-VSV
Fuel Pressure Regulator Vacuum Switching Valve
Ft. Lbs.
Foot Pounds
FWD
Front Wheel Drive
"G"
g
gr a ms
Gals.
ga l l o n s
GND or GRND
Ground
"H"
HAC
High Altitude Compensation
HC
Hydrocarbons
H/D
Heavy Duty
HO2S
Heated Exhaust Gas Oxygen Sensor
Hg
Mercury
Hgt.
Height
HLDT
Headlight
HO
High Output
HO2S
Heated Oxygen Sensor
HP
Page 7 of 15 MITCHELL 1 ARTICLE - GENERAL INFORMATION Commonly Used Abbreviations
3/10/2009 http://www.eautorepair.net/app/PrintItems.asp?S0=2097152&S1=0&SG=%7B9B990D68%2D660A%2D45E9%2D8F46%2DE
...
Page 210 of 454
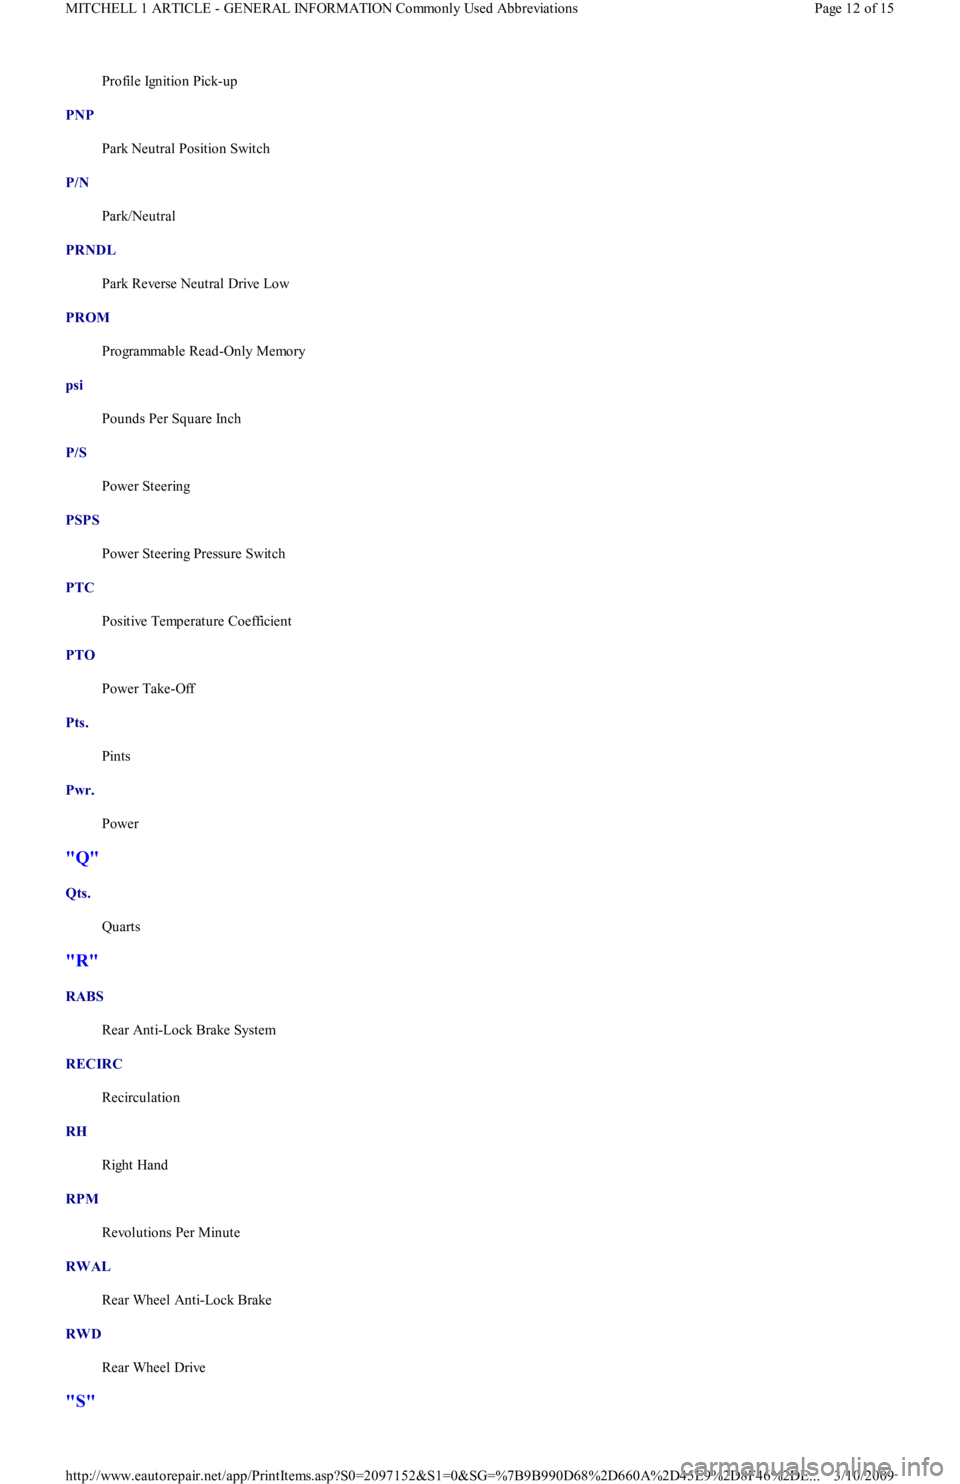
Profile Ignition Pick-up
PNP
Park Neutral Position Switch
P/N
Park/Neutral
PRNDL
Park Reverse Neutral Drive Low
PROM
Programmable Read-Only Memory
psi
Pounds Per Square Inch
P/S
Power Steering
PSPS
Power Steering Pressure Switch
PTC
Positive Temperature Coefficient
PTO
Power Take-Off
Pts.
Pints
Pwr.
Power
"Q"
Qts.
Quarts
"R"
RABS
Rear Anti-Lock Brake System
RECIRC
Recirculation
RH
Right Hand
RPM
Revolutions Per Minute
RWAL
Rear Wheel Anti-Lock Brake
RWD
Rear Wheel Drive
"S"
Page 12 of 15 MITCHELL 1 ARTICLE - GENERAL INFORMATION Commonly Used Abbreviations
3/10/2009 http://www.eautorepair.net/app/PrintItems.asp?S0=2097152&S1=0&SG=%7B9B990D68%2D660A%2D45E9%2D8F46%2DE
...
Page 218 of 454
Broken clutch housingSee STARTER article
Pinion shaft rusted or drySee STARTER article
Engine basic timing incorrectSee Ignition Timing in TUNE-
UP article
Broken teeth on engine flywheelReplace flywheel and check for
starter pinion gear damage
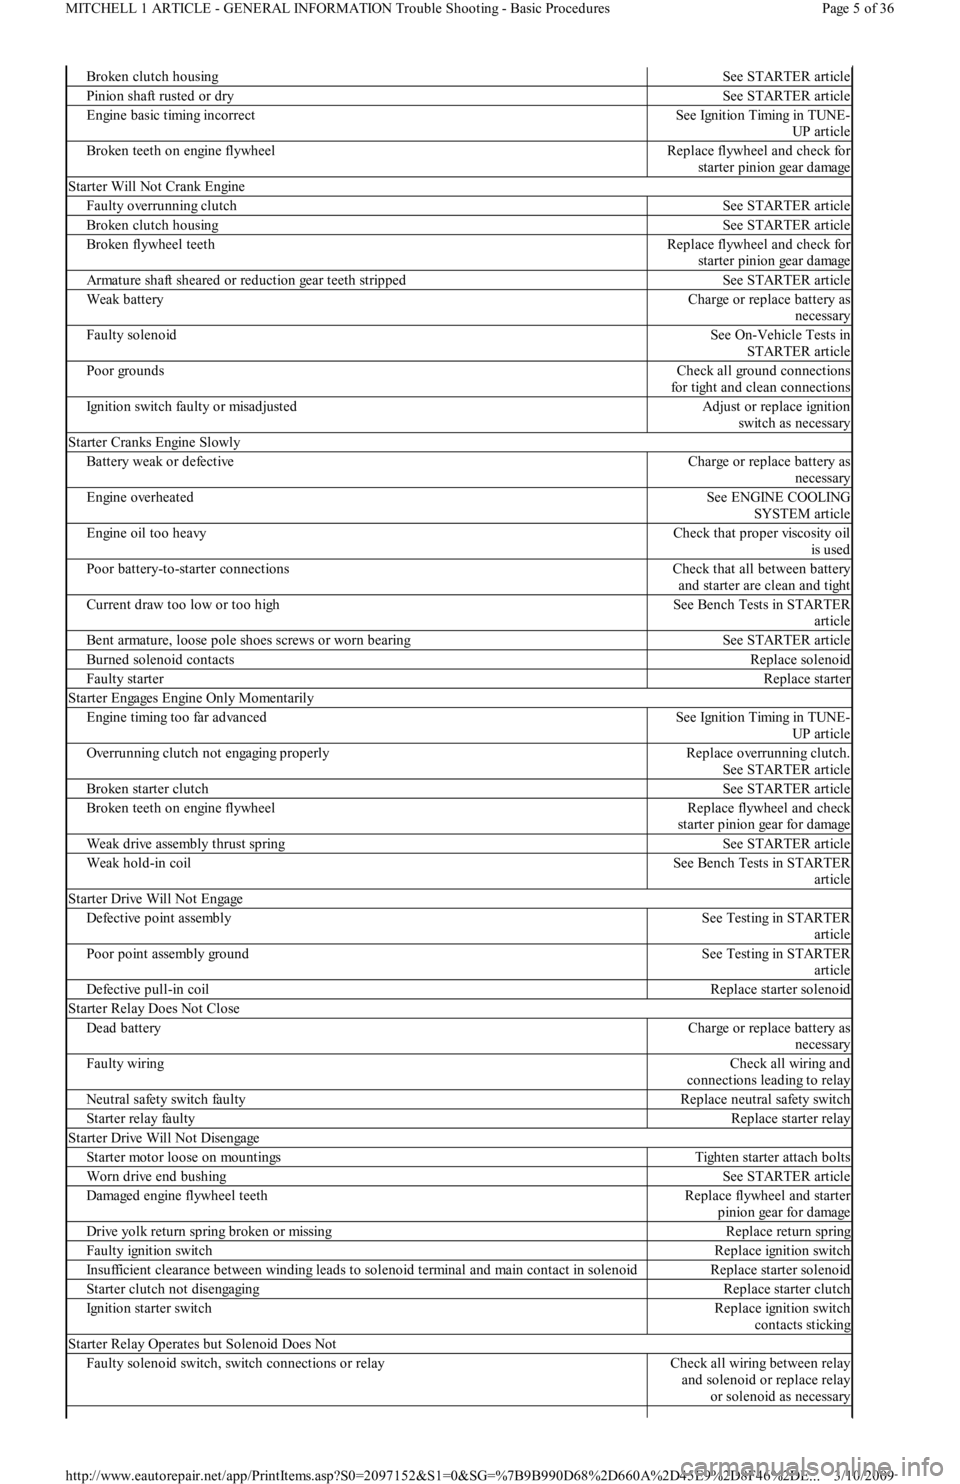
Starter Will Not Crank Engine
Faulty overrunning clutchSee STARTER article
Broken clutch housingSee STARTER article
Broken flywheel teethReplace flywheel and check for
starter pinion gear damage
Armature shaft sheared or reduction gear teeth strippedSee STARTER article
Weak batteryCharge or replace battery as
necessary
Faulty solenoidSee On-Vehicle Tests in
STARTER article
Poor groundsCheck all ground connections
for tight and clean connections
Ignition switch faulty or misadjustedAdjust or replace ignition
switch as necessary
Starter Cranks Engine Slowly
Battery weak or defectiveCharge or replace battery as
necessary
Engine overheatedSee ENGINE COOLING
SYSTEM article
Engine oil too heavyCheck that proper viscosity oil
is used
Poor battery-to-starter connectionsCheck that all between battery
and starter are clean and tight
Current draw too low or too highSee Bench Tests in STARTER
article
Bent armature, loose pole shoes screws or worn bearingSee STARTER article
Burned solenoid contactsReplace solenoid
Faulty starterReplace starter
S t a r t e r E n ga ge s E n gin e On l y M o me n t a r il y
Engine timing too far advancedSee Ignition Timing in TUNE-
UP article
Overrunning clutch not engaging properlyReplace overrunning clutch.
See STARTER article
Broken starter clutchSee STARTER article
Broken teeth on engine flywheelReplace flywheel and check
starter pinion gear for damage
Weak drive assembly thrust springSee STARTER article
Weak hold-in coilSee Bench Tests in STARTER
article
Starter Drive Will Not Engage
Defective point assemblySee Testing in STARTER
article
Poor point assembly groundSee Testing in STARTER
article
Defective pull-in coilReplace starter solenoid
Starter Relay Does Not Close
Dead batteryCharge or replace battery as
necessary
Faulty wiringCheck all wiring and
connections leading to relay
Neutral safety switch faultyReplace neutral safety switch
Starter relay faultyReplace starter relay
Starter Drive Will Not Disengage
Starter motor loose on mountingsTighten starter attach bolts
Worn drive end bushingSee STARTER article
Damaged engine flywheel teethReplace flywheel and starter
pinion gear for damage
Drive yolk return spring broken or missingReplace return spring
Faulty ignition switchReplace ignition switch
Insufficient clearance between winding leads to solenoid terminal and main contact in solenoidReplace starter solenoid
Starter clutch not disengagingReplace starter clutch
Ignition starter switchReplace ignition switch
contacts sticking
Starter Relay Operates but Solenoid Does Not
Faulty solenoid switch, switch connections or relayCheck all wiring between relay
and solenoid or replace relay
or solenoid as necessary
Page 5 of 36 MITCHELL 1 ARTICLE - GENERAL INFORMATION Trouble Shooting - Basic Procedures
3/10/2009 http://www.eautorepair.net/app/PrintItems.asp?S0=2097152&S1=0&SG=%7B9B990D68%2D660A%2D45E9%2D8F46%2DE
...
Page 219 of 454
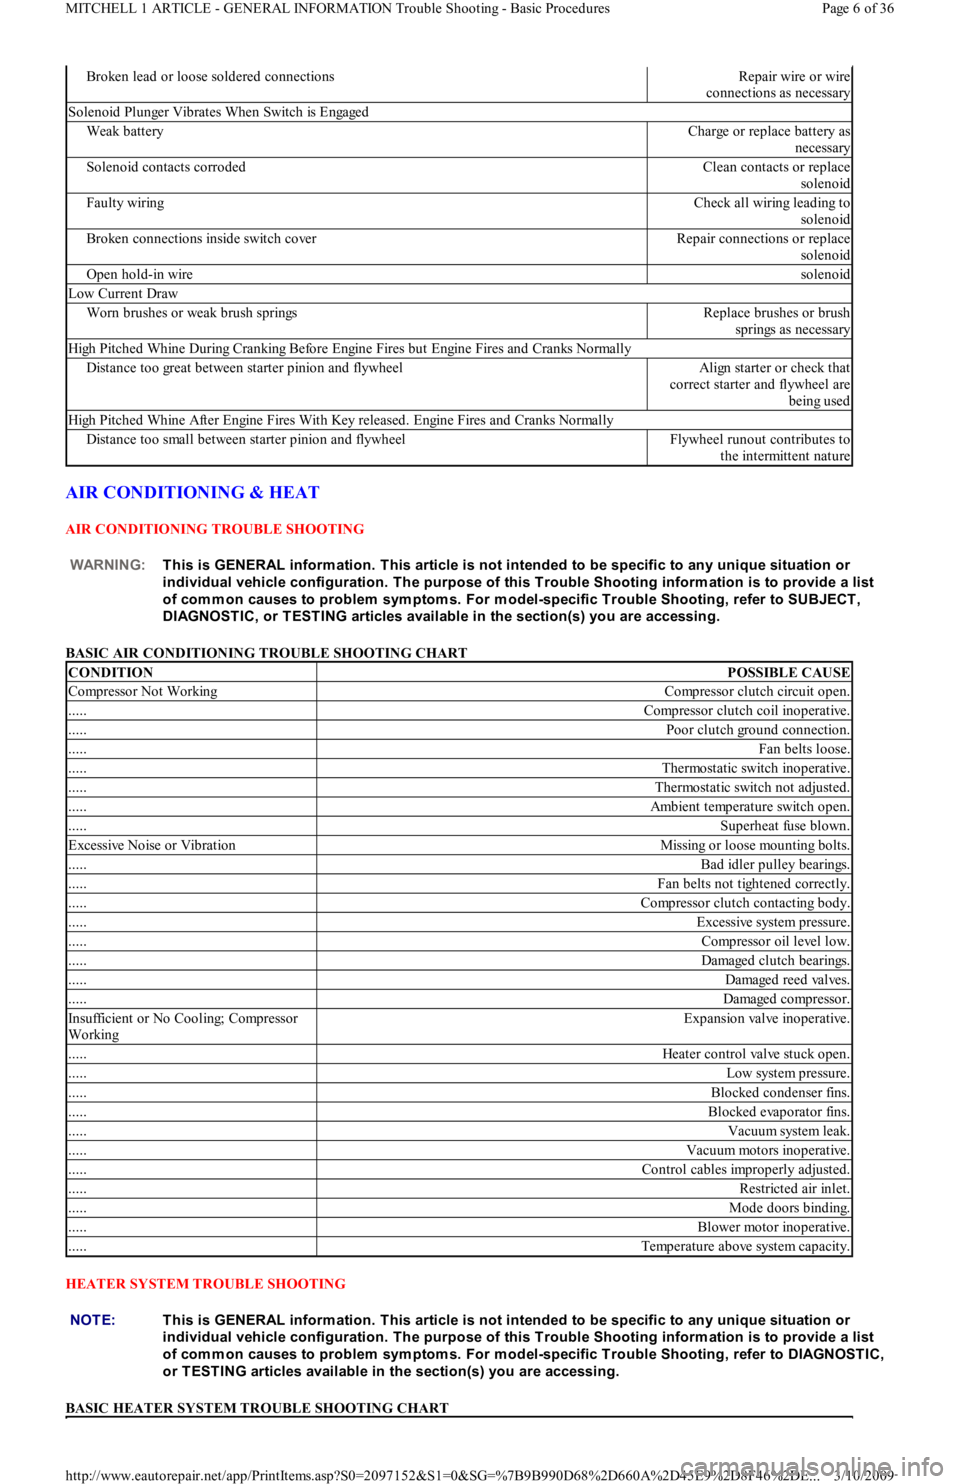
AIR CONDITIONING & HEAT
AIR CONDITIONING TROUBLE SHOOTING
BASIC AIR CONDITIONING TROUBLE SHOOTING CHART
HEATER SYSTEM TROUBLE SHOOTING
BASIC HEATER SYSTEM TROUBLE SHOOTING CHART
Broken lead or loose soldered connectionsRepair wire or wire
connections as necessary
Solenoid Plunger Vibrates When Switch is Engaged
Weak batteryCharge or replace battery as
necessary
Solenoid contacts corrodedClean contacts or replace
solenoid
Faulty wiringCheck all wiring leading to
solenoid
Broken connections inside switch coverRepair connections or replace
solenoid
Open hold-in wiresolenoid
Low Current Draw
Worn brushes or weak brush springsReplace brushes or brush
springs as necessary
High Pitched Whine During Cranking Before Engine Fires but Engine Fires and Cranks Normally
Distance too great between starter pinion and flywheelAlign starter or check that
correct starter and flywheel are
being used
High Pitched Whine After Engine Fires With Key released. Engine Fires and Cranks Normally
Distance too small between starter pinion and flywheelFlywheel runout contributes to
the intermittent nature
WARNING:This is GENERAL inform ation. This article is not intended to be specific to any unique situation or
individual vehicle configuration. T he purpose of this T rouble Shooting inform ation is to provide a list
of com m on causes to problem sym ptom s. For m odel-specific T rouble Shooting, refer to SUBJECT ,
DIAGNOST IC, or T EST ING articles available in the section(s) you are accessing.
CONDITIONPOSSIBLE CAUSE
Compressor Not WorkingCompressor clutch circuit open.
.....Compressor clutch coil inoperative.
.....Poor clutch ground connection.
.....Fan belts loose.
.....Thermostatic switch inoperative.
.....Thermostatic switch not adjusted.
.....Ambient temperature switch open.
.....Superheat fuse blown.
Excessive Noise or VibrationMissing or loose mounting bolts.
.....Bad idler pulley bearings.
.....Fan belts not tightened correctly.
.....Compressor clutch contacting body.
.....Excessive system pressure.
.....Compressor oil level low.
.....Damaged clutch bearings.
.....Damaged reed valves.
.....Damaged compressor.
In su fficien t o r No Co o l in g; Co mp resso r
WorkingExpansion valve inoperative.
.....Heater control valve stuck open.
.....Low system pressure.
.....Blocked condenser fins.
.....Blocked evaporator fins.
.....Vacuum system leak.
.....Vacuum motors inoperative.
.....Control cables improperly adjusted.
.....Restricted air inlet.
.....Mode doors binding.
.....Blower motor inoperative.
.....Temperature above system capacity.
NOTE:This is GENERAL inform ation. This article is not intended to be specific to any unique situation or
individual vehicle configuration. T he purpose of this T rouble Shooting inform ation is to provide a list
of com m on causes to problem sym ptom s. For m odel-specific T rouble Shooting, refer to DIAGNOST IC,
or T EST ING articles available in the section(s) you are accessing.
Page 6 of 36 MITCHELL 1 ARTICLE - GENERAL INFORMATION Trouble Shooting - Basic Procedures
3/10/2009 http://www.eautorepair.net/app/PrintItems.asp?S0=2097152&S1=0&SG=%7B9B990D68%2D660A%2D45E9%2D8F46%2DE
...
Page 220 of 454
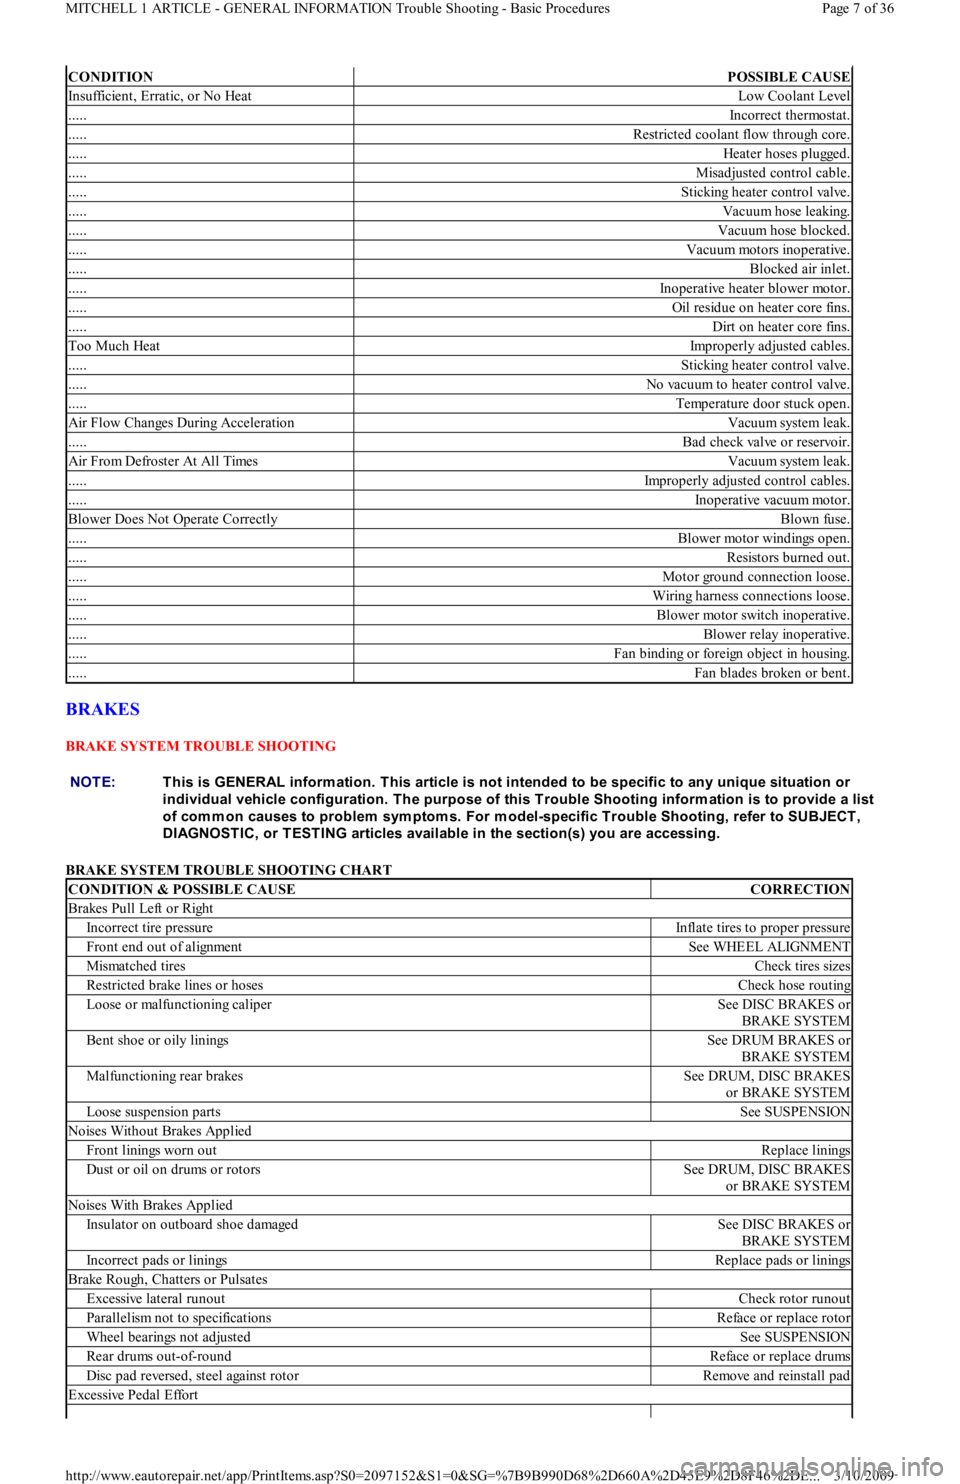
BRAKES
BRAKE SYSTEM TROUBLE SHOOTING
BRAKE SYSTEM TROUBLE SHOOTING CHART
CONDITIONPOSSIBLE CAUSE
Insufficient, Erratic, or No HeatLow Coolant Level
.....Incorrect thermostat.
.....Restricted coolant flow through core.
.....Heater hoses plugged.
.....Misadjusted control cable.
.....Sticking heater control valve.
.....Vacuum hose leaking.
.....Vacuum hose blocked.
.....Vacuum motors inoperative.
.....Blocked air inlet.
.....Inoperative heater blower motor.
.....Oil residue on heater core fins.
.....Dirt on heater core fins.
Too Much HeatImproperly adjusted cables.
.....Sticking heater control valve.
.....No vacuum to heater control valve.
.....Temperature door stuck open.
Air Flow Changes During AccelerationVacuum system leak.
.....Bad check valve or reservoir.
Air From Defroster At All TimesVacuum system leak.
.....Improperly adjusted control cables.
.....Inoperative vacuum motor.
Blower Does Not Operate CorrectlyBlown fuse.
.....Blower motor windings open.
.....Resistors burned out.
.....Motor ground connection loose.
.....Wiring harness connections loose.
.....Blower motor switch inoperative.
.....Blower relay inoperative.
.....Fan binding or foreign object in housing.
.....Fan blades broken or bent.
NOTE:This is GENERAL inform ation. This article is not intended to be specific to any unique situation or
individual vehicle configuration. T he purpose of this T rouble Shooting inform ation is to provide a list
of com m on causes to problem sym ptom s. For m odel-specific T rouble Shooting, refer to SUBJECT ,
DIAGNOST IC, or T EST ING articles available in the section(s) you are accessing.
CONDITION & POSSIBLE CAUSECORRECTION
Brakes Pull Left or Right
Incorrect tire pressureInflate tires to proper pressure
Front end out of alignmentSee WHEEL ALIGNMENT
Mismatched tiresCheck tires sizes
Restricted brake lines or hosesCheck hose routing
Loose or malfunctioning caliperSee DISC BRAKES or
BRAKE SYSTEM
Bent shoe or oily liningsSee DRUM BRAKES or
BRAKE SYSTEM
Malfunctioning rear brakesSee DRUM, DISC BRAKES
or BRAKE SYSTEM
Loose suspension partsSee SUSPENSION
Noises Without Brakes Applied
Front linings worn outReplace linings
Dust or oil on drums or rotorsSee DRUM, DISC BRAKES
or BRAKE SYSTEM
Noises With Brakes Applied
Insulator on outboard shoe damagedSee DISC BRAKES or
BRAKE SYSTEM
Incorrect pads or liningsReplace pads or linings
Brake Rough, Chatters or Pulsates
Excessive lateral runoutCheck rotor runout
Parallelism not to specificationsReface or replace rotor
Wheel bearings not adjustedSee SUSPENSION
Rear drums out-of-roundReface or replace drums
Disc pad reversed, steel against rotorRemove and reinstall pad
Excessive Pedal Effort
Page 7 of 36 MITCHELL 1 ARTICLE - GENERAL INFORMATION Trouble Shooting - Basic Procedures
3/10/2009 http://www.eautorepair.net/app/PrintItems.asp?S0=2097152&S1=0&SG=%7B9B990D68%2D660A%2D45E9%2D8F46%2DE
...