1991 ACURA NSX brake light
[x] Cancel search: brake lightPage 1437 of 1640
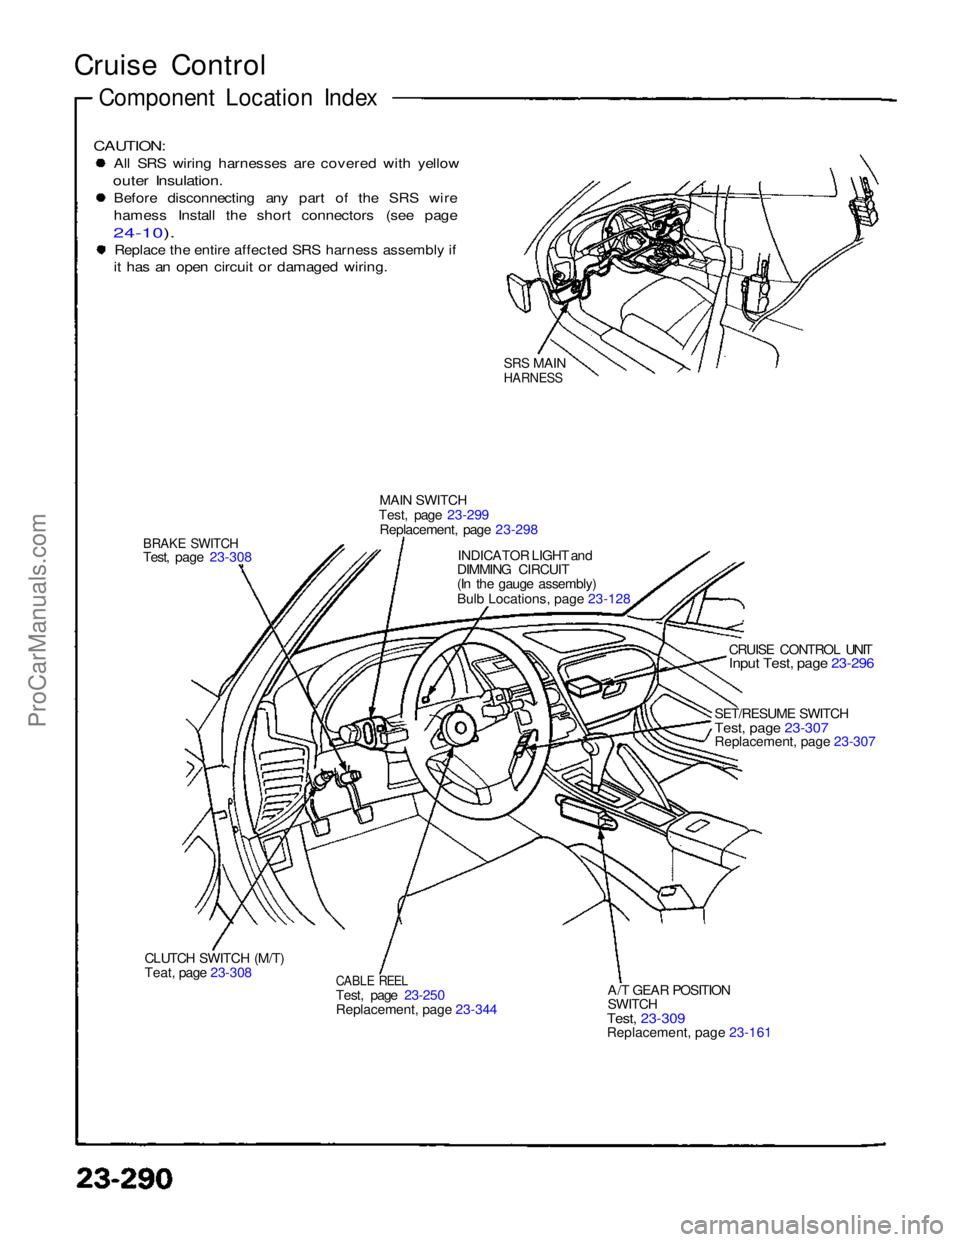
Cruise Control
Component Location Index
CAUTION:
All SRS wiring harnesses are covered with yellow
outer Insulation.
Before disconnecting any part of the SRS wire
hamess Install the short connectors (see page
24-10).
Replace the entire affected SRS harness assembly if
it has an open circuit or damaged wiring.
BRAKE SWITCH
Test, page 23-308 MAIN SWITCH
Test, page 23-299 Replacement, page 23-298
INDICATOR LIGHT and
DIMMING CIRCUIT
(In the gauge assembly)
Bulb Locations, page 23-128
CLUTCH SWITCH (M/T)
Teat, page 23-308
CABLE REEL
Test, page 23-250
Replacement
,
page 23-344
A/T GEAR POSITION
SWITCH
Test, 23-309
Replacement, page 23-161
CRUISE CONTROL UNIT
Inpu
t
Test, page 23-296
SRS
MAIN
HARNESS
SET/RESUME SWITCH
Test
,
page 23-307Replacement
,
page 23-307
ProCarManuals.com
Page 1439 of 1640
Cruise Control
Description
The cruise control system uses mechanically and elec-
trically operated devices to maintain vehicle speed at a
setting selected by the driver.
The cruise control unit receives command signals from
the cruise control main switch and the cruise control
set/resume switch. It receives information about
operating conditions from the brake switch, ECM, vehi-
cle speed sensor (VSS), the clutch switch (with manual
transmission), or the A/T gear position switch (with
automatic transmission). The cruise control unit sends
operational signals to the devices that regulate the
throttle position. The throttle position maintains the
selected vehicle speed. Essentially, the control unit
compares the actual speed of the vehicle to the
selected speed. Then, the control unit uses the result of
that comparison to open or close the throttle.
The brake switch releases the system's control of the
throttle at the instant the driver depresses the brake
pedal. The switch sends an electronic signal to the con-
trol unit when the brake pedal is depressed; the control
unit responds by allowing the throttle to close. The
clutch switch (manual transmission) or the A/T gear
position switch (automatic transmission) sends a
disengage signal to the control unit that also allows the
throttle to close.
Operation:
The cruise control system will set and automatically
maintain any speed above 30 mph (45 kph). To set,
make sure that the main switch is in the "ON" position.
After reaching the desired speed, press the set switch.
The cruise control unit will receive a set signal and, in
turn, will actuate the cruise control actuator. When the
set switch is depressed and the cruise control system is
on, the "cruise control" ON indicator in the gauge
assembly will light up. You can cancel the cruise control
system by pushing the main switch to "OFF". This
removes power to the control unit and erases the set
speed from memory. If the system is disengaged tem-
porarily by the brake switch, clutch switch, or A/T gear
position switch and vehicle speed is still above 30 mph,
press the resume switch. With the resume switch
depressed and the set memory retained, the vehicle
automatically returns to the previous set speed.
For gradual acceleration without depressing the ac-
celerator pedal, push the resume switch down and hold
it there until the desired speed is reached. This will send
an acceleration signal to the control unit. When the
switch is released, the system will be reprogrammed for
the new speed. To slow down, depress the set switch.
This will send a deceleration signal to the control unit
causing the car to coast until the desired speed is reach-
ed. When the desired speed is reached, release the set
switch. This will reprogram the system for the new
speed.ProCarManuals.com
Page 1456 of 1640
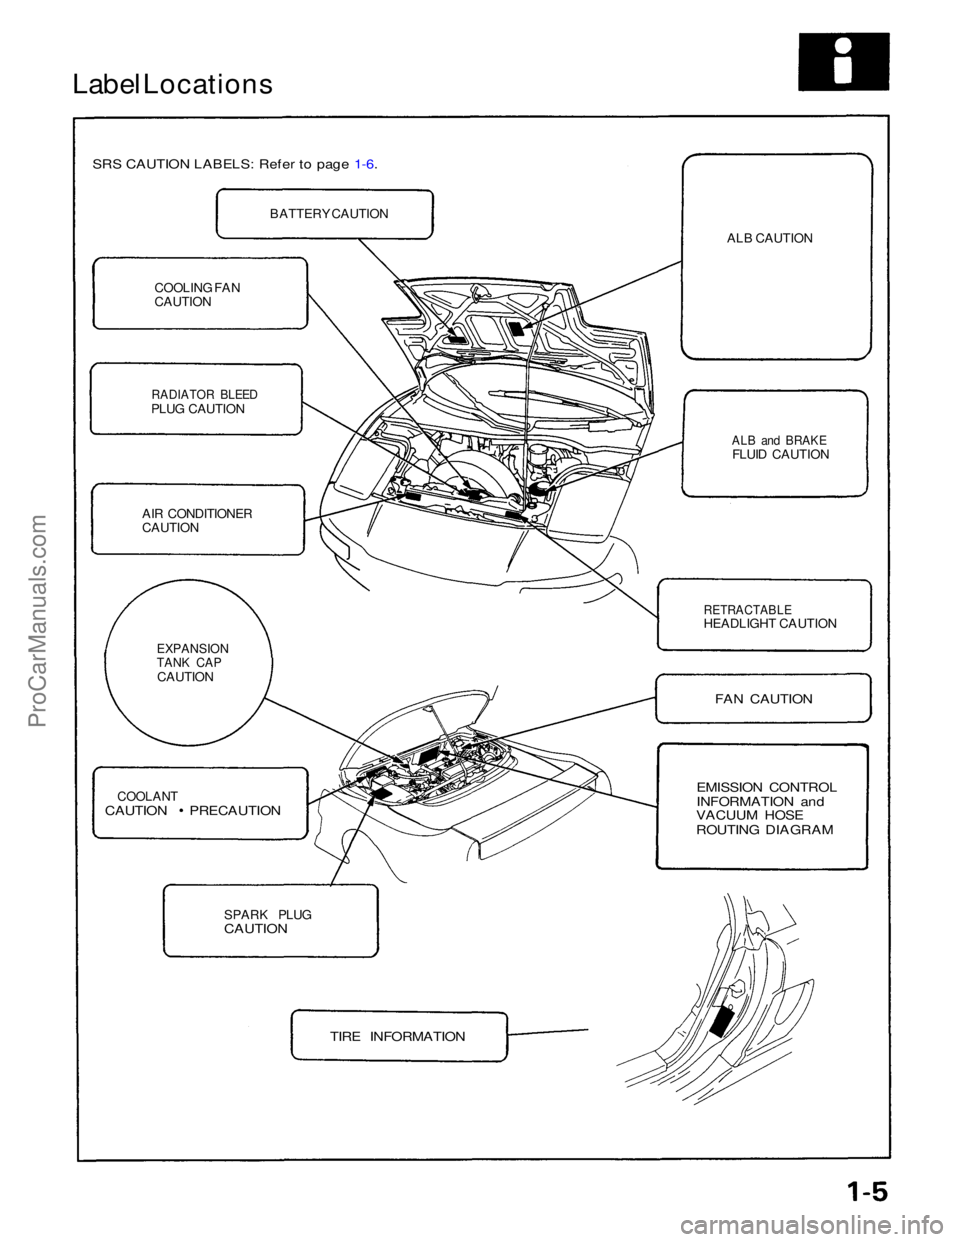
Label Locations
SRS CAUTION LABELS: Refer to page 1-6.
BATTERY CAUTION ALB CAUTION
ALB and BRAKE
FLUID CAUTION
COOLING FAN
CAUTION
RADIATOR BLEED
PLUG CAUTION
AIR CONDITIONER
CAUTION
RETRACTABLE
HEADLIGHT CAUTION
FAN CAUTION
EXPANSION
TANK CAP
CAUTION
COOLANT
CAUTION PRECAUTION
EMISSION CONTROL
INFORMATION and
VACUUM HOSE
ROUTING DIAGRAM
SPARK PLUG
CAUTION
TIRE INFORMATIONProCarManuals.com
Page 1569 of 1640
Troubleshooting
Anti-lock Brake System Indicator Light
Temporary Driving Conditions:
1. The anti-lock brake system indicator light will come
on and the control unit memorizes the problem
under certain conditions.
NOTE: Problem codes are explained on pages
19 - 46.
The tire(s) adhesion is lost due to excessive cor-
nering speed.
Problem codes: 5, 5-4, 5-8. The vehicle loses traction when starting from a
stuck condition on a muddy, snowy, or sandy
road.
Problem code: 4-1, 4-2, 4-4, 4-8. When the parking brake is applied for more than
30 seconds while the vehicle is being driven.
Problem code: 2. The vehicle is driven on extremely rough road.
The anti-lock brake system is OK, if the anti-lock brake system indicator light goes off after the
engine is restarted.
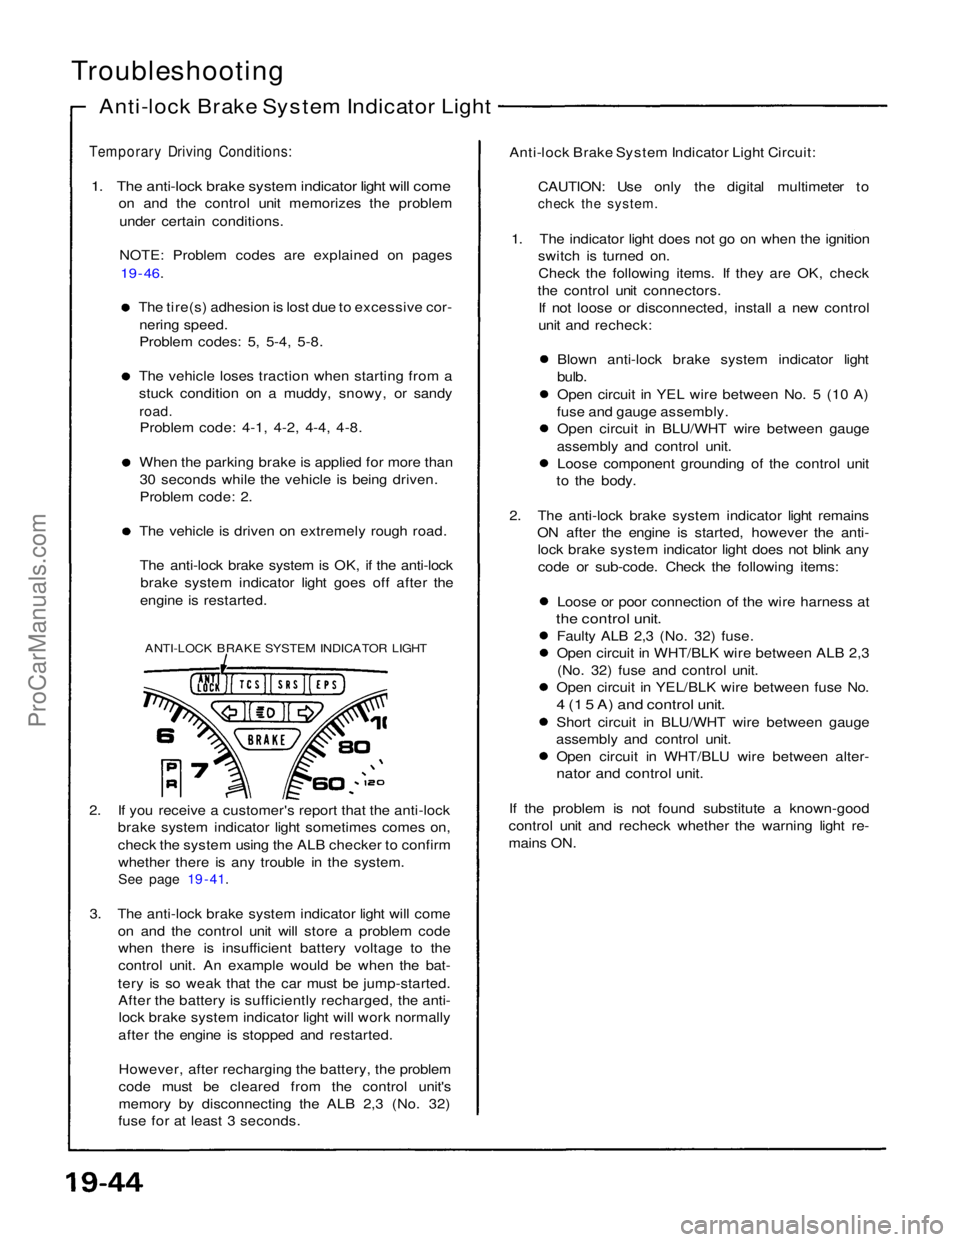
ANTI-LOCK BRAKE SYSTEM INDICATOR LIGHT
2. If you receive a customer's report that the anti-lock brake system indicator light sometimes comes on,
check the system using the ALB checker to confirm
whether there is any trouble in the system.
See page 19 - 41.
3. The anti-lock brake system indicator light will come on and the control unit will store a problem codewhen there is insufficient battery voltage to the
control unit. An example would be when the bat-
tery is so weak that the car must be jump-started. After the battery is sufficiently recharged, the anti-lock brake system indicator light will work normally
after the engine is stopped and restarted.
However, after recharging the battery, the problem
code must be cleared from the control unit's
memory by disconnecting the ALB 2,3 (No. 32)
fuse for at least 3 seconds. Anti-lock Brake System Indicator Light Circuit:
CAUTION: Use only the digital multimeter to
check the system.
1. The indicator light does not go on when the ignition switch is turned on.
Check the following items. If they are OK, check
the control unit connectors. If not loose or disconnected, install a new control
unit and recheck:
Blown anti-lock brake system indicator light
bulb.
Open circuit in YEL wire between No. 5 (10 A)
fuse and gauge assembly. Open circuit in BLU/WHT wire between gauge
assembly and control unit. Loose component grounding of the control unit
to the body.
2. The anti-lock brake system indicator light remains ON after the engine is started, however the anti-lock brake system indicator light does not blink any
code or sub-code. Check the following items:
Loose or poor connection of the wire harness at
the control unit.
Faulty ALB 2,3 (No. 32) fuse.
Open circuit in WHT/BLK wire between ALB 2,3(No. 32) fuse and control unit.
Open circuit in YEL/BLK wire between fuse No.
4 (1 5 A) and control unit.
Short circuit in BLU/WHT wire between gauge
assembly and control unit. Open circuit in WHT/BLU wire between alter-
nator and control unit.
If the problem is not found substitute a known-good
control unit and recheck whether the warning light re-
mains ON.ProCarManuals.com
Page 1570 of 1640
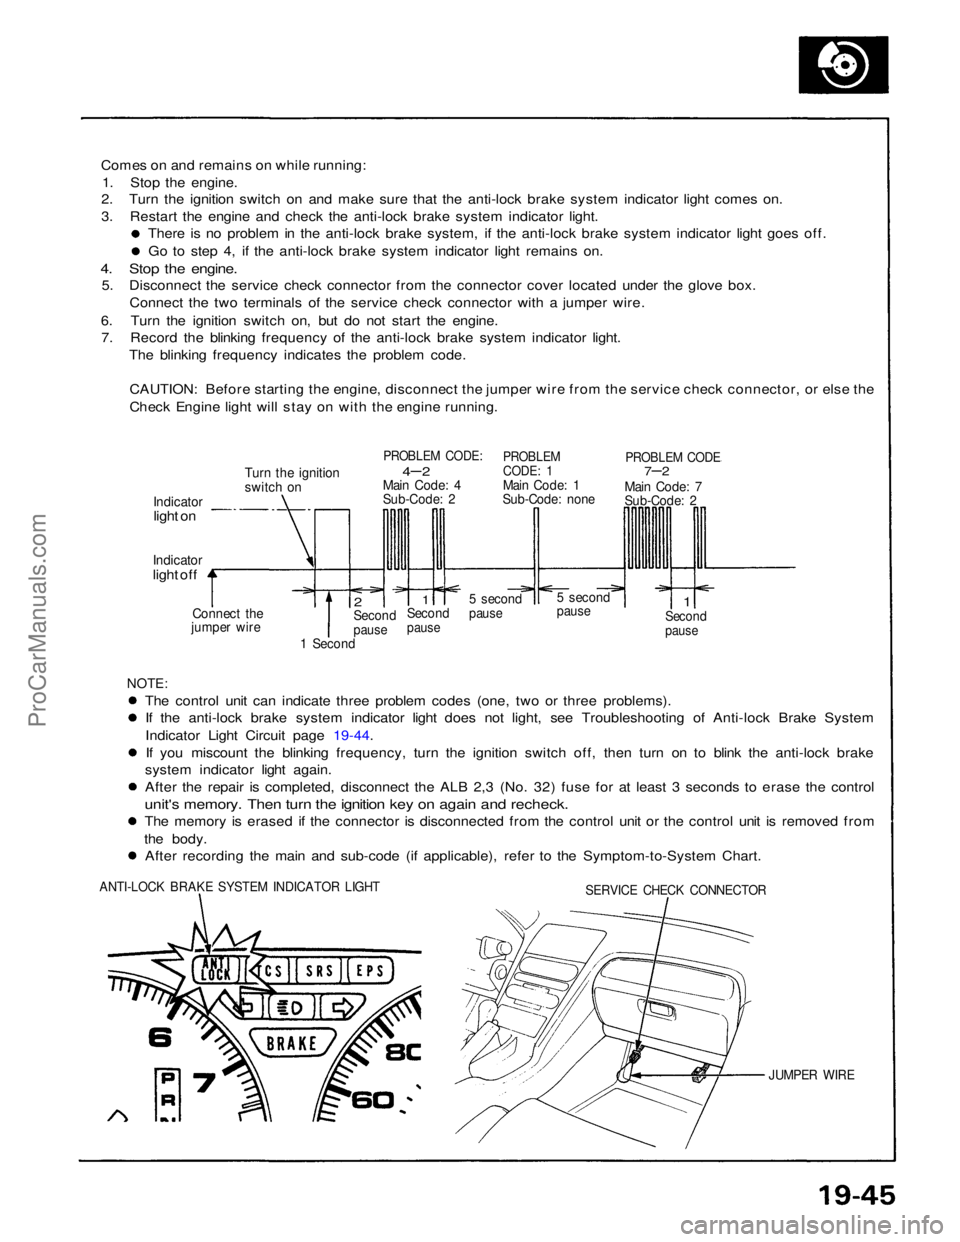
Comes on and remains on while running:
1. Stop the engine.
2. Turn the ignition switch on and make sure that the anti-lock brake system indicator light comes on.
3. Restart the engine and check the anti-lock brake system indicator light.
There is no problem in the anti-lock brake system, if the anti-lock brake system indicator light goes off. Go to step 4, if the anti-lock brake system indicator light remains on.
4. Stop the engine.
5. Disconnect the service check connector from the connector cover located under the glove box.
Connect the two terminals of the service check connector with a jumper wire.
6. Turn the ignition switch on, but do not start the engine. 7. Record the blinking frequency of the anti-lock brake system indicator light.
The blinking frequency indicates the problem code.
CAUTION: Before starting the engine, disconnect the jumper wire from the service check connector, or else the
Check Engine light will stay on with the engine running.
Turn the ignition
switch on
PROBLEM CODE:
4– 2
Main Code: 4
Sub-Code: 2
PROBLEM
CODE: 1
Main Code: 1
Sub-Code: none
PROBLEM CODE
7–2
Main Code: 7
Sub-Code: 2
Indicator
light on
Indicator
light off
Connect the
jumper wire
2
Second
pause
1
Second
pause
5 second
pause
5 second
pause
1
Second
pause
1 Second
NOTE:
The control unit can indicate three problem codes (one, two or three problems). If the anti-lock brake system indicator light does not light, see Troubleshooting of Anti-lock Brake System
Indicator Light Circuit page 19-44.
If you miscount the blinking frequency, turn the ignition switch off, then turn on to blink the anti-lock brake
system indicator light again. After the repair is completed, disconnect the ALB 2,3 (No. 32) fuse for at least 3 seconds to erase the control
unit's memory. Then turn the ignition key on again and recheck.
The memory is erased if the connector is disconnected from the control unit or the control unit is removed from
the body. After recording the main and sub-code (if applicable), refer to the Symptom-to-System Chart.
ANTI-LOCK BRAKE SYSTEM INDICATOR LIGHT
SERVICE CHECK CONNECTOR
JUMPER WIREProCarManuals.com
Page 1574 of 1640
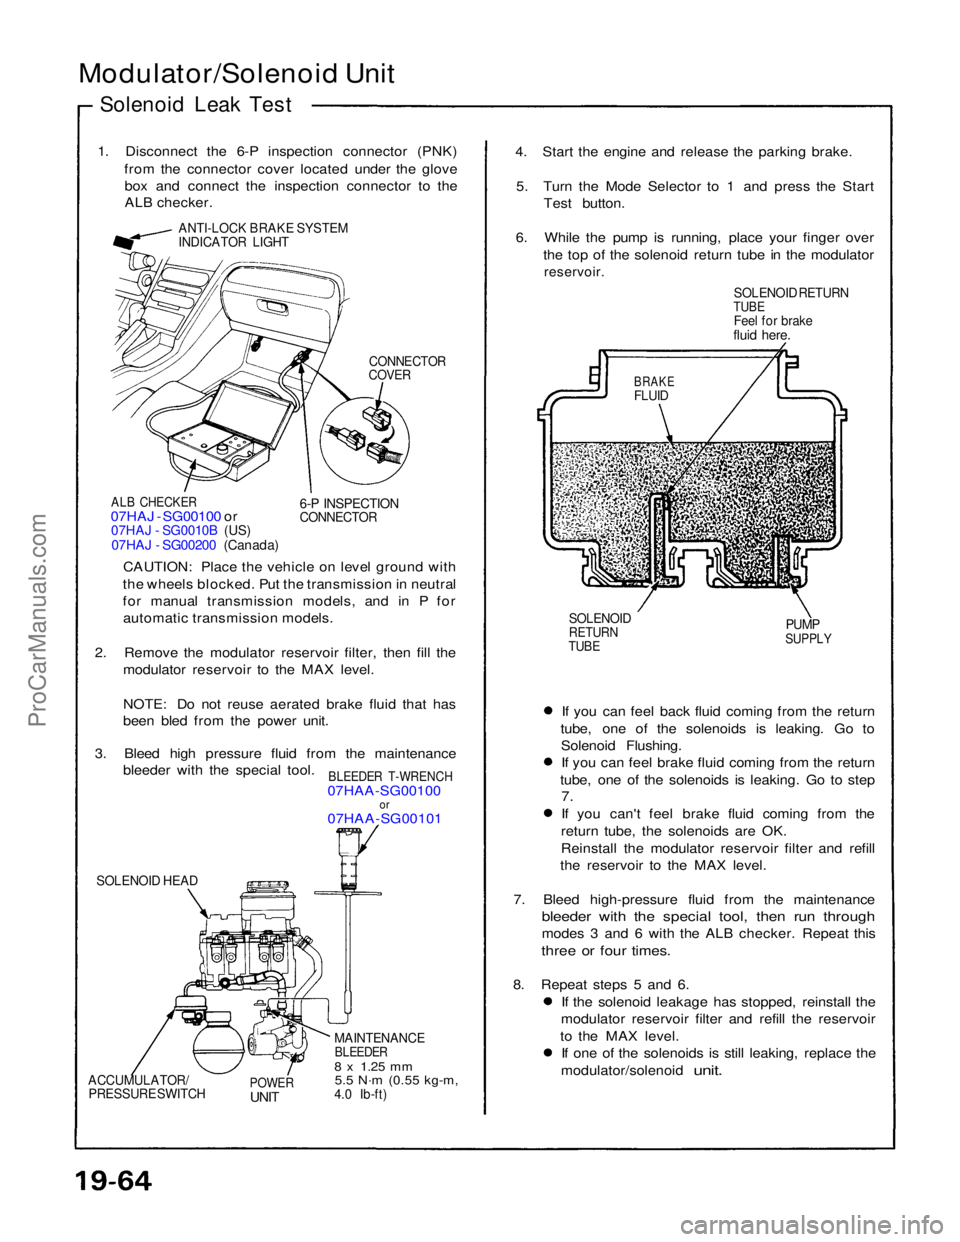
Modulator/Solenoid Unit
Solenoid Leak Test
1. Disconnect the 6-P inspection connector (PNK) from the connector cover located under the glovebox and connect the inspection connector to the
ALB checker.
ANTI-LOCK BRAKE SYSTEM
INDICATOR LIGHT
CONNECTOR
COVER
ALB CHECKER
07HAJ - SG00100 or
07HAJ - SG0010B (US)
07HAJ - SG00200 (Canada)
6-P INSPECTION
CONNECTOR
CAUTION: Place the vehicle on level ground with
the wheels blocked. Put the transmission in neutral
for manual transmission models, and in P for automatic transmission models.
2. Remove the modulator reservoir filter, then fill the modulator reservoir to the MAX level.
NOTE: Do not reuse aerated brake fluid that has
been bled from the power unit.
3. Bleed high pressure fluid from the maintenance bleeder with the special tool.
BLEEDER T-WRENCH
07HAA-SG00100
or
07HAA-SG00101
SOLENOID HEAD
MAINTENANCE
BLEEDER
8 x
1.25
mm
5.5 N·m
(0.55 kg-m,
4.0 Ib-ft)
POWER
UNIT
ACCUMULATOR/
PRESSURE SWITCH
If you can feel back fluid coming from the return
tube, one of the solenoids is leaking. Go to Solenoid Flushing.If you can feel brake fluid coming from the return
tube, one of the solenoids is leaking. Go to step
7.
If you can't feel brake fluid coming from the return tube, the solenoids are OK.
Reinstall the modulator reservoir filter and refill
the reservoir to the MAX level.
7. Bleed high-pressure fluid from the maintenance
bleeder with the special tool, then run through
modes 3 and 6 with the ALB checker. Repeat this
three or four times.
8. Repeat steps 5 and 6. If the solenoid leakage has stopped, reinstall the
modulator reservoir filter and refill the reservoir
to the MAX level. If one of the solenoids is still leaking, replace the
modulator/solenoid
unit.
SOLENOID
RETURN
TUBE
PUMP
SUPPLY
BRAKE
FLUID
SOLENOID RETURN
TUBE
Feel for brake
fluid here.
4. Start the engine and release the parking brake.
5. Turn the Mode Selector to 1 and press the Start Test button.
6. While the pump is running, place your finger over the top of the solenoid return tube in the modulator
reservoir.ProCarManuals.com
Page 1576 of 1640
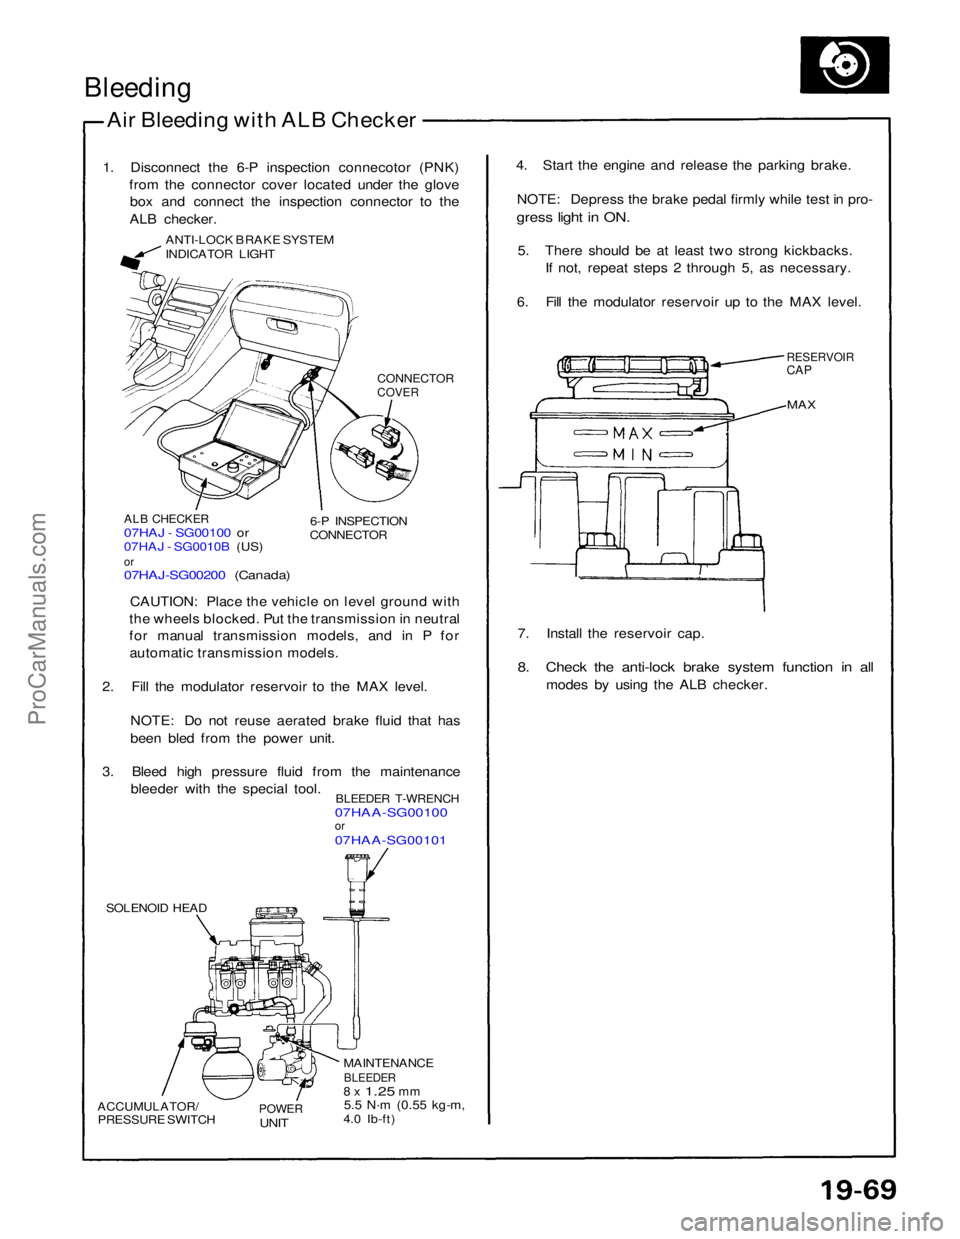
Bleeding
Air Bleeding with ALB Checker
1. Disconnect the 6-P inspection connecotor (PNK) from the connector cover located under the glovebox and connect the inspection connector to the
ALB checker.
ANTI-LOCK BRAKE SYSTEM
INDICATOR LIGHT
CONNECTOR
COVER
ALB CHECKER
07HAJ - SG00100 or
07HAJ - SG0010B (US)
or
07HAJ-SG00200 (Canada)
6-P INSPECTION
CONNECTOR
CAUTION: Place the vehicle on level ground with
the wheels blocked. Put the transmission in neutral
for manual transmission models, and in P for automatic transmission models.
2. Fill the modulator reservoir to the MAX level.
NOTE: Do not reuse aerated brake fluid that has
been bled from the power unit.
3. Bleed high pressure fluid from the maintenance bleeder with the special tool.
BLEEDER T-WRENCH
07HAA-SG00100
or
07HAA-SG00101
SOLENOID HEAD
ACCUMULATOR/
PRESSURE SWITCH
POWER
UNIT
MAINTENANCE
BLEEDER
8 x
1.25
mm
5.5 N·m
(0.55 kg-m,
4.0 Ib-ft) 7. Install the reservoir cap.
8. Check the anti-lock brake system function in all
modes by using the ALB checker.
MAX
RESERVOIR
CAP
4. Start the engine and release the parking brake.
NOTE: Depress the brake pedal firmly while test in pro-
gress light in ON.
5. There should be at least two strong kickbacks. If not, repeat steps 2 through 5, as necessary.
6. Fill the modulator reservoir up to the MAX level.ProCarManuals.com
Page 1585 of 1640
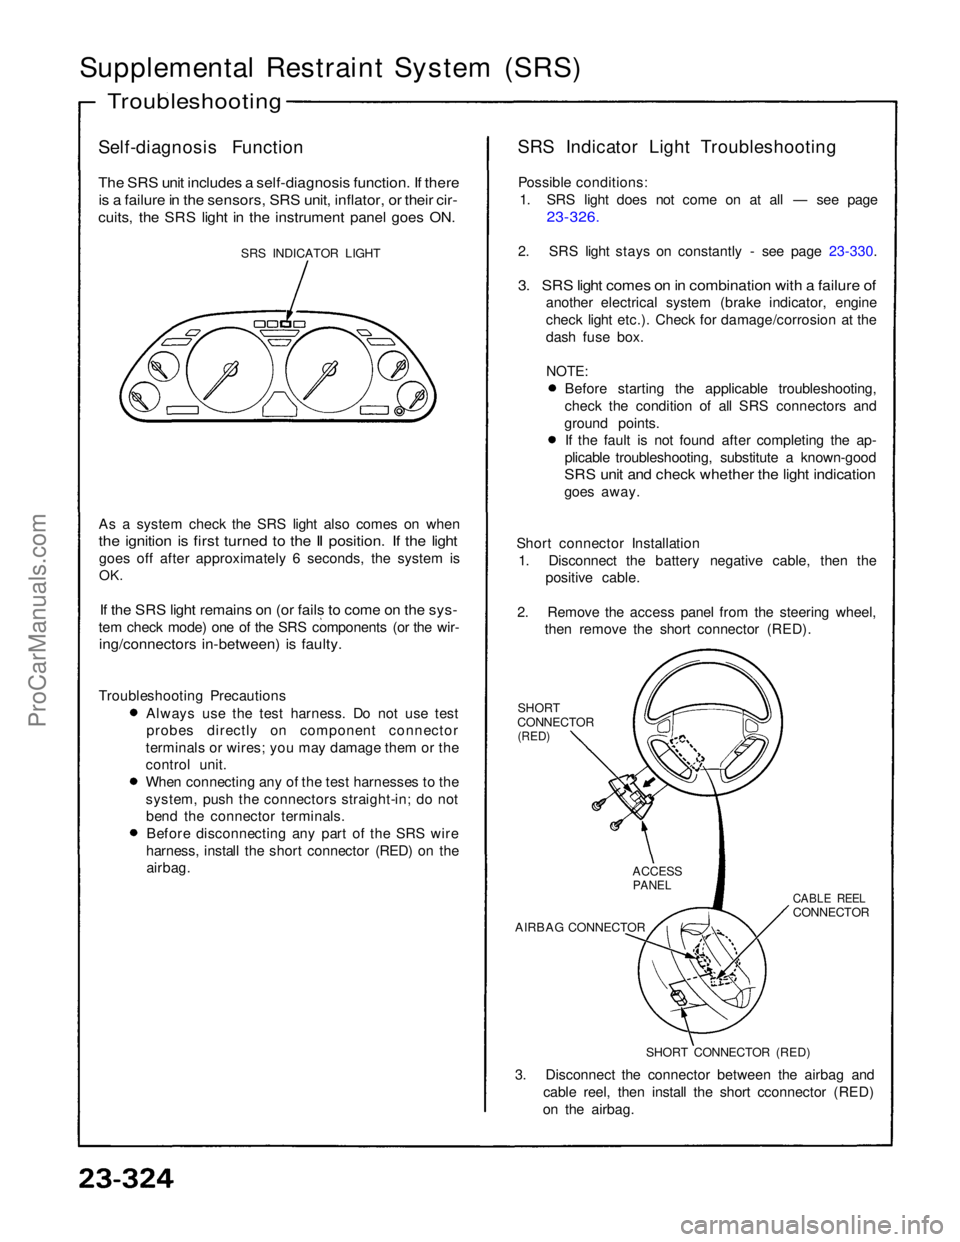
Supplemental Restraint System (SRS)
Self-diagnosis Function
The SRS unit includes a self-diagnosis function. If there
is a failure in the sensors, SRS unit, inflator, or their cir-
cuits, the SRS light in the instrument panel goes ON.
SRS INDICATOR LIGHT
As a system check the SRS light also comes on when
the ignition is first turned to the II position. If the light
goes off after approximately 6 seconds, the system is
OK.
If the SRS light remains on (or fails to come on the sys-
tem check mode) one of the SRS components (or the wir-
ing/connectors in-between) is faulty.
Troubleshooting Precautions Always use the test harness. Do not use test
probes directly on component connector
terminals or wires; you may damage them or the
control unit. When connecting any of the test harnesses to the
system, push the connectors straight-in; do not
bend the connector terminals. Before disconnecting any part of the SRS wire
harness, install the short connector (RED) on the airbag. SRS Indicator Light Troubleshooting
Possible conditions: 1. SRS light does not come on at all — see page
23-326.
2. SRS light stays on constantly - see page 23-330.
3. SRS light comes on in combination with a failure of
another electrical system (brake indicator, engine
check light etc.). Check for damage/corrosion at the
dash fuse box.
NOTE:
Before starting the applicable troubleshooting,
check the condition of all SRS connectors and
ground points. If the fault is not found after completing the ap-
plicable troubleshooting, substitute a known-good
SRS unit and check whether the light indication
goes away.
Short connector Installation 1. Disconnect the battery negative cable, then the positive cable.
2. Remove the access panel from the steering wheel, then remove the short connector (RED).
SHORT
CONNECTOR
(RED)
3. Disconnect the connector between the airbag and cable reel, then install the short cconnector (RED)
on the airbag.
Troubleshooting
SHORT CONNECTOR (RED)
AIRBAG CONNECTOR
CABLE REEL
CONNECTOR
ACCESS
PANELProCarManuals.com