1990 VOLKSWAGEN TRANSPORTER brake light
[x] Cancel search: brake lightPage 75 of 165
Downloaded from www.Manualslib.com manuals search engine
VEHICLE OPERATION
For
best roadability adjust your load to the
maximum allowed tongue load. To be sure
measure
tongue load of loaded trailer on
bathroom
scales.
Check
that
both sides of your trailer can be
seen
from the driver's seat. If necessary in
stall extended rear-view mirrors.
Check
proper working of vehicle and
trailer lights.
Check
cold
tire
pressure of both vehicle
and
trailer.
Be
sure trailer safety chains are properly
connected
from trailer to the hitch on the
vehicle.
Leave enough slack in the chains
to permit turning corners.
Trailer
towing
tips
Your
vehicle handles differently when tow ing a trailer because of the additional
weight. Safety, performance and economy
will greatly depend on how carefully you
load
your trailer and operate your "rig."
Before
you actually tow your trailer, prac
tice turning, stopping and reversing in an
area
away from
traffic
until
you learn the
feel of your vehicle and trailer
unit.
Reversing
is
difficult
and requires practice.
Steering
while reversing is generally oppo
site of
that
when backing your vehicle with
out a trailer.
Observe
speed limits. In some areas
speeds
for vehicles towing trailers are lower than for regular vehicles.
Maintain a greater distance between your
vehicle
and the one in
front.
You will need more room to stop.
When
passing remember
that
you cannot
accelerate
as fast as you normally would
because
of the added load. Make sure you
have
enough room to
pass.
After passing
allow plenty of room for your trailer before
changing
lanes again.
Avoid
jerky starts or sudden acceleration.
Slow
down in crosswinds and on rougi"
roads.
Be especially carefull when
pas
sing
other vehicles and trucks.
When
parking always block the wheels o: both vehicle and trailer. Do not park
with
a
trailer on a slope. If it cannot be avoided dc
so
only after the following:
• Apply brakes.
• Have someone place wheel blocks
under both vehicle and trailer wheels.
• With wheel blocks in place slowly re
lease
brakes
until
wheel blocks absorb the
load.
• Apply parking brake.
•
Place
transmission in
"P"
for automatic
or in
first
or reverse gear for manual trans
mission.
74
www.westfaliaT3.info - a useful website for owners and enthusiasts of VW Westfalia T25 / T3 Campervans
Page 86 of 165
Downloaded from www.Manualslib.com manuals search engine
VEHICLE OPERATION
I'iving
off-road on Steep Inclines
I Sidehills
Before reviewing how to drive up steep
• s and along sidehills, make note of an -oortant point. If you don't make it to the
co.
or your vehicle is about to slide or roll
= :eways,
turn
off the engine, put it
into
I
'3t
gear, put on the parking brake and get
W
on the uphill side and walk down. An
:^nce
of prevention is
worth
a pound of i.re.
Steep
Inclines
When preparing to climb a steep incline,
first
find out whether you can make it. If
necessary,
walk the course. Be sure there
is
enough clearance on all sides of the ve
hicle to avoid damage. If you have the
slightest doubt don't try it! It is always a
good idea to make a
trial
run to get the feel
of the surface and how much
effort
is
needed.
Go straight uphill. When the tires
begin to
spin,
apply a
little
extra gas and let
them dig in slightly. Step on the brakes
while you shift
into
reverse and drive straight back down. That's
right
- in re
verse
gear, clutch out and driving.
Abso
lutely not in neutral and
trying
to let your
self down on the brakes. To avoid sideroll remember never
turn
your vehicle
side
ways on a hill or steep incline.
On
your attempt, give yourself a running
start. Accelerate to the hill and then,
just
as
you approach the top,
ease
off the gas
to slow down.
When driving down, keep the vehicle heading straight downhill in low gear and
under control. If it begins to slide, don't lock up the brakes. You can't steer a
skid
ding wheel. Touch the gas instead to
straighten your car out.
www.westfaliaT3.info - a useful website for owners and enthusiasts of VW Westfalia T25 / T3 Campervans
Page 89 of 165
Downloaded from www.Manualslib.com manuals search engine
VEHICLE OPERATION
After driving over
difficult
terrain,
espe
cially through water or mud, the following
is
important:
• Disengage the differential lock*.
• After long drives through deep mud, the
brakes must be checked and cleaned if
they are
dirty.
This will prevent damage to
the brakes and premature wear.
• After driving through deep water, take
out oil dipstick and check to see whether
there are drops of water on the dipstick or if the oil level has risen. In
that
case,
the oil
must be changed immediately.
• If during an off-road drive the vehicle
has
become stuck (dug its way
into
the
ground) or the underside was stuck by
rocks
or similar, check undercarriage,
brake lines and oil pan for damage. • The engine compartment and vehicle
underbody must be cleaned if they are
very
dirty
so
that
the function of all mova ble and electrical/electronic parts is main
tained.
•
Clean
heavy soil from wheels and tires,
check
tires for damage or foreign objects in treads.
•
Clean
turn
signals, lights and license
plate.
• Dry brake system by driving a short dis
tance
with
brake pedal slightly depressed.
This
will help regaining normal braking ac
tion
and help prevent the possibility of the
vehicle pulling to one side while braking.
Performance
testing
If the
Vanagon/Transporter
Syncro re
quires
testing
on a
dynamometer
(en
gine
output
analysis and
brake
test)
the
transaxle
drive
shaft
must
be discon nected.
The
differential
lock
must
not be en gaged.
84 "where applicable
www.westfaliaT3.info - a useful website for owners and enthusiasts of VW Westfalia T25 / T3 Campervans
Page 95 of 165
Downloaded from www.Manualslib.com manuals search engine
VEHICLE
CARE
EXTERIOR
Washing
and
waxing
The
paint on your Volkswagen is very dura ble but must be protected
from
losing its
luster due to outside influences. There
fore, wash and wax your Volkswagen
often. The longer the
dirt
is
left
on the paint, the greater the risk of damaging the
glossy
finish, either by scratching if the
dirt
is
rubbed
into
the paint, or simply by the
chemical
effect
dirt
particles have on the paint surface.
Do not
wash
or wax in
direct
sunlight,
or
when
the
sheet
metal
is hot. Do not use hot
water.
Lukewarm
to cool
water
is
kinder
to the
paint.
WARNING
•
Do not
wash,
wax or dry the
vehicle
with
the
engine
running.
•
Do not
clean
the
underside
of chas
sis,
fenders,
wheel
covers, etc.,
without
protecting
your
hands
and
arms.
You
may cut
yourself
on
sharp-edged
metal
parts.
•
Moisture,
ice and
road
salt
on
brakes
may
affect
braking
efficiency.
Test
the
brakes
carefully
after
each
vehicle
wash.
Do
not aim the water jet directly at door,
hatch or rear lid locks. Tape the key holes
to prevent water
from
seeping
into
the lock
cylinders.
Water in lock cylinders should be removed
with
compressed air. To pre
vent locks
from
freezing in the winter, squirt glycerine or lock de-icer
into
the lock
cylinders.
Do not use any
solution
that
can
damage
the
body
paint.
Use
plenty of water, a car-wash and wax
solution and a soft sponge or hose brush.
Begin
by spraying water over the dry sur
face
to remove all loose
dirt
before apply ing the car-wash and wax solution. Use
plenty of water to rinse the vehicle off.
Wipe
everything dry
with
a chamois to avoid water spots.
When
having your vehicle washed at an automatic car
wash,
be sure to observe all
the precautions suggested by the
esta
blishment.
The
underside of the vehicle picks up d ~
and road salt. To guard against corrosic it is important to remove mud, debris a":
road salt
from
the underside
with
i
powerful jet of water. Be sure to include t"
wheel housings, bumpers, muffler, tailp :- and brackets. This should be done twice
year
and is best accomplished after the \ hide has been driven through a hea
rain.
Let engine and exhaust cool do,"
before washing.
Waxing
is not really needed when y:.
have
used a car-wash and wax solution
you do not use a car-wash liquid
with
wa^ apply wax to preserve the natural shine :
the body paint. To obtain a long last-:
finish,
apply hard wax. Wax again whe
water remains on the surface in lar:-
patches
instead of forming beads a": rolling off.
This
will
make
dirt
easier to remove e :
will
prevent the paint
from
being damage:
from
industrial dust, tree sap or bird drz~-
pings.
Use
a polish when it becomes evident tha:
waxing no longer accomplishes the jot
the polish you are using does not conta
wax, apply hard wax after polishing.
www.westfaliaT3.info - a useful website for owners and enthusiasts of VW Westfalia T25 / T3 Campervans
Page 97 of 165
Downloaded from www.Manualslib.com manuals search engine
VEHICLE
CARE
Weatherstrips
Keep silicone sprays
off the
windshield
to avoid wiper smear
in
rain.
To seal properly, weatherstrips around
hood,
hatch, windows, doors,
etc.,
must
be pliable. Spray with silicone
or
coat with
talcum powder
or
glycerine
to
retain
flexibility
of the
rubber
and to
protect against freezing
in the
winter.
Sliding roof quide rails
To assure that
the
sliding roof* function properly, clean
the
guide rails
and
lubri
cate with silicone spray
at
least once
a
year.
See
your Volkswagen dealer
for
cor rect procedures
and
lubricant.
Dull finishes and plastics
Plastic parts, such
as
light bulb lenses,
decorative stripes, panels, bumpers,
etc.,
will come clean with regular washing. Should additional cleaning
or
spot
re
moval
be
necessary,
use a
soft brush
or
cloth soaked with
a
mild detergent
solu
tion.
Then rinse thoroughly
and im
mediately with clear water.
Do not use anything which could mar the
plastic
or
dull finished surface, such
as
wax, polish, abrasive detergents
or
chemical cleaning solvents.
Sliding door
The sliding door mounting points,
the
guide tracks
and the
roller guides should be lubricated regularly
and as
often
as
necessary.
Bright metal trim
Bright
or
black anodized trim will come
clean with regular washing.
To
protect metal
trim,
use car
wax. Remove spots
or
dirt from chrome
and
stainless steel with
a
chrome cleaner. Apply
a
chrome polish
for
continued luster and protection.
Steel wheels
Always include
the hub
caps
and
whee rims when washing your vehicle
to
remove
road dirt, salt sprays and brake dust.
If
nec
essary,
use a
commercial wheel cleaner
t:
remove accumulated brake dust. Pain:
scratches should
be
touched
up to
prever
corrosion.
Light alloy wheels
To preserve
the
decorative appearance
c-
the light aluminium cast, some specie
care
is
necessary.
In
addition
to
road
dr
and salt sprays, brake metal dust
is
alsc
corrosive.
If
left
on too
long,
brake meta
dust
can
cause pitting. Wash
the
wheels
with
a
sponge
or
hose brush every othe-
week. Road salt should
be
remove:
weekly with
an
acid free cleaning solutior Every three months (after regular clear
ing)
the
wheels should
be
coated
wit-
petroleum jelly
or car
wax.
Rub it in
firml.
with
a
soft cloth. Never
use
abrasive
c
metal polishing cleaning agents.
Remember that moisture,
ice and
roac
salt
on
brakes
may
affect braking
eff
ciency. Test
the
brakes carefully afte'
each washing. Heed warning
on
page
29.
92
*
where applicable
www.westfaliaT3.info - a useful website for owners and enthusiasts of VW Westfalia T25 / T3 Campervans
Page 113 of 165
Downloaded from www.Manualslib.com manuals search engine
VEHICLE CARE
BRAKE FLUID 3 ATT
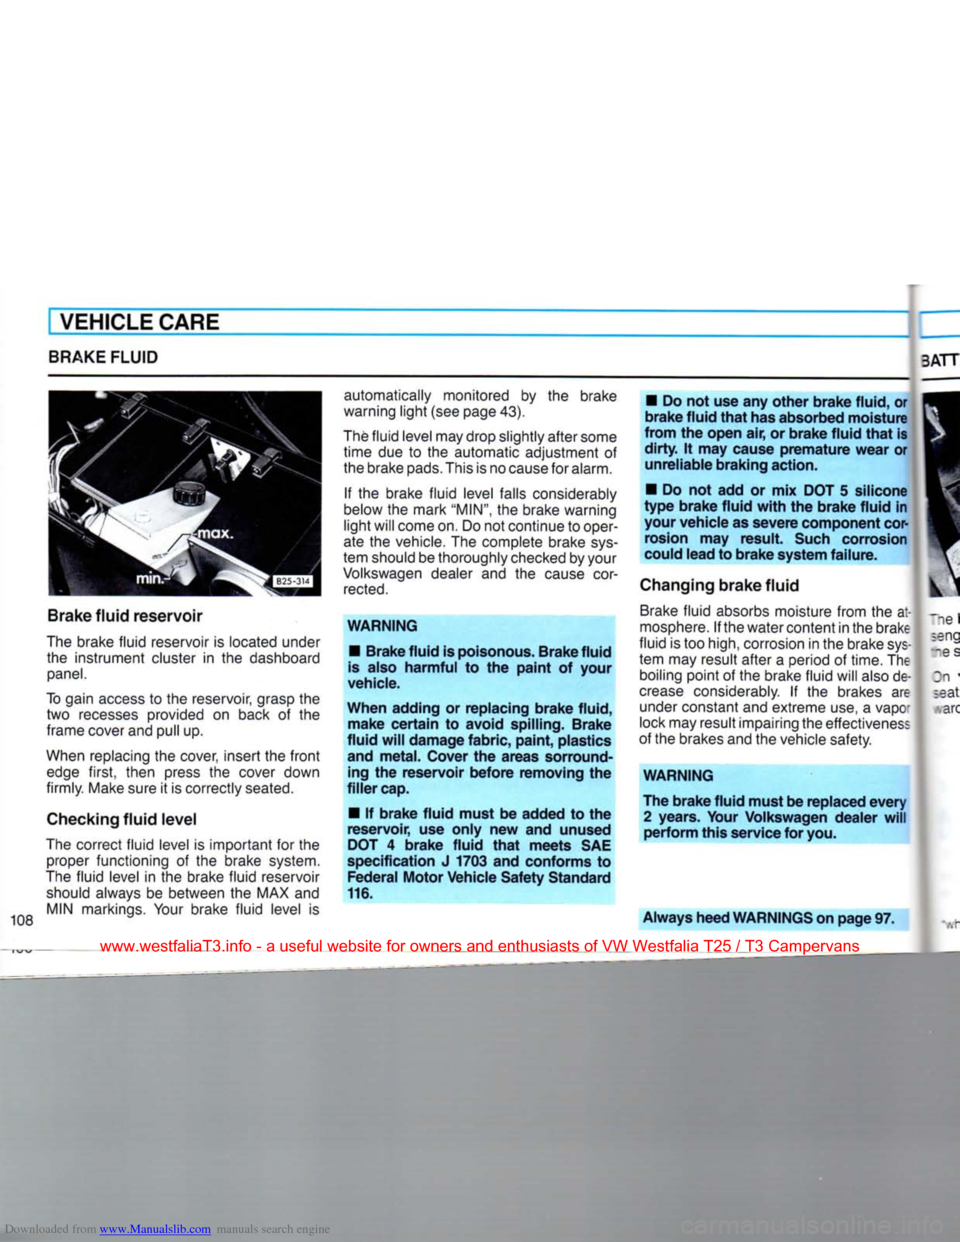
108 Brake fluid reservoir
The brake fluid reservoir is located under the instrument cluster in the dashboard
panel.
To gain access to the reservoir, grasp the two recesses provided on back of the frame cover and pull up.
When replacing the cover, insert the front edge first, then press the cover down
firmly. Make sure it is correctly seated.
Checking fluid level
The correct fluid level is important for the proper functioning of the brake system.
The fluid level in the brake fluid reservoir should always be between the MAX and MIN markings. Your brake fluid level is automatically monitored by the brake
warning light (see page 43).
The fluid level may drop slightly after some time due to the automatic adjustment of
the brake pads. This is no cause for alarm.
If the brake fluid level falls considerably
below the mark
"MIN",
the brake warning
light will come on. Do not continue to oper
ate the vehicle. The complete brake sys
tem should be thoroughly checked by your
Volkswagen dealer and the cause cor
rected.
WARNING • Brake fluid is poisonous. Brake fluid
is also harmful to the paint of your
vehicle.
When adding or replacing brake fluid, make certain to avoid spilling. Brake
fluid will damage fabric, paint, plastics and metal. Cover the areas sorround-ing the reservoir before removing the
filler cap.
• If brake fluid must be added to the
reservoir, use only new and unused
DOT 4 brake fluid that meets SAE
specification J 1703 and conforms to Federal Motor Vehicle Safety Standard
116.
• Do not use any other brake fluid, or
brake fluid that has absorbed moisture
from the open air, or brake fluid that is
dirty. It may cause premature wear or unreliable braking action.
• Do not add or mix DOT 5 silicone
type brake fluid with the brake fluid in your vehicle as severe component corrosion may result. Such corrosion
could lead to brake system failure.
Changing brake fluid Brake fluid absorbs moisture from the at
mosphere. If the watercontent in the brake
fluid is too high, corrosion in the brake sys
tem may result after a period of time. The boiling point of the brake fluid will also de
crease considerably. If the brakes are under constant and extreme use, a vapc
lock may result impairing the effectiveness
of the brakes and the vehicle safety. -e s
Dn seat arc
WARNING
The brake fluid must be replaced every 2 years. Your Volkswagen dealer will perform this service for you.
Always heed WARNINGS on page 97.
www.westfaliaT3.info - a useful website for owners and enthusiasts of VW Westfalia T25 / T3 Campervans
Page 122 of 165
Downloaded from www.Manualslib.com manuals search engine
VEHICLE
CARE
General notes
The original equipment tires
and
wheel
rims
on
your
vehicle comply with
all
applicable
Federal Motor Vehicle Safety
Standards.
If you
wish
to
equip
your
vehicle with tires
or wheels other than those installed
at the
factory, please note
the
following:
•
If
you plan
to
install other than the
ori
ginal
equipment tires
and
wheel rims,
ask
your
Volkswagen dealer.
•
For
technical reasons
it is not
possi
ble
in
every
case
to use
wheels from
other vehicles
-
under certain condi
tions
not
even wheels from
the
same
vehicle
model.
•
Wheel rims
and
wheel bolts
or lug
nuts are matched to fit
your
Volkswagen.
•
When installing different wheels
(for
example,
wheels with winter tires),
the
correct wheel bolts
or
lug nuts with
the
proper length
and
conical shape must
be used. The secure fit of the wheels and
the proper functioning
of the
brake system are dependent upon this.
•
Using tires and/or wheels which have
not been approved
by
the manufacturer
for
your
vehicle
type
can be detrimental
to vehicle safety.
•
If
wheel trim discs
or a
front
spoiler
are
installed,
make
sure the airflow for cooling
the brakes
is not
obstructed.
•
Before
you
plan
on
exchanging steel
wheels, light alloy wheels,
or
snow tires
already mounted on wheel rims, consult
your
Volkswagen dealer. He has the tech
nical
information necessary
to
advise
you which wheel rims and wheel bolts
or
lug
nuts are compatible with the original
factory installations.
WARNING
•
The
use of the wheel rims and wheel
bolts
or
lug nuts that do not meet
speci
fications
of the
original factory
install
ed equipment will affect the safe oper
ation
of
your
vehicle and may cause an
accident and personal
injury.
Tire specifications
Tire
specifications
are
imprinted
on the
sidewall
of
the tires.
If in
doubt, check with
your
Volkswagen dealer.
All
passenger car and some light trucks tires must conform
to
Federal Safety
Requirements
in
addition
to
these
grades.
Treadwear
The treadwear grade
is a
comparative
rating
based
on the
wear rate
of the
tire
when tested
on a
government test course. For example,
a
tire graded
150
would wear
one
and a
half
(IV2)
times
as
well
as a
tire
graded 100.
The
relative performance
of
tires depends
on
actual conditions
of use,
however,
and may
depart significantly
from
the
norm
due to
variations
in
driving
habits,
service practices
and
differences
in road characteristics and
climate.
Traction A, B, C
The traction grades, from highest
to
lowest,
are A, B and C and
represent
the
tire's ability
to
stop
on wet
pavement
as
measured
on
government test surfaces
of
asphalt
and concrete. Atire marked
C
may
have poor traction performance.
www.westfaliaT3.info - a useful website for owners and enthusiasts of VW Westfalia T25 / T3 Campervans
Page 130 of 165
Downloaded from www.Manualslib.com manuals search engine
HANGING
AWHEEL
DO-IT-YOURSELF-SERVICE
WARNING
•
If you have a flat tire, move a safe
distance
off the road.
Turn
off the
engine, the emergency flasher on and use other warning devices to alert
other motorists.
•
Passengers must not remain in the
vehicle when it is
jacked
up.
•
Make
sure that passengers wait in a
safe
place away from the vehicle and
well
away
from
the roadway
and
traffic.
•
Before you change a wheel, be sure
the ground is level and
firm.
If neces
sary, use
a
board under the jack.
•
Set the parking brake and block the
wheel opposite the defective wheel on
the other side of the vehicle. Engaging
a
gear or placing the Automatic trans
mission
selector lever in P (Park)
posi
tion is not a substitute for fully setting
the parking brake.
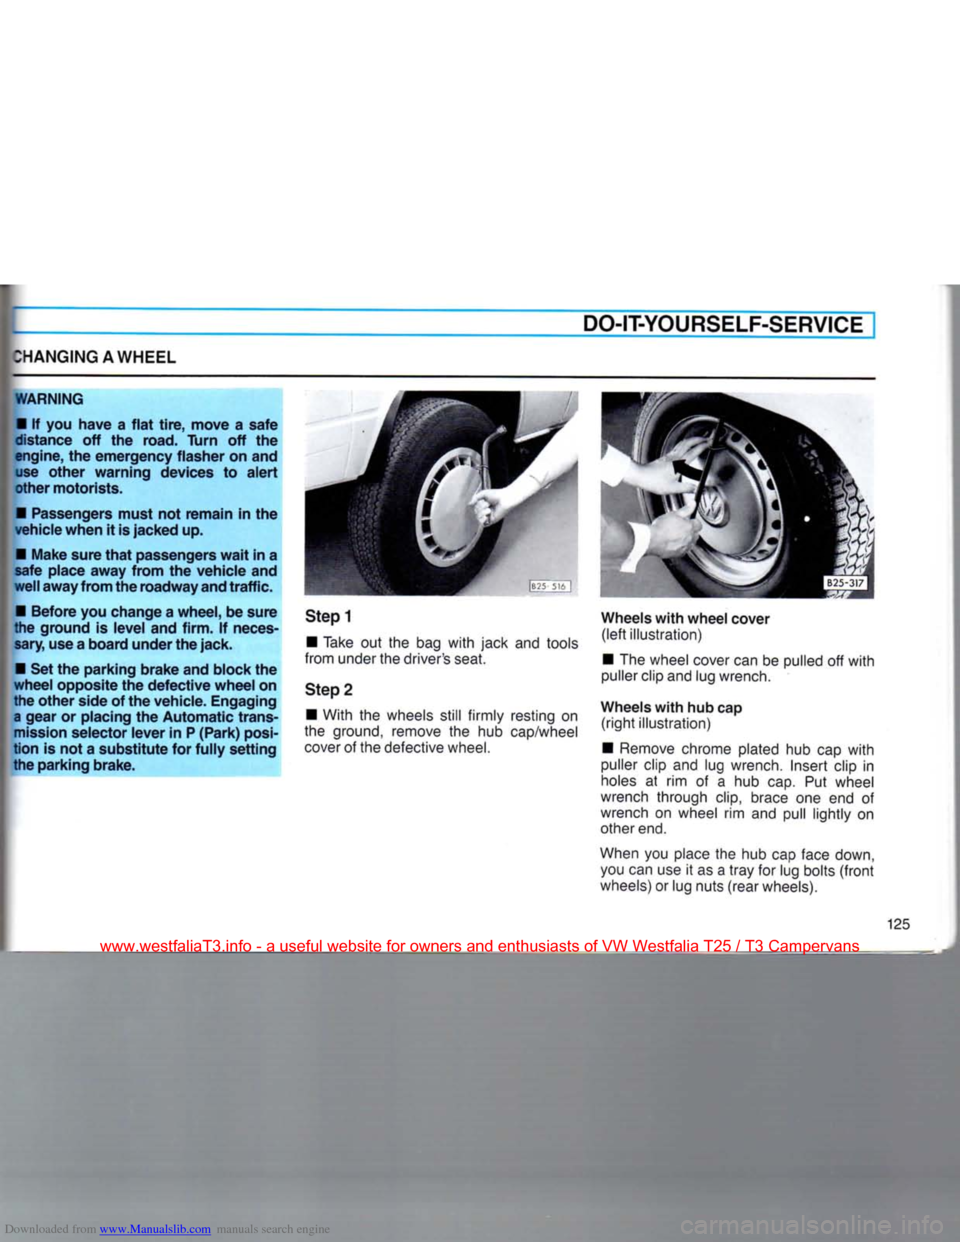
Stepl
•
Take out the bag with jack and tools
from under the driver's seat.
Step 2
•
With the wheels
still
firmly resting on
the ground, remove the hub cap/wheel
cover of the defective wheel. Wheels with wheel cover
(left
illustration)
•
The wheel cover can be pulled off with
puller clip and lug wrench.
Wheels with hub cap
(right
illustration)
•
Remove chrome plated hub cap with
puller clip and lug wrench.
Insert
clip in
holes at rim of a hub cap. Put wheel
wrench through
clip,
brace one end of
wrench on wheel rim and pull lightly on
other end.
When you place the hub cap face down, you can use it as a
tray
for lug bolts
(front
wheels) or lug nuts
(rear
wheels).
125
www.westfaliaT3.info - a useful website for owners and enthusiasts of VW Westfalia T25 / T3 Campervans