Page 129 of 165

Downloaded from www.Manualslib.com manuals search engine
DO-IT-YOURSELF-SERVICE
SPARE
WHEEL
The
spare wheel is located underneath the floor panel of the driver cab, where it rests on a hinged metal plate.
• To take out the spare wheel, remove
the bolt (curved arrow) from the holding bracket
with
wheel wrench,
WARNING
Keep hands and
arms
away
from
under-
body of vehicle.
• Stand in
front
of the vehicle and pull the
catch
hook (arrow) forward to let the metal
plate drop.
•
Pull
out the spare wheel. • When re-installing the spare wheel,
slide
spare wheel onto metal plate.
•
Give
the plate a hard upward push and
make
sure the catch hook is securely
engaged.
•
Replace
bolt and tighten firmly.
WARNING
Never
drive
the
vehicle
without
a
firmly
tightened
bolt
on the holding
bracket.
Should the catch
hook
disengage acci
dentally,
you could lose
control
of the
car.
Check
the inflation pressure periodically to
keep
the
tire
ready for use.
WARNING
Under
no circumstances should you
store
the spare
wheel
unsecured in the
luggage
compartment.
This coulc
cause serious personal
injury
to pas
sengers in the
vehicle
in case of a coll -
sion.
www.westfaliaT3.info - a useful website for owners and enthusiasts of VW Westfalia T25 / T3 Campervans
Page 130 of 165

Downloaded from www.Manualslib.com manuals search engine
HANGING
AWHEEL
DO-IT-YOURSELF-SERVICE
WARNING
•
If you have a flat tire, move a safe
distance
off the road.
Turn
off the
engine, the emergency flasher on and use other warning devices to alert
other motorists.
•
Passengers must not remain in the
vehicle when it is
jacked
up.
•
Make
sure that passengers wait in a
safe
place away from the vehicle and
well
away
from
the roadway
and
traffic.
•
Before you change a wheel, be sure
the ground is level and
firm.
If neces
sary, use
a
board under the jack.
•
Set the parking brake and block the
wheel opposite the defective wheel on
the other side of the vehicle. Engaging
a
gear or placing the Automatic trans
mission
selector lever in P (Park)
posi
tion is not a substitute for fully setting
the parking brake.
Stepl
•
Take out the bag with jack and tools
from under the driver's seat.
Step 2
•
With the wheels
still
firmly resting on
the ground, remove the hub cap/wheel
cover of the defective wheel. Wheels with wheel cover
(left
illustration)
•
The wheel cover can be pulled off with
puller clip and lug wrench.
Wheels with hub cap
(right
illustration)
•
Remove chrome plated hub cap with
puller clip and lug wrench.
Insert
clip in
holes at rim of a hub cap. Put wheel
wrench through
clip,
brace one end of
wrench on wheel rim and pull lightly on
other end.
When you place the hub cap face down, you can use it as a
tray
for lug bolts
(front
wheels) or lug nuts
(rear
wheels).
125
www.westfaliaT3.info - a useful website for owners and enthusiasts of VW Westfalia T25 / T3 Campervans
Page 131 of 165

Downloaded from www.Manualslib.com manuals search engine
DO-IT-YOURSELF-SERVICE
Step
3
•
Loosen
wheel
nuts or bolts counter
clockwise
about one turn with the lug
wrench.
Do not yet remove the nuts or
bolts.
To
loosen
- turn
counterclockwise
To
tighten - turn
clockwise
Step
4
There
are two jack ports on
each
side
under
the car
body
for front and
rear
wheel
changing
- see right illustration. [
B25-3)9|
WARNING
•
Mounting the jack at any other place
may damage the car or may result in
personal
injuries.
•
Provide a firm a base for the jack on
the ground. If
necessary,
use a board.
•
Securely
insert the jack into the jack
port
closest
to the
wheel
to be
changed.
•
Before
inserting jack,
clear
jack port.
•
Place
jack as straight as
possible,
as
shown.
Step
5
Never jack the vehicle up by the bu~
per or body.
Do
not raise the vehicle until you are
sure
the jack is securely engaged.
Passengers
must not remain in the
vehicle when jacked up.
•
Make sure
that
passengers
wait
in z
safe place away from the vehicle arc
well
away from the roadway and traffic
•
To raise the
vehicle,
turn the
har:T
clockwise.
Only
raise
the
vehicle
as
much
as
needed
to
change
a
wheel.
Step
6
WARNING Before installing the spare wheel, acc-
mulated road
dirt
must be remove:
from the inside and outside of the
wheel nut/bolt holes to assure a secure mount on front hub or rear drum.
126
www.westfaliaT3.info - a useful website for owners and enthusiasts of VW Westfalia T25 / T3 Campervans
Page 132 of 165

Downloaded from www.Manualslib.com manuals search engine
DO-IT-YOURSELF-SERVICE
• Fully unscrew wheel nuts or bolts and
dace
them into the hub cap. Take the top
nut or bolt off last.
Place
the spare wheel against the wheel hub and slightly rotate
:he wheel until a bolt hole in the wheel is in ine
with
a threaded stud in the wheel hub.
Reinstall
nuts or bolts and tighten them
crosswise
by hand before jacking the car
down.
Step
7 • To
lower
the vehicle,
turn
the handle
counterclockwise.
Step
8
• Then go crosswise from one nut or bolt
to another tightening them firmly
with
the lug wrench.
• Correct
tightness
of the
wheel
nuts
is
important.
• Correctly tightened nuts or bolts should
have
a torque of 130 ft lb/180 Nm. This
tor
que can be obtained
with
the lug wrench by any person of average strength. If in
doubt about the correct tightness of the
wheel nuts, have them checked
with
a
tor
que wrench by your dealer or at service
station.
Step
9
• To install the hub cap, place it around
the lower part of the wheel center. With a
firm
blow of your hand on the upper part,
the hub cap will snap into place. Make sure it is firmly seated.
Step
10 • Fully lower the vehicle and remove
jack.
• Correct the air pressure of the
tire
you
have
just
put on. For correct
tire
inflation
pressures,
see the sticker on the
left
door-
jamb.
• Store the jack and tools under the
driver's seat.
• Store damaged
tire
in spare wheel
metal plate under
front
of vehicle.
• Engage lock for metal plate and firmly
secure
plate
with
bolt.
• Have
flat
tire
repaired and replaced
promptly.
127
www.westfaliaT3.info - a useful website for owners and enthusiasts of VW Westfalia T25 / T3 Campervans
Page 133 of 165

Downloaded from www.Manualslib.com manuals search engine
DO-IT-YOURSELF-SERVICE
FUSES
A
failure in the electrical system may be
caused
by a burned fuse.
Fuses
are arranged in one centralized
unit.
The
unit
is located on the
left
side under the dashboard behind a cover.
Removing
cover:
Detach cover at
front,
swing downwards
and take it off.
Installing
cover:
Hang
cover in the eyes of fuse box
bracket, swing it upwards and press it
firmly
into
position.
Replacing
a
fuse
Before
replacing
a fuse,
turn
off all
lights
and accessories and
remove
the
ignition
key to
avoid
damaging
the
electrical
system.
• Consult the fuse listing on the following
page to
find
out which fuse belongs to the
component
that
has failed.
• Remove blown fuse
with
the plastic clip
located on cover in
front
of fuse box.
Three spare fuses can be attached to the
bottom
of the fuse panel. It is good planning to keep a supply of spare fuses on
hand.
They are available at your Volks
wagen dealer.
• Replace the blown fuse which can be
recognised by the
burnt
metal strip,
with
a
fuse of equal ampere rating. If a
fuse
blows
repeatedly,
do not
keep
or
replacing
it. The cause of the
short
cir
cuit
or
overload
must
be found. On nc
account
should fuses be
patched
up
with
tin
foil
or
wire
as
this
may cause serious
damage
elsewhere
in the
electrj
cal
circuit
or cause a
fire.
WARNING
Do not use a
fuse
of
higher
amperage,
because
this
could
damage
the
elec
trical
part
and
fire
can
result.
128
www.westfaliaT3.info - a useful website for owners and enthusiasts of VW Westfalia T25 / T3 Campervans
Page 134 of 165

Downloaded from www.Manualslib.com manuals search engine
DO-IT-YOURSELF-SERVICE
Fuse arrangement No. Component Amp. No. Component Amp.
From left to right: 1
Radiator fan 30 17 Windshield wiperengine 10
2 Brake lights 10
18 Brake warning light,
3 Interior lights, illuminated heated driver's seat,
Make-up mirror, clock,
ciga
cruise control system 10
rette lighter, radio 15 19 Turn signals 10
4 Emergency flasher system 15 20 Number plate light,
5 Vacant headlight washer
10
6 Vacant 21 Low beam left
10
7 Tail and side light left 10
22 Low beam right 10
8 Tail and side light right
10
9 High beam right 10
10 High beam left
10 Additional fuses
11 Windshield wipers and washer
15 (in separate holders)
12 Cruise control system
Air conditioner, power above the fuse box:
windows, auxiliary heater, Instrument lightning
10
electric outside mirrors, Overheating fuse for auxiliary heater
10
auxiliary heat exchanger, Main fuse for auxiliary heater
20
rear window wiper 20 Central locking 20
13 Fresh air fan
20 Automatic fuse for window lifter
20
14 Rear window heating, heated
rear view mirror, light for Color codes
15
16 lighting switch
Back-up lights
Double tone horn 20
10
15 10 Amp. fuses - red
15 Amp. fuses - blue
15
16 lighting switch
Back-up lights
Double tone horn 20
10
15 20 Amp. fuses - yellow
30 Amp. fuses - green
The number on the face of the fuse is the amperage rating.
www.westfaliaT3.info - a useful website for owners and enthusiasts of VW Westfalia T25 / T3 Campervans
Page 135 of 165

Downloaded from www.Manualslib.com manuals search engine
DO-IT-YOURSELF-SERVICE
REPLACING BULBS
Before starting to replace a bulb, switch off
the respective circuit.
Do not touch the glass part of the new bulb
with bare fingers. Finger prints left on the
glass evaporate when the bulb gets hot,
the vapor settles on the reflector surface and dims it.
Always use the same
type
of bulb. The designation is marked on the bulb.
It is advisable to always
carry
a box of
spare bulbs in the vehicle. Bulbs can be
obtained from any VW dealer.
It should contain, at least, the following
bulbs which are important for traffic safety:
12V/70/50W
- Headlight
12V/21
/5W -
Front
turn
signal and
front
side marker light
12V/21W
- Rear
turn
signal
12V/3W
- Rear side marker light
12V/21/5W
- Brake and tail lights
12V/4W
- Licence plate light Headlights
The outer units are for low and high beams and have two filaments. The auxiliary
driving lamps are for high beam only and have one filament.
Should it become necessary to replace a
headlight bulb, the air intake grille must be
removed first. • With a screwdriver loosen the five
quick-release screws along upper edge c
grille.
•
Pull
the grille slightly toward you.
•
Then
lift the grille out of its retainer.
130
www.westfaliaT3.info - a useful website for owners and enthusiasts of VW Westfalia T25 / T3 Campervans
Page 136 of 165
 and
take the headlight out. | B16-251
Outer
headlights
• Disconnect wire")
Downloaded from www.Manualslib.com manuals search engine
DO-IT-YOURSELF-SERVICEI
• Remove the four screws (arrows) and
take the headlight out. | B16-251
Outer
headlights
• Disconnect wire connector (1)
• Twist lock ring (2) counterclockwise,
pull bulb (3) out ot headlight housing and
discard.
• Install new bulb so
that
the locating lugs
on the headlight housing engage the
recesses
on the bulb.
• Reinstall lock ring so
that
its recesses
engage
the locating lugs on the headlight
housing.
• Twist lock ring clockwise until firmly
seated.
• Reconnect wire connector. Have head
light beam alignment checked.
Auxiliary
driving
lamps
• Turn cap to
left
and take off.
• Pull wire connector off.
• Unhook spring clip holding bulb and
swing it away.
• Take bulb out and insert new bulb so
that
the locating lug on bulb plate engages
recess
in reflector.
• Swing spring clip over bulb plate.
Squeeze
clip together and engage it in the retaining lugs.
• Attach wire again.
• Install cap and
turn
to
right.
• Have headlight setting checked.
131
www.westfaliaT3.info - a useful website for owners and enthusiasts of VW Westfalia T25 / T3 Campervans
 1
1 2
2 3
3 4
4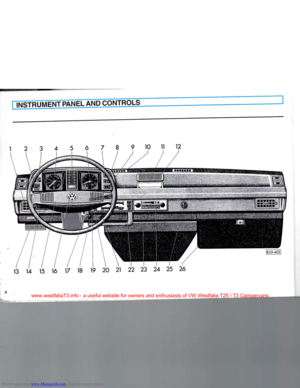 5
5 6
6 7
7 8
8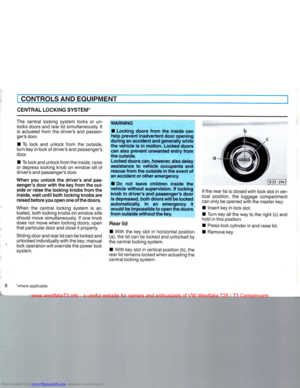 9
9 10
10 11
11 12
12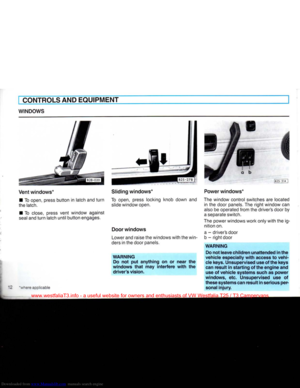 13
13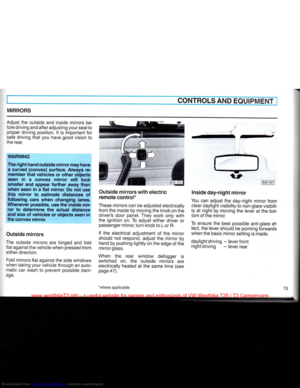 14
14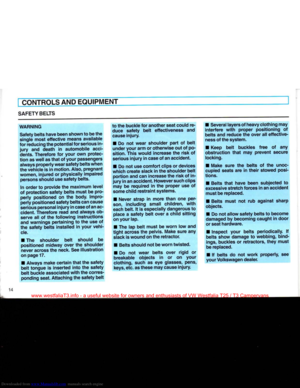 15
15 16
16 17
17 18
18 19
19 20
20 21
21 22
22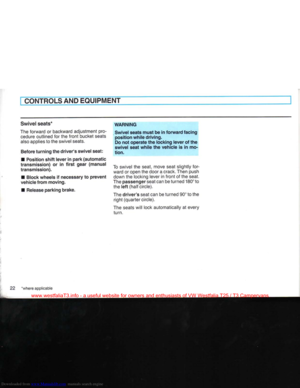 23
23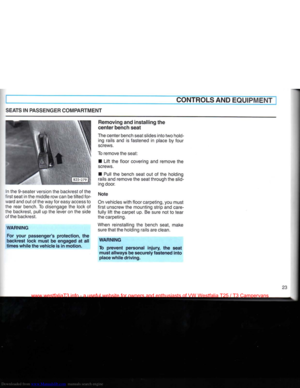 24
24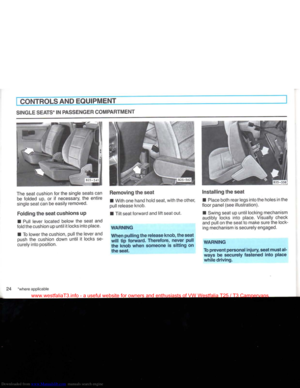 25
25 26
26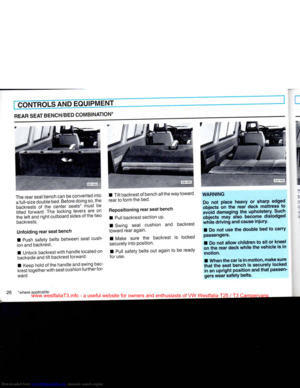 27
27 28
28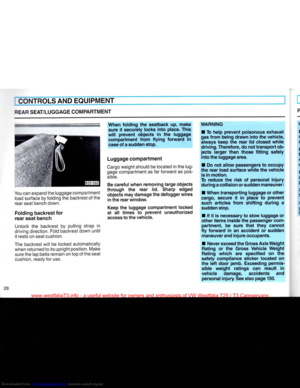 29
29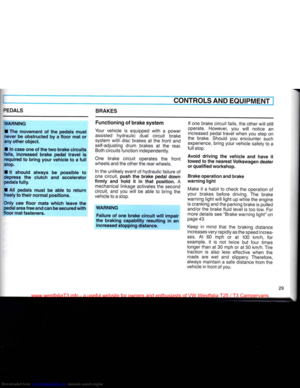 30
30 31
31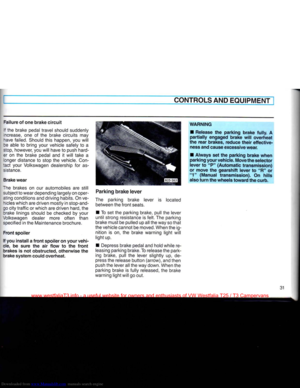 32
32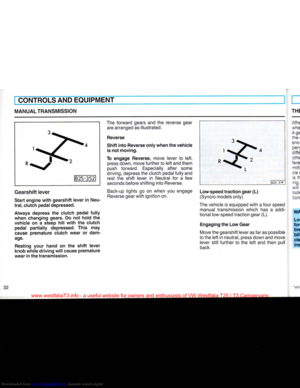 33
33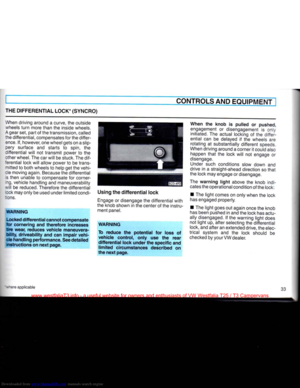 34
34 35
35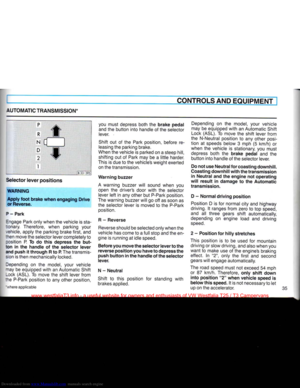 36
36 37
37 38
38 39
39 40
40 41
41 42
42 43
43 44
44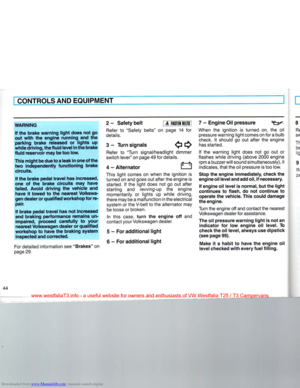 45
45 46
46 47
47 48
48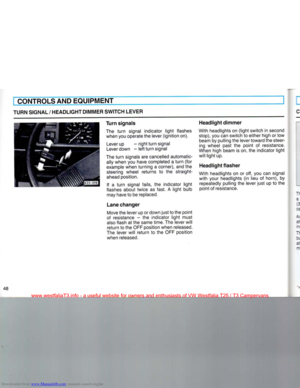 49
49 50
50 51
51 52
52 53
53 54
54 55
55 56
56 57
57 58
58 59
59 60
60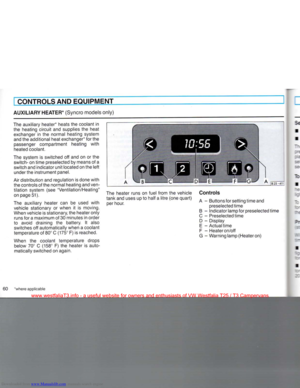 61
61 62
62 63
63 64
64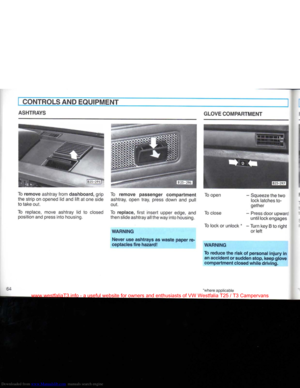 65
65 66
66 67
67 68
68 69
69 70
70 71
71 72
72 73
73 74
74 75
75 76
76 77
77 78
78 79
79 80
80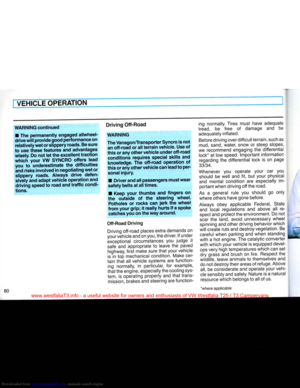 81
81 82
82 83
83 84
84 85
85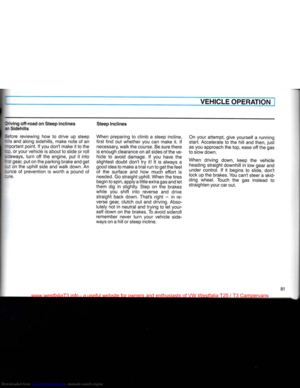 86
86 87
87 88
88 89
89 90
90 91
91 92
92 93
93 94
94 95
95 96
96 97
97 98
98 99
99 100
100 101
101 102
102 103
103 104
104 105
105 106
106 107
107 108
108 109
109 110
110 111
111 112
112 113
113 114
114 115
115 116
116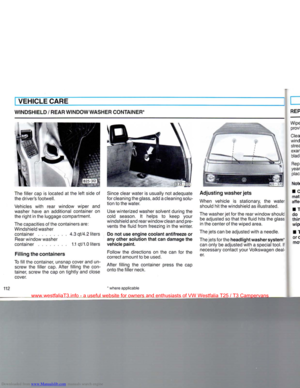 117
117 118
118 119
119 120
120 121
121 122
122 123
123 124
124 125
125 126
126 127
127 128
128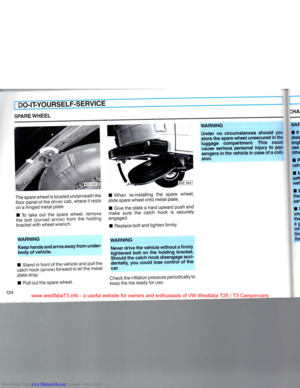 129
129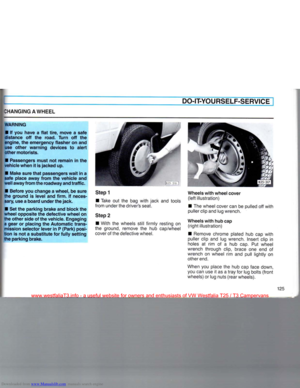 130
130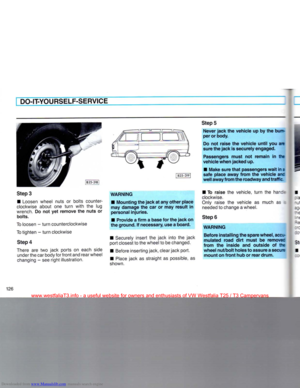 131
131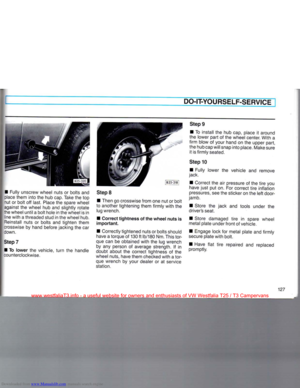 132
132 133
133 134
134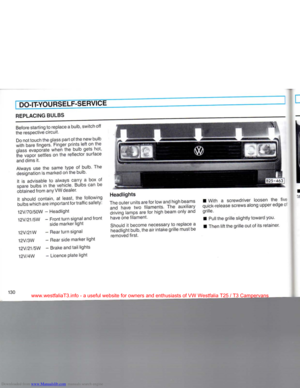 135
135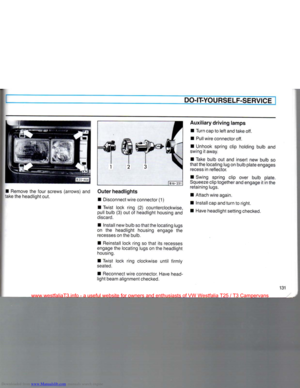 136
136 137
137 138
138 139
139 140
140 141
141 142
142 143
143 144
144 145
145 146
146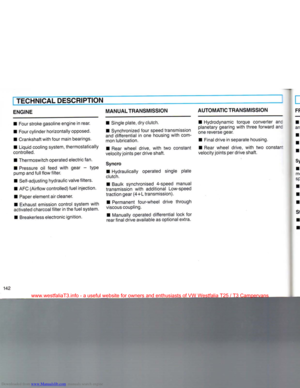 147
147 148
148 149
149 150
150 151
151 152
152 153
153 154
154 155
155 156
156 157
157 158
158 159
159 160
160 161
161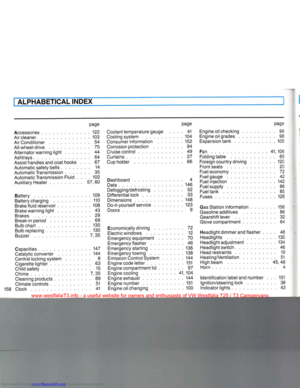 162
162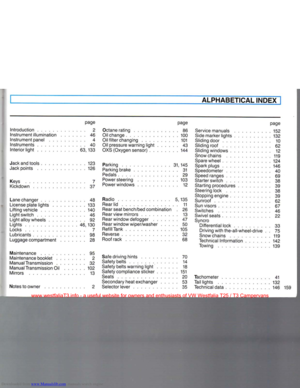 163
163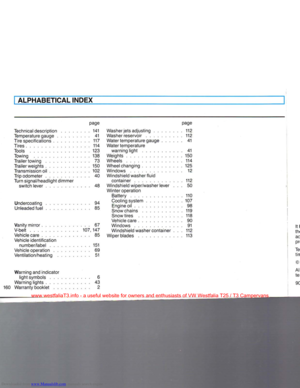 164
164