1990 VOLKSWAGEN CORRADO check oil
[x] Cancel search: check oilPage 249 of 906

* SUSPENSION UNIFORM INSPECTION GUIDELINES *
Article Text (p. 38)
1990 Volkswagen Corrado
For Volkswagen Technical Site: http://vw.belcom.ru
Copyright © 1998 Mitchell Repair Information Company, LLC
Thursday, March 23, 2000 09:39PM
Condition ³ Code ³ Procedure
ÄÄÄÄÄÄÄÄÄÄÄÄÄÄÄÄÄÄÄÄÄÄÄÄÄÄÄÅÄÄÄÄÄÄÅÄÄÄÄÄÄÄÄÄÄÄÄÄÄÄÄÄÄÄÄÄÄÄÄÄÄÄÄÄÄÄÄÄÄÄAttaching hardware bent
³ B ³ Require repair or replacement of
³ ³ bent part.
ÄÄÄÄÄÄÄÄÄÄÄÄÄÄÄÄÄÄÄÄÄÄÄÄÄÄÄÅÄÄÄÄÄÄÅÄÄÄÄÄÄÄÄÄÄÄÄÄÄÄÄÄÄÄÄÄÄÄÄÄÄÄÄÄÄÄÄÄÄÄAttaching hardware broken
³ A ³ Require replacement of broken
³ ³ part.
ÄÄÄÄÄÄÄÄÄÄÄÄÄÄÄÄÄÄÄÄÄÄÄÄÄÄÄÅÄÄÄÄÄÄÅÄÄÄÄÄÄÄÄÄÄÄÄÄÄÄÄÄÄÄÄÄÄÄÄÄÄÄÄÄÄÄÄÄÄÄAttaching hardware corroded
³ A ³ Require replacement of corroded
affecting structural
³ ³ part.
integrity
³ ³
ÄÄÄÄÄÄÄÄÄÄÄÄÄÄÄÄÄÄÄÄÄÄÄÄÄÄÄÅÄÄÄÄÄÄÅÄÄÄÄÄÄÄÄÄÄÄÄÄÄÄÄÄÄÄÄÄÄÄÄÄÄÄÄÄÄÄÄÄÄÄAttaching hardware
³ A ³ Require replacement of incorrect
incorrect
³ ³ part.
ÄÄÄÄÄÄÄÄÄÄÄÄÄÄÄÄÄÄÄÄÄÄÄÄÄÄÄÅÄÄÄÄÄÄÅÄÄÄÄÄÄÄÄÄÄÄÄÄÄÄÄÄÄÄÄÄÄÄÄÄÄÄÄÄÄÄÄÄÄÄAttaching hardware loose
³ A ³ Require repair or replacement of
³ ³ loose part.
ÄÄÄÄÄÄÄÄÄÄÄÄÄÄÄÄÄÄÄÄÄÄÄÄÄÄÄÅÄÄÄÄÄÄÅÄÄÄÄÄÄÄÄÄÄÄÄÄÄÄÄÄÄÄÄÄÄÄÄÄÄÄÄÄÄÄÄÄÄÄAttaching hardware missing
³ C ³ Require replacement of missing
³ ³ part.
ÄÄÄÄÄÄÄÄÄÄÄÄÄÄÄÄÄÄÄÄÄÄÄÄÄÄÄÅÄÄÄÄÄÄÅÄÄÄÄÄÄÄÄÄÄÄÄÄÄÄÄÄÄÄÄÄÄÄÄÄÄÄÄÄÄÄÄÄÄÄAttaching hardware threads
³ A ³ Require repair or replacement of
damaged
³ ³ part with damaged threads.
ÄÄÄÄÄÄÄÄÄÄÄÄÄÄÄÄÄÄÄÄÄÄÄÄÄÄÄÅÄÄÄÄÄÄÅÄÄÄÄÄÄÄÄÄÄÄÄÄÄÄÄÄÄÄÄÄÄÄÄÄÄÄÄÄÄÄÄÄÄÄAttaching hardware threads
³ A ³ Require replacement of part with
stripped (threads missing)
³ ³ stripped threads.
ÄÄÄÄÄÄÄÄÄÄÄÄÄÄÄÄÄÄÄÄÄÄÄÄÄÄÄÅÄÄÄÄÄÄÅÄÄÄÄÄÄÄÄÄÄÄÄÄÄÄÄÄÄÄÄÄÄÄÄÄÄÄÄÄÄÄÄÄÄÄBroken (all springs except
³ A ³ Require replacement.
secondary leave(s) on
³ ³ multi-leaf springs)
³ ³
ÄÄÄÄÄÄÄÄÄÄÄÄÄÄÄÄÄÄÄÄÄÄÄÄÄÄÄÅÄÄÄÄÄÄÅÄÄÄÄÄÄÄÄÄÄÄÄÄÄÄÄÄÄÄÄÄÄÄÄÄÄÄÄÄÄÄÄÄÄÄCoil clash
³ ³ Require ride height check.
³ ³ See note (1) below.
ÄÄÄÄÄÄÄÄÄÄÄÄÄÄÄÄÄÄÄÄÄÄÄÄÄÄÄÅÄÄÄÄÄÄÅÄÄÄÄÄÄÄÄÄÄÄÄÄÄÄÄÄÄÄÄÄÄÄÄÄÄÄÄÄÄÄÄÄÄÄCoil spring insulator
³ B,2 ³ Suggest replacement of insulator.
deteriorated
³ ³
ÄÄÄÄÄÄÄÄÄÄÄÄÄÄÄÄÄÄÄÄÄÄÄÄÄÄÄÅÄÄÄÄÄÄÅÄÄÄÄÄÄÄÄÄÄÄÄÄÄÄÄÄÄÄÄÄÄÄÄÄÄÄÄÄÄÄÄÄÄÄCoil spring insulator
³ B,2 ³ Suggest replacement of insulator.
missing
³ ³
ÄÄÄÄÄÄÄÄÄÄÄÄÄÄÄÄÄÄÄÄÄÄÄÄÄÄÄÅÄÄÄÄÄÄÅÄÄÄÄÄÄÄÄÄÄÄÄÄÄÄÄÄÄÄÄÄÄÄÄÄÄÄÄÄÄÄÄÄÄÄCoil spring insulator split
³ B,2 ³ Suggest replacement of insulator.
ÄÄÄÄÄÄÄÄÄÄÄÄÄÄÄÄÄÄÄÄÄÄÄÄÄÄÄÅÄÄÄÄÄÄÅÄÄÄÄÄÄÄÄÄÄÄÄÄÄÄÄÄÄÄÄÄÄÄÄÄÄÄÄÄÄÄÄÄÄÄCoil spring plastic coating
³ A ³ Refer to manufacturer's service
deteriorated - rust
³ ³ requirements. See note (2) below.
present
³ ³
ÄÄÄÄÄÄÄÄÄÄÄÄÄÄÄÄÄÄÄÄÄÄÄÄÄÄÄÅÄÄÄÄÄÄÅÄÄÄÄÄÄÄÄÄÄÄÄÄÄÄÄÄÄÄÄÄÄÄÄÄÄÄÄÄÄÄÄÄÄÄComposite spring damaged
³ A ³ Further inspection required.
³ ³ See note (3) below.
ÄÄÄÄÄÄÄÄÄÄÄÄÄÄÄÄÄÄÄÄÄÄÄÄÄÄÄÅÄÄÄÄÄÄÅÄÄÄÄÄÄÄÄÄÄÄÄÄÄÄÄÄÄÄÄÄÄÄÄÄÄÄÄÄÄÄÄÄÄÄCracked (all springs except
³ A ³ Require replacement.
composite leaf and
³ ³ secondary leave(s) on
³ ³
Page 301 of 906

1.8L 4-CYL 8-VALVE & 1.8L 4-CYL 16-VALVE
Article Text (p. 10)
1990 Volkswagen Corrado
For Volkswagen Technical Site: http://vw.belcom.ru
Copyright © 1998 Mitchell Repair Information Company, LLC
Thursday, March 23, 2000 09:40PM
2) Align crankshaft sprocket mark with mark on lower timing
belt cover. See Fig. 10. Install timing belt around camshaft sprocket.
Rotate tensioner clockwise until Timing Belt Tension Scale (VW 210)
reads 13-14. Rotate crankshaft 2 revolutions and check timing mark
alignment. To complete installation, reverse removal procedure.
CAMSHAFT OIL SEAL R & I
REMOVAL
1) Remove upper timing belt cover. Place crankshaft at TDC
with No. one cylinder on compression stroke. Remove timing belt from
camshaft sprocket. Remove camshaft sprocket. Remove Woodruff key.
Install camshaft sprocket bolt and washer until washer is tight
against camshaft.
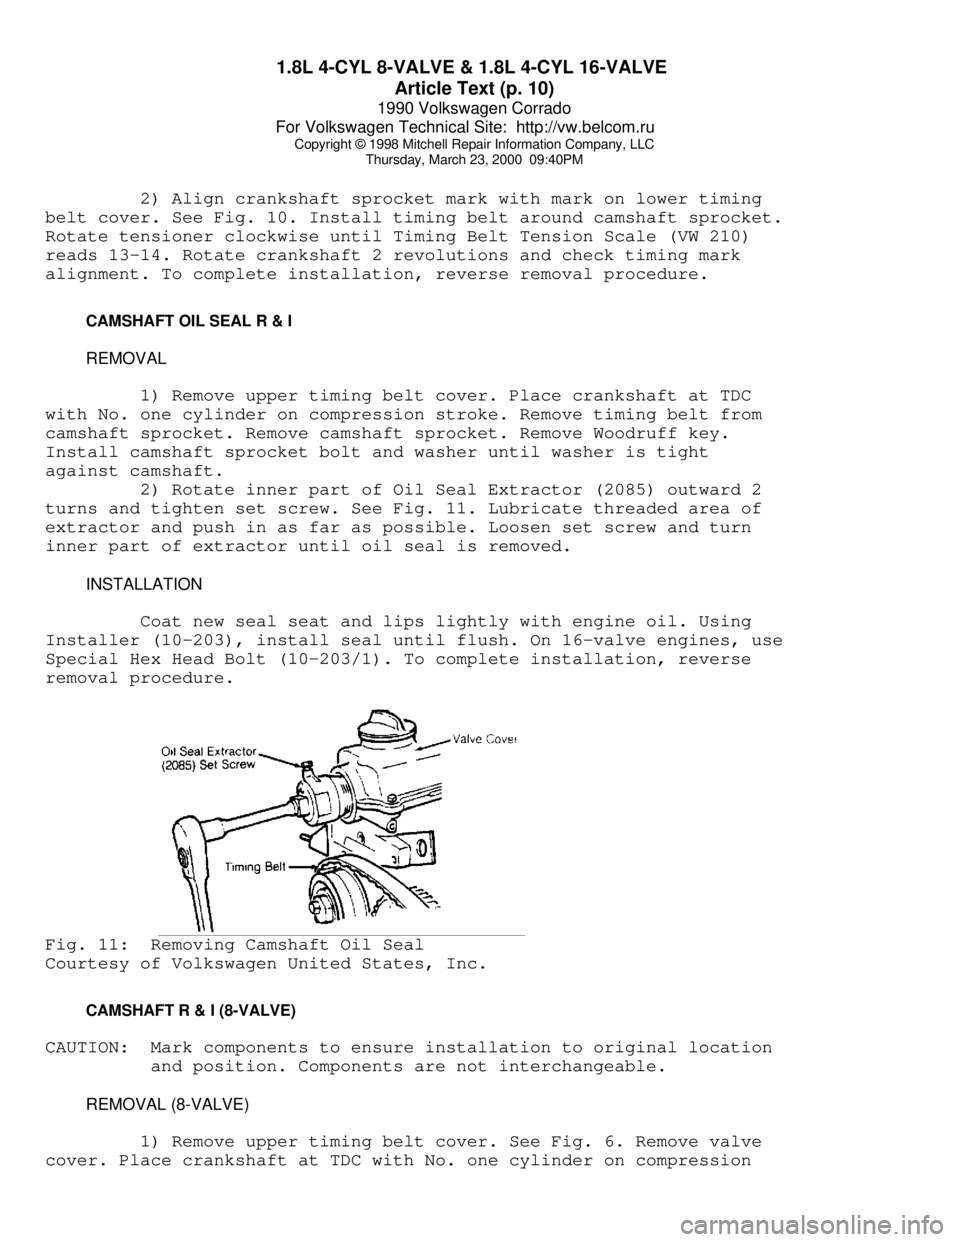
2) Rotate inner part of Oil Seal Extractor (2085) outward 2
turns and tighten set screw. See Fig. 11. Lubricate threaded area of
extractor and push in as far as possible. Loosen set screw and turn
inner part of extractor until oil seal is removed.
INSTALLATION
Coat new seal seat and lips lightly with engine oil. Using
Installer (10-203), install seal until flush. On 16-valve engines, use
Special Hex Head Bolt (10-203/1). To complete installation, reverse
removal procedure.Fig. 11: Removing Camshaft Oil Seal
Courtesy of Volkswagen United States, Inc.
CAMSHAFT R & I (8-VALVE)
CAUTION: Mark components to ensure installation to original location
and position. Components are not interchangeable.
REMOVAL (8-VALVE)
1) Remove upper timing belt cover. See Fig. 6. Remove valve
cover. Place crankshaft at TDC with No. one cylinder on compression
Page 302 of 906

1.8L 4-CYL 8-VALVE & 1.8L 4-CYL 16-VALVE
Article Text (p. 11)
1990 Volkswagen Corrado
For Volkswagen Technical Site: http://vw.belcom.ru
Copyright © 1998 Mitchell Repair Information Company, LLC
Thursday, March 23, 2000 09:40PM
stroke. Remove timing belt from camshaft sprocket. Remove camshaft
sprocket. Remove Woodruff key. Check camshaft end play with cam
followers removed and bearing cap Nos. 1 and 5 installed. See CAMSHAFT
table at end of this article.
2) Remove bearing cap Nos. 1, 3 and 5 evenly a little at a
time. Repeat for remaining caps. Lift camshaft out of cylinder head.
See INSPECTION below.
INSPECTION
1) Check camshaft bearing oil clearance. See ENGINE
SPECIFICATIONS at end of this article. If oil clearance is greater
than specifications, install new camshaft and recheck clearance.
2) If clearance is still greater than specifications,
replace cylinder head. If replacing camshaft(s), ensure identification
number between lobes of cylinder No. one, are the same.
INSTALLATION (8-VALVE)
1) On engines with oil spray jets, position spray at right
angle to camshaft. Place camshaft in cylinder head with both high
points of lobes, for No. one cylinder facing upward. Install bearing
cap Nos. 1, 3 and 5.
2) Tighten evenly a little at a time. Repeat procedure for
remaining bearing caps. To complete installation, reverse removal
procedure. Ensure timing marks are properly aligned. Allow lifters to
bleed down for 30 minutes before starting engine.
CAMSHAFT R & I (16-VALVE)
REMOVAL (16-VALVE)
1) Remove upper timing belt cover. See Fig. 6. Remove valve
cover. Place crankshaft at TDC with No. one cylinder on compression
stroke. Remove timing belt from camshaft sprocket. Remove camshaft
sprocket. Remove Woodruff key. Check camshaft end play with cam
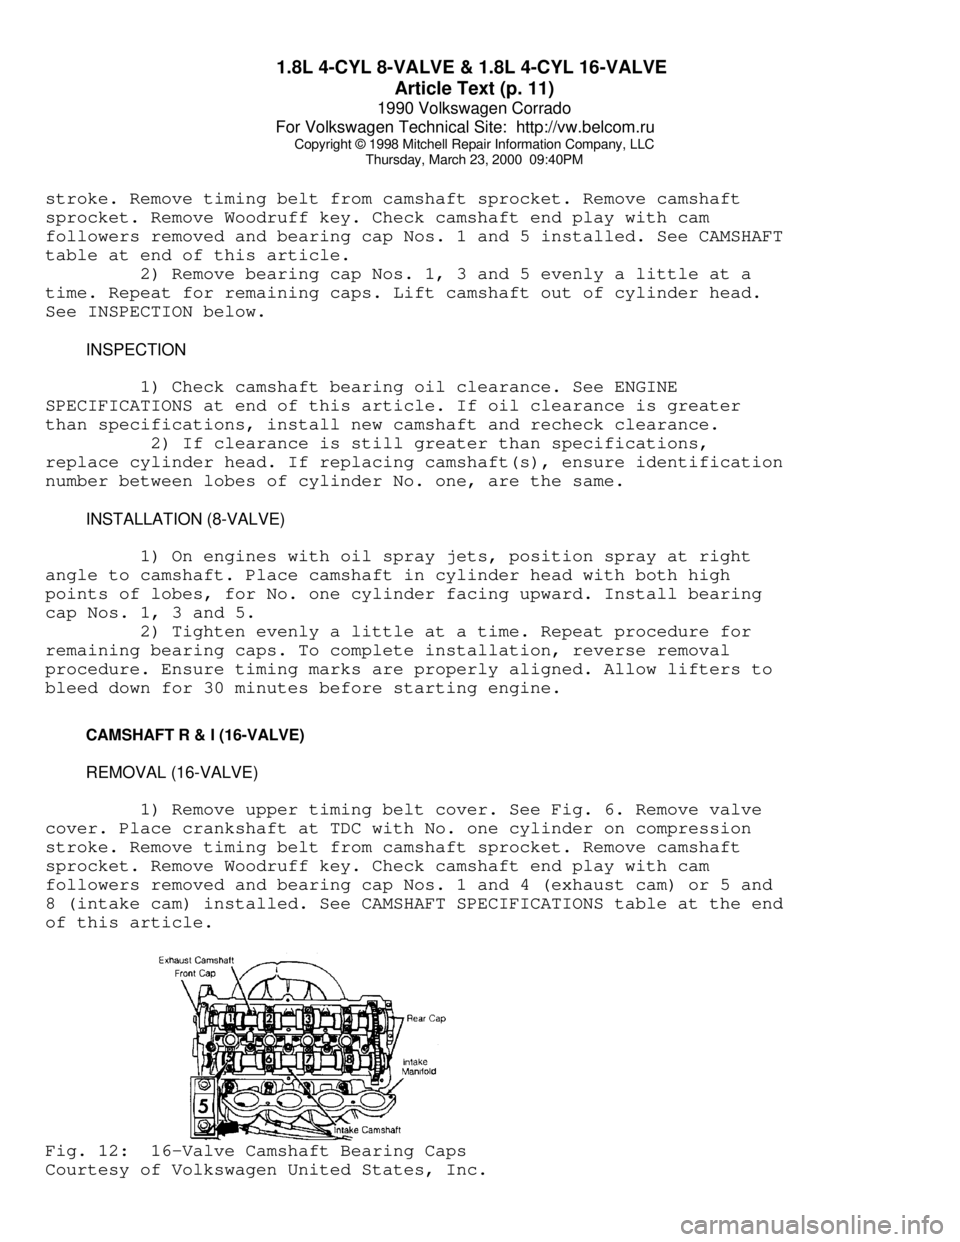
followers removed and bearing cap Nos. 1 and 4 (exhaust cam) or 5 and
8 (intake cam) installed. See CAMSHAFT SPECIFICATIONS table at the end
of this article.Fig. 12: 16-Valve Camshaft Bearing Caps
Courtesy of Volkswagen United States, Inc.
Page 303 of 906

1.8L 4-CYL 8-VALVE & 1.8L 4-CYL 16-VALVE
Article Text (p. 12)
1990 Volkswagen Corrado
For Volkswagen Technical Site: http://vw.belcom.ru
Copyright © 1998 Mitchell Repair Information Company, LLC
Thursday, March 23, 2000 09:40PM
2) Remove intake camshaft bearing cap Nos. 5, 7 and rear
evenly a little at a time. See Fig. 12. Loosen remaining intake
camshaft bearing caps evenly a little at a time. Remove exhaust
camshaft bearing cap Nos. 1, 3, front and rear evenly a little at a
time. Loosen remaining exhaust camshaft bearing caps evenly a little
at a time. Remove loosened caps. Lift camshafts out of cylinder head
together.
INSPECTION
1) Check camshaft bearing oil clearance. See ENGINE
SPECIFICATIONS at end of this article. If oil clearance is greater
than specifications, install new camshaft and recheck clearance.
2) If clearance is still greater than specifications, replace
cylinder head. If replacing camshaft(s), ensure identification number
between lobes of cylinder No. one, are the same.
INSTALLATION (16-VALVE)
1) On engines with oil spray jets, position spray at right
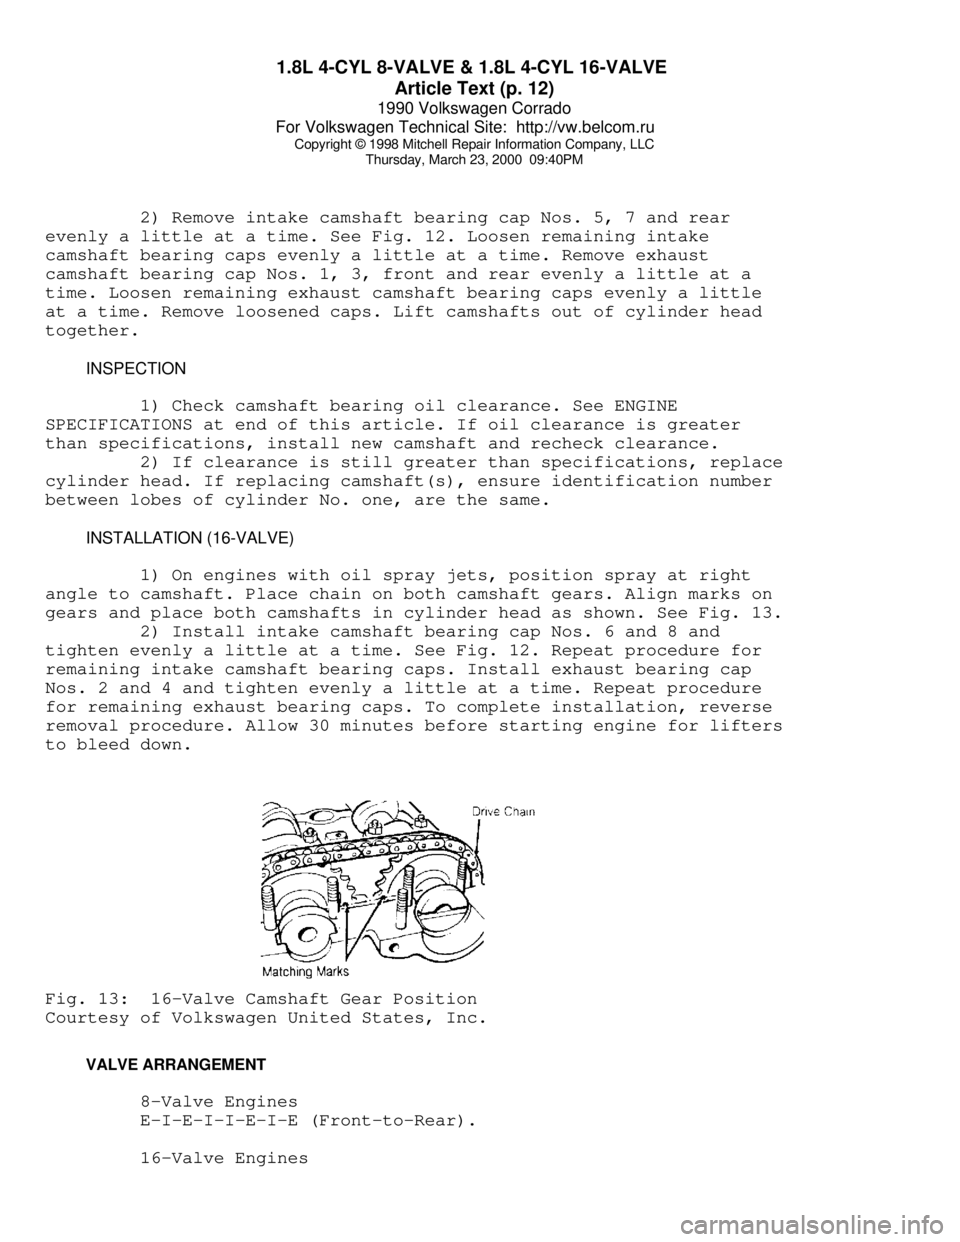
angle to camshaft. Place chain on both camshaft gears. Align marks on
gears and place both camshafts in cylinder head as shown. See Fig. 13.
2) Install intake camshaft bearing cap Nos. 6 and 8 and
tighten evenly a little at a time. See Fig. 12. Repeat procedure for
remaining intake camshaft bearing caps. Install exhaust bearing cap
Nos. 2 and 4 and tighten evenly a little at a time. Repeat procedure
for remaining exhaust bearing caps. To complete installation, reverse
removal procedure. Allow 30 minutes before starting engine for lifters
to bleed down.Fig. 13: 16-Valve Camshaft Gear Position
Courtesy of Volkswagen United States, Inc.
VALVE ARRANGEMENT
8-Valve Engines
E-I-E-I-I-E-I-E (Front-to-Rear).
16-Valve Engines
Page 308 of 906

1.8L 4-CYL 8-VALVE & 1.8L 4-CYL 16-VALVE
Article Text (p. 17)
1990 Volkswagen Corrado
For Volkswagen Technical Site: http://vw.belcom.ru
Copyright © 1998 Mitchell Repair Information Company, LLC
Thursday, March 23, 2000 09:40PM
PISTON PIN REPLACEMENT R & I
Ensure piston and rod are properly marked. Remove both
circlips from pin bore groove. Use Piston Pin Replacer (VW 207C) to
remove and install the piston pin. If pin is too tight, heat piston to
140øF (60øC). To install, reverse removal procedure. Ensure rod is
properly positioned with piston. See Fig. 15.
CRANKSHAFT R & I
1) Using flywheel Holder (10-201), remove flywheel bolts.
Remove flywheel. Remove front and rear oil seals and covers. Remove
connecting rod bearing caps.
2) Measure crankshaft end play. See CRANKSHAFT END PLAY CHECK
in this article. Remove main bearing cap bolts. Remove main bearing
caps. Remove crankshaft. To install, reverse removal procedure.
MAIN BEARING INSTALLATION
Main bearing caps are marked with matching journal and must
be installed to original position. See Fig. 16. Thrust bearing is
located at No. 3 main bearing cap. Use Plastigage method to check
clearance. Machine or replace as necessary. See ENGINE SPECIFICATIONS
at end of this article. Tighten evenly to specifications in several
steps.
CONNECTING ROD BEARING INSTALLATION
Ensure rod caps are marked to ensure installation to original
position and location. Use Plastigage to measure bearing clearances.
Measure connecting rod side play. Replace or machine as necessary. See
ENGINE SPECIFICATIONS at end of this article. Tighten evenly to
specifications in several steps.
CRANKSHAFT END PLAY CHECK
Insert feeler gauge between No. 3 main bearing and crankshaft
thrust face to measure end play. See Fig. 16. Replace thrust bearing
as necessary. See ENGINE SPECIFICATIONS at end of this article.
Original thrust bearing uses plain shell with 4 separate washers and
replacements have attached collar.
REAR MAIN BEARING OIL SEAL R & I
Remove flywheel/flex plate and discard retaining bolts. Oil
seal may removed without removing retaining flange by prying seal out.
Remove retaining flange if gasket is leaking. See Fig. 16. If
installing without removing retaining flange, use Centering Tool
(2003/2A) to center seal and Installer (2003/1) to install seal.
Page 309 of 906

1.8L 4-CYL 8-VALVE & 1.8L 4-CYL 16-VALVE
Article Text (p. 18)
1990 Volkswagen Corrado
For Volkswagen Technical Site: http://vw.belcom.ru
Copyright © 1998 Mitchell Repair Information Company, LLC
Thursday, March 23, 2000 09:40PM
Install new flywheel bolts.
FRONT COVER OIL SEAL R & I
REMOVAL
Remove timing belt. See REMOVAL under TIMING BELT R & I in
this article. Rotate inner part of Oil Seal Extractor (2085) outward 2
turns and tighten set screw. See Fig. 11. Lubricate threaded area of
extractor and push in as far as possible. Loosen set screw and turn
inner part of extractor until oil seal is removed.
INSTALLATION
Lubricate outer edge and lip of new seal. Place guide sleeve
from Seal Installer (3083) onto crankshaft. Push oil seal over guide
sleeve. Press seal completely into position. To complete installation,
reverse removal procedure.
INTERMEDIATE SHAFT ASSEMBLY
Remove timing belt. See REMOVAL under TIMING BELT in this
article. Mark distributor assembly for installation reference and
remove distributor assembly. Check intermediate shaft end play. See
INTERMEDIATE SHAFT END PLAY SPECIFICATION table following this
paragraph. Remove intermediate shaft sprocket. Remove intermediate
shaft seal flange. Replace seal (if necessary). To install, reverse
removal procedure. See ENGINE SPECIFICATIONS at end of this article.
INTERMEDIATE SHAFT END PLAY SPECIFICATIONÄÄÄÄÄÄÄÄÄÄÄÄÄÄÄÄÄÄÄÄÄÄÄÄÄÄÄÄÄÄÄÄÄÄÄÄÄÄÄÄÄÄÄÄÄApplication In. (mm)
1.8L ........................... .010 (.25)
ÄÄÄÄÄÄÄÄÄÄÄÄÄÄÄÄÄÄÄÄÄÄÄÄÄÄÄÄÄÄÄÄÄÄÄÄÄÄÄÄÄÄÄÄÄ CYLINDER BLOCK INSPECTION
DO NOT measure cylinder block while mounted on an engine
stand. Inaccurate measurements may be achieved. Check cylinder bore
for wear, out-of-round and taper. Pistons are available in oversize.
Cylinder block bore may be machined. Check cylinder block for warpage.
See ENGINE SPECIFICATIONS at end of this article.
ENGINE OILING SYSTEM SPECIFICATIONS
CRANKCASE CAPACITY
CRANKCASE CAPACITY TABLE
ÄÄÄÄÄÄÄÄÄÄÄÄÄÄÄÄÄÄÄÄÄÄÄÄÄÄÄÄÄÄÄÄÄÄÄÄÄÄÄÄÄÄÄÄÄÄÄÄÄÄÄÄÄÄÄ With Filter Without Filter
Page 310 of 906

1.8L 4-CYL 8-VALVE & 1.8L 4-CYL 16-VALVE
Article Text (p. 19)
1990 Volkswagen Corrado
For Volkswagen Technical Site: http://vw.belcom.ru
Copyright © 1998 Mitchell Repair Information Company, LLC
Thursday, March 23, 2000 09:40PM
Model Replacement Replacement
Fox ........... 3.7 Qts. (3.5L) . 3.2 Qts. (3.0L)
All Others .... 4.3 Qts. (4.1L) . 4.7 Qts. (4.5L)ÄÄÄÄÄÄÄÄÄÄÄÄÄÄÄÄÄÄÄÄÄÄÄÄÄÄÄÄÄÄÄÄÄÄÄÄÄÄÄÄÄÄÄÄÄÄÄÄÄÄÄÄÄÄÄ OIL PRESSURE
Minimum oil pressure at idle is 4.3 psi (.3 kg/cm
ý). Oil
pressure at 2000 RPM is 29 psi (2.0 kg/cm
ý).
OIL PAN REMOVAL
REMOVAL
Oil pan can be removed and installed with engine in vehicle.
No further information available from manufacturer.
OIL PUMP R & I
REMOVAL & INSTALLATION
Remove oil pan. Remove oil pump attaching bolts and remove
oil pump assembly. To install, reverse removal procedure.
INSPECTION
Check oil pump backlash and oil pump axial play. If not
within specifications, replace oil pump assembly. See OIL PUMP
SPECIFICATIONS table in this article.
OIL PUMP SPECIFICATIONS
ÄÄÄÄÄÄÄÄÄÄÄÄÄÄÄÄÄÄÄÄÄÄÄÄÄÄÄÄÄÄÄÄÄÄÄÄÄÄÄÄÄÄÄÄÄApplication In. (mm)
Backlash
New .......................... .002 (.05)
Limit ........................ .008 (.20)
Axial Play Limit ............... .006 (.15)
ÄÄÄÄÄÄÄÄÄÄÄÄÄÄÄÄÄÄÄÄÄÄÄÄÄÄÄÄÄÄÄÄÄÄÄÄÄÄÄÄÄÄÄÄÄ ENGINE COOLING SYSTEM
CAUTION: Coolant/water mixture should be used at all times. Only
ethylene glycol based (phosphate-free) antifreeze may be
used, as it protects aluminum/iron engines from corrosion.
BELT TENSION
Belt deflection with 22 lbs. (10 kg) pressure applied at
midpoint of longest belt run should be 3/8-9/16" (10-15mm).
Page 319 of 906

A/C COMPRESSOR OIL CHECKING
Article Text
1990 Volkswagen Corrado
For Volkswagen Technical Site: http://vw.belcom.ru
Copyright © 1998 Mitchell Repair Information Company, LLC
Thursday, March 23, 2000 09:41PM
ARTICLE BEGINNING
1990 AIR CONDITIONING & HEAT
Compressor Oil Checking
ISOLATING COMPRESSOR
NOTE: Only compressors with stem-type service valves can be
isolated.
1) Connect service gauge set to the compressor service valves
and open compressor valves slightly (turn in clockwise). Start engine
and operate air conditioning. Slowly turn compressor suction valve
clockwise toward closed (front-seated) position.
2) When suction pressure is reduced to zero or less, turn off
engine and compressor and quickly turn suction valve stem in to full
front-seated position. Suction pressure should be slightly above zero.
Turn discharge valve into front-seated position.
3) To check oil level, slowly open compressor crankcase plug
to relieve any remaining pressure. After oil level is corrected, cap
service gauge ports on both valves. Back-seat suction service valve to
allow refrigerant to enter compressor. Open discharge valve halfway.
4) Loosen discharge service valve cap, allowing refrigerant
pressure to force air out of compressor. Back-seat service valve and
tighten cap. Compressor is now ready for operation.
REFRIGERANT OIL
Only new, pure, moisture-free refrigerant oil should be used
in the air conditioning system. This oil is highly refined and
dehydrated to a point where moisture content is less than 10 parts per
million. The oil container must be tightly closed at all times when
not in use, or moisture will be absorbed into the refrigerant oil from
the air.
SERVICING PRECAUTIONS
NOTE: Recent findings by the EPA indicate that refrigerant is
harmful to the earth's protective Ozone layer. When
discharging refrigerant, DO NOT allow refrigerant to enter
the atmosphere. If available, use refrigerant
recovery/recycle systems when discharging system. Always
follow manufacturer's instructions.
DISCHARGING SYSTEM PRECAUTIONS
If compressor has stem-type service valves, it can be
isolated and removed without discharging entire system. See ISOLATING
COMPRESSOR at the beginning of this article. Otherwise, discharge
system completely before loosening any fittings.