Page 270 of 2103
ENGINE General Information
GENERAL INFORMATION
Specifications
Number of cylinders
Bore
In-line OHV, SOHC
4
Stroke1
Piston displacement
Compression ratio9.5
Firing order
Counterbalance shaft Valve timing Intake valve Opens
Closes
Exhaust valve Opens
Closes Equipped
18” BTDC
58” ABDC
58” BBDC
18” ATDC
Lubrication system Pressure feed-full flow filtration
LUBRICATION SYSTEM
Rocker arm
Oil filter
TSB Revision
Oilpressure, Camshaft
screen
Page 274 of 2103

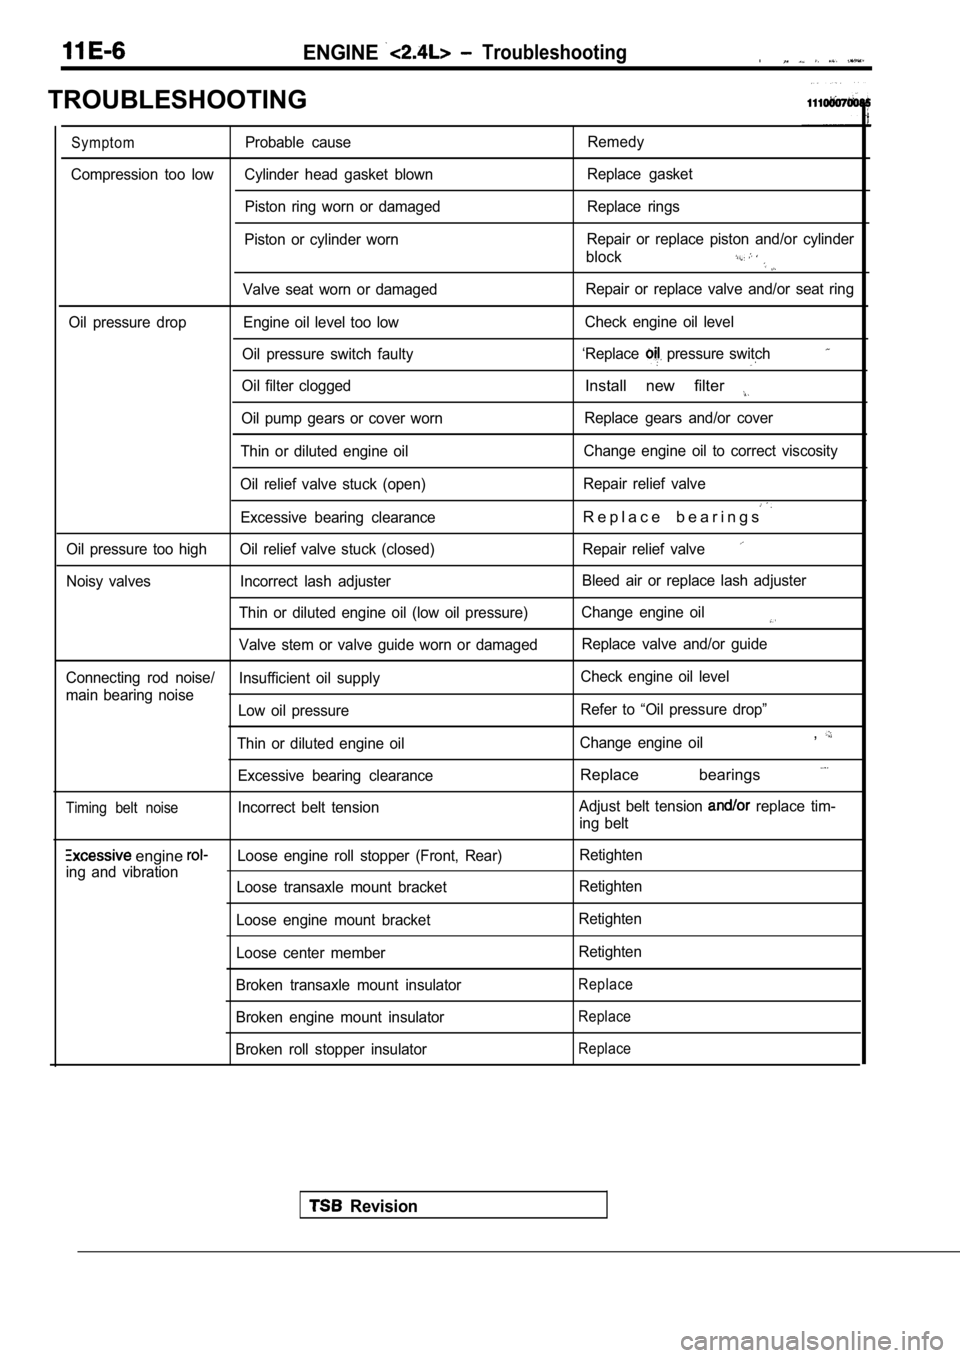
ENGINE Troubleshooting.
TROUBLESHOOTING
SymptomProbable causeRemedy
Compression too low Cylinder head gasket blown Replace gasket
Piston ring worn or damaged Replace rings
Piston or cylinder worn Repair or replace piston and/or cylinder
block
Valve seat worn or damaged Repair or replace valve and/or seat ring
Oil pressure drop Engine oil level too low Check engine oil level
Oil pressure switch faulty ‘Replace
pressure switch
Oil filter cloggedInstall new filter
Oil pump gears or cover worn Replace gears and/or cover
Thin or diluted engine oil Change engine oil to correct viscosity
Oil relief valve stuck (open) Repair relief valve
Excessive bearing clearanceR e p l a c e b e a r i n g s
Oil pressure too high Oil relief valve stuck (closed
) Repair relief valve
Noisy valves Incorrect lash adjuster Bleed air or replace lash adjuster
Thin or diluted engine oil (low oil pressure) Change engine oil
Valve stem or valve guide worn or damaged Replace valve and/or guide
Connecting rod noise/ Insufficient oil supply Check engine oil level
main bearing noise Low oil pressure Refer to “Oil pressure drop”
Thin or diluted engine oil Change engine oil
,
Excessive bearing clearanceReplace bearings
Timing belt noiseIncorrect belt tensionAdjust belt tension replace tim-
ing belt
engine Loose engine roll stopper (Front, Rear) Retighten
ing and vibration Loose transaxle mount bracket Retighten
Loose engine mount bracket Retighten
Loose center member Retighten
Broken transaxle mount insulator
Replace
Broken engine mount insulatorReplace
Broken roll stopper insulatorReplace
Revision
Page 350 of 2103
Front Case, ENGINE OVERHAUL Shaft and
FRONT CASE, COUNTERBALANCE SHAFT AND OIL
REMOVAL AND INSTALLATION
q 27 during reassembly.
2417
107
23
q 24
I
16
I
I1914
24. .
17
Removal steps
1. Oil filter2.Drain plug 3. Drain plug gasket 4. Oil pan5.Oil screen
6. Oil screen gasket
7. P l u g8.O-ring 9. Flange bolt 10. Oil pressure switch11.Relief plug12.Gasket13.Relief spring14.Relief plunger15. Oil filter bracket
16. Oil filter bracket gasket 19
14
I
l b7
75
17. Oil pump cover 18. Oil pump driven gear 19. Oil drive gear 20. Crankshaft front oilseal
21. Oil pump oil seal 22. Counterbalance shaft oil seal 23. Front case
24. Front case gasket
25. Counterbalance shaft, left
26. Counterbalance shaft, right
27. Counterbalance shaft, front bearing 28. shaft, rear
29. shaft, rear bearing,
TSB Revision
Page 353 of 2103
Front Case,
ENGINE OVERHAUL Shaft and
Socket wrench
SHAFT
I N S T A L L A T I O N
Using special tools,
front bearing,
FRONT CASE
(1) Set the special tool on the front end of cranks haft and
apply a thin coat of engine oil to the outer circum ference
of the special tool to install the front case.
(2) Install the front case assembly new front
gasket and temporarily tighten, the flange bolts (o ther
than those for tightening the filter bracket).
SHAFT OIL SEAL
INSTALLATION
TSB Revision
Page 356 of 2103
Front Case,
ENGINE OVERHAUL Shaft
Drain pigasket
side
DRAIN PLUG GASKET
Install the drain plug gasket in
. .
, I..
OIL INSTALLATION
(1) Clean the installation
of bracket.
Apply engine oil to the O-ring of, the oil filter.
(3) Screw the oil filter in until the the bracket.
Then tighten
torque: 7 Nm (12,
NOTE
For 35737, tighten
14 Nm (10 after the O-ring the
,
TSB Revision
Page 373 of 2103
ENGINE
.
CONTENTS
ENGINE OIL COOLER.. . . . . . . . . . . . . . . . . . . . . ON-VEHICLE SERVICE . . . . . . . . . . . . . . . . . . . 3
GENERAL INFORMATION. . . . . . . . . . . . . . . . . . 2Engine Oil . . . . . . . . . . . . . . . . . . . . . . . . .
Engine Oil Replacement . . . . . . . . . . . . . . . . . . . .3
LUBRICANTS. . . . . . . . . . . . . . . . . . . . . . . . . . . . . .2Oil Filter Replacement . . . . . . . . . . . . . . . . . . . . .
4
Page 374 of 2103

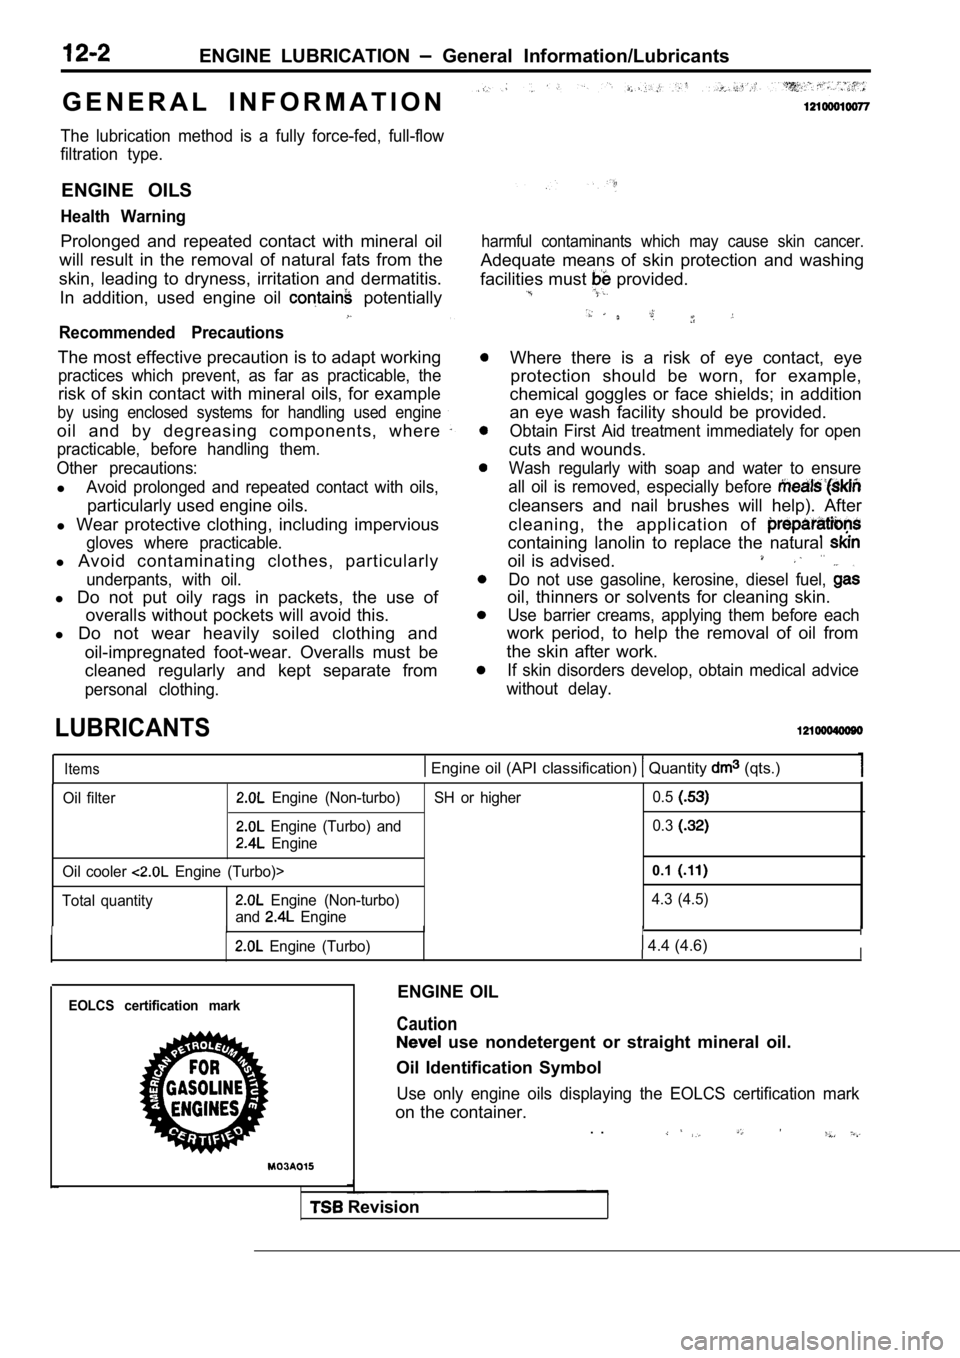
ENGINE LUBRICATION General Information/Lubricants
G E N E R A L I N F O R M A T I O N
The lubrication method is a fully force-fed, full-f low
filtration type.
ENGINE OILS
Health Warning
Prolonged and repeated contact with mineral oil
will result in the removal of natural fats from the
skin, leading to dryness, irritation and dermatitis .
In addition, used engine oil
potentially
Recommended Precautions
The most effective precaution is to adapt working
practices which prevent, as far as practicable, the
risk of skin contact with mineral oils, for example
by using enclosed systems for handling used engine
oil and by degreasing components, where
practicable, before handling them.
Other precautions:
lAvoid prolonged and repeated contact with oils,
particularly used engine oils.
l Wear protective clothing, including impervious
gloves where practicable.
l Avoid contaminating clothes, particularly
underpants, with oil.
l Do not put oily rags in packets, the use of
overalls without pockets will avoid this.
l Do not wear heavily soiled clothing and
oil-impregnated foot-wear. Overalls must be
cleaned regularly and kept separate from
personal clothing.
LUBRICANTS
harmful contaminants which may cause skin cancer.
Adequate means of skin protection and washing
facilities must
provided.
Where there is a risk of eye contact, eye protection should be worn, for example,
chemical goggles or face shields; in addition
an eye wash facility should be provided.
Obtain First Aid treatment immediately for open
cuts and wounds.
Wash regularly with soap and water to ensure
all oil is removed, especially before
cleansers and nail brushes will help). After
cleaning, the application of
containing lanolin to replace the natural
oil is advised.. .
Do not use gasoline, kerosine, diesel fuel,
oil, thinners or solvents for cleaning skin.
Use barrier creams, applying them before each
work period, to help the removal of oil from
the skin after work.
If skin disorders develop, obtain medical advice
without delay.
Items Engine oil (API classification) Quantity (qts.)
Oil filter Engine (Non-turbo)
Engine (Turbo) and
Engine
Oil cooler
Engine (Turbo)>
Total quantity
Engine (Non-turbo)
and
Engine SH or higher
0.5
0.3
0.1
4.3 (4.5)
IIIII
Engine (Turbo) 4.4 (4.6)I
EOLCS certification markENGINE OIL
Caution
use nondetergent or straight mineral oil.
Oil Identification Symbol
Use only engine oils displaying the EOLCS certifica tion mark
on the container.
. .
Revision
Page 376 of 2103
![MITSUBISHI SPYDER 1990 Service Repair Manual 12-4 L U B R I C A T I O N
EngineI
Turbo
4. Supply new engine oil through the oil filler.Engine oil total quantity:[including oil filter and oil cooler]
Engine (Non-turbo) arid MITSUBISHI SPYDER 1990 Service Repair Manual 12-4 L U B R I C A T I O N
EngineI
Turbo
4. Supply new engine oil through the oil filler.Engine oil total quantity:[including oil filter and oil cooler]
Engine (Non-turbo) arid](/manual-img/19/57345/w960_57345-375.png)
12-4 L U B R I C A T I O N
EngineI
Turbo
4. Supply new engine oil through the oil filler.Engine oil total quantity:[including oil filter and oil cooler]
Engine (Non-turbo) arid
4 . 3 (4 q t s . )
Engine (Turbo)>
4.4
(4.6 qts.)
5. Start and run the engine a
minutes.
6.Stop the engine and check the engine oil level is w ithin
the level range indicated on the oil dipstick.
.
NOTE
may be used for operation in very cold weather
areas where the lowest ambient temperature is below
OIL REPLACEMENT
1. Remove the engine oil filler cap.
2.Remove the engine oil drain plug, and drain out the engine
o i l .
3.Remove the engine oil filter by using the oil filter wrench.
4.Clean the oil filter mounting, surface of the oil f ilter bracket.
5. Coat engine oil to the O-ring of’new filter: .
6.Screw on the oil filter by hand until it touchesthe surface
of the flange and then tighten it with. the filter wrench:
etc.
Engine (Turbo) Engine>
lFor One full turn or 14 Nm
lFor or 17 Nm (12
E n g i n e ( N o n - t u r b o ) >
lFor 090: turn or 21 Nm (15
7. Add new engine oil through the oil filter.
8. Start and run engine and check for engine oil le aks.
9. After stopping engine, check oil level and reple nish as
necessary.
TSB Revision