1989 FORD FIESTA check engine light
[x] Cancel search: check engine lightPage 85 of 296
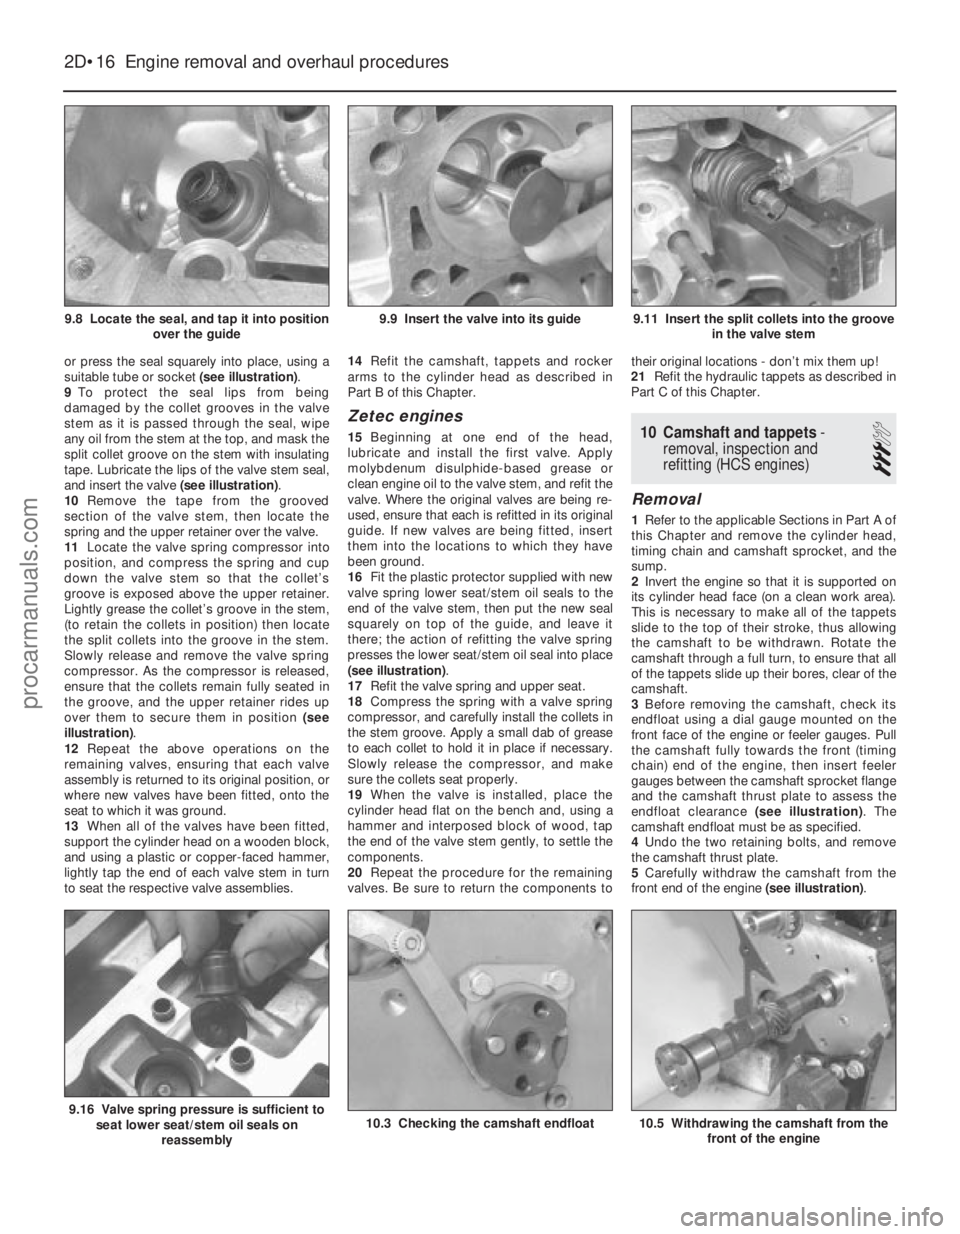
or press the seal squarely into place, using a
suitable tube or socket (see illustration).
9 To protect the seal lips from being
damaged by the collet grooves in the valve
stem as it is passed through the seal, wipe
any oil from the stem at the top, and mask the
split collet groove on the stem with insulating
tape. Lubricate the lips of the valve stem seal,
and insert the valve (see illustration).
10 Remove the tape from the grooved
section of the valve stem, then locate the
spring and the upper retainer over the valve.
11 Locate the valve spring compressor into
position, and compress the spring and cup
down the valve stem so that the collet’s
groove is exposed above the upper retainer.
Lightly grease the collet’s groove in the stem,
(to retain the collets in position) then locate
the split collets into the groove in the stem.
Slowly release and remove the valve spring
compressor. As the compressor is released,
ensure that the collets remain fully seated in
the groove, and the upper retainer rides up
over them to secure them in position (see
illustration) .
12 Repeat the above operations on the
remaining valves, ensuring that each valve
assembly is returned to its original position, or
where new valves have been fitted, onto the
seat to which it was ground.
13 When all of the valves have been fitted,
support the cylinder head on a wooden block,
and using a plastic or copper-faced hammer,
lightly tap the end of each valve stem in turn
to seat the respective valve assemblies. 14
Refit the camshaft, tappets and rocker
arms to the cylinder head as described in
Part B of this Chapter.
Zetec engines
15 Beginning at one end of the head,
lubricate and install the first valve. Apply
molybdenum disulphide-based grease or
clean engine oil to the valve stem, and refit the
valve. Where the original valves are being re-
used, ensure that each is refitted in its original
guide. If new valves are being fitted, insert
them into the locations to which they have
been ground.
16 Fit the plastic protector supplied with new
valve spring lower seat/stem oil seals to the
end of the valve stem, then put the new seal
squarely on top of the guide, and leave it
there; the action of refitting the valve spring
presses the lower seat/stem oil seal into place
(see illustration) .
17 Refit the valve spring and upper seat.
18 Compress the spring with a valve spring
compressor, and carefully install the collets in
the stem groove. Apply a small dab of grease
to each collet to hold it in place if necessary.
Slowly release the compressor, and make
sure the collets seat properly.
19 When the valve is installed, place the
cylinder head flat on the bench and, using a
hammer and interposed block of wood, tap
the end of the valve stem gently, to settle the
components.
20 Repeat the procedure for the remaining
valves. Be sure to return the components to their original locations - don’t mix them up!
21 Refit the hydraulic tappets as described in
Part C of this Chapter.10 Camshaft and tappets -
removal, inspection and
refitting (HCS engines)
3
Removal
1 Refer to the applicable Sections in Part A of
this Chapter and remove the cylinder head,
timing chain and camshaft sprocket, and the
sump.
2 Invert the engine so that it is supported on
its cylinder head face (on a clean work area).
This is necessary to make all of the tappets
slide to the top of their stroke, thus allowing
the camshaft to be withdrawn. Rotate the
camshaft through a full turn, to ensure that all
of the tappets slide up their bores, clear of the
camshaft.
3 Before removing the camshaft, check its
endfloat using a dial gauge mounted on the
front face of the engine or feeler gauges. Pull
the camshaft fully towards the front (timing
chain) end of the engine, then insert feeler
gauges between the camshaft sprocket flange
and the camshaft thrust plate to assess the
endfloat clearance (see illustration). The
camshaft endfloat must be as specified.
4 Undo the two retaining bolts, and remove
the camshaft thrust plate.
5 Carefully withdraw the camshaft from the
front end of the engine (see illustration).
2D•16 Engine removal and overhaul procedures
10.5 Withdrawing the camshaft from the
front of the engine10.3 Checking the camshaft endfloat9.16 Valve spring pressure is sufficient toseat lower seat/stem oil seals on
reassembly
9.11 Insert the split collets into the groove in the valve stem9.9 Insert the valve into its guide9.8 Locate the seal, and tap it into position over the guide
1595Ford Fiesta Remakeprocarmanuals.com
http://vnx.su
Page 87 of 296
12After removal, reassemble the big-end
bearing caps and shells on their respective
connecting rods, and refit the bolts finger-
tight. Leaving the old shells in place until
reassembly will help prevent the bearing
recesses from being accidentally nicked or
gouged. New shells should be used on
reassembly.
Inspection
13 Before the inspection process can begin,
the piston/connecting rod assemblies must
be cleaned, and the original piston rings
removed from the pistons.
14 Carefully expand the old rings over the top
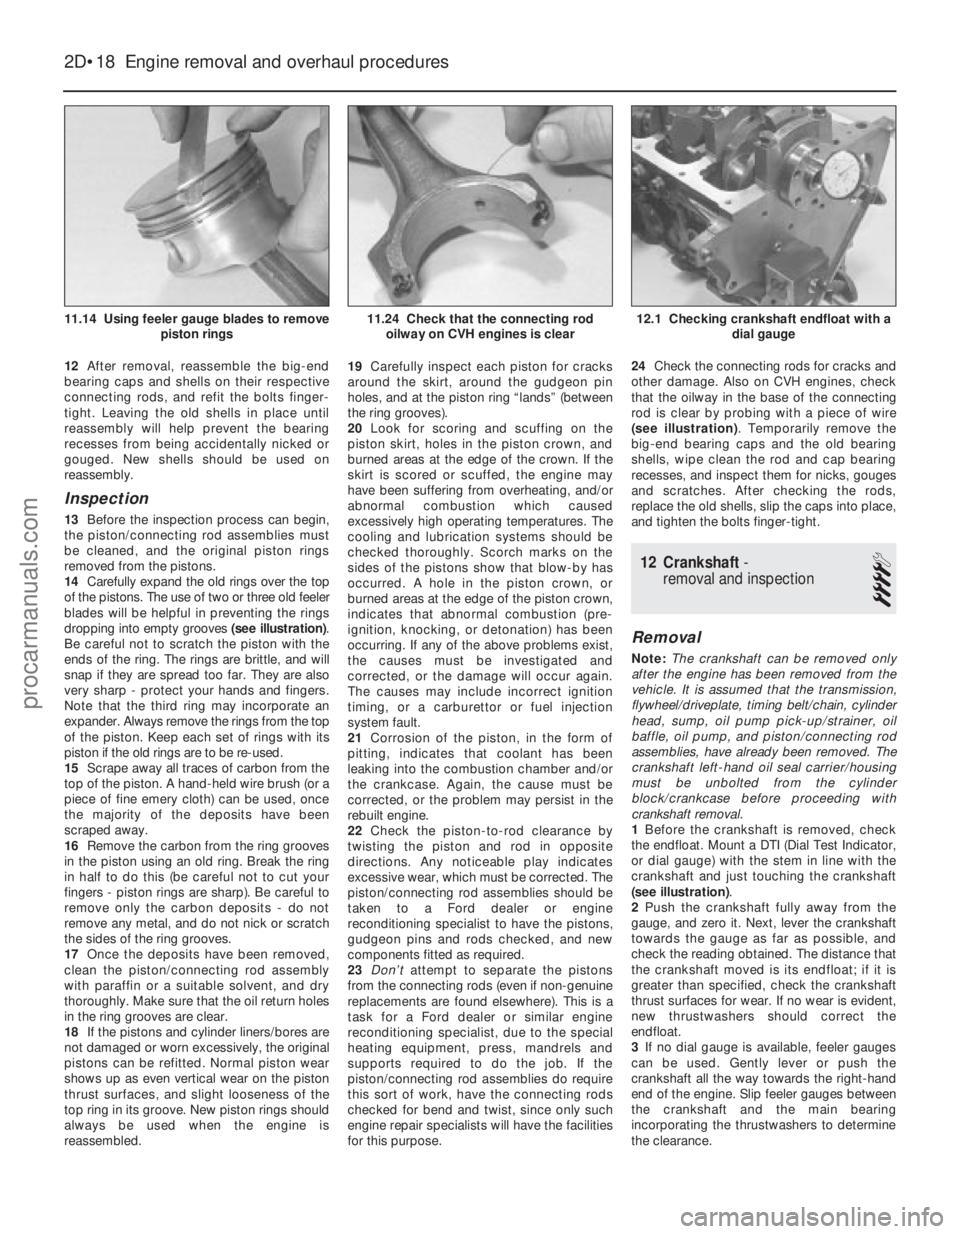
of the pistons. The use of two or three old feeler
blades will be helpful in preventing the rings
dropping into empty grooves (see illustration).
Be careful not to scratch the piston with the
ends of the ring. The rings are brittle, and will
snap if they are spread too far. They are also
very sharp - protect your hands and fingers.
Note that the third ring may incorporate an
expander. Always remove the rings from the top
of the piston. Keep each set of rings with its
piston if the old rings are to be re-used.
15 Scrape away all traces of carbon from the
top of the piston. A hand-held wire brush (or a
piece of fine emery cloth) can be used, once
the majority of the deposits have been
scraped away.
16 Remove the carbon from the ring grooves
in the piston using an old ring. Break the ring
in half to do this (be careful not to cut your
fingers - piston rings are sharp). Be careful to
remove only the carbon deposits - do not
remove any metal, and do not nick or scratch
the sides of the ring grooves.
17 Once the deposits have been removed,
clean the piston/connecting rod assembly
with paraffin or a suitable solvent, and dry
thoroughly. Make sure that the oil return holes
in the ring grooves are clear.
18 If the pistons and cylinder liners/bores are
not damaged or worn excessively, the original
pistons can be refitted. Normal piston wear
shows up as even vertical wear on the piston
thrust surfaces, and slight looseness of the
top ring in its groove. New piston rings should
always be used when the engine is
reassembled. 19
Carefully inspect each piston for cracks
around the skirt, around the gudgeon pin
holes, and at the piston ring “lands” (between
the ring grooves).
20 Look for scoring and scuffing on the
piston skirt, holes in the piston crown, and
burned areas at the edge of the crown. If the
skirt is scored or scuffed, the engine may
have been suffering from overheating, and/or
abnormal combustion which caused
excessively high operating temperatures. The
cooling and lubrication systems should be
checked thoroughly. Scorch marks on the
sides of the pistons show that blow-by has
occurred. A hole in the piston crown, or
burned areas at the edge of the piston crown,
indicates that abnormal combustion (pre-
ignition, knocking, or detonation) has been
occurring. If any of the above problems exist,
the causes must be investigated and
corrected, or the damage will occur again.
The causes may include incorrect ignition
timing, or a carburettor or fuel injection
system fault.
21 Corrosion of the piston, in the form of
pitting, indicates that coolant has been
leaking into the combustion chamber and/or
the crankcase. Again, the cause must be
corrected, or the problem may persist in the
rebuilt engine.
22 Check the piston-to-rod clearance by
twisting the piston and rod in opposite
directions. Any noticeable play indicates
excessive wear, which must be corrected. The
piston/connecting rod assemblies should be
taken to a Ford dealer or engine
reconditioning specialist to have the pistons,
gudgeon pins and rods checked, and new
components fitted as required.
23 Don’t attempt to separate the pistons
from the connecting rods (even if non-genuine
replacements are found elsewhere). This is a
task for a Ford dealer or similar engine
reconditioning specialist, due to the special
heating equipment, press, mandrels and
supports required to do the job. If the
piston/connecting rod assemblies do require
this sort of work, have the connecting rods
checked for bend and twist, since only such
engine repair specialists will have the facilities
for this purpose. 24
Check the connecting rods for cracks and
other damage. Also on CVH engines, check
that the oilway in the base of the connecting
rod is clear by probing with a piece of wire
(see illustration) . Temporarily remove the
big-end bearing caps and the old bearing
shells, wipe clean the rod and cap bearing
recesses, and inspect them for nicks, gouges
and scratches. After checking the rods,
replace the old shells, slip the caps into place,
and tighten the bolts finger-tight.
12 Crankshaft -
removal and inspection
4
Removal
Note: The crankshaft can be removed only
after the engine has been removed from the
vehicle. It is assumed that the transmission,
flywheel/driveplate, timing belt/chain, cylinder
head, sump, oil pump pick-up/strainer, oil
baffle, oil pump, and piston/connecting rod
assemblies, have already been removed. The
crankshaft left-hand oil seal carrier/housing
must be unbolted from the cylinder
block/crankcase before proceeding with
crankshaft removal.
1 Before the crankshaft is removed, check
the endfloat. Mount a DTI (Dial Test Indicator,
or dial gauge) with the stem in line with the
crankshaft and just touching the crankshaft
(see illustration) .
2 Push the crankshaft fully away from the
gauge, and zero it. Next, lever the crankshaft
towards the gauge as far as possible, and
check the reading obtained. The distance that
the crankshaft moved is its endfloat; if it is
greater than specified, check the crankshaft
thrust surfaces for wear. If no wear is evident,
new thrustwashers should correct the
endfloat.
3 If no dial gauge is available, feeler gauges
can be used. Gently lever or push the
crankshaft all the way towards the right-hand
end of the engine. Slip feeler gauges between
the crankshaft and the main bearing
incorporating the thrustwashers to determine
the clearance.
2D•18 Engine removal and overhaul procedures
12.1 Checking crankshaft endfloat with a dial gauge11.24 Check that the connecting rodoilway on CVH engines is clear11.14 Using feeler gauge blades to remove piston rings
1595Ford Fiesta Remakeprocarmanuals.com
http://vnx.su
Page 88 of 296
HCS engines
4Check that the main bearing caps have
marks to indicate their respective fitted
positions in the block. They also have arrow
marks pointing towards the timing chain cover
end of the engine to indicate correct
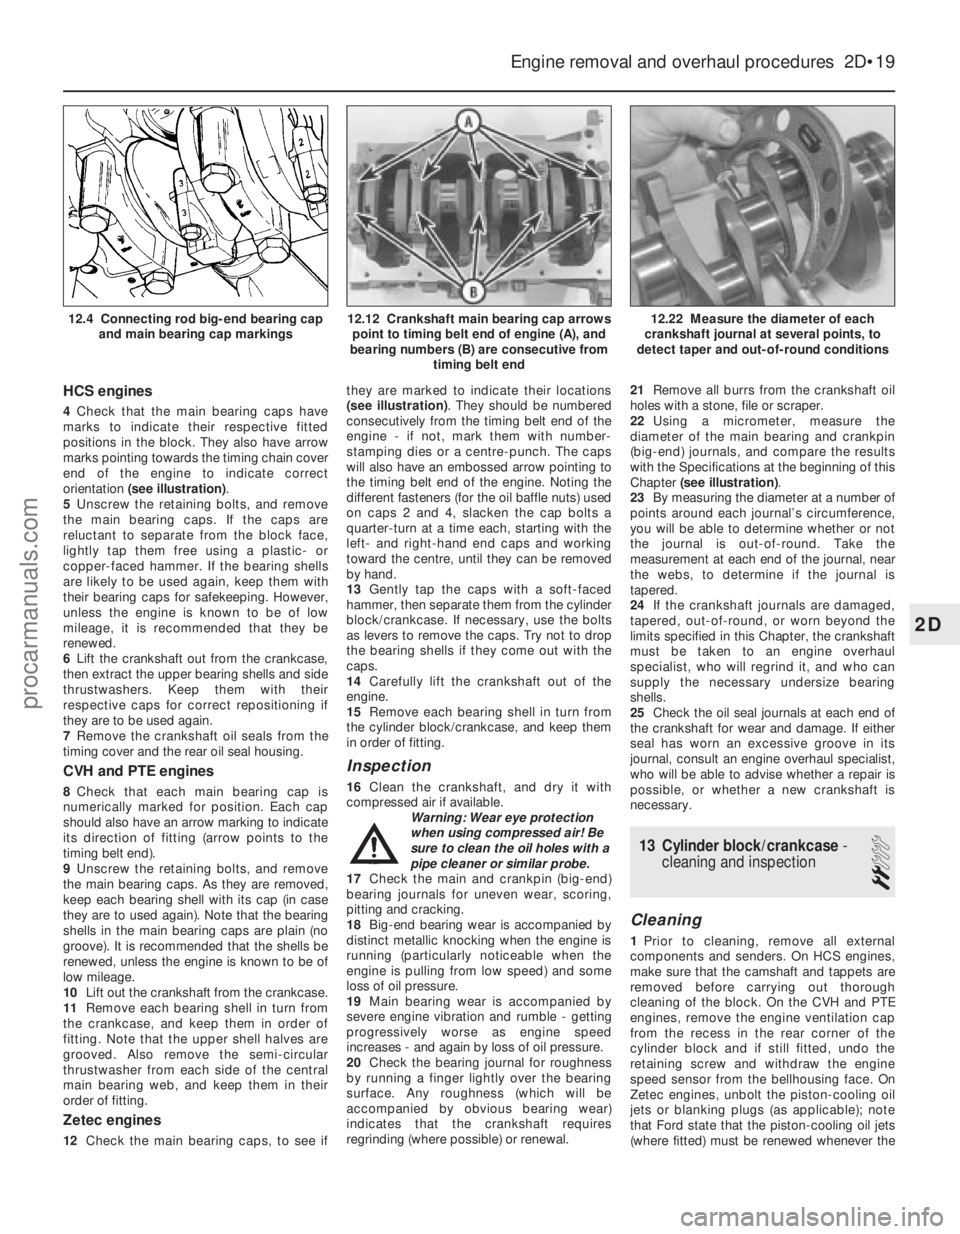
orientation (see illustration) .
5 Unscrew the retaining bolts, and remove
the main bearing caps. If the caps are
reluctant to separate from the block face,
lightly tap them free using a plastic- or
copper-faced hammer. If the bearing shells
are likely to be used again, keep them with
their bearing caps for safekeeping. However,
unless the engine is known to be of low
mileage, it is recommended that they be
renewed.
6 Lift the crankshaft out from the crankcase,
then extract the upper bearing shells and side
thrustwashers. Keep them with their
respective caps for correct repositioning if
they are to be used again.
7 Remove the crankshaft oil seals from the
timing cover and the rear oil seal housing.
CVH and PTE engines
8 Check that each main bearing cap is
numerically marked for position. Each cap
should also have an arrow marking to indicate
its direction of fitting (arrow points to the
timing belt end).
9 Unscrew the retaining bolts, and remove
the main bearing caps. As they are removed,
keep each bearing shell with its cap (in case
they are to used again). Note that the bearing
shells in the main bearing caps are plain (no
groove). It is recommended that the shells be
renewed, unless the engine is known to be of
low mileage.
10 Lift out the crankshaft from the crankcase.
11 Remove each bearing shell in turn from
the crankcase, and keep them in order of
fitting. Note that the upper shell halves are
grooved. Also remove the semi-circular
thrustwasher from each side of the central
main bearing web, and keep them in their
order of fitting.
Zetec engines
12 Check the main bearing caps, to see if they are marked to indicate their locations
(see illustration)
. They should be numbered
consecutively from the timing belt end of the
engine - if not, mark them with number-
stamping dies or a centre-punch. The caps
will also have an embossed arrow pointing to
the timing belt end of the engine. Noting the
different fasteners (for the oil baffle nuts) used
on caps 2 and 4, slacken the cap bolts a
quarter-turn at a time each, starting with the
left- and right-hand end caps and working
toward the centre, until they can be removed
by hand.
13 Gently tap the caps with a soft-faced
hammer, then separate them from the cylinder
block/crankcase. If necessary, use the bolts
as levers to remove the caps. Try not to drop
the bearing shells if they come out with the
caps.
14 Carefully lift the crankshaft out of the
engine.
15 Remove each bearing shell in turn from
the cylinder block/crankcase, and keep them
in order of fitting.
Inspection
16 Clean the crankshaft, and dry it with
compressed air if available.
Warning: Wear eye protection
when using compressed air! Be
sure to clean the oil holes with a
pipe cleaner or similar probe.
17 Check the main and crankpin (big-end)
bearing journals for uneven wear, scoring,
pitting and cracking.
18 Big-end bearing wear is accompanied by
distinct metallic knocking when the engine is
running (particularly noticeable when the
engine is pulling from low speed) and some
loss of oil pressure.
19 Main bearing wear is accompanied by
severe engine vibration and rumble - getting
progressively worse as engine speed
increases - and again by loss of oil pressure.
20 Check the bearing journal for roughness
by running a finger lightly over the bearing
surface. Any roughness (which will be
accompanied by obvious bearing wear)
indicates that the crankshaft requires
regrinding (where possible) or renewal. 21
Remove all burrs from the crankshaft oil
holes with a stone, file or scraper.
22 Using a micrometer, measure the
diameter of the main bearing and crankpin
(big-end) journals, and compare the results
with the Specifications at the beginning of this
Chapter (see illustration) .
23 By measuring the diameter at a number of
points around each journal’s circumference,
you will be able to determine whether or not
the journal is out-of-round. Take the
measurement at each end of the journal, near
the webs, to determine if the journal is
tapered.
24 If the crankshaft journals are damaged,
tapered, out-of-round, or worn beyond the
limits specified in this Chapter, the crankshaft
must be taken to an engine overhaul
specialist, who will regrind it, and who can
supply the necessary undersize bearing
shells.
25 Check the oil seal journals at each end of
the crankshaft for wear and damage. If either
seal has worn an excessive groove in its
journal, consult an engine overhaul specialist,
who will be able to advise whether a repair is
possible, or whether a new crankshaft is
necessary.
13 Cylinder block/crankcase -
cleaning and inspection
2
Cleaning
1 Prior to cleaning, remove all external
components and senders. On HCS engines,
make sure that the camshaft and tappets are
removed before carrying out thorough
cleaning of the block. On the CVH and PTE
engines, remove the engine ventilation cap
from the recess in the rear corner of the
cylinder block and if still fitted, undo the
retaining screw and withdraw the engine
speed sensor from the bellhousing face. On
Zetec engines, unbolt the piston-cooling oil
jets or blanking plugs (as applicable); note
that Ford state that the piston-cooling oil jets
(where fitted) must be renewed whenever the
Engine removal and overhaul procedures 2D•19
12.22 Measure the diameter of each
crankshaft journal at several points, to
detect taper and out-of-round conditions12.12 Crankshaft main bearing cap arrows point to timing belt end of engine (A), and
bearing numbers (B) are consecutive from timing belt end12.4 Connecting rod big-end bearing capand main bearing cap markings
2D
1595Ford Fiesta Remakeprocarmanuals.com
http://vnx.su
Page 89 of 296
engine is dismantled for full overhaul (see
illustrations) .
2 Remove all oil gallery plugs (where fitted).
The plugs are usually very tight - they may
have to be drilled out, and the holes re-
tapped. Use new plugs when the engine is
reassembled. Drill a small hole in the centre of
each core plug, and pull them out with a car
bodywork dent puller.
Caution: The core plugs (also known as
freeze or soft plugs) may be difficult or
impossible to retrieve if they are driven
into the block coolant passages.
3 If any of the castings are extremely dirty, all
should be steam-cleaned.
4 After the castings are returned from steam-
cleaning, clean all oil holes and oil galleries
one more time. Flush all internal passages
with warm water until the water runs clear,
then dry thoroughly, and apply a light film of
oil to all machined surfaces, to prevent
rusting. If you have access to compressed air,
use it to speed the drying process, and to
blow out all the oil holes and galleries.
Warning: Wear eye protection
when using compressed air!
5 If the castings are not very dirty, you can do
an adequate cleaning job with hot soapy
water (as hot as you can stand!) and a stiff
brush. Take plenty of time, and do a thorough
job. Regardless of the cleaning method used,
be sure to clean all oil holes and galleries very thoroughly, and to dry all components
completely; protect the machined surfaces as
described above, to prevent rusting.
6
All threaded holes must be clean and dry,
to ensure accurate torque readings during
reassembly; now is also a good time to clean
and check the threads of all principal bolts -
however, note that some, such as the cylinder
head and flywheel/driveplate bolts, are to be
renewed as a matter of course whenever they
are disturbed. Run the proper-size tap into
each of the holes, to remove rust, corrosion,
thread sealant or sludge, and to restore
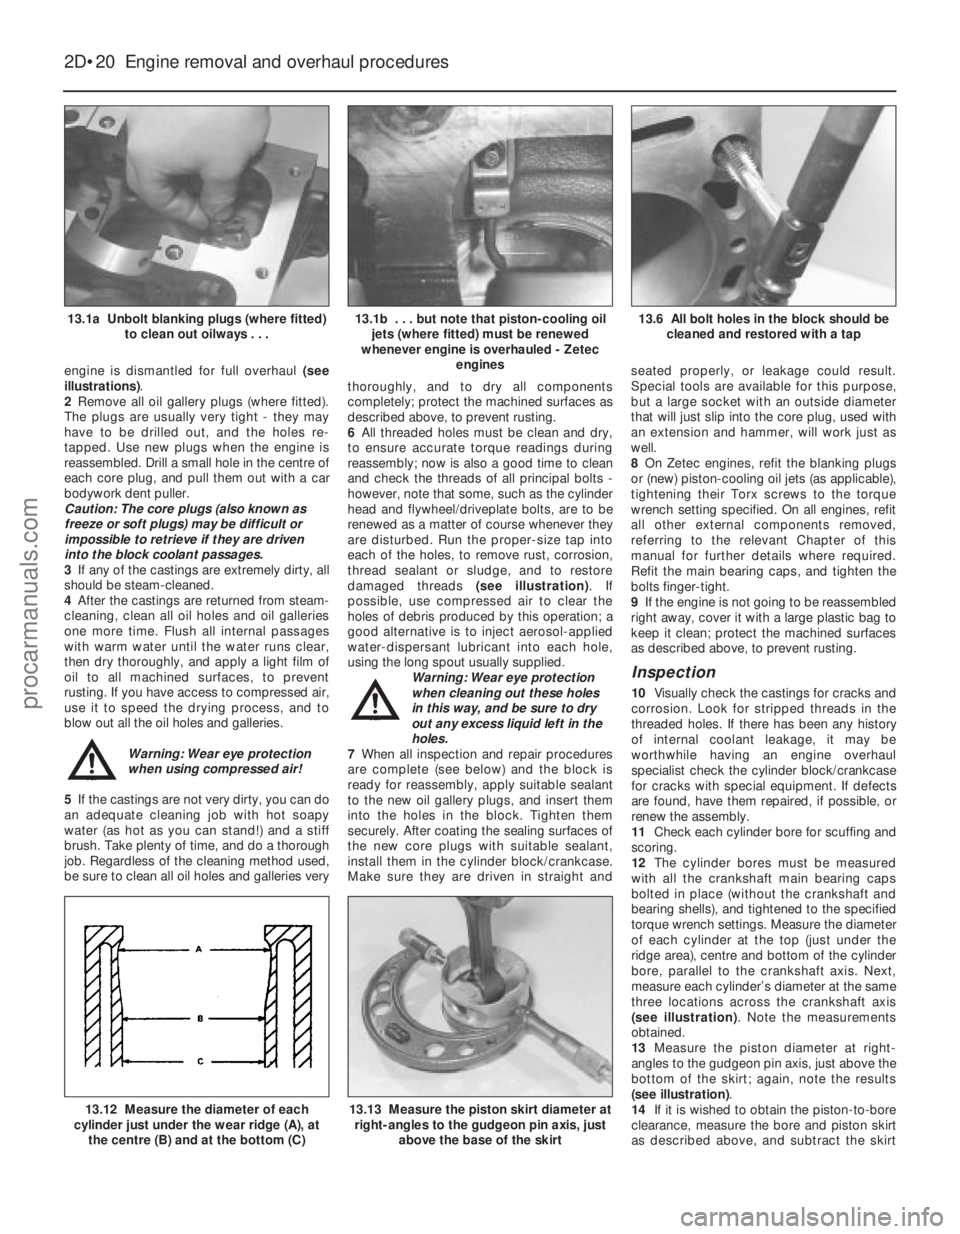
damaged threads (see illustration). If
possible, use compressed air to clear the
holes of debris produced by this operation; a
good alternative is to inject aerosol-applied
water-dispersant lubricant into each hole,
using the long spout usually supplied. Warning: Wear eye protection
when cleaning out these holes
in this way, and be sure to dry
out any excess liquid left in the
holes.
7 When all inspection and repair procedures
are complete (see below) and the block is
ready for reassembly, apply suitable sealant
to the new oil gallery plugs, and insert them
into the holes in the block. Tighten them
securely. After coating the sealing surfaces of
the new core plugs with suitable sealant,
install them in the cylinder block/crankcase.
Make sure they are driven in straight and seated properly, or leakage could result.
Special tools are available for this purpose,
but a large socket with an outside diameter
that will just slip into the core plug, used with
an extension and hammer, will work just as
well.
8
On Zetec engines, refit the blanking plugs
or (new) piston-cooling oil jets (as applicable),
tightening their Torx screws to the torque
wrench setting specified. On all engines, refit
all other external components removed,
referring to the relevant Chapter of this
manual for further details where required.
Refit the main bearing caps, and tighten the
bolts finger-tight.
9 If the engine is not going to be reassembled
right away, cover it with a large plastic bag to
keep it clean; protect the machined surfaces
as described above, to prevent rusting.
Inspection
10 Visually check the castings for cracks and
corrosion. Look for stripped threads in the
threaded holes. If there has been any history
of internal coolant leakage, it may be
worthwhile having an engine overhaul
specialist check the cylinder block/crankcase
for cracks with special equipment. If defects
are found, have them repaired, if possible, or
renew the assembly.
11 Check each cylinder bore for scuffing and
scoring.
12 The cylinder bores must be measured
with all the crankshaft main bearing caps
bolted in place (without the crankshaft and
bearing shells), and tightened to the specified
torque wrench settings. Measure the diameter
of each cylinder at the top (just under the
ridge area), centre and bottom of the cylinder
bore, parallel to the crankshaft axis. Next,
measure each cylinder’s diameter at the same
three locations across the crankshaft axis
(see illustration) . Note the measurements
obtained.
13 Measure the piston diameter at right-
angles to the gudgeon pin axis, just above the
bottom of the skirt; again, note the results
(see illustration) .
14 If it is wished to obtain the piston-to-bore
clearance, measure the bore and piston skirt
as described above, and subtract the skirt
2D•20 Engine removal and overhaul procedures
13.13 Measure the piston skirt diameter at
right-angles to the gudgeon pin axis, just
above the base of the skirt13.12 Measure the diameter of each
cylinder just under the wear ridge (A), at
the centre (B) and at the bottom (C)
13.6 All bolt holes in the block should be cleaned and restored with a tap13.1b . . . but note that piston-cooling oiljets (where fitted) must be renewed
whenever engine is overhauled - Zetec engines13.1a Unbolt blanking plugs (where fitted)to clean out oilways . . .
1595Ford Fiesta Remakeprocarmanuals.com
http://vnx.su
Page 90 of 296
diameter from the bore measurement. If the
precision measuring tools shown are not
available, the condition of the pistons and
bores can be assessed, though not quite as
accurately, by using feeler gauges as follows.
Select a feeler gauge of thickness equal to the
specified piston-to-bore clearance, and slip it
into the cylinder along with the matching
piston. The piston must be positioned exactly
as it normally would be. The feeler gauge
must be between the piston and cylinder on
one of the thrust faces (at right-angles to the
gudgeon pin bore). The piston should slip
through the cylinder (with the feeler gauge in
place) with moderate pressure; if it falls
through or slides through easily, the clearance
is excessive, and a new piston will be
required. If the piston binds at the lower end
of the cylinder, and is loose toward the top,
the cylinder is tapered. If tight spots are
encountered as the piston/feeler gauge is
rotated in the cylinder, the cylinder is
out-of-round (oval).15 Repeat these procedures for the
remaining pistons and cylinder bores.
16 Compare the results with the
Specifications at the beginning of this
Chapter; if any measurement is beyond the
dimensions specified for that class (check the
piston crown marking to establish the class
of piston fitted), or if any bore measurement is
significantly different from the others
(indicating that the bore is tapered or oval),
the piston or bore is excessively-worn.
17 Worn pistons must be renewed; on some
engines, the pistons are available as Ford
replacement parts only as part of the
complete piston/connecting rod assembly.
See a Ford dealer or engine reconditioning
specialist for advice.
18 If any of the cylinder bores are badly
scuffed or scored, or if they are excessively-
worn, out-of-round or tapered, the usual
course of action would be to have the cylinder
block/crankcase rebored, and to fit new,
oversized, pistons on reassembly. See a Ford
dealer or engine reconditioning specialist for
advice.
19 If the bores are in reasonably good
condition and not excessively-worn, then it
may only be necessary to renew the piston
rings.
20 If this is the case, the bores should be
honed, to allow the new rings to bed in
correctly and provide the best possible seal.
Honing is an operation that will be carried out
for you by an engine reconditioning specialist.
21 After all the machining operations have
been carried out, the entire block/crankcase
must be washed very thoroughly with warm
soapy water to remove all traces of abrasive
grit produced during the machining
operations. When completely clean, rinse it
thoroughly and dry it, then lightly oil all
exposed machined surfaces to prevent
rusting.
22 The cylinder block/crankcase should now
be completely clean and dry, with all components checked for wear or damage,
and repaired or overhauled as necessary.
Refit as many ancillary components as
possible, for safekeeping. If reassembly is not
to start immediately, cover the block with a
large plastic bag to keep it clean.
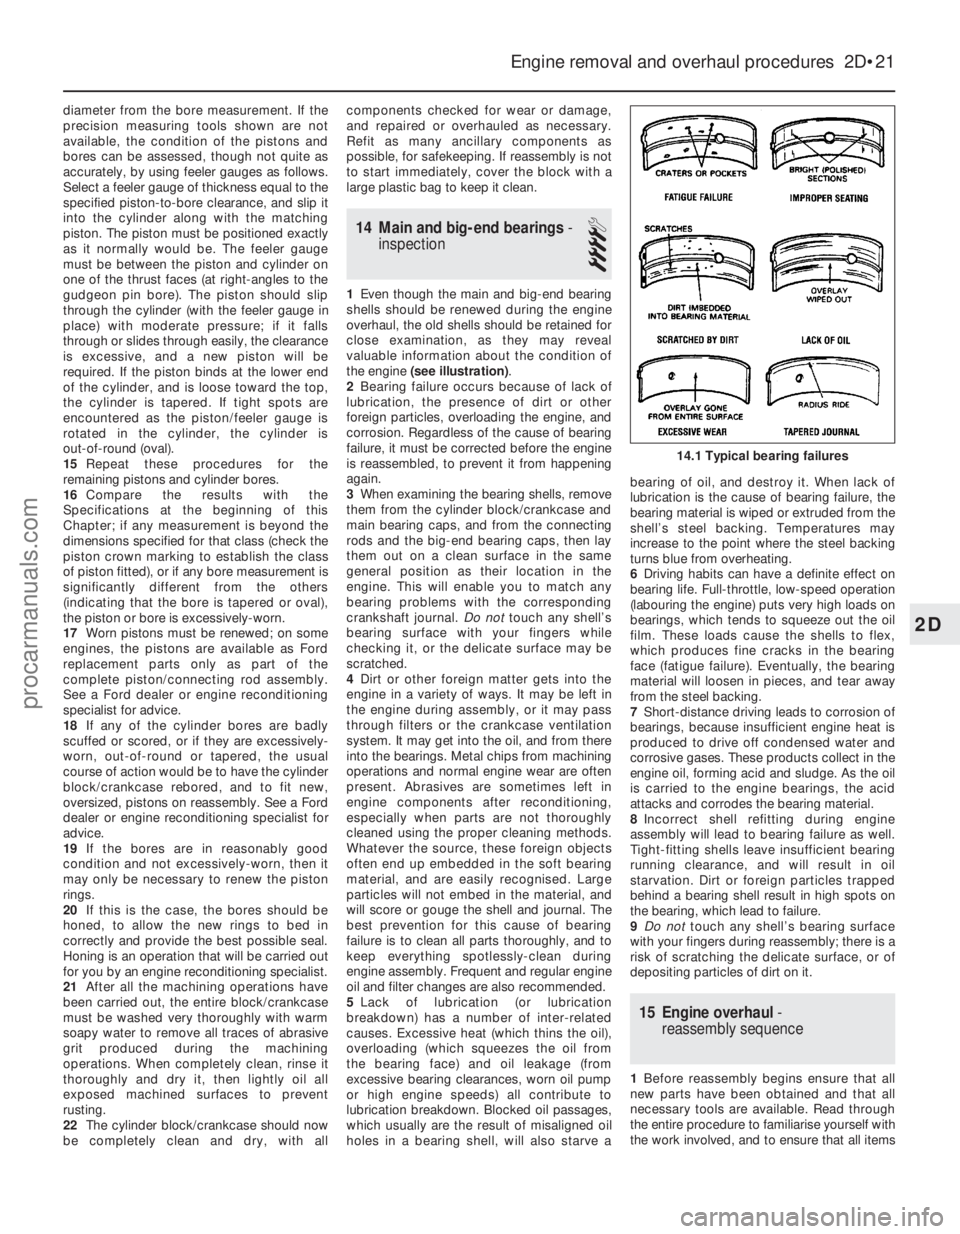
14 Main and big-end bearings
-
inspection
4
1 Even though the main and big-end bearing
shells should be renewed during the engine
overhaul, the old shells should be retained for
close examination, as they may reveal
valuable information about the condition of
the engine (see illustration) .
2 Bearing failure occurs because of lack of
lubrication, the presence of dirt or other
foreign particles, overloading the engine, and
corrosion. Regardless of the cause of bearing
failure, it must be corrected before the engine
is reassembled, to prevent it from happening
again.
3 When examining the bearing shells, remove
them from the cylinder block/crankcase and
main bearing caps, and from the connecting
rods and the big-end bearing caps, then lay
them out on a clean surface in the same
general position as their location in the
engine. This will enable you to match any
bearing problems with the corresponding
crankshaft journal. Do nottouch any shell’s
bearing surface with your fingers while
checking it, or the delicate surface may be
scratched.
4 Dirt or other foreign matter gets into the
engine in a variety of ways. It may be left in
the engine during assembly, or it may pass
through filters or the crankcase ventilation
system. It may get into the oil, and from there
into the bearings. Metal chips from machining
operations and normal engine wear are often
present. Abrasives are sometimes left in
engine components after reconditioning,
especially when parts are not thoroughly
cleaned using the proper cleaning methods.
Whatever the source, these foreign objects
often end up embedded in the soft bearing
material, and are easily recognised. Large
particles will not embed in the material, and
will score or gouge the shell and journal. The
best prevention for this cause of bearing
failure is to clean all parts thoroughly, and to
keep everything spotlessly-clean during
engine assembly. Frequent and regular engine
oil and filter changes are also recommended.
5 Lack of lubrication (or lubrication
breakdown) has a number of inter-related
causes. Excessive heat (which thins the oil),
overloading (which squeezes the oil from
the bearing face) and oil leakage (from
excessive bearing clearances, worn oil pump
or high engine speeds) all contribute to
lubrication breakdown. Blocked oil passages,
which usually are the result of misaligned oil
holes in a bearing shell, will also starve a bearing of oil, and destroy it. When lack of
lubrication is the cause of bearing failure, the
bearing material is wiped or extruded from the
shell’s steel backing. Temperatures may
increase to the point where the steel backing
turns blue from overheating.
6
Driving habits can have a definite effect on
bearing life. Full-throttle, low-speed operation
(labouring the engine) puts very high loads on
bearings, which tends to squeeze out the oil
film. These loads cause the shells to flex,
which produces fine cracks in the bearing
face (fatigue failure). Eventually, the bearing
material will loosen in pieces, and tear away
from the steel backing.
7 Short-distance driving leads to corrosion of
bearings, because insufficient engine heat is
produced to drive off condensed water and
corrosive gases. These products collect in the
engine oil, forming acid and sludge. As the oil
is carried to the engine bearings, the acid
attacks and corrodes the bearing material.
8 Incorrect shell refitting during engine
assembly will lead to bearing failure as well.
Tight-fitting shells leave insufficient bearing
running clearance, and will result in oil
starvation. Dirt or foreign particles trapped
behind a bearing shell result in high spots on
the bearing, which lead to failure.
9 Do not touch any shell’s bearing surface
with your fingers during reassembly; there is a
risk of scratching the delicate surface, or of
depositing particles of dirt on it.
15 Engine overhaul -
reassembly sequence
1 Before reassembly begins ensure that all
new parts have been obtained and that all
necessary tools are available. Read through
the entire procedure to familiarise yourself with
the work involved, and to ensure that all items
Engine removal and overhaul procedures 2D•21
14.1 Typical bearing failures
2D
1595Ford Fiesta Remakeprocarmanuals.com
http://vnx.su
Page 91 of 296
necessary for reassembly of the engine are at
hand. In addition to all normal tools and
materials, jointing and thread locking
compound will be needed during engine
reassembly. For general-purpose applications,
it is recommended that Loctite 275 setting
sealer or Hylomar PL32M non-setting sealer
be used for joints where required, and
Loctite 270 for stud and bolt thread-locking.
For specific applications on Zetec engines,
Hylosil 102 for the cylinder block/crankcase-
to-sump/oil pump/oil seal carrier joints, and
Loctite 518 for the camshaft right-hand
bearing caps should be used. These are
recommended by, and obtained from, Ford
dealers. In all other cases, provided the
relevant mating surfaces are clean and flat,
new gaskets will be sufficient to ensure joints
are oil-tight. Do notuse any kind of silicone-
based sealant on any part of the fuel system or
inlet manifold, and neveruse exhaust sealants
upstream of the catalytic converter.
2 In order to save time and avoid problems,
engine reassembly can be carried out in the
following order (as applicable).
a) Engine ventilation cap (CVH and PTE engines).
b) Tappets and camshaft (HCS engines).
c) Crankshaft and main bearings.
d) Pistons and connecting rods.
e) Oil pump.
f) Sump.
g) Flywheel/driveplate.
h) Cylinder head.
i) Timing sprockets and chain/belt.
j) Engine external components.
3 Ensure that everything is clean prior to
reassembly. As mentioned previously, dirt and
metal particles can quickly destroy bearings
and result in major engine damage. Use clean
engine oil to lubricate during reassembly.
16 Piston rings - refitting
2
1Before installing new piston rings, check
the end gaps. Lay out each piston set with a
piston/connecting rod assembly, and keep them together as a matched set from now on.
2
Insert the top compression ring into the first
cylinder, and square it up with the cylinder
walls by pushing it in with the top of the
piston. The ring should be near the bottom of
the cylinder, at the lower limit of ring travel.
3 To measure the end gap, slip feeler gauges
between the ends of the ring, until a gauge
equal to the gap width is found. The feeler
gauge should slide between the ring ends
with a slight amount of drag. Compare the
measurement to the value given in the
Specifications in this Chapter; if the gap is
larger or smaller than specified, double-check to make sure you have the correct rings
before proceeding. If you are assessing the
condition of used rings, have the cylinder
bores checked and measured by a Ford
dealer or similar engine reconditioning
specialist, so that you can be sure of exactly
which component is worn, and seek advice as
to the best course of action to take.
4 If the end gap is still too small, it must be
opened up by careful filing of the ring ends
using a fine file. If it is too large, this is not as
serious, unless the specified limit is exceeded,
in which case very careful checking is
required of the dimensions of all components,
as well as of the new parts.
5 Repeat the procedure for each ring that will
be installed in the first cylinder, and for each
ring in the remaining cylinders. Remember to
keep rings, pistons and cylinders matched up.
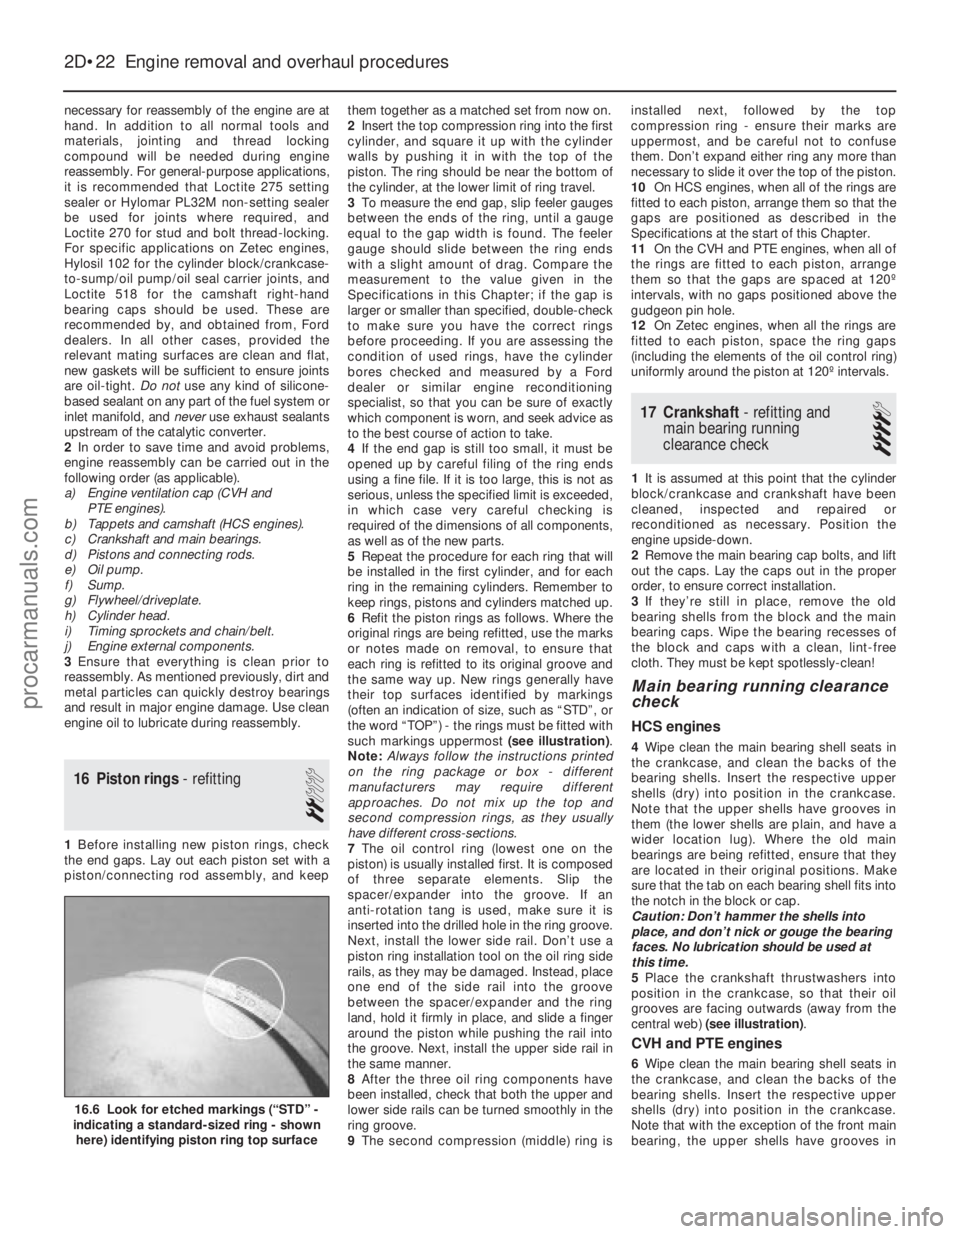
6 Refit the piston rings as follows. Where the
original rings are being refitted, use the marks
or notes made on removal, to ensure that
each ring is refitted to its original groove and
the same way up. New rings generally have
their top surfaces identified by markings
(often an indication of size, such as “STD”, or
the word “TOP”) - the rings must be fitted with
such markings uppermost (see illustration) .
Note: Always follow the instructions printed
on the ring package or box - different
manufacturers may require different
approaches. Do not mix up the top and
second compression rings, as they usually
have different cross-sections.
7 The oil control ring (lowest one on the
piston) is usually installed first. It is composed
of three separate elements. Slip the
spacer/expander into the groove. If an
anti- rotation tang is used, make sure it is
inserted into the drilled hole in the ring groove.
Next, install the lower side rail. Don’t use a
piston ring installation tool on the oil ring side
rails, as they may be damaged. Instead, place
one end of the side rail into the groove
between the spacer/expander and the ring
land, hold it firmly in place, and slide a finger
around the piston while pushing the rail into
the groove. Next, install the upper side rail in
the same manner.
8 After the three oil ring components have
been installed, check that both the upper and
lower side rails can be turned smoothly in the
ring groove.
9 The second compression (middle) ring is installed next, followed by the top
compression ring - ensure their marks are
uppermost, and be careful not to confuse
them. Don’t expand either ring any more than
necessary to slide it over the top of the piston.
10
On HCS engines, when all of the rings are
fitted to each piston, arrange them so that the
gaps are positioned as described in the
Specifications at the start of this Chapter.
11 On the CVH and PTE engines, when all of
the rings are fitted to each piston, arrange
them so that the gaps are spaced at 120º
intervals, with no gaps positioned above the
gudgeon pin hole.
12 On Zetec engines, when all the rings are
fitted to each piston, space the ring gaps
(including the elements of the oil control ring)
uniformly around the piston at 120º intervals.
17 Crankshaft - refitting and
main bearing running
clearance check
4
1 It is assumed at this point that the cylinder
block/crankcase and crankshaft have been
cleaned, inspected and repaired or
reconditioned as necessary. Position the
engine upside-down.
2 Remove the main bearing cap bolts, and lift
out the caps. Lay the caps out in the proper
order, to ensure correct installation.
3 If they’re still in place, remove the old
bearing shells from the block and the main
bearing caps. Wipe the bearing recesses of
the block and caps with a clean, lint-free
cloth. They must be kept spotlessly-clean!
Main bearing running clearance
check
HCS engines
4 Wipe clean the main bearing shell seats in
the crankcase, and clean the backs of the
bearing shells. Insert the respective upper
shells (dry) into position in the crankcase.
Note that the upper shells have grooves in
them (the lower shells are plain, and have a
wider location lug). Where the old main
bearings are being refitted, ensure that they
are located in their original positions. Make
sure that the tab on each bearing shell fits into
the notch in the block or cap.
Caution: Don’t hammer the shells into
place, and don’t nick or gouge the bearing
faces. No lubrication should be used at
this time.
5 Place the crankshaft thrustwashers into
position in the crankcase, so that their oil
grooves are facing outwards (away from the
central web) (see illustration) .
CVH and PTE engines
6Wipe clean the main bearing shell seats in
the crankcase, and clean the backs of the
bearing shells. Insert the respective upper
shells (dry) into position in the crankcase.
Note that with the exception of the front main
bearing, the upper shells have grooves in
2D•22 Engine removal and overhaul procedures
16.6 Look for etched markings (“STD” -
indicating a standard-sized ring - shown
here) identifying piston ring top surface
1595Ford Fiesta Remakeprocarmanuals.com
http://vnx.su
Page 92 of 296
them (the lower half bearings are plain). The
upper and lower front shells are narrower in
section, and both have an oil groove in them.
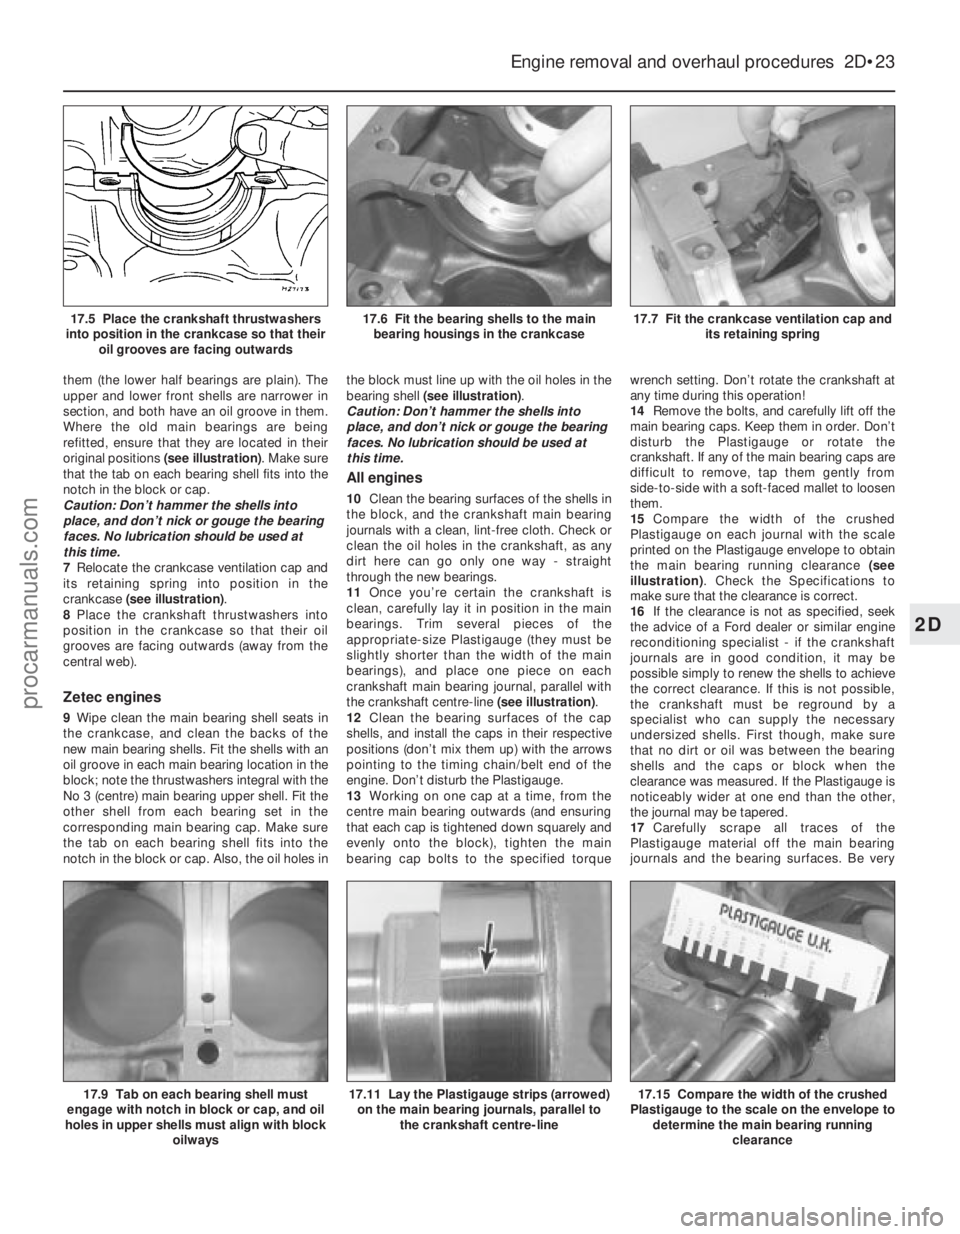
Where the old main bearings are being
refitted, ensure that they are located in their
original positions (see illustration). Make sure
that the tab on each bearing shell fits into the
notch in the block or cap.
Caution: Don’t hammer the shells into
place, and don’t nick or gouge the bearing
faces. No lubrication should be used at
this time.
7 Relocate the crankcase ventilation cap and
its retaining spring into position in the
crankcase (see illustration) .
8 Place the crankshaft thrustwashers into
position in the crankcase so that their oil
grooves are facing outwards (away from the
central web).
Zetec engines
9 Wipe clean the main bearing shell seats in
the crankcase, and clean the backs of the
new main bearing shells. Fit the shells with an
oil groove in each main bearing location in the
block; note the thrustwashers integral with the
No 3 (centre) main bearing upper shell. Fit the
other shell from each bearing set in the
corresponding main bearing cap. Make sure
the tab on each bearing shell fits into the
notch in the block or cap. Also, the oil holes in the block must line up with the oil holes in the
bearing shell
(see illustration) .
Caution: Don’t hammer the shells into
place, and don’t nick or gouge the bearing
faces. No lubrication should be used at
this time.
All engines
10 Clean the bearing surfaces of the shells in
the block, and the crankshaft main bearing
journals with a clean, lint-free cloth. Check or
clean the oil holes in the crankshaft, as any
dirt here can go only one way - straight
through the new bearings.
11 Once you’re certain the crankshaft is
clean, carefully lay it in position in the main
bearings. Trim several pieces of the
appropriate-size Plastigauge (they must be
slightly shorter than the width of the main
bearings), and place one piece on each
crankshaft main bearing journal, parallel with
the crankshaft centre-line (see illustration).
12 Clean the bearing surfaces of the cap
shells, and install the caps in their respective
positions (don’t mix them up) with the arrows
pointing to the timing chain/belt end of the
engine. Don’t disturb the Plastigauge.
13 Working on one cap at a time, from the
centre main bearing outwards (and ensuring
that each cap is tightened down squarely and
evenly onto the block), tighten the main
bearing cap bolts to the specified torque wrench setting. Don’t rotate the crankshaft at
any time during this operation!
14
Remove the bolts, and carefully lift off the
main bearing caps. Keep them in order. Don’t
disturb the Plastigauge or rotate the
crankshaft. If any of the main bearing caps are
difficult to remove, tap them gently from
side-to-side with a soft-faced mallet to loosen
them.
15 Compare the width of the crushed
Plastigauge on each journal with the scale
printed on the Plastigauge envelope to obtain
the main bearing running clearance (see
illustration) . Check the Specifications to
make sure that the clearance is correct.
16 If the clearance is not as specified, seek
the advice of a Ford dealer or similar engine
reconditioning specialist - if the crankshaft
journals are in good condition, it may be
possible simply to renew the shells to achieve
the correct clearance. If this is not possible,
the crankshaft must be reground by a
specialist who can supply the necessary
undersized shells. First though, make sure
that no dirt or oil was between the bearing
shells and the caps or block when the
clearance was measured. If the Plastigauge is
noticeably wider at one end than the other,
the journal may be tapered.
17 Carefully scrape all traces of the
Plastigauge material off the main bearing
journals and the bearing surfaces. Be very
Engine removal and overhaul procedures 2D•23
17.7 Fit the crankcase ventilation cap and its retaining spring17.6 Fit the bearing shells to the mainbearing housings in the crankcase
17.15 Compare the width of the crushed
Plastigauge to the scale on the envelope to determine the main bearing running
clearance17.11 Lay the Plastigauge strips (arrowed)on the main bearing journals, parallel to the crankshaft centre-line17.9 Tab on each bearing shell must
engage with notch in block or cap, and oil
holes in upper shells must align with block
oilways
2D
1595Ford Fiesta Remake
17.5 Place the crankshaft thrustwashers
into position in the crankcase so that their oil grooves are facing outwardsprocarmanuals.com
http://vnx.su
Page 93 of 296
careful not to scratch the bearing - use your
fingernail or the edge of a credit card.
Final crankshaft refitting
18Carefully lift the crankshaft out of the
engine. Clean the bearing surfaces of the
shells in the block, then apply a thin, uniform
layer of clean molybdenum disulphide- based
grease, engine assembly lubricant, or clean
engine oil to each surface. Coat the
thrustwasher surfaces as well.
19 Lubricate the crankshaft oil seal journals
with molybdenum disulphide-based grease,
engine assembly lubricant, or clean engine oil.
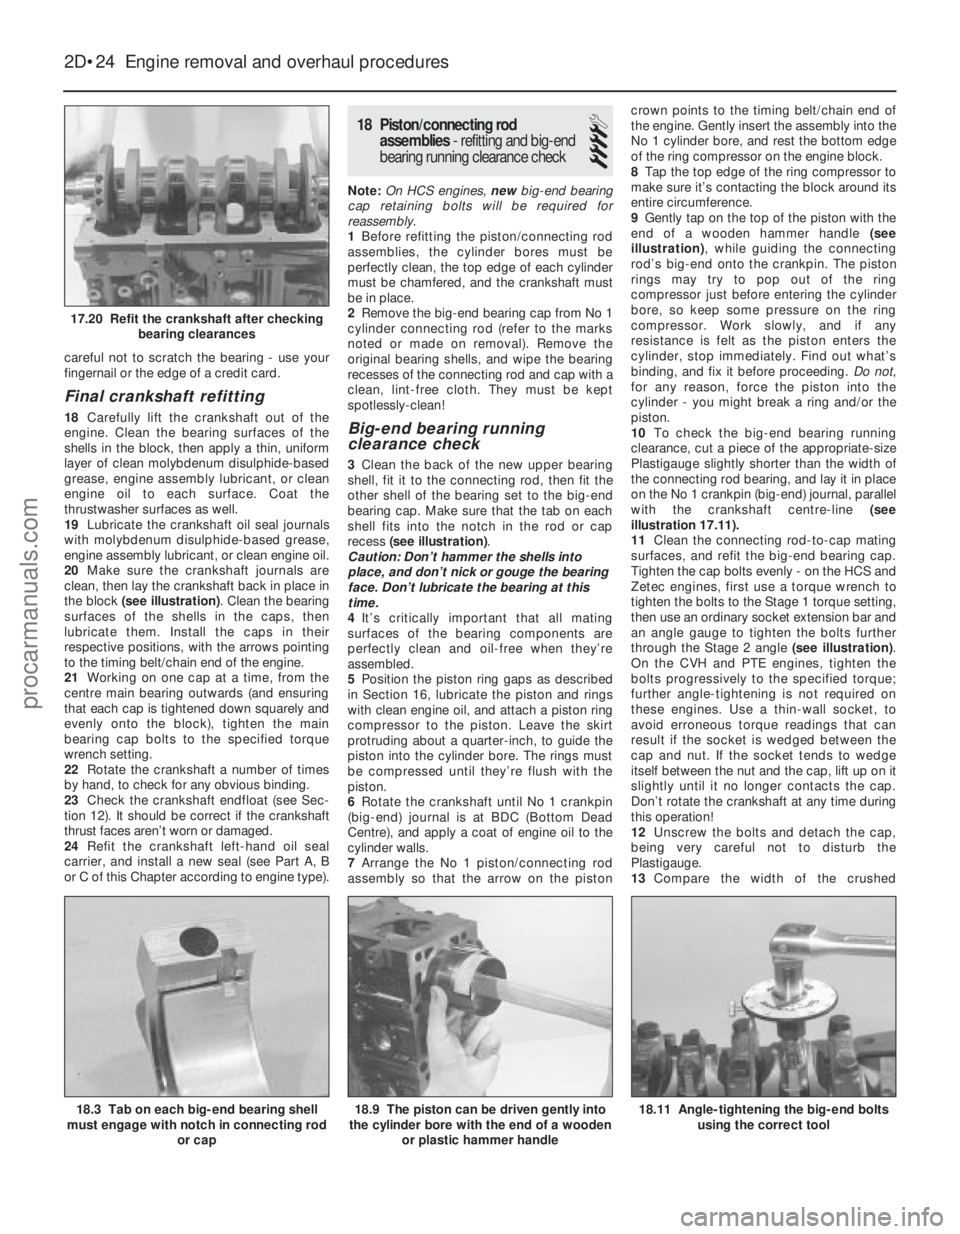
20 Make sure the crankshaft journals are
clean, then lay the crankshaft back in place in
the block (see illustration) . Clean the bearing
surfaces of the shells in the caps, then
lubricate them. Install the caps in their
respective positions, with the arrows pointing
to the timing belt/chain end of the engine.
21 Working on one cap at a time, from the
centre main bearing outwards (and ensuring
that each cap is tightened down squarely and
evenly onto the block), tighten the main
bearing cap bolts to the specified torque
wrench setting.
22 Rotate the crankshaft a number of times
by hand, to check for any obvious binding.
23 Check the crankshaft endfloat (see Sec-
tion 12). It should be correct if the crankshaft
thrust faces aren’t worn or damaged.
24 Refit the crankshaft left-hand oil seal
carrier, and install a new seal (see Part A, B
or C of this Chapter according to engine type).
18 Piston/connecting rod
assemblies - refitting and big-end
bearing running clearance check
4
Note: On HCS engines, new big-end bearing
cap retaining bolts will be required for
reassembly.
1 Before refitting the piston/connecting rod
assemblies, the cylinder bores must be
perfectly clean, the top edge of each cylinder
must be chamfered, and the crankshaft must
be in place.
2 Remove the big-end bearing cap from No 1
cylinder connecting rod (refer to the marks
noted or made on removal). Remove the
original bearing shells, and wipe the bearing
recesses of the connecting rod and cap with a
clean, lint-free cloth. They must be kept
spotlessly-clean!
Big-end bearing running
clearance check
3 Clean the back of the new upper bearing
shell, fit it to the connecting rod, then fit the
other shell of the bearing set to the big-end
bearing cap. Make sure that the tab on each
shell fits into the notch in the rod or cap
recess (see illustration) .
Caution: Don’t hammer the shells into
place, and don’t nick or gouge the bearing
face. Don’t lubricate the bearing at this
time.
4 It’s critically important that all mating
surfaces of the bearing components are
perfectly clean and oil-free when they’re
assembled.
5 Position the piston ring gaps as described
in Section 16, lubricate the piston and rings
with clean engine oil, and attach a piston ring
compressor to the piston. Leave the skirt
protruding about a quarter-inch, to guide the
piston into the cylinder bore. The rings must
be compressed until they’re flush with the
piston.
6 Rotate the crankshaft until No 1 crankpin
(big-end) journal is at BDC (Bottom Dead
Centre), and apply a coat of engine oil to the
cylinder walls.
7 Arrange the No 1 piston/connecting rod
assembly so that the arrow on the piston crown points to the timing belt/chain end of
the engine. Gently insert the assembly into the
No 1 cylinder bore, and rest the bottom edge
of the ring compressor on the engine block.
8
Tap the top edge of the ring compressor to
make sure it’s contacting the block around its
entire circumference.
9 Gently tap on the top of the piston with the
end of a wooden hammer handle (see
illustration) , while guiding the connecting
rod’s big-end onto the crankpin. The piston
rings may try to pop out of the ring
compressor just before entering the cylinder
bore, so keep some pressure on the ring
compressor. Work slowly, and if any
resistance is felt as the piston enters the
cylinder, stop immediately. Find out what’s
binding, and fix it before proceeding. Do not,
for any reason, force the piston into the
cylinder - you might break a ring and/or the
piston.
10 To check the big-end bearing running
clearance, cut a piece of the appropriate-size
Plastigauge slightly shorter than the width of
the connecting rod bearing, and lay it in place
on the No 1 crankpin (big-end) journal, parallel
with the crankshaft centre-line (see
illustration 17.11).
11 Clean the connecting rod-to-cap mating
surfaces, and refit the big-end bearing cap.
Tighten the cap bolts evenly - on the HCS and
Zetec engines, first use a torque wrench to
tighten the bolts to the Stage 1 torque setting,
then use an ordinary socket extension bar and
an angle gauge to tighten the bolts further
through the Stage 2 angle (see illustration).
On the CVH and PTE engines, tighten the
bolts progressively to the specified torque;
further angle-tightening is not required on
these engines. Use a thin-wall socket, to
avoid erroneous torque readings that can
result if the socket is wedged between the
cap and nut. If the socket tends to wedge
itself between the nut and the cap, lift up on it
slightly until it no longer contacts the cap.
Don’t rotate the crankshaft at any time during
this operation!
12 Unscrew the bolts and detach the cap,
being very careful not to disturb the
Plastigauge.
13 Compare the width of the crushed
2D•24 Engine removal and overhaul procedures
18.11 Angle-tightening the big-end bolts
using the correct tool18.9 The piston can be driven gently into
the cylinder bore with the end of a wooden
or plastic hammer handle18.3 Tab on each big-end bearing shell
must engage with notch in connecting rod
or cap
17.20 Refit the crankshaft after checkingbearing clearances
1595Ford Fiesta Remakeprocarmanuals.com
http://vnx.su