1988 OPEL CALIBRA check engine light
[x] Cancel search: check engine lightPage 99 of 525
been removed, check that No 1 cylinder is on
its firing stroke by removing No 1 cylinder
spark plug and placing a finger over the plug
hole. Turn the crankshaft until compression
can be felt, which indicates that No 1 piston is
rising on its compression stroke. Continue
turning the crankshaft until the relevant timing
marks are in alignment.
11Turn the rotor arm to the position noted in
paragraph 6c, and hold the rotor arm in this
position as the distributor is fitted. Note that
the distributor driveshaft will only engage with
the camshaft in one position. If the original
distributor is being refitted, align the marks
made on the distributor body and camshaft
housing before removal.
12Refit the clamp plate and nut, but do not
fully tighten the nut at this stage.
13On the Bosch distributor, remove the rotor
arm, then refit the plastic shield and the rotor
arm.
14On 14 NV models, reconnect the vacuum
pipe to the diaphragm unit.
15Reconnect the distributor wiring plug.
16Refit the distributor cap as described in
Section 17.
17Reconnect the battery negative lead.
18Check and if necessary adjust the ignition
timing, as described in Section 21.
19Distributor (DOHC models),
where applicable - removal
and refitting
3
Removal
1Disconnect the battery negative lead.
2Remove the distributor cap, as described in
Section 17.
3Disconnect the distributor wiring plug.
4Unscrew the two securing bolts, and
remove the distributor from the cylinder head.
5Examine the O-ring on the rear of the
distributor, and renew if necessary.
Refitting
6Refitting is a reversal of removal. However,
note that the distributor should be fitted so
that the wiring plug is positioned on the upper
left-hand side of the distributor body, when
viewed from the distributor cap end.
20Distributor - dismantling,
inspection and reassembly
3
Note: Before contemplating dismantling of a
distributor, check the cost and availability of
replacement parts. It may prove more
economical to renew the complete distributor
assembly
14 NV models
Dismantling
1With the distributor removed as described
in Section 18, continue as follows.
2Pull off the rotor arm, and remove the
plastic shield.
3The top bearing plate can be removed after
unscrewing the two securing screws, however
(other than the vacuum diaphragm unit), no
spares are available for the distributor and no
adjustments are required.
4If desired, the vacuum diaphragm unit can
be removed by extracting the two securing
screws and unhooking the operating arm from
the distributor baseplate. Note that the
screws are of differing lengths, the longer
screw also secures one of the distributor cap
clips.
Inspection
5The vacuum unit can be tested by applying
suction to the vacuum port, and checking that
the operating rod moves into the unit as
suction is applied. Remove the suction, and
check that the operating rod returns to its
original position. If the operating rod does not
move as described, renew the vacuum unit.
6Check the distributor cap for corrosion of
the segments, and for signs of tracking,
indicated by a thin black line between the
segments. Make sure that the carbon brush in
the centre of the cap moves freely and stands
proud of the surface of the cap. Renew the
cap if necessary.
7If the metal portion of the rotor arm is badly
burnt or loose, renew it. If slightly burnt or
corroded; it may be cleaned with a fine file.
8Examine the seal ring at the rear of the
distributor body, and renew if necessary.
Reassembly
9Reassembly is a reversal of dismantling,
ensuring that the vacuum unit operating arm
is correctly engaged with the peg on the
baseplate, several attempts may be required
to reconnect it.
10Refit the distributor as described in
Section 18, and then check and if necessary
adjust the ignition timing, as described in
Section 21.
16 SV models
Dismantling
11With the distributor removed as described
in Section 18, pull off the rotor arm and, on
the Bosch distributor, remove the plastic
shield.
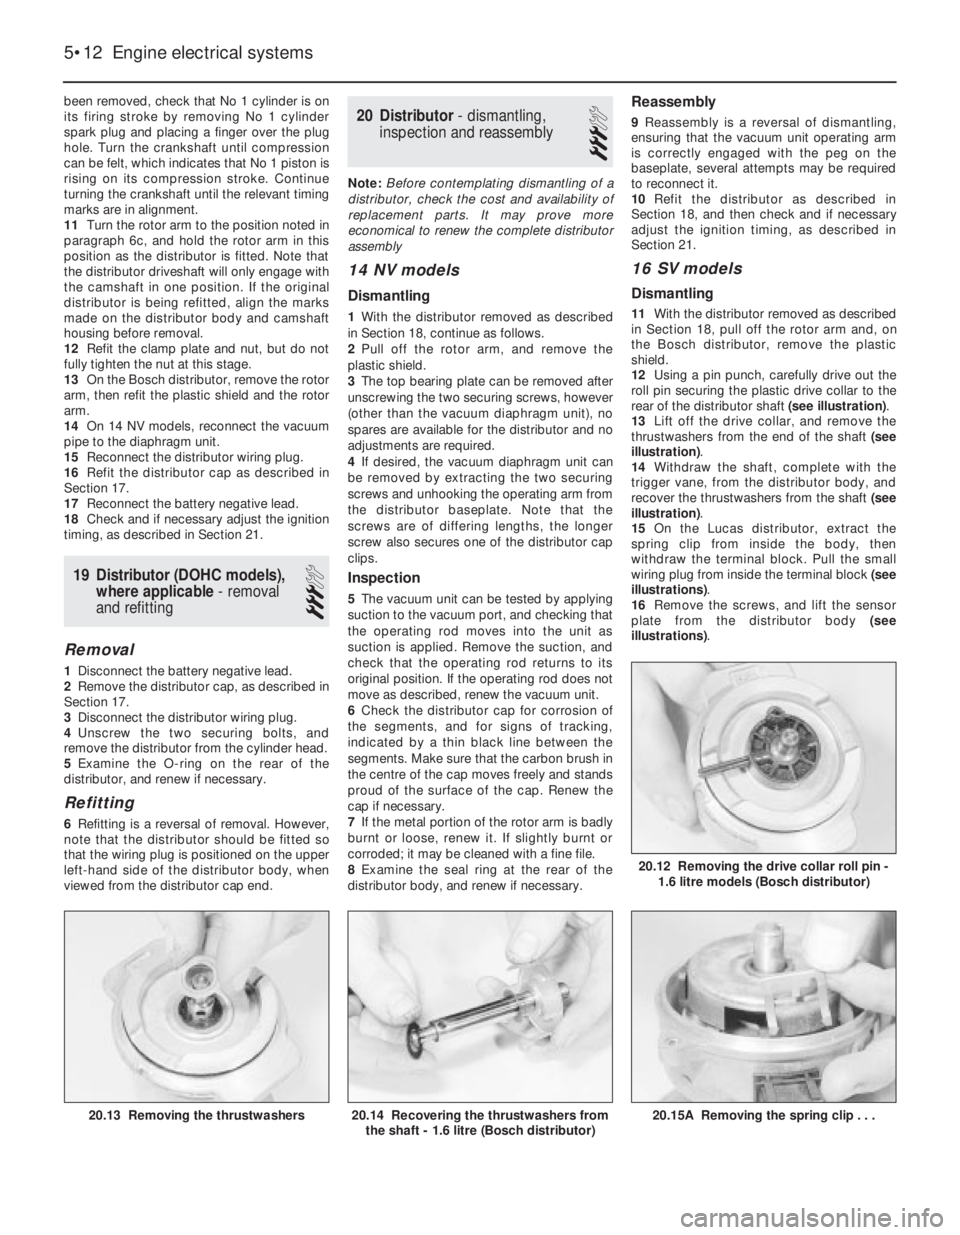
12Using a pin punch, carefully drive out the
roll pin securing the plastic drive collar to the
rear of the distributor shaft (see illustration).
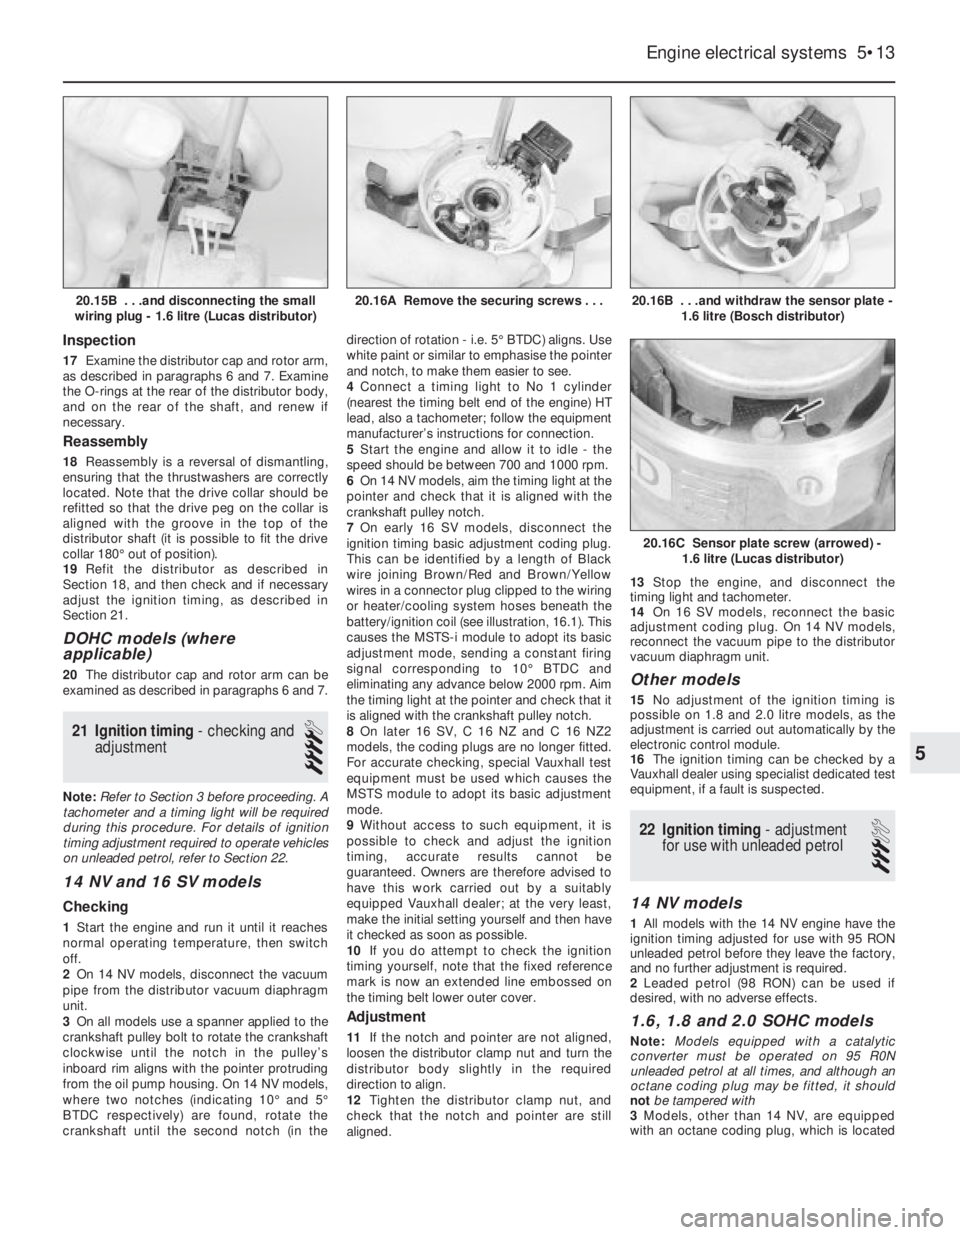
13Lift off the drive collar, and remove the
thrustwashers from the end of the shaft (see
illustration).
14Withdraw the shaft, complete with the
trigger vane, from the distributor body, and
recover the thrustwashers from the shaft (see
illustration).
15On the Lucas distributor, extract the
spring clip from inside the body, then
withdraw the terminal block. Pull the small
wiring plug from inside the terminal block (see
illustrations).
16Remove the screws, and lift the sensor
plate from the distributor body (see
illustrations).
5•12Engine electrical systems
20.15A Removing the spring clip . . .20.14 Recovering the thrustwashers from
the shaft - 1.6 litre (Bosch distributor)20.13 Removing the thrustwashers
20.12 Removing the drive collar roll pin -
1.6 litre models (Bosch distributor)
Page 100 of 525
Inspection
17Examine the distributor cap and rotor arm,
as described in paragraphs 6 and 7. Examine
the O-rings at the rear of the distributor body,
and on the rear of the shaft, and renew if
necessary.
Reassembly
18Reassembly is a reversal of dismantling,
ensuring that the thrustwashers are correctly
located. Note that the drive collar should be
refitted so that the drive peg on the collar is
aligned with the groove in the top of the
distributor shaft (it is possible to fit the drive
collar 180°out of position).
19Refit the distributor as described in
Section 18, and then check and if necessary
adjust the ignition timing, as described in
Section 21.
DOHC models (where
applicable)
20The distributor cap and rotor arm can be
examined as described in paragraphs 6 and 7.
21Ignition timing -checking and
adjustment
4
Note: Refer to Section 3 before proceeding. A
tachometer and a timing light will be required
during this procedure. For details of ignition
timing adjustment required to operate vehicles
on unleaded petrol, refer to Section 22.
14 NV and 16 SV models
Checking
1Start the engine and run it until it reaches
normal operating temperature, then switch
off.
2On 14 NV models, disconnect the vacuum
pipe from the distributor vacuum diaphragm
unit.
3On all models use a spanner applied to the
crankshaft pulley bolt to rotate the crankshaft
clockwise until the notch in the pulley’s
inboard rim aligns with the pointer protruding
from the oil pump housing. On 14 NV models,
where two notches (indicating 10°and 5°
BTDC respectively) are found, rotate the
crankshaft until the second notch (in thedirection of rotation -i.e. 5°BTDC) aligns. Use
white paint or similar to emphasise the pointer
and notch, to make them easier to see.
4Connect a timing light to No 1 cylinder
(nearest the timing belt end of the engine) HT
lead, also a tachometer; follow the equipment
manufacturer’s instructions for connection.
5Start the engine and allow it to idle -the
speed should be between 700 and 1000 rpm.
6On 14 NV models, aim the timing light at the
pointer and check that it is aligned with the
crankshaft pulley notch.
7On early 16 SV models, disconnect the
ignition timing basic adjustment coding plug.
This can be identified by a length of Black
wire joining Brown/Red and Brown/Yellow
wires in a connector plug clipped to the wiring
or heater/cooling system hoses beneath the
battery/ignition coil (see illustration, 16.1). This
causes the MSTS-i module to adopt its basic
adjustment mode, sending a constant firing
signal corresponding to 10°BTDC and
eliminating any advance below 2000 rpm. Aim
the timing light at the pointer and check that it
is aligned with the crankshaft pulley notch.
8On later 16 SV, C 16 NZ and C 16 NZ2
models, the coding plugs are no longer fitted.
For accurate checking, special Vauxhall test
equipment must be used which causes the
MSTS module to adopt its basic adjustment
mode.
9Without access to such equipment, it is
possible to check and adjust the ignition
timing, accurate results cannot be
guaranteed. Owners are therefore advised to
have this work carried out by a suitably
equipped Vauxhall dealer; at the very least,
make the initial setting yourself and then have
it checked as soon as possible.
10If you do attempt to check the ignition
timing yourself, note that the fixed reference
mark is now an extended line embossed on
the timing belt lower outer cover.
Adjustment
11If the notch and pointer are not aligned,
loosen the distributor clamp nut and turn the
distributor body slightly in the required
direction to align.
12Tighten the distributor clamp nut, and
check that the notch and pointer are still
aligned. 13Stop the engine, and disconnect the
timing light and tachometer.
14On 16 SV models, reconnect the basic
adjustment coding plug. On 14 NV models,
reconnect the vacuum pipe to the distributor
vacuum diaphragm unit.
Other models
15No adjustment of the ignition timing is
possible on 1.8 and 2.0 litre models, as the
adjustment is carried out automatically by the
electronic control module.
16The ignition timing can be checked by a
Vauxhall dealer using specialist dedicated test
equipment, if a fault is suspected.
22Ignition timing -adjustment
for use with unleaded petrol
3
14 NV models
1All models with the 14 NV engine have the
ignition timing adjusted for use with 95 RON
unleaded petrol before they leave the factory,
and no further adjustment is required.
2Leaded petrol (98 RON) can be used if
desired, with no adverse effects.
1.6, 1.8 and 2.0 SOHC models
Note: Models equipped with a catalytic
converter must be operated on 95 R0N
unleaded petrol at all times, and although an
octane coding plug may be fitted, it should
not be tampered with
3Models, other than 14 NV, are equipped
with an octane coding plug, which is located
Engine electrical systems 5•13
20.16B . . .and withdraw the sensor plate -
1.6 litre (Bosch distributor)
20.16C Sensor plate screw (arrowed) -
1.6 litre (Lucas distributor)
20.16A Remove the securing screws . . .20.15B . . .and disconnecting the small
wiring plug - 1.6 litre (Lucas distributor)
5
Page 105 of 525
wax-based underbody protective coating, it is
a good idea to have the whole of the
underframe of the vehicle steam cleaned,
engine compartment included, so that a
thorough inspection can be carried out to see
what minor repairs and renovations are
necessary. Steam cleaning is available at
many garages and is necessary for removal of
the accumulation of oily grime that sometimes
is allowed to become thick in certain areas.
The dirt can then be simply hosed off. Note
that these methods should not be used on
vehicles with wax-based underbody
protective coating or the coating will be
removed. Such vehicles should be inspected
annually, preferably just before winter, when
the underbody should be washed down and
any damage to the wax coating repaired.
Ideally, a completely fresh coat should be
applied. It would also be worth considering
the use of such wax-based protection for
injection into door panels, sills, box sections,
etc., as an additional safeguard against rust
damage where such protection is not
provided by the vehicle manufacturer.
After washing paintwork, wipe off with a
chamois leather to give an unspotted clear
finish. A coat of clear protective wax polish,
will give added protection against chemical
pollutants in the air. If the paintwork sheen
has dulled or oxidised, use a cleaner/polisher
combination to restore the brilliance of the
shine. This requires a little effort, but such
dulling is usually caused because regular
washing has been neglected. Care needs to
be taken with metallic paintwork, as special
non-abrasive cleaner/polisher is required to
avoid damage to the finish.
Always check that the door and ventilator
opening drain holes and pipes are completely
clear so that water can be drained out. Bright
work should be treated in the same way as
paint work. Windscreens and windows can be
kept clear of the smeary film that often
appears, by using a glass cleaner. Never use
any form of wax or other body or chromium
polish on glass.
3Upholstery and carpets -
maintenance
1
Mats and carpets should be brushed or
vacuum cleaned regularly to keep them free of
grit. If they are badly stained remove them
from the vehicle for scrubbing or sponging
and make quite sure they are dry before
refitting. Seats and interior trim panels can be
kept clean by wiping with a damp cloth. If they
do become stained (which can be more
apparent on light coloured upholstery) use a
little liquid detergent and a soft nail brush to
scour the grime out of the grain of the
material. Do not forget to keep the headlining
clean in the same way as the upholstery.
When using liquid cleaners inside the vehicle
do not over-wet the surfaces being cleaned.Excessive damp could get into the seams and
padded interior causing stains, offensive
odours or even rot. If the inside of the vehicle
gets wet accidentally it is worthwhile taking
some trouble to dry it out properly, particularly
where carpets are involved. Do not leave oil or
electric heaters inside the vehicle for this
purpose.
4Minor body damage - repair
3
Repairs of minor scratches in
bodywork
If the scratch is very superficial, and does
not penetrate to the metal of the bodywork,
repair is very simple. Lightly rub the area of
the scratch with a paintwork renovator, to
remove loose paint from the scratch and to
clear the surrounding bodywork of wax polish.
Rinse the area with clean water.
Apply touch-up paint to the scratch using a
fine paint brush; continue to apply fine layers
of paint until the surface of the paint in the
scratch is level with the surrounding
paintwork. Allow the new paint at least two
weeks to harden: then blend it into the
surrounding paintwork by rubbing the scratch
area with a paintwork renovator or a very fine
cutting paste and apply wax polish.
Where the scratch has penetrated right
through to the metal of the bodywork, causing
the metal to rust, a different repair technique
is required. Remove any loose rust from the
bottom of the scratch with a penknife, then
apply rust inhibiting paint, to prevent the
formation of rust in the future. Using a rubber
or nylon applicator fill the scratch with
bodystopper paste. If required, this paste can
be mixed with cellulose thinners to provide a
very thin paste that is ideal for filling narrow
scratches. Before the stopper-paste in the
scratch hardens, wrap a piece of smooth
cotton rag around the top of a finger. Dip the
finger in cellulose thinners and then quickly
sweep it across the surface of the
stopper-paste in the scratch; this will ensure
that the surface of the stopper-paste is
slightly hollowed. The scratch can now be
painted over as described earlier in this
Section.
Repair of dents in bodywork
When deep denting of the vehicle’s
bodywork has taken place, the first task is to
pull the dent out, until the affected bodywork
almost attains its original shape. There is little
point in trying to restore the original shape
completely, as the metal in the damaged area
will have stretched on impact and cannot be
reshaped fully to its original contour. It is
better to bring the level of the dent up to a
point that is about 8 in (3 mm) below the level
of the surrounding bodywork. In cases where
the dent is very shallow anyway, it is not worthtrying to pull it out at all. If the underside of the
dent is accessible, it can be hammered out
gently from behind, using a mallet with a
wooden or plastic head. Whilst doing this,
hold a block of wood firmly against the
outside of the panel to absorb the impact
from the hammer blows and thus prevent a
large area of the bodywork from being
“belled-out”.
Should the dent be in a section of the
bodywork that has a double skin or some
other factor making it inaccessible from
behind, a different technique is called for. Drill
several small holes through the metal inside
the area particularly in the deeper section.
Then screw long self-tapping screws into the
holes just sufficiently for them to gain a good
purchase in the metal. Now the dent can be
pulled out by pulling on the protruding heads
of the screws with a pair of pliers.
The next stage of the repair is the removal
of the paint from the damaged area, and from
an inch or so of the surrounding “sound”
bodywork. This is accomplished most easily
by using a wire brush or abrasive pad on a
power drill, although it can be done just as
effectively by hand using sheets of abrasive
paper. To complete the preparation for filling,
score the surface of the bare metal with a
screwdriver or the tang of a file, or
alternatively, drill small holes in the affected
area. This will provide a good “key” for the
filler paste.
To complete the repair see the Section on
filling and re-spraying.
Repair of rust holes or gashes in
bodywork
Remove all paint from the affected area and
from an inch or so of the surrounding “sound”
bodywork, using an abrasive pad or a wire
brush on a power drill. If these are not
available a few sheets of abrasive paper will
do the job just as effectively. With the paint
removed you will be able to gauge the severity
of the corrosion and therefore decide whether
to renew the whole panel (if this is possible) or
to repair the affected area. New body panels
are not as expensive as most people think
and it is often quicker and more satisfactory
to fit a new panel than to attempt to repair
large areas of corrosion.
Remove all fittings from the affected area
except those which will act as a guide to the
original shape of the damaged bodywork (e.g.
headlamp shells, etc.). Then, using tin snips or
a hacksaw blade, remove all loose metal and
any other metal badly affected by corrosion.
Hammer the edges of the hole inwards to
create a slight depression for the filler paste.
Wire brush the affected area to remove the
powdery rust from the surface of the
remaining metal. Paint the affected area with
rust inhibiting paint. If the back of the rusted
area is accessible treat this also.
Before filling can take place it will be
necessary to block the hole in some way. This
can be achieved by using aluminium or plastic
mesh, or aluminium tape.
11•2Bodywork and fittings
Page 129 of 525
b)Always keep the ignition and fuel systems
well maintained according to the
manufacturers schedule (see “Routine
maintenance” and the relevant Chapter).
In particular, ensure that the air cleaner
filter element, the fuel filter and the spark
plugs are renewed at the correct intervals.
If the inlet air/fuel mixture is allowed to
become too rich due to neglect, the
unburned surplus will enter and burn in
the catalytic converter, overheating the
element and eventually destroying the
converter.
c)If the engine develops a misfire, do not
drive the vehicle at all (or at least as little
as possible) until the fault is cured. The
misfire will allow unburned fuel to enter
the converter, which will result in its
overheating, as noted above.
d)The engine control indicator (the outline
of an engine with a lightning symbol
superimposed), will light when the ignition
is switched on and the engine is started,
then it will go out. While it may light briefly
while the engine is running, it should go
out again immediately and stays unlit. If it
lights and stays on while the engine is
running, seek the advice of a Vauxhall
dealer as soon as possible. A fault has
occurred in the fuel injection/ignition
system that, apart from increasing fuel
consumption and impairing the engine’s
performance, may damage the catalytic
converter.
e)DO NOT push or tow-start the vehicle.
This will soak the catalytic converter in
unburned fuel causing it to overheat when
the engine does start see (b) above.
f)DO NOT switch off the ignition at high
engine speeds. If the ignition is switched
off at anything above idle speed,
unburned fuel will enter the (very hot)
catalytic converter, with the possible risk
of its igniting on the element and
damaging the converter.
g)DO NOT use fuel or engine oil additives.
These may contain substances harmful to
the catalytic converter.
h)DO NOT continue to use the vehicle if the
engine burns oil to the extent of leaving a
visible trail of blue smoke. The unburned
carbon deposits will clog the converter
passages and reduce its efficiency; in
severe cases the element will overheat.
i)Remember that the catalytic converter
operates at very high temperatures hence
the heat shields on the vehicle’s under-
body and the casing will become hot
enough to ignite combustible materials
that brush against it. DO NOT, therefore,
park the vehicle in dry undergrowth, over
long grass or over piles of dead leaves.
j)Remember that the catalytic converter is
FRAGlLE. Do not strike it with tools during
servicing work. Take great care when
working on the exhaust system. Ensure
that the converter is well clear of any
jacks or other lifting gear used to raise thevehicle. Do not drive the vehicle over
rough ground, road humps, etc., in such a
way as to ground the exhaust system.
k)In some cases, particularly when the
vehicle is new and/or is used for
stop/start driving, a sulphurous smell (like
that of rotten eggs) may be noticed from
the exhaust. This is common to many
catalytic converter-equipped vehicles and
seems to be due to the small amount of
sulphur found in some petrol’s reacting
with hydrogen in the exhaust to produce
hydrogen sulphide (CS) gas. While this
gas is toxic, it is not produced in sufficient
amounts to be a problem. Once the
vehicle has covered a few thousand miles
the problem should disappear. In the
meanwhile a change of driving style or of
the brand of petrol may effect a solution.
l)The catalytic converter, used on a
well-maintained and well-driven vehicle,
should last for between 50 000 and 100
000 miles. From this point on, careful
checks should be made at all specified
service intervals of the CO level to ensure
that the converter is still operating
efficiently. If the converter is no longer
effective it must be renewed.
11Carbon canister - removal
and refitting
3
Removal
1Apply the handbrake, then jack up the front
of the vehicle, and support securely on axle
stands placed under the body side members
(see “Jacking and Vehicle Support”).
2Remove the front right hand wheel and
wheel arch liner.
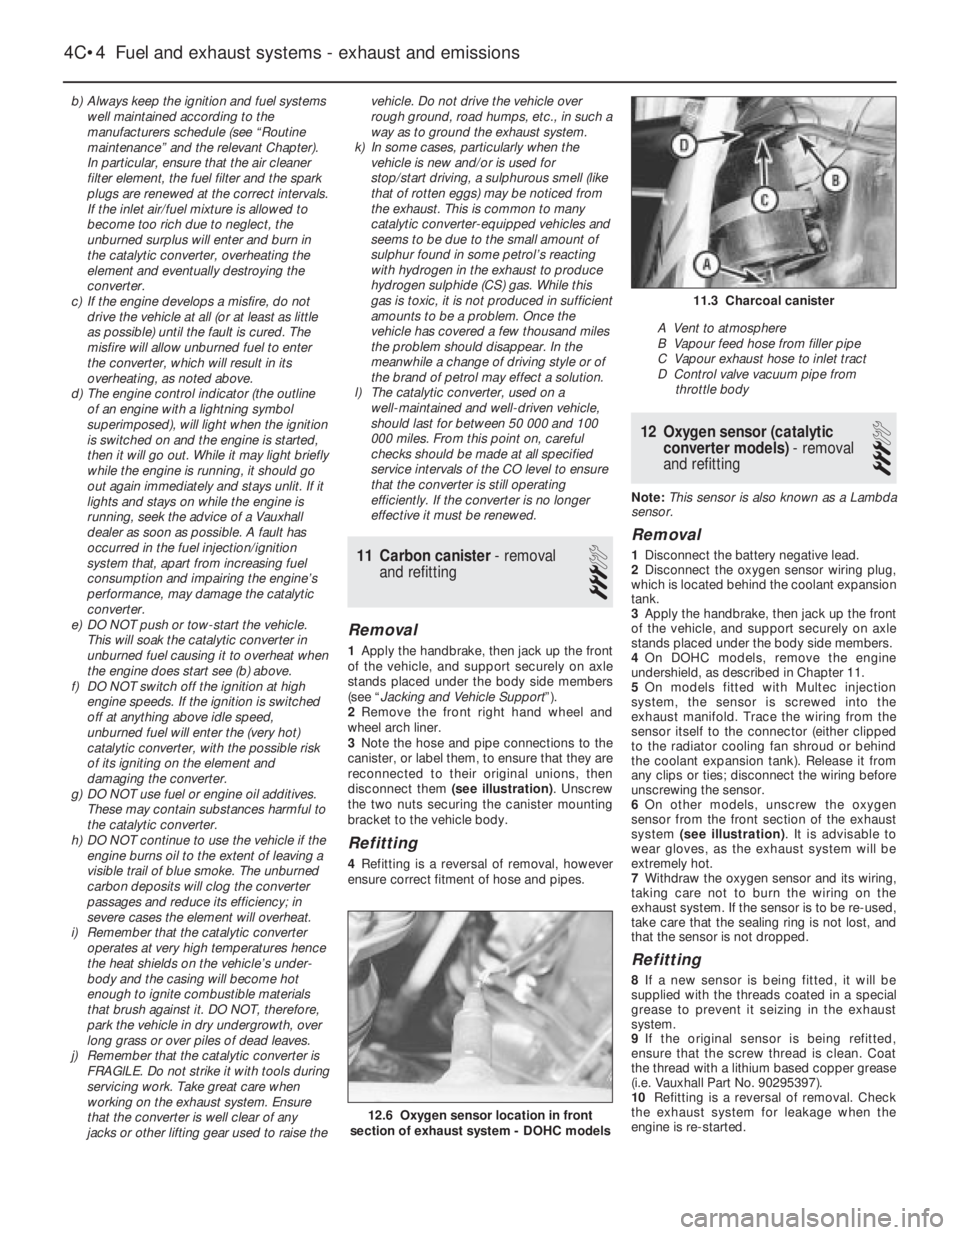
3Note the hose and pipe connections to the
canister, or label them, to ensure that they are
reconnected to their original unions, then
disconnect them (see illustration). Unscrew
the two nuts securing the canister mounting
bracket to the vehicle body.
Refitting
4Refitting is a reversal of removal, however
ensure correct fitment of hose and pipes.
12Oxygen sensor (catalytic
converter models) - removal
and refitting
3
Note: This sensor is also known as a Lambda
sensor.
Removal
1Disconnect the battery negative lead.
2Disconnect the oxygen sensor wiring plug,
which is located behind the coolant expansion
tank.
3Apply the handbrake, then jack up the front
of the vehicle, and support securely on axle
stands placed under the body side members.
4On DOHC models, remove the engine
undershield, as described in Chapter 11.
5On models fitted with Multec injection
system, the sensor is screwed into the
exhaust manifold. Trace the wiring from the
sensor itself to the connector (either clipped
to the radiator cooling fan shroud or behind
the coolant expansion tank). Release it from
any clips or ties; disconnect the wiring before
unscrewing the sensor.
6On other models, unscrew the oxygen
sensor from the front section of the exhaust
system (see illustration). It is advisable to
wear gloves, as the exhaust system will be
extremely hot.
7Withdraw the oxygen sensor and its wiring,
taking care not to burn the wiring on the
exhaust system. If the sensor is to be re-used,
take care that the sealing ring is not lost, and
that the sensor is not dropped.
Refitting
8If a new sensor is being fitted, it will be
supplied with the threads coated in a special
grease to prevent it seizing in the exhaust
system.
9If the original sensor is being refitted,
ensure that the screw thread is clean. Coat
the thread with a lithium based copper grease
(i.e. Vauxhall Part No. 90295397).
10Refitting is a reversal of removal. Check
the exhaust system for leakage when the
engine is re-started.
4C•4Fuel and exhaust systems - exhaust and emissions
12.6 Oxygen sensor location in front
section of exhaust system - DOHC models
11.3 Charcoal canister
A Vent to atmosphere
B Vapour feed hose from filler pipe
C Vapour exhaust hose to inlet tract
D Control valve vacuum pipe from
throttle body
Page 141 of 525
Overhaul
6If desired, the caliper can be overhauled as
follows. Otherwise, go on to paragraph 20 for
details of refitting.
7Brush the dirt and dust from the caliper, but
take care not to inhale it.
8Note that no attempt must be made to
separate the two halves of the caliper.
9Using a screwdriver, prise the dust seal
retaining clips from the piston dust seals, then
carefully prise off the dust seals.
10Using a clamp, secure one of the pistons
in its fully retracted position. Then apply low
air pressure (e.g. from a foot pump), to the
hydraulic fluid union hole in the rear of the
caliper body, to eject the remaining piston
from its bore. Take care not to drop the
piston, which may result in damage.
11Temporarily close off the bore of the
removed piston, using a flat piece of wood or
similar improvised tool. Then remove the
clamp from the remaining piston, and again
apply air pressure to the caliper union to eject
the piston.
12Carefully prise the seals from the grooves
in the caliper piston bores, using a plastic or
wooden instrument.
13Inspect the surfaces of the pistons and
their bores in the caliper for scoring, or
evidence of metal-to-metal contact. If evident,
renew the complete caliper assembly.
14If the pistons and bores are in good
condition, discard the seals and obtain a
repair kit, which will contain all the necessary
renewable items. Also obtain a tube of brake
cylinder paste.
15Clean the piston and cylinder bore with
brake fluid or methylated spirit - nothing else!
16Apply a little brake cylinder paste to the
pistons, cylinder bores and piston seals.
17Begin reassembly by fitting the seals to
the grooves in the caliper bores.
18Locate the dust seals in their grooves in
the pistons, then insert the pistons carefully
into their bores until they enter the seals. It
may be necessary to rotate the pistons to
prevent them from jamming in the seals.
19When the pistons have been partially
depressed, engage the dust seals with the
rims of the caliper bores, and fit the retaining
clips.
Refitting
20Refit the caliper and tighten the securing
bolts to the specified torque, ensuring that the
ABS sensor bracket is in position, where
applicable.
21Reconnect the brake fluid pipe to the
caliper, and tighten the union nut.
22Refit the disc pads, as described in
Section 5.
23Remove the polythene from the brake
fluid reservoir filler neck and bleed the
relevant brake hydraulic circuit, as described
in Section 3.
24Refit the roadwheel and lower the vehicle
to the ground. Do not fully tighten the
roadwheel bolts until the vehicle is resting on
its wheels.
10Brake disc - inspection,
removal and refitting
3
Inspection
1Where applicable, remove the wheel trim,
then loosen the relevant roadwheel bolts. If
checking a front disc, apply the handbrake,
and if checking a rear disc, chock the front
wheels, then jack up the relevant end of the
vehicle and support on axle stands (see
“Jacking and Vehicle Support”) positioned
under the body side members. Remove the
roadwheel.
2Where applicable, check that the brake disc
securing screw is tight. Then fit a spacer
approximately 10.0 mm (0.4 in) thick to one of
the roadwheel bolts, and refit and tighten the
bolt in the hole opposite the disc securing
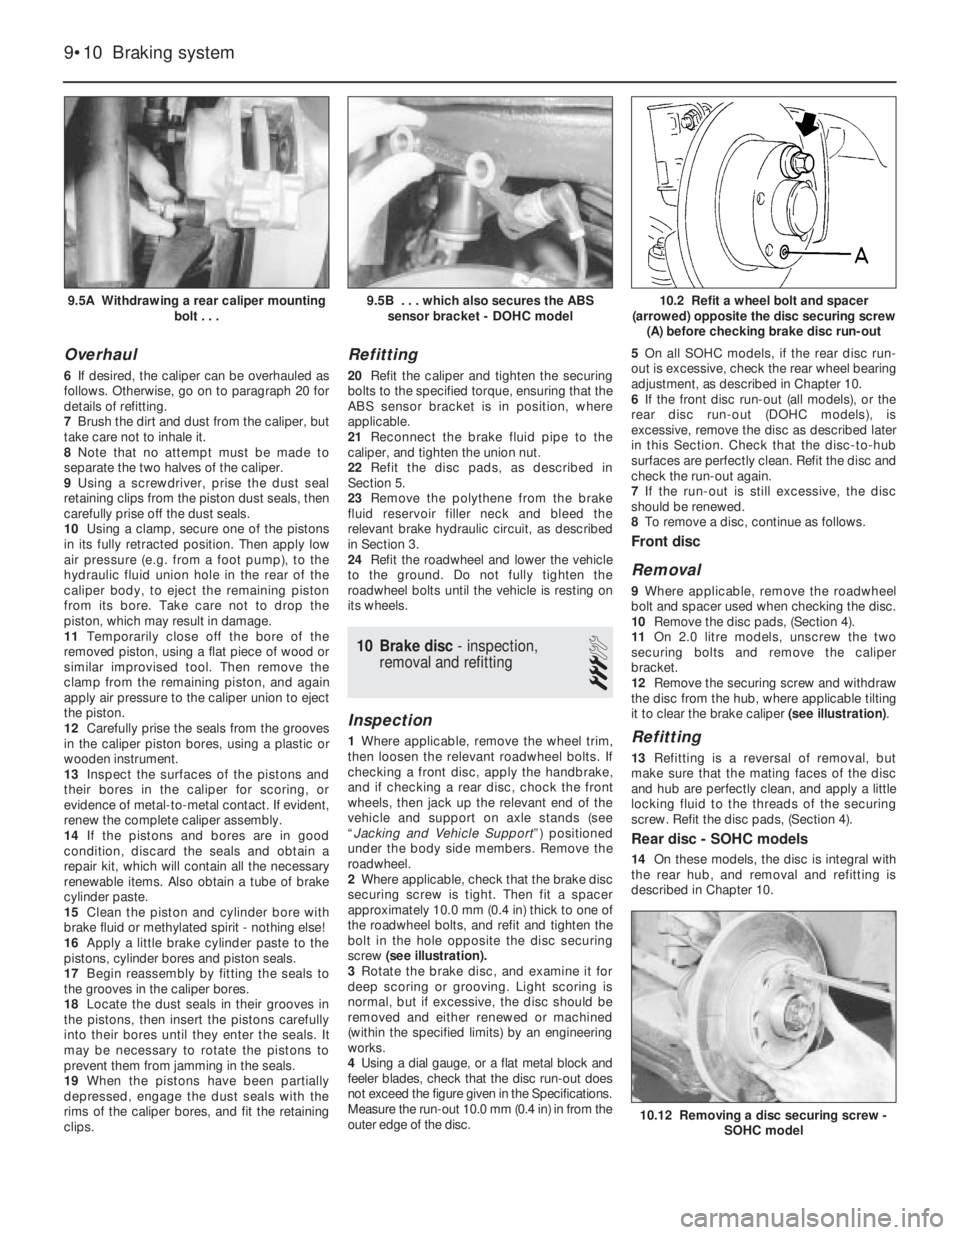
screw (see illustration).
3Rotate the brake disc, and examine it for
deep scoring or grooving. Light scoring is
normal, but if excessive, the disc should be
removed and either renewed or machined
(within the specified limits) by an engineering
works.
4Using a dial gauge, or a flat metal block and
feeler blades, check that the disc run-out does
not exceed the figure given in the Specifications.
Measure the run-out 10.0 mm (0.4 in) in from the
outer edge of the disc. 5On all SOHC models, if the rear disc run-
out is excessive, check the rear wheel bearing
adjustment, as described in Chapter 10.
6If the front disc run-out (all models), or the
rear disc run-out (DOHC models), is
excessive, remove the disc as described later
in this Section. Check that the disc-to-hub
surfaces are perfectly clean. Refit the disc and
check the run-out again.
7If the run-out is still excessive, the disc
should be renewed.
8To remove a disc, continue as follows.
Front disc
Removal
9Where applicable, remove the roadwheel
bolt and spacer used when checking the disc.
10Remove the disc pads, (Section 4).
11On 2.0 litre models, unscrew the two
securing bolts and remove the caliper
bracket.
12Remove the securing screw and withdraw
the disc from the hub, where applicable tilting
it to clear the brake caliper (see illustration).
Refitting
13Refitting is a reversal of removal, but
make sure that the mating faces of the disc
and hub are perfectly clean, and apply a little
locking fluid to the threads of the securing
screw. Refit the disc pads, (Section 4).
Rear disc - SOHC models
14On these models, the disc is integral with
the rear hub, and removal and refitting is
described in Chapter 10.
9•10Braking system
9.5A Withdrawing a rear caliper mounting
bolt . . .10.2 Refit a wheel bolt and spacer
(arrowed) opposite the disc securing screw
(A) before checking brake disc run-out
10.12 Removing a disc securing screw -
SOHC model
9.5B . . . which also secures the ABS
sensor bracket - DOHC model
Page 146 of 525
42Where applicable, screw the pressure-
proportioning valves into the base of the
cylinder.
43Refit the master cylinder, as described in
Section 15.
17Master cylinder (ABS) -
general
The master cylinder fitted to models with
ABS cannot be dismantled, and no attempt
should be made at overhaul.
If faulty, the complete unit must be
renewed, as described in Section 15.
18Vacuum servo - description
and testing
Description
1The vacuum servo is fitted between the
brake pedal and the master cylinder, and
provides assistance to the driver when the
pedal is depressed, reducing the effort required
to operate the brakes. The unit is operated by
vacuum from the inlet manifold. With the brake
pedal released, vacuum is channelled to both
sides of the internal diaphragm. However,
when the pedal is depressed, one side of the
diaphragm is opened to atmosphere, resulting
in assistance to the pedal effort. Should the
vacuum servo develop a fault, the hydraulic
system is not affected, but greater effort will be
required at the pedal.
Testing
2The operation of the servo can be checked
as follows.
3With the engine stopped, destroy the
vacuum in the servo by depressing the brake
pedal several times.
4Hold the brake pedal depressed and start
the engine. The pedal should sink slightly as
the engine is started.
5If the pedal does not sink, check the servo
vacuum hose for leaks.
6If no defects are found in the vacuum hose,
the fault must lie in the servo itself.7No overhaul of the servo is possible, and if
faulty, the complete unit must be renewed.
19Vacuum servo - removal and
refitting
4
Note: During the 1989 model year, some
vehicles were produced with the brake pedal
height incorrectly set, resulting in the brake
pedal resting approximately 15.0 mm (0.6 in)
above the clutch pedal instead of 4.0 mm
(0.16 in below). The correct pedal height can
be set by adjusting the vacuum servo
operating fork dimension, as described in
paragraphs 15 and 16
Removal
1Disconnect the battery negative lead.
2Working inside the vehicle, remove the
lower trim panel from the driver’s footwell.
3Disconnect the wiring plug from the brake
lamp switch, then twist the switch anti-
clockwise and remove it from its bracket.
4Pull the spring clip from the right-hand end
of the servo fork-to-pedal pivot pin.
5Using a pair of pliers, pull back the end of
the pedal return spring from the pedal, to
enable the servo fork-to-pedal pivot pin to be
removed. Withdraw the pivot pin.
6Remove the windscreen cowl panel, as
described in Chapter 11, then remove the
windscreen wiper motor and linkage as
described in Chapter 12.7Remove the coolant expansion tank as
described in Chapter 3.
8Pull the vacuum pipe from the brake servo.
9Unscrew the two securing nuts, and
carefully withdraw the brake master cylinder
from the studs on the servo. Move the master
cylinder forwards slightly, taking care not to
strain the brake pipes.
10Remove the two plugs covering the servo
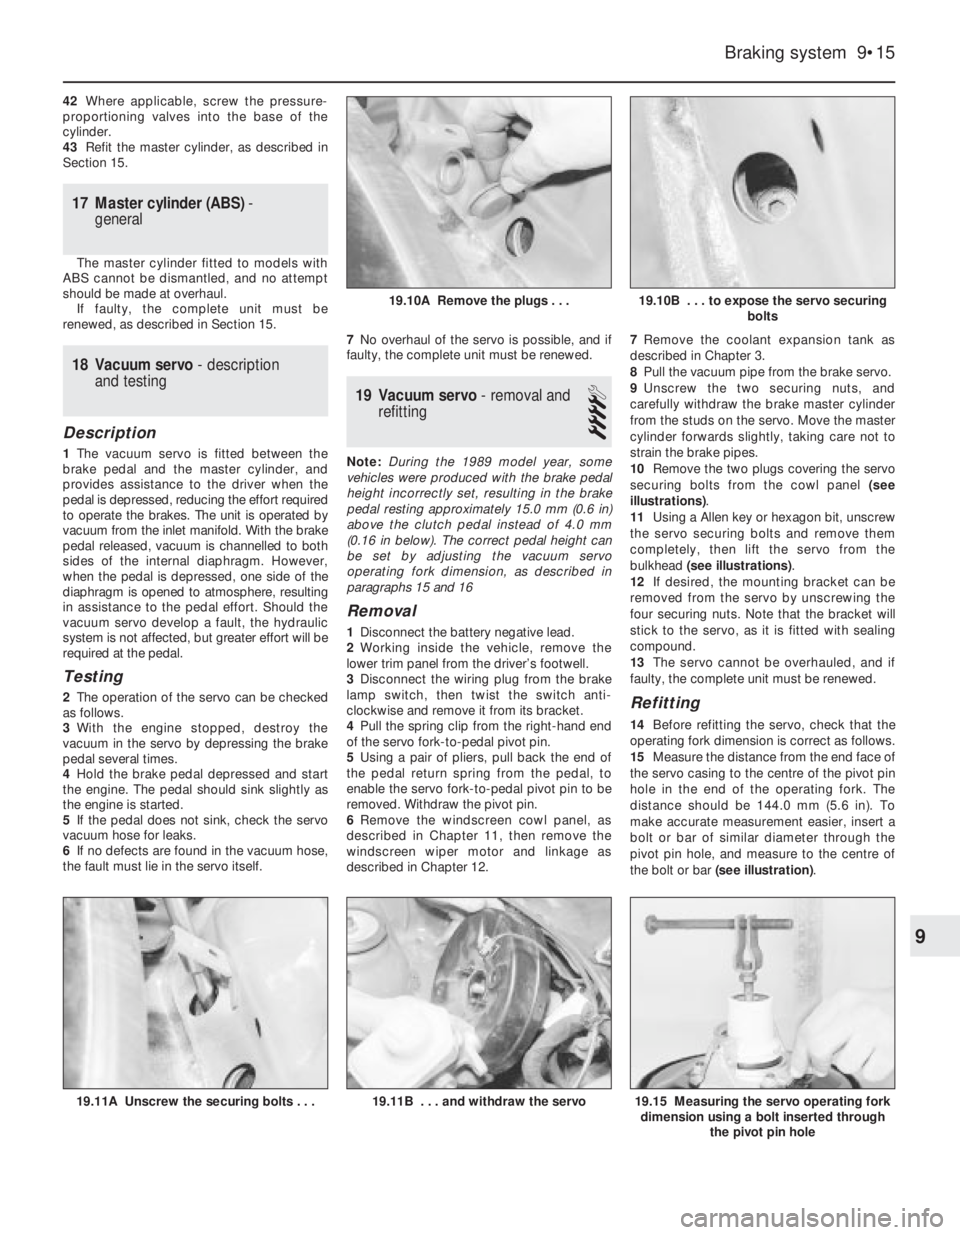
securing bolts from the cowl panel (see
illustrations).
11Using a Allen key or hexagon bit, unscrew
the servo securing bolts and remove them
completely, then lift the servo from the
bulkhead (see illustrations).
12If desired, the mounting bracket can be
removed from the servo by unscrewing the
four securing nuts. Note that the bracket will
stick to the servo, as it is fitted with sealing
compound.
13The servo cannot be overhauled, and if
faulty, the complete unit must be renewed.
Refitting
14Before refitting the servo, check that the
operating fork dimension is correct as follows.
15Measure the distance from the end face of
the servo casing to the centre of the pivot pin
hole in the end of the operating fork. The
distance should be 144.0 mm (5.6 in). To
make accurate measurement easier, insert a
bolt or bar of similar diameter through the
pivot pin hole, and measure to the centre of
the bolt or bar (see illustration).
Braking system 9•15
19.11A Unscrew the securing bolts . . .19.15 Measuring the servo operating fork
dimension using a bolt inserted through
the pivot pin hole19.11B . . . and withdraw the servo
19.10B . . . to expose the servo securing
bolts19.10A Remove the plugs . . .
9
Page 147 of 525
16If adjustment is necessary, slacken the
locknut, turn the fork to give the specified
dimension, then tighten the locknut.
17Where applicable, coat the contact faces
of the servo and the mounting bracket with
sealing compound, then refit the bracket to
the servo, and tighten the securing nuts to the
specified torque.
18Coat the threads of the servo securing
bolts with locking fluid, then fit the servo to
the bulkhead and tighten the securing bolts.
19Refit the securing bolt cover plugs to the
cowl panel.
20Refit the master cylinder to the servo, and
tighten the securing nuts to the specified
torque.
21Reconnect the vacuum pipe to the servo.
22Refit the coolant expansion tank, as
described in Chapter 3.
23Refit the windscreen wiper motor and
linkage as described in Chapter 12, then refit
the windscreen cowl panel.
24Further refitting is a reversal of removal.
On completion, test the operation of the
servo, as described in Section 18.
20ABS hydraulic modulator -
removal and refitting
4
Note: Refer to Section 2, and the note at the
beginning of Section 3, before proceeding
Removal
1Disconnect the battery negative lead.
2Remove the brake fluid reservoir cap, and
secure a piece of polythene over the filler
neck with a rubber band, or by refitting the
cap. This will reduce the loss of fluid during
the following procedure.
3Remove the securing screw, and withdraw
the plastic cover from the hydraulic
modulator.
4Remove the two clamp screws, and lift off
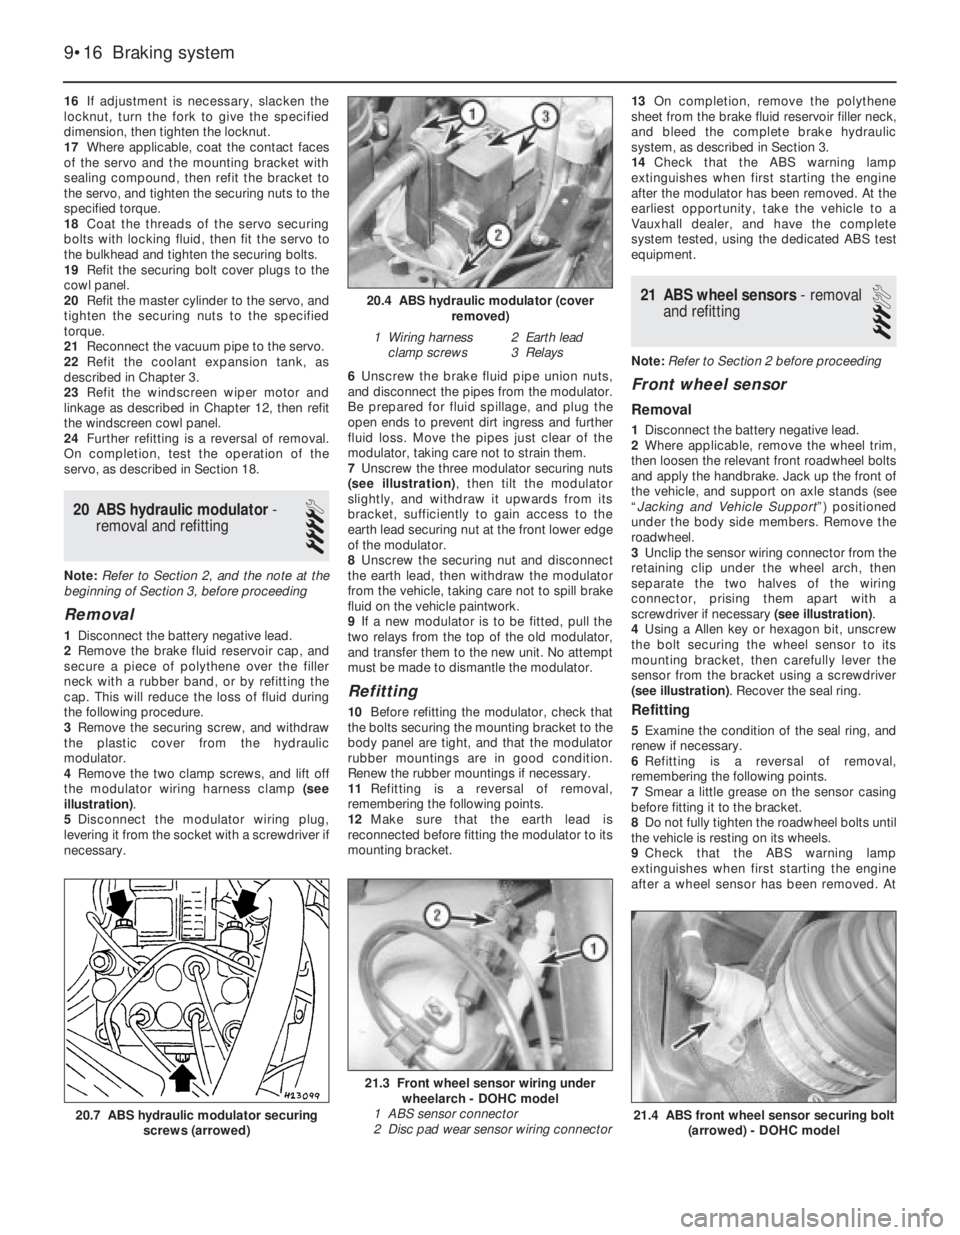
the modulator wiring harness clamp (see
illustration).
5Disconnect the modulator wiring plug,
levering it from the socket with a screwdriver if
necessary.6Unscrew the brake fluid pipe union nuts,
and disconnect the pipes from the modulator.
Be prepared for fluid spillage, and plug the
open ends to prevent dirt ingress and further
fluid loss. Move the pipes just clear of the
modulator, taking care not to strain them.
7Unscrew the three modulator securing nuts
(see illustration), then tilt the modulator
slightly, and withdraw it upwards from its
bracket, sufficiently to gain access to the
earth lead securing nut at the front lower edge
of the modulator.
8Unscrew the securing nut and disconnect
the earth lead, then withdraw the modulator
from the vehicle, taking care not to spill brake
fluid on the vehicle paintwork.
9If a new modulator is to be fitted, pull the
two relays from the top of the old modulator,
and transfer them to the new unit. No attempt
must be made to dismantle the modulator.
Refitting
10Before refitting the modulator, check that
the bolts securing the mounting bracket to the
body panel are tight, and that the modulator
rubber mountings are in good condition.
Renew the rubber mountings if necessary.
11Refitting is a reversal of removal,
remembering the following points.
12Make sure that the earth lead is
reconnected before fitting the modulator to its
mounting bracket.13On completion, remove the polythene
sheet from the brake fluid reservoir filler neck,
and bleed the complete brake hydraulic
system, as described in Section 3.
14Check that the ABS warning lamp
extinguishes when first starting the engine
after the modulator has been removed. At the
earliest opportunity, take the vehicle to a
Vauxhall dealer, and have the complete
system tested, using the dedicated ABS test
equipment.
21ABS wheel sensors - removal
and refitting
3
Note: Refer to Section 2 before proceeding
Front wheel sensor
Removal
1Disconnect the battery negative lead.
2Where applicable, remove the wheel trim,
then loosen the relevant front roadwheel bolts
and apply the handbrake. Jack up the front of
the vehicle, and support on axle stands (see
“Jacking and Vehicle Support”) positioned
under the body side members. Remove the
roadwheel.
3Unclip the sensor wiring connector from the
retaining clip under the wheel arch, then
separate the two halves of the wiring
connector, prising them apart with a
screwdriver if necessary (see illustration).
4Using a Allen key or hexagon bit, unscrew
the bolt securing the wheel sensor to its
mounting bracket, then carefully lever the
sensor from the bracket using a screwdriver
(see illustration). Recover the seal ring.
Refitting
5Examine the condition of the seal ring, and
renew if necessary.
6Refitting is a reversal of removal,
remembering the following points.
7Smear a little grease on the sensor casing
before fitting it to the bracket.
8Do not fully tighten the roadwheel bolts until
the vehicle is resting on its wheels.
9Check that the ABS warning lamp
extinguishes when first starting the engine
after a wheel sensor has been removed. At
9•16Braking system
20.4 ABS hydraulic modulator (cover
removed)
1 Wiring harness
clamp screws2 Earth lead
3 Relays
21.3 Front wheel sensor wiring under
wheelarch - DOHC model
1 ABS sensor connector
2 Disc pad wear sensor wiring connector
21.4 ABS front wheel sensor securing bolt
(arrowed) - DOHC model20.7 ABS hydraulic modulator securing
screws (arrowed)
Page 169 of 525
b)Check the throttle cable operation and
adjustment (see above).
c)When reconnecting the vacuum hoses
and pipes, ensure that they are connected
to the front unions as shown in the
accompanying photograph.
d)As no fuel vapour trap is fitted, it is
essential that the manifold absolute
pressure sensor vacuum hose is routed
so that it falls steadily from the sensor to
the throttle body. This precaution will
prevent any fuel droplets being trapped in
the sensor or hose and allowing them to
drain into the inlet port.
e)Ensure that the fuel hoses are correctly
reconnected; the feed hose is on the
injector end of the throttle body.
f)Switch on the ignition and check for signs
of fuel leaks from all disturbed unions; if
any signs of leakage are detected, the
problem must be rectified before the
engine is started.
33Idle air control stepper
motor - removal and refitting
3
Removal
1Remove the air box (see Section 5).
2Disconnect the battery earth lead.3Disconnect the wiring plug from the stepper
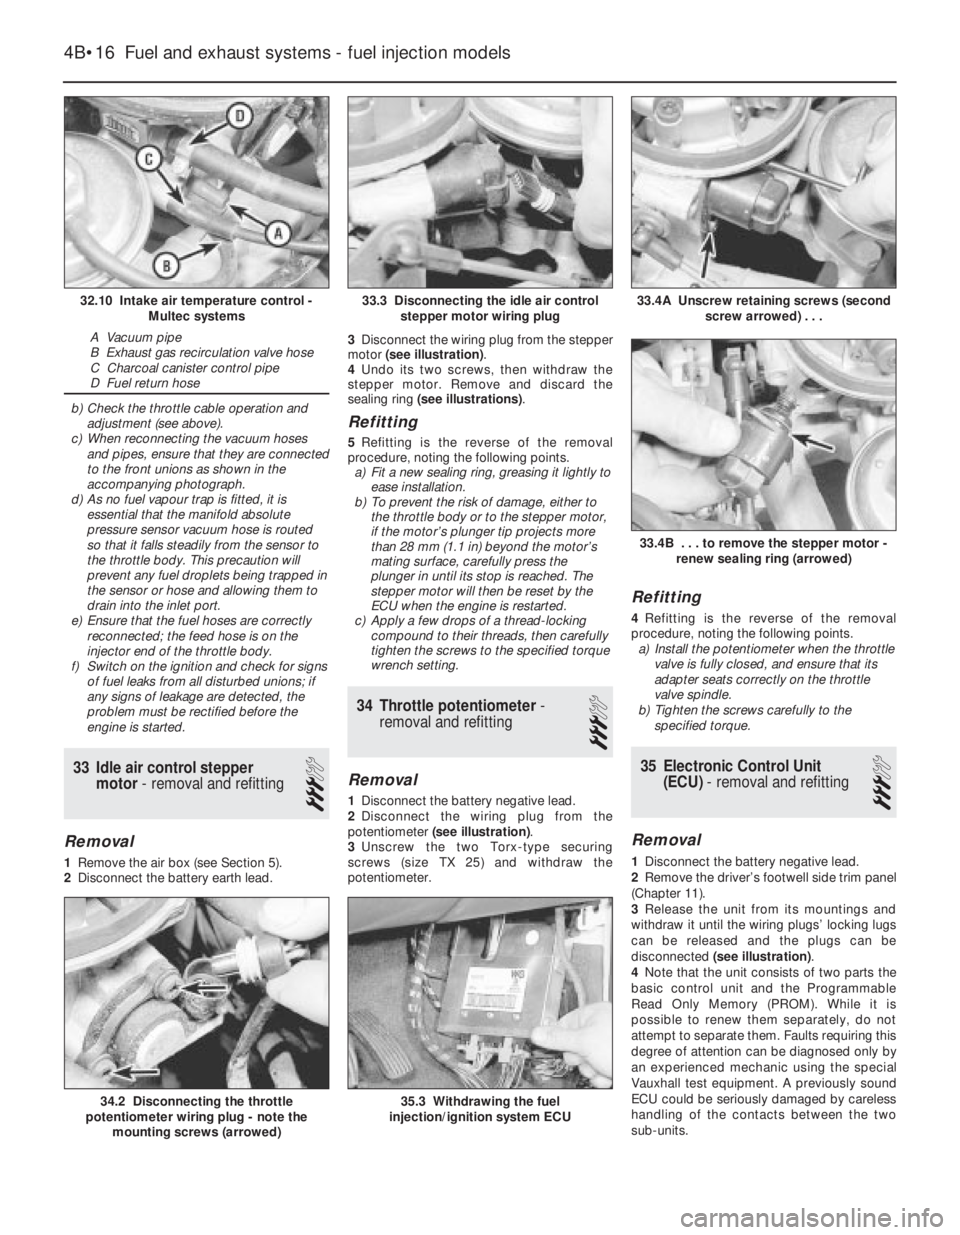
motor (see illustration).
4Undo its two screws, then withdraw the
stepper motor. Remove and discard the
sealing ring (see illustrations).
Refitting
5Refitting is the reverse of the removal
procedure, noting the following points.
a)Fit a new sealing ring, greasing it lightly to
ease installation.
b)To prevent the risk of damage, either to
the throttle body or to the stepper motor,
if the motor’s plunger tip projects more
than 28 mm (1.1 in) beyond the motor’s
mating surface, carefully press the
plunger in until its stop is reached. The
stepper motor will then be reset by the
ECU when the engine is restarted.
c)Apply a few drops of a thread-locking
compound to their threads, then carefully
tighten the screws to the specified torque
wrench setting.
34Throttle potentiometer -
removal and refitting
3
Removal
1Disconnect the battery negative lead.
2Disconnect the wiring plug from the
potentiometer (see illustration).
3Unscrew the two Torx-type securing
screws (size TX 25) and withdraw the
potentiometer.
Refitting
4Refitting is the reverse of the removal
procedure, noting the following points.
a)Install the potentiometer when the throttle
valve is fully closed, and ensure that its
adapter seats correctly on the throttle
valve spindle.
b)Tighten the screws carefully to the
specified torque.
35Electronic Control Unit
(ECU) - removal and refitting
3
Removal
1Disconnect the battery negative lead.
2Remove the driver’s footwell side trim panel
(Chapter 11).
3Release the unit from its mountings and
withdraw it until the wiring plugs’ locking lugs
can be released and the plugs can be
disconnected (see illustration).
4Note that the unit consists of two parts the
basic control unit and the Programmable
Read Only Memory (PROM). While it is
possible to renew them separately, do not
attempt to separate them. Faults requiring this
degree of attention can be diagnosed only by
an experienced mechanic using the special
Vauxhall test equipment. A previously sound
ECU could be seriously damaged by careless
handling of the contacts between the two
sub-units.
4B•16Fuel and exhaust systems - fuel injection models
32.10 Intake air temperature control -
Multec systems
A Vacuum pipe
B Exhaust gas recirculation valve hose
C Charcoal canister control pipe
D Fuel return hose
33.4A Unscrew retaining screws (second
screw arrowed) . . .
35.3 Withdrawing the fuel
injection/ignition system ECU34.2 Disconnecting the throttle
potentiometer wiring plug - note the
mounting screws (arrowed)
33.4B . . . to remove the stepper motor -
renew sealing ring (arrowed)
33.3 Disconnecting the idle air control
stepper motor wiring plug