1987 MAZDA 626 fuse
[x] Cancel search: fusePage 1727 of 1865
![MAZDA 626 1987 Workshop Manual
15 REAR WINDOW WIPER
CIRCUIT DIAGRAM
BATTERY MAIN FUSE X-01
X-01
REAR WIPER
&
WASHER SW GW [!]>• Control (Sectin Eb)
To Instrument Panel Light
D-01 Combination Sw [D]
LO
L B ±±±
LW MAZDA 626 1987 Workshop Manual
15 REAR WINDOW WIPER
CIRCUIT DIAGRAM
BATTERY MAIN FUSE X-01
X-01
REAR WIPER
&
WASHER SW GW [!]>• Control (Sectin Eb)
To Instrument Panel Light
D-01 Combination Sw [D]
LO
L B ±±±
LW](/manual-img/28/57059/w960_57059-1726.png)
15 REAR WINDOW WIPER
CIRCUIT DIAGRAM
BATTERY MAIN FUSE X-01
X-01
REAR WIPER
&
WASHER SW GW [!]>• Control (Sectin Eb)
To Instrument Panel Light
D-01 Combination Sw [D]
LO
L B ±±±
LW
LB LR
D-02 Front Wiper Motor [F]
B
LR
LW
±±±
L LB L
D-03 Rear Wiper Sw [I] x
x GW
\±U±±
TTTT
(5 Door)
B
L BL
D-04 Rear Wiper Motor [R3]
^bGL (5Door)
D-05 Rear Washer Motor 1 D-06 Headlight Cleaner Sw
[
LY
RB
(5 Door)
LW GW
C-05 Washer Motor Assembly |Fj
LW
LY L
©I®T
T
LO
15-72
86U15X-127
Page 1730 of 1865
REAR WINDOW WIPER 1 5
86U15X-132
INSPECTION
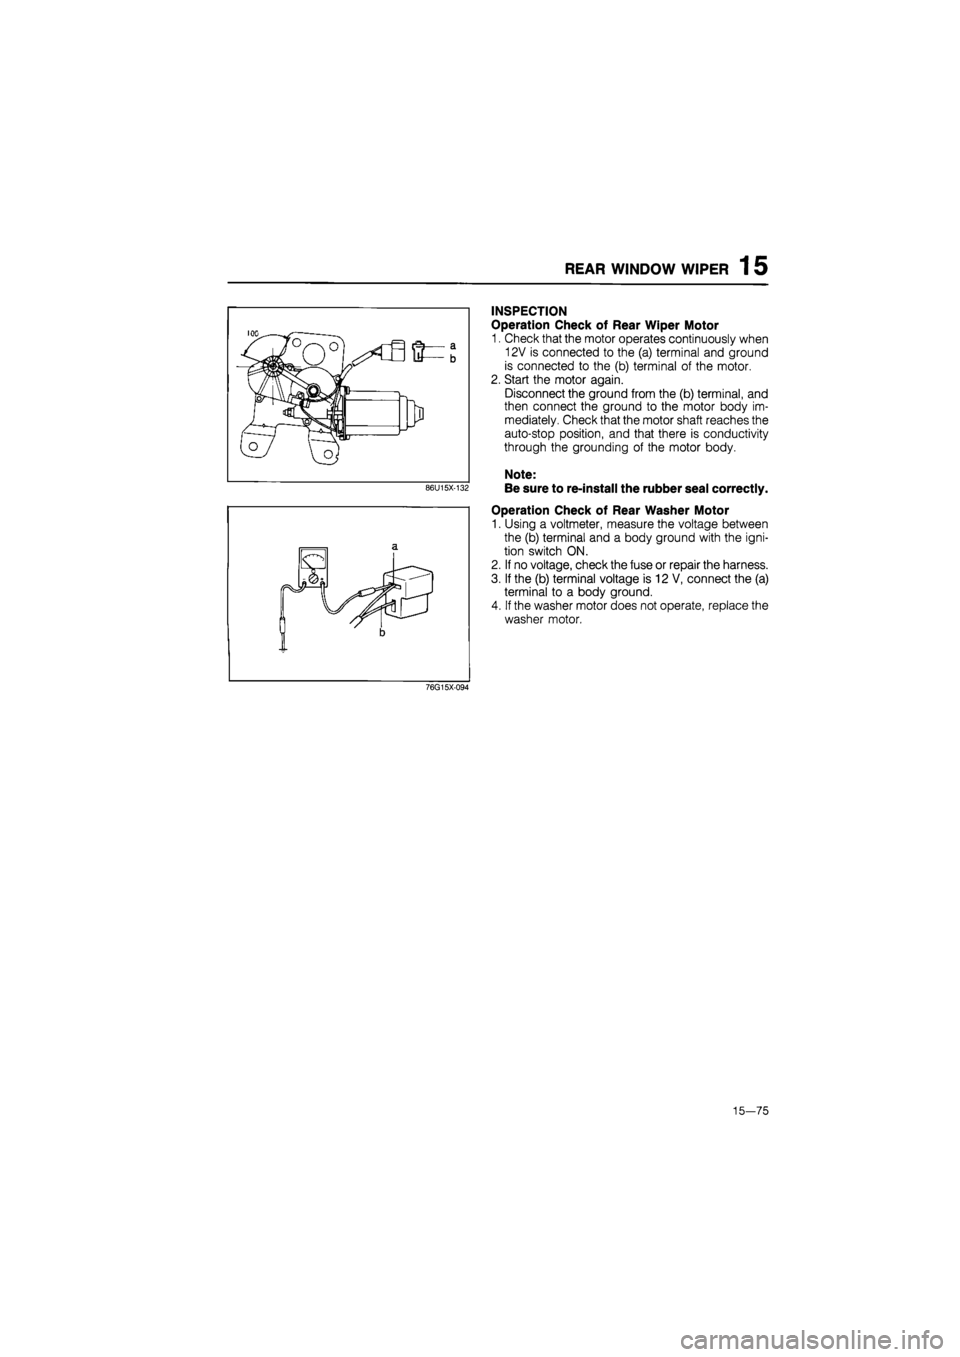
Operation Check of Rear Wiper Motor
1. Check that the motor operates continuously when
12V is connected to the (a) terminal and ground
is connected to the (b) terminal of the motor.
2. Start the motor again.
Disconnect the ground from the (b) terminal, and
then connect the ground to the motor body im-
mediately. Check that the motor shaft reaches the
auto-stop position, and that there is conductivity
through the grounding of the motor body.
Note:
Be sure to re-install the rubber seal correctly.
Operation Check of Rear Washer Motor
1. Using a voltmeter, measure the voltage between
the (b) terminal and a body ground with the igni-
tion switch ON.
2. If no voltage, check the fuse or repair the harness.
3. If the (b) terminal voltage is 12 V, connect the (a)
terminal to a body ground.
4. If the washer motor does not operate, replace the
washer motor.
76G15X-094
15-75
Page 1738 of 1865
CRUISE CONTROL SYSTEM 1 5
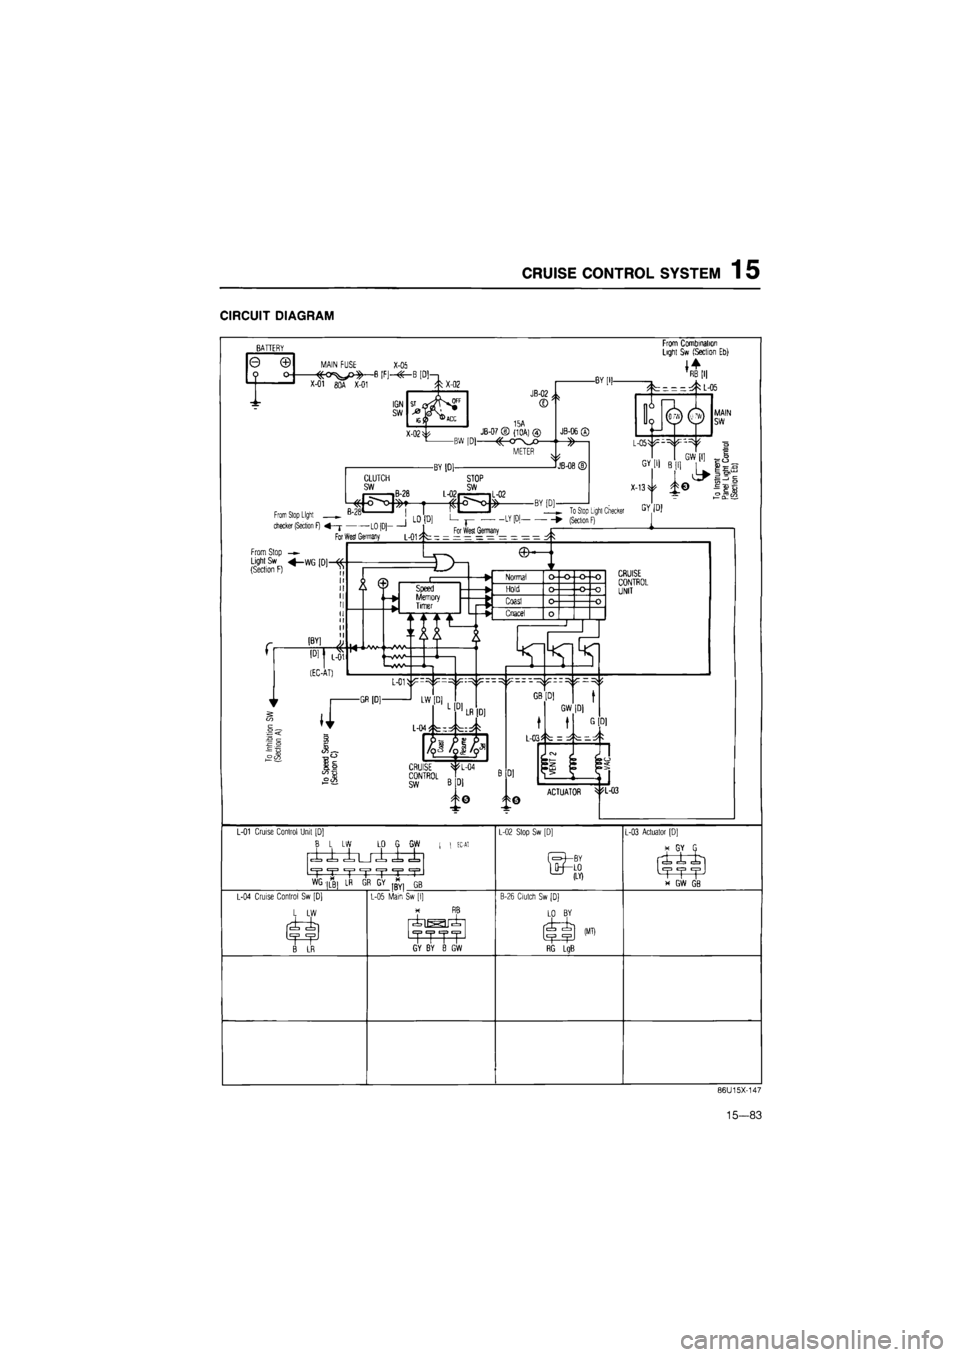
CIRCUIT DIAGRAM
BATTERY
0
t
© o-
MAIN FUSE
X-05
—13 |F|-«-X-01
8QA X-01
X-02^ 15A JB-07 ® (1 OA) @
BW |D)
^-O
METER
From Combination Light Sw (Section Eb>
J*
TRB
[l|
MAIN SW
CLUTCH
SW
-BY ID]—
I iB-28 L-u^p——.L-1
~
—
LO,DI--JLO!D1
Lr
For West Germany
STOP SW
L-02nr iL-02
From Stop Light
.
checker (Section F)
GW
[I]
-BY [D] To Stop Light Checker GY.IDI
From Stop
Light Sw WG (Dj—
(Section F)
' '
L-01 Cruise Control Unit
|
B
L LW LO G GW
±±±LA±± TT
EC-Al
WG
MI LR
L-04 Cruise Control Sw [D]
L
LW
GR GY
GB
B
LR
L-05 Main Sw
[I]
riu^rii
^TTT1 GY BY B GW
L-02 Slop Sw
[
' (LV)
B-26 Clutch Sw (D]
LO
BY
m
RG LgB
L-03 Actuator
I
* GY G
r±±i
X GW GB
86U15X-147
15-83
Page 1739 of 1865
1 5 CRUISE CONTROL SYSTEM
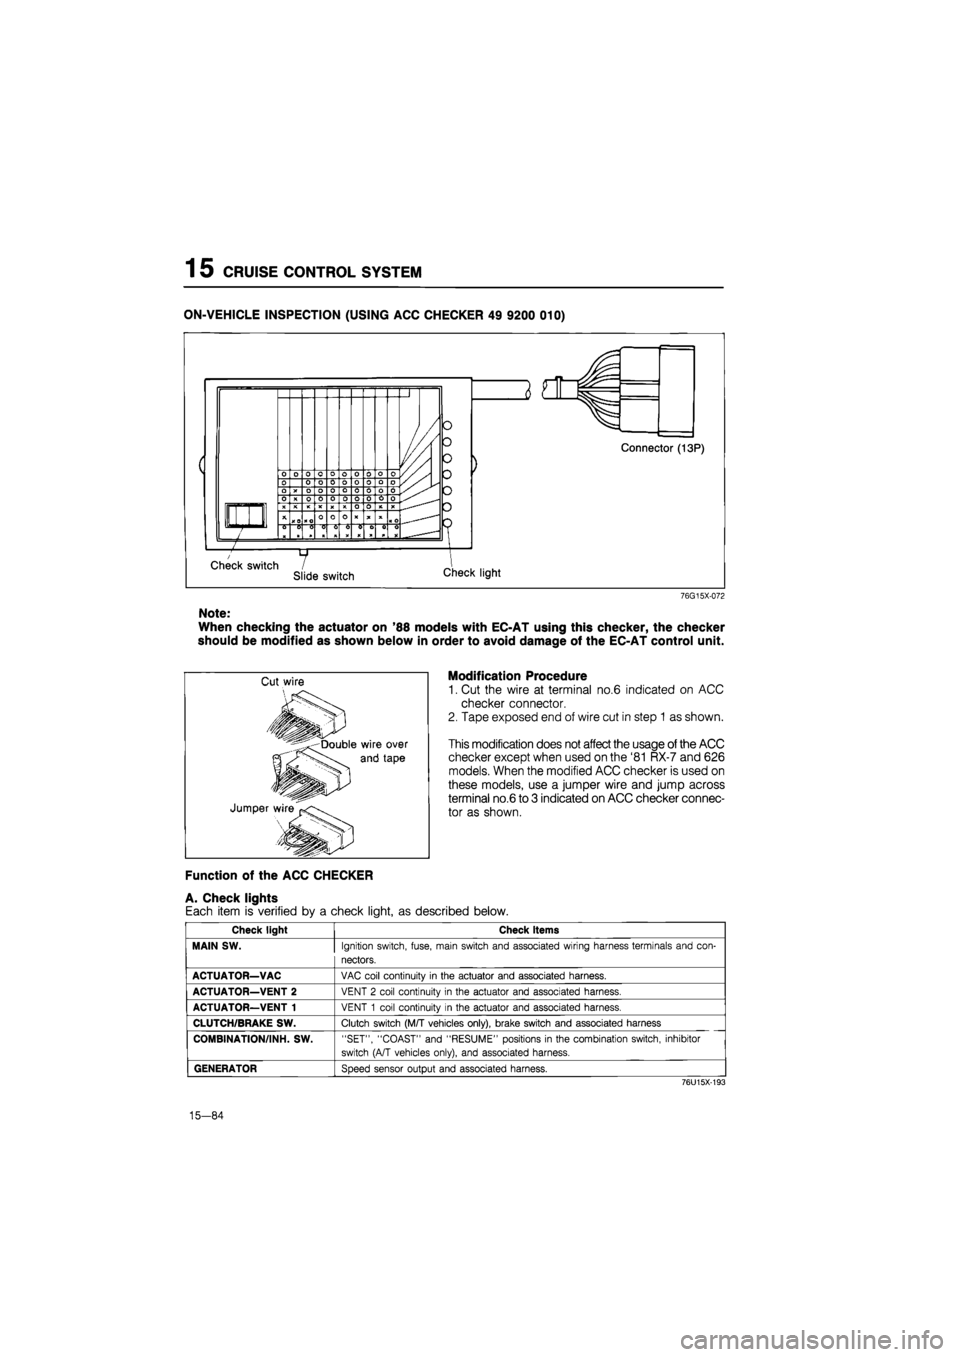
ON-VEHICLE INSPECTION (USING ACC CHECKER 49 9200 010)
76G15X-072
Note:
When checking the actuator on '88 models with EC-AT using this checker, the checker
should be modified as shown below in order to avoid damage of the EC-AT control unit.
Modification Procedure
1. Cut the wire at terminal no.6 indicated on ACC
checker connector.
2. Tape exposed end of wire cut in step 1 as shown.
This modification does not affect the usage of the ACC
checker except when used on the '81 RX-7 and 626
models. When the modified ACC checker is used on
these models, use a jumper wire and jump across
terminal no.6 to 3 indicated on ACC checker connec-
tor as shown.
Function of the ACC CHECKER
A. Check lights
Each item is verified by a check light, as described below.
Check light Check items
MAIN SW.
Ignition switch, fuse, main switch and associated wiring harness terminals and con-
nectors.
ACTUATOR—VAC
VAC coil continuity
in
the actuator and associated harness.
ACTUATOR—VENT 2
VENT
2
coil continuity
in
the actuator and associated harness.
ACTUATOR—VENT 1
VENT
1
coil continuity
in
the actuator and associated harness.
CLUTCH/BRAKE SW.
Clutch switch (M/T vehicles only), brake switch and associated harness
COMBINATION/INH. SW.
"SET", "COAST" and "RESUME" positions
in
the combination switch, inhibitor
switch (A/T vehicles only), and associated harness.
GENERATOR
Speed sensor output and associated harness.
76U15X-193
15-84
Page 1741 of 1865
1
5
CRUISE CONTROL SYSTEM
Checking
the
System
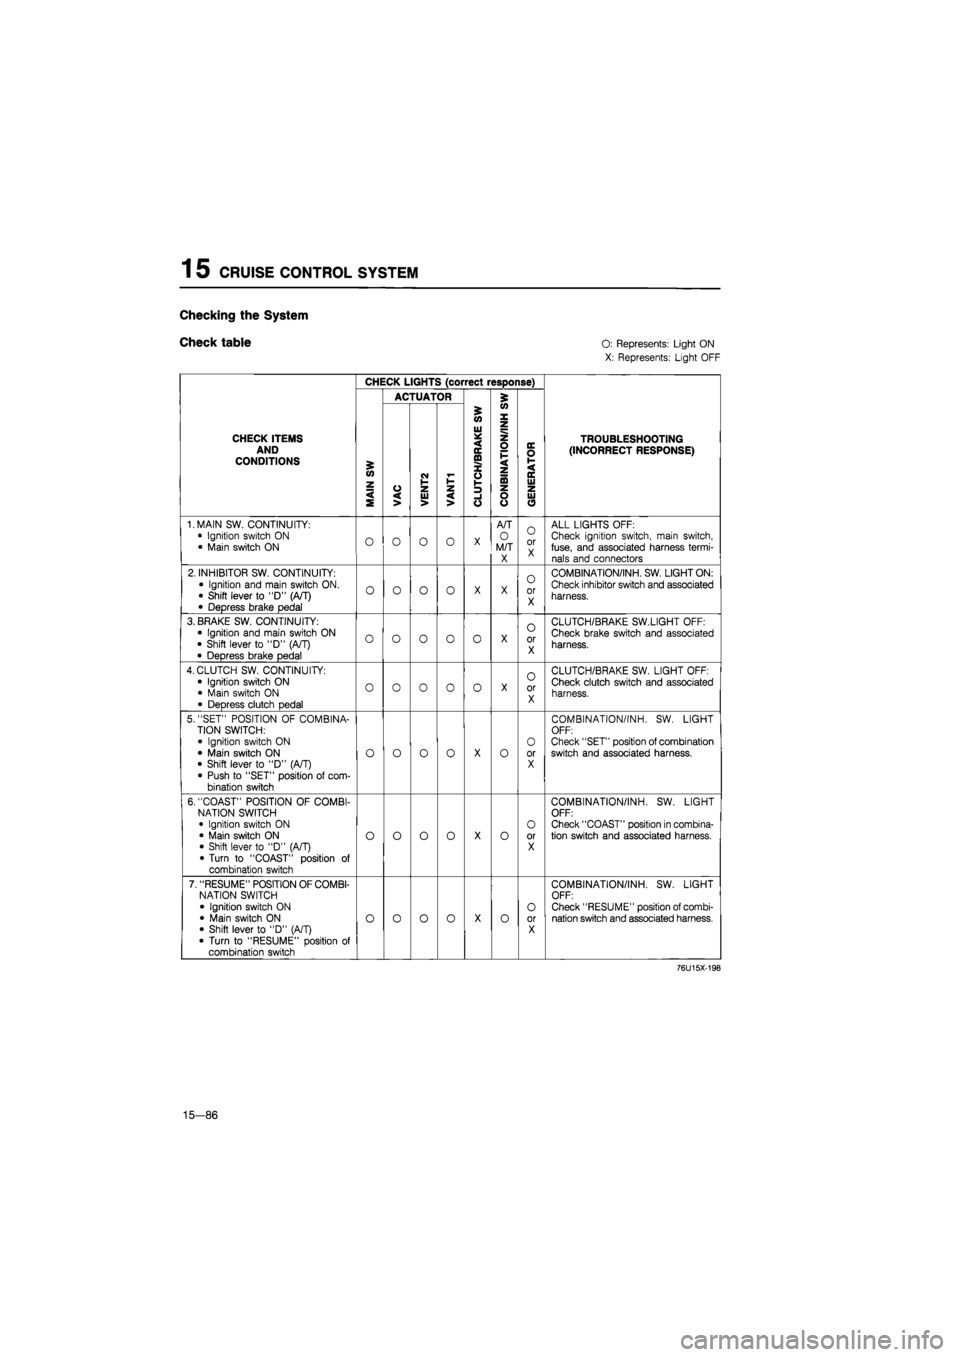
Check table O:
Represents: Light ON
X: Represents: Light OFF
CHECK LIGHTS (correct response)
ACTUATOR 5
CHECK ITEMS AND CONDITIONS
MAIN
SW
VAC
i
VENT2 VANT1
i
'
CLUTCH/BRAKE
SW
CONBINATION/INH
S
'
GENERATOR
TROUBLESHOOTING (INCORRECT RESPONSE)
1. MAIN SW. CONTINUITY:
• Ignition switch
ON
• Main switch
ON O O O o
X
A/T
O
M/T X
O
or X
ALL LIGHTS OFF: Check ignition switch, main switch, fuse, and associated harness termi-nals and connectors
2. INHIBITOR SW. CONTINUITY:
• Ignition and main switch ON. • Shift lever
to "D"
(A/T)
• Depress brake pedal
o o o o
X X
0
or X
COMBINATION/INH. SW. LIGHT ON:
Check inhibitor switch and associated
harness.
3. BRAKE SW. CONTINUITY: • Ignition and main switch
ON
• Shift lever
to
"D"
(A/T)
• Depress brake pedal
o o o o 0
X
o
or X
CLUTCH/BRAKE SW.LIGHT OFF:
Check brake switch and associated
harness.
4. CLUTCH SW. CONTINUITY:
• Ignition switch
ON
• Main switch
ON
• Depress clutch pedal
o o o 0 o
X
O
or X
CLUTCH/BRAKE SW. LIGHT OFF: Check clutch switch and associated harness.
5. "SET" POSITION
OF
COMBINA-TION SWITCH:
• Ignition switch
ON
• Main switch
ON
• Shift lever
to "D"
(A/T) • Push
to
"SET" position
of
com-bination switch
o o o o
X
o
O
or X
COMBINATION/INH.
SW.
LIGHT OFF: Check "SET" position of combination switch and associated harness.
6. "COAST" POSITION
OF
COMBI-NATION SWITCH • Ignition switch
ON
• Main switch
ON
• Shift lever
to "D"
(A/T) • Turn
to
"COAST" position
of
combination switch
o o o o
X
o
O
or X
COMBINATION/INH.
SW.
LIGHT OFF: Check "COAST" position in combina-tion switch and associated harness.
7. "RESUME" POSITION OF COMBI-NATION SWITCH
• Ignition switch
ON
• Main switch
ON
• Shift lever
to "D"
(A/T)
• Turn
to
"RESUME" position
of
combination switch
o o o o
X
o O
or X
COMBINATION/INH.
SW.
LIGHT OFF: Check "RESUME" position of combi-nation switch and associated harness.
76U15X-198
15—86
Page 1745 of 1865
![MAZDA 626 1987 Workshop Manual
1 5 SLIDING SUNROOF
CIRCUIT DIAGRAM
BATTEHY
© © P o-
B
[Fj -
80A
X-01
ff
WR [F] X-01 MAIN
X-06
FUSE
X-ffij
4 |
-WR [D]-
JB-09
©
Hit
LR
R|
LR [Fr) REAR HATCH
^T-06 T-06
MAZDA 626 1987 Workshop Manual
1 5 SLIDING SUNROOF
CIRCUIT DIAGRAM
BATTEHY
© © P o-
B
[Fj -
80A
X-01
ff
WR [F] X-01 MAIN
X-06
FUSE
X-ffij
4 |
-WR [D]-
JB-09
©
Hit
LR
R|
LR [Fr) REAR HATCH
^T-06 T-06](/manual-img/28/57059/w960_57059-1744.png)
1 5 SLIDING SUNROOF
CIRCUIT DIAGRAM
BATTEHY
© © P o-
B
[Fj -
80A
X-01
ff
WR [F] X-01 MAIN
X-06
FUSE
X-ffij
4 |
-WR [D]-
JB-09
©
Hit
LR
R|
LR [Fr) REAR HATCH
^T-06 T-06
BlFrj
Bl
i iii
-LR [In] -
15®
— JB-IO ® ROOM
^JB-03(
[
B[D| i
-J1
Unleaded Fuel (Except Sweden & West Germany)
X-D2
IGN SW
VX-OZ
BW |D|
r-oe T-01 JB-10 © 5SA@ ^JB-07®
= = = = = ^ T-05
BrW"|Frj RW IFi]
^ X-jfi
RW [R]
BrW'[H2| RW [R2|
LR
T-04
SUNROOF REUY No.1
I fp LW-' ly
4f - = - --
LW
S.G LY
REAR HATCH MOTOR
T-01 Connector Between Interior Light Harness [In] and Sunroof
T-02 Sunroof Sw
LG
LW G (±±±
B
l. LY
GO
LW LG ±±±
LY
L B
T-03 Sunroof Motor
Y
L LY YG
pL=LX Jh
TTTT1
YR
B
LG LW
YG
LY L Y
Ntttt) TTTT
LW LG
B YR
T-04 Sunroof Relay No
1
G
Y G
r±±±-
B
« L
T-05 Sunroof Relay No
2
G
YR G
B
x YG
T-06 Rear Hatch Sw
|
BrW
B
LR
RW
5 Door
T-07 Rear Hatch Motor [R3] RW
*
B;W
*
15-90
86U15X-149
Page 1746 of 1865
SLIDING SUNROOF 1 5
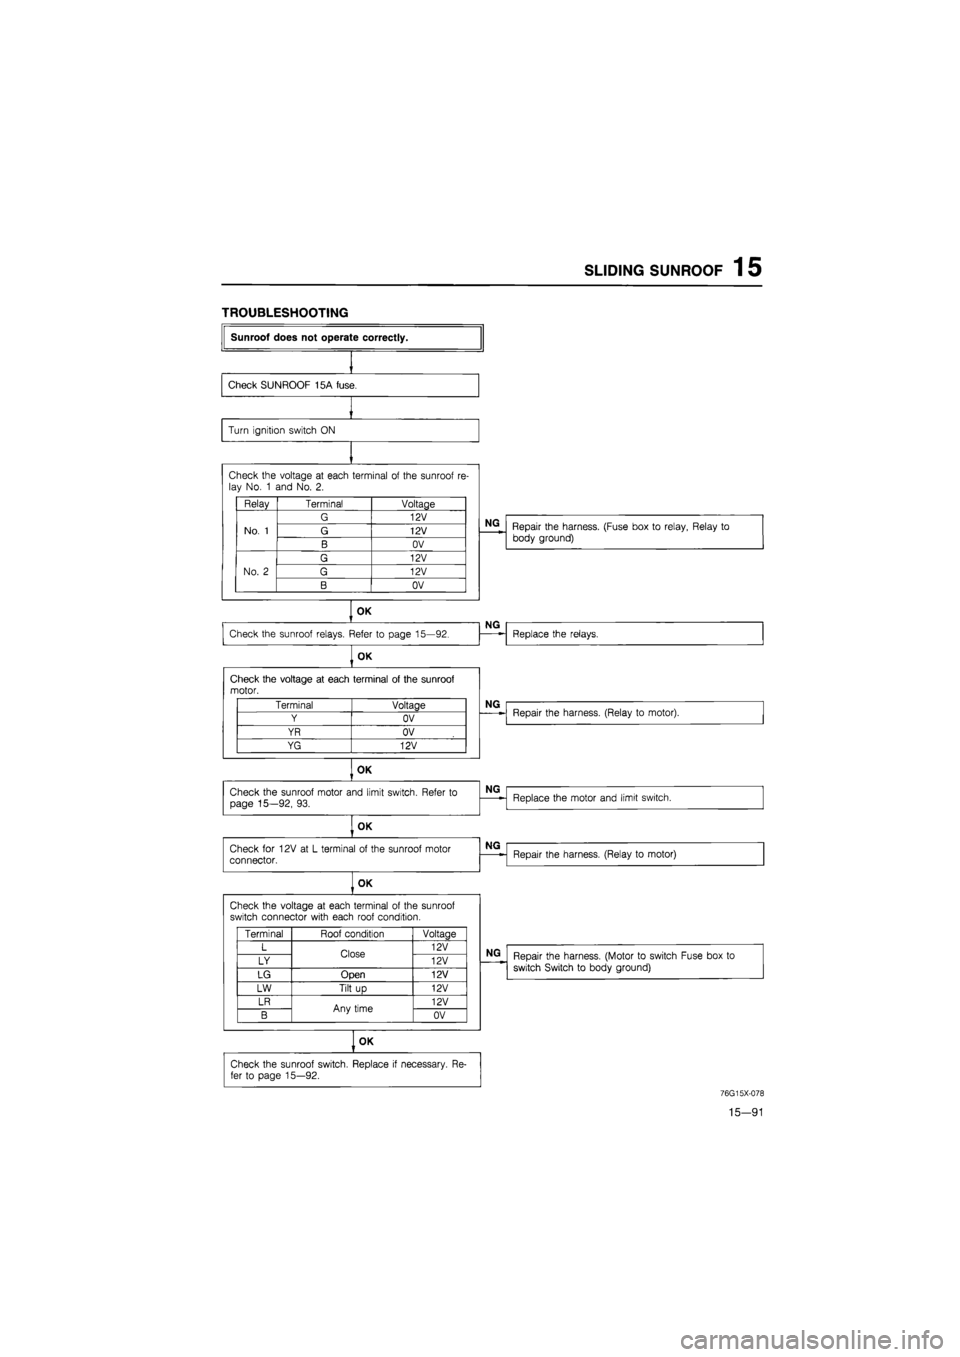
TROUBLESHOOTING
Sunroof does not operate correctly.
Check SUNROOF 15A fuse.
Turn ignition switch
ON
Check the voltage
at
each terminal
of
the sunroof
re-
lay No.
1
and No.
2.
Relay Terminal Voltage
No.
1
G 12V
No.
1
G 12V No.
1
B OV
No.
2
G 12V
No.
2
G 12V No.
2
B OV
OK
Check the sunroof relays. Refer
to
page 15—92.
OK
Check the voltage
at
each terminal
of
the sunroof motor.
OK
Check the sunroof motor and limit switch. Refer
to
page 15—92,
93.
OK
Check
for
12V
at L
terminal
of
the sunroof motor connector.
OK
Check the voltage
at
each terminal
of
the sunroof switch connector with each roof condition.
OK
Terminal Voltage
Y OV
YR OV
YG 12V
Terminal Roof condition Voltaae
L Close 12V
LY Close 12V
LG Open 12V
LW Tilt
up
12V
LR Any time 12V
B Any time OV
Check the sunroof switch. Replace
if
necessary.
Re-
fer
to
page 15—92.
NG
Repair the harness. (Fuse box
to
relay, Relay
to
body ground)
NG
Replace the relays.
NG
Repair the harness. (Relay
to
motor).
NG
Replace the motor and limit switch.
NG
Repair the harness. (Relay
to
motor)
NG
Repair the harness. (Motor
to
switch Fuse box
to
switch Switch
to
body ground)
76G15X-078
15—91
Page 1751 of 1865
1 5 AUTO ADJUSTING SUSPENSION (AAS)
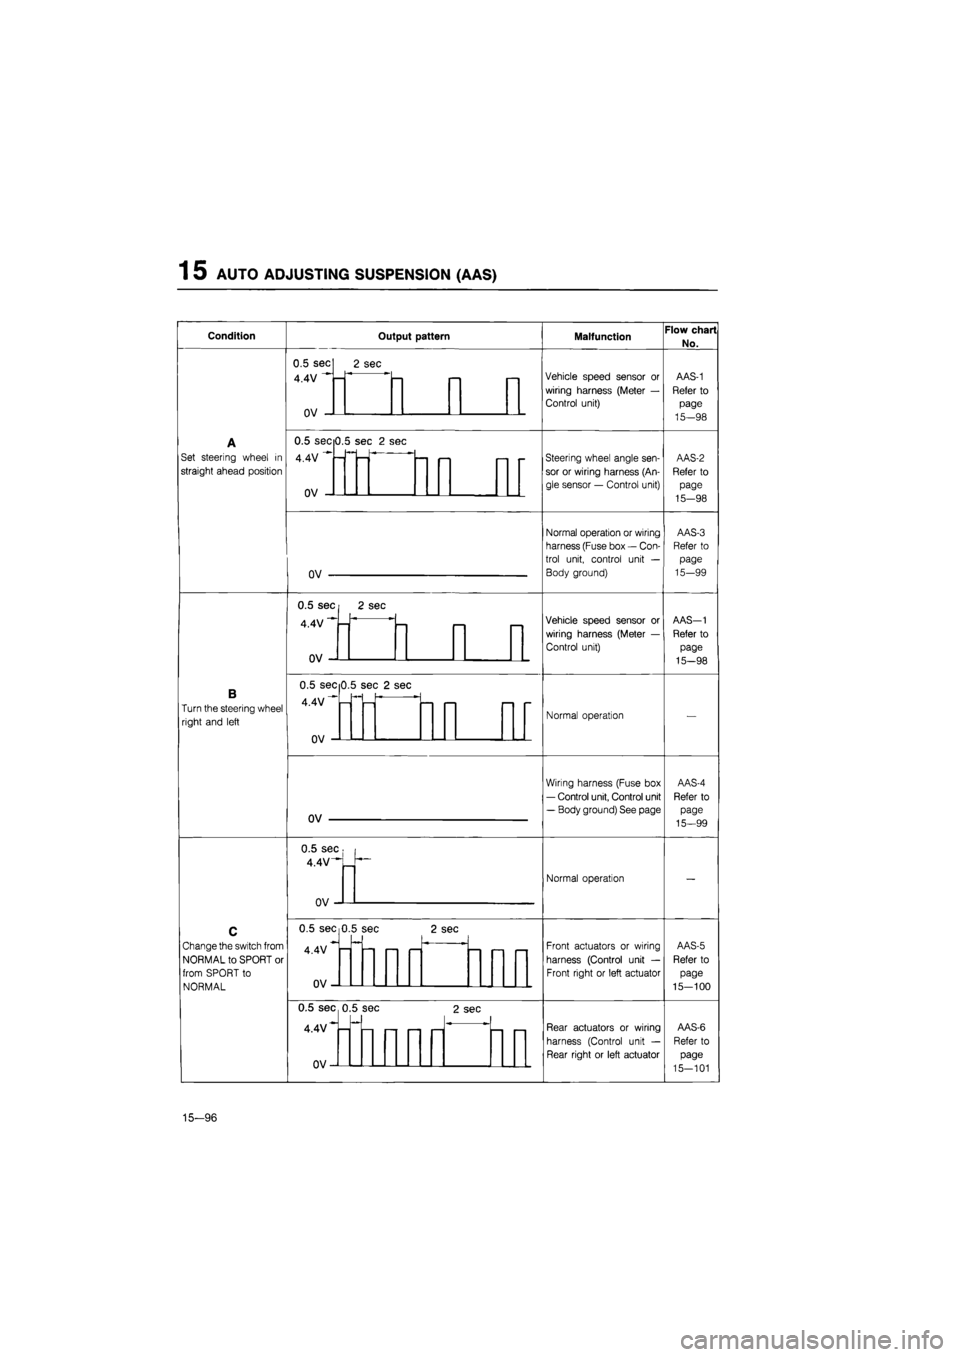
Condition Output pattern Malfunction Flow chart
No.
A
Set steering wheel
in
straight ahead position
0.5 sec
4.4V
n\/
2 sec
Vehicle speed sensor
or
wiring harness (Meter
—
Control unit)
AAS-1
Refer
to
page
15—98
A
Set steering wheel
in
straight ahead position
Vehicle speed sensor
or
wiring harness (Meter
—
Control unit)
AAS-1
Refer
to
page
15—98
A
Set steering wheel
in
straight ahead position
0.5 secO.!
4.4V
nv
i sec
2
sec
— <—i i— -
Steering wheel angle sen-
sor
or
wiring harness (An-
gle sensor
—
Control unit)
AAS-2
Refer
to
page
15-98
A
Set steering wheel
in
straight ahead position
-
Steering wheel angle sen-
sor
or
wiring harness (An-
gle sensor
—
Control unit)
AAS-2
Refer
to
page
15-98
A
Set steering wheel
in
straight ahead position
nv
Normal operation or wiring
harness (Fuse box
—
Con-
trol unit, control unit
—
Body ground)
AAS-3
Refer
to
page
15-99
A
Set steering wheel
in
straight ahead position
Normal operation or wiring
harness (Fuse box
—
Con-
trol unit, control unit
—
Body ground)
AAS-3
Refer
to
page
15-99
B
Turn the steering wheel
right and left
0.5 sec
4.4V
n\/
2 sec
—
Vehicle speed sensor
or
wiring harness (Meter
—
Control unit)
AAS-1
Refer
to
page
15-98
B
Turn the steering wheel
right and left
Vehicle speed sensor
or
wiring harness (Meter
—
Control unit)
AAS-1
Refer
to
page
15-98
B
Turn the steering wheel
right and left
0.5 sec 0
4.4V""-
.5 se c 2 se
-
Normal operation
—
B
Turn the steering wheel
right and left Normal operation
—
B
Turn the steering wheel
right and left
ov
Wiring harness (Fuse box
— Control unit, Control unit
— Body ground) See page
AAS-4
Refer
to
page
15—99
B
Turn the steering wheel
right and left
Wiring harness (Fuse box
— Control unit, Control unit
— Body ground) See page
AAS-4
Refer
to
page
15—99
C
Change the switch from
NORMAL to SPORT
or
from SPORT
to
NORMAL
0.5 sec
4.4V-""
_
n
Normal operation
—
C
Change the switch from
NORMAL to SPORT
or
from SPORT
to
NORMAL
Normal operation
—
C
Change the switch from
NORMAL to SPORT
or
from SPORT
to
NORMAL
0.5 sec 0
4.4V
nv
.5 se c
—
2 se
C
i—1 i—i
Front actuators
or
wiring
harness (Control unit
—
Front right
or
left actuator
AAS-5
Refer
to
page
15-100
C
Change the switch from
NORMAL to SPORT
or
from SPORT
to
NORMAL
Front actuators
or
wiring
harness (Control unit
—
Front right
or
left actuator
AAS-5
Refer
to
page
15-100
C
Change the switch from
NORMAL to SPORT
or
from SPORT
to
NORMAL
0.5 sec 0
4.4V*-
n\/
.5 se c
— r— —
2 sec
—1
Rear actuators
or
wiring
harness (Control unit
—
Rear right
or
left actuator
AAS-6
Refer
to
page
15-101
C
Change the switch from
NORMAL to SPORT
or
from SPORT
to
NORMAL
Rear actuators
or
wiring
harness (Control unit
—
Rear right
or
left actuator
AAS-6
Refer
to
page
15-101
15-96