Page 1687 of 1865
1 5 WARNING LIGHT AND SENDER
TROUBLESHOOTING
Note
Check the "Meter 10 or 15A" fuse in the fuse box before troubleshooting. If normal, refer
to the following troubleshooting chart.
Brake System Warning Light
76G15X-033
76G15X034
15-32
Page 1693 of 1865
1 5 WARNING AND SENDER
Shift Indicator Light
All shift indicator lights do not Illuminate when ignition switch on. (other warning light are all right.)
Check the voltage
at BY
terminal
of
the inhibitor switch connector with ignition switch
on.
Terminal Voltage
BY 12V
NG
Repair the harness (Fuse box
to
inhibitor switch).
OK
Check the inhibitor switch. Refer
to
page 7B—65
NG
Replace the inhibitor switch. Check the inhibitor switch. Refer
to
page 7B—65 Replace the inhibitor switch.
OK
NG
Check the bulbs
of
the shift indicator lights.
NG
Replace the bulb.
OK
Turn the ignition switch on, and check the voltage
at
each terminal
of
the meter connector with each con-dition.
Terminal Selector lever Voltage
YL (2J) P 12V
RG (1L) R 12V
YR (2L) N 12V
Y(1V) D 12V
YB (1S) 2 12V
YW (1M) 1 12V
NG
Repair the harness (Inhibitor switch
to
meter).
76G15X-087
O/D OFF Indicator Light
OK
Repair the harness (O/D OFF switch
to
ground).
76G15X092
15-38
Page 1701 of 1865

1 5 TURN AND HAZARD LIGHT
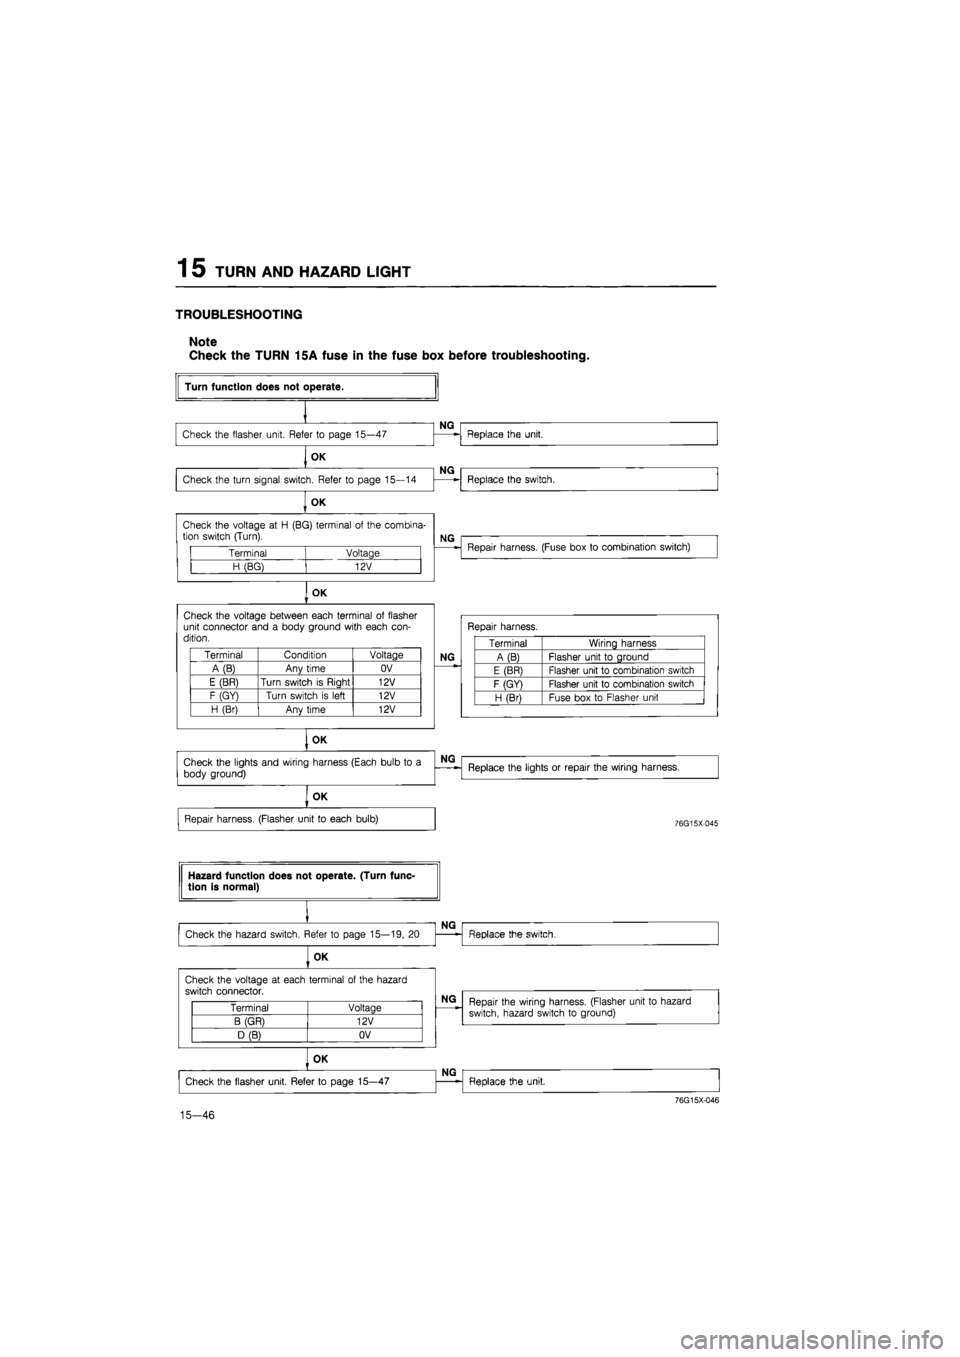
TROUBLESHOOTING
Note
Check the TURN 15A fuse in the fuse box before troubleshooting.
Terminal Voltage
H (BG) 12V
OK
Check the voltage between each terminal
of
flasher unit connector and
a
body ground with each con-dition.
Terminal Condition Voltage
A(B) Any time OV
E (BR) Turn switch
is
Riaht 12V
F (GY) Turn switch
is
left 12V
H (Br) Anv time 12V
OK
Turn function does not operate.
Check the flasher unit. Refer
to
page 15—47
OK
Check the turn signal switch. Refer
to
page 15—14
OK
NG
NG
Check the voltage
at H
(BG) terminal
of
the combina-tion switch (Turn).
Replace the unit.
Replace the switch.
NG
Repair harness. (Fuse box
to
combination switch)
Repair harness.
NG
Terminal Wiring harness
A (B) Flasher unit
to
ground
E (BR) Flasher unit
to
combination switch
F (GY) Flasher unit
to
combination switch
H (Bri Fuse box
to
Flasher unit
Check the lights and wiring harness (Each bulb
to a
body ground)
NG
Replace the lights
or
repair the wiring harness.
OK
Repair harness. (Flasher unit
to
each bulb)
76G15X-045
Hazard function does not operate. (Turn func-tion is normal)
Check the hazard switch. Refer
to
page 15—19,
20
OK
NG
Replace the switch.
Check the voltage
at
each terminal
of
the hazard
switch connector.
Terminal Voltage
B (GR) 12V
D (B) OV
15-46
NG
Repair the wiring harness. (Flasher unit
to
hazard
switch, hazard switch
to
ground)
OK
Check the flasher unit. Refer
to
page 15—47
NG
Replace the unit.
76G15X-046
Page 1704 of 1865
STOP LIGHT 1 5
CIRCUIT DIAGRAM
TROUBLESHOOTING
Note
Check the STOP 15A fuse in the fuse box before troubleshooting.
86U15X-085
15—49
Page 1705 of 1865

1 5 STOP LIGHT
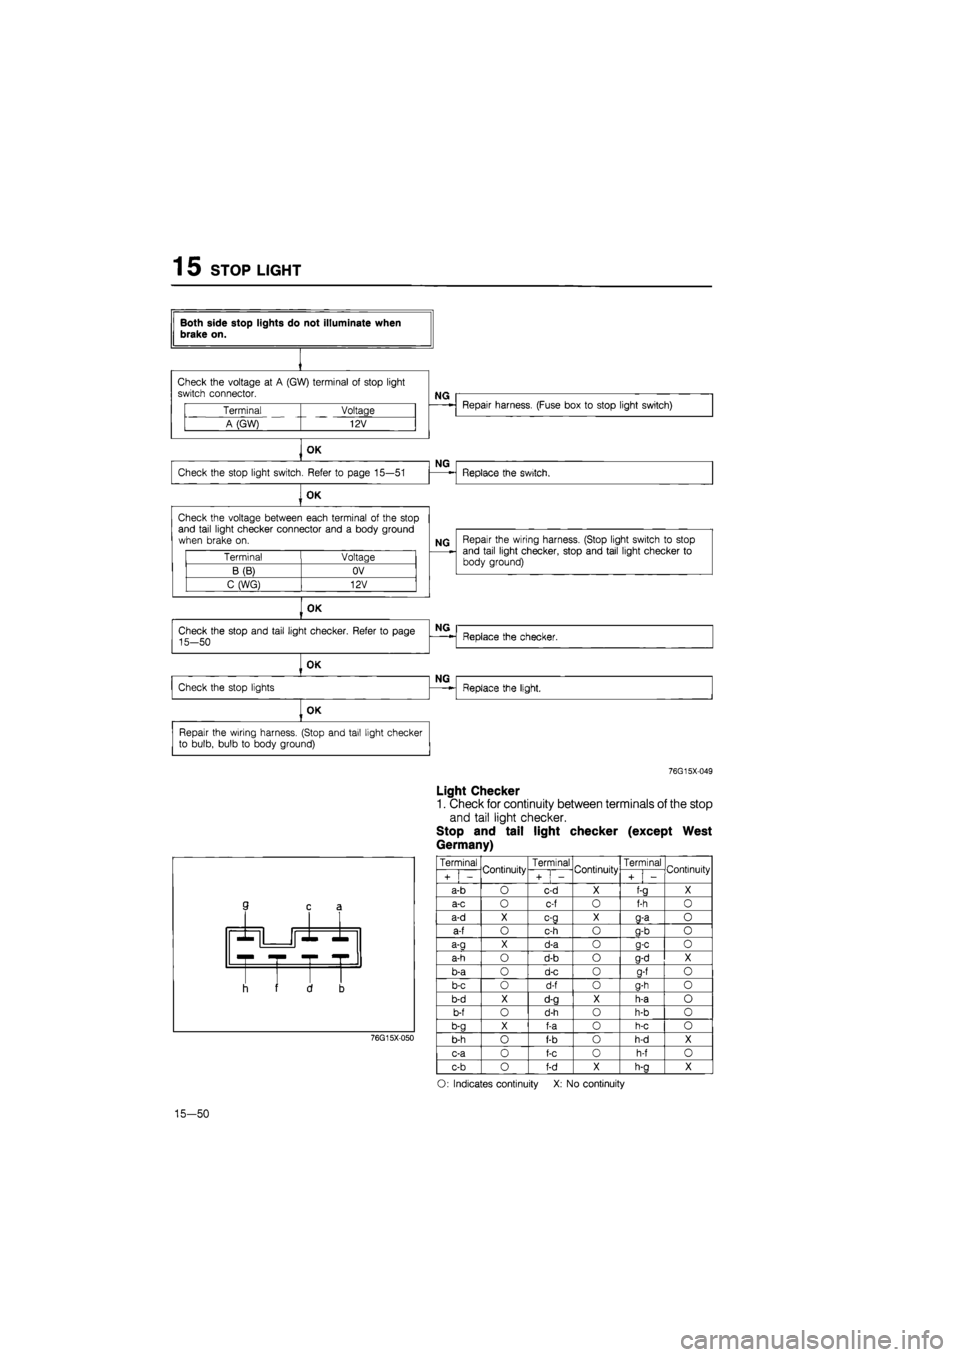
Both side stop lights do not illuminate when brake on.
Check the voltage
at A
(GW) terminal
of
stop light switch connector.
NG
Terminal Voltage
A (GW) 12V
Repair harness. (Fuse box
to
stop light switch)
OK
Check the stop light switch. Refer
to
page 15—51
NG
Replace the switch.
OK
Check the voltage between each terminal
of
the stop and tail light checker connector and
a
body ground when brake
on.
Terminal Voltage
B(B) OV
C (WG) 12V
NG Repair the wiring harness. (Stop light switch
to
stop and tail light checker, stop and tail light checker
to
body ground)
OK
OK
Repair the wiring harness. (Stop and tail light checker to bulb, bulb
to
body ground)
76G15X-049
Light Checker
1. Check for continuity between terminals of the stop
and tail light checker.
Stop and tail light checker (except West
Germany)
3 c £
r -r •
I i f 1 3
76G15X050
Terminal Continuity Terminal Continuity Terminal Continuity
i + i -
Continuity
+
1
-
Continuity
i + i -
Continuity
a-b
O
c-d
X
f-a
X
a-c
O
c-f
o
f-h
0
a-d
X c-g X g-a o
a-f
o
c-h
o
g-b
o
a-a
X
d-a
o a-c o
a-h
o
d-b
o
g-d
X
b-a
o
d-c
0
a-f
o
b-c
o
d-f
o
g-h
o
b-d
X
d-g
X
h-a
o
b-f
o
d-h
o
h-b
o
b-g
X
f-a
0
h-c
o
b-h
o
f-b
o
h-d
X
c-a
0
f-c
o
h-f
o
c-b
o
f-d
X
h-a
X
O: Indicates continuity
X: No
continuity
15-50
Page 1710 of 1865
HEADLIGHT 15
Unleaded fuel model
OK
Check
for
12V
at
"RB" wire (when low and/or "RW" wire (when high)
of
combination switch
6
pin con-nector
NG
Check
for
12V
at
"RB" wire (when low and/or "RW" wire (when high)
of
combination switch
6
pin con-nector
NG
Replace combination switch
Check
for
12V
at
"RB" wire (when low and/or "RW" wire (when high)
of
combination switch
6
pin con-nector
OK
Check the voltage between each terminal
of
the headlihgt relay and
a
body ground.
Terminal Voltage
a (RW) 12V
c(R) 12V
NQ Repair harness
(a
terminal
—
combination switch
to
headlight relay,
c
terminal
—
main fuse
to
headlight relay)
OK
OK —
Replace the bulb(s)
76G15X-053
INSPECTION
Headlight Relay
Check for continuity between terminals of the relay.
Connecting
to
Terminal
12V Ground a b c d
— —
O— —O
a b O— —-O
O—O: indicates continuity
76G15X-054
15—55
Page 1711 of 1865
1 5 PANEL LIGHT CONTROL
PANEL LIGHT CONTROL
CIRCUIT DIAGRAM
COMBINATION SW (Light Sw)
1 ? 3= o
5
B
*
SB c
52 "
o
-too u c E o E H Eil'y E 1 a tcsfi
86U15X-098
TROUBLESHOOTING
OK
Repair the wiring harness. (Fuse box
to
panel light controller, Panel light controller
to
body ground)
76G15X-056
15—56
Check the voltage between each terminal
of
the pan-el light controller connector and
a
body ground.
Terminal Voltage
B (RB) 12V
C(B) OV
Page 1725 of 1865

15 REMOTE CONTROL MIRROR
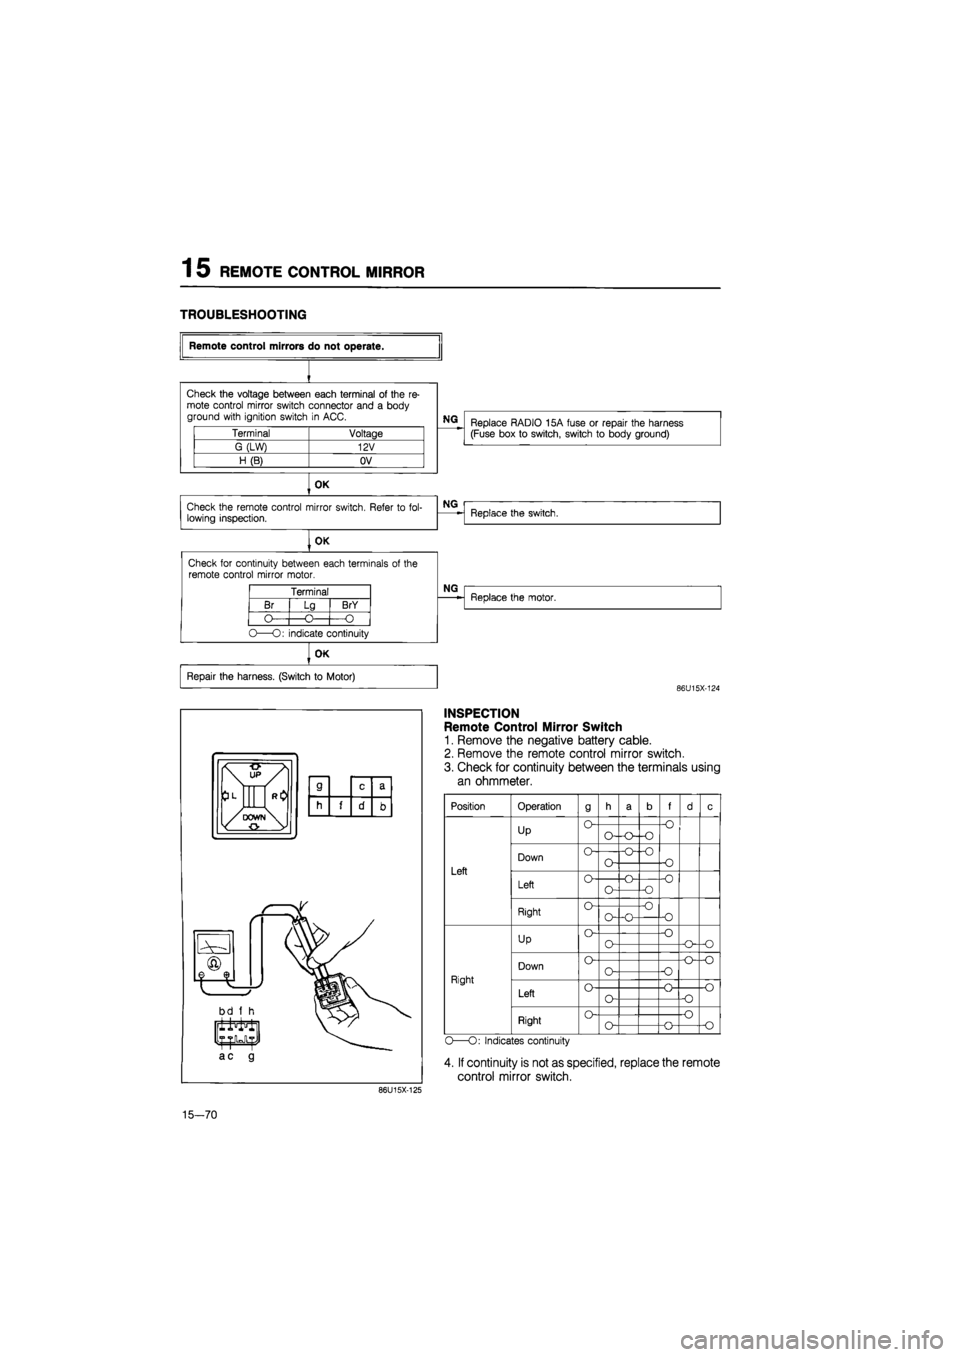
TROUBLESHOOTING
Terminal Voltage
G (LW) 12V
H(B) OV
OK
Check the remote control mirror switch. Refer
to
fol-lowing inspection.
OK
Check for continuity between each terminals
of
the remote control mirror motor.
Terminal
Br
O
Lg
-O-
BrY
-O
O—O: indicate continuity
Remote control mirrors do not operate.
Check the voltage between each terminal
of
the
re-
mote control mirror switch connector and
a
body ground with ignition switch
in
ACC.
NG
Replace RADIO 15A fuse
or
repair the harness (Fuse box
to
switch, switch
to
body ground)
NG
Replace the switch.
NG
Replace the motor.
OK
Repair the harness. (Switch
to
Motor)
86U15X-124
86U15X-125
INSPECTION
Remote Control Mirror Switch
1. Remove the negative battery cable.
2. Remove the remote control mirror switch.
3. Check for continuity between the terminals using
an ohmmeter.
Position
Left
Right
Operation
Up
Down
Left
Right
Up
Down
Left
Right
9
O
o-
o
o
o
o-
o-
o
O-O—o
o-
o-
o~o
o
o-
o
o-
o-o
•o -o
•o
f
•o
-o
-O
o
-o
-o
o
o
o-o
-o-o
-o
o
•o
o
O—O: Indicates continuity
4. If continuity is not as specified, replace the remote
control mirror switch.
15—70