Page 1605 of 1865
14 REAR WINDOW GLASS
86U14X-127
76G14X-034
/W Af/
wAfii
A
86U14X-129
REMOVAL
1. Disconnect the negative battery cable.
2. Disconnect the defogger connector.
3. Remove the seat belts.
4. Remove the screws and the quarter trim.
5. Remove the screws and the center pillar trim.
6. Remove the screws and the rear header.
7. Remove the nuts and the rear window side
molding.
8. Remove the fasteners and the rear package tray.
86U14X-130
14—54
Page 1606 of 1865

REAR WINDOW GLASS 14
Upper molding
/ /
/
/
Lower molding ^
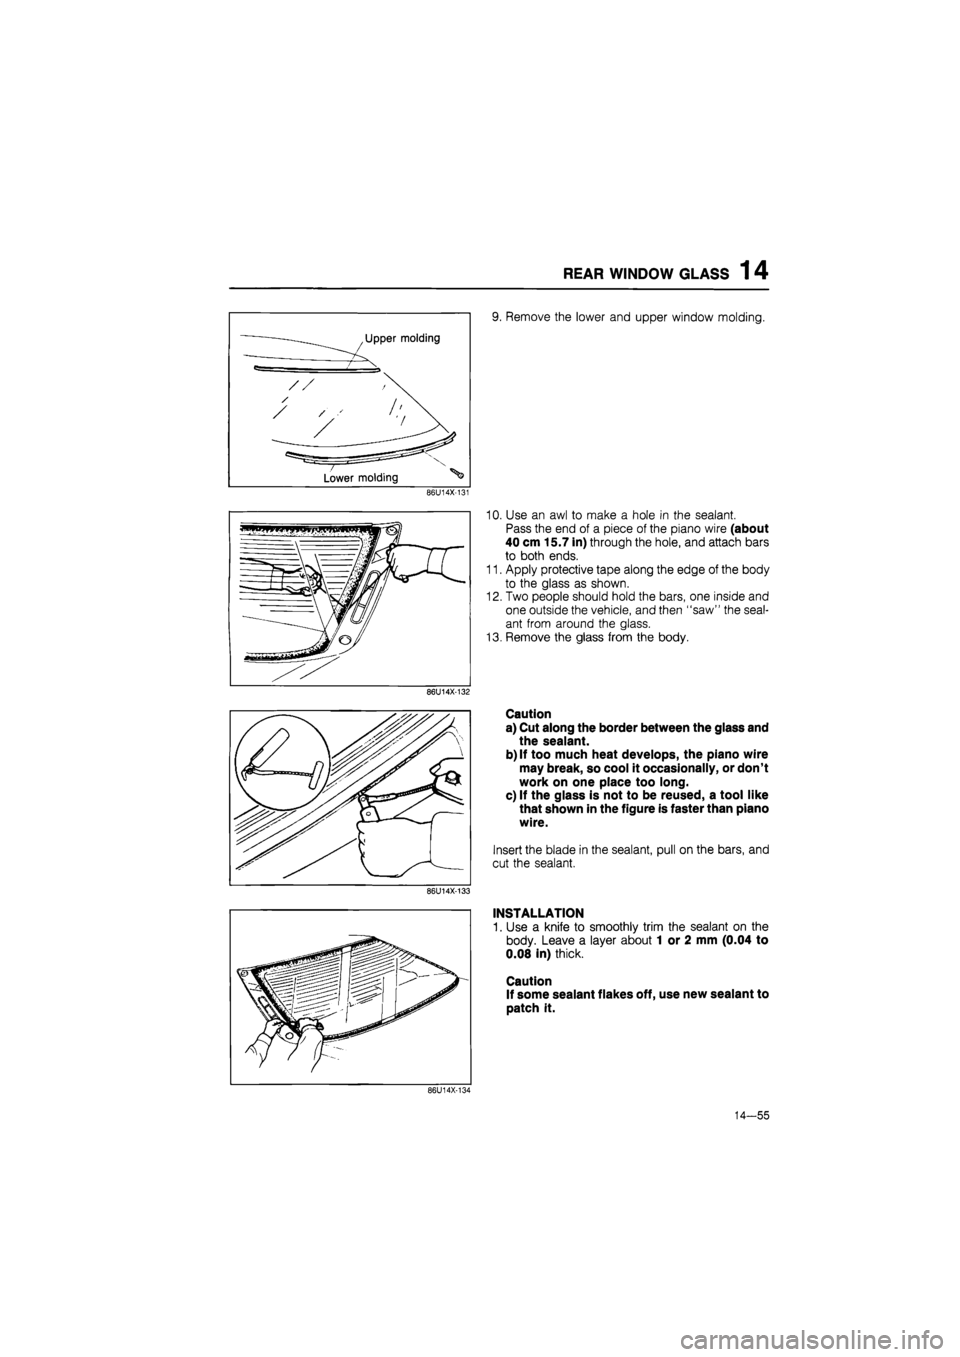
9. Remove the lower and upper window molding.
86U14X-131
86U14X-132
86U14X-133
10. Use an awl to make a hole in the sealant.
Pass the end of a piece of the piano wire (about
40 cm 15.7 in) through the hole, and attach bars
to both ends.
11. Apply protective tape along the edge of the body
to the glass as shown.
12. Two people should hold the bars, one inside and
one outside the vehicle, and then "saw" the seal-
ant from around the glass.
13. Remove the glass from the body.
Caution
a) Cut along the border between the glass and
the sealant.
b) If too much heat develops, the piano wire
may break, so cool it occasionally, or don't
work on one place too long.
c) If the glass is not to be reused, a tool like
that shown in the figure is faster than piano
wire.
Insert the blade in the sealant, pull on the bars, and
cut the sealant.
INSTALLATION
1. Use a knife to smoothly trim the sealant on the
body. Leave a layer about 1 or 2 mm (0.04 to
0.08 in) thick.
Caution
If some sealant flakes off, use new sealant to
patch it.
86U14X-134
14-55
Page 1607 of 1865

14 REAR WINDOW GLASS
2. Carefully clean and remove any grease from a 5
cm (1.97 in) wide area around the circumference
of the glass and the remaining bond on the body.
3. Bond a dam along the circumference of the glass
8 mm (0.31 in) from the edge.
Caution
Securely bond the dam and let it dry.
63U14X-064
4. Apply primer with a brush to the circumference of
the glass and the body and
it
them to naturally dry
for 20 to 30 minutes.
Caution
Be sure not to allow dirt, water, oil, etc. to
come in contact with the coated surfaces and
do not touch it with your hand.
63U14X-065
5. Install the spacers at the positions shown in the
figure.
Caution
Spacer, with flaws, must be replaced.
63U14X066
6. When the primer has dried, apply an 11 mm (0.43
in) thick bead of repair seal (B001 77 739) 11 mm
(0.43 in) from the periphery of the window glass
using a sealant gun.
Caution
Cut the nozzle of the repair seal cartridge as
illustrated in the figure.
If necessary, smooth the repair seal to correct
any irregularities.
63U14X-067
14-56
Page 1608 of 1865
REAR WINDOW GLASS 1 4
86U14X-135
63U14X-069
Replenished section
with sealing agent
-Glass
Spacer
63U14X-070
7. Attach the back door glass to the body.
Caution
Keep the door glass open until the repair seal
hardens to some degree to prevent pressure
from being exerted on the rear glass, if the
door is closed quickly.
Hardening time of repair seal
Tem-
perature Surface hardening
time
Time required until car
can be put in service
5°C
(41
°F) Approx. 1.5 hrs 12 hrs
20°C (68°F) Approx. 1 hr 4 hrs
35°C (95°F) Approx. 10 min 2 hrs
8. Remove any excess or add repair seal where
necessary.
9. Check for water leaks. If a leak is found, wipe the
water off well and add repair seal (B001 77 739).
10. After checking for water leakage, install the mold-
ing and trim.
11. Connect the defogger connector.
86U14X-136
14—57
Page 1609 of 1865
1 4 REAR HATCH GLASS
REAR HATCH GLASS
STRUCTURAL VIEW
86U14X-137
4. Lower trim
5. Window upper molding
6. Window upper molding joint
7. Rear hatch glass
8. Clips
1. Rear wiper arm
2. Upper trim
3. Side trim
Note
Use window tool set (49 0305 870A) to remove and install the glass.
14-58
Page 1610 of 1865

REAR HATCH GLASS 1 4
86U14X-138
86U14X-139
86U14X-140
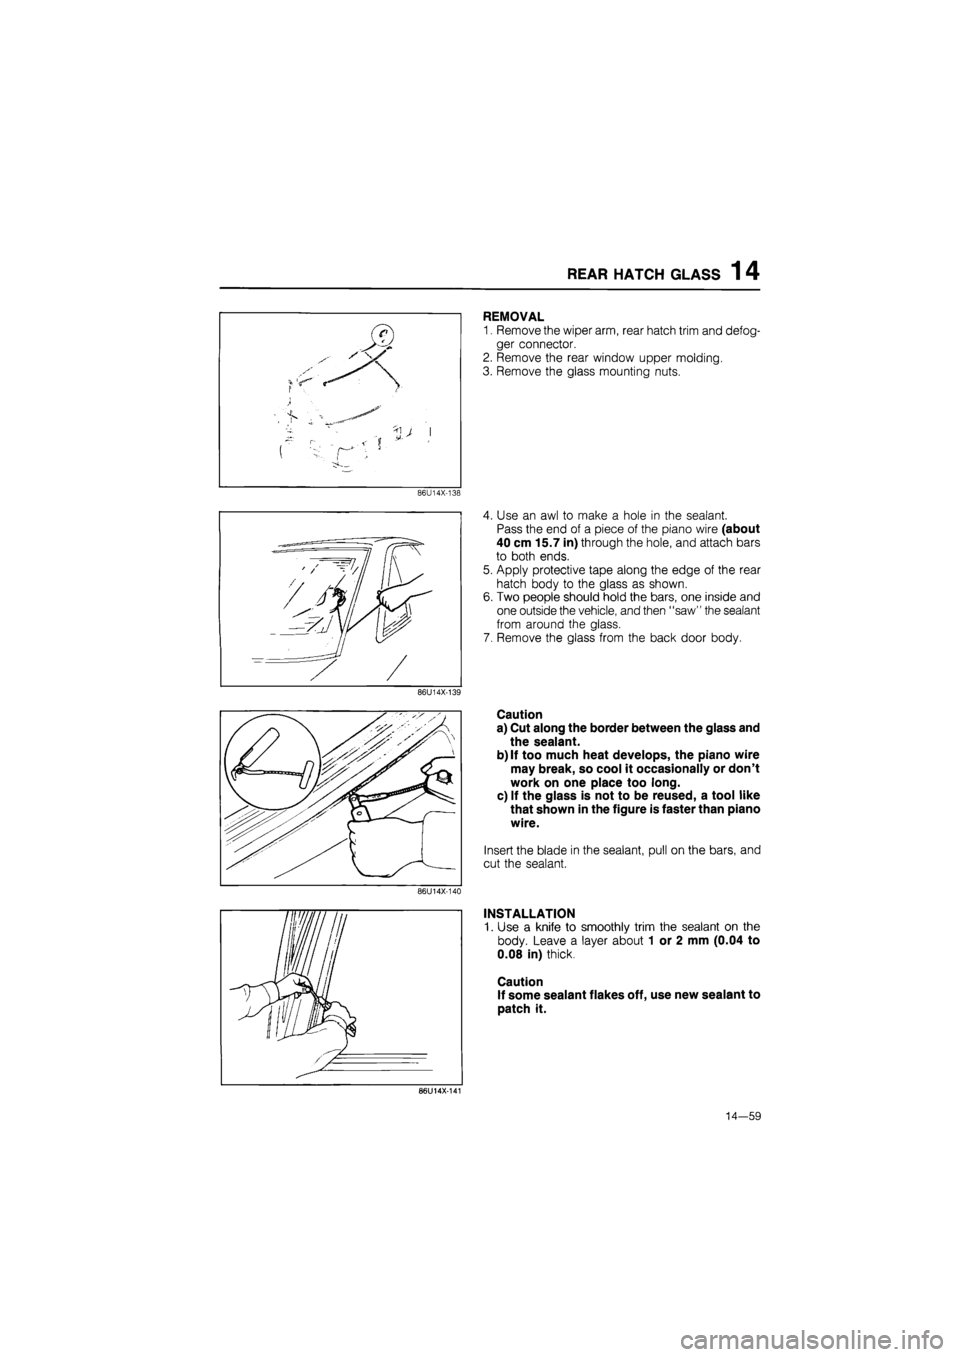
REMOVAL
1. Remove the wiper arm, rear hatch trim and defog-
ger connector.
2. Remove the rear window upper molding.
3. Remove the glass mounting nuts.
4. Use an awl to make a hole in the sealant.
Pass the end of a piece of the piano wire (about
40 cm 15.7 in) through the hole, and attach bars
to both ends.
5. Apply protective tape along the edge of the rear
hatch body to the glass as shown.
6. Two people should hold the bars, one inside and
one outside the vehicle, and then "saw" the sealant
from around the glass.
7. Remove the glass from the back door body.
Caution
a) Cut along the border between the glass and
the sealant.
b) If too much heat develops, the piano wire
may break, so cool it occasionally or don't
work on one place too long.
c) If the glass is not to be reused, a tool like
that shown in the figure is faster than piano
wire.
Insert the blade in the sealant, pull on the bars, and
cut the sealant.
INSTALLATION
1. Use a knife to smoothly trim the sealant on the
body. Leave a layer about 1 or 2 mm (0.04 to
0.08 in) thick
Caution
If some sealant flakes off, use new sealant to
patch it.
86U14X-141
14—59
Page 1611 of 1865

1 4 REAR HATCH GLASS
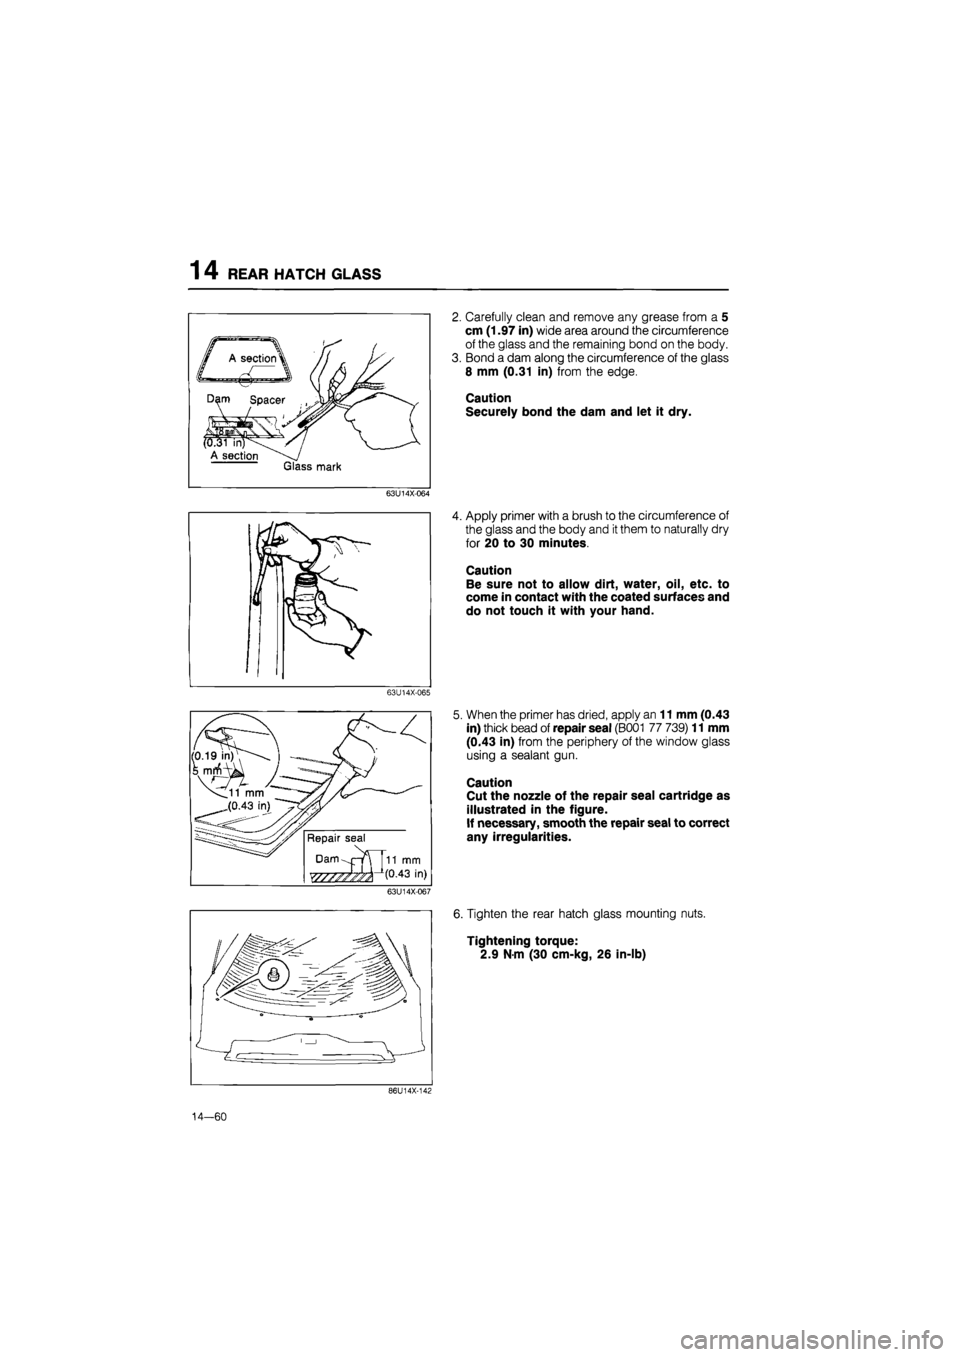
2. Carefully clean and remove any grease from a 5
cm (1.97 in) wide area around the circumference
of the glass and the remaining bond on the body.
3. Bond a dam along the circumference of the glass
8 mm (0.31 in) from the edge.
Caution
Securely bond the dam and let it dry.
63U14X-064
4. Apply primer with a brush to the circumference of
the glass and the body and
it
them to naturally dry
for 20 to 30 minutes.
Caution
Be sure not to allow dirt, water, oil, etc. to
come in contact with the coated surfaces and
do not touch it with your hand.
63U14X-065
5. When the primer has dried, apply an 11 mm (0.43
in) thick bead of repair seal (B001 77 739) 11 mm
(0.43 in) from the periphery of the window glass
using a sealant gun.
Caution
Cut the nozzle of the repair seal cartridge as
illustrated in the figure.
If necessary, smooth the repair seal to correct
any irregularities.
63U14X-067
6. Tighten the rear hatch glass mounting nuts.
Tightening torque:
2.9 N-m (30 cm-kg, 26 in-lb)
86U14X-142
14—60
Page 1613 of 1865
1 4 QUARTER WINDOW GLASS
QUARTER WINDOW GLASS
STRUCTURAL VIEW
76G14X-024
1. Bolt
2. Rear side seatback
3. Screw (Hatchback)
Note
4. Package side shelf
(Hatchback)
5. Rear header trim screw
6. Rear pillar trim
7. Nuts
8. Quarter window molding
9. Quarter window glass
10. Dam
Use window tool set (49 0305 870A) to remove and install the glass.
14-62