Page 1476 of 1865
1 1 ANTI-LOCK BRAKE SYSTEM (ABS)
ABS-15
Possible failure
Control unit, Harness, Hydraulic unit
Disconnect Q-10 and Q-01 (17-pin and 11-pin) connectors. Check continuity
at
hydraulic unit side.
Q-10 Continuity
BR
|
Ground No
OK
Disconnect Q-06 connector.
Check continuity
at
hydraulic side.
Q-10 Continuity
BR Ground No
Q-06 Q-10 Resistance
Br
BW L
YG BR approx.
3 J)
YR YW
NG
NG
OK
Check Q-06 connector for proper connection.
| OK
Disconnect Q-06 connector. Meas-ure resistance
at
hydraulic unit side.
OK
NG
Replace hydraulic unit.
Repair harness. (Hydraulic unit-Control unit)
Replace hydraulic unit.
NG
Repair Q-06 connector.
Connect
Q-06 and Q-10 con-
nectors.
Check continuity
at
harness side.
Q-01 (17-pin) Continuity
Br (K) BW (0) L(R) YG(J) YR (M) YW (Q)
LO (C)
Yes
(Less than
100 Q)
NG
Repair harness.
(Control unit—Hydraulic unit)
OK
Replace control unit.
76G11X-095
11—84
Page 1477 of 1865
ANTI-LOCK BRAKE SYSTEM
(ABS) 1 1
ABS-16
Possible failure
Control unit, Harness
Disconnect Q-01 (17-pin) and Q-10 connectors.
Check that hydraulic unit and har-ness resistance does not fluctuate when moving harness.
Q-01 17-pin) Q-10 Resistance
Br (K) BW
(0)
L(R) YG(J) YR (M) YW (Q)
BR Must
be
constant
NG
Repair connector
or
harness. (Q-01 (17-pin), Q-10)
OK
Replace control unit.
86U11X-160
ABS-17
Possible failure
ABS-17
Control unit
Replace control unit.
ABS-18
Possible failure
ABS-18
Control unit
Replace control unit.
86U11X-161
11-85
Page 1478 of 1865

1 1 ANTI-LOCK BRAKE SYSTEM (ABS)
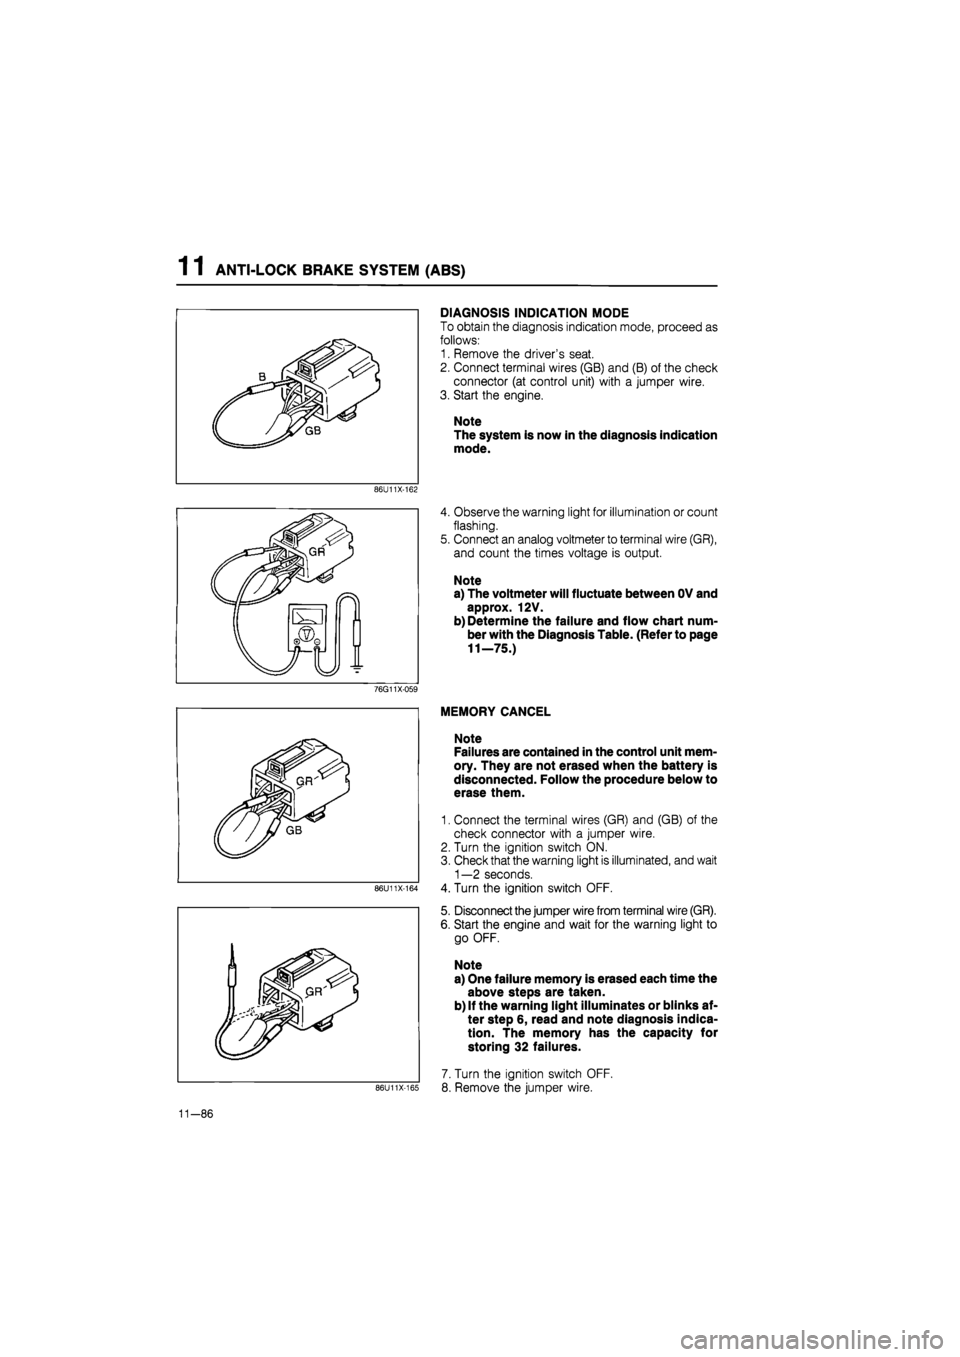
DIAGNOSIS INDICATION MODE
To obtain the diagnosis indication mode, proceed as
follows:
1. Remove the driver's seat.
2. Connect terminal wires (GB) and (B) of the check
connector (at control unit) with a jumper wire.
3. Start the engine.
Note
The system is now in the diagnosis indication
mode.
86U11X-162
4. Observe the warning light for illumination or count
flashing.
5. Connect an analog voltmeter to terminal wire (GR),
and count the times voltage is output.
Note
a) The voltmeter will fluctuate between OV and
approx. 12V.
b) Determine the failure and flow chart num-
ber with the Diagnosis Table. (Refer to page
11—75.)
76G11X-059
86U11X-164
86U11X-165
MEMORY CANCEL
Note
Failures are contained in the control unit mem-
ory. They are not erased when the battery is
disconnected. Follow the procedure below to
erase them.
1. Connect the terminal wires (GR) and (GB) of the
check connector with a jumper wire.
2. Turn the ignition switch ON.
3. Check that the warning light is illuminated, and wait
1—2 seconds.
4. Turn the ignition switch OFF.
5. Disconnect the jumper wire from terminal wire (GR).
6. Start the engine and wait for the warning light to
go OFF.
Note
a) One failure memory is erased each time the
above steps are taken.
b) If the warning light illuminates or blinks af-
ter step 6, read and note diagnosis indica-
tion. The memory has the capacity for
storing 32 failures.
7. Turn the ignition switch OFF.
8. Remove the jumper wire.
11-86
Page 1479 of 1865

ANTI-LOCK BRAKE SYSTEM (ABS) 1 1
86U11X-1C
Q-08
Q-08
Fail-safe relay
B B BG
(Q-08)(Q-09)
V
BL BR
Motor relay
B BR (Q-09)
LO RY
View from male-pin side
86U11X-167
76G11X-096
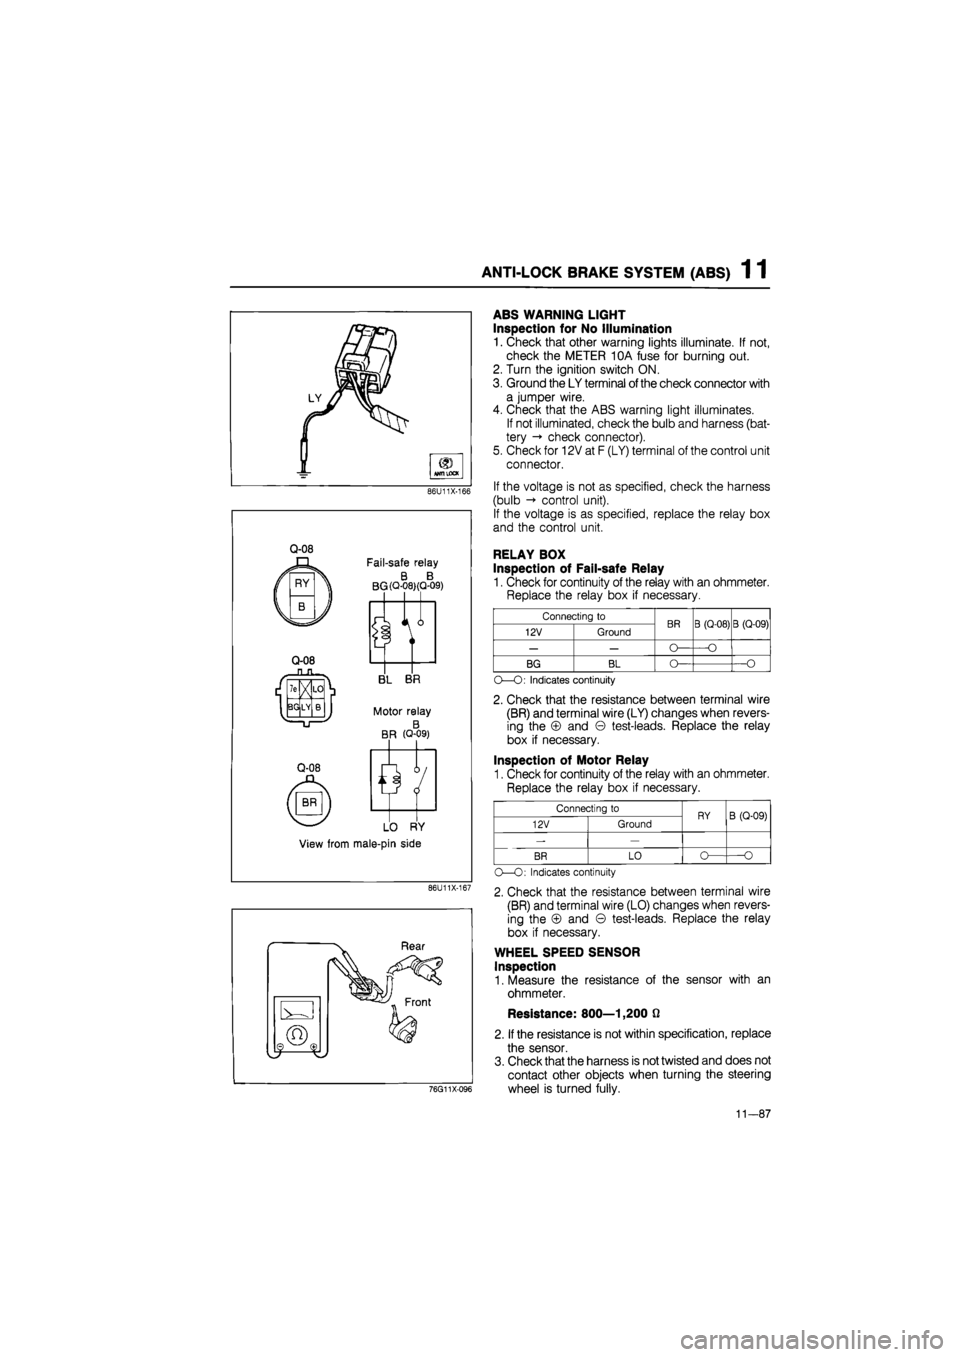
ABS WARNING LIGHT
Inspection for No Illumination
1. Check that other warning lights illuminate. If not,
check the METER 10A fuse for burning out.
2. Turn the ignition switch ON.
3. Ground the LY terminal
of
the check connector with
a jumper wire.
4. Check that the ABS warning light illuminates.
If not illuminated, check the bulb and harness (bat-
tery -» check connector).
5. Check for 12V at F (LY) terminal of the control unit
connector.
If the voltage is not as specified, check the harness
(bulb control unit).
If the voltage is as specified, replace the relay box
and the control unit.
RELAY BOX
Inspection of Fail-safe Relay
1. Check for continuity of the relay with an ohmmeter.
Replace the relay box if necessary.
Connecting to BR B (Q-08) B (Q-09) 12V Ground BR B (Q-08) B (Q-09)
— — O— —O
BG BL O— —O
O—O: Indicates continuity
2. Check that the resistance between terminal wire
(BR) and terminal wire (LY) changes when revers-
ing the © and © test-leads. Replace the relay
box if necessary.
Inspection of Motor Relay
1. Check for continuity of the relay with an ohmmeter.
Replace the relay box if necessary.
Connecting to RY B (Q-09) 12V Ground RY B (Q-09)
-—
BR LO o— O
O—O: Indicates continuity
2. Check that the resistance between terminal wire
(BR) and terminal wire (LO) changes when revers-
ing the © and © test-leads. Replace the relay
box if necessary.
WHEEL SPEED SENSOR
Inspection
1. Measure the resistance of the sensor with an
ohmmeter.
Resistance: 800—1,200 0
2. If the resistance is not within specification, replace
the sensor.
3. Check that the harness is not twisted and does not
contact other objects when turning the steering
wheel is turned fully.
11-87
Page 1480 of 1865
1 1 ANTI-LOCK BRAKE SYSTEM (ABS)
86U11X-170
86U11X-171
Removal of Front Wheel Speed Sensor
1. Remove the wheel and tire.
2. Remove the parts shown in the figure, and remove
the sensor from the knuckle.
Installation of Front Wheel Speed Sensor
1. Install the sensor to the knuckle.
Tightening torque:
16—23 N m (1.6—2.3 m-kg, 12—17 ft-lb)
Caution
The left and right sensors are not interchange-
able. L or R is indicated on the bracket.
2. Install the sensor harness bracket onto the knuckle.
Tightening torque:
16—23 Nm (1.6—2.3 m-kg, 12—17 ft-lb)
3. Push the sensor harness through the splash shield
and secure it with the clip.
4. Install the sensor harness bracket to the body.
Tightening torque:
16—23 Nm (1.6—2.3 m-kg, 12—17 ft-lb)
Caution
Verify that the harness is not twisted and does
not contact the shock absorber or body when
the steering wheel is turned.
5. Connect the sensor connector.
6. Install the wheel and tire.
86U11X-172
11-88
Page 1481 of 1865

ANTI-LOCK BRAKE SYSTEM (ABS) 1 1
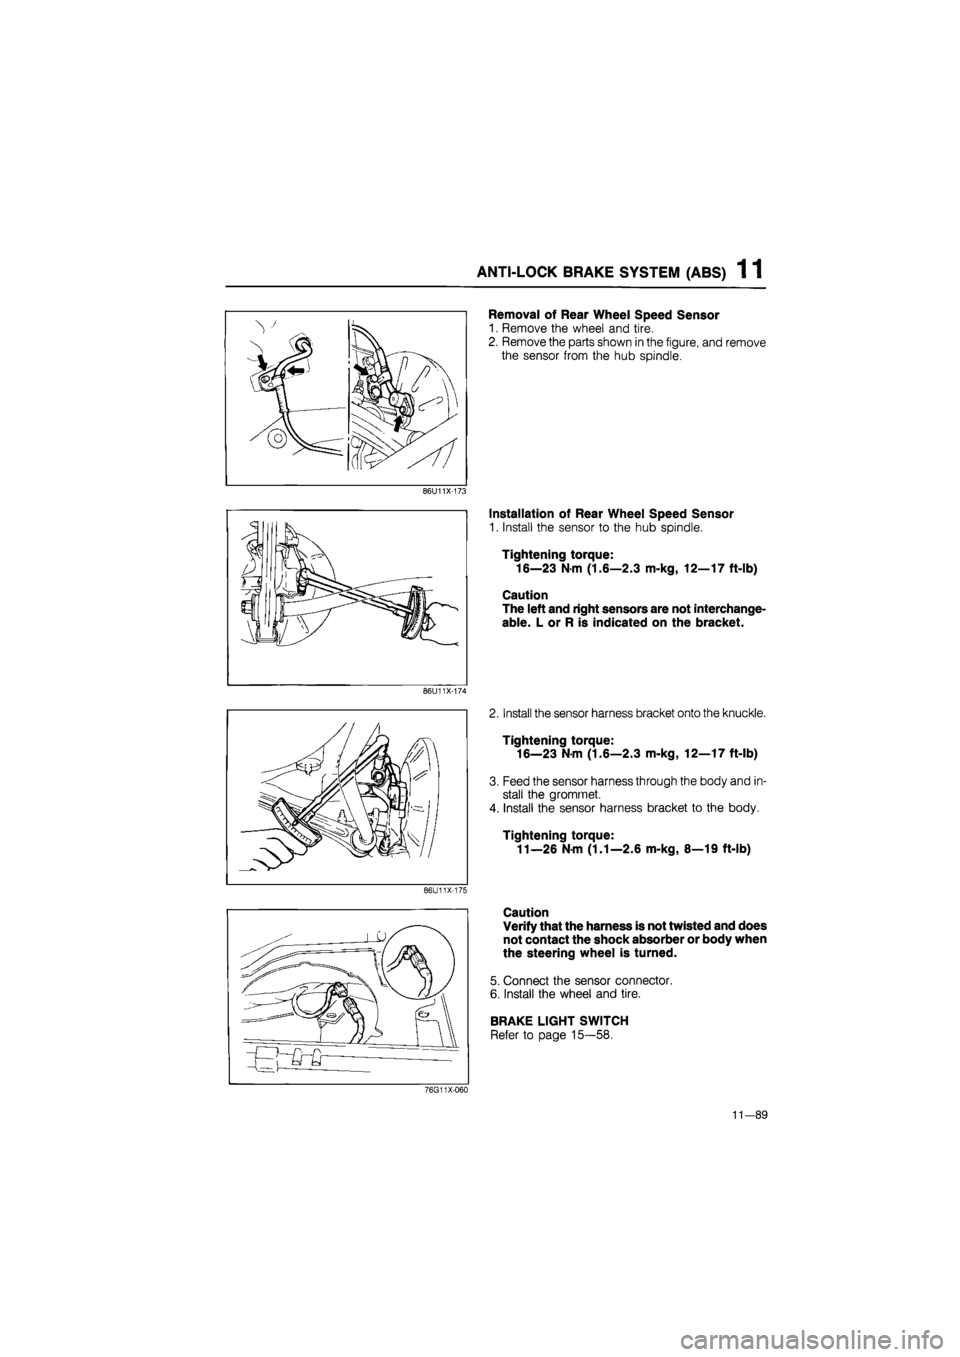
Removal of Rear Wheel Speed Sensor
1. Remove the wheel and tire.
2. Remove the parts shown in the figure, and remove
the sensor from the hub spindle.
86U11X-173
86U11X-174
86U11X-175
Installation of Rear Wheel Speed Sensor
1. Install the sensor to the hub spindle.
Tightening torque:
16—23 N m (1.6—2.3 m-kg, 12—17 ft-lb)
Caution
The left and right sensors are not interchange-
able. L or R is indicated on the bracket.
2. Install the sensor harness bracket onto the knuckle.
Tightening torque:
16—23 Nm (1.6—2.3 m-kg, 12—17 ft-lb)
3. Feed the sensor harness through the body and in-
stall the gromrnet.
4. Install the sensor harness bracket to the body.
Tightening torque:
11—26 N m (1.1—2.6 m-kg, 8—19 ft-lb)
Caution
Verify that the harness is not twisted and does
not contact the shock absorber or body when
the steering wheel is turned.
5. Connect the sensor connector.
6. Install the wheel and tire.
BRAKE LIGHT SWITCH
Refer to page 15—58.
76G11X-060
11-89
Page 1482 of 1865
1 1 ANTI-LOCK BRAKE SYSTEM (ABS)
SENSOR ROTOR
Inspection
Check the sensor rotor for missing or damaged teeth.
86U11X-177
Removal of Front Sensor Rotor
1. Loosen the front wheel lug nuts.
2. Block the rear wheels.
3. Jack up the front of the vehicle and support it with safety stands.
4. Remove the wheels.
5. Remove in the sequence shown in the figure, referring to removal note for the specially marked parts.
86U11X-178
1. Hub cap
2. Locknut
3. Driveshaft (Refer to section 9)
4. Sensor rotor
11-90
Page 1483 of 1865
ANTI-LOCK BRAKE SYSTEM (ABS) 1 1
Installation of Front Sensor Rotor
Install in the reverse order of removal, referring
Torque specifications
Removal note
Sensor rotor
Tap the sensor rotor off the drive shaft with a chisel.
to installation note for the specially marked parts.
Installation note
Sensor rotor
Press the sensor rotor onto the driveshaft with the
SST.
Caution
Install the sensor rotor with chamfered edge
toward the driveshaft.
11—91