1987 MAZDA 626 engine oil
[x] Cancel search: engine oilPage 1796 of 1865
COMPRESSOR 16
69G16X-026
M10X1.25^45
Low-pressure x pressure
hose hose Compressor
COMPRESSOR
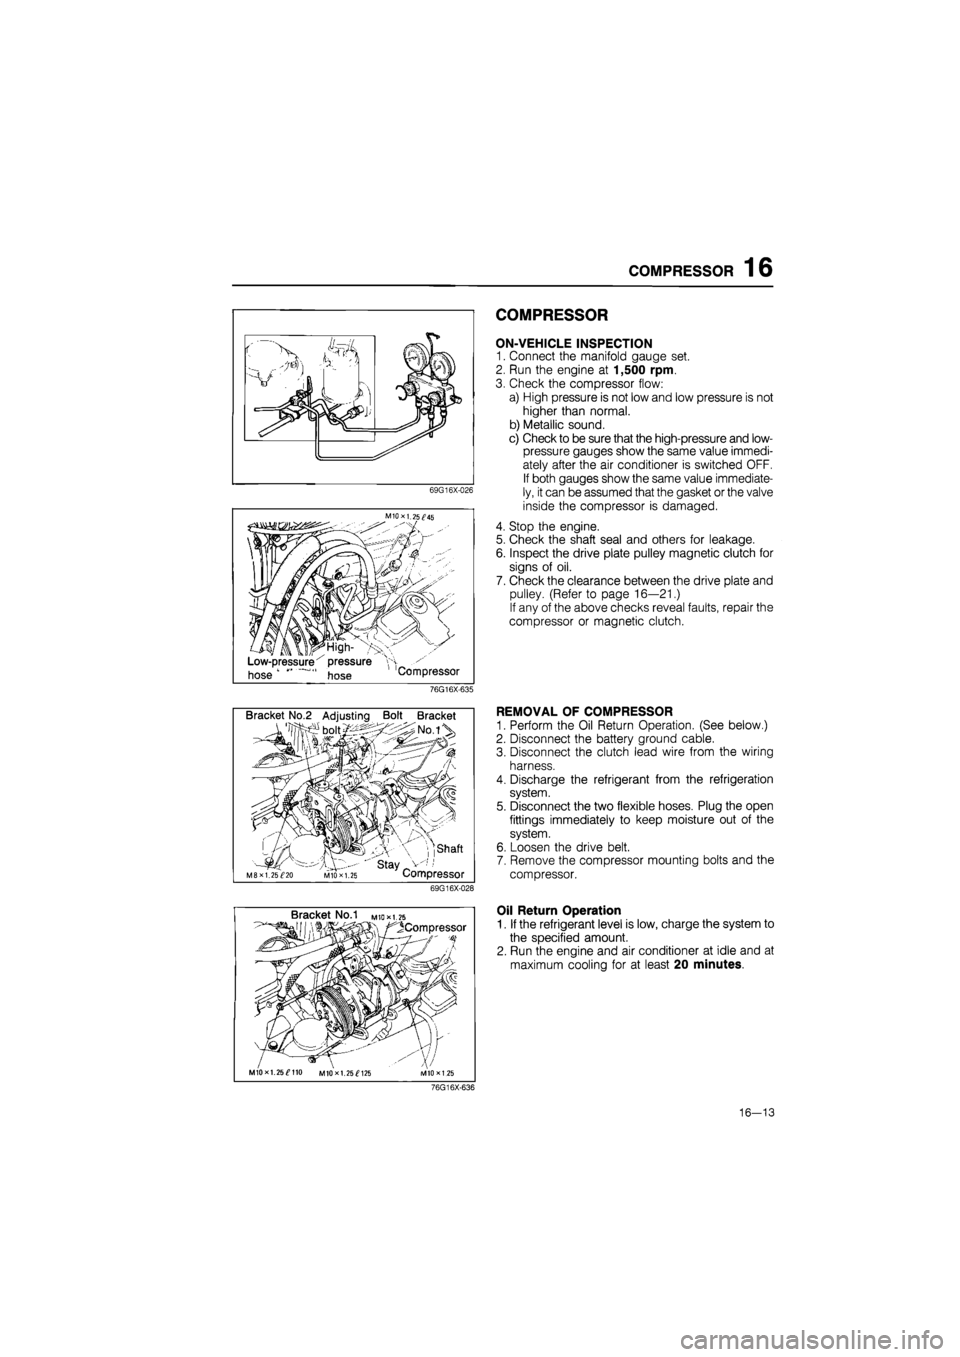
ON-VEHICLE INSPECTION
1. Connect the manifold gauge set.
2. Run the engine at 1,500 rpm.
3. Check the compressor flow:
a) High pressure is not low and low pressure is not
higher than normal.
b) Metallic sound.
c) Check to be sure that the high-pressure and low-
pressure gauges show the same value immedi-
ately after the air conditioner is switched OFF.
If both gauges show the same value immediate-
ly, it can be assumed that the gasket or the valve
inside the compressor is damaged.
4. Stop the engine.
5. Check the shaft seal and others for leakage.
6. Inspect the drive plate pulley magnetic clutch for
signs of oil.
7. Check the clearance between the drive plate and
pulley. (Refer to page 16—21.)
If any of the above checks reveal faults, repair the
compressor or magnetic clutch.
76G16X-635
Bracket No.2 Adjusting Bolt Bracket
, ,shaft
' stay _ M8XI. 25^20 MIO X 1.25 Compressor
69G16X-028
REMOVAL OF COMPRESSOR
1. Perform the Oil Return Operation. (See below.)
2. Disconnect the battery ground cable.
3. Disconnect the clutch lead wire from the wiring
harness.
4. Discharge the refrigerant from the refrigeration
system.
5. Disconnect the two flexible hoses. Plug the open
fittings immediately to keep moisture out of the
system.
6. Loosen the drive belt.
7. Remove the compressor mounting bolts and the
compressor.
Bracket No.1 M
to* 1.25
^Compressor
MIOxl. 25^110 MIOxl. 25^125
Oil Return Operation
1. If the refrigerant level is low, charge the system to
the specified amount.
2. Run the engine and air conditioner at idle and at
maximum cooling for at least 20 minutes.
76G16X-636
16—13
Page 1808 of 1865
RECEIVER-DRIER 16
RECEIVER-DRIER
ON-VEHICLE INSPECTION
1. Use a leak detector to check the sight glass, the
fusible plug, and the fittings for leakage.
Repair or replace, if necessary.
2. Check the receiver-drier for clogging.
a) Run the engine at fast idle with the air conditioner
on.
b) Check both inlet and outlet temperatures.
If there is a great difference between the two tem-
peratures, replace the receiver-drier.
76G16X-622
Receiver-drier
Condenser bolt
76G16X-638
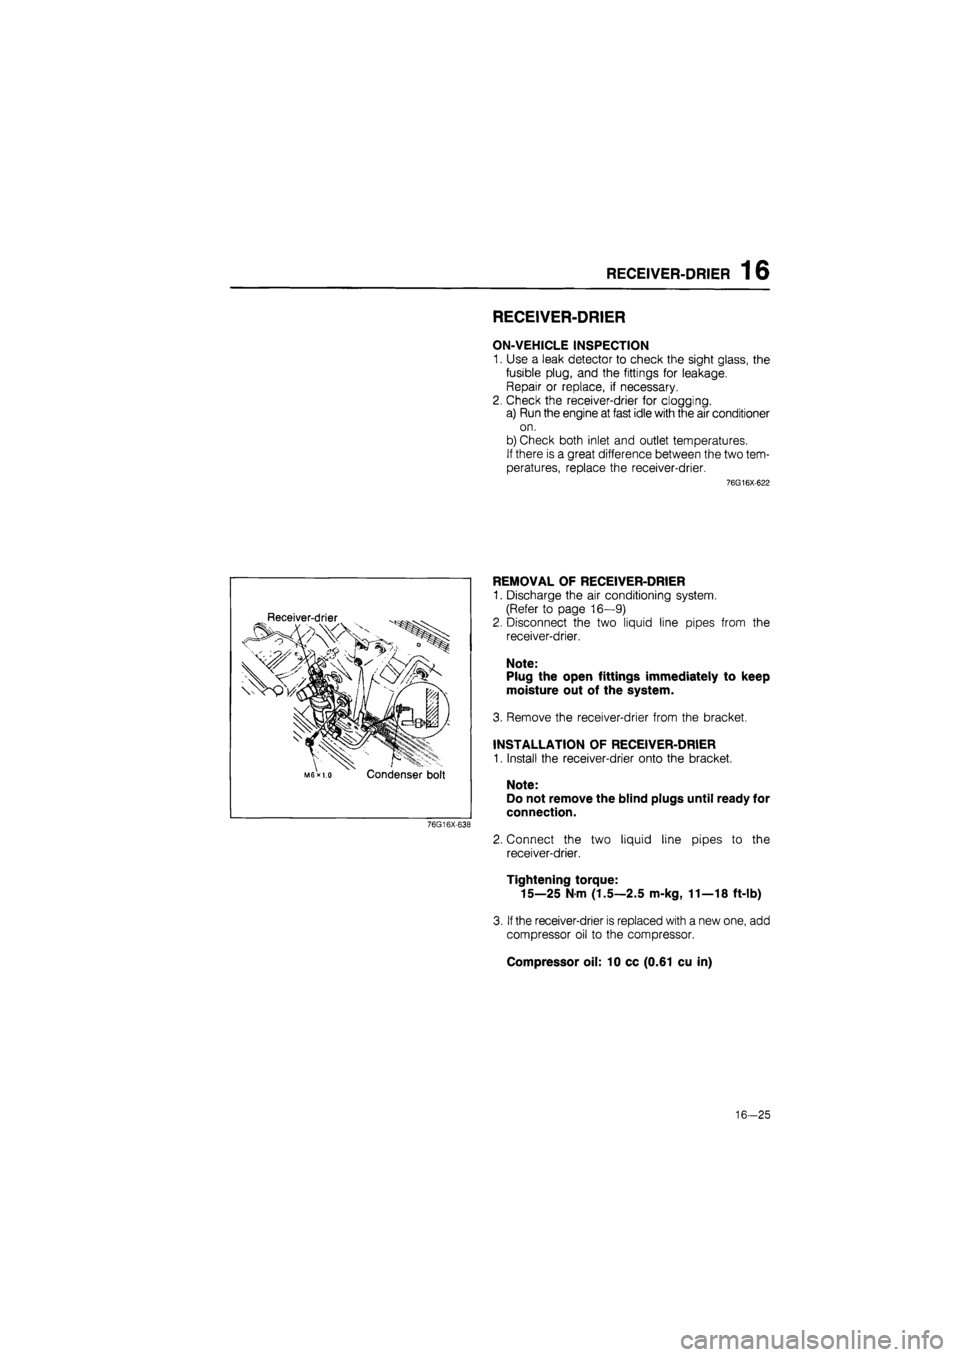
REMOVAL OF RECEIVER-DRIER
1. Discharge the air conditioning system.
(Refer to page 16—9)
2. Disconnect the two liquid line pipes from the
receiver-drier.
Note:
Plug the open fittings immediately to keep
moisture out of the system.
3. Remove the receiver-drier from the bracket.
INSTALLATION OF RECEIVER-DRIER
1. Install the receiver-drier onto the bracket.
Note:
Do not remove the blind plugs until ready for
connection.
2. Connect the two liquid line pipes to the
receiver-drier.
Tightening torque:
15—25 N m (1.5—2.5 m-kg, 11—18 ft-lb)
3.
If
the receiver-drier is replaced with a new one, add
compressor oil to the compressor.
Compressor oil: 10 cc (0.61 cu in)
16-25
Page 1818 of 1865
30 TECHNICAL DATA
Item Engine model FE 12-valve
Top 0.20—0.35 (0.008-0.0138)
End gap measured
in
cylinder
mm
(in) Second 0.15—0.30 (0.006-0.012) End gap measured
in
cylinder
mm
(in) Oil (rail) 0.20-0.70 (0.008-0.0276)
Maximum 1.0 (0.039)
Top 1.52-1.54 (0.0598-0.0606)
Ring groove width
in
piston mm (in) Second 1.52-1.54 (0.0598-0.0606)
Oil 4.02-4.04 (0.1583-0.1591)
Top 0.03—0.07 (0.0012—0.0028) Clearance
ot
piston ring
to
ring Second 0.03—0.07 (0.0012-0.0028)
Maximum 0.15(0.006)
Piston pin
Diameter mm (in) 21.974-21.980 (0.8651-0.8654)
Interference
in
connecting
rod
mm (in) 0.013-0.037 (0.0005-0.0015)
Piston
to
piston pin clearance mm (in) 0.008-0.024 (0.0003—0.0009)
Installation pressure N (kg,
lb)
4,900-14,700 (500-1,500, 1,100-3,300)
Connecting rod and connecting rod bearing
Length (Center
to
center) mm (in) 151.95—152.05 (5.982—5.986)
Twisting and bending mm (in) 0.06 (0.0024) max.
Small end bore mm (in) 21.943—21.961 (0.8640-0.8646)
Big end bore mm (in) 54.002-54.017 (2.1261—2.1266)
Big end width mm (in) 26.838-26.890 (1.0566—1.0587)
Connecting rod side clearance
mm
(in) Standard 0.110-0.262 (0.004-0.010) Connecting rod side clearance
mm
(in) Maximum 0.30 (0.012)
Crankshaft
Crankshaft runout mm (in) Maximum 0.03 (0.0012)
Standard size 59.937-59.955 (2.3597—2.3604)
0.25 (0.010) Standard 59.693-59.711 (2.3501-2.3508)
Main journal diameter mm (in)
undersize No.3 59.687-59.705 (2.3499-2.3506) Main journal diameter mm (in) 0.50 (0.020) No. 1,2,4,5 59.443-59.461 (2.3403-2.3410) Main journal diameter mm (in) undersize No.
3
59.437-59.455 (2.3400-2.3407)
0.75 (0.030) No. 1,2,4,5 59.193-59.211 (2.3304-2.3311)
undersize No.
3
59.187-59.205 (2.3302-2.3309)
Main journal taper and out-of-round mm (in) Maximum 0.05 (0.0020)
Standard 50.940-50.955 (2.0055-2.0061)
Crankpin diameter 0.25 (0.010) undersize 50.690—50.705 (1.9957-1.9963)
mm (in) 0.50 (0.020) undersize 50.440-50.455 (1.9858-1.9864)
0.75 (0.030) undersize 50.190-50.205 (1.9760-1.9766)
Crankpin taper and out-of-round
mm (in)
Maximum 0.05 (0.0020)
Main bearing
No. 1,2,4,5 Standard 0.025-0.043 (0.0010—0.0017)
Main journal bearing
oil
No. 1,2,4,5 Maximum 0.08 (0.0031) clearance
mm
(in) No.
3
Standard 0.031—0.049 (0.0012—0.0019) No.
3
Maximum 0.08 (0.0031)
Available undersize bearing mm fin} 0.25 (0.010), 0.50 (0.020), 0.75 (0.030)
Crankpin bearing
Crankpin bearing
oil
clearance
mm
(in) Standard 0.027-0.067 (0.0011-0.0026) Crankpin bearing
oil
clearance
mm
(in) Maximum 0.10 (0.0039)
Available undersize bearina mm (in) 0.25 (0.010), 0.50 (0.020), 0.75 (0.030)
Thrust bearing (center main bearing)
Crankshaft end play mm (in) Standard 0.08-0.18 (0.0031-0.0071) Crankshaft end play mm (in) Maximum 0.30 (0.0118)
Standard 27.94-27.99 (1.100-1.102)
Bearing width
mm (in)
0.25 (0.010) oversize 28.04-28.09 (1.104-1.106) Bearing width
mm (in)
0.50 (0.020) oversize 28.12-28.17 (1.107-1.109)
0.75 (0.030) oversize 28.20—28.25 (1.110—1.112)
30—4
Page 1820 of 1865
30 TECHNICAL DATA
Engine model FE 8-valve
Item ECE Middle East General
F8 F6
Valve seat
Seat angle IN 45° Seat angle EX 45°
Seat contact width mm (in) IN 1.2—1.6 (0.047-0.063) Seat contact width mm (in) EX 1.2-1.6 (0.047-0.063)
Seat sinking (Measure valve protruding length)
mm (in)
IN Standard 46.5 (1.831) Seat sinking (Measure valve protruding length)
mm (in)
IN Maximum 48.0 (1.890) Seat sinking (Measure valve protruding length)
mm (in) EX Standard 46.5 (1.831)
Seat sinking (Measure valve protruding length)
mm (in) EX Maximum 48.0 (1.890)
Valve spring
Free length mm (in)
Outer
Inner
Standard
Minimum
51.5(2.028)
Standard
44.0 (1.732)
Minimum
43.3 (1.705)
51.2 (2.016)
52.0 (2.047)
50.6 (1.992)
51.5 (2.028)
45.7 (1.799)
44.0 (1.732)
437 (1.720)1
43.3 (1.705)
Out-of-square mm (in) Maximum 1.8 (0.071)
Setting load/height
N
(kg, lb)/mm
(in)
Outer
128(13.1,29) 136.5
(1
44)
Inner
189 (19,2, 42) 141 (1.61)
124 (12.7, 28) 136.5
(1
44)
193 (19.6,43) 141 (1.61)
128 (13.1, 29)/36.5 (1.44)
189 (19.2, 42)/41 (1.61)
Camshaft
Cam lobe height
mm (in)
IN
EX
Standard
Minimum
Standard
Minimum
38.107-38.207 (1.5003-1.5042)
37.957 (1.4944)
38.110-38.210 (1.5004-1.5043)
37.960 (1.4945)
Journal diameter
mm (in)
Front and Rear (No.
1,5)
31.940-32.035 (1.2575-1.2612)
Center (No. 2,3,4)
Out-of-round Maximum
31.910-32.065 (1.2563-1.2624)
0.05 (0.002)
Camshaft bearing
oil
clearance
mm (in)
Front and Rear (No.
1,5)
0.035-0.085 (0.0014-0.00331
Center (No. 2,3,4) 0.065-0.115 (0.0026—0.0045)
Maximum 0.15 (0.0059)
Camshaft runout mm (in) Maximum 0.03 (0.00121
Camshaft end play mm (in) Standard 0.08—0.16 (0.003—0.006)
Maximum 0.20 (0.008)
Rocker arm and rocker arm shaft
Rocker arm inner diameter mm (in) 16.000-16.027 (0.6299-0.6310)
Rocker arm shaft diameter mm (in) 15.966-15.984 (0.6286-0.6293)
Rocker arm
to
shaft clearance
mm (in)
Standard 0.016—0.061 (0.0006-0.0024)
Maximum 0.10 (0.004)
Cylinder block
Heiaht mm
fin)
289.0 (11.38) 268.5 (10.57)
Distortion mm (in) Maximum 0.15 (0.006)
Grindina limit mm (in)
0.20 (0.008)
Cylinder bore diameter
mm (in)
Standard 86.000—86.019 (3.3858—3.3866)
0.25 (0.010) oversize 86.250-86.269 (3.3957-3.3964)
0.50 (0.020) oversize 86.500-86.519 (3.4055-3.4062)
0.75 (0.030) oversize
1.00 (0.039) oversize
81.000-
(3.1890-
-81.019 -3.1897)
81.250-(3.1988-
-81.269
-3.1996) 81.500-(3.2087-
-81.519 -3.2094)
81.750-(3.2185-
-81.769
-3.2192)
82.000-
(3.2283-
-82.019
-3.2291)
Cylinder bore taper and out-of-round mm (in) Maximum 0.019 (0.0007)
Piston
Piston diameter measured at 90°
to pin
bore axis and 18.0
mm
(0.709
in)
below
oil
ring groove
mm (in)
Standard 85.944-85.964 (3.3836—3.3844) 80.944-80.964
(3.1868—3.1876) Piston diameter measured at 90°
to pin
bore axis and 18.0
mm
(0.709
in)
below
oil
ring groove
mm (in)
0.25 (0.010) oversize 86.194—86.214 (3.3935—3.3942) 81.194—81.214
(3.1966-3.1974)
Piston diameter measured at 90°
to pin
bore axis and 18.0
mm
(0.709
in)
below
oil
ring groove
mm (in) 0.50 (0.020) oversize 86.444-86.464 (3.4033-3.4041) 81.444-81.464
(3.2065-3.2072)
30—6
Page 1821 of 1865
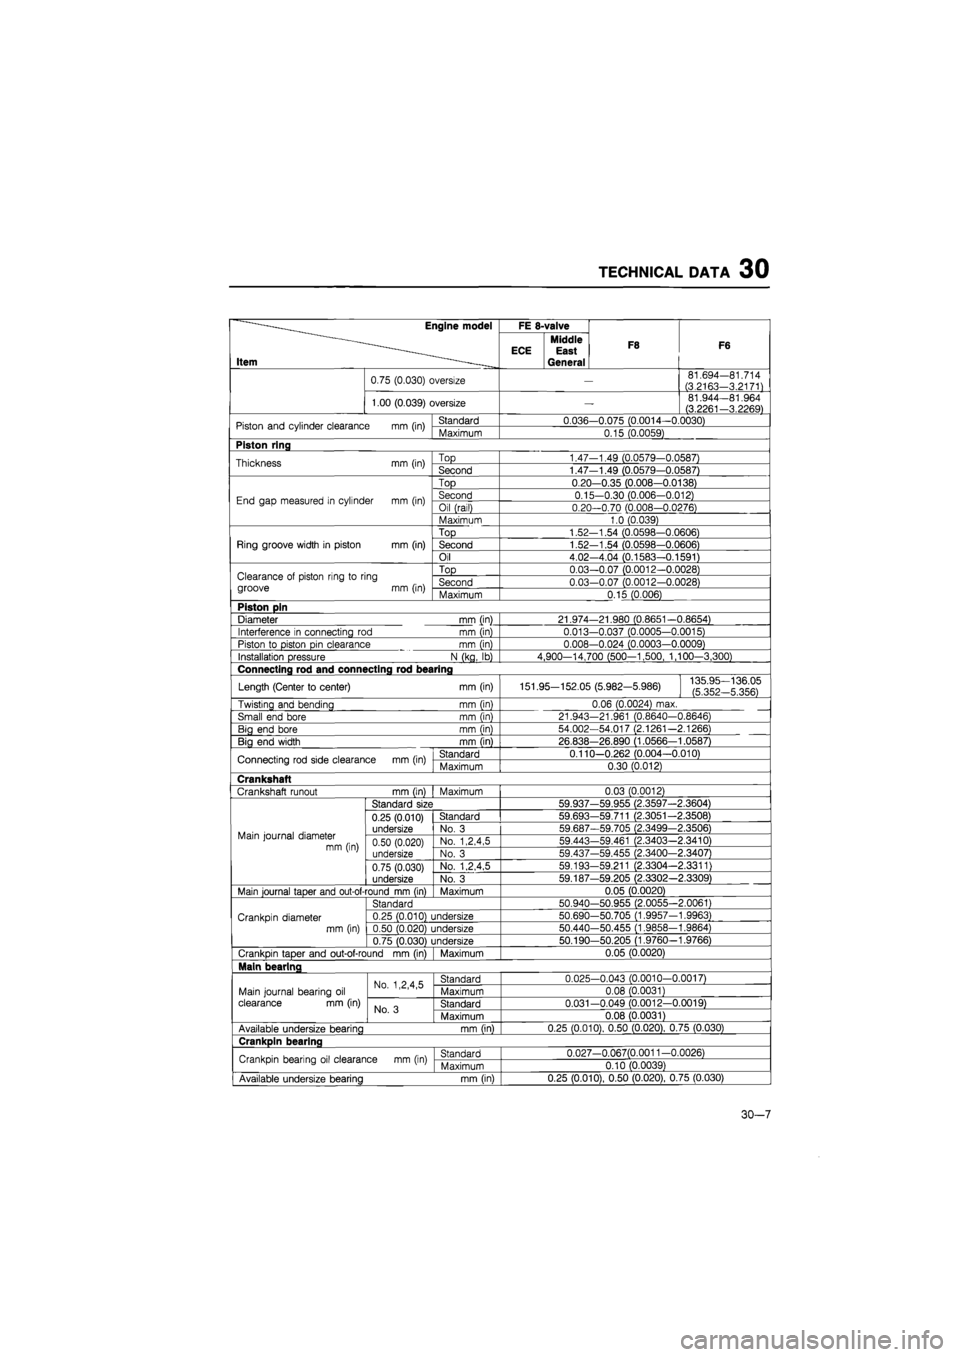
TECHNICAL DATA 30
—Engine model
Item -
FE 8-valve
F8 F6
—Engine model
Item -
ECE Middle East General
F8 F6
0.75 (0.030) oversize
—
81.694—81.714
(3.2163-3.2171)
1.00 (0.039) oversize
—
81.944—81.964 (3.2261-3.2269)
Piston and cylinder clearance
mm
(in) Standard 0.036-0.075 (0.0014—0.0030) Piston and cylinder clearance
mm
(in) Maximum 0.15 (0.0059)
Piston ring
Thickness
mm
(in) Top 1.47-1.49 (0.0579-0.0587) Thickness
mm
(in) Second 1.47-1.49 (0.0579—0.0587)
End gap measured
in
cylinder
mm (in)
Top 0.20—0.35 (0.008—0.0138)
End gap measured
in
cylinder
mm (in)
Second 0.15-0.30 (0.006-0.012) End gap measured
in
cylinder
mm (in)
Oil (rail) 0.20—0.70 (0.008—0.0276) End gap measured
in
cylinder
mm (in)
Maximum 1.0 (0.039)
Ring groove width
in
piston
mm
(in)
Top 1.52—1.54 (0.0598-0.0606)
Ring groove width
in
piston
mm
(in) Second 1.52-1.54 (0.0598-0.0606) Ring groove width
in
piston
mm
(in)
Oil 4.02-4.04 (0.1583-0.1591)
Clearance
of
piston ring
to
ring
groove
mm
(in)
Top 0.03-0.07 (0.0012-0.0028) Clearance
of
piston ring
to
ring
groove
mm
(in) Second 0.03-0.07 (0.0012-0.0028) Clearance
of
piston ring
to
ring
groove
mm
(in) Maximum 0.15 (0.006)
Piston pin
Diameter
mm
(in) 21.974—21.980 (0.8651—0.8654)
Interference
in
connecting
rod mm
(in) 0.013—0.037 (0.0005—0.0015)
Piston
to
piston pin clearance
mm
(in) 0.008—0.024 (0.0003-0.0009)
Installation pressure
N
(kg,
lb)
4,900—14,700 (500—1,500, 1,100—3,300)
Connecting rod and connecting rod bearing
Length (Center
to
center)
mm
(in) 151.95-152.05 (5.982-5.986) 135.95—136.05
(5.352-5.356)
Twisting and bending
mm
(in) 0.06 (0.0024) max.
Small end bore
mm
(in) 21.943-21.961 (0.8640-0.8646)
Big end bore
mm
(in) 54.002-54.017 (2.1261—2.1266)
Bia end width
mm
(in) 26.838-26.890 (1.0566—1.0587)
Connecting rod side clearance
mm
(in) Standard 0.110-0.262 (0.004—0.010) Connecting rod side clearance
mm
(in) Maximum 0.30 (0.012)
Crankshaft
Crankshaft runout mm (in)
I
Maximum 0.03 (0.0012)
Main journal diameter
mm (in)
Standard size 59.937-59.955 (2.3597—2.3604)
Main journal diameter
mm (in)
0.25 (0.010) undersize
Standard 59.693—59.711 (2.3051—2.3508)
Main journal diameter
mm (in)
0.25 (0.010) undersize No.
3
59.687—59.705 (2.3499-2.3506) Main journal diameter
mm (in) 0.50 (0.020) undersize
No. 1,2,4,5 59.443-59.461 (2.3403—2.3410) Main journal diameter
mm (in) 0.50 (0.020) undersize No.
3
59.437-59.455 (2.3400—2.3407)
Main journal diameter
mm (in)
0.75 (0.030)
undersize
No. 1,2,4,5 59.193-59.211 (2.3304—2.3311)
Main journal diameter
mm (in)
0.75 (0.030)
undersize No.
3
59.187—59.205 (2.3302—2.3309)
Main journal taper and out-of-round mm (in) Maximum 0.05 (0.0020)
Crankpin diameter mm (in)
Standard 50.940-50.955 (2.0055-2.0061)
Crankpin diameter mm (in)
0.25 (0.010) undersize 50.690-50.705 (1.9957-1.9963) Crankpin diameter mm (in) 0.50 (0.020) undersize 50.440-50.455 (1.9858-1.9864) Crankpin diameter mm (in)
0.75 (0.030) undersize 50.190—50.205 (1.9760-1.9766)
Crankpin taper and out-of-round
mm
(in) Maximum 0.05 (0.0020)
Main bearlna
Main journal bearing
oil
clearance
mm
(in)
No. 1,2,4,5 Standard 0.025-0.043 (0.0010-0.0017)
Main journal bearing
oil
clearance
mm
(in)
No. 1,2,4,5 Maximum 0.08 (0.0031) Main journal bearing
oil
clearance
mm
(in) No.
3
Standard 0.031—0.049 (0.0012—0.0019)
Main journal bearing
oil
clearance
mm
(in) No.
3
Maximum 0.08 (0.0031)
Available undersize bearina
mm
(in) 0.25 (0.010), 0.50 (0.020), 0.75 (0.030)
Crankpin bearing
Crankpin bearing
oil
clearance
mm
(in) Standard 0.027-0.067(0.0011 -0.0026) Crankpin bearing
oil
clearance
mm
(in) Maximum 0.10 (0.0039)
Available undersize bearing
mm
(in) 0.25 (0.010), 0.50 (0.020), 0.75 (0.030)
30-7
Page 1823 of 1865
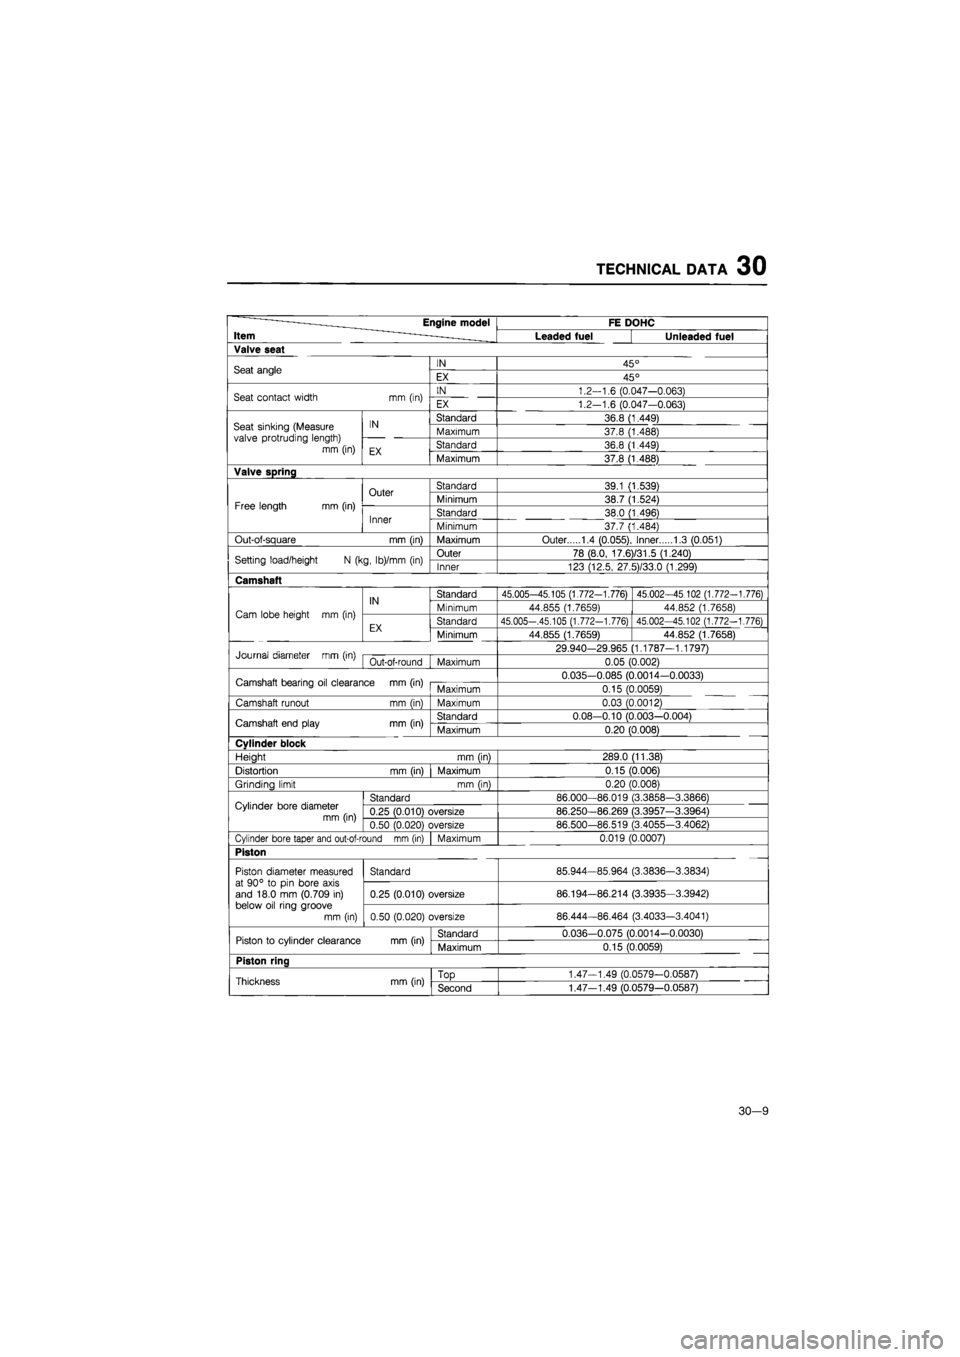
TECHNICAL DATA 30
——Engine model
Item -
FE DOHC ——Engine model
Item -Leaded fuel Unleaded fuel
Valve seat
Seat angle IN 45° Seat angle EX 45°
Seat contact width
mm
(in) IN 1.2-1.6 (0.047-0.063) Seat contact width
mm
(in) EX 1.2-1.6 (0.047-0.063)
Seat sinking (Measure valve protruding length) mm (in)
IN Standard 36.8 (1.449) Seat sinking (Measure valve protruding length) mm (in)
IN Maximum 37.8 (1.488) Seat sinking (Measure valve protruding length) mm (in) EX Standard 36.8 (1.449)
Seat sinking (Measure valve protruding length) mm (in) EX Maximum 37.8 (1.488)
Valve spring
Free length mm (in)
Outer Standard 39.1 (1.539)
Free length mm (in)
Outer Minimum 38.7 (1.524) Free length mm (in)
Inner Standard 38.0 (1.496) Free length mm (in)
Inner Minimum 37.7 (1.484)
Out-of-square
mm
(in) Maximum Outer 1.4 (0.055), Inner 1.3 (0.051)
Setting load/height
N
(kg, lb)/mm
(in)
Outer 78 (8.0, 17.6)/31.5 (1.240) Setting load/height
N
(kg, lb)/mm
(in)
Inner 123 (12.5, 27.5)/33.0 (1.299)
Camshaft
Cam lobe height
mm (in)
IN Standard 45.005-45.105 (1.772-1.776) 45.002-45 102 (1.772-1.776)
Cam lobe height
mm (in)
IN Minimum 44.855 (1.7659) 44.852 (1.7658) Cam lobe height
mm (in)
EX Standard 45.005—.45.105 (1.772-1.776) 45.002-45.102 (1.772-1.776) Cam lobe height
mm (in)
EX Minimum 44.855 (1.7659) 44.852 (1.7658)
Journal diameter
mm
(in) 29.940-29.965 (1.1787-1.1797) Journal diameter
mm
(in) Out-of-round
|
Maximum 0.05 (0.002)
Camshaft bearing
oil
clearance mm (in) 0.035-0.085 (0.0014-0.0033) Camshaft bearing
oil
clearance mm (in) Maximum 0.15 (0.0059)
Camshaft runout
mm (in)
Maximum 0.03 (0.0012)
Camshaft end play
mm
(in) Standard 0.08-0.10 (0.003-0.004) Camshaft end play
mm
(in) Maximum 0.20 (0.008)
Cylinder block
Height
mm
(in) 289.0 (11.38)
Distortion
mm
(in) Maximum 0.15 (0.006)
Grindino limit
mm
fin) 0.20 (0.008)
Cylinder bore diameter mm (in)
Standard 86.000—86.019 (3.3858-3.3866) Cylinder bore diameter mm (in) 0.25 (0.010) oversize 86.250—86.269 (3.3957—3.3964) Cylinder bore diameter mm (in) 0.50 (0.020) oversize 86.500-86.519 (3.4055-3.4062)
Cylinder bore taper and out-of-round mm (in) Maximum 0.019 (0.0007)
Piston
Piston diameter measured at 90°
to pin
bore axis and 18.0
mm
(0.709
in)
below oil ring groove
mm (in)
Standard 85.944-85.964 (3.3836-3.3834) Piston diameter measured at 90°
to pin
bore axis and 18.0
mm
(0.709
in)
below oil ring groove
mm (in)
0.25 (0.010) oversize 86.194-86.214 (3.3935-3.3942)
Piston diameter measured at 90°
to pin
bore axis and 18.0
mm
(0.709
in)
below oil ring groove
mm (in) 0.50 (0.020) oversize 86.444-86.464 (3.4033-3.4041)
Piston
to
cylinder clearance
mm
(in) Standard 0.036-0.075 (0.0014-0.0030) Piston
to
cylinder clearance
mm
(in) Maximum 0.15 (0.0059)
Piston ring
Thickness mm (in)
TOD
1.47-1.49 (0.0579-0.0587) Thickness mm (in) Second 1.47-1.49 (0.0579-0.0587)
30-9
Page 1824 of 1865
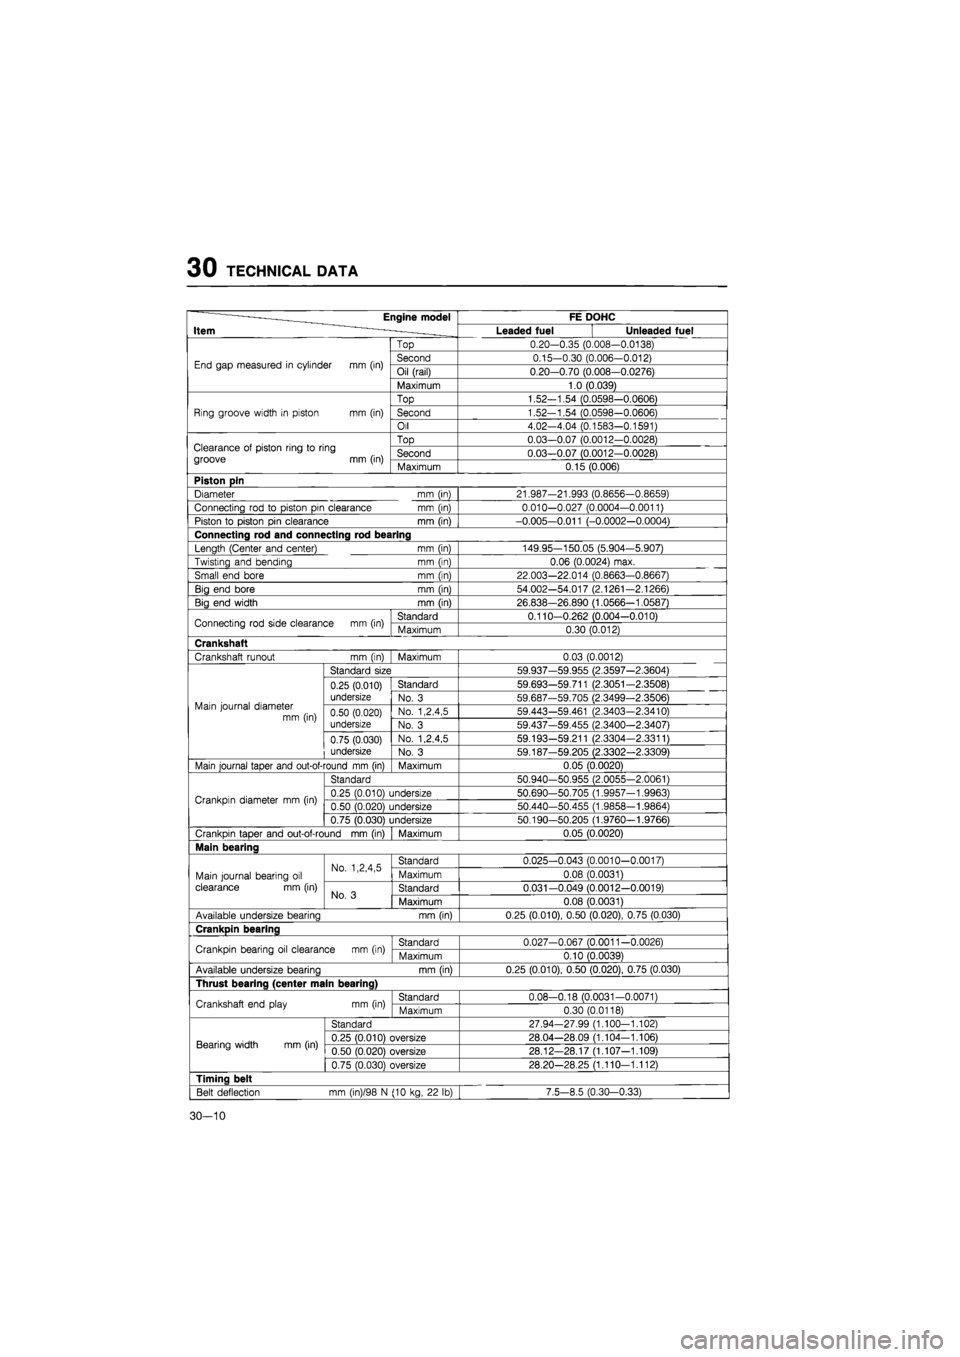
30 TECHNICAL DATA
~ ———Engine model
Item ~ . _
FE DOHC ~ ———Engine model
Item ~ . _ Leaded fuel Unleaded fuel
End gap measured
in
cylinder
mm
(in)
Top 0.20-0.35 (0.008-0.0138)
End gap measured
in
cylinder
mm
(in) Second 0.15-0.30 (0.006-0.012) End gap measured
in
cylinder
mm
(in) Oil (rail) 0.20-0.70 (0.008-0.0276) End gap measured
in
cylinder
mm
(in)
Maximum 1.0 (0.039)
Ring groove width
in
piston
mm (in)
Top 1.52-1.54 (0.0598—0.0606)
Ring groove width
in
piston
mm (in)
Second 1.52-1.54 (0.0598-0.0606) Ring groove width
in
piston
mm (in)
Oil 4.02-4.04 (0.1583—0.1591)
Clearance
of
piston ring
to
ring
groove
mm
(in)
Top 0.03-0.07 (0.0012-0.0028) Clearance
of
piston ring
to
ring
groove
mm
(in) Second 0.03-0.07 (0.0012-0.0028) Clearance
of
piston ring
to
ring
groove
mm
(in) Maximum 0.15 (0.006)
Piston pin
Diameter
mm (in)
21.987-21.993 (0.8656-0.8659)
Connecting rod
to
piston pin clearance
mm (in)
0.010-0.027 (0.0004-0.0011)
Piston
to
piston pin clearance
mm
(in) -0.005-0.011 (-0.0002-0.0004)
Connecting rod and connecting rod bearing
Length (Center and center)
mm (in)
149.95—150.05 (5.904-5.907)
Twisting and bending
mm
(in) 0.06 (0.0024) max.
Small end bore
mm (in)
22.003-22.014 (0.8663-0.8667)
Big end bore
mm (in)
54.002-54.017 (2.1261-2.1266)
Big end width
mm
(in) 26.838-26.890 (1.0566-1.0587)
Connecting rod side clearance
mm
(in) Standard 0.110-0.262 (0.004-0.010) Connecting rod side clearance
mm
(in) Maximum 0.30 (0.012)
Crankshaft
Crankshaft runout
mm (in)
Maximum 0.03 (0.0012)
Main journal diameter mm (in)
Standard size 59.937-59.955 (2.3597-2.3604)
Main journal diameter mm (in)
0.25 (0.010)
undersize
Standard 59.693—59.711 (2.3051-2.3508)
Main journal diameter mm (in)
0.25 (0.010)
undersize No.
3
59.687-59.705 (2.3499-2.35061 Main journal diameter mm (in) 0.50 (0.020)
undersize
No. 1,2,4,5 59.443-59.461 (2.3403-2.3410) Main journal diameter mm (in) 0.50 (0.020)
undersize No.
3
59.437-59.455 (2.3400-2.3407)
Main journal diameter mm (in)
0.75 (0.030)
undersize
No. 1,2,4,5 59.193-59.211 (2.3304-2.3311)
Main journal diameter mm (in)
0.75 (0.030)
undersize No.
3
59.187-59.205 (2.3302-2.3309)
Main journal taper and out-of-round mm (in) Maximum 0.05 (0.0020)
Crankpin diameter
mm
(in)
Standard 50.940-50.955 (2.0055-2.0061)
Crankpin diameter
mm
(in) 0.25 (0.010) undersize 50.690-50.705 (1.9957-1.9963) Crankpin diameter
mm
(in) 0.50 (0.020) undersize 50.440-50.455 (1.9858-1.9864) Crankpin diameter
mm
(in)
0.75 (0.030) undersize 50.190-50.205 (1.9760-1.9766)
Crankpin taper and out-of-round
mm
(in) Maximum 0.05 (0.0020)
Main bearing
Main journal bearing
oil
clearance
mm
(in)
No. 1,2,4,5 Standard 0.025-0.043 (0.0010-0.0017)
Main journal bearing
oil
clearance
mm
(in)
No. 1,2,4,5 Maximum 0.08 (0.0031) Main journal bearing
oil
clearance
mm
(in) No.
3
Standard 0.031-0.049 (0.0012-0.0019)
Main journal bearing
oil
clearance
mm
(in) No.
3
Maximum 0.08 (0.0031)
Available undersize bearing
mm
(in) 0.25 (0.010), 0.50 (0.020), 0.75 (0.030)
Crankpin bearing
Crankpin bearing
oil
clearance
mm
(in) Standard 0.027-0.067 (0.0011-0.0026) Crankpin bearing
oil
clearance
mm
(in) Maximum 0.10 (0.0039)
Available undersize bearina
mm
(in) 0.25 (0.010), 0.50 (0.020), 0.75 (0.030)
Thrust bearing (center main bearing)
Crankshaft end play
mm
(in) Standard 0.08-0.18 (0.0031-0.0071) Crankshaft end play
mm
(in) Maximum 0.30 (0.0118)
Bearing width
mm
(in)
Standard 27.94-27.99 (1.100-1.102)
Bearing width
mm
(in) 0.25 (0.010) oversize 28.04—28.09 (1.104-1.106) Bearing width
mm
(in) 0.50 (0.020) oversize 28.12—28.17 (1.107-1.109) Bearing width
mm
(in)
0.75 (0.030) oversize 28.20-28.25 (1.110-1.112)
Timing belt
Belt deflection
mm
(in)/98
N
(10 kg,
22 lb)
7.5-8.5 (0.30-0.33)
30—10
Page 1826 of 1865
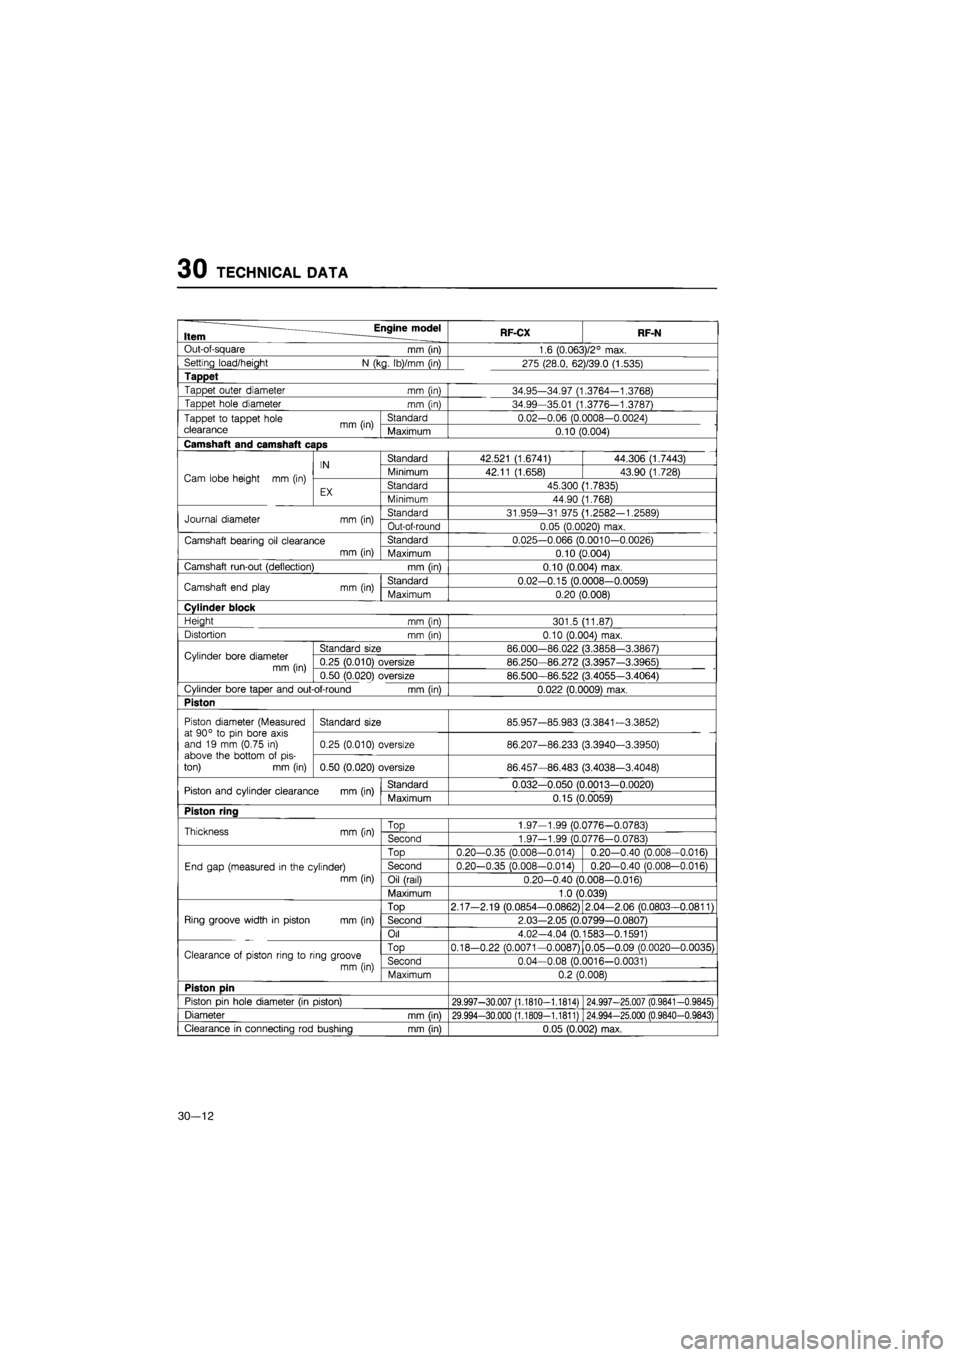
30 TECHNICAL DATA
—— Engine model Item RF-CX RF-N
0..t cy sui.aro
mm
(in) 1.6 (0.063)/2° max.
Setting load/height
N
(kg. Ib)/mm (in) 275 (28.0, 62)/39.0 (1.535)
Tappet
Tappet outer diameter
mm
(in) 34.95-34.97 (1.3764-1.3768)
Tappet hole diameter
mm
(in) 34.99-35.01 (1.3776-1.3787)
Tappet
to
tappet hole
,. ,
clearance
mm (in)
Standard 0.02-0.06 (0.0008-0.0024) Tappet
to
tappet hole
,. ,
clearance
mm (in)
Maximum 0.10 (0.004)
Camshaft and camshaft caps
Cam lobe height
mm (in)
IN Standard 42.521 (1.6741) 44.306 (1.7443)
Cam lobe height
mm (in)
IN Minimum 42.11 (1.658) 43.90 (1.728) Cam lobe height
mm (in)
EX Standard 45.300 (1.7835) Cam lobe height
mm (in)
EX Minimum 44.90 (1.768)
Journal diameter
mm (in)
Standard 31.959-31.975 (1.2582-1.2589) Journal diameter
mm (in)
Out-of-round 0.05 (0.0020) max.
Camshaft bearing
oil
clearance
mm (in)
Standard 0.025—0.066 (0.0010-0.0026) Camshaft bearing
oil
clearance
mm (in) Maximum 0.10 (0.004)
Camshaft run-out (deflection)
mm
(in) 0.10 (0.004) max.
Camshaft end play
mm (in)
Standard 0.02-0.15 (0.0008-0.0059) Camshaft end play
mm (in)
Maximum 0.20 (0.008)
Cylinder block
Height
mm (in)
301.5 (11.87)
Distortion
mm (in)
0.10 (0.004) max.
Cylinder bore diameter
mm (in)
Standard size 86.000-86.022 (3.3858-3.3867) Cylinder bore diameter
mm (in) 0.25 (0.010) oversize 86.250-86.272 (3.3957-3.3965) Cylinder bore diameter
mm (in) 0.50 (0.020) oversize 86.500-86.522 (3.4055-3.4064)
Cylinder bore taper and out-of-round
mm
(in) 0.022 (0.0009) max.
Piston
Piston diameter (Measured at 90°
to pin
bore axis and
19
mm (0.75
in)
above the bottom
of
pis-ton) mm (in)
Standard size 85.957—85.983 (3.3841—3.3852) Piston diameter (Measured at 90°
to pin
bore axis and
19
mm (0.75
in)
above the bottom
of
pis-ton) mm (in)
0.25 (0.010) oversize 86.207-86.233 (3.3940-3.3950)
Piston diameter (Measured at 90°
to pin
bore axis and
19
mm (0.75
in)
above the bottom
of
pis-ton) mm (in) 0.50 (0.020) oversize 86.457-86.483 (3.4038-3.4048)
Piston and cylinder clearance
mm
(in) Standard 0.032-0.050 (0.0013-0.0020) Piston and cylinder clearance
mm
(in) Maximum 0.15 (0.0059)
Piston ring
Thickness
mm
(in)
TOD
1.97-1.99 (0.0776-0.0783) Thickness
mm
(in) Second 1.97-1.99 (0.0776—0.0783)
End gap (measured
in
the cylinder)
mm (in)
TOD
0.20-0.35 (0.008-0.014) 0.20-0.40 (0.008-0.016)
End gap (measured
in
the cylinder)
mm (in)
Second 0.20-0.35 (0.008-0.014) 0.20-0.40 (0.008-0.016) End gap (measured
in
the cylinder)
mm (in) Oil (rail) 0.20-0.40 (0.008-0.016)
End gap (measured
in
the cylinder)
mm (in)
Maximum 1.0 (0.039)
Ring groove width
in
piston
mm
(in)
TOD
2.17-2.19 (0.0854-0.0862) 2.04-2.06 (0.0803-0.0811)
Ring groove width
in
piston
mm
(in) Second 2.03-2.05 (0.0799—0.0807) Ring groove width
in
piston
mm
(in)
Oil 4.02-4.04 (0.1583-0.1591)
Clearance
of
piston ring
to
ring groove
mm (in)
TOD
0.18-0.22 (0.0071-0.0087) 0.05—0.09 (0.0020-0.0035) Clearance
of
piston ring
to
ring groove
mm (in) Second 0.04-0.08 (0.0016-0.0031) Clearance
of
piston ring
to
ring groove
mm (in) Maximum 0.2 (0.008)
Piston pin
Piston pin hole diameter
(in
piston) 29.997-30.007 (1.1810-1.1814) 24.997-25.007 (0.9841-0.9845)
Diameter
mm
fin) 29.994-30.000 (1.1809-1.1811) 24.994-25.000 (0.9840-0.9843)
Clearance
in
connecting rod bushing
mm
(in) 0.05 (0.002) max.
30—12