Page 2260 of 2389
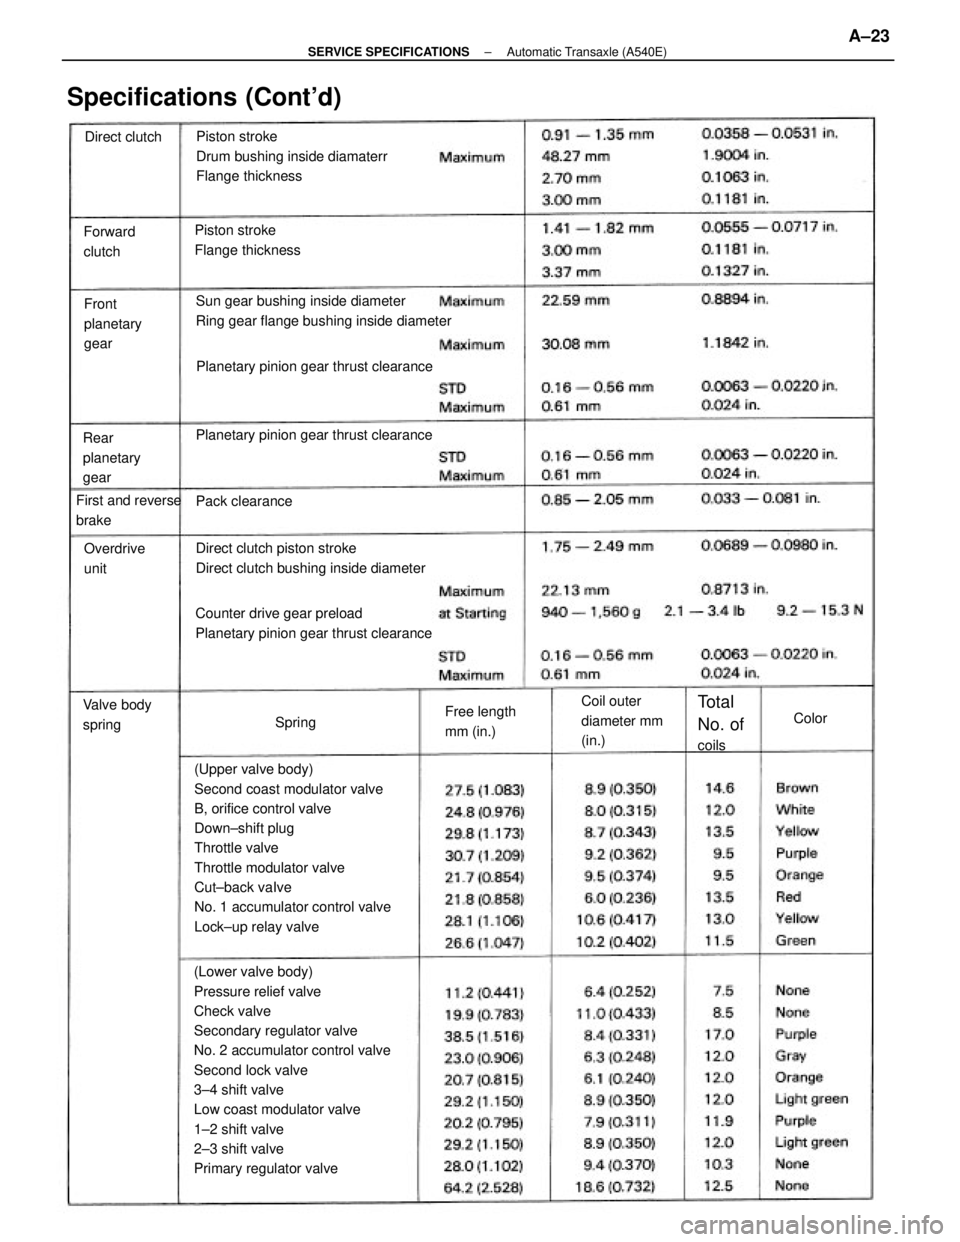
(Lower valve body)
Pressure relief valve
Check valve
Secondary regulator valve
No. 2 accumulator control valve
Second lock valve
3±4 shift valve
Low coast modulator valve
1±2 shift valve
2±3 shift valve
Primary regulator valve(Upper valve body)
Second coast modulator valve
B, orifice control valve
Down±shift plug
Throttle valve
Throttle modulator valve
Cut±back vaIve
No. 1 accumulator control valve
Lock±up relay valvePiston stroke
Drum bushing inside diamaterr
Flange thickness
Sun gear bushing inside diameter
Ring gear flange bushing inside diameter
Counter drive gear preload
Planetary pinion gear thrust clearanceDirect clutch piston stroke
Direct clutch bushing inside diameter Planetary pinion gear thrust clearancePlanetary pinion gear thrust clearance
Specifications (Cont'd)
Piston stroke
Flange thickness
Coil outer
diameter mm
(in.) Rear
planetary
gearFront
planetary
gear Forward
clutch
First and reverse
brake
Free length
mm (in.) Valve body
springOverdrive
unit
Total
No. of
coils Pack clearance Direct clutch
SpringColor
± SERVICE SPECIFICATIONSAutomatic Transaxle (A540E)A±23
Page 2271 of 2389
Limit Lateral runout
Radial runout
Ring gear installing temperature
Drive pinion oil seal drive in depth
Side gear oil seal drive in depth
Side gear thrust washer thicknessDrive pinion bearing preload at Starting
New bearing
Reused bearing
Drive pinion to ring gear backlash
Pinion gear to side gear backlash
Ring gear runout
Companion flange runout
REAR AXLE AND SUSPENSION
Specifications
Camber (FWD /Sedan)
(FWD/Wagon)
(4WD)
Left±right error
Wheel lateral runout
Hub bearing axial direction(FWD/SV21 and 4WD)
(FWD/VZV21)
(FWD SV21)
(4WD)
(FIND/¿¿V21)
(FWD/SV21)
(FWD/VZV21)
(4WD)
Rear axle
and suspensionChassis ground
clearanceCold tire
inflation
pressure
Rear wheel
alignmentAdjustment STD Inspection STD
Total preloacf at Starting DifferentialWagon
Toe±inSedan
± SERVICE SPECIFICATIONSRear Axle and SuspensionA±33
Page 2276 of 2389
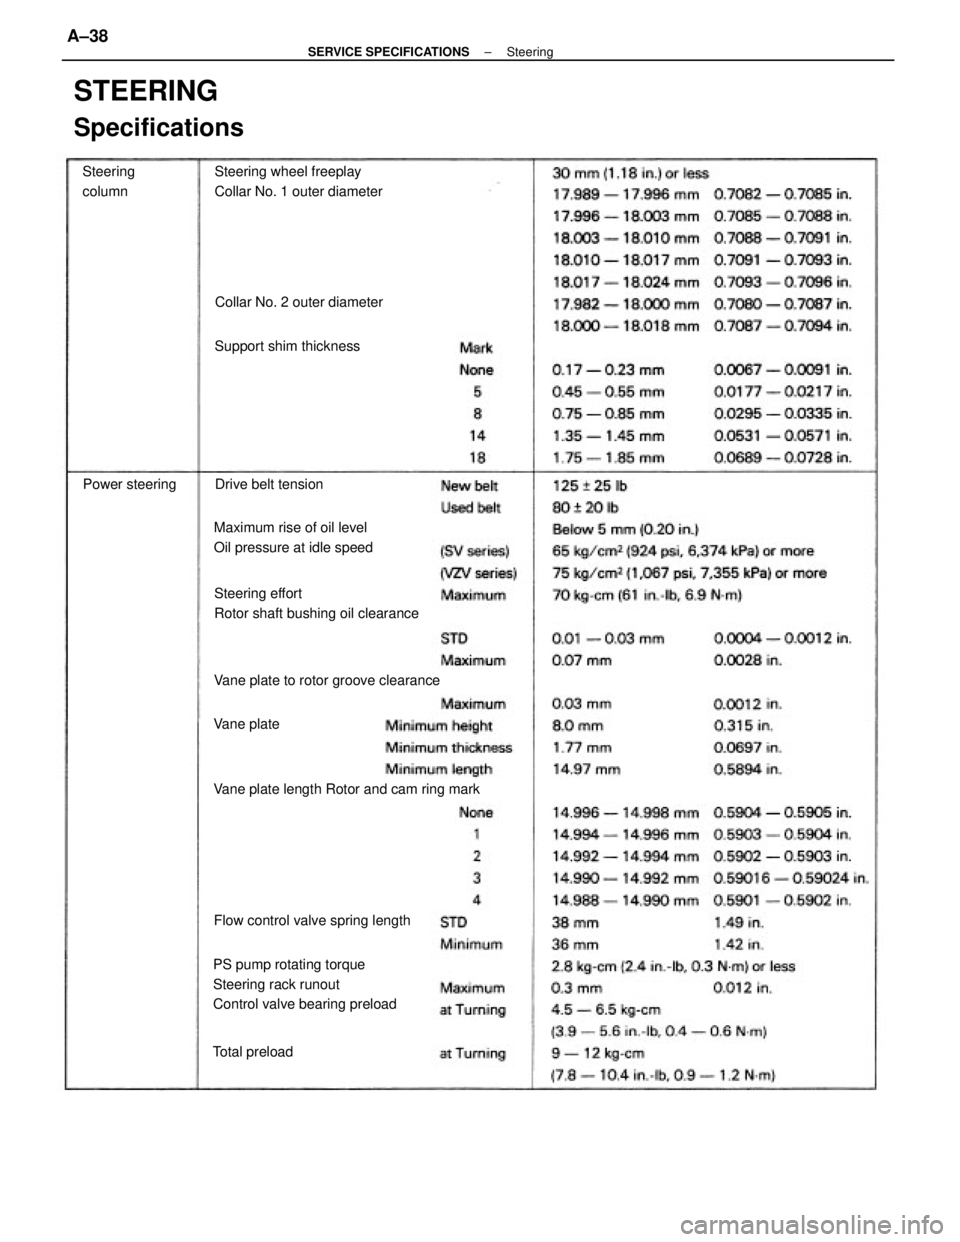
PS pump rotating torque
Steering rack runout
Control valve bearing preload
STEERING
Specifications
Steering effort
Rotor shaft bushing oil clearanceSteering wheel freeplay
Collar No. 1 outer diameter
Vane plate length Rotor and cam ring markMaximum rise of oil level
Oil pressure at idle speed
Vane plate to rotor groove clearance
Flow control valve spring lengthCollar No. 2 outer diameter
Support shim thickness
Drive belt tension Steering
column
Power steering
Total preloadVane plate
± SERVICE SPECIFICATIONSSteeringA±38
Page 2299 of 2389
SST (SPECIAL SERVICE TOOLS) (Cont'd)
Remarks:
* 1 2VZ±FE only
* 2 E52 and E56F5
* 3 E56F5 only
* 4 Speedometer driven gear oil seal
* 5 FWD/VZV21 and 4WD Windshield Moulding
Remover
Altemator Pulley Set
Nut Wrench Set
Diagnosis Check
WiringAlternator Rear
Bearing PullerDoor Hinge Set
Bolt Wrench
Wiring º'Aº EFI
Inspection
Hexagon 8 mm
WrenchOil Pressure
Switch Socket
Back±up Light
Switch Tool
Wiring ªFº
EFI Inspection
Spring Tension Tool
IllustrationPart Name Section
Part No.
Puller Set
EM
RA
BO
± SST AND SSMSST (Special Service Tools)C±19
Page 2300 of 2389
SST (SPECIAL SERVICE TOOLS) (Cont'd)
NOTE: For reference to SSTs for the Air Conditioning System see page AC±15.
Remarks:
* 1 E52 and E56F5
* 2 Drive shaft dust cover
* 3 4WD only A.B.S. Actuator
Checker and
Sub±harness
A.B.S. Actuator
Checker Sheet ºAºBearing Remover
Attachment
Oil Pressure
Gauge SetBearing Remover
IllustrationPart Name
Universal Puller
Part No.Section
± SST AND SSMSST (Special Service Tools)C±20
Page 2302 of 2389
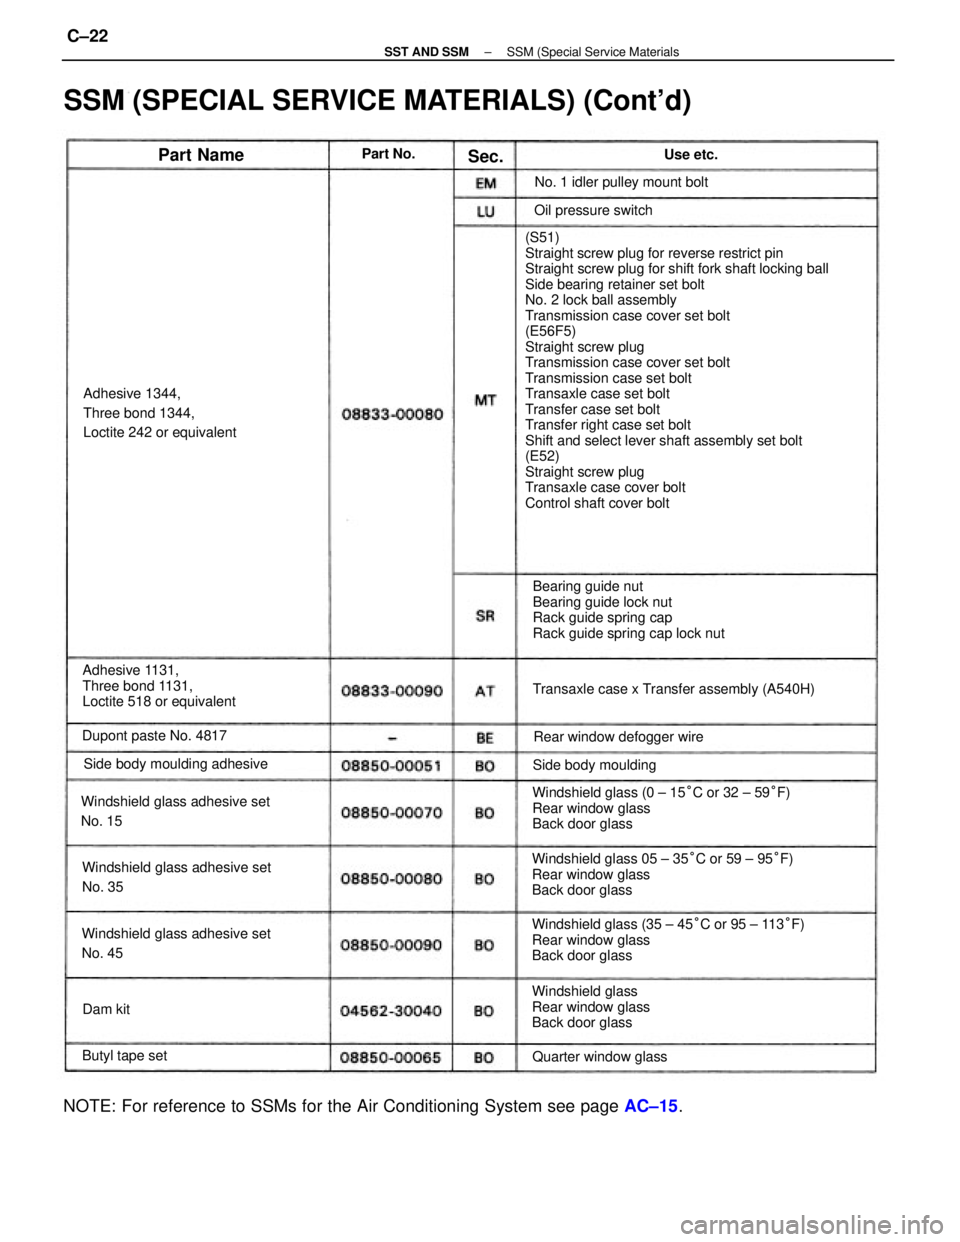
(S51)
Straight screw plug for reverse restrict pin
Straight screw plug for shift fork shaft locking ball
Side bearing retainer set bolt
No. 2 lock ball assembly
Transmission case cover set bolt
(E56F5)
Straight screw plug
Transmission case cover set bolt
Transmission case set bolt
Transaxle case set bolt
Transfer case set bolt
Transfer right case set bolt
Shift and select lever shaft assembly set bolt
(E52)
Straight screw plug
Transaxle case cover bolt
Control shaft cover bolt
SSM (SPECIAL SERVICE MATERIALS) (Cont'd)
Windshield glass (35 ± 45°C or 95 ± 113°F)
Rear window glass
Back door glass Windshield glass 05 ± 35°C or 59 ± 95°F)
Rear window glass
Back door glassWindshield glass (0 ± 15°C or 32 ± 59°F)
Rear window glass
Back door glass
NOTE: For reference to SSMs for the Air Conditioning System see page AC±15.
Bearing guide nut
Bearing guide lock nut
Rack guide spring cap
Rack guide spring cap lock nut
Adhesive 1131,
Three bond 1131,
Loctite 518 or equivalentAdhesive 1344,
Three bond 1344,
Loctite 242 or equivalent
Windshield glass adhesive set
No. 15
Windshield glass adhesive set
No. 45Windshield glass adhesive set
No. 35Transaxle case x Transfer assembly (A540H)
Windshield glass
Rear window glass
Back door glass Side body moulding adhesiveNo. 1 idler pulley mount bolt
Rear window defogger wire Dupont paste No. 4817
Quarter window glassSide body mouldingOil pressure switch
Butyl tape set
Part NameUse etc. Part No.
Dam kitSec.
± SST AND SSMSSM (Special Service MaterialsC±22
Page 2336 of 2389
SERVICE HINT
Troubles with the power steering system are usually
concerned with hard steering due to the fact that
there is no assist. In such cases, before attempting
to make repairs, it is necessary to determine wheth-
er the trouble lies with the pump or with the gear
housing. To do this, an on±vehicle inspection can be
made by using a pressure gauge.
ON±VEHICLE INSPECTION
Power steering is a hydraulic device and problems
are normally due to insufficient fluid pressure acting
on the piston. This could be caused by either the
pump not producing the specified fluid pressure or
the control valve in the gear housing not functioning
properly so that the proper fluid pressure can not be
obtained.
If the fault lies with the pump, the same symptoms
will generally occur whether the steering wheel is
turned fully to the right or left. On the other hand, if
the fault lies with the control valve, there will gener-
ally be difference between the amount of assist
when the steering wheel is turned to the left and
right, causing harder steering. However, if the piston
seal of the power cylinder is worn, there will be a
loss of fluid pressure whether the steering wheel is
turned to the right or left and the symptoms will be
the same for both.
Before performing an on±vehicle inspection, a
check must first be made to confirm that the power
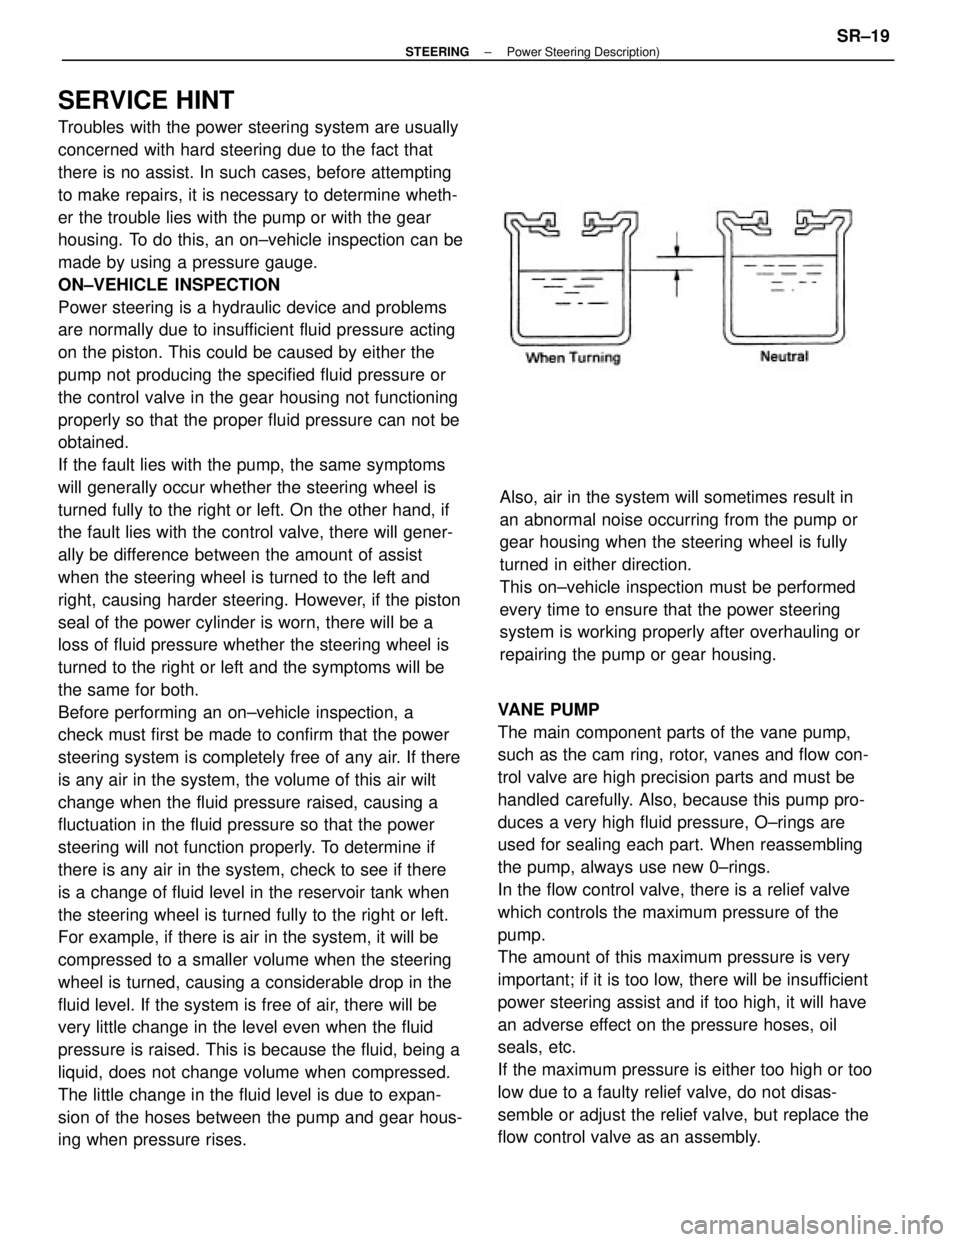
steering system is completely free of any air. If there
is any air in the system, the volume of this air wilt
change when the fluid pressure raised, causing a
fluctuation in the fluid pressure so that the power
steering will not function properly. To determine if
there is any air in the system, check to see if there
is a change of fluid level in the reservoir tank when
the steering wheel is turned fully to the right or left.
For example, if there is air in the system, it will be
compressed to a smaller volume when the steering
wheel is turned, causing a considerable drop in the
fluid level. If the system is free of air, there will be
very little change in the level even when the fluid
pressure is raised. This is because the fluid, being a
liquid, does not change volume when compressed.
The little change in the fluid level is due to expan-
sion of the hoses between the pump and gear hous-
ing when pressure rises.VANE PUMP
The main component parts of the vane pump,
such as the cam ring, rotor, vanes and flow con-
trol valve are high precision parts and must be
handled carefully. Also, because this pump pro-
duces a very high fluid pressure, O±rings are
used for sealing each part. When reassembling
the pump, always use new 0±rings.
In the flow control valve, there is a relief valve
which controls the maximum pressure of the
pump.
The amount of this maximum pressure is very
important; if it is too low, there will be insufficient
power steering assist and if too high, it will have
an adverse effect on the pressure hoses, oil
seals, etc.
If the maximum pressure is either too high or too
low due to a faulty relief valve, do not disas-
semble or adjust the relief valve, but replace the
flow control valve as an assembly.Also, air in the system will sometimes result in
an abnormal noise occurring from the pump or
gear housing when the steering wheel is fully
turned in either direction.
This on±vehicle inspection must be performed
every time to ensure that the power steering
system is working properly after overhauling or
repairing the pump or gear housing.
± STEERINGPower Steering Description)SR±19
Page 2337 of 2389
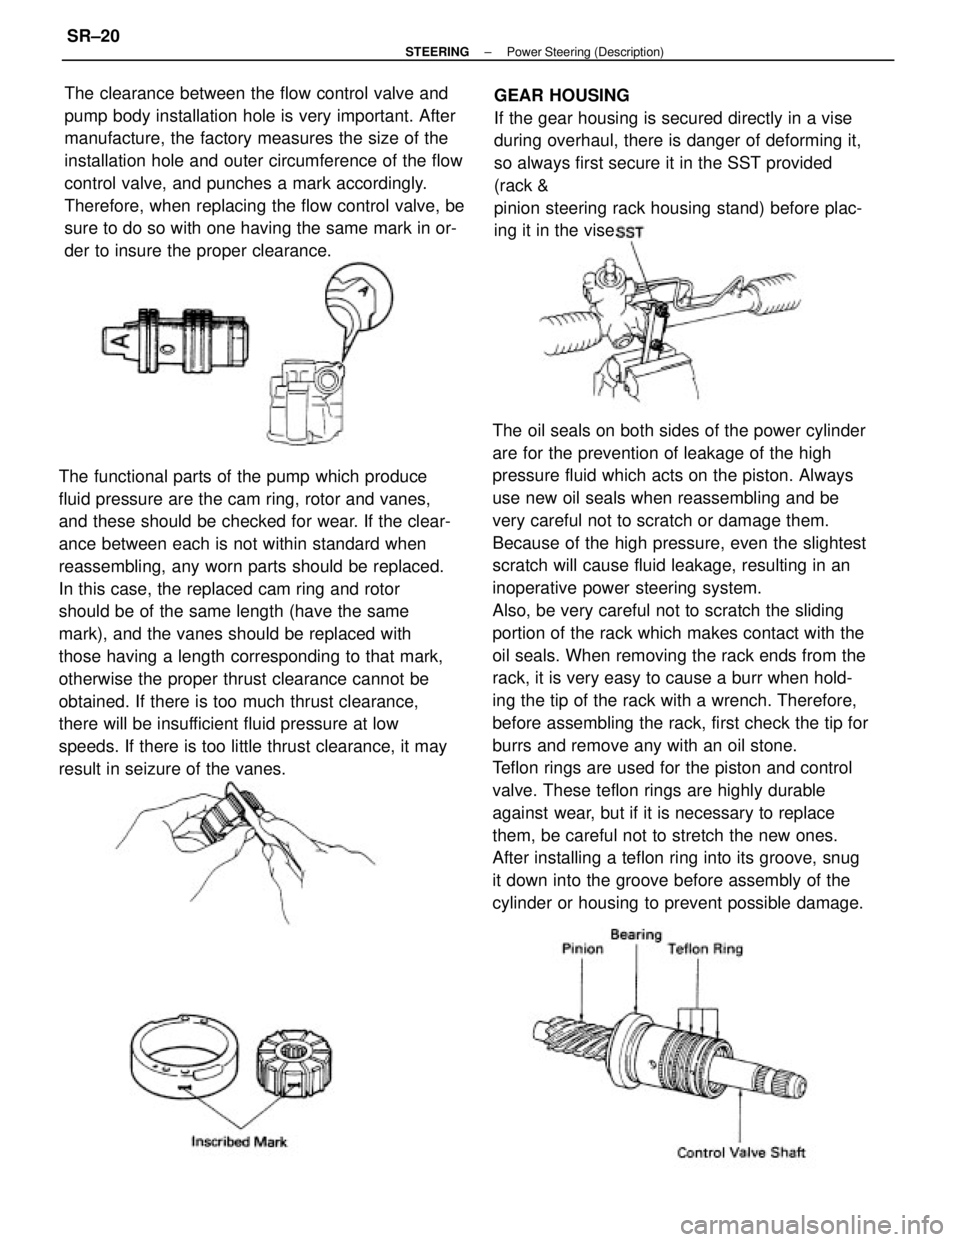
The oil seals on both sides of the power cylinder
are for the prevention of leakage of the high
pressure fluid which acts on the piston. Always
use new oil seals when reassembling and be
very careful not to scratch or damage them.
Because of the high pressure, even the slightest
scratch will cause fluid leakage, resulting in an
inoperative power steering system.
Also, be very careful not to scratch the sliding
portion of the rack which makes contact with the
oil seals. When removing the rack ends from the
rack, it is very easy to cause a burr when hold-
ing the tip of the rack with a wrench. Therefore,
before assembling the rack, first check the tip for
burrs and remove any with an oil stone.
Teflon rings are used for the piston and control
valve. These teflon rings are highly durable
against wear, but if it is necessary to replace
them, be careful not to stretch the new ones.
After installing a teflon ring into its groove, snug
it down into the groove before assembly of the
cylinder or housing to prevent possible damage. The functional parts of the pump which produce
fluid pressure are the cam ring, rotor and vanes,
and these should be checked for wear. If the clear-
ance between each is not within standard when
reassembling, any worn parts should be replaced.
In this case, the replaced cam ring and rotor
should be of the same length (have the same
mark), and the vanes should be replaced with
those having a length corresponding to that mark,
otherwise the proper thrust clearance cannot be
obtained. If there is too much thrust clearance,
there will be insufficient fluid pressure at low
speeds. If there is too little thrust clearance, it may
result in seizure of the vanes.The clearance between the flow control valve and
pump body installation hole is very important. After
manufacture, the factory measures the size of the
installation hole and outer circumference of the flow
control valve, and punches a mark accordingly.
Therefore, when replacing the flow control valve, be
sure to do so with one having the same mark in or-
der to insure the proper clearance.GEAR HOUSING
If the gear housing is secured directly in a vise
during overhaul, there is danger of deforming it,
so always first secure it in the SST provided
(rack &
pinion steering rack housing stand) before plac-
ing it in the vise.
± STEERINGPower Steering (Description)SR±20