Page 650 of 2389
5. INSTALL FIRST AND REVERSE BRAKE PISTON TO
TRANSMISSION CASE
(a) Coat the new 4±rings with ATF.
(b) Install the two O±rings on the piston. 4. CHECK OPERATION OF PARKING LOCK PAWL
Make sure the counter driven gear is locked when the
manual valve fever is in the P range. 3. INSTALL PARKING LOCK PAWL BRACKET
Torque: 75 kg±cm (65 in.±Ib, 7.4 N±m)
(g) Match the collar hole to the lever calking hollow
and calk the collar to the lever.
(h) Install the retaining spring.
± AUTOMATIC TRANSAXLEInstallation of Component Parts (A540E and A540H)AT±392
Page 1864 of 2389
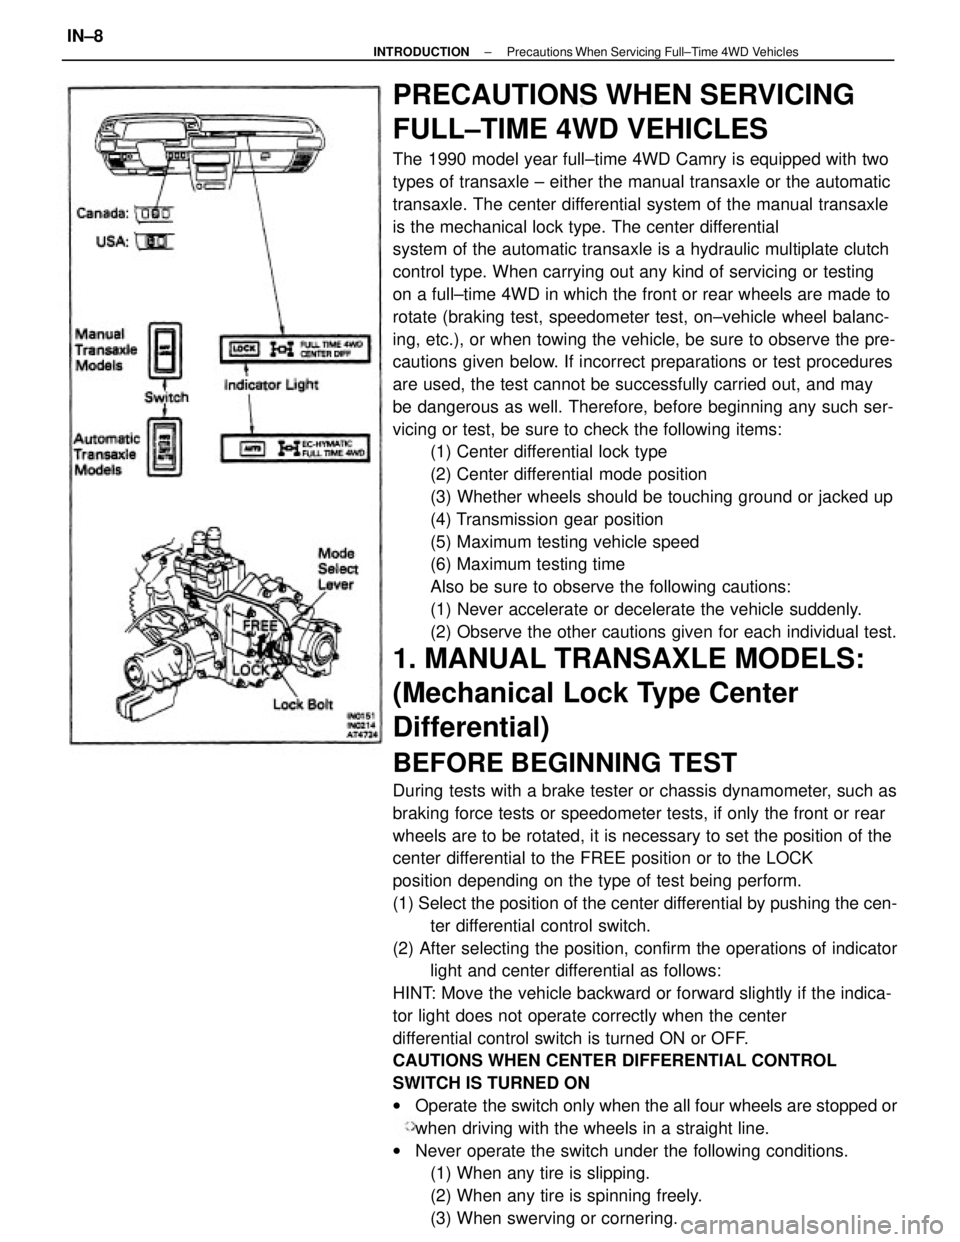
PRECAUTIONS WHEN SERVICING
FULL±TIME 4WD VEHICLES
The 1990 model year full±time 4WD Camry is equipped with two
types of transaxle ± either the manual transaxle or the automatic
transaxle. The center differential system of the manual transaxle
is the mechanical lock type. The center differential
system of the automatic transaxle is a hydraulic multiplate clutch
control type. When carrying out any kind of servicing or testing
on a full±time 4WD in which the front or rear wheels are made to
rotate (braking test, speedometer test, on±vehicle wheel balanc-
ing, etc.), or when towing the vehicle, be sure to observe the pre-
cautions given below. If incorrect preparations or test procedures
are used, the test cannot be successfully carried out, and may
be dangerous as well. Therefore, before beginning any such ser-
vicing or test, be sure to check the following items:
(1) Center differential lock type
(2) Center differential mode position
(3) Whether wheels should be touching ground or jacked up
(4) Transmission gear position
(5) Maximum testing vehicle speed
(6) Maximum testing time
Also be sure to observe the following cautions:
(1) Never accelerate or decelerate the vehicle suddenly.
(2) Observe the other cautions given for each individual test.
1. MANUAL TRANSAXLE MODELS:
(Mechanical Lock Type Center
Differential)
BEFORE BEGINNING TEST
During tests with a brake tester or chassis dynamometer, such as
braking force tests or speedometer tests, if only the front or rear
wheels are to be rotated, it is necessary to set the position of the
center differential to the FREE position or to the LOCK
position depending on the type of test being perform.
(1) Select the position of the center differential by pushing the cen-
ter differential control switch.
(2) After selecting the position, confirm the operations of indicator
light and center differential as follows:
HINT: Move the vehicle backward or forward slightly if the indica-
tor light does not operate correctly when the center
differential control switch is turned ON or OFF.
CAUTIONS WHEN CENTER DIFFERENTIAL CONTROL
SWITCH IS TURNED ON
wOperate the switch only when the all four wheels are stopped or
when driving with the wheels in a straight line.
wNever operate the switch under the following conditions.
(1) When any tire is slipping.
(2) When any tire is spinning freely.
(3) When swerving or cornering.
± INTRODUCTIONPrecautions When Servicing Full±Time 4WD VehiclesIN±8
Page 1865 of 2389
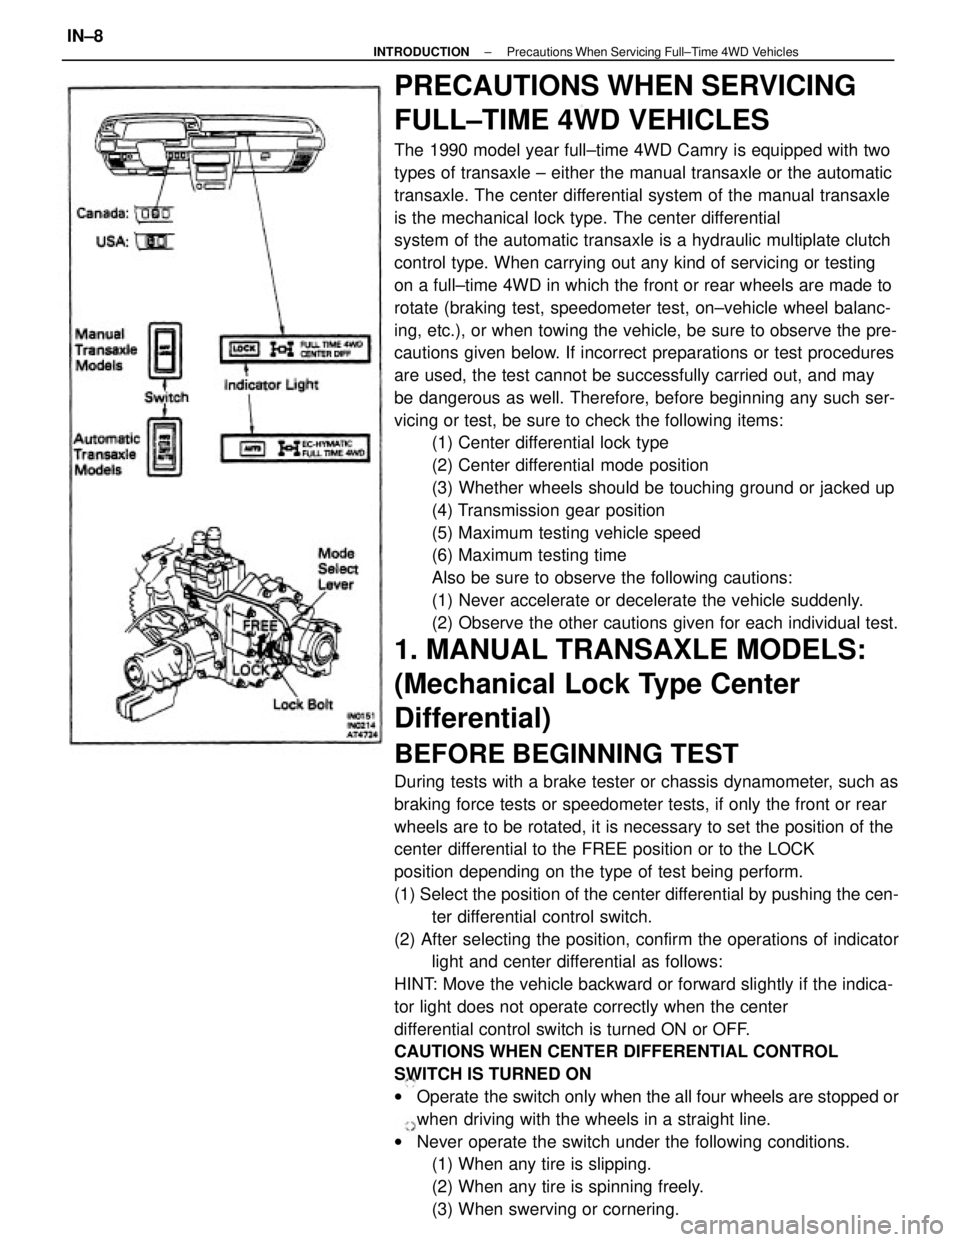
PRECAUTIONS WHEN SERVICING
FULL±TIME 4WD VEHICLES
The 1990 model year full±time 4WD Camry is equipped with two
types of transaxle ± either the manual transaxle or the automatic
transaxle. The center differential system of the manual transaxle
is the mechanical lock type. The center differential
system of the automatic transaxle is a hydraulic multiplate clutch
control type. When carrying out any kind of servicing or testing
on a full±time 4WD in which the front or rear wheels are made to
rotate (braking test, speedometer test, on±vehicle wheel balanc-
ing, etc.), or when towing the vehicle, be sure to observe the pre-
cautions given below. If incorrect preparations or test procedures
are used, the test cannot be successfully carried out, and may
be dangerous as well. Therefore, before beginning any such ser-
vicing or test, be sure to check the following items:
(1) Center differential lock type
(2) Center differential mode position
(3) Whether wheels should be touching ground or jacked up
(4) Transmission gear position
(5) Maximum testing vehicle speed
(6) Maximum testing time
Also be sure to observe the following cautions:
(1) Never accelerate or decelerate the vehicle suddenly.
(2) Observe the other cautions given for each individual test.
1. MANUAL TRANSAXLE MODELS:
(Mechanical Lock Type Center
Differential)
BEFORE BEGINNING TEST
During tests with a brake tester or chassis dynamometer, such as
braking force tests or speedometer tests, if only the front or rear
wheels are to be rotated, it is necessary to set the position of the
center differential to the FREE position or to the LOCK
position depending on the type of test being perform.
(1) Select the position of the center differential by pushing the cen-
ter differential control switch.
(2) After selecting the position, confirm the operations of indicator
light and center differential as follows:
HINT: Move the vehicle backward or forward slightly if the indica-
tor light does not operate correctly when the center
differential control switch is turned ON or OFF.
CAUTIONS WHEN CENTER DIFFERENTIAL CONTROL
SWITCH IS TURNED ON
wOperate the switch only when the all four wheels are stopped or
when driving with the wheels in a straight line.
wNever operate the switch under the following conditions.
(1) When any tire is slipping.
(2) When any tire is spinning freely.
(3) When swerving or cornering.
± INTRODUCTIONPrecautions When Servicing Full±Time 4WD VehiclesIN±8
Page 1885 of 2389
ABBREVIATIONS USED IN THIS
MANUAL
A.B.S. Anti±Lock Brake System
A/C Air Conditioner
ALR Automatic Locking Retractor
Approx. Approximation
A/T, ATM Automatic Transaxle
ATF Automatic Transmission Fluid
B
0 Overdrive Brake
B
1 Second Coast Brake
B
2 Second Brake
B
3 First and Reverse Brake
BDC Bottom Dead Center
BTDC Before Top Dead Center
BVSV Bimetal Vacuum Switching Valve
C
0 Overdrive Clutch
C
1 Forward Clutch
C
2 Direct Clutch
CB Circuit Breaker
DP Dash Pot
CRS Child Restraint System
ECT Electronic Controlled Transaxle
ECU Electronic Controlled Unit
EFI Electronic Fuel Injection
E/G Engine
EGR Exhaust Gas Recirculation
ELR Emergency Locking Retractor
ESA Electronic Spark Advance
EVAP Evaporative (Emission Control)
EX Exhaust (manifold, valve)
Ex. Except
F
0 Overdrive One±Way Clutch
F
1 No. 1 One±Way Clutch
F
2 No. 2 One±Way Clutch
FIPG Formed in Place Gasket
FL Fusible Link
Fr Front
IG Ignition
IN Intake (manifold, valve)
ISC Idle Speed Control
LED Light Emitting Diode
LH Left±Hand
LSPV Load Sensing Proportioning Valve
Max. Maximum
Min. Minimum
MP Multipurpose
M/T, MTM Manual Transaxle
O/D, OD Overdrive
O/S Oversize
PCV Positive Crankcase Ventilation
PKB Parking Brake
± INTRODUCTIONAbbreviations Used in This ManualIN±28
Page 1922 of 2389
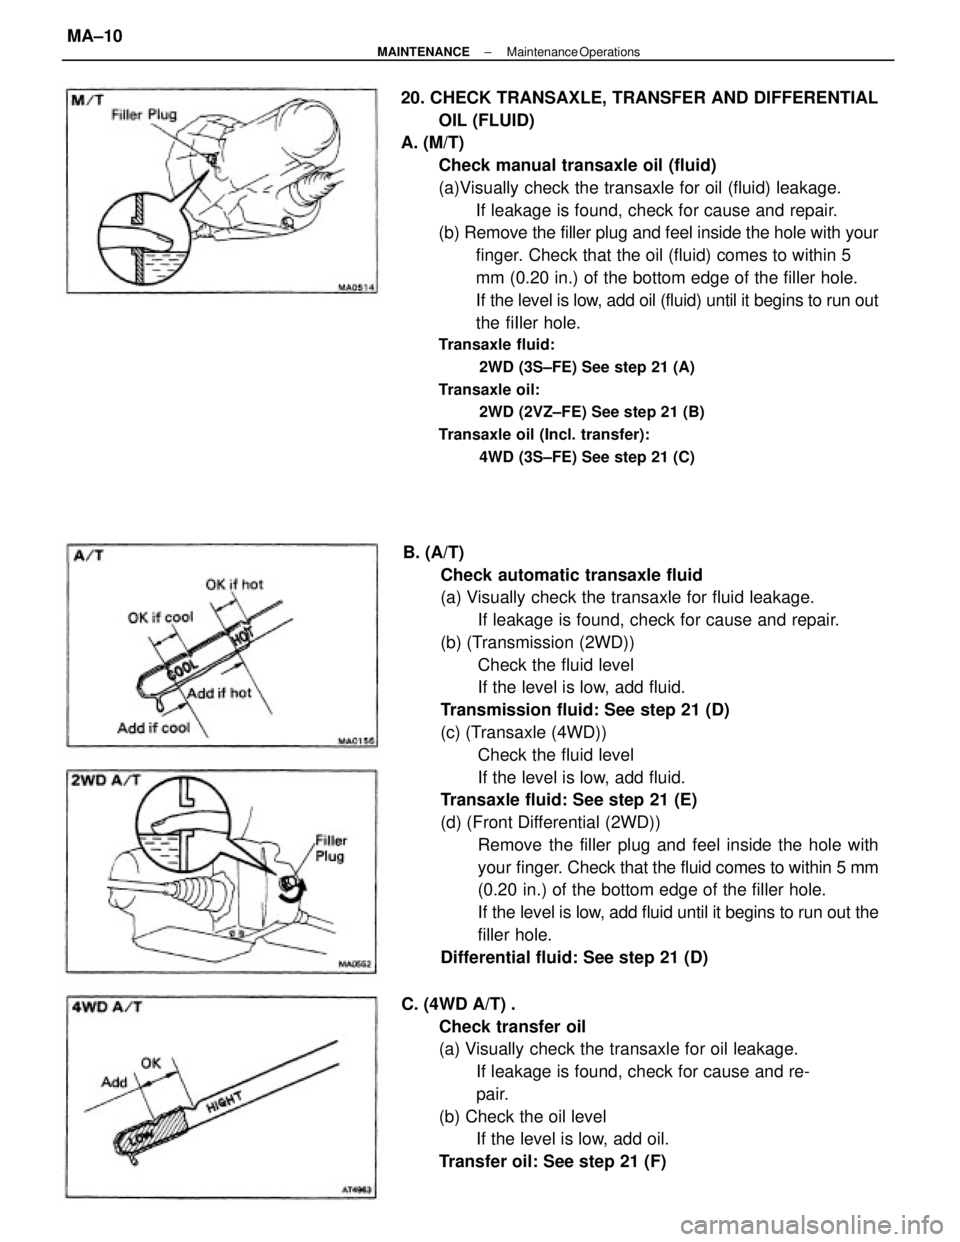
B. (A/T)
Check automatic transaxle fluid
(a) Visually check the transaxle for fluid leakage.
If leakage is found, check for cause and repair.
(b) (Transmission (2WD))
Check the fluid level
If the level is low, add fluid.
Transmission fluid: See step 21 (D)
(c) (Transaxle (4WD))
Check the fluid level
If the level is low, add fluid.
Transaxle fluid: See step 21 (E)
(d) (Front Differential (2WD))
Remove the filler plug and feel inside the hole with
your finger. Check that the fluid comes to within 5 mm
(0.20 in.) of the bottom edge of the filler hole.
If the level is low, add fluid until it begins to run out the
filler hole.
Differential fluid: See step 21 (D) 20. CHECK TRANSAXLE, TRANSFER AND DIFFERENTIAL
OIL (FLUID)
A. (M/T)
Check manual transaxle oil (fluid)
(a)Visually check the transaxle for oil (fluid) leakage.
If leakage is found, check for cause and repair.
(b) Remove the filler plug and feel inside the hole with your
finger. Check that the oil (fluid) comes to within 5
mm (0.20 in.) of the bottom edge of the filler hole.
If the level is low, add oil (fluid) until it begins to run out
the fiIler hole.
Transaxle fluid:
2WD (3S±FE) See step 21 (A)
Transaxle oil:
2WD (2VZ±FE) See step 21 (B)
Transaxle oil (Incl. transfer):
4WD (3S±FE) See step 21 (C)
C. (4WD A/T) .
Check transfer oil
(a) Visually check the transaxle for oil leakage.
If leakage is found, check for cause and re-
pair.
(b) Check the oil level
If the level is low, add oil.
Transfer oil: See step 21 (F)
± MAINTENANCEMaintenance OperationsMA±10
Page 1930 of 2389
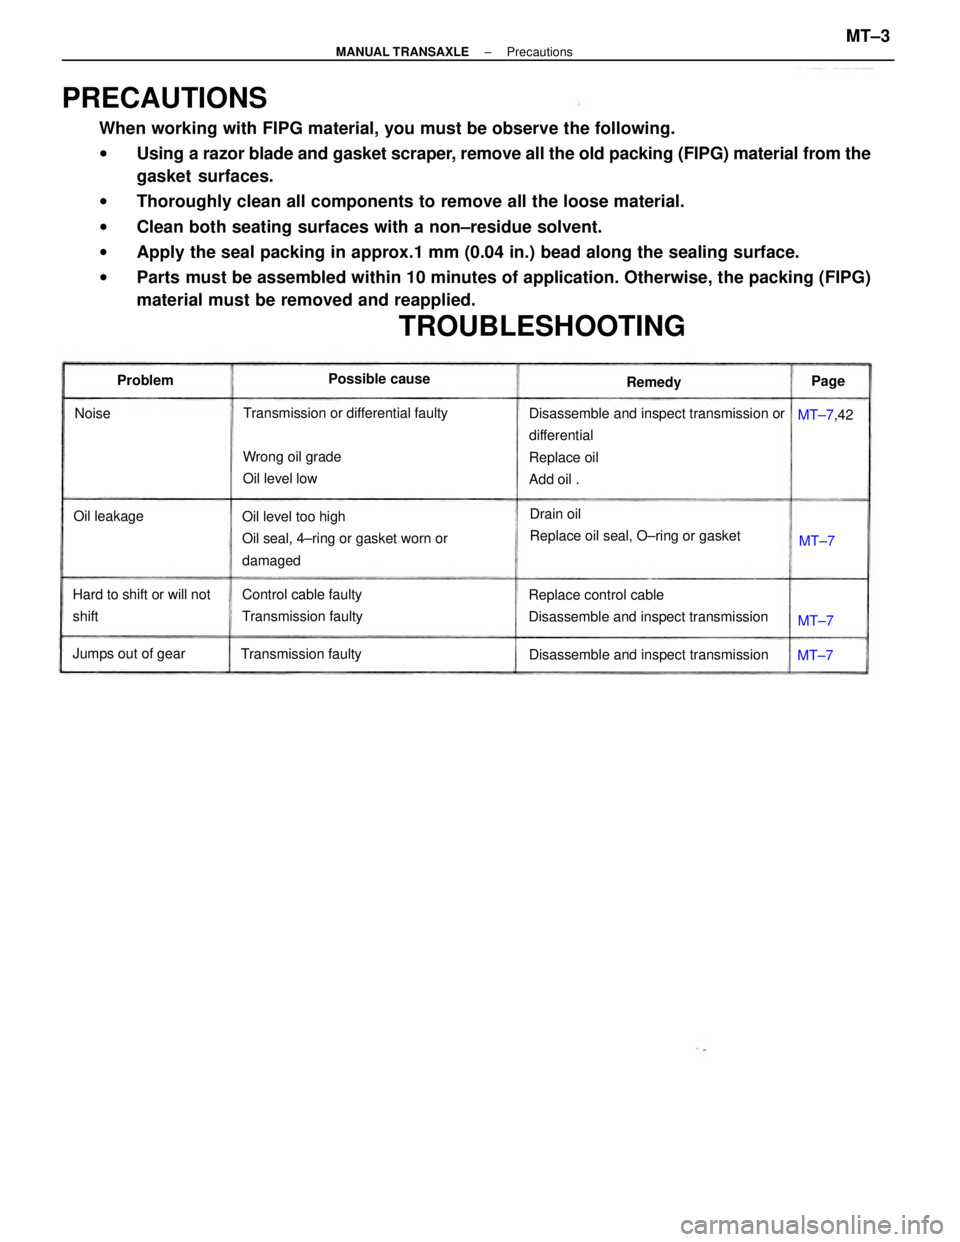
PRECAUTIONS
When working with FIPG material, you must be observe the following.
wUsing a razor blade and gasket scraper, remove all the old packing (FIPG) material from the
gasket surfaces.
wThoroughly clean all components to remove all the loose material.
wClean both seating surfaces with a non±residue solvent.
wApply the seal packing in approx.1 mm (0.04 in.) bead along the sealing surface.
wParts must be assembled within 10 minutes of application. Otherwise, the packing (FIPG)
material must be removed and reapplied.
Disassemble and inspect transmission or
differential
Replace oil
Add oil .
Oil level too high
Oil seal, 4±ring or gasket worn or
damaged
Replace control cable
Disassemble and inspect transmissionDrain oil
Replace oil seal, O±ring or gasket
TROUBLESHOOTING
Control cable faulty
Transmission faulty
Disassemble and inspect transmission Transmission or differential faulty
Hard to shift or will not
shiftWrong oil grade
Oil level low
Transmission faulty Jumps out of gearPossible cause
Oil leakageMT±7,42 Problem
Remedy
Noise
MT±7MT±7MT±7Page
± MANUAL TRANSAXLEPrecautionsMT±3
Page 1931 of 2389
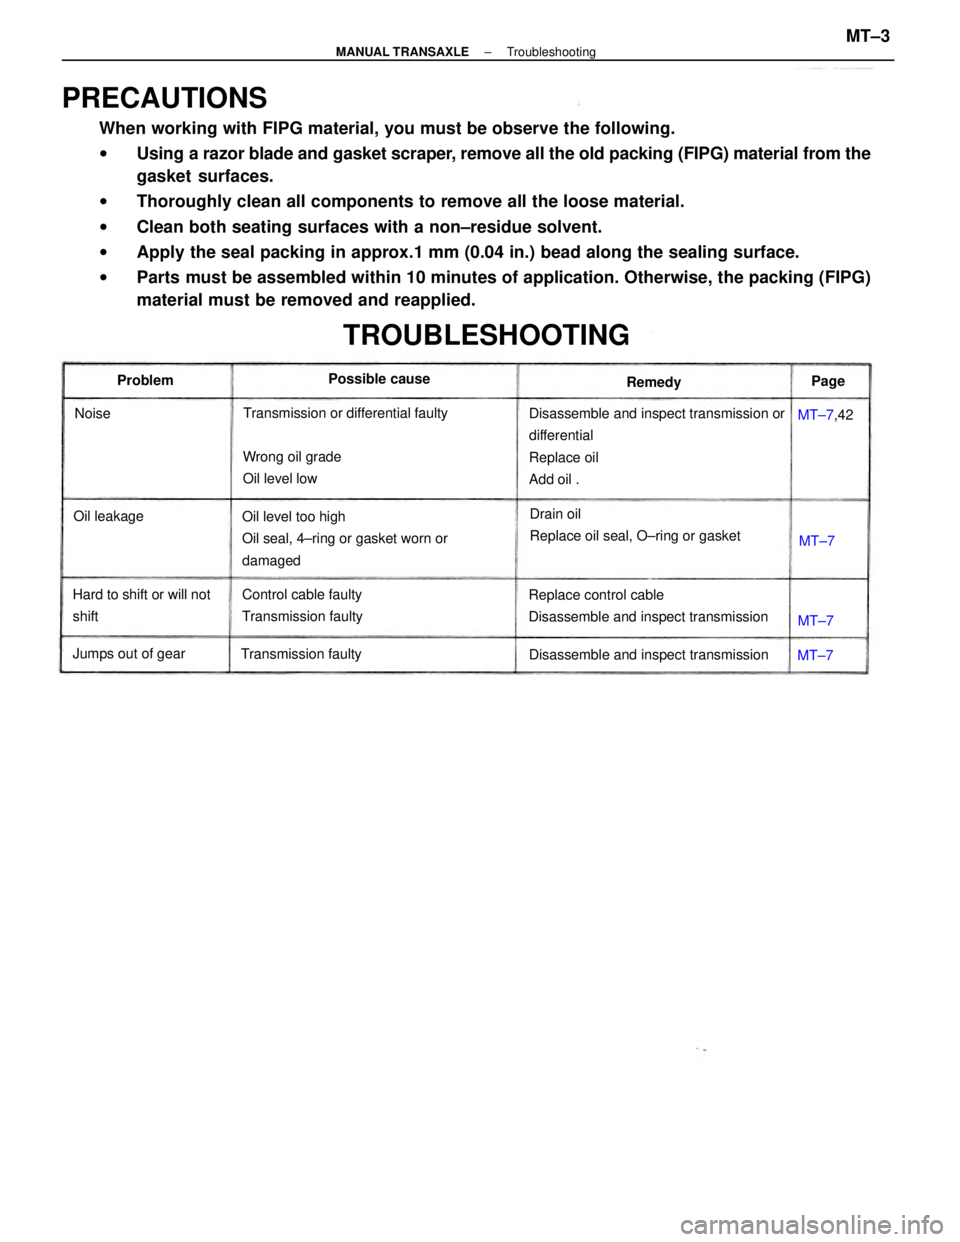
PRECAUTIONS
When working with FIPG material, you must be observe the following.
wUsing a razor blade and gasket scraper, remove all the old packing (FIPG) material from the
gasket surfaces.
wThoroughly clean all components to remove all the loose material.
wClean both seating surfaces with a non±residue solvent.
wApply the seal packing in approx.1 mm (0.04 in.) bead along the sealing surface.
wParts must be assembled within 10 minutes of application. Otherwise, the packing (FIPG)
material must be removed and reapplied.
Disassemble and inspect transmission or
differential
Replace oil
Add oil .
Oil level too high
Oil seal, 4±ring or gasket worn or
damaged
Replace control cable
Disassemble and inspect transmissionDrain oil
Replace oil seal, O±ring or gasket
TROUBLESHOOTING
Control cable faulty
Transmission faulty
Disassemble and inspect transmission Transmission or differential faulty
Hard to shift or will not
shiftWrong oil grade
Oil level low
Transmission faulty Jumps out of gearPossible cause
Oil leakageMT±7,42 Problem
Remedy
Noise
MT±7MT±7MT±7Page
± MANUAL TRANSAXLETroubleshootingMT±3
Page 1932 of 2389
7. REMOVE TRANSAXLE MOUNTING BOLTS OF
TRANSAXLE UPPER
8. RAISE VEHICLE
NOTICE: Be sure the vehicle is securely supported.
9. REMOVE UNDER COVERS
10. DRAIN OUT FLUID
11. DISCONNECT SPEEDOMETER CABLE
S51 TRANSMISSION
REMOVAL OF TRANSAXLE
1. REMOVE NEGATIVE BATTERY CABLE
2. REMOVE CLUTCH RELEASE CYLINDER AND TUBE
CLAMP
5. REMOVE STARTER
(a) Disconnect the cable and connector.
(b) Remove the starter with the two bolts.
6. DISCONNECT BACK±UP LIGHT SWITCH
CONNECTOR AND GROUND STRAP 3. REMOVE±.CLUTCH TUBE BRACKET
(a) Remove the retainer from the bracket.
(b) Remove the bolt and bracket.
4. DISCONNECT CONTROL CABLES
(a) Remove the clips and washers.
(b) Remove the retainer from the cables.
± MANUAL TRANSAXLES51 TransmissionMT±4