1985 FORD GRANADA spark plugs
[x] Cancel search: spark plugsPage 124 of 255

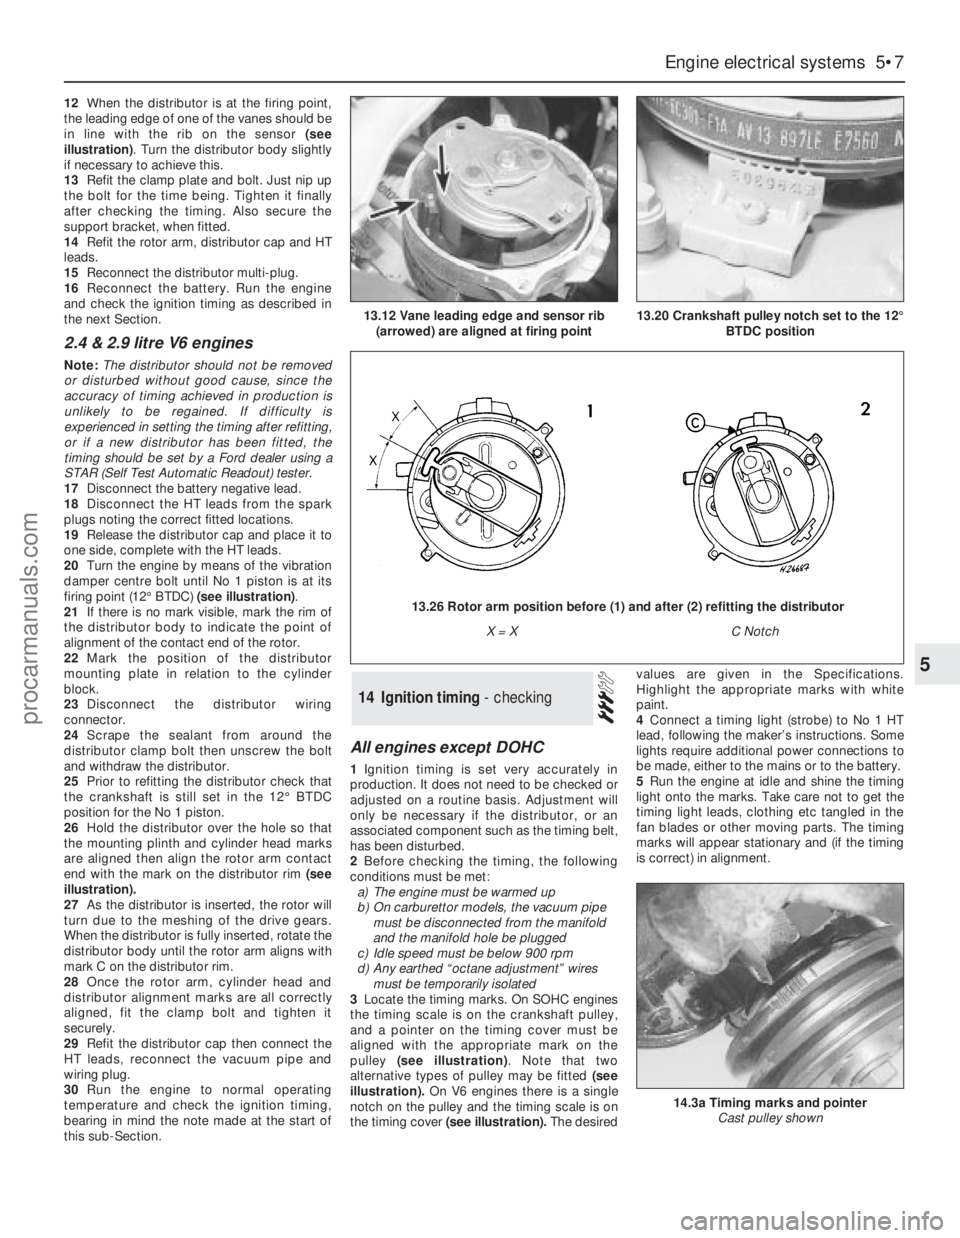
12When the distributor is at the firing point,
the leading edge of one of the vanes should be
in line with the rib on the sensor (see
illustration). Turn the distributor body slightly
if necessary to achieve this.
13Refit the clamp plate and bolt. Just nip up
the bolt for the time being. Tighten it finally
after checking the timing. Also secure the
support bracket, when fitted.
14Refit the rotor arm, distributor cap and HT
leads.
15Reconnect the distributor multi-plug.
16Reconnect the battery. Run the engine
and check the ignition timing as described in
the next Section.
2.4 & 2.9 litre V6 engines
Note: The distributor should not be removed
or disturbed without good cause, since the
accuracy of timing achieved in production is
unlikely to be regained. If difficulty is
experienced in setting the timing after refitting,
or if a new distributor has been fitted, the
timing should be set by a Ford dealer using a
STAR (Self Test Automatic Readout) tester.
17Disconnect the battery negative lead.
18Disconnect the HT leads from the spark
plugs noting the correct fitted locations.
19Release the distributor cap and place it to
one side, complete with the HT leads.
20Turn the engine by means of the vibration
damper centre bolt until No 1 piston is at its
firing point (12°BTDC) (see illustration).
21If there is no mark visible, mark the rim of
the distributor body to indicate the point of
alignment of the contact end of the rotor.
22Mark the position of the distributor
mounting plate in relation to the cylinder
block.
23Disconnect the distributor wiring
connector.
24Scrape the sealant from around the
distributor clamp bolt then unscrew the bolt
and withdraw the distributor.
25Prior to refitting the distributor check that
the crankshaft is still set in the 12°BTDC
position for the No 1 piston.
26Hold the distributor over the hole so that
the mounting plinth and cylinder head marks
are aligned then align the rotor arm contact
end with the mark on the distributor rim (see
illustration).
27As the distributor is inserted, the rotor will
turn due to the meshing of the drive gears.
When the distributor is fully inserted, rotate the
distributor body until the rotor arm aligns with
mark C on the distributor rim.
28Once the rotor arm, cylinder head and
distributor alignment marks are all correctly
aligned, fit the clamp bolt and tighten it
securely.
29Refit the distributor cap then connect the
HT leads, reconnect the vacuum pipe and
wiring plug.
30Run the engine to normal operating
temperature and check the ignition timing,
bearing in mind the note made at the start of
this sub-Section.
All engines except DOHC
1Ignition timing is set very accurately in
production. It does not need to be checked or
adjusted on a routine basis. Adjustment will
only be necessary if the distributor, or an
associated component such as the timing belt,
has been disturbed.
2Before checking the timing, the following
conditions must be met:
a)The engine must be warmed up
b)On carburettor models, the vacuum pipe
must be disconnected from the manifold
and the manifold hole be plugged
c)Idle speed must be below 900 rpm
d)Any earthed “octane adjustment” wires
must be temporarily isolated
3Locate the timing marks. On SOHC engines
the timing scale is on the crankshaft pulley,
and a pointer on the timing cover must be
aligned with the appropriate mark on the
pulley (see illustration). Note that two
alternative types of pulley may be fitted (see
illustration).On V6 engines there is a single
notch on the pulley and the timing scale is on
the timing cover (see illustration).The desiredvalues are given in the Specifications.
Highlight the appropriate marks with white
paint.
4Connect a timing light (strobe) to No 1 HT
lead, following the maker’s instructions. Some
lights require additional power connections to
be made, either to the mains or to the battery.
5Run the engine at idle and shine the timing
light onto the marks. Take care not to get the
timing light leads, clothing etc tangled in the
fan blades or other moving parts. The timing
marks will appear stationary and (if the timing
is correct) in alignment.
14Ignition timing - checking
Engine electrical systems 5•7
5
13.12 Vane leading edge and sensor rib
(arrowed) are aligned at firing point13.20 Crankshaft pulley notch set to the 12°
BTDC position
14.3a Timing marks and pointer
Cast pulley shown
13.26 Rotor arm position before (1) and after (2) refitting the distributor
X = XC Notch
procarmanuals.com
Page 241 of 255

REF•6
Engine fails to rotate when attempting to start
m mBattery terminal connections loose or corroded (Chapter 1).
m mBattery discharged or faulty (Chapter 5).
m mBroken, loose or disconnected wiring in the starting circuit
(Chapter 5).
m mDefective starter solenoid or switch (Chapter 5).
m mDefective starter motor (Chapter 5).
m mStarter pinion or flywheel/driveplate ring gear teeth loose or broken
(Chapters 2 or 5).
m mEngine earth strap broken or disconnected.
Starter motor turns engine slowly
m
mPartially-discharged battery (recharge, use jump leads, or push
start) (Chapter 5).
m mBattery terminals loose or corroded (Chapter 1).
m mBattery earth to body defective (Chapter 5).
m mEngine earth strap loose.
m mStarter motor (or solenoid) wiring loose (Chapter 5).
m mStarter motor internal fault (Chapter 5).
Engine rotates, but will not start
m
mFuel pump inertia switch tripped (electric pump) (Chapter 4).
m mFuel tank empty.
m mBattery discharged (engine rotates slowly) (Chapter 5).
m mBattery terminal connections loose or corroded (Chapter 1).
m mIgnition components damp or damaged (Chapters 1 and 5).
m mBroken, loose or disconnected wiring in the ignition circuit
(Chapters 1 and 5).
m mWorn, faulty or incorrectly-gapped spark plugs (Chapter 1).
m mFuel injection system fault (Chapter 4).
m mMajor mechanical failure (eg broken timing chain) (Chapter 2).
Engine difficult to start when cold
m
mBattery discharged (Chapter 5).
m mBattery terminal connections loose or corroded (Chapter 1).
m mWorn, faulty or incorrectly-gapped spark plugs (Chapter 1).
m mFuel injection system fault (Chapter 4).
m mOther ignition system fault (Chapters 1 and 5).
m mLow cylinder compressions (Chapter 2).
Engine difficult to start when hot
m
mAir filter element dirty or clogged (Chapter 1).
m mFuel injection system fault (Chapter 4).
m mLow cylinder compressions (Chapter 2).
Starter motor noisy or excessively-rough in
engagement
m mStarter pinion or flywheel/driveplate ring gear teeth loose or broken
(Chapters 2 or 5).
m mStarter motor mounting bolts loose or missing (Chapter 5).
m mStarter motor internal components worn or damaged (Chapter 5).
Engine starts, but stops immediately
m
mLoose or faulty electrical connections in the ignition circuit
(Chapters 1 and 5).
m mVacuum leak at the throttle body or inlet manifold (Chapter 4).
m mFuel injection system fault (Chapter 4).
Engine idles erratically
m
mCarburettor stepper motor plunger dirty (2.0 litre only) (Chapter 5)
m mIncorrectly-adjusted idle speed (Chapter 4).
m mAir filter element clogged (Chapter 1).
m mVacuum leak at the throttle body, inlet manifold or associated hoses
(Chapter 4).
m mWorn, faulty or incorrectly-gapped spark plugs (Chapter 1).
m mUneven or low cylinder compressions (Chapter 2).
m mCamshaft lobes worn (Chapter 2).
m mFuel injection system fault (Chapter 4).
Engine misfires at idle speed
m
mWorn, faulty or incorrectly-gapped spark plugs (Chapter 1).
m mFaulty spark plug HT leads (Chapter 5).
m mVacuum leak at the throttle body, inlet manifold or associated hoses
(Chapter 4).
m mFuel injection system fault (Chapter 4).
m mDistributor cap cracked or tracking internally, where applicable
(Chapter 5).
m mUneven or low cylinder compressions (Chapter 2).
m mDisconnected, leaking, or perished crankcase ventilation hoses
(Chapter 4).
Fault Finding
spark plugs may only be pointers to some underlying fault.
The pages which follow provide an easy-reference guide to the more
common problems which may occur during the operation of the
vehicle. These problems and their possible causes are grouped under
headings denoting various components or systems, such as Engine,
Cooling system, etc. The Chapter and/or Section which deals with the
problem is also shown in brackets. Whatever the fault, certain basic
principles apply. These are as follows:
Verify the fault. This is simply a matter of being sure that you know
what the symptoms are before starting work. This is particularly
important if you are investigating a fault for someone else, who may
not have described it very accurately.
Don’t overlook the obvious. For example, if the vehicle won’t start, is
there fuel in the tank? (Don’t take anyone else’s word on this particular
point, and don’t trust the fuel gauge either!) If an electrical fault isindicated, look for loose or broken wires before digging out the test
gear.
Cure the disease, not the symptom. Substituting a flat battery with a
fully-charged one will get you off the hard shoulder, but if the
underlying cause is not attended to, the new battery will go the same
way. Similarly, changing oil-fouled spark plugs for a new set will get
you moving again, but remember that the reason for the fouling (if it
wasn’t simply an incorrect grade of plug) will have to be established
and corrected.
Don’t take anything for granted. Particularly, don’t forget that a
“new” component may itself be defective (especially if it’s been rattling
around in the boot for months), and don’t leave components out of a
fault diagnosis sequence just because they are new or recently-fitted.
When you do finally diagnose a difficult fault, you’ll probably realise
that all the evidence was there from the start.
1 Engine
procarmanuals.com
Page 242 of 255

Engine misfires throughout the driving speed range
m mFuel filter choked (Chapter 1).
m mFuel pump faulty, or delivery pressure low (Chapter 4).
m mFuel tank vent blocked, or fuel pipes restricted (Chapter 4).
m mVacuum leak at the throttle body, inlet manifold or associated hoses
(Chapter 4).
m mWorn, faulty or incorrectly-gapped spark plugs (Chapter 1).
m mFaulty spark plug HT leads (Chapter 5).
m mDistributor cap cracked or tracking internally (Chapter 5).
m mFaulty ignition coil (Chapter 5).
m mUneven or low cylinder compressions (Chapter 2).
m mFuel injection system fault (Chapter 4).
Engine hesitates on acceleration
m
mWorn, faulty or incorrectly-gapped spark plugs (Chapter 1).
m mVacuum leak at the throttle body, inlet manifold or associated hoses
(Chapter 4).
m mFuel injection system fault (Chapter 4).
Engine stalls
m
mVacuum leak at the throttle body, inlet manifold or associated hoses
(Chapter 4).
m mFuel filter choked (Chapter 1).
m mFuel pump faulty, or delivery pressure low (Chapter 4).
m mFuel tank vent blocked, or fuel pipes restricted (Chapter 4).
m mFuel injection system fault (Chapter 4).
Engine lacks power
m
mFuel filter choked (Chapter 1).
m mFuel pump faulty, or delivery pressure low (Chapter 4).
m mUneven or low cylinder compressions (Chapter 2).
m mWorn, faulty or incorrectly-gapped spark plugs (Chapter 1).
m mVacuum leak at the throttle body, inlet manifold or associated hoses
(Chapter 4).
m mFuel injection system fault (Chapter 4).
m mBrakes binding (Chapters 1 and 10).
m mClutch slipping (Chapter 6).
Engine backfires
m
mVacuum leak at the throttle body, inlet manifold or associated hoses
(Chapter 4).
m mFuel injection system fault (Chapter 4).
Oil pressure warning light illuminated with engine
running
m mLow oil level, or incorrect oil grade (Chapter 1).
m mFaulty oil pressure sensor (Chapter 2).
m mWorn engine bearings and/or oil pump (Chapter 2).
m mExcessively high engine operating temperature (Chapter 3).
m mOil pressure relief valve defective (Chapter 2).
m mOil pick-up strainer clogged (Chapter 2).
Note:Low oil pressure in a high-mileage engine at tickover is not
necessarily a cause for concern. Sudden pressure loss at speed is far
more significant. In any event, check the gauge or warning light sender
before condemning the engine.
Engine runs-on after switching off
m mExcessive carbon build-up in engine (Chapter 2).
m mExcessively high engine operating temperature (Chapter 3).
Engine noises
Pre-ignition (pinking) or knocking during acceleration or
under load
m mIgnition timing incorrect/ignition system fault (Chapters 1 and 5).
m mIncorrect grade of spark plug (Chapter 1).
m mIncorrect grade of fuel (Chapter 1).
m mVacuum leak at throttle body, inlet manifold or associated hoses
(Chapter 4).
m mExcessive carbon build-up in engine (Chapter 2).
m mFuel injection system fault (Chapter 4).
Whistling or wheezing noises
m
mLeaking inlet manifold or throttle body gasket (Chapter 4).
m mLeaking exhaust manifold gasket (Chapter 4).
m mLeaking vacuum hose (Chapters 4 and 10).
m mBlowing cylinder head gasket (Chapter 2).
Tapping or rattling noises
m
mWorn valve gear, timing chain, camshaft or hydraulic tappets
(Chapter 2).
m mAncillary component fault (water pump, alternator, etc) (Chapters 3,
5, etc).
Knocking or thumping noises
m mWorn big-end bearings (regular heavy knocking, perhaps less under
load) (Chapter 2).
m mWorn main bearings (rumbling and knocking, perhaps worsening
under load) (Chapter 2).
m mPiston slap (most noticeable when cold) (Chapter 2).
m mAncillary component fault (water pump, alternator, etc) (Chapters 3,
5, etc).
REF•7Fault Finding
2Cooling system
Overheating
m
mAuxiliary drivebelt broken or incorrectly adjusted (Chapter 1).
m mInsufficient coolant in system (Chapter 1).
m mThermostat faulty (Chapter 3).
m mRadiator core blocked, or grille restricted (Chapter 3).
m mElectric cooling fan or thermostatic switch faulty (Chapter 3).
m mViscous-coupled fan faulty (Chapter 3).
m mIgnition timing incorrect, or ignition system fault (Chapters 1 and 5).
m mInaccurate temperature gauge sender unit (Chapter 3).
m mAirlock in cooling system (Chapter 3).
Overcooling
m
mThermostat faulty (Chapter 3).
m mInaccurate temperature gauge sender unit (Chapter 3).
External coolant leakage
m
mDeteriorated or damaged hoses or hose clips (Chapter 1).
m mRadiator core or heater matrix leaking (Chapter 3).
m mPressure cap faulty (Chapter 3).
m mWater pump internal seal leaking (Chapter 3).
m mWater pump-to-block seal leaking (Chapter 3).
m mBoiling due to overheating (Chapter 3).
m mCore plug leaking (Chapter 2).
Internal coolant leakage
m
mLeaking cylinder head gasket (Chapter 2).
m mCracked cylinder head or cylinder block (Chapter 2).
Corrosion
m
mInfrequent draining and flushing (Chapter 1).
m mIncorrect coolant mixture or inappropriate coolant type (Chapter 1).
procarmanuals.com
Page 254 of 255

Q
Quarter window moulding - 12•10
R
Radiator - 3•3, 12•9
Radio fader light - 13•8
Radio or radio/cassette player - 13•20, 13•21
Rear light cluster - 13•5, 13•6
Recline motor - 13•15
Regulator mechanism - 12•9
Relays - 13•13
Respraying - 12•3
Reversing light switch - 7B•3, 13•12, 13•13
Ride height control - 11•12, 11•13
Road test - 1•16
Rocker shaft - 2C•12
Rotor arm - 5•5
Routine maintenance and servicing- 1•1et
seq
Rust holes or gashes in bodywork - 12•2
S
Safety first! - 0•5
Scalding - 0•5
Scratches in bodywork - 12•2
Screw threads and fastenings - REF•4
Seals and hoses - 1•19
Seat air cushion - 12•17
Seat belts - 0•12, 1•10, 12•17, 12•18
Seats - 0•12, 12•17, 12•18, 13•10, 13•13,
13•15
Selector rod - 7B•4
Servo - 10•12, 10•13, 13•20
Shock absorbers - 0•12, 0•13, 11•12
Short-circuit - 13•4
Side mouldings - 12•10
Sidelight - 13•4
Sliding roof - 12•5, 13•12, 13•16
Spare parts - 0•8
Spark plugs - 1•12, 5•5
Speakers - 13•21, 13•22
Speed control system components - 13•19,
13•20
Speedometer sender unit - 13•16
Spoiler - 12•11
Springs - 0•13, 11•11
Starter inhibitor/reversing light switch -
7B•3, 13•13
Starter motor - 5•4, 5•5
Starter motor noisy or excessively-rough in
engagement - REF•6
Starter motor turns engine slowly - REF•6
Steering and suspension - 0•12, 0•13, 1•15,
1•16, 11•1et seq,REF•10
Steering column- 0•11, 11•5
Steering gear - 11•3
Steering intermediate shaft and flexible
coupling - 11•6Steering play - REF•10
Steering rack bellows - 11•4
Steering stiff - REF•10
Steering wheel - 0•11, 11•4, 11•5
Steering wheel and column -
Stop-light switch - 13•12
Strut - 11•9, 11•10
Stub axle carrier - 11•7
Sump - 2A•9, 2A•16, 2B•15, 2C•9, 2C•19
Switch illumination lights - 13•8
Switches - 13•9, 13•11, 13•12, 13•13,
13•18, 13•19
T
Tailgate - 12•4, 12•7, 13•12, 13•18
Tailgate wash/wipe inoperative, or
unsatisfactory in operation - REF•11
Tailgate window mouldings - 12•10
Tappets - 2C•13
Temperature gauge gives false reading -
REF•11
Temperature gauge sender - 3•7
Thermostat - 3•3
Throttle body - 4•15
Throttle cable - 4•7
Throttle kicker - 4•13
Throttle pedal - 4•6
Throttle position sensor - 4•15
Timing belt - 2A•8, 2A•14, 2A•18
Timing chain - 2B•8, 2B•10, 2C•9, 2C•17
Tools and working facilities- REF•1et seq
Towing - 0•7
Track rod end - 11•6
Transmission fluid brown, or has burned
smell - REF•9
Transmission slips, shifts roughly, is noisy,
or has no drive in forward or reverse
gears - REF•9
Transmission will not downshift (kickdown)
with accelerator pedal fully depressed -
REF•9
Tyre wear - REF•10
Tyres - 0•14, 1•7
U
Ultrasonic sensor - 13•23
Underbody inspection - 1•15
Unleaded fuel - 4•23
V
Vacuum dump valve/switch - 13•19
Vacuum hoses - 2C•7
Vacuum line modification - 7B•4
Vacuum pull-down adjustment - 4•13
Vacuum pump - 13•20
Vacuum servo - 10•12, 10•13, 13•20
Valve block and pump assembly - 10•13
Valve clearances - 1•13, 2A•20, 2C•21Valve grinding - 2A•14
Vane airflow meter(s) - 4•16
Vanity mirror light - 13•7
Vapour separator - 4•7
Vehicle identification - 0•9, 0•12
Vehicle pulls to one side - REF•9, REF•10
Vehicle speed sensor - 5•12
Vibration damper (MT75type gearbox) - 8•4
Viscous-coupled fan - 3•5
W
Wandering or general instability - REF•10
Warning light bulbs - 13•18
Wash/wipe inoperative, or unsatisfactory in
operation - REF•11
Wash/wipe switch - 13•12
Washer fluid - 1•7, 13•19
Washer jets inoperative - REF•11
Washer pump fails to operate - REF•11
Washer pump runs for some time before
fluid is emitted from jets - REF•11
Water pump - 3•5
Water pump/alternator drivebelt - 3•7
Weatherstrip - 12•7
Weber 2V carburettor - 4•9, 4•10
Weber 2V TLD carburettor - 4•11, 4•12,
4•13
Wheel alignment - 11•7
Wheel bearings - 0•13, 11•8, 11•11
Wheel changing - 0•7
Wheel sensors - 10•12
Wheel stud - 11•11
Wheel wobble and vibration - REF•10
Wheels - 0•14, 1•10
Wheels locking under normal braking -
REF•10
Window frame mouldings - 12•10
Window glass - 12•8
Window glass fails to move - REF•11
Window glass slow to move - REF•11
Window glass will only move in one
direction - REF•11
Window operating motor - 13•15
Window operating switch - 13•12
Windscreen - 0•11, 12•9
Windscreen mouldings - 12•10
Windscreen, rear window and headlight
washer components - 13•17
Wiper arms and blades - 13•16
Wiper blades - 1•9
Wiper blades fail to clean the glass
effectively - REF•11
Wiper blades sweep over too large or too
small an area of the glass - REF•11
Wiper motor - 13•17
Wipers fail to operate, or operate very
slowly - REF•11
Wiring diagrams- WD•0 et seq
Working facilities - REF•3
IND•3Index
procarmanuals.com