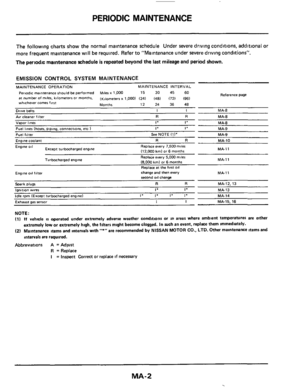
Page 9 of 38

ENGINE MAINTENANCE
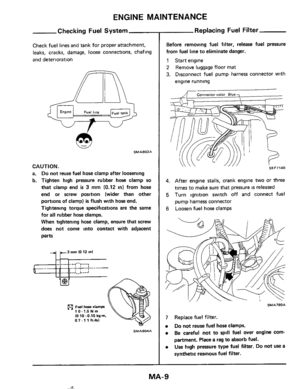
Checking Fuel System
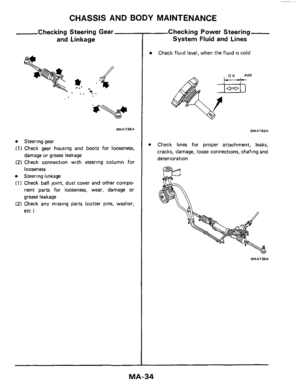
Check fuel lines and tank for proper attachment,
leaks, cracks, damage,
loose connections, chafing
and deterioration
SMA803A
CAUTION.
a. Do not reuse fuel hose clamp after loosening
b. Tighten high pressure rubber hose clamp
so
that clamp end is 3 mm (0.12 in) from hose
end or screw position (wider than other
portions of clamp)
is flush with hose end.
Tightening torque specifications are the same
for all rubber hose clamps.
When tightening hose clamp, ensure that screw
does not come into contact with adjacent
parts
10-1dNm IO 10 -0.15 kgm. 07 - 1 1 h-lbl
SMAS04A
Replacing Fuel Filter
Before removing fuel filter, release fuel pressure
from fuel line
to eliminate danger.
1 Start engine
2 Remove luggage floor mat
3. Disconnect fuel pump harness connector with
engine running
SEF7148
4. After engine stalls, crank engine two or three
times to make sure that pressure
is released
5 Turn ignition switch off and connect fuel
pump harness connector
6 Loosen fuel hose clamps
SMA780A
7 Replace fuel filter.
Do not reuse fuel hose clamps.
Be careful not to spill fuel over engine com-
partment. Place a rag
to absorb fuel.
Use high pressure type fuel filter. Do not use a
synthetic resinous
fuel filter.
MA-9
I
Page 10 of 38
 Except aut")
ENGINE MAINTENANCE
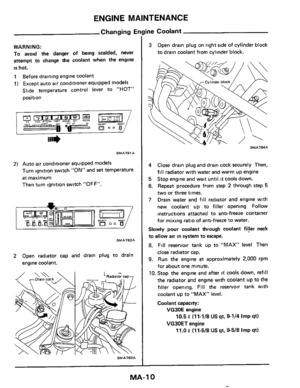
Changing Ei
WARNING:
To avoid the danger of being scalded, never
attempt to change the coolant when the engine
is hot.
1 Before drainmg engine coolant
1) Except auto air conditioner equipped models
Slide temperature control lever to
"HOT"
position
SMAJ81 A
2) Auto air conditioner equipped models
Turn ignition switch
"ON" and set temperature
at maximum
Then turn ignition switch
"OFF".
SMA782A
2 Open radiator cap and drain plug to drain
engine coolant.
SMA703A
ine Coolant
3 Open drain plug on right side of cylinder block
to drain coolant from cylinder block.
4 Close drain plug and drain cock securely Then,
fill radiator with water and warm up engine
5 Stop engine and wait until it cools down.
6. Repeat procedure from step 2 through step 5
two or three times.
7 Drain water and fill radiator and engine with
new coolant up to
filler opening Follow
instructions attached to anti-freeze container
for
mixing ratio of anti-freeze to water.
Slowly pour coolant through coolant fryer neck
to allow air in system to escape.
8. Fill reservoir tank up to "MAX" level Then
close radiator cap.
9. Run the engine at approximately 2,000 rpm
for about one minute.
IO. Stop the engine and after it cools down, refill
the radiator
and engine with coolant up to the
filler opening. Fill the reservoir tank with
coolant up to "MAX" level.
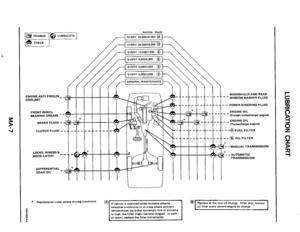
Coolant capacity:
VG30E engine
VG30ET engine
10.5 P (11-1/8 US qt, 9-1/4 Imp qt)
11.0 P (1 1-5/8 US qt, 9-5/8 Imp qt)
MA-1 0
Page 11 of 38

ENGINE MAINTENANCE
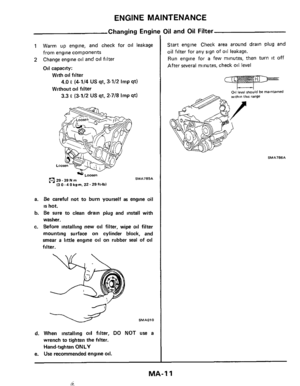
Changing Engine Oil and Oil Filter
1
2
Warm up engine, and check for oil leakage
from engine components
Change engine
oil and oil filter
Oil capacity:
With oil filter
Without
oil filter
4.0 p (4-1/4 US qt, 3-1/2 Imp qt)
3.3 2 (3-1/2 US qt, 2-7/8 Imp qt)
* Loose" SMA785A 29 - 39 N m (3 0 .4 0 kg-m, 22 . 29 ft-lbl
a. Be careful not to burn yourself as engine oil
is hot.
b. Be sure to clean drain plug and install with
washer.
c. Before installing new oil filter, wipe oil filter
mounting surface
on cylinder block, and
smear
a little engine oil on rubber seal of oil
filter.
d. When installing oil filter, DO NOT use a
wrench to tighten the filter.
Hand-tighten
ONLY
e. Use recommended engine oil.
Start engine Check area around drain plug and
oil filter for any sign of oil leakage.
Run engine for a few minutes, then turn it off
After several minutes, check oil level
Oil'level should be within this range
c---l 011 level should be IO range maintained
SMA786A
MA-I 1
4
Page 12 of 38
ENGINE MAINTENANCE
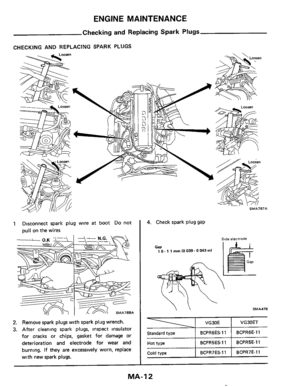
Checking and Replacing Spark Plugs
CHECKING AND REPLACING SPARK PLUGS
VG30E
Standard type BCPRGES-11
1 Disconnect spark plug wire at boot Do not
pull on the wires
VG30ET
BCPRGE-11 2. Remove spark plugs with spark plug wrench.
3. After cleaning spark plugs, inspect insulator
for cracks or chips,
gasket for damage or
deterioration and electrode for wear and
burning.
If they are excessively worn, replace
with new spark plugs.
Hot type I BCPRSESI 1
4. Check spark plug gap
BCPR5E-I 1
Slde elecrrode ~~~~
Cold type
Gap 1 0.1 1 mm (0 039 - 0 043 in)
BCPR7ES-11
BCPR7E-11
MA-1 2
Page 13 of 38
ENGINE MAINTENANCE
Checking and Replacing
Spark Plugs (Cont’d)
5 Install spark plugs Reconnect high tension
cables according to
Nos indicated on them.
0 . Spark plug
20 - 29 Nm
(2.0 - 3.0 kg-m, 14 - 22 ft-lb)
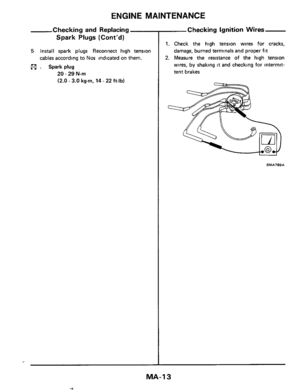
Checking Ignition Wires
1. Check the high tension wires for cracks,
damage, burned terminals and proper fit
2. Measure the resistance of the high tension
wires, by shaking it and checking for intermit-
tent brakes
SMA789A
MA-I 3
Page 14 of 38
ENGINE MAINTENANCE
Checking idle Speed (VG30E engine)
Preparation
WARNING:
a. Depress brake pedal while accelerating the engine to prevent forward surge of vehicle.
b. Inspection should
be carried out while shift lever IS in "D" position on automatic transmission equipped
models.
c. After inspection and adjustment have been made, shift the lever to "N" or "P" position.
Engage parking brake and lock both front and rear wheels with wheel chocks.
Turn
off air conditioner and headlamps.
Keep front wheels straight ahead.
c START I 1
Start engine and warm up untgl water
temperature Indicator poinrs to middle of
I
To harness 4
Stop engine and anach adapter harness between ignmon coil primary winding terminals and harness connector Then set
timer under no-load, then run engine at
+
Stop engine and connect idle UP solenoid
harness connector
Dismnnm adapter harness Connector and
connect ignition
coil harness connector io
(- END
MA-I 4
-
Page 15 of 38
ENGINE MAINTENANCE
Checking Exhi
48,000 krn (30,000 miles) OR 24 MONTHS
SERVICE
Exhaust gas sensor should be checked after 48,000
km (30,000 miles) or 24 months of operation
After vehicle has been operated for
48,000 km
(30,000 miles), exhaust gas sensor warning lamp
will come on to indicate that sensor should
be
inspected
Digital type
t
After inspection, disconnect warning lamp harness
connector so that warning lamp will not come on
thereafter.
SMA792A
1st Gas Sensor
MA-1 5
.-I
Page 16 of 38
ENGINE MAINTENANCE
Checking Exhaust Gas Sensor (Cont'd)
Preparation
When checking exhaust gas sensor, make sure that the following are
in good order
0 Battery
0 Hoses
Engine oil and coolant levels
E C C S. components
E.C C S. harness and connectors
Oil filler cap and oil level gauge
Checking procedure
START
Stan engine and warm UP until water
temperature indicator Points
IO middle
of gauge
I +
Run engine at about 2.000 rpm for abut
2 minutes under noload
I
E C C S control unit is turned fully
referring to MIXTURE RA
MA-1 6


5 Install spark plugs Reconnect high tension
cables according to
Nos indicated on them.
0 . Spark plug
20 - 29 Nm
(2.0")

Preparation
WARNING:
a. Depress brake pedal while accelerating the engine to prevent forward surge of vehicle.
b. Inspection should")
 OR 24 MONTHS
SERVICE
Exhaust gas sensor should be checked after 48,000
km (30,000 miles) or 24 months of operation
After vehicle has")

Preparation
When checking exhaust gas sensor, make sure that the following are
in good order
0 Battery
0 Hoses
Engine oil and coolant")