1984 CHEVROLET CAVALIER brake fluid
[x] Cancel search: brake fluidPage 6 of 105
Downloaded from www.Manualslib.com manuals search engine SECTION 1
BEFORE DRIVING YOUR CAVALIER
TRANSAXLE
While reading this manual, you will nole many references 10 Ihe "transaxle." The transaxle is a transmission and differential (axle) combined in a singl ,e unit.
To avoid confusion, the word
"transaxle" will be used throughout this manual 10 refer to bolh Ihe transmission and differenlial funclions.
DRIVER DAILY CHECKUST
Be sure you know how to use your vehicle and its equipment before operating it
Before Entering the Vehicle
1. See that windows, mirrors and lights are clean and unobstructed.
2. If any lire does not look normal, check it with a pressure gage.
3. Look for fluid leaks .
4. Be sure everything is properly stowed.
5. Check the area behind the vehicle if you are about to back up.
__ Before Driving Off
1. Lock all doors.
2. Adjust the seat and any movable head restraint
3. Adjust inside and outside mirrors.
4. DO NOT allow anyone to ride where there is no seat belt ; and ALWAYS properly fasten the seat belt.
5. Check that all the warning lights work as the key is turned to "Run" or "Start"
6. Check all gages (including the fuel gage).
7 . Release the parking brake (and make sure the
"BRAKE " light turns .off).
See related topics in this manual
or the Maintenance Schedule folder H problems are found.
STOWING THINGS IN (OR ON) THE VEHICLE
CAUTION: Put luggage or cargo In the trunk, or rea' area if postible. Cargo weight,
whether In the trunk or rear area, should be located as far forward as possible. Cargo weight on the roof Shoukt be positioned .s evenly as possible. Secure all i1ems in place to help keep them -from being thrown about and injuring people during a cot"-ion or sudden maneuver. Do not pile luggage or cargo higher than the seetbaCks. Do not place anything on the filler panel, or any cargo cover between the rear seat~.ck and window.
GUARD AGAINST THEFT
Your new Cava~er has many features to help prevent then of the vehicle, its
equipment, and contents. But these anti-then features
depend upon you to work.
t -1
Page 19 of 105
Downloaded from www.Manualslib.com manuals search engine Now and then, check that all trailer hitch bolts and nuts are tight. Also see the
Maintenance
Schedule folder, and thelndax in this manual , for important facts
on
belts , cooling system care and brake ~tment.
Break-In Schedule
See the new vehicle break-in information in this manual. Also, we recommend
you drive your new vehicle for 500 miles (800 kilometers) before trailer towing.
At the end of this 500 mile (800 kilometer) break-in period, avoid speeds over
50 mph (80 km/h) and full throttle starts during the first 500 miles (800 kilometers) of trailer towing .
CAUTION:
BRAKES-To help avoid personal injury due to poor braking action :
•
Trailer brakes of adequate size are required on trailers more than 450
kilograms (1,000 pounds) loaded weight.
• If you use trailer brakes with this vehicle, follow the instailation and balance instructions of the trailer brake manufacturer.
• Do not tap into the vehicle's brake system iUhe trailer brake system uses
more than 0.3 cubic centimeter (0.02 cubic inches) 01 fluid from the
vehicle 's
mast.". cyllnd<1r .. , In this case, the vehicle's brake fluid capacity will not be enough to operate both thevehicte and trailer brakes under all kinds
of use.
• All brake fluid parts must be able to stand 20 650 kPa (3,000 psi) . The
brake fluid tap must be made at the upper rear master cylinder port.
Copper tubing is subject to fatigue failure and must not be used.
HITCHES-To help avoid personal injury due to sway caused by such things as
crosswinds, large trucks passing or road roughness , or due to separation of
the trailer :
• A properly installed and adjusted (1) frame mounted, weight-dstribut ing hitch and (2) sway control witheoough capacity are required for trailers
more than 900 kilograms (2,000 pounds) loaded weight.
• Keep the trailer tongue load at 10 percent of the loaded trailer weight for
dead-weight hitches and 12 percent for weight-distributing hitches. Tongue
loads can be adjusted by proper distribution of the load in the trailer. This
can
be checked by weighing separately the loaded trailer and then the
tongue .
• Do not use axle-mounted Mches. They can damage the axle housing , wheel bearings , wheels or tires.
• Do not allow steel hitch parts to be in direct contact with aluminum bumper
parts, if so equipped. When steel and aluminum are in contact, a galvanic
reaction (a form of corrosion) can occur which will progressively lessen the
strength of the contacting metals to the point
of failure. An organic
compound or paint should
be used as a barrier on the contacting surfaces
and on the attaching fasteners.
• When you remove a trailer hitch, be sure to seal any mounting holes in the body. This will help prevent entry 01 exhaust fumes,
"Starting and Operating ," Section 2 ollhis manual.)
2-3
Page 20 of 105
Downloaded from www.Manualslib.com manuals search engine NonCE: Use only trailer hitches which permit normal operation of the Energy
Absorbing Bumper system, If so equipped. For example, a rigid fore and aft connection between the bumper and any other part of-the vehicle may increase damage in the event of a collision.
TRAILER TOWING TIPS
Getting Started
Before entering traffic with a trailer that has electric brakes, start the vehicle and trailer moving and apply the trailer brakes by hand to be sure the trailer
brakes are working and the trailer electrical system is connected.
Engine Cooling
If your engine overheats, follow the steps under "Engine Cooling System
Overheating" in "In Case of Emergency," Section 3 of this manual.
Long Uphill Grades
When going up long grades, you can reduce the chance 01 engine overheating
by turning off the air conditioner, if so equipped.
Down Steep Or Long Grades
Before going down a steep or long grade, reduce speed and shift the transaxle
into a lower gear to help control your vehicle's speed. Try not to hold the brake pedal down too long or too often. This could cause the brakes to overheat and
reduce brake effectiveness.
Transaxle
See the method for checking the transaxle fluid level in "Service and
Maintenance,"
Section 5 of this manual.
Parkin!!
You should not park vehicles with trailers on a grade (hill). However, if you
must park on a grade, these steps must be followed:
1. Apply the regular brakes.
2. Have someone place wheel chocks under the trailer wheels.
3. When the wheel chocks are in place, release the regular brakes until the
chocks absorb the load.
4. Apply the parking brake.
5. Shift the transaxle to "P"(Park),
If the vehicle is parked on a grade, don't shift the transaxle to "P"(Park) until the trailer wheels are chocked and the parking brake is set. If you do, the
weight of the
vehicle and trailer may put so much force on the parking pawl in
the transaxle that it may be hard to shift out of "P"(Park).
When starting, after being parked
on a grade:
1. Apply the regular brakes and hold.
2. Start the engine in "P"(Park).
3. Shift into gear and release the parking brake.
4. Release the regular brakes and drive until the chocks are free.
5. Apply the regular brakes and have someone remove the chocks.
2·4
Page 26 of 105
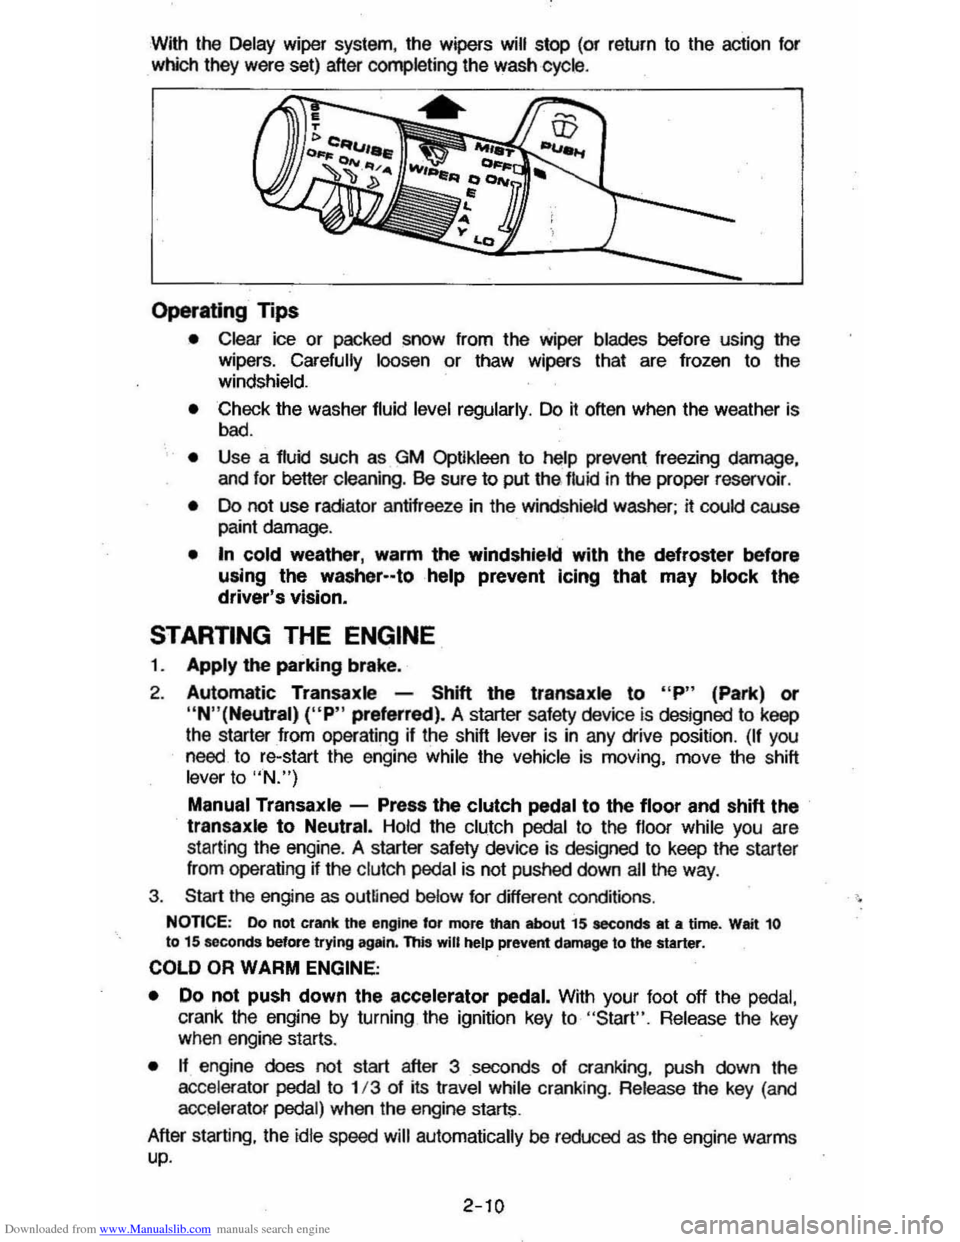
Downloaded from www.Manualslib.com manuals search engine With the Delay wiper system, the wipers will stop (or return to the action for
which they were set) after completing the wash cycle .
Operating Tips
• Clear ice or packed snow from the wiper blades before using the
wipers. Carefully loosen or thaw wipers that are frozen to the
windshield.
• Check the washer fluid level regularly. Do it often when the weather is
bad.
• Use a fluid such as GM Optikleen to help prevent freezing damage,
and lor better cleaning. Be sure to put thE> lIuid in the proper reservoir .
• Do not use radiator antifreeze in the windshield washer; it could cause paint damage.
• In cold weather, warm the windshield with the defroster before
using the washer--tohelp prevent Icing that may block the driver's vision.
STARTING THE ENGINE
1. Apply the parking brake.
2. Automatic Transaxle -Shift the transaxls to "P" (Park) or
"N"(Neutral) ("P" preferred). A starter safety device is designed to keep
the starter
from operating if the shift lever is in any drive position. (If you need. to re-start the engine while the vehicle is moving. move the shift lever to "N.")
Manual Transaxle -Press the clutch pedal to the floor and shift the transaxle to Neutral. Hold the clutch pedal to the lIoor while you are
starting the engine. A starter safety device is designed to keep the starler
Irom operating ~ the clutch pedal is not pushed down ail the way .
3. Start the engine as outlined below for different conditions .
NonCE: Do not crank the engine for more than about 15 seconds at a time. Wait 10 to 15 seconds before trying agltin. this will help prevent damage to the starter.
COLD OR WARM ENGINE;
•
Do not push down the accelerator pedal. With your foot off the pedal,
crank the engine by turning the ignition key to "Start". Release the key when engine starts.
• n engine does not start after 3 seconds 01 cranking. push down the
accelerator pedai to 1/3 of its travel while cranking . Release the key (and
accelerator pedal) when the engine starts.
After starting. the
idle speed will automatically be reduced as the engine warms up.
2-10
Page 59 of 105
Downloaded from www.Manualslib.com manuals search engine •
~-
SECTION 3
IN CASE OF EMERGENCY
. FOUR·WAY HAZARD WARNING FLASHER
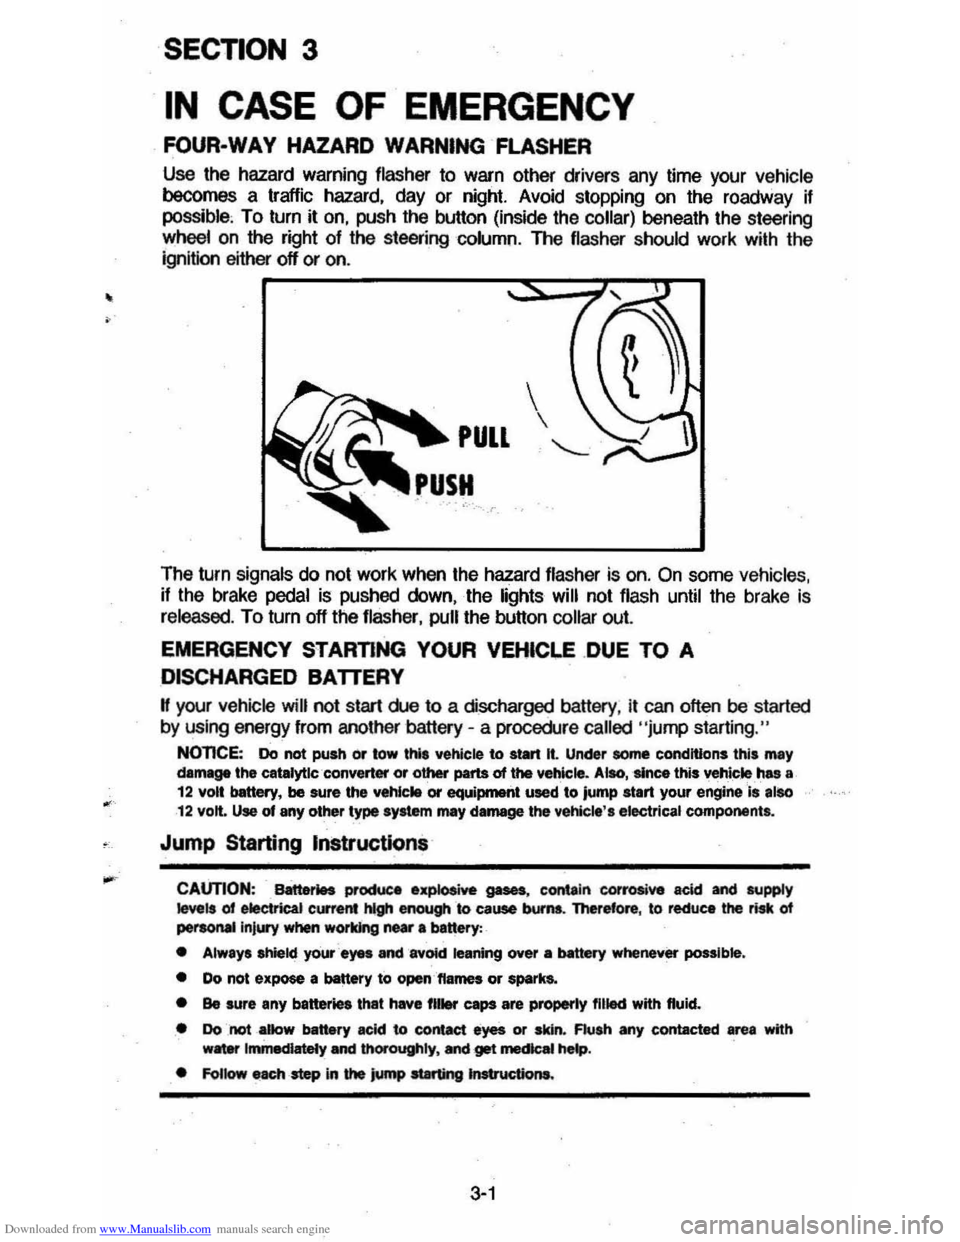
Use the hazard warning flasher to warn other drivers any time your vehicle becomes a traffic hazard. day or night. Avoid stopping on the roadway if possible, To turn it on. push the button (inside the collar) beneath the steering
wheelan the right of the steering column. The flasher should work with the
ignition either off or on .
The turn
signals do not work when the hazard flasher is on. On some vehicles. if the brake pedal is pushed down. the lights will not flash until the brake is
released. To turn off the flasher. pull the button collar out.
EMERGENCY STARTING YOUR VEHICI.E .DUE TO A
DISCHARGED BATTERY
H your vehicle will not start rue to a discharged battery. it can often be started
by using energy from another battery -a procedure called "jump starting."
NOnCE: Do not push or tow thl' vehicle to start It. Under some conditions this may damage the catalytlc ·converter or other parts of the vehicle. Alao, 'since this vehicle ,has a 12 volt bettery, be sure the vehlc .. or equiprnetlt used to jump start your engine Is also 12 volt. Use of any other type syltem mey damage the vehicle', electrical components.
Jump Starting Instructions
CAUTION: Battet1H productl .~ gases, contain corrosive acid and supply ~ls of electrical current hlgh enough &0 cause bums. Therefore, to reduce the risk of peraoMIlnjury when working near 8 banery:
• Always shield your ayes and avOid leaning over a MtttIry whenever possible.
• Do not expose a battery to open,'ftames or spark&.
• Be sure any batter. that have fll .... caps are properly filled with fluid.
• Do not _aDow battery acid to contact eyes or skin. Flush any contacted area with w8ter Immediately and thOrOughly. Mel get mecIcaI hMp.
• FoUow each -step in the jump at8rting Jnstructiona.
3-1
Page 73 of 105
Downloaded from www.Manualslib.com manuals search engine '"
.,.
PART NUMBER
1051516
1050017
1052277
1050172
1050173
1050174 "1050214 "1050244 1052627
1050427
1050429
1052349 1050729
1052870
1051055 "1051398 1051515 1050201 1051855 1052367 1052753
1052271 1052535
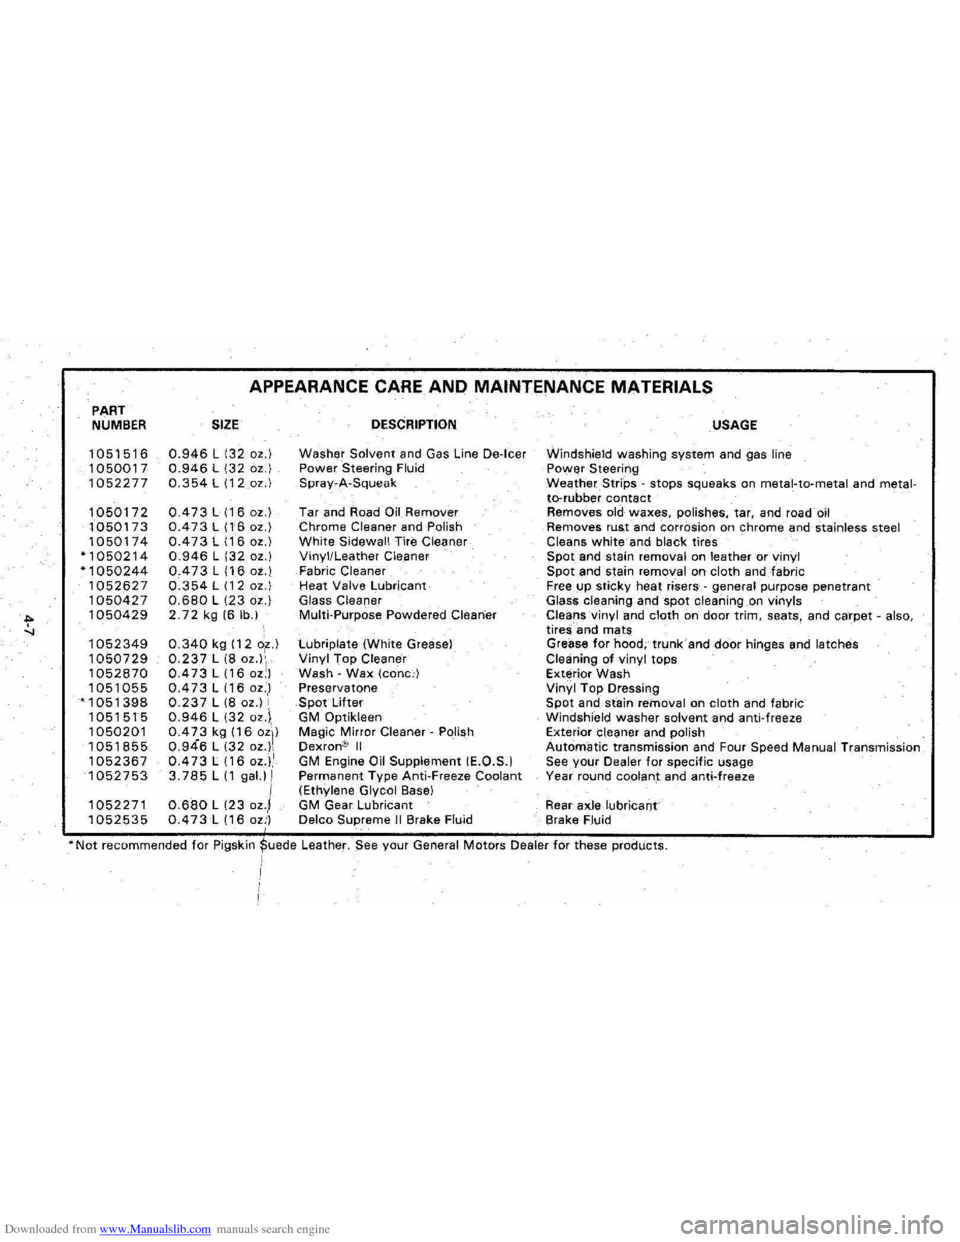
APPEARANCE CARE AND MAINTENANCE MATERIALS
SIZE
0.946 L 132 oz.) 0.946 L 132 oz.) 0.354 L (12oz.)
0.473 L 116 oz.) 0.473 L (16 oz.) 0.473 L 116 oz.) 0.946 L 132 oz.) 0.473 L 116 ot.) 0.354 L 112 oz.) 0.680 L 123 oz.) 2.72 kg 16 lb.)
0.340 kg 112 o~.) 0.237 L 18 oZ')'1 0.473 L 116 oz,) 0.473 L 116 oz.,1 0.237 L 18 oz.) , 0.946 L 132 oz.i, 0.4Z3 kg 116 oZI) 0.946 L 132 oz.), 0.473 L (16 OZ.),.I 3.785 L 11 gal.) 1
0.680 L (23 oz.l 0.473 L 116 ozi)
DESCRIPTION
Washer Solvent and Gas Line De-Icer Power Steering Fluid Spray~A-Squeak
Tar and Road on Remover Chrome Cleaner and Polish White Sidewall Tire Cleaner Vinyl/Leather Cleaner Fabric Cleaner Heat Valve Lubricant Glass Cleaner Multi-Purpose Powdered Cleaner
tubriplate (White Grease) Vinyl Top Cleaner Wash -Wax (cone.') Preservatone Spot Lifter GM Optikleen Magic Mirror Cleaner-Polish Dexron® II GM Engine Oil Supplement IE.O.S.1 Permanent Type Anti.Freeze Coolant (Ethylene Glycol Base) GM Gear Lubricant Delco Supreme II Brake Fluid
USAGE
Windshield washing system and gas line Power Steering WeatherStrips -stops squeaks on metal-to-metaland metalto-rubber contact Removes old waxes, polishes, tar, and road oil Removes rust and corrosion on chrome and stainless steel Cleans white and black tires Spot and stain removal on leather or vinyl Spot and stain removal on cloth andfabric Free up sticky heat risers -general purpose penetrant
Glass cleaning and spot cleaning on vinyls Cleans vinyl and cloth on door trim, seats, and carpet -also, tireS; and mats
Grease for hood; trunk and door hinges and latches
Cleaning of vinyl tops
Exterior Wash
Vinyl Top Dressing
Spot and stain removal on cloth and fabric
Windshield washer solvent and anti-freeze Exterior Cleaner and polish Automatic transmission and Four Speed Manual Transmission See your Dealer for specific usage
Year round coolant and anti-freeze
Rear
axle lubricant
Brake Fluid
*Not recommended for Pigskj~ede Leather. $ee your General Motors Dealer for these products. I
Page 79 of 105
Downloaded from www.Manualslib.com manuals search engine AUTOMATIC TRANSAXLE FLUID RECOMMENDATIONS
Use the Proper Fluid
Use only automatic transmission fluid labeled DEXRON'" II. You can buy this
fluid from your dealer or other service outlets.
Check the Fluid Level with Care
Check the automatic transaxle fluid level at each engine oil change. Driving
with too much or too
little fluid can damage the transaxle.
To check the fluid
level, first set the parking brake, then start the engine in
"P"(Park), and let idle for two minutes . You must check the fluid level with the
engine running at slow
idle and the vehicle level.
You cannot read the correct fluid level if you have just driven the vehicle for a
long time at high speed, in city traffic in hot weather, or if the vehicle has been
pulling a trailer. Wait
until the fluid has cooled down (about 30 minutes).
Remove the dipstick located
On the driver's side forward of the cowl. Carefully
touch the wet end of the dipstick to find out if the fluid is cool, warm or hot. Wipe it clean and push it back in until the cap seats. Pull out the dipstick and
read the fluid level.
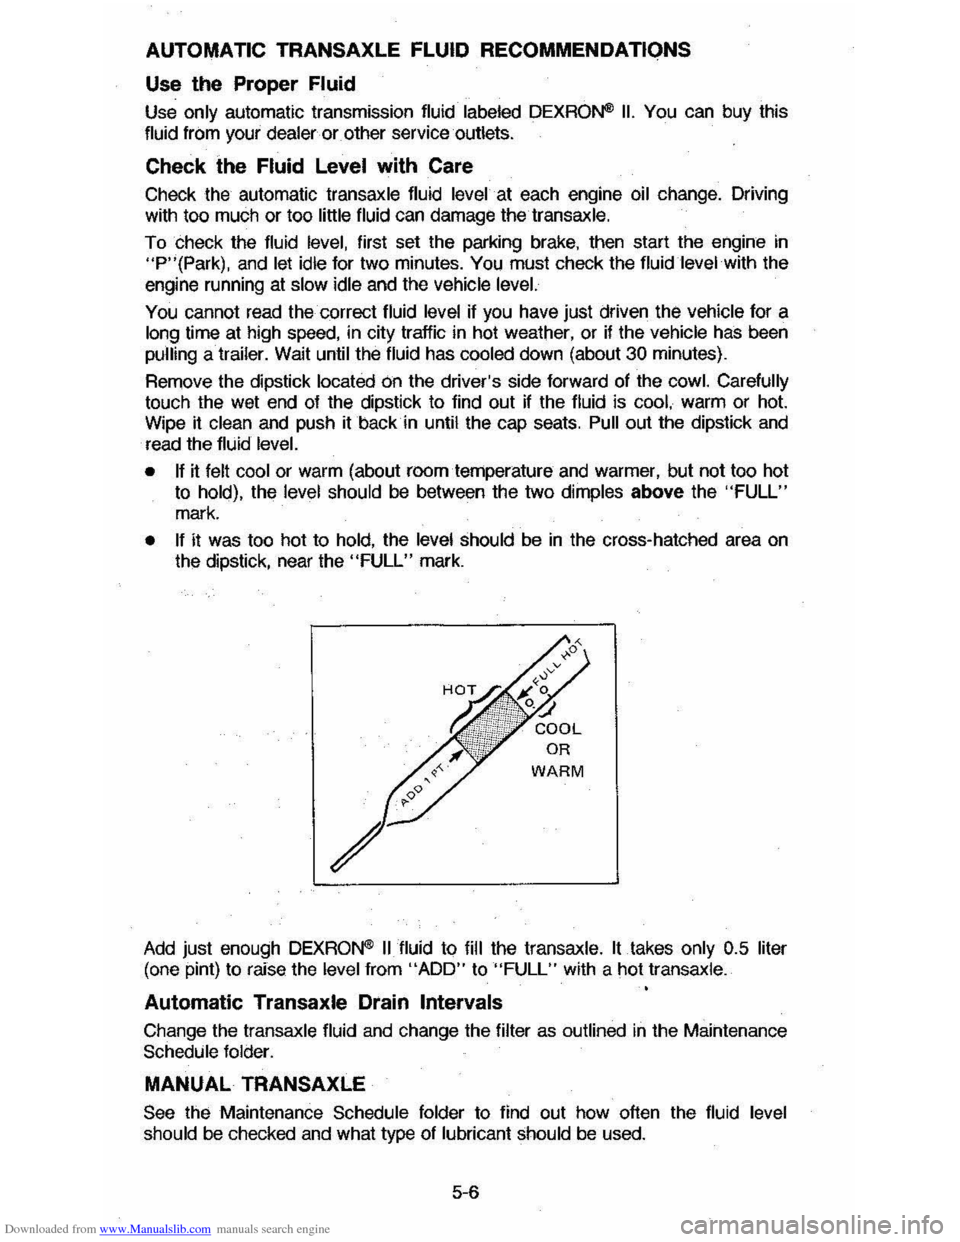
• If it felt cool or warm (about roomternperature and warmer, but not too hot
to hold), the level should be between the two dimples above the "FULL"
mark.
• If it was too hot to hold, the level should be in the cross-hatched area on the dipstick, near the "FULL" mark.
Add just enough DEXRON'" II fluid to fill the transaxle. It takes only 0.5 liter
(one pint) to raise the level from "ADD" to "FULL" with a hot transaxle.
Automatic Transaxle Drain Intervals
Change the transaxle fluid and change the filter as outlined in the Maintenance Schedule folder.
MANUAL TRANSAXLE
See the Maintenance Schedule folder to find out how often the fluid level should be checked and what type of lubricant should be used.
5-6
Page 83 of 105
Downloaded from www.Manualslib.com manuals search engine Radiator Pressure Cap
The radiator cap, a 105 kPa (15 psi) pressure type, must be installed tightly, otherwise coolant may be lost and damage to engine may resuK from
overheating . Radiator pressure cap
should be checked periodically for proper
operation .
If replacement is required, an AC cap is recommencled.
ACCELERATOR LINKAGE
Lubricate all pivot points with .engine oil at the interval shown in the
Maintenance
Schedule. Do not lubricate the accelerator cable.
AIR CLEANER ELEMENT
When replacement of air cleaner fmer element is necessary, an AC air Imer
elemenl
is recornmencled .
See your Maintenance Schedule for change intervals . Operation of vehicle in
dusty areas will necessitate more frequent replacement. Your dealer can be of
assistance
in determining the proper replacement frequency for the conditions
under which you operate your
vehicle.
CAUTION: The air cleaner a* functions ... name arrestor in the event of engine backfire . The -air cleaner ehould be lnstaIIed at an times unit .. III removal is neceaary for repair or maintenance. To help reduce the-risk of pereonal Injury and lor property damage , be sure that no one 18 ne.-the engine comJ*1ment before starting the engine wiU'l the air cleaner removed. If engine backfire occurs with the air cleaner remowd, thwe could be-a burst of flame and posaibly other fnln the engine compartment.
HOOD LATCHES AND HOOD HINGE
SeetHe Maintenance Schedule folder to find out how to lubricate hood.latch ·
and hood hinge assembly .
BRAKE MASTER CYLINDER
Check masler cylinder fluid· level in the reservoir at the interval shown in the Maintenance Schedule . If the fluid is low in the reservoir, it should be filled to
the maximum
level line with Delco Supreme No. 11 or OOT-3 fluids.
POWER STEERING SYSTEM
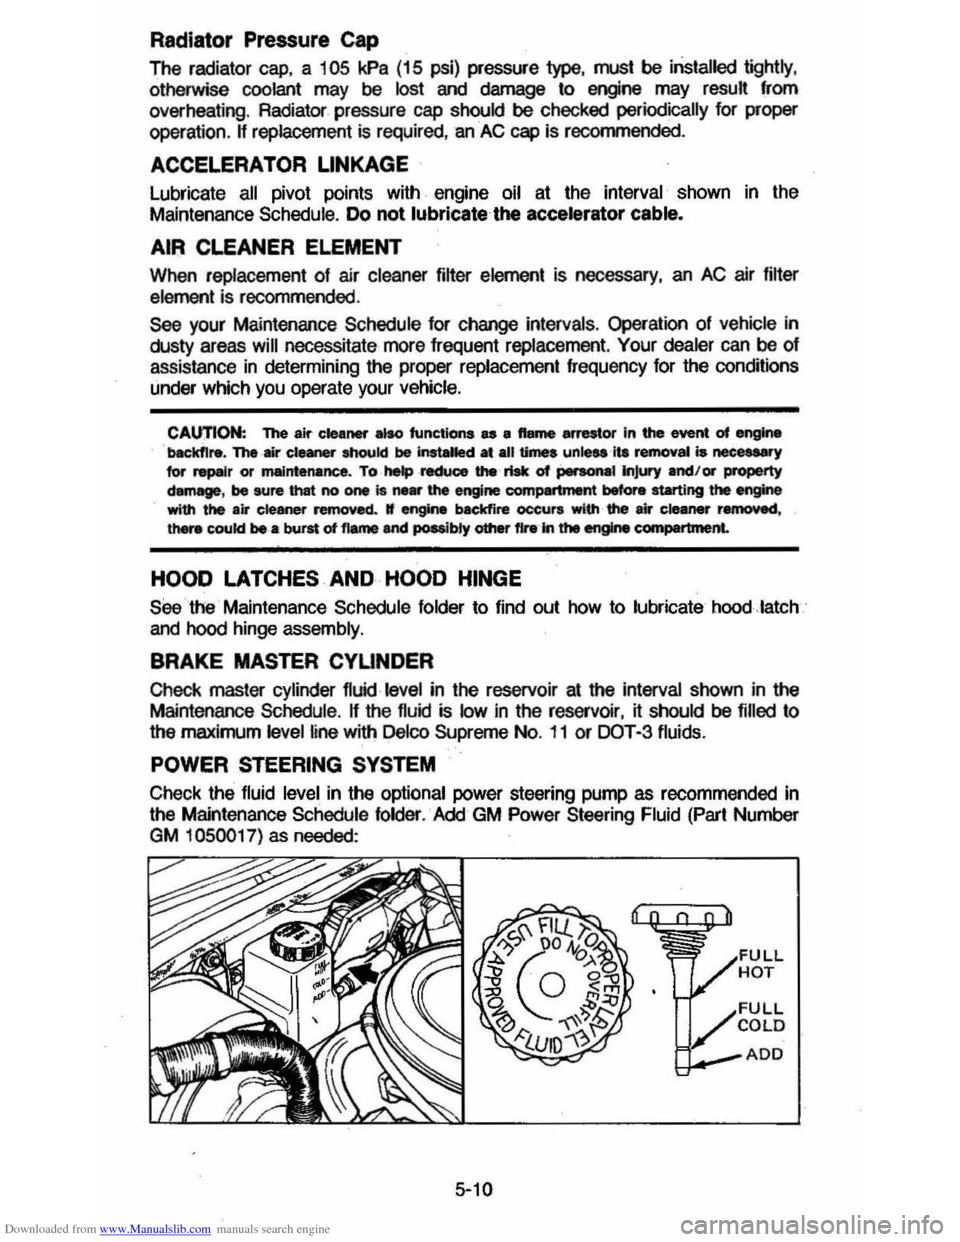
Check the fluid level in the optional power steering pump as recommended in
the Maintenance Schedule folder. Add GM Power Steering Fluid (Part Number
GM 1050017) as needed:
5-10