1984 CHEVROLET CAVALIER window
[x] Cancel search: windowPage 6 of 105
Downloaded from www.Manualslib.com manuals search engine SECTION 1
BEFORE DRIVING YOUR CAVALIER
TRANSAXLE
While reading this manual, you will nole many references 10 Ihe "transaxle." The transaxle is a transmission and differential (axle) combined in a singl ,e unit.
To avoid confusion, the word
"transaxle" will be used throughout this manual 10 refer to bolh Ihe transmission and differenlial funclions.
DRIVER DAILY CHECKUST
Be sure you know how to use your vehicle and its equipment before operating it
Before Entering the Vehicle
1. See that windows, mirrors and lights are clean and unobstructed.
2. If any lire does not look normal, check it with a pressure gage.
3. Look for fluid leaks .
4. Be sure everything is properly stowed.
5. Check the area behind the vehicle if you are about to back up.
__ Before Driving Off
1. Lock all doors.
2. Adjust the seat and any movable head restraint
3. Adjust inside and outside mirrors.
4. DO NOT allow anyone to ride where there is no seat belt ; and ALWAYS properly fasten the seat belt.
5. Check that all the warning lights work as the key is turned to "Run" or "Start"
6. Check all gages (including the fuel gage).
7 . Release the parking brake (and make sure the
"BRAKE " light turns .off).
See related topics in this manual
or the Maintenance Schedule folder H problems are found.
STOWING THINGS IN (OR ON) THE VEHICLE
CAUTION: Put luggage or cargo In the trunk, or rea' area if postible. Cargo weight,
whether In the trunk or rear area, should be located as far forward as possible. Cargo weight on the roof Shoukt be positioned .s evenly as possible. Secure all i1ems in place to help keep them -from being thrown about and injuring people during a cot"-ion or sudden maneuver. Do not pile luggage or cargo higher than the seetbaCks. Do not place anything on the filler panel, or any cargo cover between the rear seat~.ck and window.
GUARD AGAINST THEFT
Your new Cava~er has many features to help prevent then of the vehicle, its
equipment, and contents. But these anti-then features
depend upon you to work.
t -1
Page 7 of 105
Downloaded from www.Manualslib.com manuals search engine The time to be most on guard is when leaving the vehicle:
1. Park in a lighted spot when you can, and fully close all windows and
any roof panels.
2 .
Lock the steering column and take the keys:
• Turn the key to "Lock" while depressing the key release lever (if so
equipped) and remove the
key. This locks the ignition and both
steering and shift controls , unless your manual transaxJe vehicle has a key release lever . In thai case . Ihe shiH control is not locked. The key can be removed only when the ignition is locked.
• II you must leave a key wilh the vehicle. leave the square-head key
only. Take the oval-head key with you. This will help prevent unwanted
entry into your vehicle or any locked compartment at a later date. Be
sure to
lock the glove box since the remote release button allows the
hatchback.
tailgate , or trunk to be opened even though the ignition key
has been removed .
3. Keep items that may appear to be of value out of sight and locked up
when possible.
4 .
Lock all doors.
KEYS
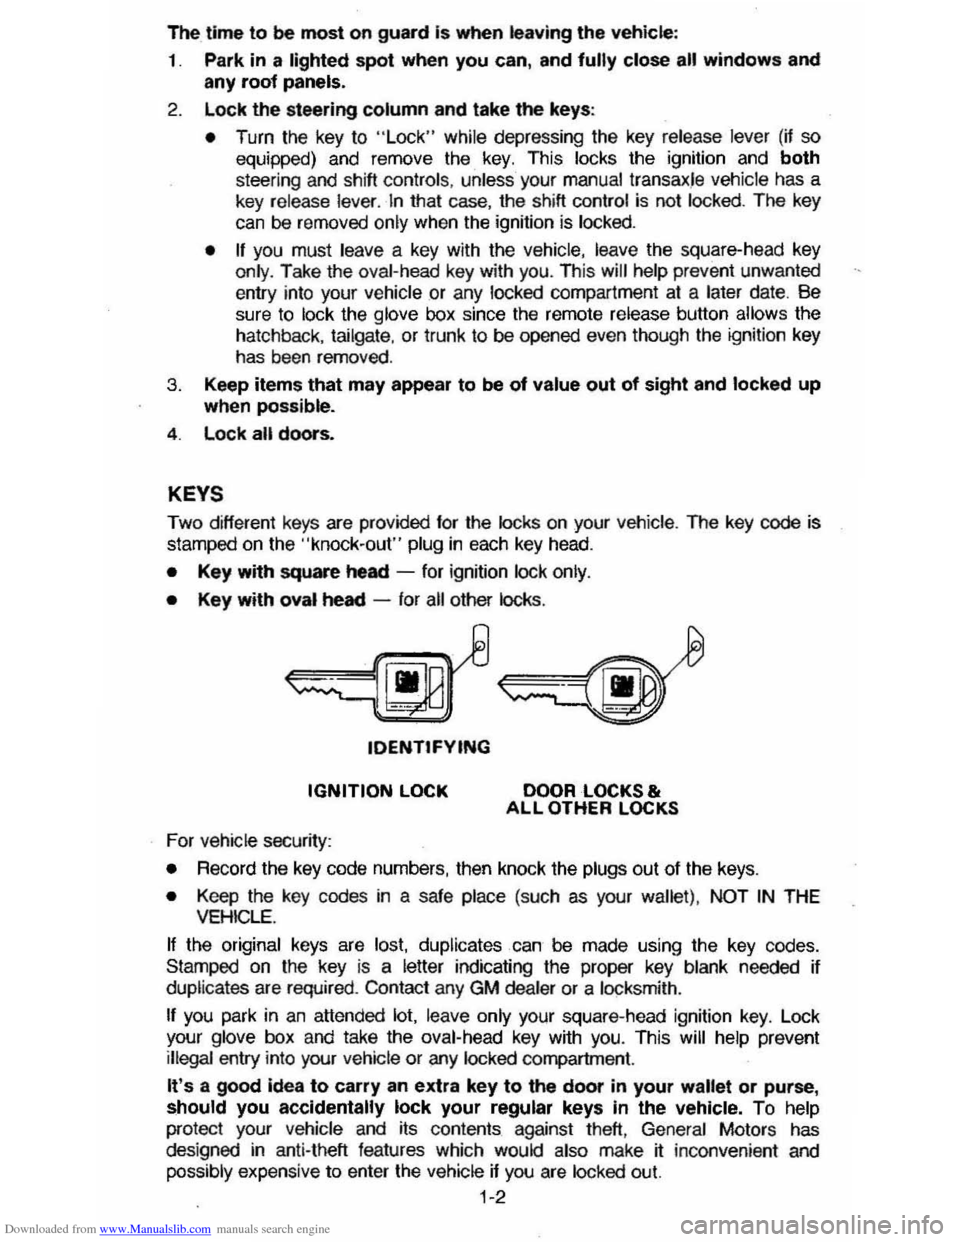
Two different keys are provided for the locks on your vehicte. The key code is
stamped on the "knock-out" plug in each key head.
• Key with square heed -for ignition lock only.
• Key with oval heed -for all other locks .
tDENTtFYING
IGNITION LOCK
For vehicle security:
DOOR LOCKS & ALL OTHER LOCKS
•
Record the key code numbers, then knock the plugs out of the keys.
• Keep the key codes in a safe place (such as your wallet) . NOT IN THE VEHICLE.
If the original keys are lost. duplicates can be made using the key codes.
Stamped on the key
is a letter indicating the proper key blank needed if
duplicates are required . Contact any GM dealer or a locksmith .
If you park in an attended lot. leave only your square-head ignition key. Lock
your glove box and take the oval-head key with you. This will help prevent illegal entry into your vehicle or any locked compartment.
It's a good idea to carry an extra key to the door in your wallet or purse, should you accidentally lock your regular keys In the vehicle. To help
protect your Vehicle and its contents against theft, General Motors has
des igned in anti-theft features which would also make jf: inconvenient and
possibly expensive to enter the vehicle if you are locked out.
1-2
Page 8 of 105
Downloaded from www.Manualslib.com manuals search engine DOOR LOCKS
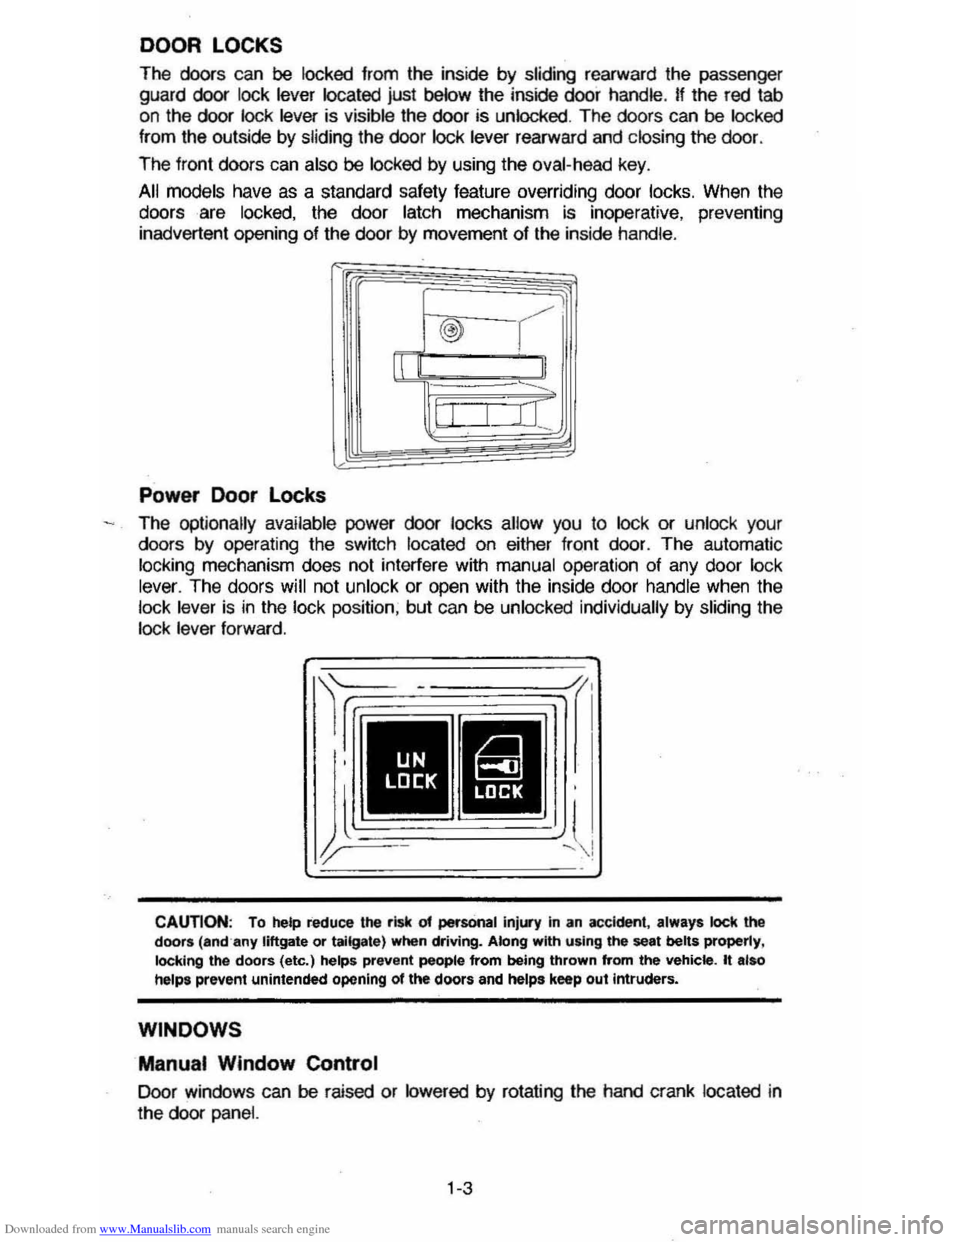
The doors can be locked from the inside by sliding rearward the passenger
guard
door lock lever located just below the inside door handle . If the red tab on the door lock lever is visible the door is unlocked . The doors can be locked
from the outside by sliding the door lock lever rearward and closing the door.
The front doors can
also be locked by using the oval-head key.
All inodels have as a standard safety feature overriding door locks. When the doors ·are locked, the door latch mechanism is inoperative, preventing
inadvertent opening 01 the door by movement of the inside handle.
@ r------
II II
lJI
[ Sf J ,tr=I ___ ,
Power Door Locks
The optionally available power door locks allow you to lock or unlock your
dears by operating the switch located on either front door. The automatic
locking mechanism does not interfere with manual operation of any door lock
lever. The doors will not unlock or open with the inside door handle when the lock lever is in the lock position, but can be unlocked individually by sliding the
lock lever forward.
r
CAUTION: To help reduce the risk of persOnal inj .... y in an accident. always lock the doors (and"any liftgate or tailgate) when driving. Along with using the seat belts properly.
locking the doors (etc.) helps prevent people from being thrown from the vehicle. It also helps prevent unintended opening of the doors and helps keep out intruders.
WINDOWS
Manual Window Control
Door windews can be raised or lowered by rotating the hand crank located in
the dear
panel.
1-3
Page 9 of 105
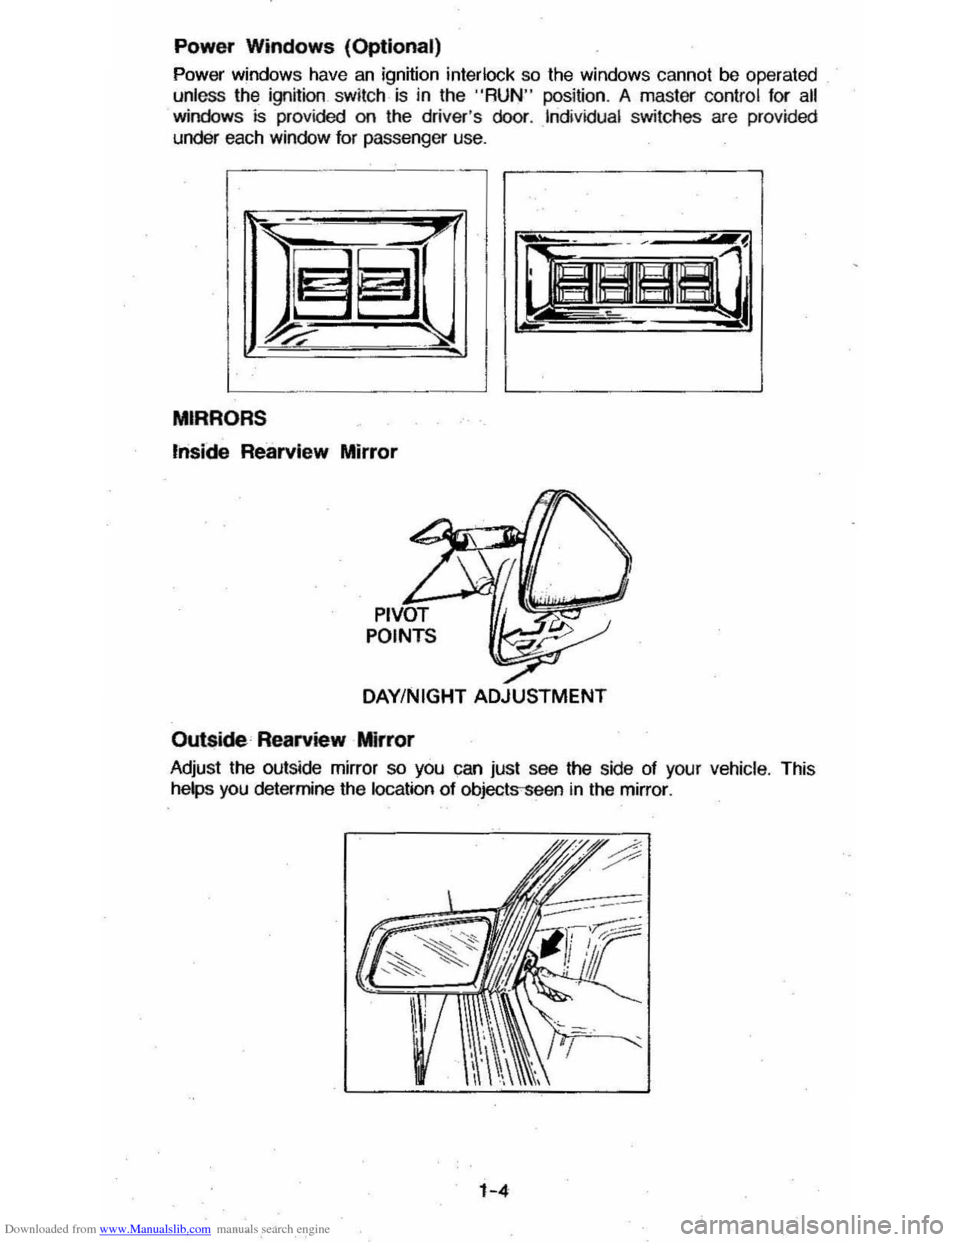
Downloaded from www.Manualslib.com manuals search engine Power Windows (Optional)
Power windows have an ignition interlock so the windows cannot be operated
unless the ignition .
switch· is in the "RUN " position . A master control for all windows is provided on the driver 's door . Individual switches are provided
under each window for passenger use.
MIRRORS
",side Rearvlew Mirror
DAY/NIGHT ADJUSTMENT
Outside Rearview Mirror
Adjust the outside mirror so you can just see the side of your vehicle . This
helps you determine the location of objects-seen
in the mirror .
1-4
Page 14 of 105
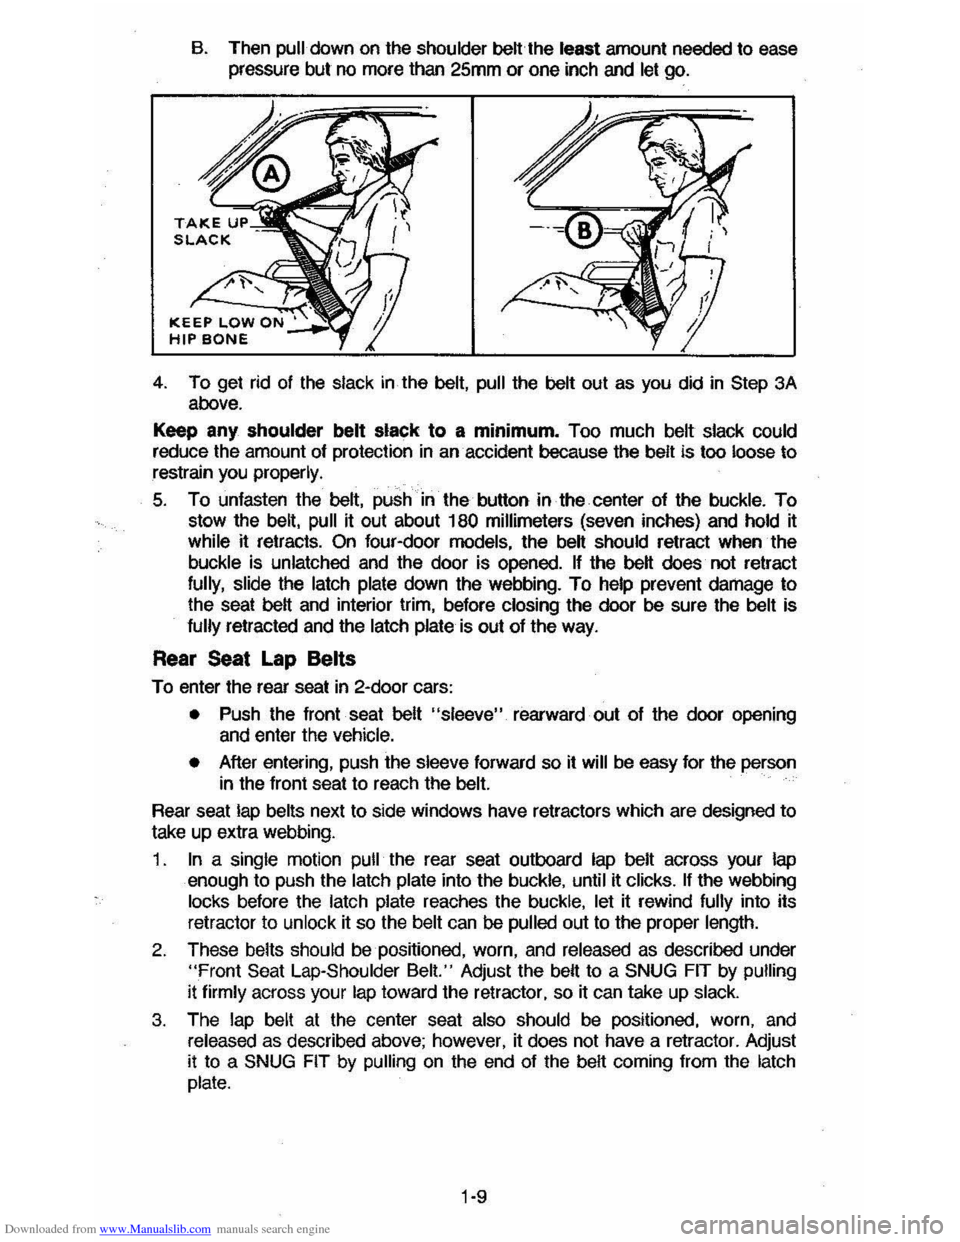
Downloaded from www.Manualslib.com manuals search engine B. Then pull down on the shoulder beUthe teast amount needed to ease
pressure but no more than 25mm or one inch and let go.
4. To get rid of the slack in the belt, pull the belt out as you did in Step 3A above.
Keep any
shoulder belt stack to a minimum. Too much belt slack could reduce the amount of protection in an· accident because the belt is too loose to restrain you properly.
5. To unfasten the belt, push in the button in the center of the buckle. To
stow the
belt, pull it out about 180 millimeters (seven inches) and hold it
while it retracts. On four-door models, the beH should retract when the
buckle is unlatched and the door is opened. If the beH does not retract
fully,
slide the latch plate down the webbing. To help prevent damage to
the seat beH and interior trim, before closing the door be sure the belt is
fully retracted
and the latch plate is out of the way.
Rear Seat Lap Belts
To enter the rear seat in 2-door cars:
• Push the front seat belt "sleeve" rearward out of the door opening and enter the vehicle.
•
After entering, push the sleeve forward so it will be easy for the person in the front seat to reach the belt.
Rear seat lap belts next to side windows have retractors which are designed to
take up extra webbing.
1 .
In a single motion pull the rear seat outboard lap belt across your lap enough to push the latch plate into the buckle, until it clicks. If the webbing
locks before the latch plate reaches the buckle, let it rewind fully into its
retractor to
unlock it so the belt can be pulled out to the proper length.
2. These belts should be positioned, worn, and released as described under
"Front Seat Lap-Shoulder Belt." Adjust the beH to a SNUG FIT by pulling
it firmly across your lap toward the retractor, so it can take up slack.
3. The lap belt at the center seat also should be positioned, worn, and
released as described above; however, it does not have a retractor. Adjust it to a SNUG FIT by pulling on the end of the beH coming from the latch
plate.
1·9
Page 17 of 105
Downloaded from www.Manualslib.com manuals search engine SECTION 2
STARTING AND OPERATING
ENGINE EXHAUST GAS CAUTION
(CARBON MONOXIDE)
CAUTION:-Do not breathe exhaust gas because it contains carbon monoxide, which by itself has no color crador. Carbon monoxide is a
dangerous gas. It can cause unconsciousness and can be lethal.
If at any time you think exhaust fumes are entering the vehicle, have the cause
determined and corrected as soon as possible. If you must drive under these conditions, drive only with ALL windows lully OPEN.
Protect against carbon monoxide entry into the vehicle body. The best way is
to keep the engine exhaust system,
vehicle body and body ventilation system
properly maintained. We recommend that the exhaust system and body be
inspected by a competent technician:
• each time the vehicle is raised for an oil change;
• whenever a change is noticed in the sound, of the exhaust system;
• whenever the exhaust system, underbody or rear of the vehicle is damaged
or becomes corroded.
See your Maintenance Schedule folder for parts requiring inspection.
To allow proper operation of your vehicle's ventilation system, keep the air inlet
grille in front of the windshield clear of snow, leaves or other obstructions at all
times.
DO NOT PARK WITH THE ENGINE RUNNING OR IDLE THIS VEHICLE FOR
MORE
THAN 10 MINUTES WITH THE VENTILATION SYSTEM CONTROL
SWITCH
IN THE "OFF" POSITION. EVEN WITH THE VENTILATION SYSTEM ON, RUNNING THE ENGINE WHILE PARKED OR STOPPED FOR LONGER
PERIODS OF TIME IS NOT
RECOMMENDED. ENTRY OF CARBON
MONOXIDE INTO THE CAR BODY IS POSSiBlE WITH A POORLY REPAIRED, DAMAGED, OR CORRODED EXHAUST SYSTEM OR BODY.
Do not run the engine in CONFINED areas (such as garages or next to a
building) any more than needed to move the vehicle. When the
vehicle has to
be stopped
in an UNCONFINED area with the engine running for any more
than a few minutes, take the following steps:
A. Adjust the heating or cooling system to force outside air into the vehicle as
follows:
1. On vehicles not equipped with air conditioning, set the fan to
intermediate or high speed and the upper control lever to any position.
2. On vehicles equipped with air conditioning, set the fan to an
intermediate or high speed and the upper control lever to any position
except
"OFF" or "MAX."
B. Keep the exhaust tailpipe area clear of snow and other material to help
reduce the buildup of exhaust gases under the vehicle. This is particularly
important when parked in blizzard conditions.
2-1
Page 18 of 105
Downloaded from www.Manualslib.com manuals search engine Driving with the trunk lid, hatchback or liftgate on station wagon models open is not recommended. Under some conditions, exhaust gases may be drawn
into the vehicle. If the trunk lid, hatchback or liftback must remain open for
some reason while moving, or if electrical wiring or other cable connections to a trailer must pass through the seal between the trunk lid, hatchback or liftback
and the body, follow these precautions:
• Close all windows.
• Adjust the heating or cooling system to force outside air into the vehicle as
described abcve, but set the fan to high speed.
• On vehicles with outside air vents in or under the instrument panel, open the vents fully.
NEW VEHICLE "BREAK-IN" PERIOD
You can drive your new vehicle from its very first mile/kilometer without
following a formal "break-in" schedule. However, there are things you can do during the first few hundred miles/kilometers of driving that will add to the
future performance and economy of your vehicle.
We recommend you limit your speed during the first 500 miles (800 kilometers)
to a maximum of 55 mph (90 km/h); but do not drive for long periods at any
one constant speed, either fast or slow. During this time, avoid full throttle
starts and, if possible, avoid hard stops especially during the first 200 miles (320 kilometers) of driving.
Always drive at moderate speed until the engine has completely warmed up.
I! you plan to use your new vehicle for trailer towing, see the following.
TRAILER TOWING
This car is designed and intended to be used mainly to carry people. Towing a
trailer
will affect handling, durability and economy. Your safety and satisfaction
depend upon proper use of correct equipment. Also, you should avoid
overloads and other abusive use.
The maximum loaded trailer weight you can pull with your vehicle depends on
your intended use
and what special equipment has been installed on it.
Information on trailer towing ability, special equipment required, and optional
equipment available should be obtained from your dealer. Ask for the trailering brochure. Or, write: Consumer Relations Department, Chevrolet Motor
Division, Warren, Michigan 48090.
(In Canada, write to General Motors of
Canada Limited, Customer Services Department, Oshawa, Ontario L lJ 5Z6.)
Tires
When towing trailers, be sure your tires are properly inflated to the inflation pressure shown on the Tire Placard on the driver's door.
The allowable passenger and cargo load for this vehicle, also shown on the
Tire
Placard, is reduced by the trailer tongue weight whenever the trailer is
attached to the vehicle. See "Service and Maintenance," Section 5 for more tire information.
Maintenance
More frequent service is required when using your vehicle to pull a trailer. See
the Maintenance Schedule folder for Automatic Transaxle Fluid and Engine Oil change requirements for trailering.
2-2
Page 39 of 105
Downloaded from www.Manualslib.com manuals search engine '" ,
t:l
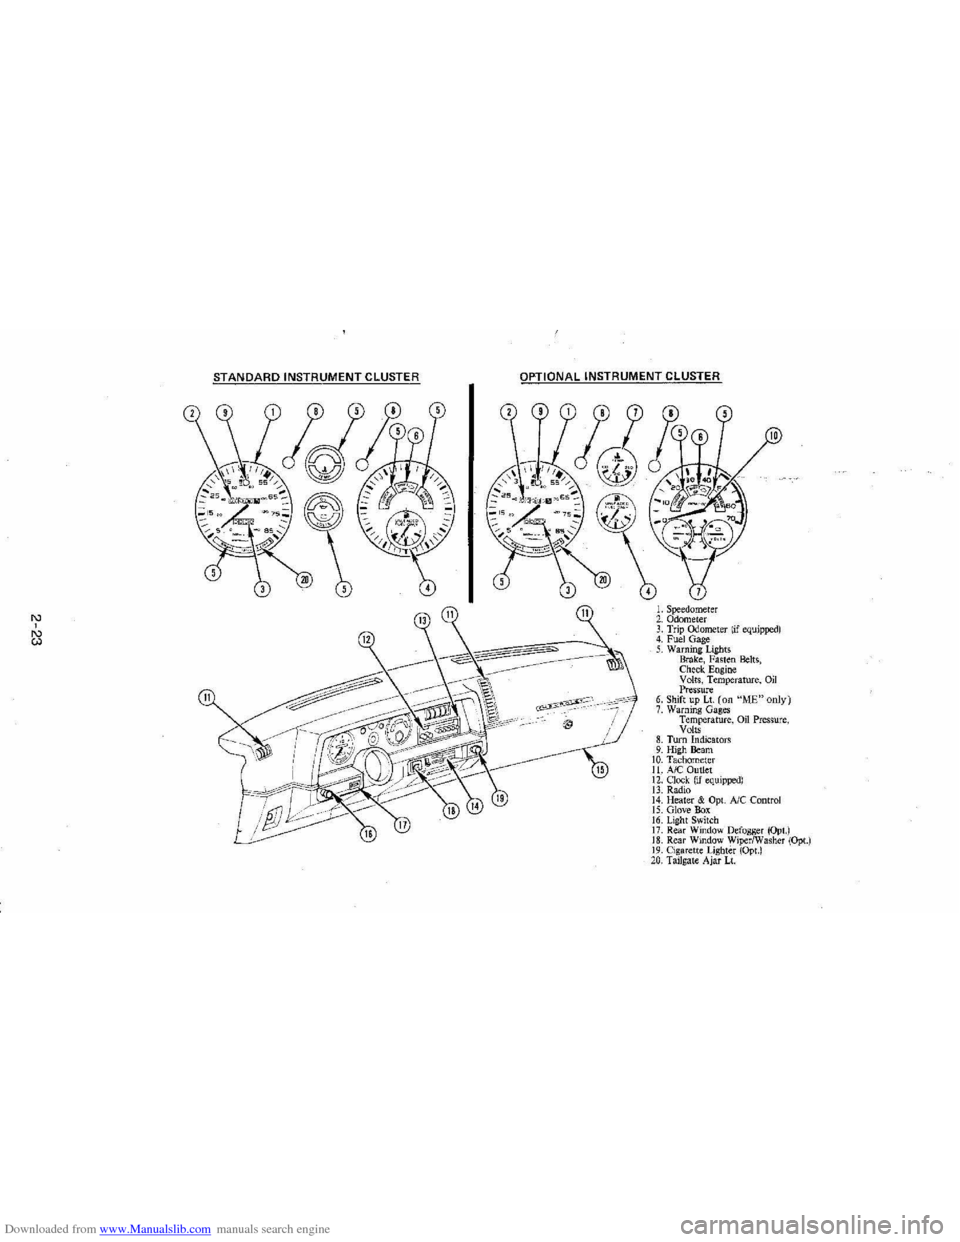
STANDARD INSTRUMENT CLUSTER
IJ
12
OPTIONAL INSTRUMENT CLUSTER
~~~~-:'----,~~:
l'l
1l
10
L Speedometer 2. Odometer 3. Trip ()jometer lif equipped) 4. Fuel Gage 5. Warning Lights Brake, Fasten Belts, Check. Engine Volts, Temperature, Oil Pressure 6. Shift up Lt. (on "ME"only) 7. Warning Gages Temperature, on Pressure, Volts 8. Turn Indicators 9. High Beam 10. Tachomet er 11. A/C Outlet 12. Clock. (if equipped) 13. Radio 14. Heater & Opt. Ale Control 15. Glove Box 16. Lig ht Switch 17. Rear Window Defogger (Opt.) 18. Rear Window WiperlWasher (Opt.) 19. Cigare tt e Lighter (Opt.) 20, Tailgat e Ajar Lt.