1984 CHEVROLET CAVALIER high beam
[x] Cancel search: high beamPage 24 of 105

Downloaded from www.Manualslib.com manuals search engine CAunOM: tf you need to tum oft the ... whikt the vehicte ls moving, turn the key only to "Oft." DO NOT depreSS the key release lever while turning the Ignition off._This
wln ·lock the steering column and result in loss arability to steer the vehlete.
If you have trouble turning the key to unlock the ignition, first be sure the key is
pushed in all the way . Then , try to turn the steering wheel as hard as you can .
in the direclioo the
wheels are tUrned . At the same ti me , turn the ignition kay
w~h as much eftort as you can apply with your hand. Do not try to use a tool of
any kind to
apply more force on the lock knob , as tnis could break the knob.
NOTICE: Do not park, idle, or operate your vehk:le over combustible materials, such
as grass or leaves . They couki touch the hot exhaust ay8tem and ignite.
Parking
CAUTION: Before the driver leaves this vehicle, to reduce the risk of personal injury ... resun of vehicle movement:
1. Firmly apply the parking brake.
2. Shift the automatic transtixle to Park or the manual tranSlale to "Reverse."
3. Tum the kef to "Lock. " On vehietn wrth manual transaxle$, __ ~ the key reiease tever and tum the key to·'Loclic. " .
4. Remove the key (the chime ia designed to remind you).
To reduce the chance of persona' injury and/or vehicle damage due' to engine overheating , never lellVe the engine Idling without an alert driver present. If the engine ahoukl overheat, as indicated by the Erlgine Coolant Temperature light Of gage,
Immediate action 1a required to correct the concIUon. Continued operation 01' the engine . enn FOA -A SHORT TtME may resutt In a fire.
TURN SIGNAL AND MULTI-FUNCTION LEVER
The turn signal lever on the left side of the steering column also controls headlight low-beam and high-beam, the windshield wiper/washer, and the
optional Cruise
Control. (See Cruise Control operatiOn in this section .)
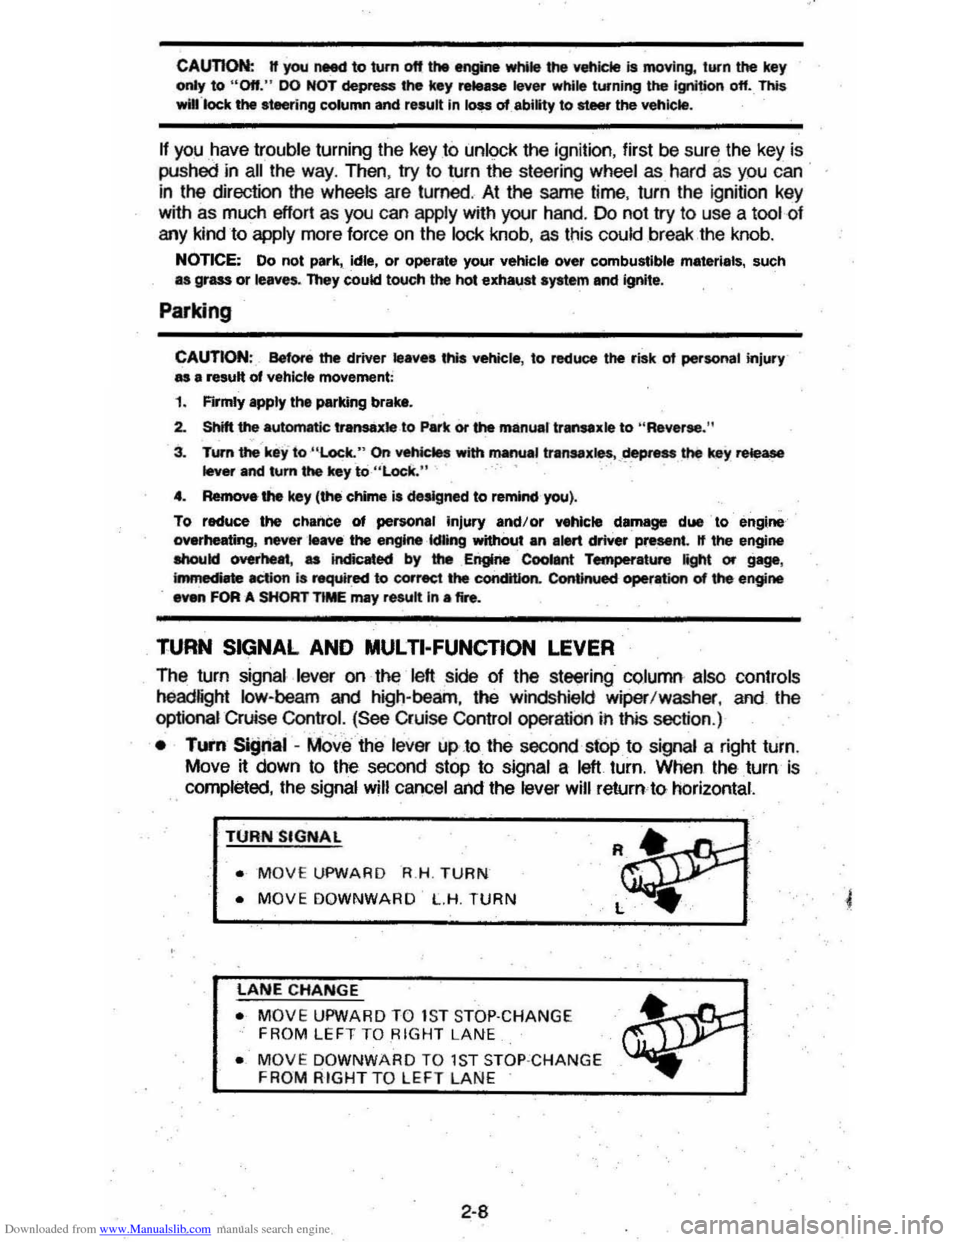
• TUI'fI Si!Jnal -MOve the lever up .to the second stop to signal a right turn.
Move
~ down to the second stop to signal a left turn. When the turn is
completed, the signal will cancel and the lever will return to horizontal.
TURN SIGNAL
• MOVE UPWARD R.H . TURN
• MOVE DOWNWARD L.H. TURN
LANE CHANGE
• MOVE UPWARD TO 1S T STOP·CHANGE
FROM LEFT TO RIGHT LANE
• MOVE DOWNWARD TO 1ST STOP ·CHANGE FROM RIGHT TO LEFT LAN E
2-8
Page 25 of 105

Downloaded from www.Manualslib.com manuals search engine • Lane Change Signal -In some turns, such as changing lanes, the steering wheel tS not turned far enough to cancel the turn signal. For convenience, you can flash the turn signal by moving the lever part way (to the first stop)
and holding it there. The lever will return to horizontal when you release it.
A green light on the instrument panel is designed to flash to tell you that the
front
and rear turn signal lights are working. If the light stays on, but does not flash, check for burned-out turn signal bulbs. If the green light does not come
on when
you move the lever, check the fuse and indicator bulb.
However, if you ordered a trailertowing·optiOil.·in which extra wiring was added to attach the trailer lighting, a different type of flasher was installed. In this
case, the green light will continue to flash even if a turn signal bulb burns out.
Therefore, you must regularly look at the front
and rear turn signal lights to be
sure they are working.
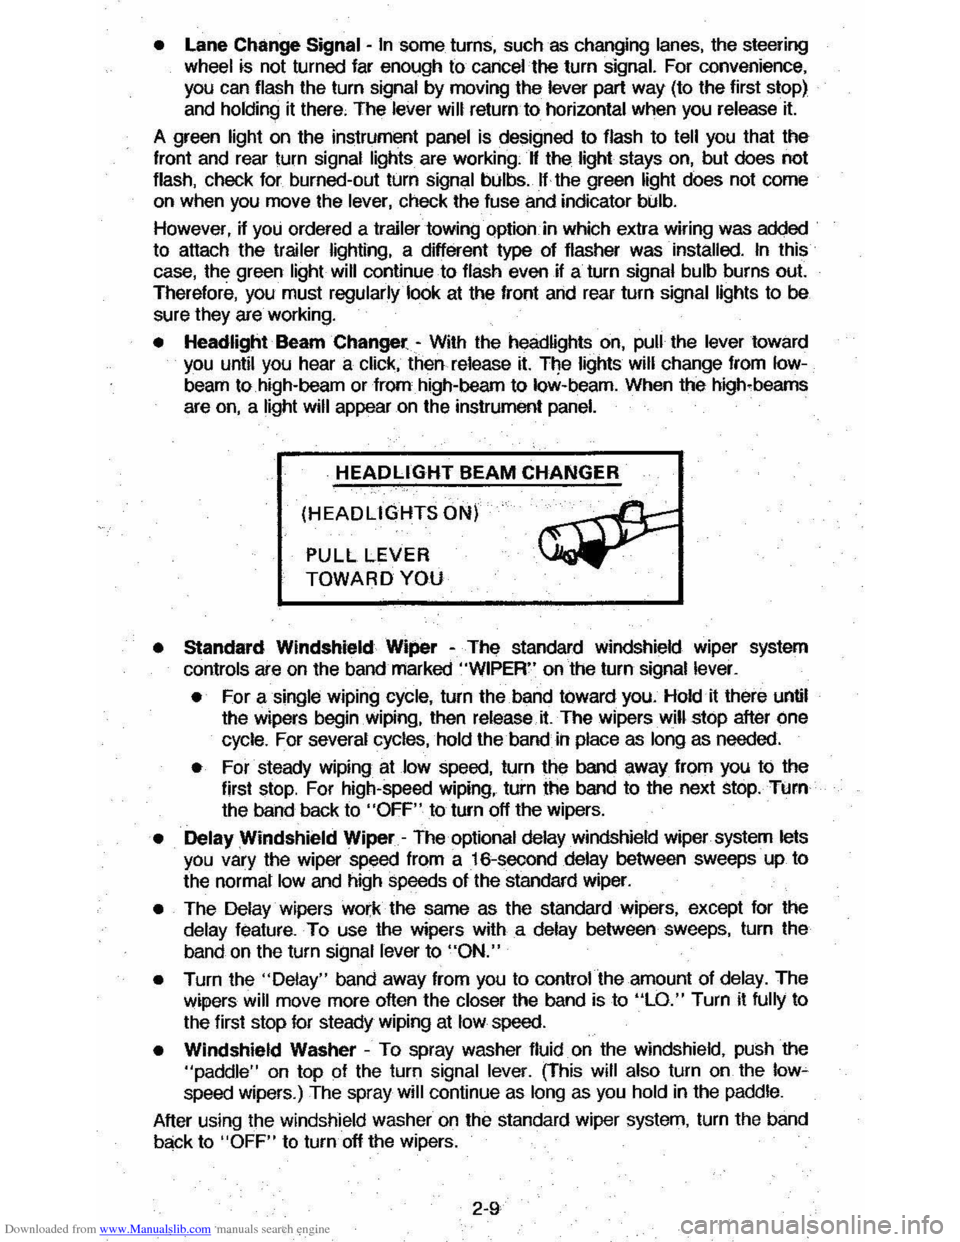
• Headlight Beam Changer -With the headlights on, pull the lever toward you until you hear a click, then release it. The lights will change from Iow
beam to high-beam or from high-beam to low-beam. When the high-beams
are
on, a light will appear on the instrument panel.
HEADLIGHT BEAM CHANGER
(HEADLIGHTS ON)
PULL LEVER
TOWARD YOU
• Standard Windshield Wiper -The standard Windshield wiper system
con
ols are on the band marked "WIPER" on the turn signal lever.
• For a single wiping cycle, turn the band toward you. Hold it there until
the wipers begin
Wiping, then release.it. The wipers will stop after one
cycle. For several cycles, hold the band in place as long as needed.
• For steady wiping at low speed, turn the band away from you to the
first stop. For high-speed wiping, turn the band to the next stop. Turn
the band back to
"OFF" to turn off the wipers.
• Delay Windshield Wiper -The optional delay windshield wiper system lets you vary the wiper speed from a 16-second delay between sweeps up to
the normal
low and high speeds of the standard wiper.
• The Delay wipers work the same as the standard wipers, except for the
delay feature. To use the wipers with a delay between sweeps, turn the
band on the turn signal lever to
"ON."
• Turn the "Delay" band away from you to control the amount of delay. The
wipers will move more often the closer the band is to "LO." Turn it fully to
the first stop for steady wiping at
low speed.
• Windshield Washer -To spray washer fluid on the windshield, pUSh the "paddle" on top of the turn signal lever. (This will also turn on the low~ speed wipers.) The spray will continue as long as you hold in the paddle.
After using the windshield washer
on the standard wiper system, turn the band
back to "OFF" to turn off the wipers.
2-9
Page 39 of 105

Downloaded from www.Manualslib.com manuals search engine '" ,
t:l
STANDARD INSTRUMENT CLUSTER
IJ
12
OPTIONAL INSTRUMENT CLUSTER
~~~~-:'----,~~:
l'l
1l
10
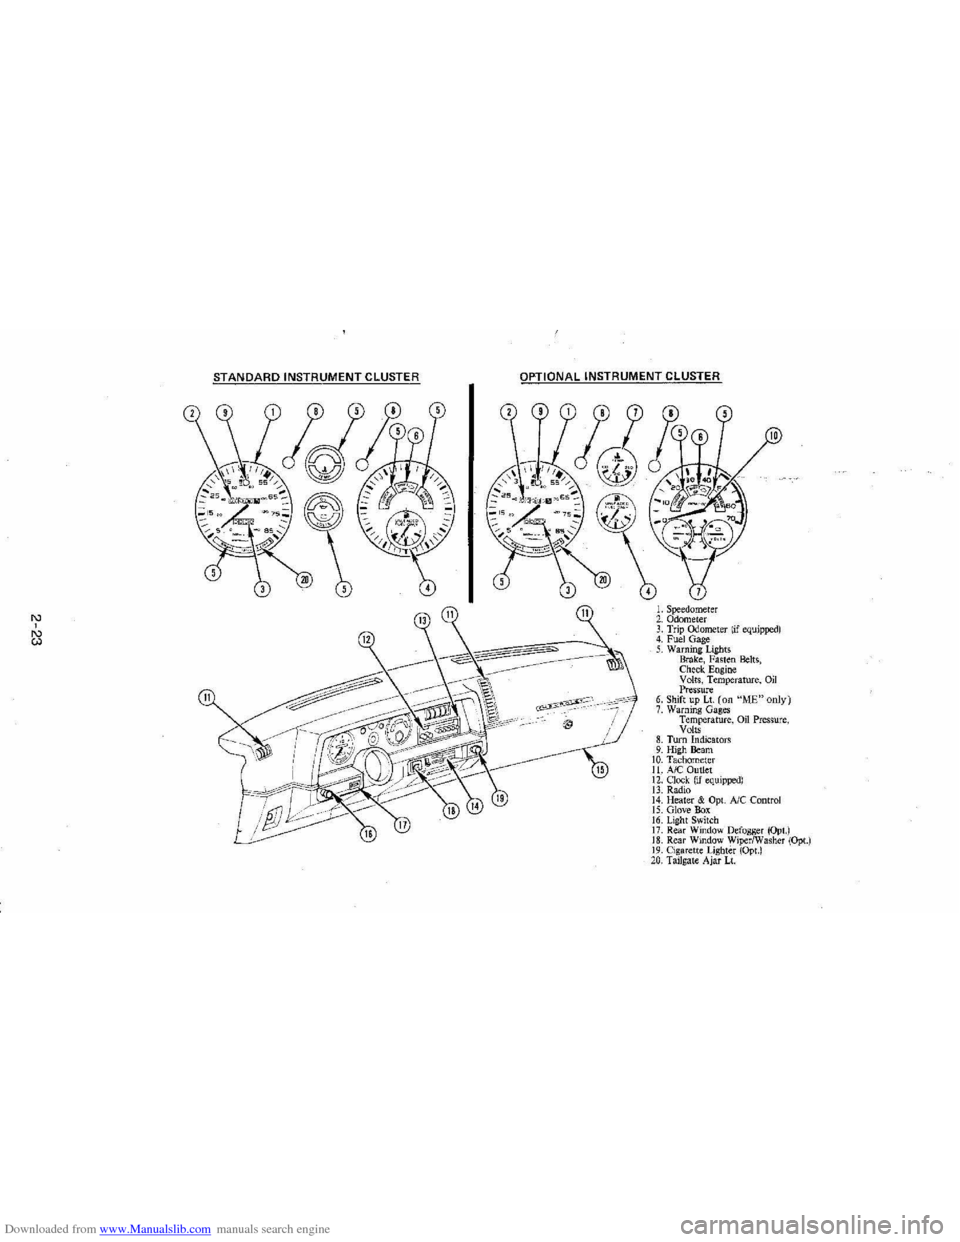
L Speedometer 2. Odometer 3. Trip ()jometer lif equipped) 4. Fuel Gage 5. Warning Lights Brake, Fasten Belts, Check. Engine Volts, Temperature, Oil Pressure 6. Shift up Lt. (on "ME"only) 7. Warning Gages Temperature, on Pressure, Volts 8. Turn Indicators 9. High Beam 10. Tachomet er 11. A/C Outlet 12. Clock. (if equipped) 13. Radio 14. Heater & Opt. Ale Control 15. Glove Box 16. Lig ht Switch 17. Rear Window Defogger (Opt.) 18. Rear Window WiperlWasher (Opt.) 19. Cigare tt e Lighter (Opt.) 20, Tailgat e Ajar Lt.
Page 40 of 105

Downloaded from www.Manualslib.com manuals search engine Engine Coolant Temperature Gage
This optional gage is located in the instrument cluster. If the gage shows that
an overheat condition exists-as indicated by pointer moving beyond the
center of the band immediate action by the driver is required. If an overheat
condition is shown, see "Engine
Cooling System Overheating" in "In Case of
Emergency,"
Section 3 of this manual. The coolant temperature indication will VaIY with air temperature and operating conditions. The ignition must be in
"Run" for accurate readings. Prolonged driving or idling in very hot weather
may cause the pointer to move beyond the center of the gage. Make a practice
of scanning this and other gages
while driving, especially in hot weather and!
or when the
vehicle is under load.
CAUTION: II the Engine Coolant Temperature Gage shows an overheat condition or you have other reason to suspect the engine may be overheating, continued operation of the engine EVEN FOR A SHORT TIME may result in a fire and the risk of personal injury and/or severe vehicle damage. Take immediate action as outlined under "Engine Cooling System Overheating" in "In Case of Emergency," Section 3.
Oil Pressure Gage
The oil pressure gage indicates the pressure at which oil is being delivered to
the vaIiOUS paIls of the engine requiring lubrication. Pressures registered by
the gage may
vBIY according to outside air temperatures or weight of oil being
used. Oil pressure of a cold engine being operated at a given speed will be
somewhat higher than when the engine is at normal operating temperature at
the
SaIne speed. Prolonged high speed operation on a hot day at the given
speed will
resuH in somewhatlower oil pressure readings. Readings of 205 to
275 kPa
(30 to 40 psi) may be considered normal during moderate road
speeds of 35 to 40 mph (55 to 60 km!h) with the engine at proper operating
temperature. Gage readings which are consistently high
or low under these conditions may indicate lubrication system and/ or engine malfunction.
Light Switch
The three· position light switch controls the headlights, taillights, paIking lights,
sidemaIker lights,
instrument lights and dome lights.
Instrument light intensity can be varied by turning knob clockwise or
counterclockwise. Full counterclockwise position turns on interior light.
The headlight circuit is protected by a circuit breaker in the
light switch. An overload on the breaker will cause the lights to "flicker" on and off. If this
condition
develops, have your headlight wiring checked immediately. The
headlight beaIn changer is located in the Turn Signal Lever; for operation see
Section 2 under heading "Turn Signal and Muiji-Function Lever."·
Headlight High Beam Indicator Light
The headlights of your vehicle have. high and low beams to provide you with
proper nighttime visibility for most driving conditions. The
"low" beams are
used during most city driving. The
"high" beams are especially useful when
driving on daIk roads since they provide long range illumination. The headlight
beam indicator light (located on the speedometer face) will be ON whenever
the high beams or "brights" are in use. The turn
signal lever controls the
headlight beaIns and is described in "Steering Column Controls."
2-24
Page 94 of 105

Downloaded from www.Manualslib.com manuals search engine LAMP BULB DATA
RATING
APPLICATION BULB NO. QUANTITY CANOLEPOWER
FRONT LAMPS
Headlamp -Inner-Std. 4651 2 50 Watts
-Inner-Halogen H4651 2 50 Watts
-Outer 4652 2 60/40 Watts
Park & Turn Signal 2057 2 32
Sidemarker 194 2 2
REAR LAMPS
Back-up 1156 2 32
license -Exc. Wagon 194 1 2
-Wagon 194 2 2
Sidemarker 194 2 2
Tail & Stop -Exc. Wagon 2057 2 2/32
Tail, Stop & Turn Signal -Wagon 2057 2 2/32
Turn Signal -Exc. Wagon 1156 . 2 32
INTERIOR ILLUMINATION
Ale -Heater Control
I
168 1
3
Ash Tray 168 1 3 ~-..... -Auto Trans 168 1
3
Courtesy lamp 906
I
2 6
Dome Lamp Std. 561 1 12
Dome & Reading -Dome 562
I
1 6
-Reading 90 1 6
Glove Box 194 1 2
instrument Cluster 194/168 2/4 2/3
Luggage/Cargo -Exc. Wagon 1003
I
1 15
-Wagon 561 1 12
Radio Dial 194 1 2
U nderhood lamp 93 1 15
WARNING LIGHTS & INDICATORS
Brake 194 1 2
Check Engine 168 1 3
High Beam 194 1 2
Oil Pressure 194
I
1 2
Seat Belt 168 1 3
Tailgate Ajar 194 l' 2
Temperature 194 1 2
Turn Signal 194 2 2
Upshift
I
168 1 3
Volts (Batter) 194 1 2 y
6·3