1984 CHEVROLET CAVALIER oil type
[x] Cancel search: oil typePage 25 of 105
Downloaded from www.Manualslib.com manuals search engine • Lane Change Signal -In some turns, such as changing lanes, the steering wheel tS not turned far enough to cancel the turn signal. For convenience, you can flash the turn signal by moving the lever part way (to the first stop)
and holding it there. The lever will return to horizontal when you release it.
A green light on the instrument panel is designed to flash to tell you that the
front
and rear turn signal lights are working. If the light stays on, but does not flash, check for burned-out turn signal bulbs. If the green light does not come
on when
you move the lever, check the fuse and indicator bulb.
However, if you ordered a trailertowing·optiOil.·in which extra wiring was added to attach the trailer lighting, a different type of flasher was installed. In this
case, the green light will continue to flash even if a turn signal bulb burns out.
Therefore, you must regularly look at the front
and rear turn signal lights to be
sure they are working.
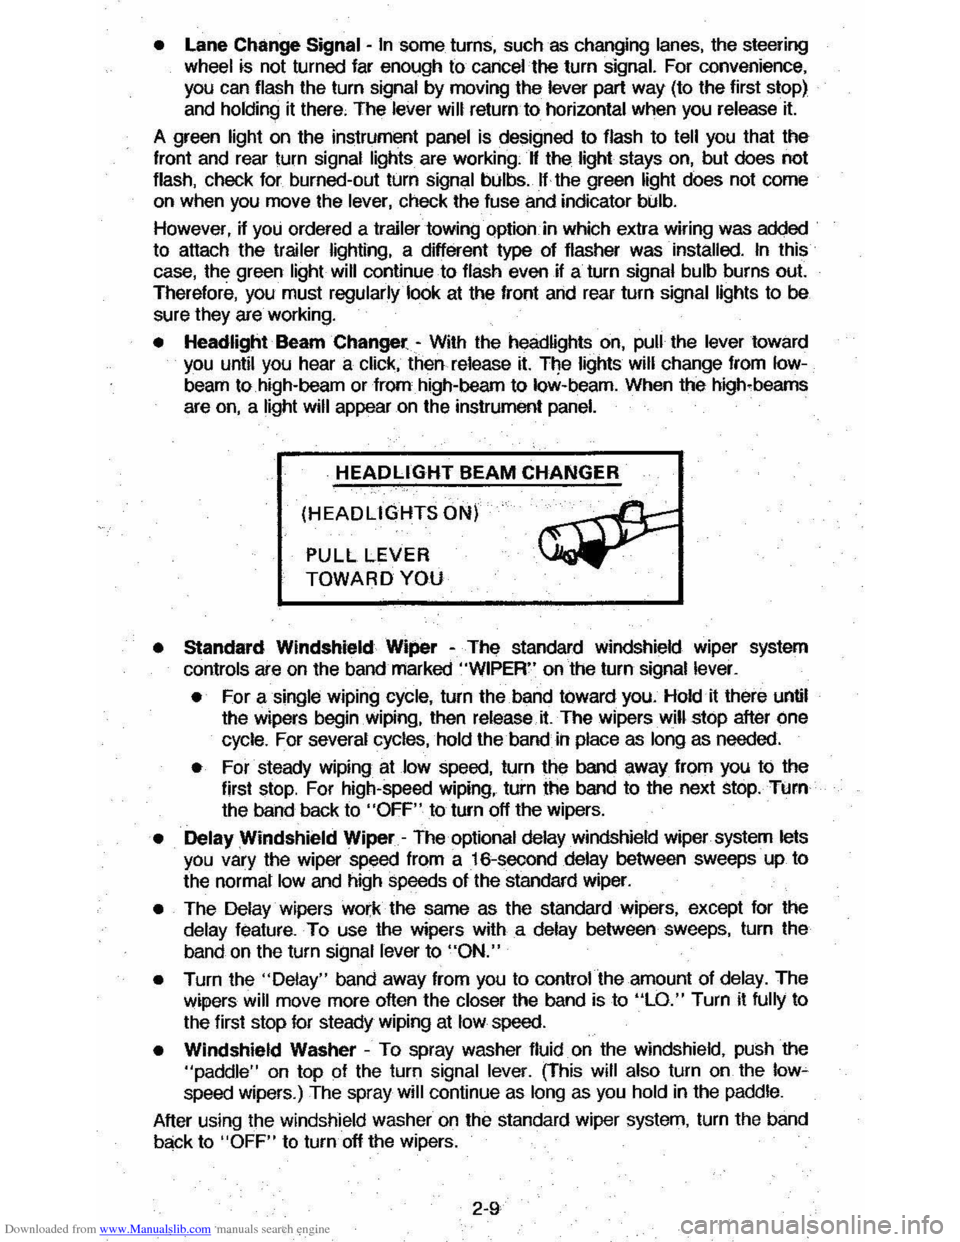
• Headlight Beam Changer -With the headlights on, pull the lever toward you until you hear a click, then release it. The lights will change from Iow
beam to high-beam or from high-beam to low-beam. When the high-beams
are
on, a light will appear on the instrument panel.
HEADLIGHT BEAM CHANGER
(HEADLIGHTS ON)
PULL LEVER
TOWARD YOU
• Standard Windshield Wiper -The standard Windshield wiper system
con
ols are on the band marked "WIPER" on the turn signal lever.
• For a single wiping cycle, turn the band toward you. Hold it there until
the wipers begin
Wiping, then release.it. The wipers will stop after one
cycle. For several cycles, hold the band in place as long as needed.
• For steady wiping at low speed, turn the band away from you to the
first stop. For high-speed wiping, turn the band to the next stop. Turn
the band back to
"OFF" to turn off the wipers.
• Delay Windshield Wiper -The optional delay windshield wiper system lets you vary the wiper speed from a 16-second delay between sweeps up to
the normal
low and high speeds of the standard wiper.
• The Delay wipers work the same as the standard wipers, except for the
delay feature. To use the wipers with a delay between sweeps, turn the
band on the turn signal lever to
"ON."
• Turn the "Delay" band away from you to control the amount of delay. The
wipers will move more often the closer the band is to "LO." Turn it fully to
the first stop for steady wiping at
low speed.
• Windshield Washer -To spray washer fluid on the windshield, pUSh the "paddle" on top of the turn signal lever. (This will also turn on the low~ speed wipers.) The spray will continue as long as you hold in the paddle.
After using the windshield washer
on the standard wiper system, turn the band
back to "OFF" to turn off the wipers.
2-9
Page 67 of 105

Downloaded from www.Manualslib.com manuals search engine SECTION 4
APPEARANCE CARE
CAUTION: Follow the manufacturer'. advic:e WHENEVER cleaning agents or other chemicals are used, inside, or outaide the vehicle. Some clelner. may be poisonous or flammable, and improper UM may cause personal injury or daf1lllge. When cleaning the Inaide or outsideot the vehic~, DO NOT USE volatile cleaning aolYents such Ia: acetone, lacquer thinners, enamel reducers, nail poUsh removers; or such cleaning mmeriliis .. laundry soaps, bleaches or redudng agents except as noted In the fIIbric clHning MtYlce on stein removal which: faNow. . NEVER use carbon tetrlChlorkle, gasoline, benzene, or naphtha for any cleaning purpose .
()pen aM vehicle doors tor ventlillUon when ANY c5unlng agenu or other -chemk:ata _. uaed In the interior. Overexposure to some YIjIpOI'S may Nautt In a health -probtem which I. more likely to occur in small, unvent8ated spaces.
NonCE: Toavoidpoasible permanent discoloration ,Of, white or light COlored leN, DO NOT let triaterials with un .. able dyes come in contact with seat trim material, until
these rMterials are totally dry. (ThIs Includes cet:t-~YP8' of casual clothing. such •• colored denims, corduroys , IeMhers and suedes; alsodecorltive paper, etc.)
CARE AND CLEANING OF THE INTERIOR
With the use of modern trim materials, ~ is VERY IMPORTANT that you use
proper cleaning techniques and cleaners. Failing to do this on the fi'st cleaning may result in water spots, spot rings, or setting of stains or soilage -all of
which are more difficult to remove in a second cleaning :
Dust
and loose dirt that collect on interior fabrics should be removed often with
a vacuum
cleaner or soft bristle brush. Wipe vinyl or leather trim regularly with
a clean damp cloth. Normal trim soilage, spots, or stains can be cleaned with
these
GM c leaners :
GMCLEANERS
Container GM Part Cleaner Size Number
GM"Spot Lifter 80z. 1051398 (Solv en t Type) 10.237 L)
GM Multj-Purpose SIbs. P owdered Clean er 12.72 kg.} 1050429 (Foa m Type)
The above products are excellent cleaners when used properly. Tlley are
available through your authorized
dealer.
Remember these basic steps before cleaning:
t. Remove stains as quickly as possible before they beoome "set."
2. Use a clean Cloth or sponge, and change to a clean area often. (A soft
brush may be used if stains persist.)
3 . Use solvent-type cleaners
only in a well ventilated area; also, do not
saturate the stained area.
4 .
If a ring forms after spot cleaning , clean the entire area immediately .
5. Follow specific instruction s on cleaner labels.
4-1
Page 68 of 105
Downloaded from www.Manualslib.com manuals search engine Cleaning General Soilage Or Water Spots From Fabric-Type
Trim
(Including Fleece and Pigskin Suede Leather) With Foam
Type
Cleaner
GM Multi-Purpose Powdered Cleaner is excellent for this type of cleaning and for cleaning panel sections where small cleaning rings may be left from spot
cleaning .
• Vacuum the area thoroughly to remove any loose dirt.
• ALWAYS clean a full trim assembly or complete trim section . Mask
surrounding trim along stitch or welt lines.
•
Mix Muiji -Purpose Powdered Cleaner in strict accordance with the
directions
on the container label. Mix in proportion for smaller quantities .
• USE SUDS ONlY ON A CLEAN SPONGE OR SOFT BRISTLE BRUSH . 00 NOT SATURATE THE FABRIC OR RUB IT HARSHLY WITH A BRUSH.
IMMEDIATELY
AFTER CLEANING, WIPE OFF EXCESS SUDS WITH A SLIGHTLY DAMP ABSORBENT TOWEL OR CLOTH.
•
IMPORTANT -IMMEDIATELY AFTER WIPING, FORCE-DRY THE FABRIC
WITH . AN AIR HOSE. FOR MATERIALS OTHER THAN PIGSKIN SUEDE
LEATHER A HEAT DRYER OR HEAT LAMP MAY BE USED. (Use caution wijh heat dryer or lamp to help prevent fabric damage. )
• When trim materials wijh a sheen or luster finish are dry, wipe the fabric
lightly with a soft, dry, clean cloth to restore ijs sheen or luster.
Spot Cleaning Fabric Type Trim (Except Pigskin Suede
Leather) with Solvent Type Cleaner
Before trying to remove a spot or stain from fabric, determine as accurately as
you can the type and age
of the spot or stain . Some spots or stains can be
removed with water
or mild soap solulion (see "Removal of Spec~ic Stains").
Spots or stains should always be removed as soon as possible .
Some types of stains or soilage, such as lipstick, inks and grease, are very
difficufl (sometimes impossible) to completely remove. When cleaning this type
of stain
or soilage, be sure not to. enlarge the soiled area .
GM Fabric
Cleaner (Solvent Type) is excellent for spot cleaning grease, oil, or fat stains .
NonCE: Solvent type cle.ners MUST NOT be used on pigskin suede leather. Damage 10 the materia' may result from such use.
• Gently scrape excess stain from the trim material with a clean , DULL kn~e or scraper. USE VERY LITTLE CLEANER , light pressure and clean cloths
(preferably cheesecloth) . Cleaning should start at the outside of the stain,
"FEATHERING" toward the center. Keep changing to a clean section of the cloth.
• When you clean a stain from fabric, immediately dry the area with an air
hose, heat dryer, or heat lamp to help prevent a cleaning ring. (Use caution
with a heat dryer or lamp to help prevent fabric damage).
• ij a ring forms, immediately repeat the cleaning operation over a slightly larger area with emphasis on '.'FEATHERING" towards its center . ij a ring
remains, mask
off surrounding trim sections and clean the entire ajijected
area wijh GM Mufti-Purpose Powdered Cleaner (as described under "Cleaning General Soilage or Water Spots from Fabric Type Trim with
Foam Type Cleaner").
4-2
Page 69 of 105
Downloaded from www.Manualslib.com manuals search engine Removal Of Specific Stains (Except from Pigskin Suede
Leather)
Grease or Oil Stains ~ Includes grease, oil, butter, margarine, shoe polish, coffee with cream, chewing gum, cosmetic creams, vegetable oils, wax crayon,
tar and asphalts.
•
Carefully scrape off excess stain, then use GM Fabric Cleaner (Solvent Type) as previously described.
• Shoe polish, wax crayons, tar and asphalts will stain if left on trim; they
should be removed as soon as possible. Use caution as the cleaner will
dissolve them and may cause them to "bleed."
Non-Greasy Stains -Includes catsup, coffee (black), egg, fruit, fruit juice, milk,
soft drinks, wine, vomit and blood.
• Carefully scrape off excess stain, then sponge the stain with cool water.
• If a stain remains, use Multi-Purpose Powdered Cleaner (Foam Type) as previously described.
• If an odor lingers after cleaning vomit or urine, treat the area with a water /
baking soda solution: 5 milliliters (1 teaspoon) of baking soda to 250 milliliters (1 cup) of lukewarm water.
• Finally, if needed, clean lightly with Fabric Cleaner (Solvent Type).
Combination
Stains -Includes candy, ice cream, mayonnaise, chili sauce and
unknown stains.
• Carefully scrape off excess stain, then clean with cool water and allow to
dry.
• U a stain remains, clean it with Fabric Cleaner (Solvent Type).
Removal of Specific Stains from Pigskin Suede Leather
For the removal of all grease or oil, non-greasy and combination stains on
Pigskin Suede Leather, GM recommends the use of a qualified professional
cleaner who has been trained to care for suede leather.
Cleaning Vinyl Or Leather Trim (Except Pigskin Suede
Leather)
Ordinary soilage can be removed from vinyl or leather wlth warm water and a
mild soap such as saddle soap or oil soap, or an equivalent.
• Apply a small amount of soap solution and let it soak for a few minutes to loosen dirt; then, rub briskly with a clean, damp cloth to remove dirt and
traces of soap. (This may ba repeated several times, if needed.)
• Soilage such as tars, asphalts, shoe polish, etc. will stain if left on trim.
They should be wiped off as quickly as possible and the area cleaned with
a
clean cloth dampened with GM Vinyl/Leather Cleaner (Solvent Type).
Seat Belt Care
• Keep belts clean and dry.
• Clean seat belts only with mild soap and lukewarm water.
• Do not bleach or dye belts since this may severely weaken them.
4-3
Page 73 of 105
Downloaded from www.Manualslib.com manuals search engine '"
.,.
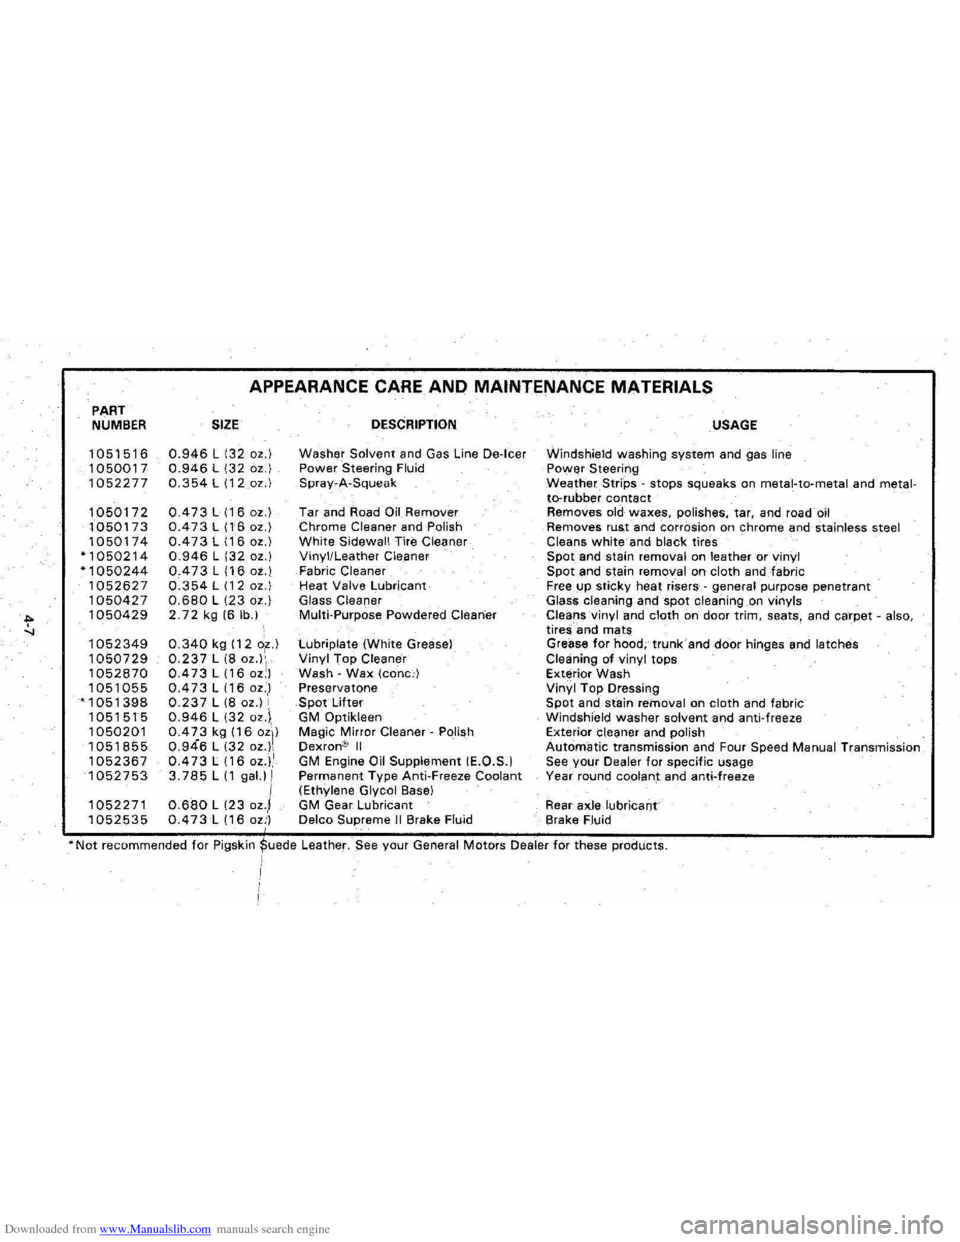
PART NUMBER
1051516
1050017
1052277
1050172
1050173
1050174 "1050214 "1050244 1052627
1050427
1050429
1052349 1050729
1052870
1051055 "1051398 1051515 1050201 1051855 1052367 1052753
1052271 1052535
APPEARANCE CARE AND MAINTENANCE MATERIALS
SIZE
0.946 L 132 oz.) 0.946 L 132 oz.) 0.354 L (12oz.)
0.473 L 116 oz.) 0.473 L (16 oz.) 0.473 L 116 oz.) 0.946 L 132 oz.) 0.473 L 116 ot.) 0.354 L 112 oz.) 0.680 L 123 oz.) 2.72 kg 16 lb.)
0.340 kg 112 o~.) 0.237 L 18 oZ')'1 0.473 L 116 oz,) 0.473 L 116 oz.,1 0.237 L 18 oz.) , 0.946 L 132 oz.i, 0.4Z3 kg 116 oZI) 0.946 L 132 oz.), 0.473 L (16 OZ.),.I 3.785 L 11 gal.) 1
0.680 L (23 oz.l 0.473 L 116 ozi)
DESCRIPTION
Washer Solvent and Gas Line De-Icer Power Steering Fluid Spray~A-Squeak
Tar and Road on Remover Chrome Cleaner and Polish White Sidewall Tire Cleaner Vinyl/Leather Cleaner Fabric Cleaner Heat Valve Lubricant Glass Cleaner Multi-Purpose Powdered Cleaner
tubriplate (White Grease) Vinyl Top Cleaner Wash -Wax (cone.') Preservatone Spot Lifter GM Optikleen Magic Mirror Cleaner-Polish Dexron® II GM Engine Oil Supplement IE.O.S.1 Permanent Type Anti.Freeze Coolant (Ethylene Glycol Base) GM Gear Lubricant Delco Supreme II Brake Fluid
USAGE
Windshield washing system and gas line Power Steering WeatherStrips -stops squeaks on metal-to-metaland metalto-rubber contact Removes old waxes, polishes, tar, and road oil Removes rust and corrosion on chrome and stainless steel Cleans white and black tires Spot and stain removal on leather or vinyl Spot and stain removal on cloth andfabric Free up sticky heat risers -general purpose penetrant
Glass cleaning and spot cleaning on vinyls Cleans vinyl and cloth on door trim, seats, and carpet -also, tireS; and mats
Grease for hood; trunk and door hinges and latches
Cleaning of vinyl tops
Exterior Wash
Vinyl Top Dressing
Spot and stain removal on cloth and fabric
Windshield washer solvent and anti-freeze Exterior Cleaner and polish Automatic transmission and Four Speed Manual Transmission See your Dealer for specific usage
Year round coolant and anti-freeze
Rear
axle lubricant
Brake Fluid
*Not recommended for Pigskj~ede Leather. $ee your General Motors Dealer for these products. I
Page 79 of 105
Downloaded from www.Manualslib.com manuals search engine AUTOMATIC TRANSAXLE FLUID RECOMMENDATIONS
Use the Proper Fluid
Use only automatic transmission fluid labeled DEXRON'" II. You can buy this
fluid from your dealer or other service outlets.
Check the Fluid Level with Care
Check the automatic transaxle fluid level at each engine oil change. Driving
with too much or too
little fluid can damage the transaxle.
To check the fluid
level, first set the parking brake, then start the engine in
"P"(Park), and let idle for two minutes . You must check the fluid level with the
engine running at slow
idle and the vehicle level.
You cannot read the correct fluid level if you have just driven the vehicle for a
long time at high speed, in city traffic in hot weather, or if the vehicle has been
pulling a trailer. Wait
until the fluid has cooled down (about 30 minutes).
Remove the dipstick located
On the driver's side forward of the cowl. Carefully
touch the wet end of the dipstick to find out if the fluid is cool, warm or hot. Wipe it clean and push it back in until the cap seats. Pull out the dipstick and
read the fluid level.
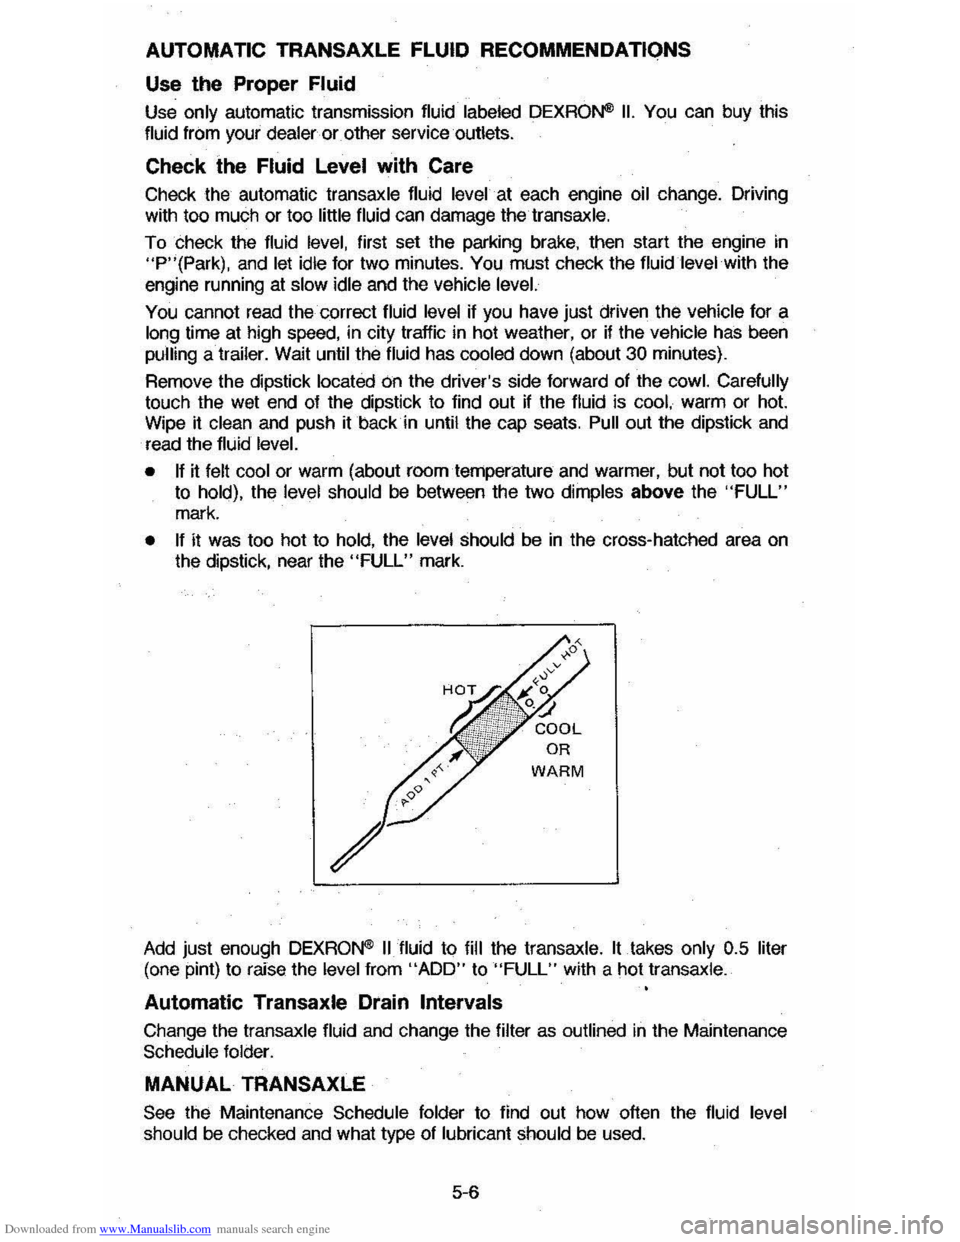
• If it felt cool or warm (about roomternperature and warmer, but not too hot
to hold), the level should be between the two dimples above the "FULL"
mark.
• If it was too hot to hold, the level should be in the cross-hatched area on the dipstick, near the "FULL" mark.
Add just enough DEXRON'" II fluid to fill the transaxle. It takes only 0.5 liter
(one pint) to raise the level from "ADD" to "FULL" with a hot transaxle.
Automatic Transaxle Drain Intervals
Change the transaxle fluid and change the filter as outlined in the Maintenance Schedule folder.
MANUAL TRANSAXLE
See the Maintenance Schedule folder to find out how often the fluid level should be checked and what type of lubricant should be used.
5-6
Page 83 of 105
Downloaded from www.Manualslib.com manuals search engine Radiator Pressure Cap
The radiator cap, a 105 kPa (15 psi) pressure type, must be installed tightly, otherwise coolant may be lost and damage to engine may resuK from
overheating . Radiator pressure cap
should be checked periodically for proper
operation .
If replacement is required, an AC cap is recommencled.
ACCELERATOR LINKAGE
Lubricate all pivot points with .engine oil at the interval shown in the
Maintenance
Schedule. Do not lubricate the accelerator cable.
AIR CLEANER ELEMENT
When replacement of air cleaner fmer element is necessary, an AC air Imer
elemenl
is recornmencled .
See your Maintenance Schedule for change intervals . Operation of vehicle in
dusty areas will necessitate more frequent replacement. Your dealer can be of
assistance
in determining the proper replacement frequency for the conditions
under which you operate your
vehicle.
CAUTION: The air cleaner a* functions ... name arrestor in the event of engine backfire . The -air cleaner ehould be lnstaIIed at an times unit .. III removal is neceaary for repair or maintenance. To help reduce the-risk of pereonal Injury and lor property damage , be sure that no one 18 ne.-the engine comJ*1ment before starting the engine wiU'l the air cleaner removed. If engine backfire occurs with the air cleaner remowd, thwe could be-a burst of flame and posaibly other fnln the engine compartment.
HOOD LATCHES AND HOOD HINGE
SeetHe Maintenance Schedule folder to find out how to lubricate hood.latch ·
and hood hinge assembly .
BRAKE MASTER CYLINDER
Check masler cylinder fluid· level in the reservoir at the interval shown in the Maintenance Schedule . If the fluid is low in the reservoir, it should be filled to
the maximum
level line with Delco Supreme No. 11 or OOT-3 fluids.
POWER STEERING SYSTEM
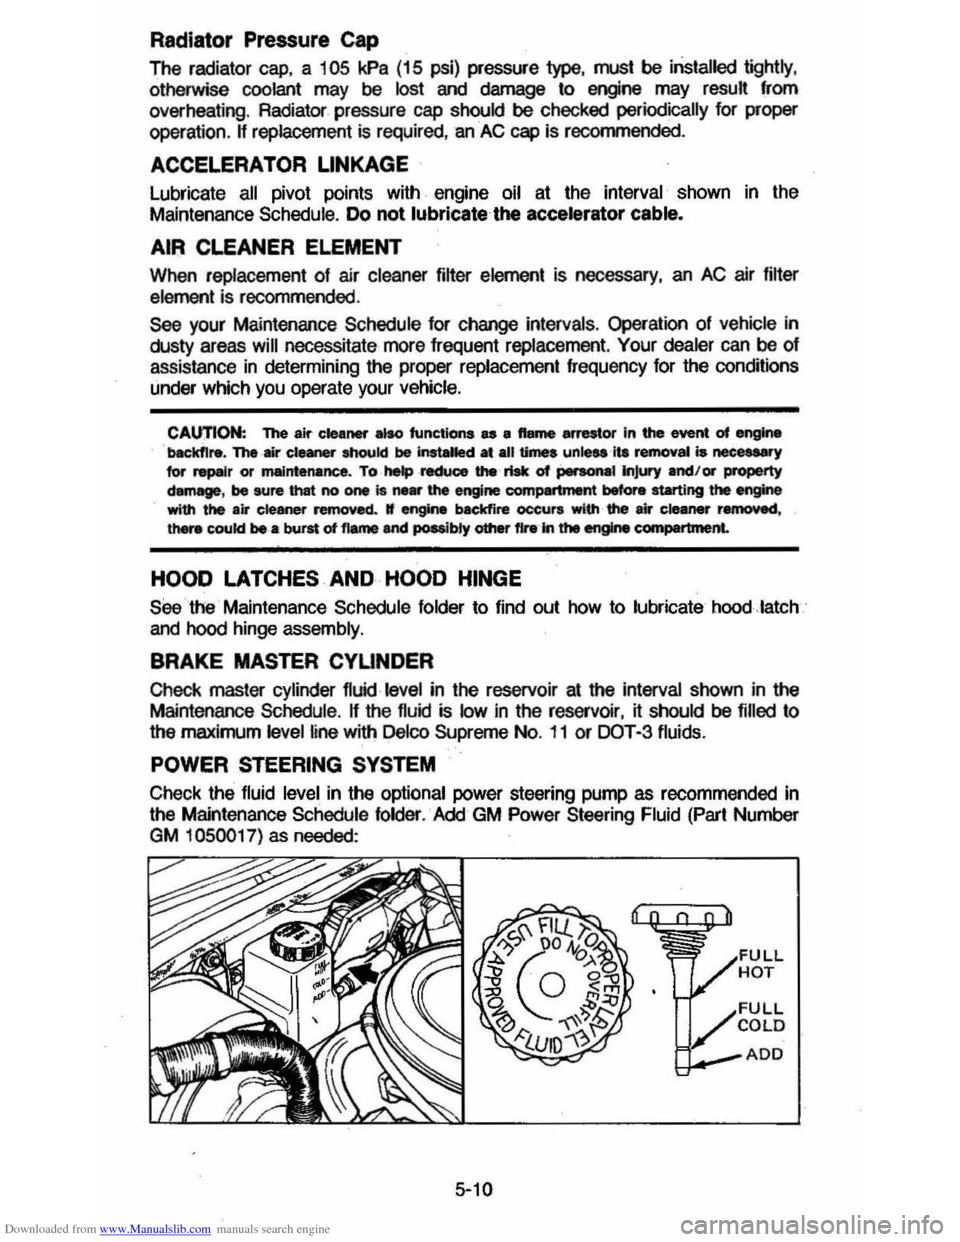
Check the fluid level in the optional power steering pump as recommended in
the Maintenance Schedule folder. Add GM Power Steering Fluid (Part Number
GM 1050017) as needed:
5-10