1982 CHEVROLET CAMARO wheel
[x] Cancel search: wheelPage 108 of 875

GM – CAMARO 1982-1992 – Repair Guide (Checked by WxMax) 108
11. Install the wheel cylinder.
REAR DISK BRAKES
BRAKE PADS
INSPECTION
Refer to the Front Disc Brake Inspection procedure.
REMOVAL & INSTALLATION
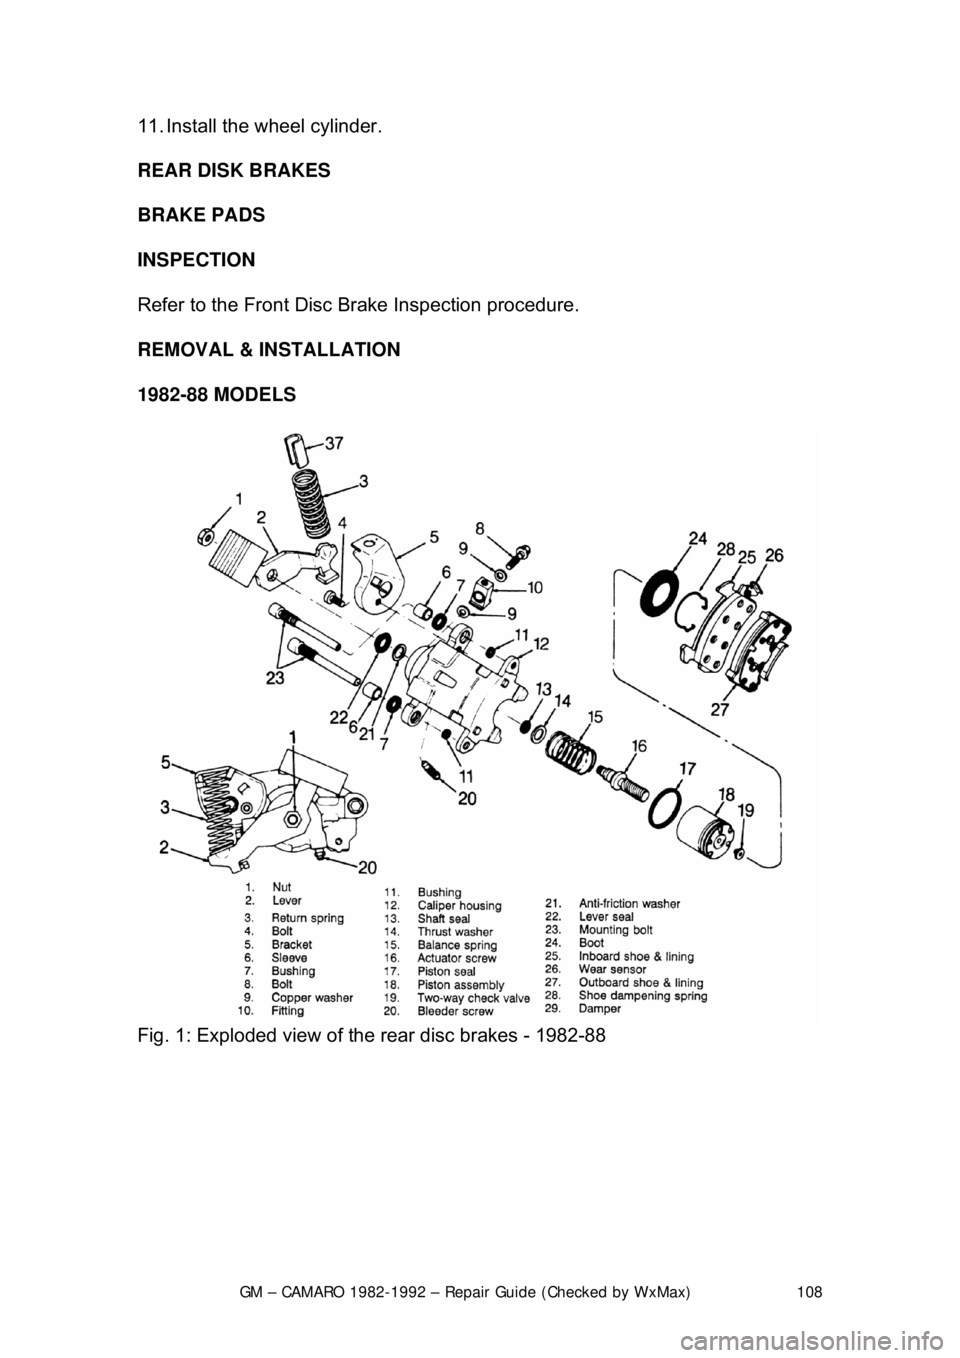
1982-88 MODELS
Fig. 1: Exploded view of t he rear disc brakes - 1982-88
Page 110 of 875

GM – CAMARO 1982-1992 – Repair Guide (Checked by WxMax) 110
4. Position the brake pads
into the caliper. Lubricate and install new bushings,
sleeves and check valve.
5. When installing the inner brake pad, make sure that the D-shaped tab of the
pad engages with the D-shaped notch of the piston, as illustrated.
6. Upon installation of the inner pad, make sure that the wear sensor of the pad
is at the leading edge of the shoe during forward wheel rotation. Slide the
metal edge of the pad under the ends of the dampening spring and snap the
pad into position against the piston.
7. Install the outer pad and caliper. Afte r installing the caliper, apply the brakes,
then bend the ears of the out er pad against the caliper and ensure that there
is no excessive clearance.
Page 111 of 875

GM – CAMARO 1982-1992 – Repair Guide (Checked by WxMax) 111
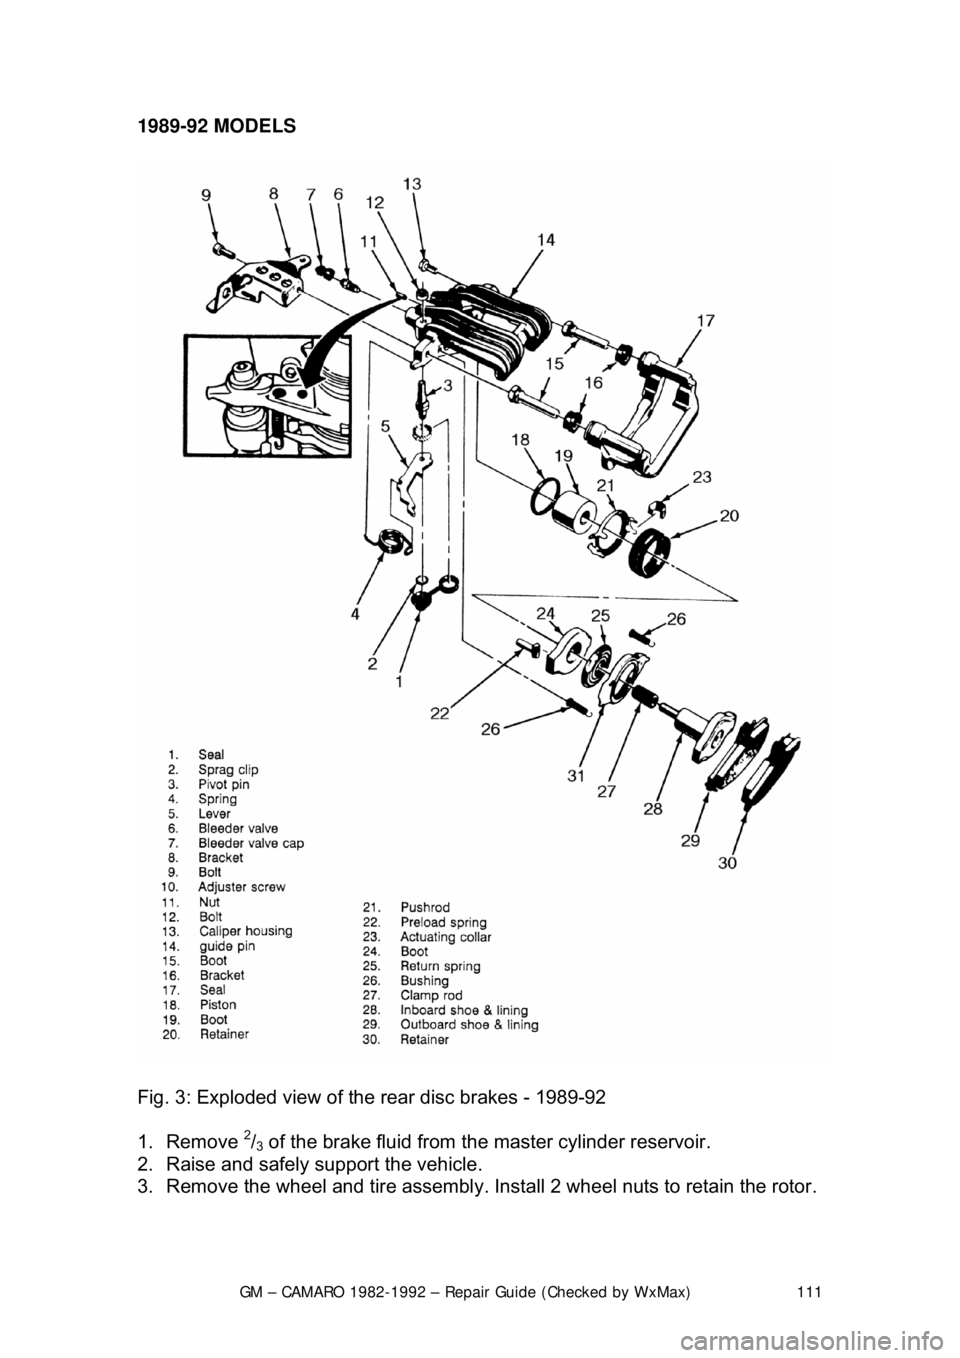
1989-92 MODELS
Fig. 3: Exploded view of t
he rear disc brakes - 1989-92
1. Remove
2/3 of the brake fluid from the master cylinder reservoir.
2. Raise and safely support the vehicle.
3. Remove the wheel and tire assembly. Inst all 2 wheel nuts to retain the rotor.
Page 112 of 875

GM – CAMARO 1982-1992 – Repair Guide (Checked by WxMax) 112
4. Position a C-clamp a
nd tighten until the piston bottoms in the base of the
caliper housing. Make sure 1 end of the C-clamp rests on the inlet fitting bolt
and the other against the outboard disc brake pad.
It is not necessary to remove the parki ng brake caliper lever return spring to
replace the disc brake pads.
5. Remove the upper caliper guide pin bolt and discard.
6. Rotate the caliper housing. Be careful not to strain the hose or cable conduit.
7. Remove the disc brake pads.
To install:
8. Clean all residue from the pad guide surfaces on the mounting bracket and
caliper housing. Inspect the guide pins for free movement in the mounting
bracket. Replace the guide pins or boot s, if they are corroded or damaged.
9. Install the disc brake pads. The out board pad with insulator is installed
toward the caliper housing. The inboard pad with the w ear sensor is installed
nearest the caliper piston. The wear sens or must be in the trailing position
with forward wheel rotation.
10. Rotate the caliper housing into it 's operating position. The springs on the
outboard brake pad must not stick through the inspection hole in the caliper
housing. If the springs are sticking thr ough the inspection hole in the caliper
housing, lift the caliper housing and make the necessary corrections to the
outboard brake pad positions.
11. Install a new upper cali per guide pin bolt and tight en to 26 ft. lbs. (35 Nm).
Tighten the lower caliper guide pin bolt to 16 ft. lbs. (22 Nm).
12. With the engine runni ng, pump the brake pedal slo wly and firmly to seat the
brake pads.
13. Check the caliper parking brake levers to make sure they are against the
stops on the caliper housing. If the leve rs are not on their stops, check the
parking brake adjustment.
14. Remove the 2 wheel nuts from t he rotor and install the wheel and tire
assembly.
15. Lower the vehicle, che ck the master cylinder fluid level and road test the
vehicle.
BRAKE CALIPER
REMOVAL & INSTALLATION
CAUTION - Brake pads contain asbestos, which has been determined to be a
cancer causing agent. Never clean the brake surfaces with compressed air!
Avoid inhaling any dust from any brake surface! When cleaning brake surfaces,
use a commercially available brake cleaning fluid.
1982-88 MODELS
Page 113 of 875

GM – CAMARO 1982-1992 – Repair Guide (Checked by WxMax) 113
1. Remove 2/3 of the brake fluid from the ma
ster cylinder. Raise the car.
Remove the wheel. Reinstall a wheel nut, with the flat side toward the rotor,
to hold the rotor in place.
2. Loosen the parking brake cable at the equalizer. At the caliper, remove the
parking brake cable, damper and spring from the lever.
3. Hold the parking brake lever and re move the lock nut. Remove the lever,
seal and anti-friction washer.
4. Position a C-clamp ov er the caliper and force the piston into its bore.
Remove the C-clamp. Rein stall the lever, seal and nut to the caliper.
5. Loosen the brake tube nut and disc onnect the brake tube from the caliper.
Plug the tube to prevent t he loss of brake fluid.
At the right rear wheel, it may be necessary to remove the rear bolt from the
lower control arm to allow the lower caliper mounting bolt to be removed.
6. Remove the mounting bolts using a
3/8 in. Allen head socket. Remove the
caliper and inspect the mounting bolts for corrosion. If necessary, replace
the mounting bolts.
To install:
7. Place the caliper onto the rotor and install the m ounting bolts. Torque the
mounting bolts to 30-45 ft . lbs. (40.7-61 Nm).
8. Install a new anti-friction washer and lubricate the lever with silicone brake
lube. Install the lever on the actuator with the lever pointing down. Rotate the
lever toward the front of the car and hol d while installing the nut. Torque the
nut to 30-40 ft. lbs. (40.7-54.2 Nm), then rotate the lever back against the
stop on the caliper.
9. Install damper and spring. Connect the parking brake cable. Tighten the
cable at the equalizer until the lever starts to move off the stop on the
caliper, then loosen the adjustment unt il the lever moves back against the
stop.
10. Remove the nut holding the rotor in place and install the wheel. Lower the
car and fill the master cylin der with brake fluid.
1989-92 MODELS
1. Raise and safely support the vehicle.
2. Loosen the parking brake cable at the equalizer.
3. Remove the wheel and tire assembly. Inst all 2 wheel nuts to retain the rotor.
4. Remove the bolt, inlet fitting and was hers from the caliper housing. Plug the
holes in the caliper housing and inlet fitting.
5. Remove the caliper lever return spri ng only if it is defective. Discard the
spring if the coils are opened.
6. Disconnect the parking brake cable from the caliper lever and caliper
bracket.
7. Remove the 2 caliper guide pin holes.
8. Remove the caliper housing from the rotor and mounting bracket.
To install:
Page 114 of 875

GM – CAMARO 1982-1992 – Repair Guide (Checked by WxMax) 114
9. Inspect the guide pins and boots and re
place if corroded, worn or damaged.
Check the inlet fitting bolt for blockage.
10. Install the caliper housing over t he rotor and into the mounting bracket.
Install the 2 caliper guide pin bolts. Tighten the upper caliper guide pin bolt
to 26 ft. lbs. (35 Nm) and the lower gui de pin bolt to 16 ft. lbs. (22 Nm).
11. Connect the parking brake cable to t he caliper bracket and caliper lever.
Install the caliper lever return spring, if removed.
12. Install the inlet fitting, bolt and 2 new washers to the caliper housing. Tighten
the bolt to 22 ft. lbs. (30 Nm).
13. Bleed the brake system.
14. Adjust the parking brake free trav el if the caliper was overhauled.
15. Lower the vehicle and cycle the parking brake.
16. Raise and safely support the vehicle.
17. Inspect the caliper parking brake levers and ensure they are against the
stops on the caliper housing. If the levers are not on their stop, refer to the
parking brake adjustment.
18. Remove the 2 nuts securing the roto r and then install the wheel and tire
assembly. Lower the vehicle.
19. With the engine running, pump the br ake pedal slowly and firmly 3 times to
seat the disc brake pads. Check the hydraulic system for leaks.
OVERHAUL
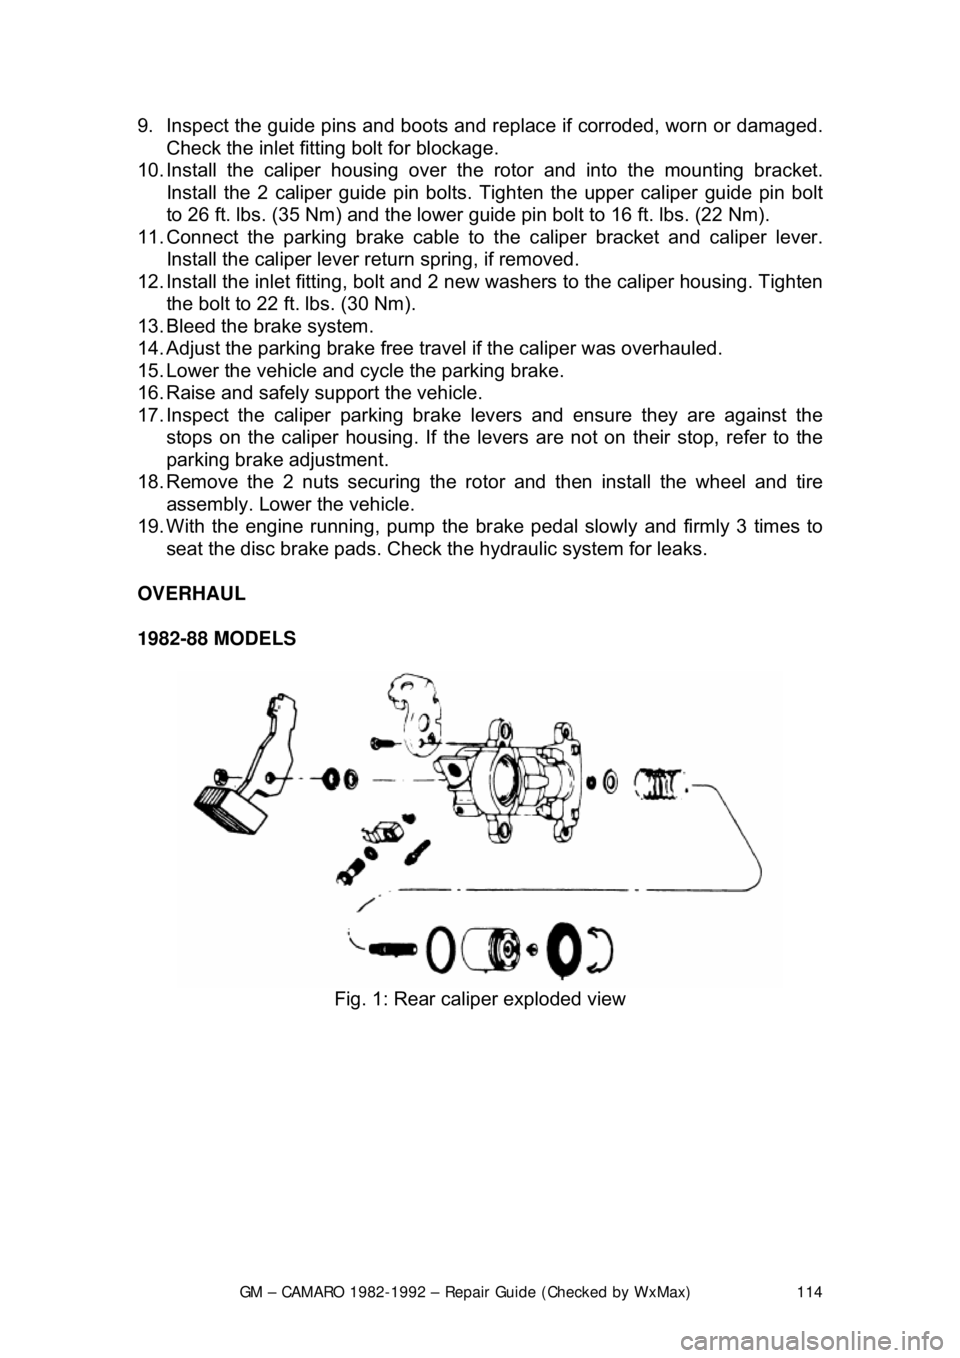
1982-88 MODELS
Fig. 1: Rear caliper exploded view
Page 119 of 875

GM – CAMARO 1982-1992 – Repair Guide (Checked by WxMax) 119
1. Raise and support the car. Remove the wheel.
2. Remove the caliper by referring to
the Rear Caliper Removal procedure. Pull
the brake disc from the axle.
3. To install, place the rotor ont o the spindle and install caliper.
4. Install the wheel and lower the car.
INSPECTION
1. Raise and support the car. Remove the wheel. Replace wheel nuts to hold rotor in place.
2. Check the rotor surface for wear, sco ring, grooves or rust pitting. Rotor
damage can be corrected by refacing, cons ult your local garage or machine
shop. If the damage exceeds the minimu m thickness, which is stamped on
the rotor, replace the rotor.
3. Using a dial indicator, check the ro tor parallelism at several points around
the circumference. The difference must not vary more than 0.0005 in.
(0.013mm). Make all measur ements at the same distance in from the edge
of the rotor.
4. Using the same dial indicator, meas ure the rotor runout. The runout should
not exceed 0.004 in. (0.10mm).
5. If any of these conditions are not me t, reface or replace the rotor.
PARKING BRAKES
CABLES
REMOVAL & INSTALLATION
FRONT CABLE
Fig. 1: Lever and front cable
1. Raise the car and support it with jackstands.
Page 121 of 875

GM – CAMARO 1982-1992 – Repair Guide (Checked by WxMax) 121
air! Avoid inhaling any dust from any
brake surface! When cleaning brake
surfaces, use a commercially available brake cleaning fluid.
1. Raise the car and support it with jackstands.
2. Loosen the adjusting nut at the equalizer.
3. Disengage the rear cabl e at the connector.
4. Remove the wheel assembly and brake drum.
5. Bend the retainer fingers.
6. Disengage the cable at the brake shoe operating lever.
To install:
7. Engage the cable at the brake shoe operating lever.
8. Bend the retainer fingers.
9. Install the wheel a ssembly and brake drum.
10. Engage the rear cabl e at the connector.
11. Adjust the parking brake by t he adjusting nut at the equalizer.
12. Lower the car.
DISC BRAKES
1. Raise the car and support it with jackstands.
2. Loosen the adjusting nut at the equalizer.
3. Disengage the cable at the connector.
4. Push forward on the caliper parking brak e apply lever. This allows the cable
to be removed from the tang. Then, release the lever.
5. Pull on the caliper parki ng brake apply lever to engage the cable to the tang.
6. Engage the cable at the connector.
7. Adjust the parking brake cable by the adjusting nut at the equalizer.
8. Apply the parking brake 3 times with heavy pressure and repeat adjustment.
9. Lower the car.
ADJUSTMENT
The parking brake cable is adjustable only on 1982-89 vehicles. All 1990-92
vehicles feature a self- adjusting parking brake.
REAR DRUM BRAKES
1. Depress the parking brake leve r exactly two ratchet clicks.
2. Raise the rear of the vehicl e and support safely with jackstands.
3. Tighten the brake cable adjusting nut until the left rear wheel can be turned
rearward with both hands, but locks when forward rotation is attempted. \
4. Release the parking brake le ver; both rear wheels must turn freely in either
direction without brake drag.
5. Lower the vehicle.