1982 CHEVROLET CAMARO coolant
[x] Cancel search: coolantPage 411 of 875

GM – CAMARO 1982-1992 – Repair Guide (Checked by WxMax) 411
1. Disconnect the negative battery cable.
2. Relieve the fuel system pressure
and drain the engine coolant from the
radiator into a suitable container.
3. Remove the intake manifold and the spark plugs.
4. Remove the dipstick tube and bra cket. Raise and support the vehicle
safely. Drain the oil and remove the oil filter. Lower the vehicle.
5. Remove the exhaust manifolds.
6. Remove the drive belt(s).
7. Remove the air conditioning compresso r and bracket, reposition it aside.
Do not disconnect the lines.
8. Remove the power steering pump and bracket, reposition it aside.
9. Remove the alternator and br acket, reposition it aside.
10. Remove the ground cable from the rear of the cylinder head and remove
the engine lift bracket.
11. Remove the rocker arm covers.
12. Loosen the rocker arms until the pushrods can be removed.
13. Remove the cylinder head bolts and remove the cylinder heads.
To install: 14. Clean the gasket mating surfaces of all components. Be careful not to
nick or scratch any surfaces as this will allow leak paths. Clean the bolt
threads in the cylinder bl ock and on the head bolts. Dirt will affect bolt
torque.
15. Place the head gaskets in pos ition over the dowel pins.
16. Install the cylinder heads.
17. Coat the cylinder head bolts th reads with GM sealer 1052080 or
equivalent, and install the bolts. Tight en the bolts in the proper sequence
to:
• 1982-1987 engines: 70 ft lbs. (90 Nm)
• 1988-1992 engines: 1st step: 40 ft lbs. (55 Nm); 2nd step: tighten
an additional 1/4 (90 degree) turn
18. Install the pushrods a nd loosely retain them wit h the rocker arms. Make
sure the lower ends of the pushrods ar e in the lifter seats. Refer to the
rocker arm procedures outlined ea rlier in this section.
19. Install the power steering pump br acket and pump. Do the same for the
air conditioning compressor bracket and compressor.
20. Install the ground cable to t he rear of the cylinder head.
21. Install the exhaust manifolds.
22. Install the dipstick tube and bracket.
23. Install the intake manifold.
24. Install the alternator bracket and alternator.
25. Install the drive belt(s).
26. Install the spark plugs.
27. Fill the cooling system with the proper type and quantity of coolant. Install
a new oil filter and fill the crankca se with the proper type and quantity of
oil.
28. Connect the negative battery cable, star t the vehicle and check for leaks.
Page 417 of 875

GM – CAMARO 1982-1992 – Repair Guide (Checked by WxMax) 417
16. Fill the cooling syst
em with the proper type and amount of coolant.
Connect the negative battery cable.
17. Raise and support the vehicle safely . Install a new oil filter, lower the
vehicle. Fill the crankcase with the proper type and quantity of engine oil.
18. Start the engine, check for lea ks and check the ignition timing.
OIL PAN
REMOVAL & INSTALLATION
CAUTION - The EPA warns that prolonged contact with used engine oil may
cause a number of skin disorders, incl uding cancer! You should make every
effort to minimize your exposure to used engine oil. Pr otective gloves should be
worn when changing the oil. Wash y our hands and any other exposed skin
areas as soon as possible after exposure to used engine oil. Soap and water, or
waterless hand cleaner should be used.
EXCEPT 2.5L ENGINE
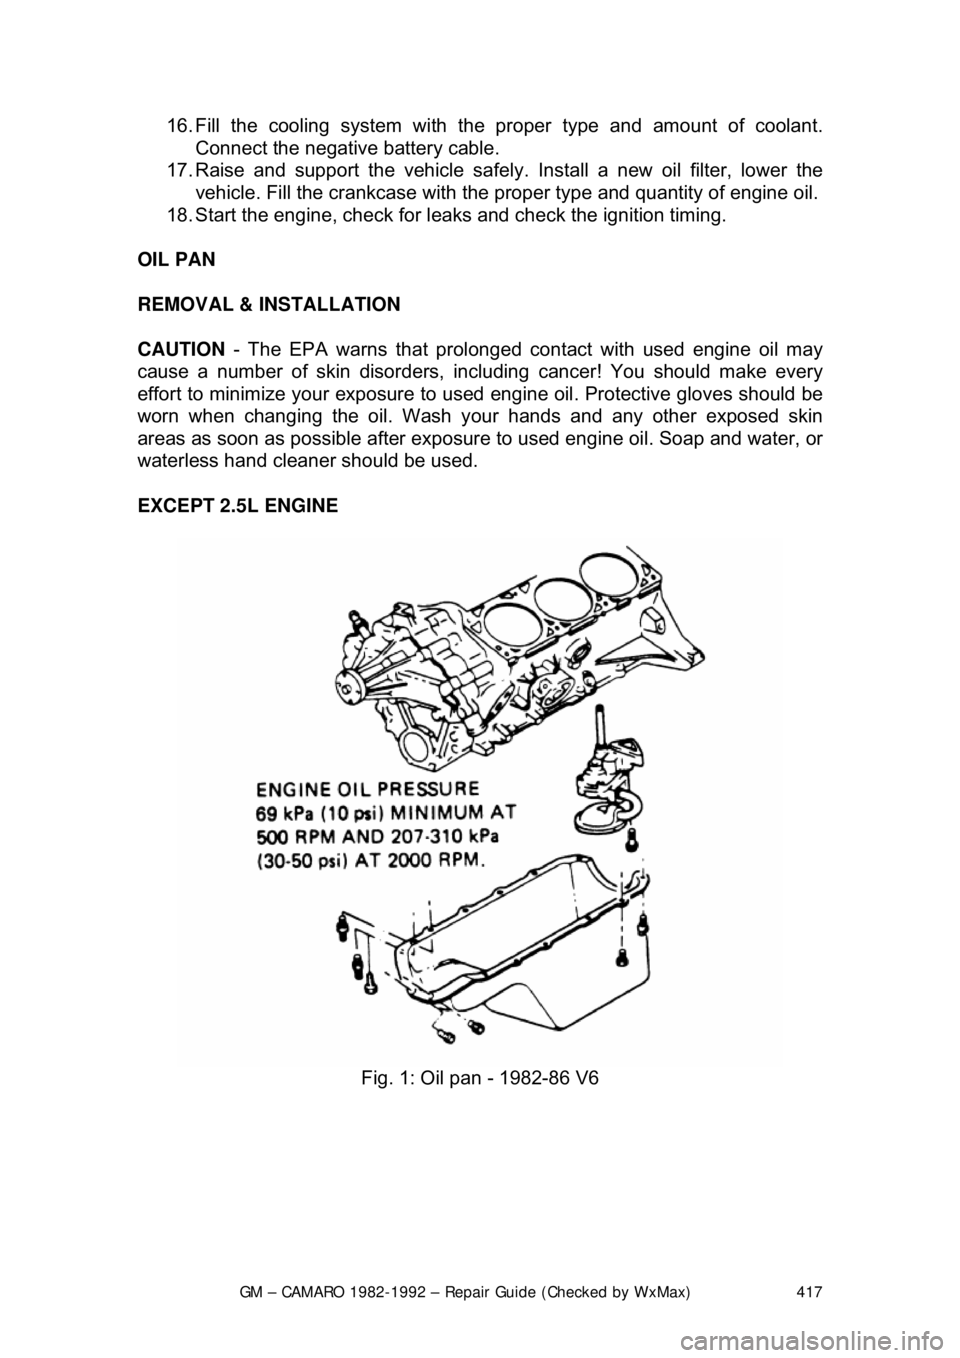
Fig. 1: Oil pan - 1982-86 V6
Page 435 of 875

GM – CAMARO 1982-1992 – Repair Guide (Checked by WxMax) 435
CAMSHAFT AND BEARINGS
REMOVAL & INSTALLATION
CAUTION - When draining the coolant, keep in mind that cats and dogs are
attracted by the ethylene gl ycol antifreeze, and are quite likely to drink any that
is left in an uncovered container or in puddles on the ground. This will prove
fatal in sufficient quantity. Always drai n the coolant into a sealable container.
Coolant should be reused unless it is contaminated or several years old.
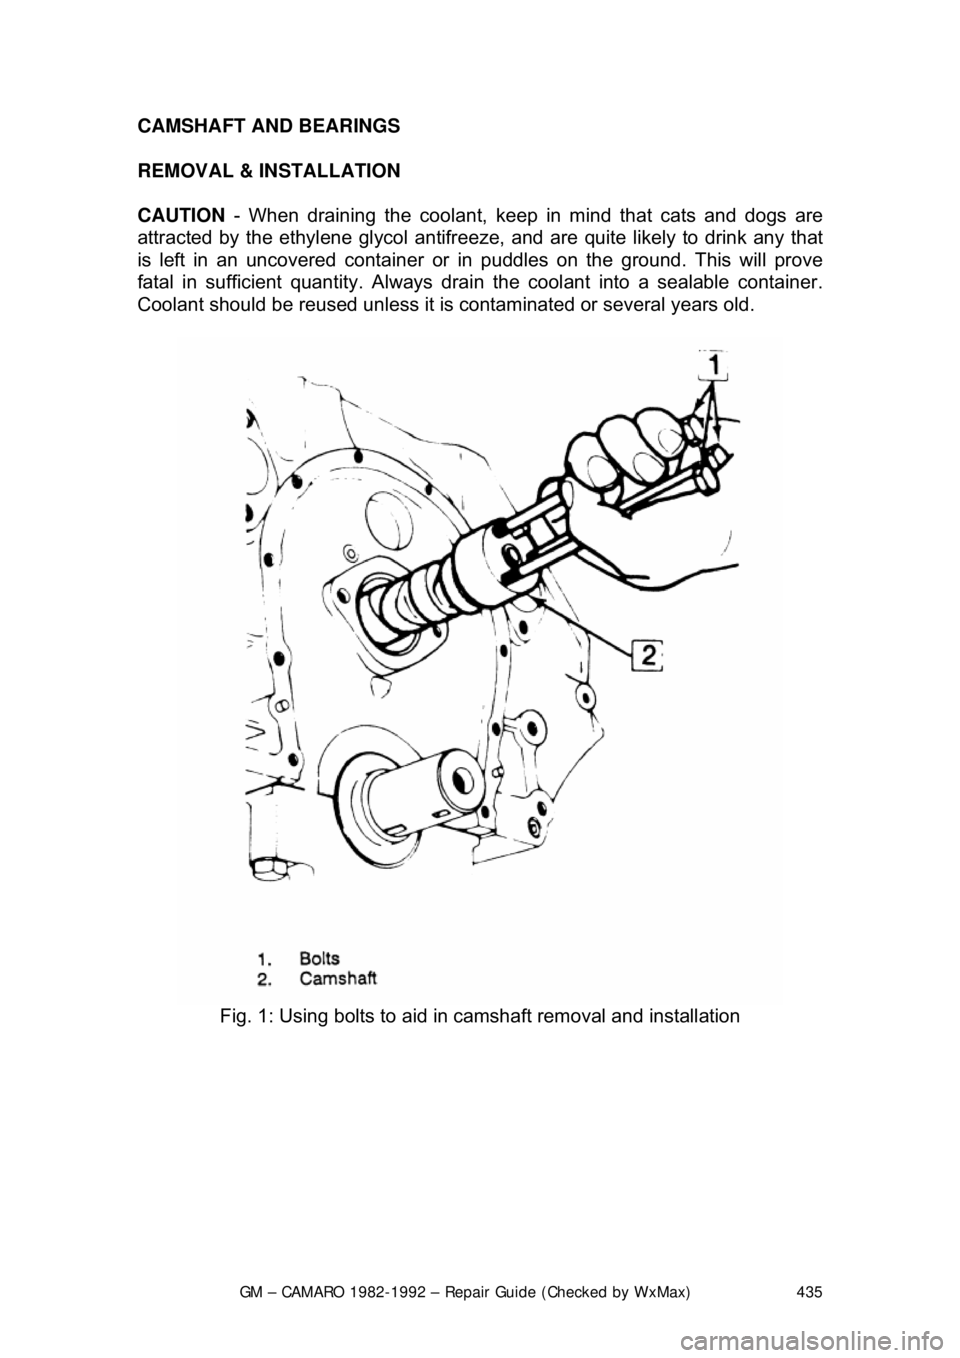
Fig. 1: Using bolts to aid in camshaft removal and installation
Page 449 of 875

GM – CAMARO 1982-1992 – Repair Guide (Checked by WxMax) 449
1. Remove the intake manifold, valve
cover and pushrod cover (4-cylinder).
Disassemble the rocker arms and remove the pushrods.
2. Remove the lifters. If they are coat ed with varnish, clean with carburetor
cleaning solvent.
3. If installing new lifters or you have disassembled the lifters, they must be
primed before installation. Submer ge the lifters in SAE 10 oil and
carefully push down on the plunger with a
1/8 in. (3mm) drift. Hold the
plunger down (DO NOT pum p), then release the plunger slowly. The lifter
is now primed.
4. Coat the bottoms of the lifters wit h Molykote® before installation. Install
the lifters and pushrods into the e ngine in their original position.
5. Install the rocker arms and adjust the valves. Complete the installation by
reversing the removal procedure.
FREEZE PLUGS
REMOVAL & INSTALLATION
CAUTION - When draining the coolant, keep in mind that cats and dogs are
attracted by the ethylene gl ycol antifreeze, and are quite likely to drink any that
is left in an uncovered container or in puddles on the ground. This will prove
fatal in sufficient quantity. Always drai n the coolant into a sealable container.
Coolant should be reused unless it is contaminated or several years old.
1. Disconnect the negative battery cable.
2. Drain the cooling system.
3. Raise and support the vehicle safely.
4. Remove the coolant drain plug on t he side of the block, if equipped. If not
you can use a punch to put a small ho le in the center of the freeze plug
that is being replaced.
5. Remove all components in order to gain access to the freeze plug(s).
6. Using a punch, tap the bottom corner of the freeze plug to cock it in the
bore. Remove the plug using pliers.
7. Clean the freeze plug hole and c oat the new plug with sealer.
8. Using a suitable tool, install the freeze plug into the block.
9. Connect the negative battery cable, fill the cooling system, start the
engine and check for leaks.
REAR MAIN OIL SEAL
REMOVAL & INSTALLATION
CAUTION - The EPA warns that prol onged contact with used engine oil may
cause a number of skin disorders, incl uding cancer! You should make every
effort to minimize your exposure to used engine oil. Pr otective gloves should be
worn when changing the oil. Wash y our hands and any other exposed skin
areas as soon as possible after exposure to used engine oil. Soap and water, or
waterless hand cleaner should be used.
1-PIECE NEOPRENE SEAL
Page 465 of 875

GM – CAMARO 1982-1992 – Repair Guide (Checked by WxMax) 465
Fig. 12: Muffler hanger attachment
ENGINE RECONDITIONING DETE RMINING ENGINE CONDITION
Anything that generates heat and/or friction will eventually burn or wear out (i.e.
a light bulb generates heat, therefore its life span is limited). With this in mind, a
running engine generates trem endous amounts of both; friction is encountered
by the moving and rotating parts inside the engine and heat is created b\
y
friction and combustion of the fuel. Ho wever, the engine has systems designed
to help reduce the effects of heat and fr iction and provide added longevity. The
oiling system reduces the amount of fr iction encountered by the moving parts
inside the engine, while the cooling system reduces heat created by friction and
combustion. If either system is not main tained, a break-down will be inevitable.
Therefore, you can see how regular main tenance can affect the service life of
your vehicle. If you do not drain, flush and refill your cooling system at the
proper intervals, deposits will begin to accumulate in the radiator, thereby
reducing the amount of heat it can extrac t from the coolant. The same applies to
your oil and filter; if it is not changed often enoug h it becomes laden with
contaminates and is unable to properly lubricate the engine. This increases
friction and wear.
There are a number of methods for evaluat ing the condition of your engine. A
compression test can reveal the condition of your pistons, piston rings, cylinder
bores, head gasket(s), valves and valve seat s. An oil pressure test can warn
you of possible engine bearing, or oil pump failures. Excessive oil consumption,
evidence of oil in the engine air intake area and/or bluish smoke from the tail
pipe may indicate worn piston rings, worn valve guides and/or valve seals. As a
general rule, an engine that uses no more than one quart of oil every 1000
miles is in good condi tion. Engines that use one quart of oil or more in less than
1000 miles should first be checked for oil leaks. If any oil leaks are present,
have them fixed before dete rmining how much oil is consumed by the engine,
especially if blue smoke is not visible at the tail pipe.
COMPRESSION TEST
A noticeable lack of engine power, excessive oil consumption and/or poor fuel
mileage measured over an extended period are all indicators of internal engine
Page 467 of 875

GM – CAMARO 1982-1992 – Repair Guide (Checked by WxMax) 467
8. According to the tool manufacture
r's instructions, connect a remote
starting switch to the starting circuit.
9. With the ignition switch in the OFF position, use the remote starting
switch to crank the engine through at least five compression strokes
(approximately 5 seconds of cranking) and record the highest reading on
the gauge.
10. Repeat the test on each cylinder, cranking the engine approximately the
same number of compression stroke s and/or time as the first.
11. Compare the highest readi ngs from each cylinder to that of the others.
The indicated compression pre ssures are considered within
specifications if the lo west reading cylinder is within 75 percent of the
pressure recorded for the highest readi ng cylinder. For example, if your
highest reading cylinder pressure was 150 psi (1034 kPa), then 75
percent of that would be 113 psi (779 kPa). So the lowest reading
cylinder should be no less than 113 psi (779 kPa).
12. If a cylinder exhibits an unusually low compression reading, pour a
tablespoon of clean engine oil into the cylinder through the spark plug
hole and repeat the compression tes t. If the compression rises after
adding oil, it means that the cylinder's piston rings and/or cylinder bore
are damaged or worn. If the pressure re mains low, the valves may not be
seating properly (a valve job is needed), or the head gasket may be
blown near that cylinder. If compressi on in any two adjacent cylinders is
low, and if the addition of oil doesn' t help raise compression, there is
leakage past the head gasket. Oil and coolant in the combustion
chamber, combined with blue or const ant white smoke from the tail pipe,
are symptoms of this pr oblem. However, don't be alarmed by the normal
white smoke emitted from the tail pipe during engine warm-up or from
cold weather driving. There may be evidence of water droplets on the
engine dipstick and/or oil droplets in the cooling system if a head gasket
is blown.
OIL PRESSURE TEST
Check for proper oil pressu re at the sending unit passage with an externally
mounted mechanical oil pressure gauge (a s opposed to relying on a factory
installed dash-mounted gauge). A tachom eter may also be needed, as some
specifications may require running the engine at a specific rpm.
1. With the engine cold, locate and remo ve the oil pressure sending unit.
2. Following the manufacturer's inst ructions, connect a mechanical oil
pressure gauge and, if necessary, a tachometer to the engine.
3. Start the engine and allow it to idle.
4. Check the oil pressure reading when cold and record the number. You
may need to run the engine at a specified rpm, so check the
specifications chart located earlier in this section.
5. Run the engine until normal operati ng temperature is reached (upper
radiator hose will feel warm).
6. Check the oil pressure reading agai n with the engine hot and record the
number. Turn the engine OFF.
Page 476 of 875

GM – CAMARO 1982-1992 – Repair Guide (Checked by WxMax) 476
Before attempting to repair a threaded
hole, remove any snapped, broken or
damaged bolts or studs. Penetrating oil ca n be used to free frozen threads. The
offending item can usually be removed with locking pliers or using a screw/stud
extractor. After the hole is clear, the thread can be repaired, as shown in the
series of accompanying illustrations and in the kit manufacturer's instructions.
ENGINE PREPARATION
To properly rebuild an engine, you must fi rst remove it from the vehicle, then
disassemble and diagnose it. Ideally you should place your engine on an engine
stand. This affords you the best access to the engine components. Follow the
manufacturer's directions for using the stand with your particular engine.
Remove the flywheel or fl explate before installing the engine to the stand.
Now that you have the engine on a stand, and assuming that you have drained
the oil and coolant from the engine, it's ti me to strip it of all but the necessary
components. Before you start disassembli ng the engine, you may want to take
a moment to draw some pictures, or fabr icate some labels or containers to mark
the locations of various components and the bolts and/or studs which fasten
them. Modern day engines use a lot of littl e brackets and clips which hold wiring
harnesses and such, and these holders are often mounted on studs and/or bolts
that can be easily mixed up. The manufacturer spent a lot of time and money
designing your vehicle, and they wouldn't have wasted any of it by haphazardly
placing brackets, clips or fasteners on t he vehicle. If it's present when you
disassemble it, put it back when you asse mble, you will regret not remembering
that little bracket which holds a wire har ness out of the path of a rotating part.
You should begin by unbolting any accessories still attached to the engine, such
as the water pump, power steering pump, alternator, etc. Then, unfasten any
manifolds (intake or exhaust) which were not removed during the engine
removal procedure. Finally, remove any covers remaining on the engine such
as the rocker arm, front or timing cove r and oil pan. Some front covers may
require the vibration dam per and/or crank pulley to be removed beforehand.
The idea is to reduce the engine to the bar e necessities (cylinder head(s), valve
train, engine block, crankshaft, pistons and connecting rods), plus any other 'in
block' components such as oil pumps, balance shafts and auxiliary shafts.
Finally, remove the cylinder head(s) from the engine block and carefully place
on a bench. Disassembly instructions fo r each component follow later in this
section.
CYLINDER HEAD
There are two basic types of cylinder heads used on today’s automobiles:
the Overhead Valve (OHV) and the Over head Camshaft (OHC). The latter can
also be broken down into two subgr oups: the Single Overhead Camshaft
(SOHC) and the Dual Overhead Camshaft (DO HC). Generally, if there is only a
single camshaft on a head, it is just referred to as an OHC head. Also, an
engine with a OHV cylinder head is also known as a pushrod engine.
Page 487 of 875

GM – CAMARO 1982-1992 – Repair Guide (Checked by WxMax) 487
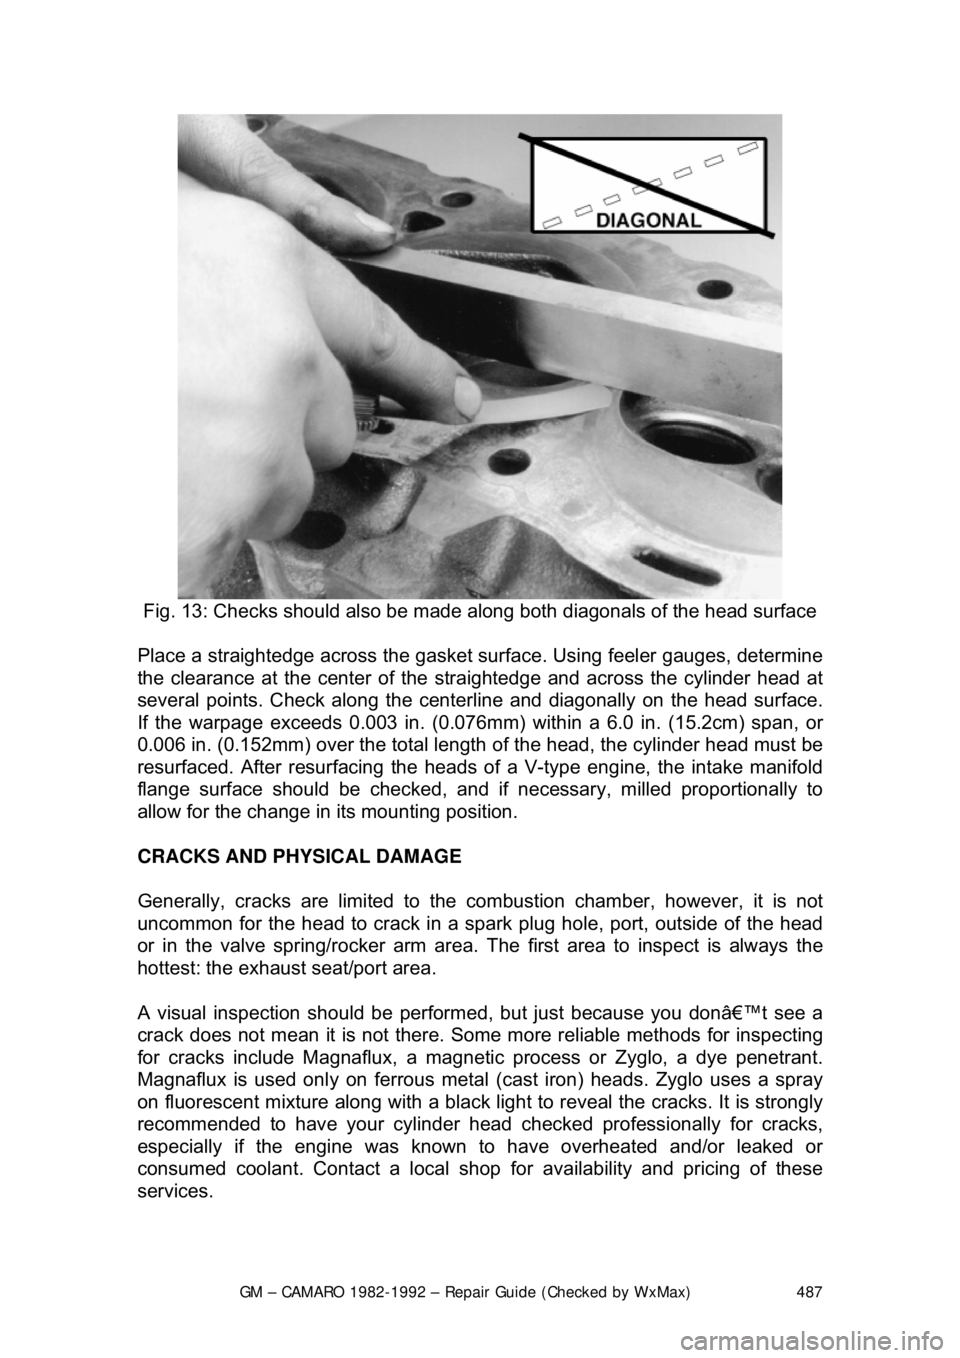
Fig. 13: Checks should also be made al ong both diagonals of the head surface
Place a straightedge across the gasket surf ace. Using feeler gauges, determine
the clearance at the cent er of the straightedge and across the cylinder head at
several points. Check along the centerli ne and diagonally on the head surface.
If the warpage exceeds 0.003 in. (0.076mm) within a 6.0 in. (15.2cm) span, or
0.006 in. (0.152mm) over the total length of the head, the cylinder head must be
resurfaced. After resurfacing the heads of a V-type engine, the intake manifold
flange surface should be checked, and if necessary, milled proportionally to
allow for the change in its mounting position.
CRACKS AND PHYSICAL DAMAGE
Generally, cracks are limited to the comb ustion chamber, however, it is not
uncommon for the head to crack in a s park plug hole, port, outside of the head
or in the valve spring/rocker arm area. The first area to inspect is always the
hottest: the exhaust seat/port area.
A visual inspection should be perform ed, but just because you don’t see a
crack does not mean it is not there. Some more reliable methods for inspecting
for cracks include Magnaflux, a magnetic process or Zyglo, a dye penetrant.
Magnaflux is used onl y on ferrous metal (cast iron) heads. Zyglo uses a spray
on fluorescent mixture along with a black light to reveal the cracks. It is strongly
recommended to have your cylinder head c hecked professionally for cracks,
especially if the engine was known to have overheated and/or leaked or
consumed coolant. Contact a local shop fo r availability and pricing of these
services.