1980 CHEVROLET CITATION wheel
[x] Cancel search: wheelPage 48 of 95
Downloaded from www.Manualslib.com manuals search engine /
SECTION 3
IN CASE OF EMERGENCY
See also ",Engine Exhaust Gas Caution (Carbon Monoxide),' at the beginning of
"Starting and Operating," Section 2 of this manual.
FOUR·WAY HAZARD WARNING FLASHER
•. Use the warning flasher to warn other drivers any lime your vehicle -becomes
a traffic hazard, day or nighc.
• Avoid 'stopping on the roadway ,if possible.
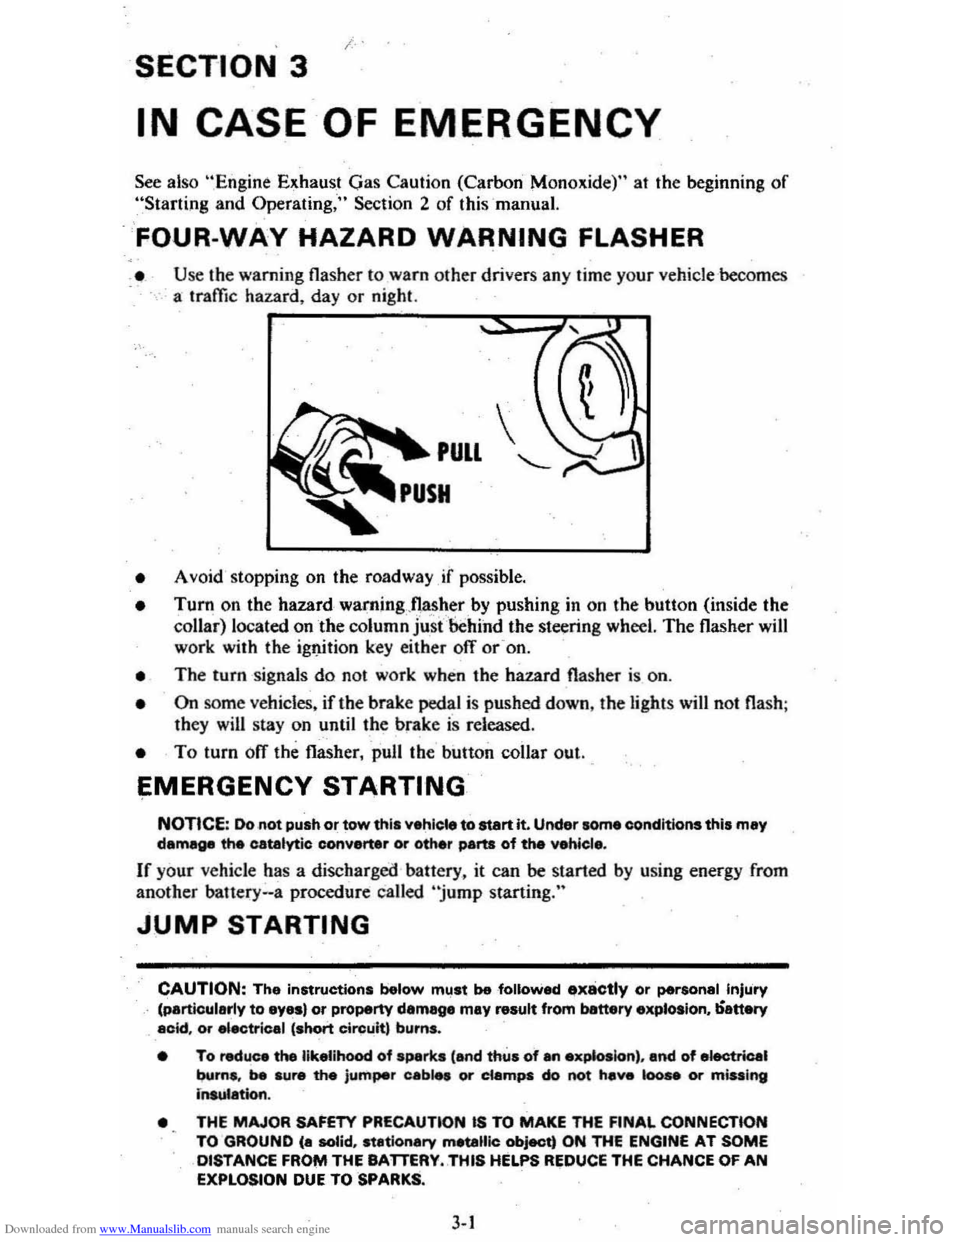
• Turn on the hazard waming"nas~,er by pushing in on the button (inside the collar) located on the column just 'behind the steering wheel. The flasher will work with the ig1J.ition key either ofT or -on.
• The turn signals do not work when the hazard flasher is on.
• On some vehicles. if the brake pedal is pushed down, the light s will not flash ;
they will stay on until the brake is released .
• To turn ofT the flasher, pull the button collar out ..
EMERGENCY STARTING
NOTICE: Do not push or tow this vehiele to start it. Under some eonditions this may damage the catalytic converter or other parts of the vehicl ••
If your vehicle has a discharged battery. it can be started by using energy from
another bauery .. a procedure called "jump starting."
JUMP STARTING
CAUTION: The instructions below mllst be followed ..,x8ctly or personal Injury (particularly to eyas) or property damege may result from banery explosion, ';-attery acid. or "ectrical 'short Circuit, burns.
• To reduce the likelihood of sparks 'and thus of an exp&oslon) , and of electrical
burns. be sure the jumper cab," or ciampa do not hev. 100 .. Of m;uing insulation.
•
THE MAJOR SAFETY PRECAUTlON IS TO MAKE THE FINAL CONNECTION
TO GROUND (a solid, stationary metallic object) ON THE ENGINE AT SOME DISTANCE FROI'II THE BATTERY .. THIS HELPS REDUCE THE CHANCE OF AN EXPLOSION DUE TO SPARKS.
3-1
Page 52 of 95
Downloaded from www.Manualslib.com manuals search engine I COMPACT SPAul
*( ~
Y' v.
~
I ~-C( -"""-c I NO SPARE I • G@1J;"~j ((?)lie, __ ,". ::..-_~.c_
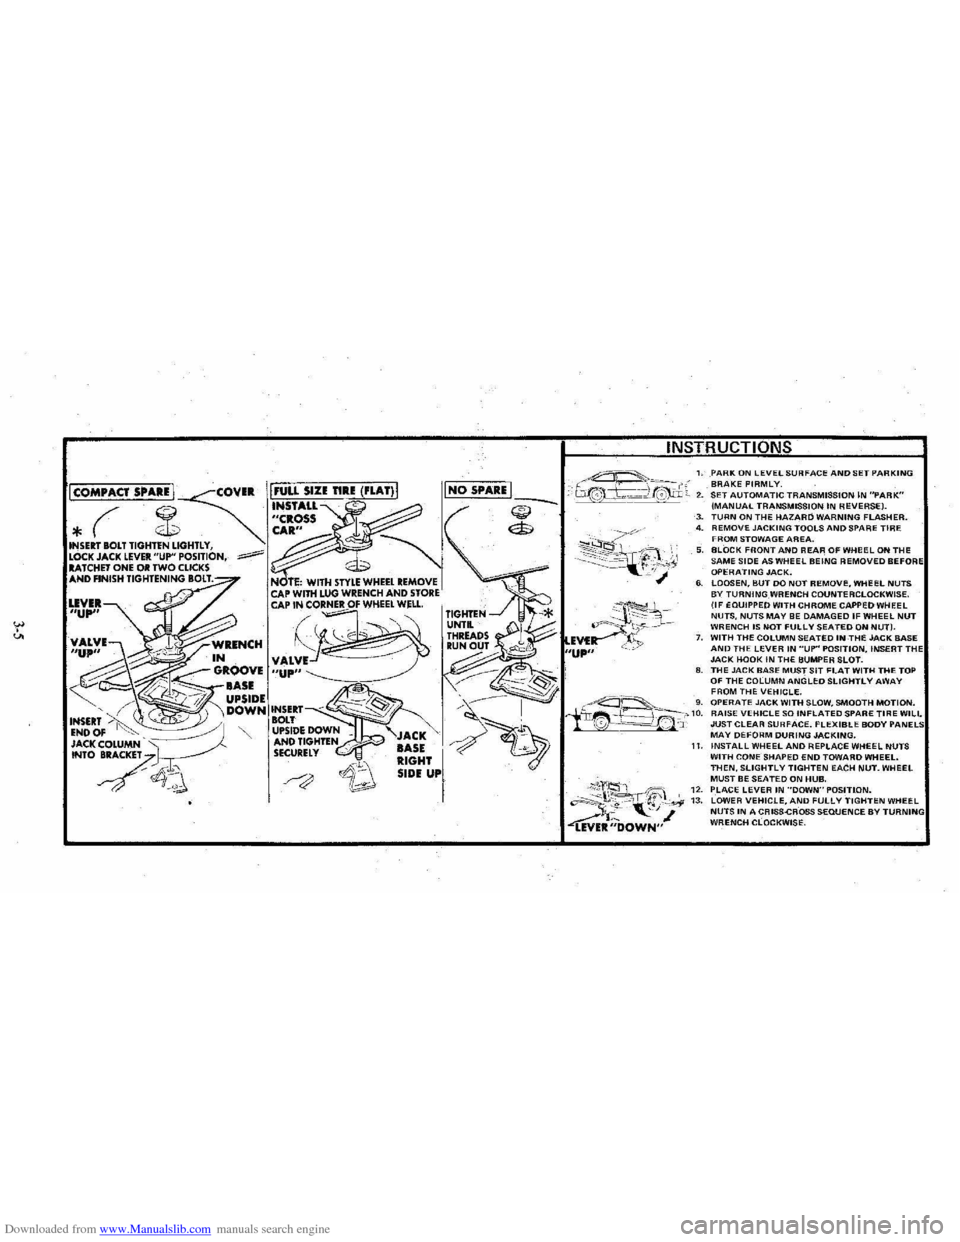
1. PARK ON lEVEL SURFACE AND SET PARKING BRAKE FIRMLY. 2. SET AUTOMATIC TRANSMISSION IN "PARK" (MANUAL TRANSMISSION IN REVERSE). ~ ($
~~~~?~;y,
3. TURN ON THE HAZARD WARNING FLASHER. 4. REMOVE JACKING TOOLS AND SPARE TIRE FROM STOWAGE AREA. 5. BLOCK FRONT AND REAR OF WHeEL ON THE SAME SIDE AS WHEEL BEING REMOVED BEFO OPERATING JACK. 6. LOOSEN, BUT DO NOT REMOVI:, WHEEL NUTS BY TURNING WRENCH COUNTERCLOCKWISE. (IF EQUIPPED WITH CHROME CAPPED WHEEL NUTS, NUTS MAY BE DAMAGED IF WHEEL NUT WRENCH IS NOT FULLY SEATED ON NUT). 7. WITH THE COLUMN SEATED INTHE JACK BASE AND THE LEVER IN "UP" POSITION, INSERT TH JACK HOOK IN THE BUMPER SLOT. 8. THE JACK BASE MUST SIT FLAT WITH THE TOP OF THE COLUMN ANGLED SLIGHTLY AWAY
I
FROM THE VEHICLE. ~---'-_ 'g. OPERATE JACK WITH SLOW, SMOOTH MOTION. iir~f~~_-'-'10. RAISE VEHICLE SO INFLATED SPARE TIRE WILL '0 --=-==!.~' 'J: JUST CLEAR SURFACE. FLEXIBLE BODY MAY DEFORM DURING JACKING.
;\;'2, 'ift;" "~~t. "-', ~ ~R;;'OWN"
11. INSTALL WHEEL AND REPLACE WHEEL NUTS WITH CONE SHAPED END TOWARD WHEEL. THEN. SLIGHTLY TIGHTEN EACH NUT. WHEEL MUST BE SEATED ON HUB. 12. PLACE LEVER IN ··DOWN"POSITlON. 13. LOWER VEHICLE. AND FULLY TIGHTEN WHEEL NUTS IN A CRISS-CROSS SEQUENCE BY WRENCH CLOCKWISE.
Page 53 of 95
Downloaded from www.Manualslib.com manuals search engine JACKING
CAUTION
To help avoid personal injury:
• Follow all jackin g and stowag e instructions.
• Use jack only fo r liftin g this venicle du -rin g wheel c h a ng e.
• Nev er ge t ben eath th e vehiCle, start or run en g in e while vehicle is supported b y jac k.
• Always securely res tow spare tire (o r flat tire ) an d all jackin g equipment.
Wheel Nut Torque
CAUTION: As soon as possible after Installing 8 wheel-and at the intervals shown on the chart-in the Maintenance Schedule foldet-han 8 m.chanic tighten whe&l nuta with II torque wrench to the specifications shown in "SpeCifications ," Section 7 of this manual. Wheel nuts should be tightened alternately and evenly to the correct torque. Never us. oil or grease on studs or nuts. Improperly tightened wheel nuts could eventually allow the wheel to come off while the vehicle is moving, possibty causing loss of control.IAlso see the Caution in "Service and Maintenance," Seetion 5 of this manual regarding the danger of mixing metric and customary fasteners.)
Stowage of Tire and Jack
CAUTION:·AlwaYs MOurely restow the spare tire assembty (or flat tire). all jacking equipment. and the cover, using the means provided. When driving the car with the compact spare installed and the reer seat folded down, stow the wheel cover flat on the rear floor behind the-right front seat. When the rear seat is up (or If It does not fold), stow the wheel cover in the trunk area. This will help keep such things from being thrown about and injuring peopla In the car in an accident.
Compact Spare
The compa ct sp are is des ig ned to save space in yo ur trunk, and its lighler weig ht
m ak es
it easi er to in stall if a flat tire occurs. The light~r weig ht als o helps improve fuel eco no my.
If you have a flat tire, follow the jack ing in struction s in this manual while keeping
t h ese point s in min d:
• Chec k inflati on press ure as soo n as practical after in sta llin g the s pa re ( use of a pocke t type: high pressure inflatio n gage is adv ised) and adjust to 415
k Pa (60 psi). The tire pressur e sh o uld be checked at least monthl y and kept at 415 kPa (60 ps i) while the tire is s tored.
• Co ntinuou s use at spe eds over 50 mph (80 km/h) is not re c omme nded .
NOTICE: Because this tire is amaUer than the standar d tire, vehicle ground clearance is reduced, Avoid driving over obstacles, and do not take your car U,rough an automatic car wash whila the spare is installed. The car may get caught possibly resulting in property damage.
• A trea d life of up to 3,000 mil es (4 800 kilomet ers) ca n b e expe cted, depe nding
on roa d condi tions and you r
driv ing habits . T o co nserve tire t read life. return the spar e to the sto rage area as soo n as the sta nd ard tir e ca n be repa ir ed -or
r
epl ac ed .
• Beca use the co mpac t spare was spec ifica lly designe d for your car, it s hould
no t be used on any other vehicle.
3-6
Page 54 of 95
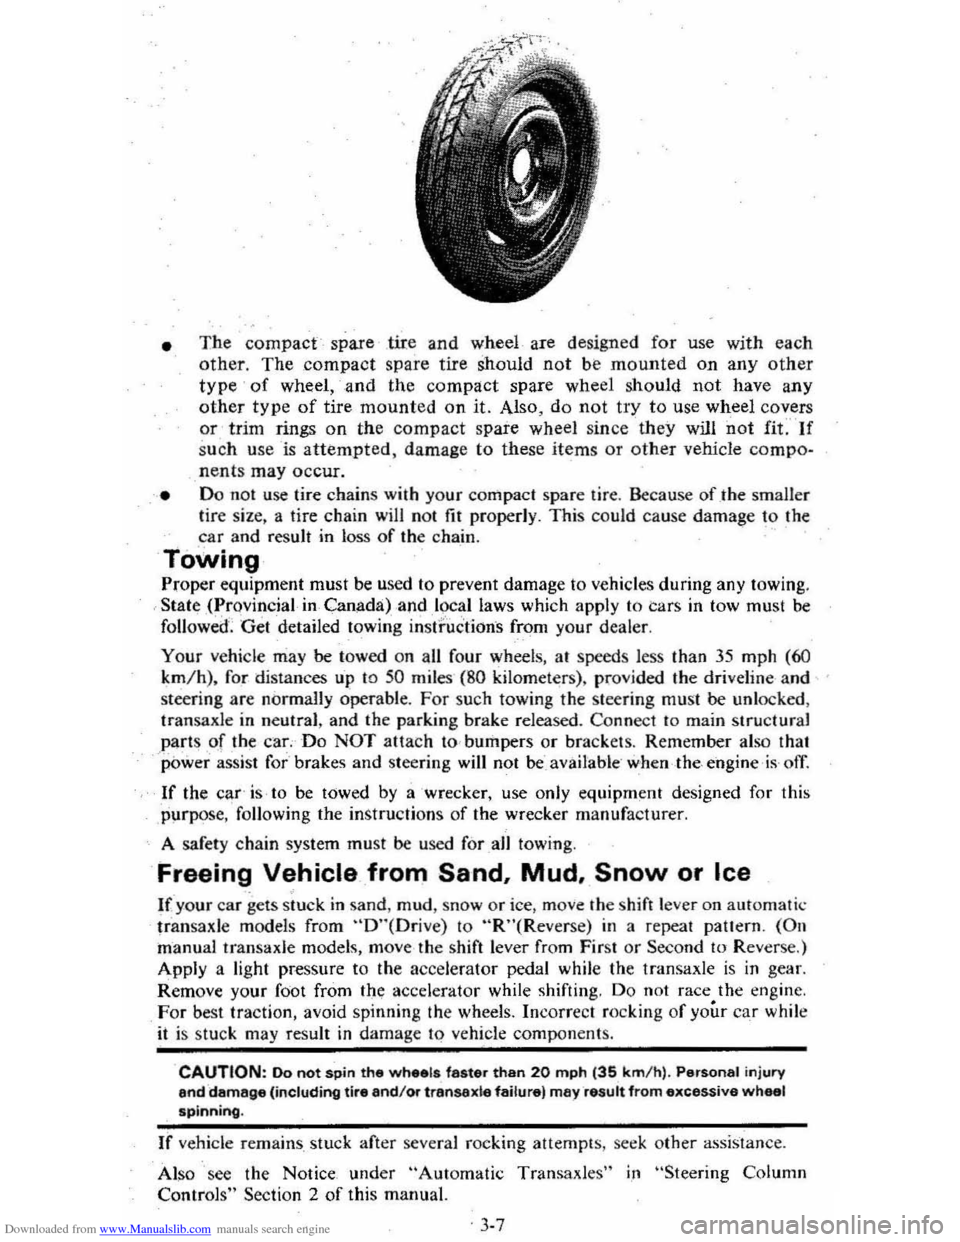
Downloaded from www.Manualslib.com manuals search engine • The compact spare .tire and wheel are design ed for use with each
other. The compact spare tire should not be mounted on any other
type of wheel, and the compact spare wheel should not have any
other type of tire mounted on it. Also, do not try to use wheel covers or trim rings on the compact spare wheel since they will not fif" If
s u ch u se is attempted, damage to these items or other vehicle compo~
nent s may occur.
• Do 1I0t use tire chains with your compact spar e tir e. Because of .the smaller lire size, a tire chain will no t fit properly . This could cause damage to the car and result in loss of the cha,in.
Towing
Prop er equipment must be used 10 prevent damage to ve hicle s during any towing .
State ,(.,rovincial in Canada) ,and l~~l laws which apply to Cars in tow must be
followed '. Get detailed towing instructions from your deale r.
Your
vehicle may be towed on all fo ur wheels, at speeds less than 35 mph (60
km /h) , for distances u'p 1O 50 miles ( 8 0 kilometer s). pro vided the driveline and
steering are normally operabl
e. For such towing the steering must be unlocked ,
tran saxle in neutral , and the parking brake released . Co
nnec t to main structural
part s of th~ car; Do NOT attach to , bumpers or brackets . Remember also that power assist for brakes and steering will not beavailable ' when the, engine is ofl
If the car' is to be towed by a 'wrecker, use only equipm~nt designed for this
purpos
e, following the instru ction s of the wrecker manufacturer.
A safety chain system must
be used forall towing .
Freeing Vehicle from Sand. Mud. Snow or Ice
If your car gets stuck in sa nd , mud , snow or ice , move the s hift lever on aut om atic
tr ans ax le models from "D"(Orive) to "R"(Reverse) in a repeat pattern. (On
manual transaxle models, move the shift lever from First or Second to Rever se.)
Apply a
light pressure to the acce lerator pedal while the transaxle is in gear.
Remove your
foot from the;: accelerator while shifting . Do not race the engine.
For best traction, avoid spinnin g the wheels. Incorrect rocking of your car while it is stuc k may result in damage to vehicle components.
CAUTION: 00 not spin the wh •• ls faster than 20 mph (35 km/ h) . Personal injury end damage (including tire and/Of transexle failure) rna)' result from excessive wheal spinning.
If vehide re mains stuck after several roc king attempt s, s eek other assistan ce.
Also 'see the Notice under
"Automatic Transaxles" i,n "Steering Column
Contro ls" Section 2 of this manu al.
. 3-7
Page 58 of 95
Downloaded from www.Manualslib.com manuals search engine CARE AND CLEANING OF EXTERIOR
EXTERIOR APPEARANCE
The paint finish on yo~r vehicle provides beauty, depth of color, gloss retention
and durability.
WASHING YOUR VEHICLE
The best way to preserve your vehicle's finish is to keep it clean by frequent
wa sh ings. Wash the vehicle in lukewarm or cold wate r. .
Do n o t lise hot water or wash in the direct rays of the 's un. Do not use stro ng
soap or chemical deterge nts. All cleaning agents should be promptly flushed from the surface and not allowed to dry on the fini sh .
POLISHING AND WAXING YOUR VEHICLE
Poli shin g is recomme nded to rem ove accu mulat ed residue and elim inate any "weathered" appearance;
Y ou r dealer offers several
polishes and cleaners which have proven value in
m aint
ainin g original finish appe .a rance and durability .
PROTECTION OF EXTERIOR ~RIGHT METAL PARTS
Bright metal parts should be clean ed regu larly to keep their luster. Washing with
wat er i s all that
is usu ally, needed. How ever, GM Chrome Polish may be used on CHROME or STAINLESS STEEL trim. if neces sary .
Use spec ial care with ALUMINU M trim . N eve r use aul a o r chrome polish, s team
or caustic soap to clean .aluminum. A coat ing of wax, rubbed to a high polish,
is recom mended for all bright metal parts.
CLEANING ALUMINUM WHEELS
Prese rve the original appearance of opti onal ·aluminum wheels by keep ing them clean and free ·Jrorn build-up of road dirt andlor road salt. Regular cleaning
followed
by · a coat of paste wax (such as GM 1.050237 " Fini sh Guard") is reco mm ended.
FOREIGN MATERIAL DEPOSITS
Calcium chloride and other salts, ice melt ing ag~nts, road oil and tar, tree sap ,
bird drop pings , chem icals from industria l c himn eys, and other foreign matter may
dam age
vehicle finishe s if allowed to remai n on painted surfa~es.
Promp t washing may ,not complet ely remove all of these deposits. Additional
clean ers may be needed . When using chem ical clean ers developed for this purpose,
be certain they are safe for use on painted s
urfaces.
FINISH DAMAGE.
Any sto ne chips, fractures or deep scratches in the finish should be repaired
promptly. Exposed
meta l will corrode ,quick ly and may develo p into majo r repair
exp ense.
Min or chips and scratches c
an be repaired using touc h-up materials available from
your dealer. Larger areas of dama ge to the finish can be co rreeted in your dealer's
body and paint sho p.
4 -4
Page 59 of 95
Downloaded from www.Manualslib.com manuals search engine CLEANING WHITE SIDEWALL TIRES
UseGM White Sidewall Tire Cleaner or a tire cleaner which will not harm wheel
aluminum trim. A stitT brush may
be used with the cleaner.
CORROSION PROTECTION
Generally, your vehicle has been designed and built to resist corrosion. Special
materials and protective finishes were applied to most parts of your vehicle when it was built to belp maintain good looks, strength and reliable operation. However,
some parts which are normally not visible (such as certain parts
under the vehicle and under the hood) are strong enough so that surface rust will not affect their
reliability.
So corrosion protection is not needed or used on these parts. By
omitting unneeded fust protection on such parts and applying extra protection where it is needed most, best value is assured for the vehicle buyer.
SHEET METAL DAMAGE
If your vehicle is damaged and requires sheet metal repair or replacement. make
sure·
the body repair shop applies anti-corrosion material to the parts repaired or replaced so that corrosion protection is restored. (Also see "Finish Damage" in
this section.)
UNDERBODY MAINTENANCE
Corrosive materials used for ice and· snow removal and dust control can collect
on the underbody. If these materials are-not removed. accelerated corrosion (rust)
can
occur on underbody parts such as fuel lines. frame, floor pan. and exhaust
system even though they have been provided with corrosion protection.
At least every spring. flush these materials from the underbooy with plain water.
Take care to clean well any areas where mud and other debris can collect.
Sediment packed in closed areas
of the frame should . be loosened before being
flushed.
If desired. your authorized dealer can perform this service for you.
4-5
Page 73 of 95
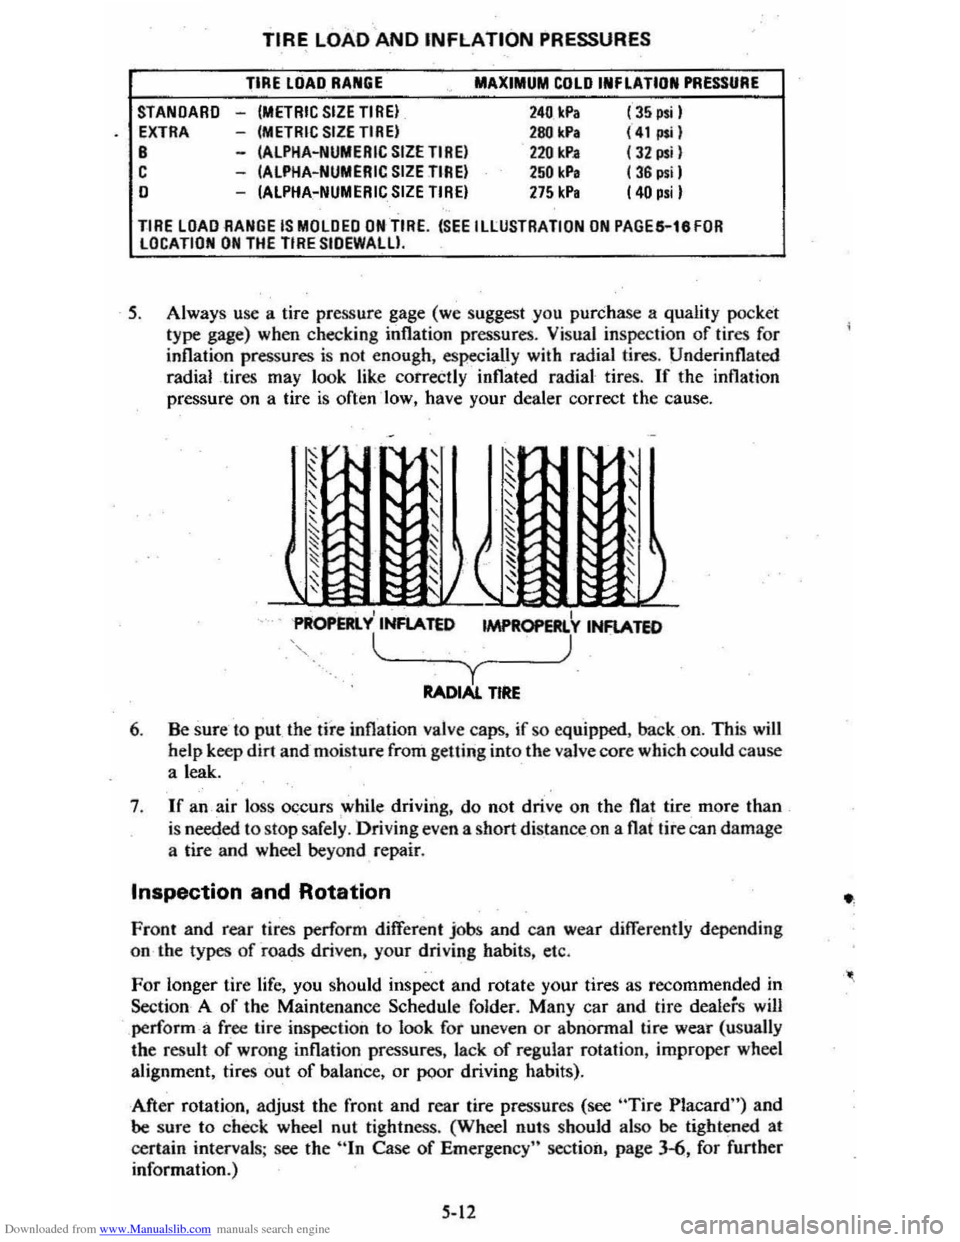
Downloaded from www.Manualslib.com manuals search engine STANDARD EXTRA B C o
TIRE LOAD AND INFLATION PRESSURES
TIRE LOAD RANGE
-(METRIC SIZETIREI -(METRIC SIZETIREI -(ALPHA-NUMERIC SIZE TIREI -(ALPHA-NUMERIC SIZE TIREI -(ALPHA-NUMERIC SIZE TIREI
MAXIMUM COLD INFLATION PRESSURE
240 Ic.Pa 280 kPa 2211 kP. 250 kP, 275 kP,
(35 psi I (41";1 (J2 psil ( 36 psil (40 p.iI
TIRE LOAD RANGE IS MOLDED ON TIRE. (SEE ILLUSTRATION ON PAGES-leFOR LOCATION ON THE TIRE SIOEWALU.
5. Always use a tire pressure gage (we suggest you purchase a quality pocket
type gage) when checking inflation pressures. Visual inspection of tires for
inflation pressures is nol enough, especially with radial tires. Underinflated
radial tires may look like correctly inflated radial tires.
If the inflation
pressure on a tire
is often ·low, have your dealer correct the cause.
, I PROPERlY INFlATED 1MPR0PERl Y INFlATED
l~_~~_~) y RADIAl. TIRE
6. Be sure to put the tire inflation valve caps, if so equipped. back on. This will help keep dirt and-moisture from getting into the valve core which could cause
a leak.
7 .
If an air loss occurs while driving. do not drive on the flat tire more than
is needed to stop safely . Driving even a short distance _on a flat tire can damage
a tire and wheel beyond repair.
Inspection and Rotation
Front and rear tires perform different jobs and can wear differently depending
on the types
of roads driven, your driving habits, etc.
For longer tire life, you should inspect and rotate your tires as recommended in
Section A
of the Maintenance Schedule folder. Many car and tire dealers will perform -a free lire inspection to look for uneven or abnormal tire wear (usually
the result of wrong inflation pressures, lack of regular rotation, improper wheel
alignment, tires out
of balance, or poor driving habits).
After rotation, adjust the front and rear tire pressures (see
"Tire Placard") and be sure to check wheel nut tightness. (Wheel nulS should also be tightened at
certain intervals ; see the
hIn Case of Emergency" section, page 3-6, for further
information.)
5-12
Page 74 of 95
Downloaded from www.Manualslib.com manuals search engine CAUTION: BefOf"e Installing wheels. remo';.'~-~y build.up of corrosion on the wheel mOOnti_ng surfllce.and brake .drum or disc mounting surface by scrllping and wire brushing~-Installing ~h •• ls without good metal·to-metal contact at the mounting surfaces can cause whe.lnuts to loosen. which can later allow a wheel to c;ome off while the vehicle is moving. possibly causing loss of control.
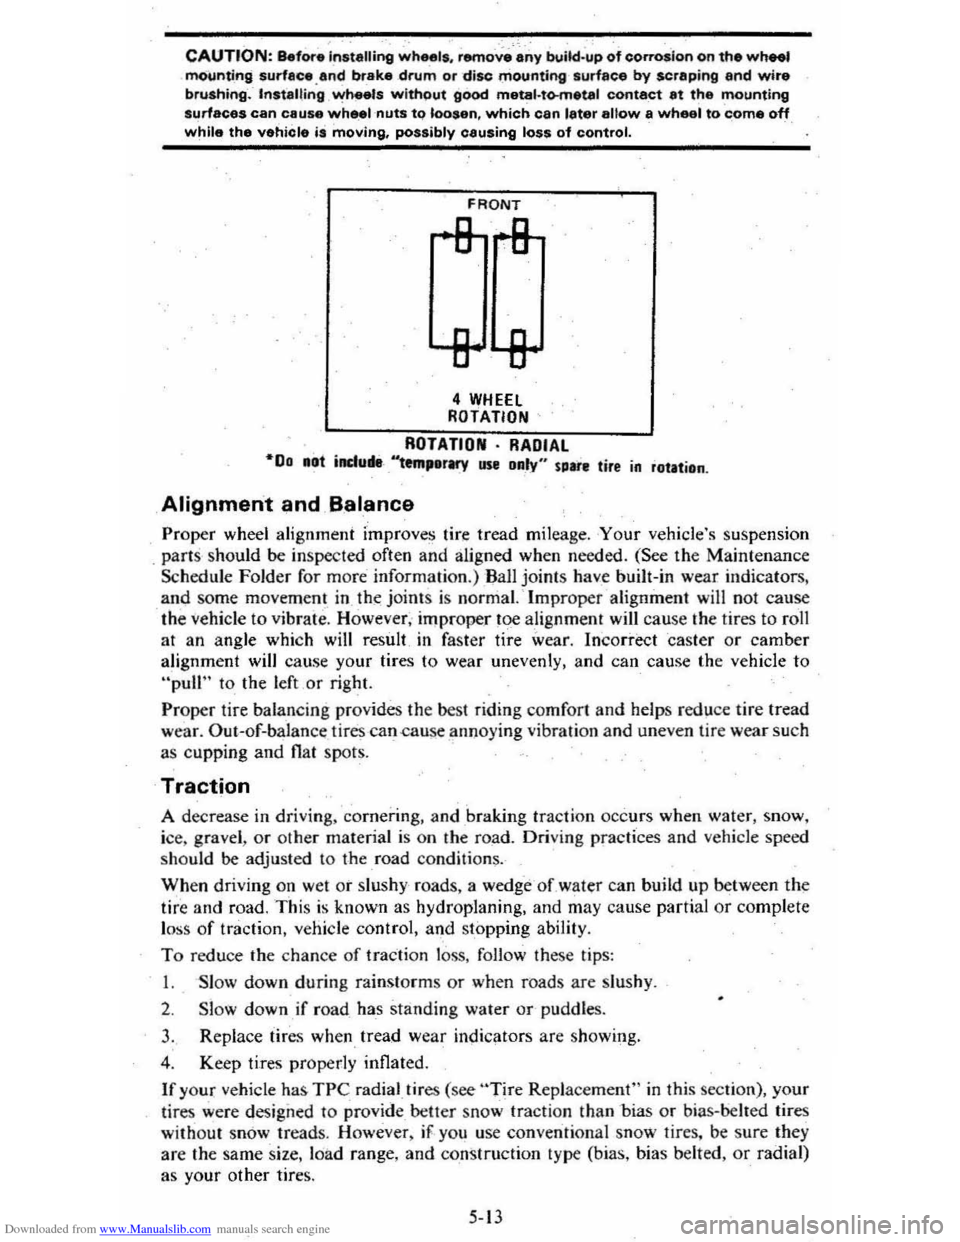
FRONT
4 WHEEl ROTATION
ROTATION· RADIAL "00 .at induM-'''tm,erMY use Daly" sure tire in rotation .
Alignment and B.alance
Proper wheel alignment improves tire tread mileage . Your vehicle's suspension
. parts should be inspected often and aligned when needed. (See the Maintenance
Schedule Folder for m ore information.) Ball joints have built-in wear indicators,
and some movem ent in th~ joint s is normal. ' Improper alignment will not cause
the
vehicle to vibrate. However, improper toe alignment will cause the tires to roll
at an angle which will result in faster tire wear. Incorrect caster or camber
alignment will cause your tires to wear unevenly, and can cause the vehicle to
"pull" to the left or right.
Proper tire balan cing provides the best riding comfort and helps reduce tire tread
wear. Out--of-balan ce tires -can .cause annoying vibration and uneven tire wear such
as cupping and
flat spots.
Traction
A decrease in driving. cornerin g, and braking traction occurs when water, snow,
ice, gravel ,
or other material is on the road. Driving practices and vehicle speed
should be adjusted to the road condition~.
When driving on wet or slushy roads, a wedge -of water can build up between the
tire and road. This is known as hydroplaning, and may cause partial or complete
l oss
of traction, vehicle control, and stopping ability.
To reduce the chance of traction loss, follow these tips:
I. Slow down during rainstorms or when roads are Slu shy .
2. Slow down if road has standing water or-pUddles.
3. Replace tires when tread wear indicators are showing.
4 . Keep tires properly inflated.
If your vehicle has TPC radial.tires (see "Tire Replacement" in this section), your
lir es were design ed to
provide _ better snow tracti on than -bias or bias-belled tires
without snow treads. However , iF . yo u use conventional snow tires. be sure they
are the same size. loa d range, and construction type (bias, bias belted,
or radial)
as your other tire
s.
5-13