1980 CHEVROLET CITATION parking brake
[x] Cancel search: parking brakePage 5 of 95
Downloaded from www.Manualslib.com manuals search engine SECTION 1
BEFORE DRIVING YOUR
CHEVROLET
DRIVER DAILY CHECKLIST
Be sure you know your vehicle and its, equipment and how to use it safely.
Before Entering the Vehicle
1. See that windows, mirrors, and lights are clean and unobstructed.
2. Check whether any tire is low or flat. (If any tire looks different from nonnal,
we recommend you check
it with a tire pressure gage.)
3. Check that all lights work.
4. Look for fluid leaks.
5. Be sure everything is properly stowed.
6. Check the area behind the vehicle if you are about to back up.
Before Driving Off
1. Lock all doors.
2. Adjust seat.
3. Adjust inside and outside mirrors.
4. Fasten seat belts.
5. Check that all the warning lights work as the key is turned to "'Start."
6. Check all gages (including the fuel gage).
7. Release the parking brake (and see that the "Brake" light turns om.
Seerelated topics in this manual, or the Maintenance Schedule folder, if problems
are found.
Guard Against Theft
For tips on how to protect your vehicle and its contents, see "Starting and
Operating" in section 2 of this manuaL
KEYS
Two different keys are· provided for the locks on your vehicle. The key code is
stamped on the "knock out" plug in each key head.
• Key with square head (letter "A" or "e") -for ignition lock only.
• Key with oval head (letter "8" or "0") ~ for all other locks.,
For vehicle security:
• Record the key code numbers; then knock the plugs out of the keys.
• Keep the key codes in a safe place (such as your wallet), NOT IN THE
VEHICLE.
If the original keys are lost, duplicates can
be made using the key codes. Contact
any
OM dealer or a locksmith.
If yO~i park in an attended lot, leave only your square-head ignition key.
1-1
Page 17 of 95
Downloaded from www.Manualslib.com manuals search engine NOTICE: Use only trailer hitches which permit normal operation of the Energy Absorbing Bumper System. if so equipped. For example. a rigid fore and .iUt connection between the bumper and any other part.of. the car may increase .damage in the event of II collision.
TRAILER TOWING TIPS
Getting Started
Before entering traffic with a frailer that has electric brakes, start the car and
trailer moving and apply the trailer brakes
by hand to be sure the trailer brakes
are working and the trailer electrical system
is connected .
. Engine Cooling
:
When going up long grades, you, can reduce the chance 'of engine overheating by
turning
off the air conditioner, if so equipped.
Transaxle
,See the method for checking the transaxle fluid le ve l. in "Service and
,.;.Maintenance," Section 5 of this manual .
Parking
You should not park cars with trailers on a grade (hill). However, if you must
park on a grade, these steps must be followed:
1. Apply the regular brakes.
2. Have someone place wheel' chocks under the trailer wheels.
3. When the wheel chocks are in place, release the regular brakes until the
chocks absorb the load .
4; Apply Ihe parking brake.
S. Shift Ihe transaxle 10 ··P"(Park).
If the car is parked on a grade. don't shift the transaxle 10 "P"(Park) until the
trailer wheels
are chocked and the parkinghrake, is set~ If you do, the weight of . the car and trailer may put so much force on the parking pawl in the transaxle
.
that it may be hard to shift oul of "P"(Park).
When starting , after being parked ' on a grade:
(; Apply the regular brakes and hold.
2 .
Stan th e engine in ··P"(Park) .
-3. Shift into gear and release the parking brake.
4. Release the regular brakes and drive until the chock s are free.
5. Apply the regular brakes and have your helper remove the chocks.
J.]3
Page 23 of 95
Downloaded from www.Manualslib.com manuals search engine • Off· You can turn off the engine without loc king the steering ,wheel and shirt control s o'n aut omatic tranSaxle models. or steering -wh eel only on
mariual transaxle models.
• Run· Normal operating position.
• Start -Cranks the engine:
If you have trouble turning the key to unlock the ignition. first be sure the key
i s pushed in all the way. Then try to turn the ste ering wheel as hard as you can
in the _di rec tion the Wheels are turned. At th e same time, turn the ignition key
with
as mu ch effort as you can apply with your ha nd. Do not try to use a tool
of any kind to
a_pply more force on 'the lock knob. as this could bre ak the kn.ob.
CAUTION: .on manual tranS8xle cars. if you need to turn off the engina while the car is moving. turn the key onlv to ".off." DO NOT press down on the key release lever while turning the ignition off. This will result in locking the steering wheel and If'S8 of steering control.
NOTICE: Do_.oot drive through . idle or park your vehicle over combustible materials. such as grass or lC!'aves. They could touch the hot exhaust system and Ignite.
Parking
When leaving your car unatte nded :
• Firml y appl y the park ing brake. Do n o t use th e tran saxle a 's a substitut e for (he parking brake.
• Mov e the automatic transaxle shift lever to "P"(Park) ("Rever se" for man ual
tran saxle ).
• 'Turn the key to "Lock ," On manualtransaxle cars, press,down the key release
lever a
nd turn the key to "Lock. "
•
Close all windows.
• Remove the key (the buzzer is designed to remind you).
• Lock ,,'n doors.
TURN SIGNAL AND MULTI-FUNCTION LEVER
The I urn signa l-lever on th e left side of the ste erin g column also co ntr ols headlight
l ow -beam
or high·beam. and the windshield wiper/washer .
• Turn Signal -Move the lever up to t he second stop to signal a right tum.
Move it do wn 10 the seco nd stop to sig nal a left turn . When the turn is
compleled, the signal will cancel and the lever will return to' h o rizont al.
• Lane Change Signal. In some turns. such as ch an ging lanes, the steering wheel is not turned far enou gh 10 ca nce l th e turn signal. Fo r convenience.
you
can flash Ihe turn signal by moving the lever part way (to t-he first stop) and h olding it there. The lever will re turn to horizo ntal when 'You release it.
Tw o green lights_ o n the instrum ent panel are des igned to nas h 10 tell you that
th e front and rear turn
sign al light s are working. If the light stays on, but does
not flash, check for bur ned- out turn signal bulbs. If Ihe green light does not com e
all when yo u m ove the leve r. c _h ec k the fuse and indicator . bulb. However, iryou
ordered a ,tra iler towing optio n in which extra wiring waS added to attach the
trailer lighting, a different type
of flasher was installed . In this case , the gree n light will co ntinu e 10 flas h even if a turn sig nal bulb burns out. Therefore, you must
regularly look at the front and
rear turn signal light s 10 be sure they are working.
2-6
Page 25 of 95
![CHEVROLET CITATION 1980 1.G Owners Manual Downloaded from www.Manualslib.com manuals search engine SINGLE WIPE
LOW SPEED (PULSE WIPER)
HIGH
SPEED
• Check the washer fluid levelregu]arly. Do it often when the weather
is bad.
• U CHEVROLET CITATION 1980 1.G Owners Manual Downloaded from www.Manualslib.com manuals search engine SINGLE WIPE
LOW SPEED (PULSE WIPER)
HIGH
SPEED
• Check the washer fluid levelregu]arly. Do it often when the weather
is bad.
• U](/manual-img/24/8083/w960_8083-24.png)
Downloaded from www.Manualslib.com manuals search engine SINGLE WIPE
LOW SPEED (PULSE WIPER)
HIGH
SPEED
• Check the washer fluid levelregu]arly. Do it often when the weather
is bad.
• Use a nuid such as OM Optikleen to help prevent freezing damage, and for better cleaning.
• Do not use radiator antifreeze in the 'windshield washer; ifcould cause
paint damage .
• In cold weather, warm the windshield with the defroster before using the washer-to help prevent Icing that my block
the driver's vision.
STARTING THE ENGINE
I.
2.
Apply the parking brake. . .
Automatic Trl!nsaxl..: Move the transaxle shift lever to "P"(Park) or "N" (Neutral) "P" Preferred). A starter safety device is
designed to keep the starter from operating if the shift lever is in any drive position. (If you need to fe-start the engine while the car is moving . move
the shift lever to "N.")
Manuel Transaxle· Press the clutch pedal to the floor and shift the transaxle to Neutral. Hold the clutch pedal to the floor while you are s tarting ,the engine. A starter safety device l,s d esigned to keep the starter
from operating if the clutch pedal is not fully depres sed.
3. Sta'rt the engine as outlined below for different conditions.
NOTICE: 00 not crenk the engil'. for more than 15 seconds at e time. Walt 10 to 15 seconds before trYiog agein.
• COLD ENGINE:
•
L·4 Engine Press the accelerator pedal to the floor and ·i slowly release It. With your foot off the pedal; crank the engine
by turning the ignition key to "Start ." Release the key when the engine
sta rts.
If the engine starts, but fails to run, repeat this procedure. •
• V-6 Engine: Press the accelerator pedal to the floor twice and slowly release it. With your foot off the pedal. crank the engine by turning the ignition key to 'Stan". Release key when engine
s tarts.
If the engine starts, but fails to run, repeat this procedure but press
the accelerat or pedal only
ONCE to the floor . :When the e ngine is
running smoothly (about 30 seconds), you_ can reduce the engine idle speecf by press ing down slightly on the accelerator pedal. then slowly
releasing it.
2-8
Page 28 of 95
Downloaded from www.Manualslib.com manuals search engine • Holding. vehicle on an upgrade with the accelerator pedal. (Use the regular
brakes to hold car on an uphill grade.)
Column Shift Lever
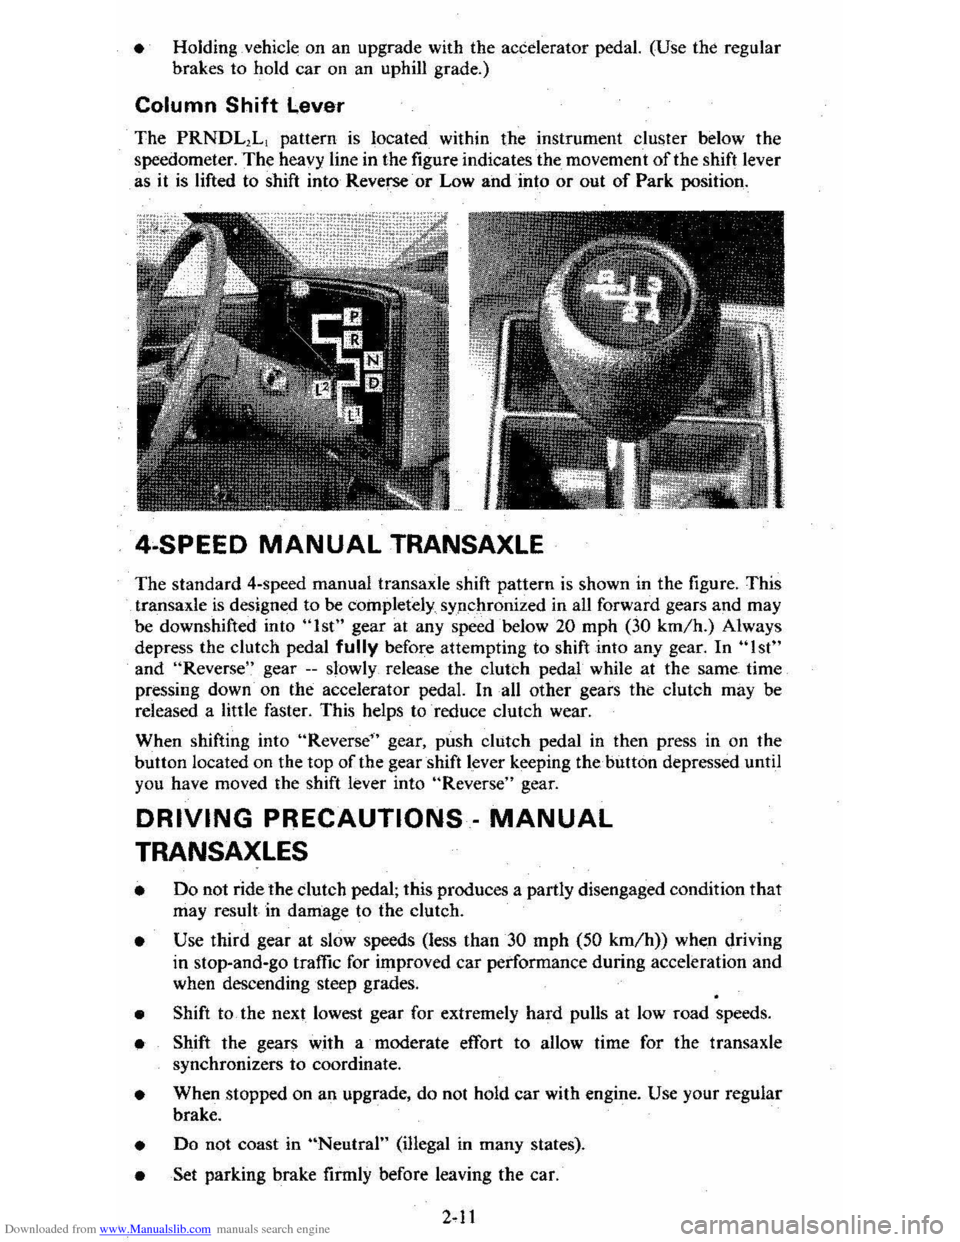
The PRNDL1L1 pattern is located within the instrument cluster below the
speedometer.
The heavy line in the figure indicates the movement of the shift lever
as it
is lifted to shift into Reverse or Low and into or out of Park position.
4·SPEED MANUAL TRANSAXLE
The standard 4-speed manual transaxle shift pattern is shown in the figure. This
transaxle
is designed to be cOinpletely sypchronized in all forward gears and may
be downshifted into "1st" gear at any speed below 20 mph (30 km/h.) Always
depress the clutch pedal
fully before attempting to shift into any gear. In "1st"
and "Reverse " gear --slowly release the clutch pedal while at the same time
pressing down· on the accelerator pedal. In all other gears the clutch may be
released a little faster. This helps to reduce clutch wear.
When shifting into
"Reverse" gear, push clutch pedal in then press in on the
button located on the top of the gearshift lever keeping thehutton depressed until
you have moved the shift
lever into "Reverse" gear.
DRIVING PRECAUTIONS· MANUAL
TRANSAXLES
• Do not ride the dutch pedal; this produces a partly disengaged condition that may result in damage to the clutch.
• Use third gear at slow speeds (less than 30 mph (50 km/h)) when driving
in stop-and-go traffic for improved
car performance during acceleration and
when descending steep grades.
• Shift to the next lowest gear for extremely hard pulls at low road speeds.
• Shift the gears with a moderate effort to allow time for the transaxle
synchronizers to coordinate.
• When stopped on an upgrade, do not hold car with engine. Use your regular
brake.
• Do not coast in "Neutral" (i1legal in many states).
• Set parking brake firmly before leaving the car.
Page 31 of 95
Downloaded from www.Manualslib.com manuals search engine CAUTION: Driving thr~gh water deep enough to wet the brakes may cause the brakes not to work as well. As 8 result the vehicle will not slow down at the usual
rate ; and it may pull to the right or left. After checking to the rear for other vehicle., apply the brakes lightly to check whether this has happened. To dry them quickly, lightly apply the brakes. At the-same time, k .. p a safe forward speed, with plenty of clear space ahead, to the rear, and to the side •. 00 this until the brakes return to normal.
The brake system warning light is covered in the "Instrument Panel" section.
Power Brakes
• If optional power assis t is lost because of a stalled engine or other reasons .
the brakes can normally still be applied with power assist at leas t two times
u sing reserv e power.
• Th e system is designed to bring the vehicle to a full stop on reserve power if the brake pedal is applied once and held down . However . the reserve power
is partly used up each time the brake pedal is applied and rele ased. Do not
pump the brakes when ,brake power assist has been lost, except when needed
to maintain steering control on slippery surfaces.
• Without power assist, the vehicle can still be stopped by pushing much harder
o n the brake pedal. However, the stopping distance may be longer. even
though the brakes themselves remain fully operational.
Self-Adjusting Brakes
• The brakes on this vehicle (exc,ept for the parking brake) are self-adjusting.
They have been design ed so
that periodic brake adjustment is not required.
• The drum brakes adjust themselves when the brakes are firml y applied while
the vehicle is moving backwards.
• The disc brakes adjust themselve s each time the brakes are used.
• If the brak e pedal goes down farther than nonnal. it may be due to a lack
of adjustment. To find out if this is the case, drive backward and forward
a few times , applying the brakes firmly when going each way.
• See yo ur dealer if pedal height does not return to normal, or if there is a rapid
increase in pedal travel, which could be a sign of other brake trouble .
• Also see your dealer if the parking brake needs adjustment' .
NOTICE: "Riding the brake" by resting your foot on the brake pedal when not intending to brake can cause overheated brakes. This can waar out the brake linings faster and damage the brakas thamselvas, 85 well 8S waste fuel.
DIMMER SWITCH
The dimmer switch that controls the headlight high/lo w beam is built into the
turn signal control. See the "Steering Column Controls" Section 2 of this manual.
PARKING BRAKE
• To set the parking brake, fully depress the foot pedal at the far left side.
• For better holding power, first press down the regular brake pedal with your
right foot. Then hold it while setting the parking brake with your lefl foo[.
•
To release the parking brake, pull the "Brake Release" handle located at the
lower left of the instrument panel.
• To help remind you. the brake system warning light is designed to come on if the parking brake control is not fully released and the ignition key is on.
2-14
Page 32 of 95
Downloaded from www.Manualslib.com manuals search engine • Never drive-the vehicle _with the parking brake set as this -may overheat the
reaf brakes reducing their effectiveness and causing excessive wear or damage,
DISC BRAKE WEAR INDICATORS
Front disc brakes have built-in wear indicators that are designed to make a
high-pitched
squealing or cricket-like warning sound when the brake linings are
worn 10 where -new linings are needed. The sound will come and go, or be heard
all the time
when the wheels are rolling, and when the brake pedal is pu~hed down
firmly . Expensive damage can result
if linings are not replaced when needed.
See also the brake checks listed in the Maintenance Schedule folder.
CLUTCH .PEDAL
On models equiPPed with a manual transaxle, a clutch pedal is used to engage
or disengage the clutch, thereby connecting
or disconnecting the engine from the
transaxle and drive1ine to the front wheels. -When the pedal is fully extended the
clutch
is engaged, driving the transaxle arid the front wheels.
INSTRUMENT PANEL P.ND CONTROLS
INSTRUMENTS
The instruments, gages and indicator lights conveniently grouped in the
instrument cluster are des igned to
tell you at a glance many important things about
_the perfonnance of your vehicle _, _ The following information will enable you to
more quickly -understand and properly it';:rerpretthese instruments.
Speedometer
The speedometer chand ·indicatt:5 vehicle speed in miles per hour and kilometers
per hour.
Odometer
The group of six figures . in the speedometer lower center section indicates the
accumulated mileage.
Fuel Gage
The fuel gagewiH register the_APPROXIMATE fuel level in the tank, when the
ignition
is in the RUN position.
When the gage registers
EMPTY, some fuel is still available as a reserve. When
the gage registers
FULL. some additional" fuel can"still be added to the tank. The
following conditiqns may be considered normal:
• Gas station _pump may shut off before fuel gage indicates FULL. •
•
Amount of gasoline required for fill-up may not exactly correspond to gage.
• Needle may not move away from FULL until some time after fill·up.
• Needle may !Dove during turns. stops and-accelerations.
When the ignition switch
is turned to the OFF position, the needle will not
necessarily
retiJrn · all the way to the EMPTY mark.
2-15
Page 33 of 95
Downloaded from www.Manualslib.com manuals search engine '" 0;
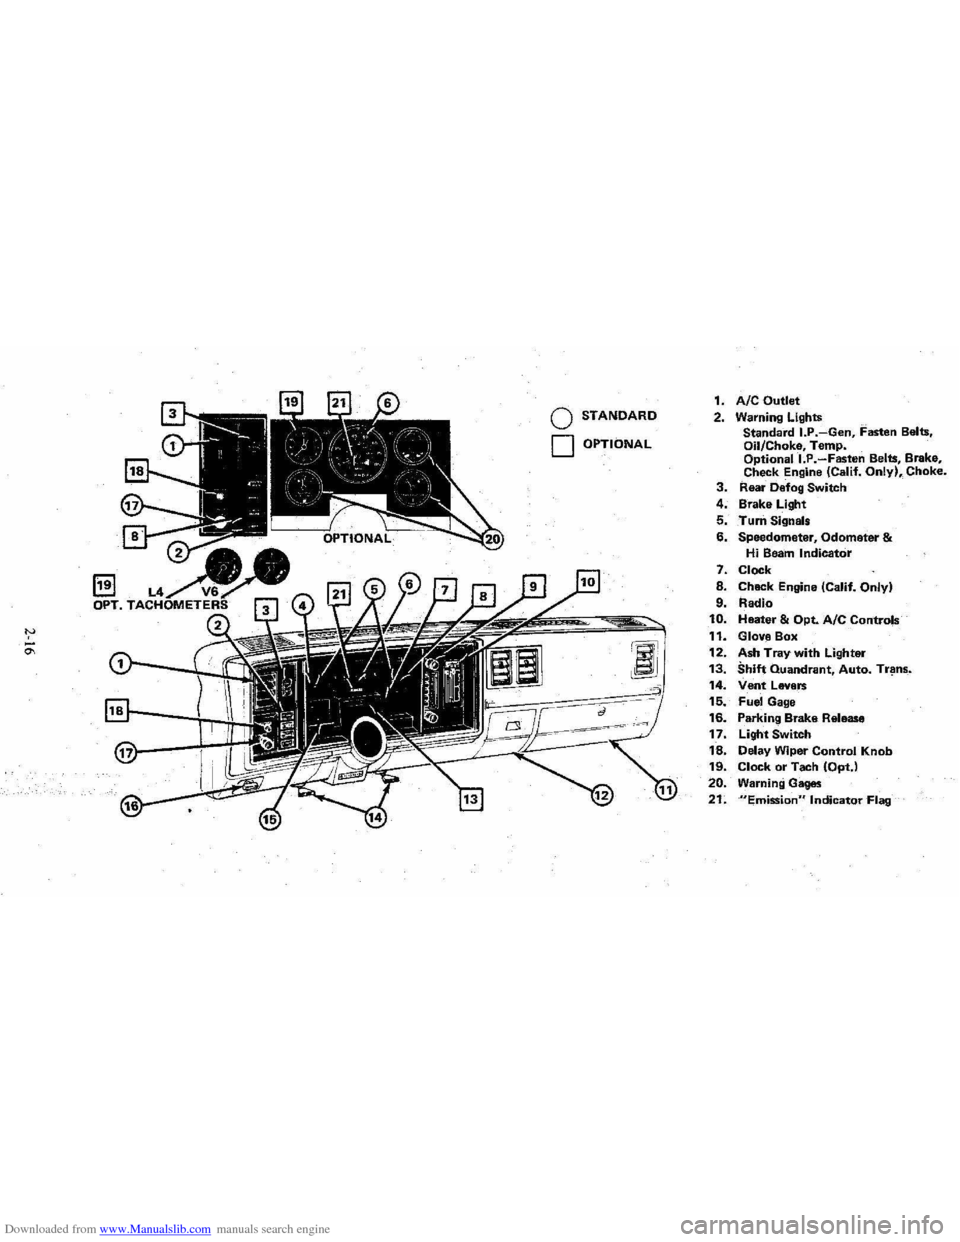
o STANDARD
o OPTIONAL
1. AIC Outlet 2. Warning Lights
Standard I.P.-Gen, Fasten Belts.
Oil/Choke, Temp.
Optionall.P.-Fasten Belts, Brake,
Check Engine (Calif. Only), Choke. 3. Rear Defog Switch
4. Brake Light
5. Turn Signals
6. Speedometer, Odometer & Hi Beam Indicator
7. Clock
8. Chack Engine (Calif. Only)
9. Radio 10. Heater & Opt. Ale Controls
11. Glove Box
12. Ash Tray with Lighter 13. Shift Quandrant, Auto. Tr~ns_.
14. Vent Levers 15. Fuel Gage
16. Parking Brake Release
17. Light Switch
18. Delay Wiper Control Knob 19. Clock or Tach (OptJ
20. Warning Gages
21. "Emission" Indicator Flag