1980 CHEVROLET CITATION washer fluid
[x] Cancel search: washer fluidPage 24 of 95

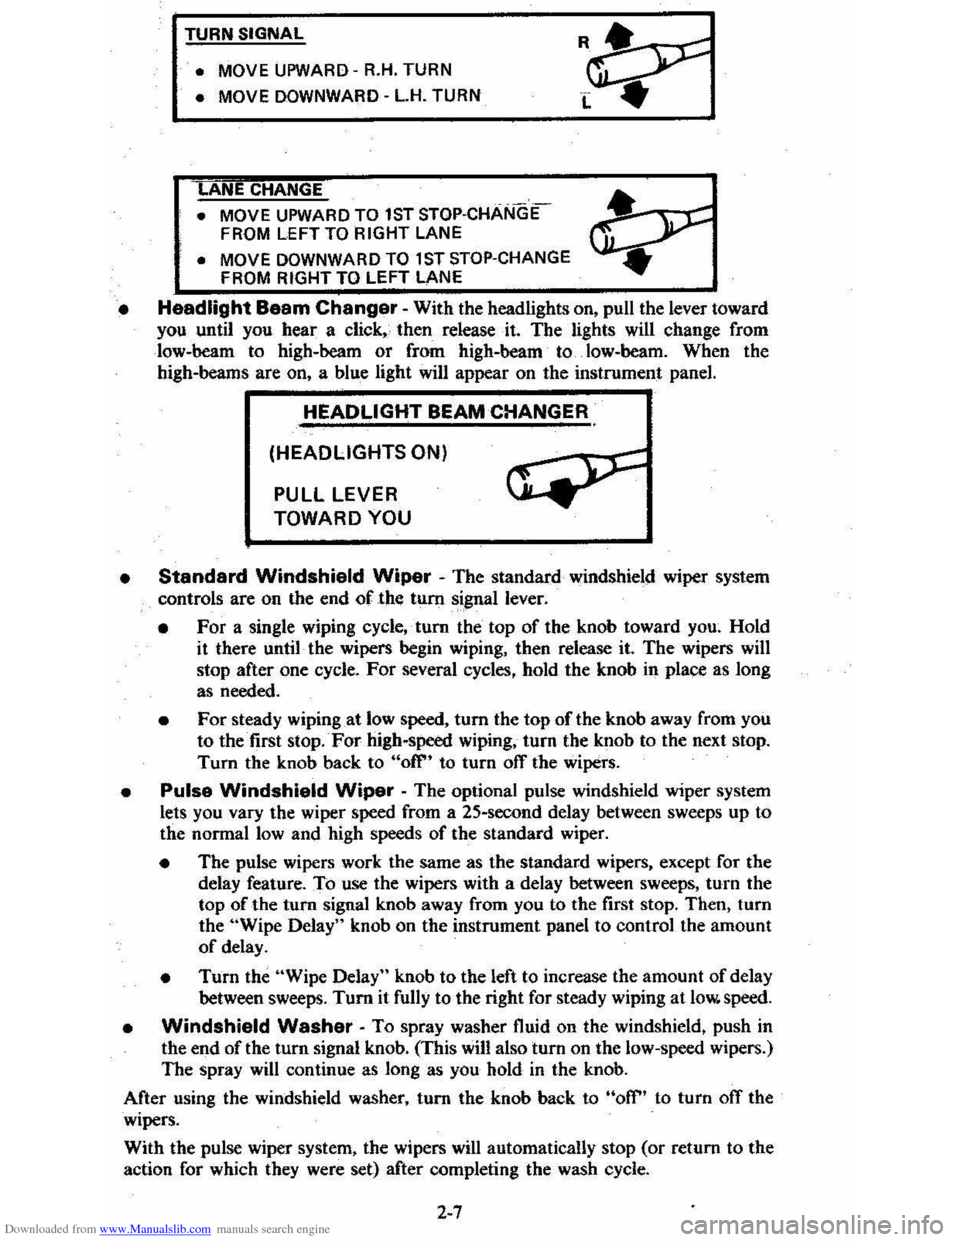
Downloaded from www.Manualslib.com manuals search engine TURN SIGNAL
• MOVE
UPWARD -R.H. TURN
• MOVE DOWNWARD -L.H. TURN
ANE CHANGE
• MOVE UPWARD TO 1ST STOP·CHANGE
FROM LEFT TO RIGHT LANE
• MOVE DOWNWARD TO 1 ST STOP-CHANGE
FROM RIGHT TO LEFT LANE
• Headlight Baam Changer -With the headlights on, pull the lever toward you until you hear a click" then release· it. The lights will change from
low-beam to high-beam
or from high-beam to. low-heam. When the high-beams are on, a blue light will appear on the instrument panel.
HEADLIGHT BEAM CHANGER
(HEADLIGHTS ON)
PULL LEVER
TOWARD YOU
•
Standard Windshield Wiper - The standard windshield wiper system
controls are on the end of the tum signal lever.
• For a single wiping cycle,' tum the top of the knob toward you~ Hold
it there until· the wipers begin wiping, then release it. The wipers will stop after one cycle. For several cycles, hold the knob in place as long
as needed.
• For steady wiping at low speed, tum the top of the knob away from you to the first stop. For high-speed wiping, turn the knob to the next stop.
Turn the knob back to "ofr' to turn off the wipers.
• Pulse Windshield Wiper -The optional pulse windshield wiper system
lets you vary the wiper speed from a 25-second delay between sweeps up to
the normal
low and high speeds of the standard wiper.
• The pulse wipers work the same as the standard wipers, except for the
delay feature. To use the wipers with a delay between sweeps, turn the
top of the turn signal knob away from you to the first stop. Then, turn
the "Wipe Delay" knob on the instrument panel to control the amount
of delay.
• Turn the "Wipe Delay" knob to the left to increase the amount of delay
between sweeps. Tum it fully to the right for steady wiping at low. speed.
• Windshield Washer -To spray washer fluid on the windshield, push in the end of the tum signal knob. (This will also turn on the low-speed wipers.)
The spray will continue as long as you hold
in the knob.
After using the windshield washer, turn the knob back to
"off" to turn ofT the
wipers.
With the pulse wiper system, the wipers
will automatically stop (or return to the
action for which they were set) after completing the wash cycle.
2-7
Page 25 of 95
![CHEVROLET CITATION 1980 1.G Owners Manual Downloaded from www.Manualslib.com manuals search engine SINGLE WIPE
LOW SPEED (PULSE WIPER)
HIGH
SPEED
• Check the washer fluid levelregu]arly. Do it often when the weather
is bad.
• U CHEVROLET CITATION 1980 1.G Owners Manual Downloaded from www.Manualslib.com manuals search engine SINGLE WIPE
LOW SPEED (PULSE WIPER)
HIGH
SPEED
• Check the washer fluid levelregu]arly. Do it often when the weather
is bad.
• U](/manual-img/24/8083/w960_8083-24.png)
Downloaded from www.Manualslib.com manuals search engine SINGLE WIPE
LOW SPEED (PULSE WIPER)
HIGH
SPEED
• Check the washer fluid levelregu]arly. Do it often when the weather
is bad.
• Use a nuid such as OM Optikleen to help prevent freezing damage, and for better cleaning.
• Do not use radiator antifreeze in the 'windshield washer; ifcould cause
paint damage .
• In cold weather, warm the windshield with the defroster before using the washer-to help prevent Icing that my block
the driver's vision.
STARTING THE ENGINE
I.
2.
Apply the parking brake. . .
Automatic Trl!nsaxl..: Move the transaxle shift lever to "P"(Park) or "N" (Neutral) "P" Preferred). A starter safety device is
designed to keep the starter from operating if the shift lever is in any drive position. (If you need to fe-start the engine while the car is moving . move
the shift lever to "N.")
Manuel Transaxle· Press the clutch pedal to the floor and shift the transaxle to Neutral. Hold the clutch pedal to the floor while you are s tarting ,the engine. A starter safety device l,s d esigned to keep the starter
from operating if the clutch pedal is not fully depres sed.
3. Sta'rt the engine as outlined below for different conditions.
NOTICE: 00 not crenk the engil'. for more than 15 seconds at e time. Walt 10 to 15 seconds before trYiog agein.
• COLD ENGINE:
•
L·4 Engine Press the accelerator pedal to the floor and ·i slowly release It. With your foot off the pedal; crank the engine
by turning the ignition key to "Start ." Release the key when the engine
sta rts.
If the engine starts, but fails to run, repeat this procedure. •
• V-6 Engine: Press the accelerator pedal to the floor twice and slowly release it. With your foot off the pedal. crank the engine by turning the ignition key to 'Stan". Release key when engine
s tarts.
If the engine starts, but fails to run, repeat this procedure but press
the accelerat or pedal only
ONCE to the floor . :When the e ngine is
running smoothly (about 30 seconds), you_ can reduce the engine idle speecf by press ing down slightly on the accelerator pedal. then slowly
releasing it.
2-8
Page 60 of 95

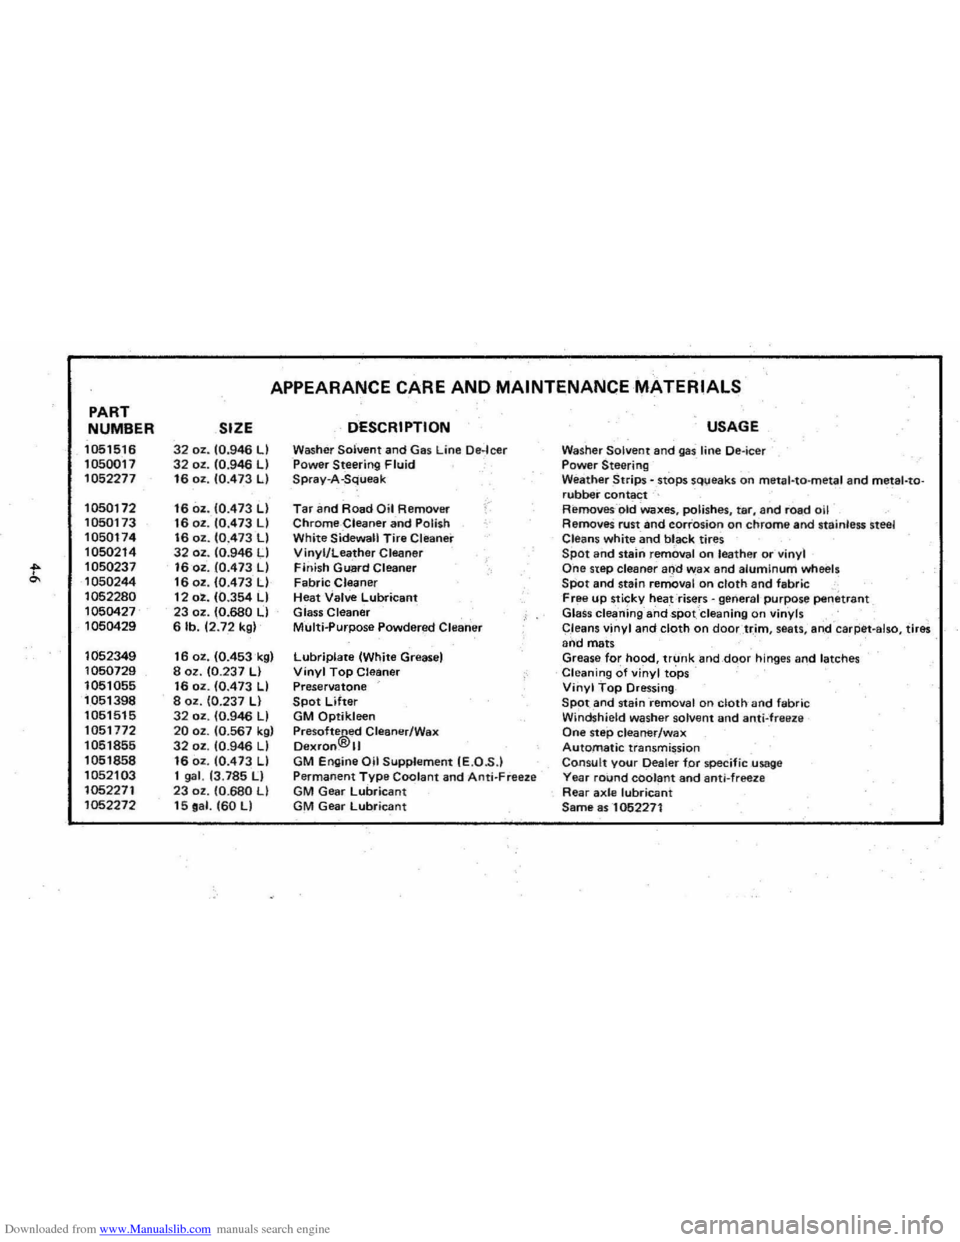
Downloaded from www.Manualslib.com manuals search engine PART
NUMBER
1051516
1050017
1052277
1050172 1050173
1050174
1050214
t 1050237
1050244
1052280
1050427 1050429
1052349
1050729
1051055 1051398 1051515
1051772 1051855
1051858
1052103
1052271 1052272
APPEARANCE CARE AND MAINTENANCE MATERIALS
SIZE DESCRIPTION
32 oz. 10.946 LI Washer Solvent and Gas Line De·leer 32 oz. 10.946 LI Power Steering Fluid 16 oz. 10.473 LI Spray-A-Squeak
16 oz. 10.473 LI Tar an d Road Oil Removirr /"
16 oz . 10.473 LI Chrome-Cleaner and Polish 16 oz. 10.473 LI White Sidewall Tire Cleaner 32 oz. 10:946 LI Vinyl/Leather Cleaner 16 oz . 10.473 LI Finish Guard Cleaner 16 oz. 10.473 LI Fabric Cleaner 12 oz. 10.354 LI Heat Valve Lubricant 23 oz. (0.680 LI Glass Cleaner 6 lb. 12.72 kgl Multi..purpose Powdered Clearier
16 oz. 10.453k91 Lubriplate (White Greasel 8 oz. 10.237 LI Vinyl Top Cleaner 16 oz. 10.473 LI Preservatone 8 oz. 10.237 LI Spot Lifter 32 oz. 10.946 LI GM Qptikleen 20 oz. 10.567 kgl Pre softe®ed Cleaner/Wax 32 oz. 10.946 LI Dexfon. II 16 oz. 10.473 LI GM Engine Oil Supplement IE.O .S .) 1 gal. 13.785 II Permanent Type Coolant and Anti- Freeze 23 oz . 10.680 LI GM Gear lubricant 15 oa l. 160 LI GM Gear Lubricant
USAGE
Washer Solvent and gas line Oe-ieer Power Steering Weather Strips - .stops sq\;leaks on meta l-ta-metal and metal-torubber contact Removes- -old Waxes, polishes, tar, and road oil RemoveS rust and corrosion on chrome and stainless steel
Cleans white and bl _ack tires Spot and stalrl removal o n leather or vinyl One step cleaner and wax and alumInum wh eels SPot and stain removal on cloth and fabric , Free up sticky heat risers -general 'purpose penetrant Glass cleaning ahdspot Cleaning on vinyls
C,leans vinyl and cloth on doortr,im , seats , ari,d -caq:iet -also, tires and mats Grease for hood, trunk and,dQor hinges and latches Cleaning of vinyl tops Vinyl Top Dressing SPOt and staini-emoval on cloth and fabric Windshield washer solvent and anti-freeze One step cleaner/wax Automatic transmission Consult your Dealer for specific usage Yea r round coolant and anti-freez e Rear axle lubricant Same as -1052271
Page 91 of 95

Downloaded from www.Manualslib.com manuals search engine ,
Shifting, Manual Transaxle .. Shoulder Beltt .. 2~1 1 ,2'12 (See "Seat Belt$"J Sidematker lights Signala, Turn ...................... 7·3 ......... ... . . ..........•...•. 2-6 Slippery SUffices. Driving On .. Snow Chains Snow Tires Sounds (Buzzers, Tones, etc.)
, .. 5·14 5-14
Disc Brake Wear Indicator .... 2-15 Engine Hot... 2-17 Headlights On ................. ....................... .... 2-19 H .. t Warning, Catalytic Con. 2·18 ,5-2 Kay Reminder . .................................. ...... 2-6 Sell eelt 1-8 Spar. Tire Compact .......................... 3 .5 Jaeking .... ............................. .. . 3-6 Stowage ...................... _ ....... ........ .......... 3·5. 3-6 Spark Plugs .. .......... .......................... ........... 7-2 Sound Systems (Radios). 2.23 Speclficllions.. ...................... 7-1 Speed, Cruise Control.................... . 2-I 2 Sp .. d, New Car Break-In ............................. 2-2 Speedometar & Odometar ... 'Spot Cleaning
Staln le .. Steal Prtltect ion ........ .. S .. ln •• Removel of Staner Safety Switch .............. _ ..... . Starting E",ergency (Jump Staning) Engine F.ill to Stan ................ .............. ..
2-15 ,.,
,.,
'·3 ' ·8
Ga.olino Engine.. . .......................... .
3·, , ..
'·8 5·' Pushing to Start .. Steering Column Contrail ..................... .................. . '·S '·5 2·12 2 -12 2·23
Column Lock .. Power ......................... . Whee l, Tilt ......... ........................ ....... .. Siereo, Radiol & Tape Systems. Stowage of Tire & Jack ... Stowing Things In (Or On) Car .. Stuck Car. Freeing .. Suspenlion eall Joints ................................ ....... .. Tachometer ........ ................................ ....... .
3 ·5 . 3-6 ,·3 3·'
5·8 2·18 Temperature Gage .................. ............... 2-19 Temperature Light. .. 2 ·17 Thermostat ......... ....... ....... 5-7 TiIt·Away Steering Wheel.. 2 ·12 Tilting Seats... '·4 T ip', Operating.. (See "Oper.tlng Tips ") Tire.
Air Preuure ..... ......... ................................ . Ch.in •... Ch.nglng .. Cle.nlng .. Compacl Spara ......................... ....... . High·Speed ..
5·10 5-14 3·5,3-6 '·4 3·S 5-11
7-9
Jack 3-5 , 3·~ Inflation Pre .. ure ................. .... ......... ........ 5·" Load Capacity ............................. 5-12 Load Range 5-10 Overse •• Use ... 2-3 Placard ... Pres.u,., A ir ..................... ....................... . Repl.cement Wh.ell ............................ . . Snow nte ........... . Stow.ge ............... . Trailer Towing .. Top C.r., Vinyl ..
TowinQ
Disabl-.:t V.hicle To S .. rt. Tr.il.ring ....... . Tr.n.ax'"
5·10 5 ·1, 5,,6 5·14 3·$ ,3-6 1 ·11 4.'
3·'
S ·'
1·11
Autom.tic...... .......... .. .............. ....... 2.10 Manu.l.. . ...... ; . ................... .................. 2 .' 1 Tr.nlmitt.r, Mobile Radio 2 .25 Key. . ..................................... . ..... 1.1 Turn Signall.... ................................................. 2.6 Underbody Maintenance ............................... 4.5
Undercoating... ... ................................. ............ 4.5 Unleaded G •• oline (See "Fu~1") Uphollt.ry Care ................... ... 4 .1 Vehicle ldentifi~tion Number ._............. 7 .5 Vehicl. Lo.ding .. _ Ventil.tion System .. Vents , Outside Air ... V'N Vinyl F.bric C.r •.
5·10 2·20 2 .21 ' ·S
Roof Care ................. ................................. ..... . '·3 ,., Vilta-V.nt ....... . Voltm.t.r .. 2 ·26 2·'V 3 ·' Warning Flasher , Hazard .. Warning Lights ... W.rr.nty .... (See "Light.")
Washer Fluid Indicator W.shers. W indshield. Washing C.r ....
(See W.rranty folder) ,.,
, .,
, ., W.xing & P olilhing .. Wear lndi'c.tor., Disc Srake .. Weight, Load Carrying ... Wheel Changing .. Whaal Nut Torque .. Wh.el., Repllcement ........................ _ .. Wheal, Tilt Sleerlng ... Windows M.nu. 1 Power , ... , ............................. ..................... . . RUr, De.fogg.r .. . Windshi.ld Defrosting &; Defogging .. W.sher Ule in Cold Weather ... Walh.r Fluid .. Wipers & Wa.hers .. Wiper Blades .. Wreck.r Towing .. Zona OHic.s ......... " ............... ....... .
'·4 2·15 5 ·10 3 ·5 ,3 ·6 3 ·5 , 7·2 5 ·16
2 ·12
'·S
' ·S
2 ·2t
2·21
2 ·8
,., , ., , .,
3 ·' 6 ·2 . 6·3
Page 95 of 95

Downloaded from www.Manualslib.com manuals search engine SERVICE STATION INFORMATION
Refer to "Service and Maintenance"
Section for Further Details
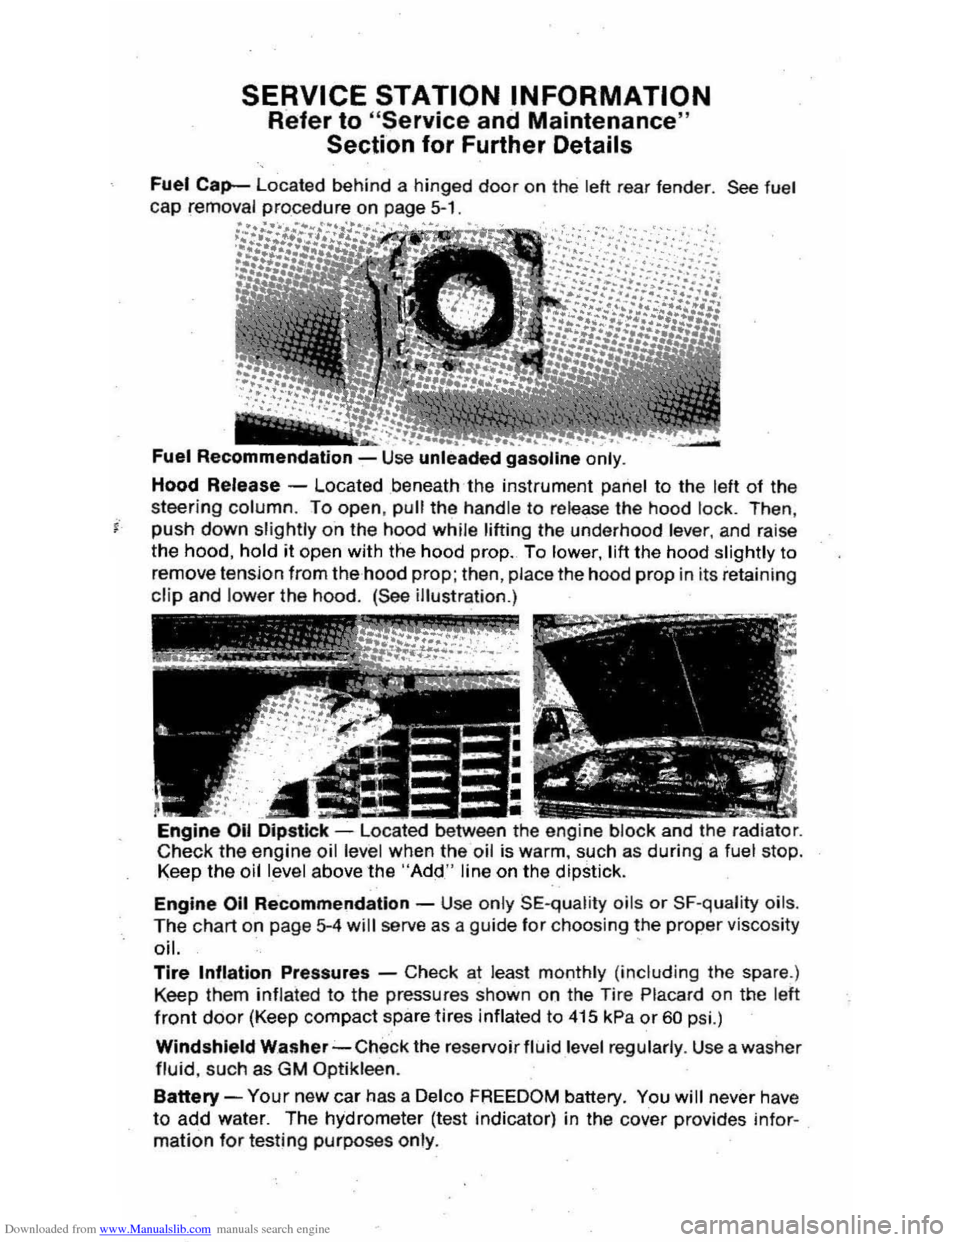
Fuel Cap-Located behind a hinged door on the lett rear fender. See fuel cap removal procedure on page 5-1.
Fuel Recommendation -Use unle~ded gasoline only .
Hood Release -Located beneath the instrument panel to the left of the
steering column. To open, pull the handle to re lease the hood lock . Then ,
j" push down slightly o "n the hood whil e lifting the underhood lever, and raise
the hood, hold it open with the hood prop. To lower, lift the hood slightly to
remove tension from the hood
prop; then , place the hood prop in its retainin g
clip and lower the hood. (See illustration.)
Engine Oil -located between the engine block and the radiator. Check the engine oil level when the oil is warm, such as during a fuel stop. Keep the oil level above the "Add" line on the .dipstick.
Engine Oil Re "commendatlon -Use only SE-q ualit y oils or SF-quality oils .
The chart o n page 5-4 will serve as a gu ide tor choosing the proper viscosity oil. .
Tire Inflation Pressures -Check at least monthly (including the spare .)
Keep them
inflated to the pressures shown on the Tire Placard on the left
front door (Keep compact spare tires inflated to 4t5 kPa or 60 psi.)
Windshield Washer-Check the reservoir fluid level regularly . Use a wa sher
fluid, such as GM Optikleen.
Battery -Your new car has a Delco FREEDOM battery. You will never have
to add water. The hydrometer (test indicator) in the cover provides infor
mation for testing purposes only.